
EDH903BEWA - Tumble dryer ELECTROLUX - Free user manual and instructions
Find the device manual for free EDH903BEWA ELECTROLUX in PDF.


| Brand | Electrolux |
| Model | EDH903BEWA |
| Product Type | Tumble Dryer (Heat Pump) |
| Energy Efficiency Class | A++ |
| Drying Capacity (kg) | 9 kg |
| Dimensions (H x W x D) (mm) | 850 x 596 x 656 |
| Weight (kg) | 50 kg |
| Power Supply | 230 V / 50 Hz / 10 A |
| Total Power (W) | 500 W (heat pump) |
| Noise Level (dB) | 65 dB(A) |
| Condenser Type | Self-cleaning condenser |
| Drying Programs | Cotton, Synthetics, Wool, Delicates, Mix, Time Dry |
| Reverse Tumbling | Yes |
| Delay Start | Up to 20 hours |
| Moisture Sensor | Yes (auto dry) |
| Anti-Crease Phase | 120 min |
| Child Lock | Yes |
| Lint Filter | Easy access, washable |
| Water Tank | Removable, 4.5 L |
| Drain Hose | Optional direct drain |
Frequently Asked Questions - EDH903BEWA ELECTROLUX
User questions about EDH903BEWA ELECTROLUX
0 question about this device. Answer the ones you know or ask your own.
Ask a new question about this device
Download the instructions for your Tumble dryer in PDF format for free! Find your manual EDH903BEWA - ELECTROLUX and take your electronic device back in hand. On this page are published all the documents necessary for the use of your device. EDH903BEWA by ELECTROLUX.
USER MANUAL EDH903BEWA ELECTROLUX
EN Tumble Dryer User Manual 2
WE'RE THINKING OF YOU
Thank you for purchasing an Electrolux appliance. You've chosen a product that brings with it decades of professional experience and innovation. Ingenious and stylish, it has been designed with you in mind. So whenever you use it, you can be safe in the knowledge that you'll get great results every time. Welcome to Electrolux.
Visit our website:

Get usage advice, brochures, trouble shooter, service information:
www.electrolux.com
CUSTOMER CARE AND SERVICE
Always use original spare parts.
When contacting our Authorised Service Centre, ensure that you have the following data available: Model, PNC, Serial Number.
The information can be found on the rating plate.
⚠ Warning / Caution-Safety information
i General information and tips
Environmental information
Subject to change without notice.
1. ⚠SAFETY INFORMATION
Before beginning the installation and use of this appliance, carefully read the supplied instructions. The manufacturer is not responsible for any injuries or damage that are the result of incorrect installation or usage. Always keep the instructions in a safe and accessible location for future reference.

Read the supplied instructions.
1.1 Children and vulnerable people safety

WARNING!
Risk of suffocation, injury or permanent disability.
- This appliance can be used by children aged from 8 years and above and persons with reduced physical, sensory or mental capabilities or lack of experience and knowledge if they have been given supervision or
instruction concerning the use of the appliance in a safe way and understand the hazards involved.
- Children between 3 and 8 years of age and persons with very extensive and complex disabilities shall be kept away from the appliance unless continuously supervised.
- Children of less than 3 years of age should be kept away from the appliance unless continuously supervised.
- Do not let children play with the appliance.
- Keep all packaging away from children and dispose of it appropriately.
- Keep detergents away from children.
- Keep children and pets away from the appliance when the door is open.
- If the appliance has a child safety device, it should be activated.
• Children shall not carry out cleaning and user maintenance of the appliance without supervision.
1.2 General Safety
- Do not change the specification of this appliance.
- If the tumble dryer is put on top of a washing machine, use the stacking kit. The stacking kit, available from your authorized vendor, can be used only with the appliance specified in the instructions supplied with the accessory. Read it carefully before installation (refer to the Installation leaflet).
- The appliance can be installed as freestanding or below a kitchen counter with correct space (refer to the Installation leaflet).
- Do not install the appliance behind a lockable door, a sliding door or a door with a hinge on the opposite side, that would prevent the appliance door from being fully open.
- The ventilation opening in the base must not be covered by a carpet, mat, or any floor covering.
- CAUTION: The appliance must not be supplied through an external switching device, such as a timer, or connected to a circuit that is regularly switched on and off by a utility.
- Connect the mains plug to the mains socket only at the end of the installation process. Make sure that the mains plug is accessible after installation.
- If the mains power supply cable is damaged, it must be replaced by the manufacturer, its Authorised Service Centre or similarly qualified persons to avoid an electrical hazard.
- Do not exceed the maximum load of 9 kg (refer to the "Programme chart" chapter).
- Do not use the appliance if items have been soiled with industrial chemicals.
- Wipe away lint or packaging debris that has accumulated around the appliance.
- Do not run the appliance without a filter. Clean the lint filter before or after each use.
- Do not dry unwashed items in the tumble dryer.
- Items that have been soiled with substances such as cooking oil, acetone, alcohol, petrol, kerosene, spot removers, turpentine, waxes and wax removers should be washed in hot water with an extra amount of detergent before being dried in the tumble dryer.
- Items such as foam rubber (latex foam), shower caps, waterproof textiles, rubber backed articles and clothes or pillows fitted with foam rubber pads should not be dried in the tumble dryer.
- Fabric softeners, or similar products, should only be used as specified by the product manufacturer's instructions.
- Remove all objects from items that could be a source of fire ignition such as lighters or matches.
- WARNING: Never stop a tumble dryer before the end of the drying cycle unless all items are quickly removed and spread out so that the heat is dissipated.
- Before any maintenance operation, deactivate the appliance and disconnect the mains plug from the socket.
2. SAFETY INSTRUCTIONS
2.1 Installation
- Remove all the packaging.
- Do not install or use a damaged appliance.
- Follow the installation instructions supplied with the appliance.
• Always take care when moving the appliance as it is heavy. Always use safety gloves and enclosed footwear. - Do not install or use the appliance where the temperature can be lower than 5°C or higher than 35°C.
- The floor area on which the appliance is to be installed must be flat, stable, heat resistant and clean.
- Make sure that there is air circulation between the appliance and the floor.
• Always keep the appliance vertical when it is being moved. - The rear surface of the appliance must be put against a wall.
- When the appliance is in its permanent position, check if it is levelled correctly with the aid of a spirit level. If it is not, adjust the feet accordingly.
2.2 Electrical connection

WARNING!
Risk of fire and electric shock.
- Connect the mains plug to the mains socket only at the end of the installation. Make sure that there is access to the mains plug after the installation.
• The appliance must be earthed. - Make sure that the parameters on the rating plate are compatible with the electrical ratings of the mains power supply.
• Always use a correctly installed shockproof socket. -
Do not use multi-plug adapters and extension cables.
-
Do not pull the mains cable to disconnect the appliance. Always pull the mains plug.
- Do not touch the mains cable or the mains plug with wet hands.
• This appliance complies with the E.E.C. Directives.
2.3 Use

WARNING!
Risk of injury, electric shock, fire, burns or damage to the appliance.
- This appliance is for household use only.
- Do not dry damaged (torn, frayed) items that contain padding or fillings.
- If laundry has been washed with a stain remover, carry out an additional rinse cycle before starting a drying cycle.
- Dry only fabrics that are suitable to dry in the appliance. Follow the cleaning instruction on the item label.
- Do not drink or prepare food with the condensed water/distilled water. It can cause health problems to people and pets.
- Do not sit or stand on the open door of the appliance.
- Do not dry dripping wet clothes in the appliance.
2.4 Internal lighting

WARNING!
Risk of injury.
• Visible LED radiation, do not look directly into the beam.
- The LED lamp is dedicated to drum lighting. This lamp cannot be reused for other lighting purposes.
• To replace the internal lighting, contact the Authorised Service Centre.
2.5 Care and cleaning

WARNING!
Risk of injury or damage to the appliance.
- Do not use water spray and steam to clean the appliance.
- Clean the appliance with a moist soft cloth. Only use neutral detergents. Do not use any abrasive products, abrasive cleaning pads, solvents or metal objects.
• To prevent damage to the cooling system be careful when you clean the appliance.
2.6 Compressor

WARNING!
Risk of damage to the appliance.
• The compressor and its system in the tumble dryer is filled with a special
3. PRODUCT DESCRIPTION

agent which is free from fluoro-chloro-hydrocarbons. This system must stay tight. The damage of the system can cause a leakage.
2.7 Disposal

WARNING!
Risk of injury or suffocation.
- Disconnect the appliance from the mains electrical and water supplies.
- Cut off the mains electrical cable close to the appliance and dispose of it.
- Remove the door catch to prevent children or pets from becoming trapped in the drum.
- Dispose of the appliance in accordance with local requirements for the disposal of Waste Electrical and Electronic Equipment (WEEE).
1 Water container
2 Control panel
3 Internal light
4 Appliance door
5 Filter
6 Rating plate
7 Airflow slots
8 Heat Exchanger lid
9 Heat Exchanger cover
10 Adjustable feet

For ease of loading laundry or ease of installation the door is reversible. (see separate leaflet).
4. CONTROL PANEL

1 Programme knob
2 Extra Anticrease touch button
3 Dryness Level touch button
4 Display
5 Time Dry touch button
6 Start/Pause touch button
7 Delay Start touch button
8 Remote touch button
9 End Alert touch button
10 Reverse Plus touch button
11 Extra Silent touch button
12 On/Off button

Press the touch buttons with your finger in the area with the symbol or name of the option. Do not wear gloves when you operate the control panel. Make sure that the control panel is always clean and dry.
4.1 Display

| Symbol on the display Symbol description | |
| laundry dryness option: iron dry, cupboard dry, extra dry | |
| time drying option on | |
| delay start option on | |
| indicator: Wi-Fi connection | |
| remote start option on | |
| indicator: check Heat Exchanger | |
| indicator: clean filter | |
| indicator: drain the water container | |
| child lock on | |
| wrong selection | |
| indicator: drying phase | |
| indicator: cooling phase | |
| indicator: anti-crease phase | |
| 1:50 | programme duration |
| +30min., +60min. +90min. +2h | extension of default anti-crease phase: +30min, +60min, +90min, +2h) |
| : 10 - 2 : 0 0 | time drying selection (10min-2h) |
| 1h - 20 h | delay start selection (1h-20h) |
5. WI-FI - CONNECTIVITY SETUP
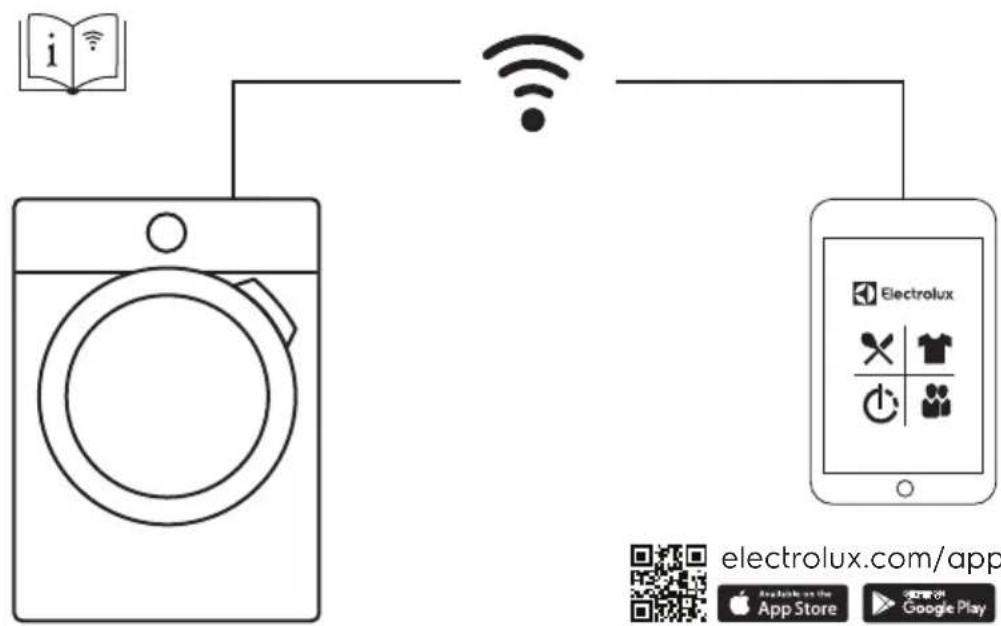
This chapter describes how to connect the smart appliance to the Wi-Fi network and to link it to a mobile devices.
By this functionality you can receive notifications, monitor and control your tumble dryer from your mobile devices.
To connect the appliance to enjoy the full range of features and services you need:
- Wireless network at home with internet connection enabled.
- Mobile device connected to wireless network.
| Frequency 2.4 GHz according to local country regulation |
| Protocol IEEE 802.11b/g/n |
| Max power According to local country regulation |

Minimum requirements: Operating system compatibility iOS 9.3/Android 5.1 and above. Install the Electrolux Life app, create an account and accept the Terms and Conditions and Electrolux's Privacy Policy to use the connected features. Stable Internet and good WiFi connection with 2.4GHz wireless frequency is required. Minimum requirements, apps and services are subject to change without notice.
5.1 Installing and configuring Electrolux Life
When connecting the tumble dryer to the application, stand near it with Your smart device.
Make sure that your smart device is connected to the wireless network.
- Go to the App Store on your smart device.
- Download and install App Electrolux Life.
- Make sure you started a Wi-fi connection in the tumble dryer. If not, read the next paragraph 'Configuring the dryer wireless connection'.
- Start the application. Select the country and language and login with Your email and password. If you do not have an account, create a new one following the instructions in Electrolux Life
- Follow the instructions on the App for the appliance registration and configuration.
5.2 Configuring the dryer wireless connection
Have Electrolux Life downloaded and installed on your smart device.
- Press the on/off button for a few seconds to activate the appliance.
- Select a programme by turning the programme dial.
- Press and hold Remote touch button for 3 seconds.
The text pop up for about 5 seconds and the icon starts flashing and wireless module begins starting up. It may takes about 45 seconds before it is ready. When the wireless module is ready, the text AP (Access Point) is on to inform you, that the access point will be open for about 3 minute.
- Configure the Electrolux Life app on your smart device.
- If the connectivity is configured, (Access Point) symbol is off and the icon will stop blinking and lit
steadily to confirm that the configuration was successful.
Every time you switch the appliance on, the appliance takes 45 seconds to connect to the network automatically. When the indicator 📋 stops blinking the connection is ready.
To switch the wireless connection
off, Press and hold Remote touch button for 3 seconds until the first acoustic signal: appears on the display.
If you switch the appliance off and on again, the wireless connection is automatically off.
To remove the wireless
credentials, Press and hold 🔒 Remote touch button for 10 seconds until the second acoustic signal: — — — appears on the display.
5.3 Remote Start
When the App is installed and the wireless connection is complete, you can start and stop a drying programme remotely by activate remote start.
The Remote Control activates automatically when you press the Start/Pause button to start the programme, but it is also possible to start a drying programme
Activate Remote Start
- Press the Remote button and the indicator appears on the display.
- Press the Start/Pause button to activate the Remote Start.
The indicators appears on the display. Now it is possible to start the programme remotely.
Deactivate Remote Start
Press the Remote touch button and confirm by pressing the Start/Pause button.
The icon is off and the remote start is deactivated.

If the door is open, the Remote Start is deactivated.
The update is accepted via App only.
If a programme is running, the App notifies that the update will start at the end of the programme.
During the update, the appliance shows UPd in the display.
The appliance will usable again at the end of the update, without any notification about successful update.
If an error occurs, the appliance shows
Err in the display: just press any buttons or turn the knob to return to normal use.
5.4 Over-the-air update
The App may propose an update for downloading new features.
6. PROGRAMME TABLE
| Programme | Load^1) | Properties / Fabric type^2) |
| Favourite^1 [SW74] | The load depends on a mem-orised pro-gramme | You can do your configuration of programme and options and memorise in the appliance memory (See chapter "Settings - Favourite ☆"). |
| Cottons 9 kg Cotton fabrics. |  | |
| Mixed + 6 kg | Mix of garments made of cotton, cotton-synthetic blend and syn-thetic fabric. | |
| Bedding + 4,5 kg | Up to three bed linen sets, one of which can be double size. | |
| Energy Saver 9 kg | Cycle to be used to dry cotton with "cotton cupboard" dryness level, with maximum energy sav-ing. | |
| Refresh 1kg Refreshing textiles that were in storage. | ||
| □ App Program | The load depends on a selec-ted pro-gramme in the app | App Program gives you additional pro-grammes that you can select from the App (see chapter "WI-FI - CONNECTIVITY SET-UP" to connect the smart appliance to the Wi-Fi network and to link it to a mobile devices). |
| Programme | Load 1) | Properties / Fabric type2) |
| Drying Rack | 1kg (or 1 pair of sport shoes) | For drying sport shoes only with Drying Rack (see separate user manual provided with Drying Rack). |
| Sports 2 kg | Sportswear, thin and light fabrics, microfiber, polyester. / [IMAGE] | |
| Silk 1 kg | Gentle drying of hand-washable silks. | |
| Synthetics 3,5 kg Synthetic and mixed fabrics. / [IMAGE] | ||
| Wool [IMAGE] | 1 kg |  The wool drying cycle of this machine has been approved by The Woolmark Company for the drying of wool garments labelled as "hand wash" provided that the garments are dried according to the instructions issued by the manufacturer of this machine. Follow the garment care label for other laundry instructions. M1717 The wool drying cycle of this machine has been approved by The Woolmark Company for the drying of wool garments labelled as "hand wash" provided that the garments are dried according to the instructions issued by the manufacturer of this machine. Follow the garment care label for other laundry instructions. M1717 |
| Delicates 4 kg | Delicate fabrics such as viscose, rayon, acrylic, and their blends. / [IMAGE] | |
1) The maximum weight refers to dry items.
2) For fabric mark meaning see chapter HINTS AND TIPS: Preparing the laundry.
7. OPTIONS
7.1 Extra Anticrease
Extends the anti-crease phase by 30,60,90 or 2 hours at the end of the drying cycle. This function reduces creases. The laundry can be removed during the anti-crease phase.
7.2 Dryness Level
This function helps to increase dryness of the laundry. There are 3 options:
- Extra Dry
- Cupboard Dry
- Iron Dry
7.3 Time Dry
You can set the programme duration, from a minimum of 10 minutes to a maximum of 2 hours. The required duration is related to the quantity of laundry in the appliance.

We recommend that you set a short duration for small quantities of laundry or for only one item.
7.4 Time Dry on Wool programme
Option suitable for Wool programme to adjust final dryness level.
7.5 Time Dry on Drying Rack programme
Option suitable for Drying Rack programme.
You can set the programme duration, from a minimum of 10 minutes to a maximum of 2 hours. The setting of the duration is related to the quantity of laundry in the appliance.
We recommend that you set a short duration for small quantities of laundry or for only one item.
- cycle end
- start and end of the anti-crease phase
- cycle interruption
The buzzer function is by default always on. You can use this function to activate or deactivate the sound.

You can activate the End Alert option with all programmes.
7.7 Reverse Plus
Increase drum reversing frequency to reduce items twisting and entanglement. To increase uniformity of drying result and help reduce creases. Recommended for large or long items (e.g. sheets, trousers, long dresses)"
7.8 Extra Silent
The appliance operates with low noise without effect on the drying quality. The appliance operates slowly with longer cycle time.
7.6 End Alert
The buzzer sounds at the:
7.9 Options table
| Programmes1) | Dryness Level | Extra Anti-crease | Extra Silent | Reverse Plus | Time Dry |
| Favourite ☆ | Depends on a memorised programme | ||||
| Cottons ■ ■ ■ ■ ■ ■ | |||||
| Mixed + ■ ■ ■ ■ ■ | |||||
| Bedding + ■ ■ ■ ■ ■ | |||||
| Energy Saver ■ ■ | |||||
| Refresh ■ | |||||
| App Program Depends on a selected programme in the app | |||||
| Drying Rack | ■ 2) | ||||
| Sports | ■ ■ | ||||
| Silk ■ ■ | |||||
| Synthetics ■ ■ ■ ■ ■ ■ ■ | |||||
| Wool 📄 | ■ 3) | ||||
| Delicates ■ ■ | |||||
1) Together with the programme you can set 1 or more options. To activate or deactivate them, press the related touch button.
2) See chapter OPTIONS: Time Dry on Drying Rack programme
3) See chapter OPTIONS: Time Dry on Wool programme
8. SETTINGS

A. Time Dry touch button
B. Start/Pause touch button
C. Delay Start touch button
D. Remote touch button
E. End Alert touch button
F. Reverse Plus touch button
G. Extra Silent touch button
H. Extra Anticrease touch button
I. Dryness Level touch button
8.1 Child lock function
This option prevents children playing with the appliance while a programme is operating. The touch buttons are locked.
Only the on/off button is unlocked.
Activating the child lock option:
- Press the on/off button to activate the appliance.
- Press and hold touch button (E) for a few seconds.
The child lock indicator comes on.

It is possible to deactivate the child lock option while a programme operates. Press and hold the same touch buttons until the child lock indicator goes off. The Child Lock function isn't available for 8 s after switching on the appliance.
8.2 Favourite


App Program cycle cannot be saved as a Favourite on the appliance.
You can do your configuration of programme and options and memorise in the appliance memory.
To memorise your configuration:
- Press the on/off button to activate the appliance
- Set the programme and available options.
- Press the (F) button for some seconds.
The sound and the message on the display confirm that the configuration is memorised.
To activate your memorised configuration:
- Press the on/off button to activate the appliance.
- Use the programme knob to set Favourite ★position.
Previously memorised configuration of programme and options will be restore.
8.3 Adjustment of the remaining moisture

Every time you enter in the "Adjustment of remaining laundry moisture" mode, previously set degree of remaining moisture will change into next value (e.g. previously set will - change into 1).
To change the default degree of remaining moisture:
- Press the on/off button to activate the appliance.
- Use the programme knob to set any programme.
- Wait approximately 8 seconds.
- Press and hold buttons (F) and (E) at the same time.
One of these indicators comes on:
- -0 - maximum dryness
- more dry laundry
-
standard dry laundry
-
Press and hold buttons (F) and (E) again until the indicator of the correct level comes on.

If the display returns to the normal mode (the time of the selected programme from step 2. will be displayed), while setting the degree of remaining moisture, press and hold buttons (F) and (E) once again to enter to the "Adjustment of remaining laundry moisture" mode (previously set degree of remaining moisture will change into next value).
- To accept the selected degree of remaining moisture, wait 5 s and the display returns to the normal mode.
| Dryness level Display symbol | |
| -0-maximum dryness | +### |
| -1-more dry laundry | +### |
| -2-standard dry laundry | ### |
8.4 Water container indicator
By default, the water container indicator is on. It comes on when the programme is completed or when it is necessary to empty the water container.

If a draining kit is installed (additional accessory), the appliance automatically drains the water from the water container. In this case we recommend that you deactivate the indicator of the water container.
Deactivating the water container indicator:
- Press the on/off button to activate the appliance.
- Wait approximately 8 seconds.
- Press and hold touch buttons (A) and (C) at the same time.
The display shows one of these 2 configurations:
9. BEFORE FIRST USE

Rear drum packaging is removed automatically when dryer is activated for the first time. Possible to hear some noise.
Before you use the appliance for the first time:
- Clean the tumble dryer drum with a moist cloth.
- Start a 1 hour programme with moist laundry.
10. DAILY USE
10.1 Start a programme without delay start
- Prepare the laundry and load the appliance.

CAUTION!
Make sure that when you close the door, the laundry does not get caught between the appliance door and the rubber seal.
- Press the on/off button to activate the appliance.
-
Set the correct programme and options for the type of load. The display shows the programme duration.
-
The display shows "Off". After 5 s the display returns to normal mode.
- The display shows "On". After 5 s the display returns to normal mode.

At the beginning of the drying cycle (first 3-5 min) there could be a slightly higher sound level. This is due to the compressor starting up. This is normal for compressor powered appliances such as refrigerators and freezers.

The drying time you see on the display, when the cotton programme is selected, is related to the load of 5 kg and standard conditions. Real drying time will depend on type of the load (quantity and composition), the room temperature and the humidity of your laundry after spin drying phase.
- Press the Start/Pause touch button. The programme starts.
10.2 Starting the programme with delay start
- Set the correct programme and options for the type of load.
- Press the delay start button again and again until the display shows the delay time you want to set.

You can delay the start of a programme from a minimum of 30 minutes to a maximum of 20 hours.
- Press the Start/Pause touch button.
The display shows the countdown of the delay start.
When the countdown is completed, the programme starts.
10.3 Change a programme
- Press the on/off button to deactivate appliance
- Press the on/off button to activate the appliance.
- Set the programme.
10.4 At the end of the programme
When the programme is completed:
- An intermittent acoustic signal operates.
• The display shows ☐ : ☐ ☐ - The indicator is on.
• The indicators Piter and Tank may come on. - The Start/Pause indicator is on.
The appliance continues to operate with the anti-crease phase for approximately 30 minutes or more if Extra Anticrease option was set (see chapter Option - Extra Anticrease).
The anti-crease phase reduces creasing.
You can remove the laundry before the anti-crease phase is completed. We
11. HINTS AND TIPS
11.1 Preparing the laundry
- Close the zips.
- Close the fasteners of duvet covers.
- Do not dry ties or ribbons loose (e.g. apron ribbons). Tie them before you start a programme.
- Remove all items from pockets.
- Turn items with the internal layer made of cotton inside out. Cotton layer must be faced outwards.
• Always set the programme suitable for the type of laundry. - Do not put light and dark colours together.
recommend, for better results, that you remove the laundry when the phase is almost completed.
When the anti-crease phase is completed:
• The display still shows 0 : 0 0
- The indicator is off.
- The indicators 📋 Filter and Tank remain on.
- Start/Pause indicator goes off.
- Press the on/off button to deactivate the appliance.
- Open the appliance door.
- Remove the laundry.
- Close the appliance door.

Always clean the filter and empty the water container when a programme is completed.
10.5 Stand-by function
To reduce energy consumption, this function automatically deactivates the appliance:
• After 5 minutes if you do not start the programme.
• After 5 minutes from the end of the programme.
- Use suitable programme for cottons, jersey and knitwear to reduce shrinkage.
- Do not exceed the maximum load stated in the programmes chapter or shown on the display.
- Dry only the laundry that is suitable for tumble drying. Refer to the fabric label on the items.
- Do not dry large and small items together. Small items can be trapped inside the large items and remain wet.
| Fabric label Description | |
 | Laundry is suitable for tumble drying. |
 | Laundry is suitable for tumble drying at higher temperatures. |
 | Laundry is suitable for tumble drying at low temperatures only. |
 | Laundry is not suitable for tumble drying. |
12. CARE AND CLEANING
12.1 Cleaning the filter
1.2.
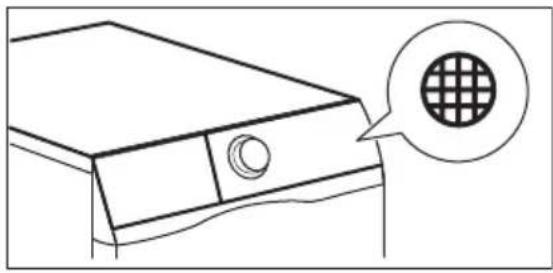
natural_image
Line drawing of a device with a circular inset showing a grid pattern (no text or symbols)
3.
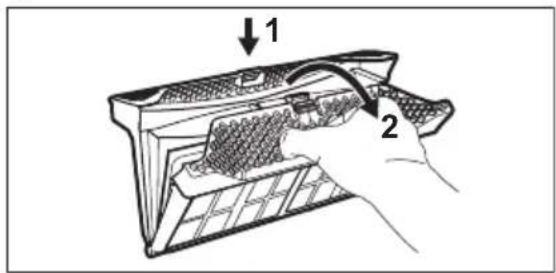
4.

natural_image
Line drawing of a hand opening a device with a meshed panel (no text or symbols)5.1)

natural_image
Line drawing of a hand holding a tool interacting with a curved object (no text or symbols)6.

1) If necessary remove fluff from the filter socket and gasket. You can use a vacuum cleaner.
12.2 Emptying the water container
1.2.

natural_image
Line drawing of a server cabinet with a speech bubble showing a water drop symbol (no text or labels)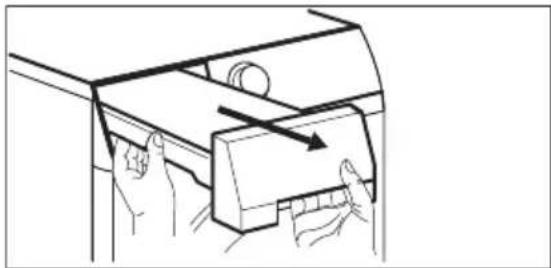
natural_image
Line drawing of hands operating a mechanical device with an arrow indicating motion (no text or symbols)3.4.
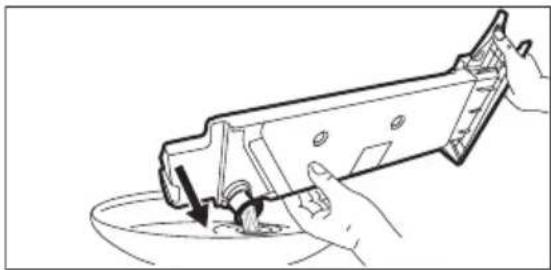
natural_image
Line drawing of a hand using a tool to clean or brush a bowl (no text or symbols present)
natural_image
Diagram of a mechanical device with hands operating a block and an arrow indicating force or direction (no text or symbols)i
You can use the water from the water container as an alternative to distilled water (e.g. for steam ironing).
Before you use the water, remove dirt residues with a filter.
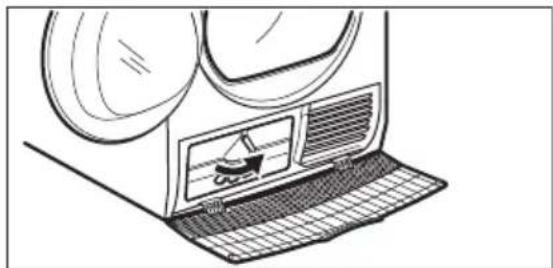
12.3 Cleaning the Heat Exchanger
1.2.

natural_image
Line drawing of a server rack with a circular arrow indicating data flow (no text or symbols)
3.4.
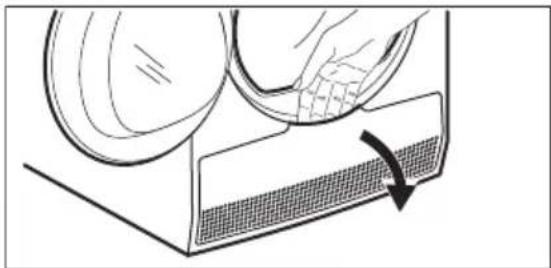
natural_image
Diagram showing a hand pressing down on a textured surface with an arrow indicating rotation (no text or symbols)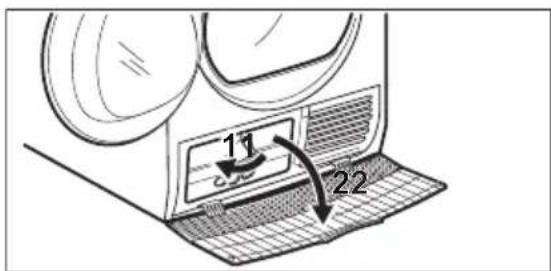
5.6.

natural_image
Line drawing of a hand using a tool to press down an air conditioner cover (no text or symbols present)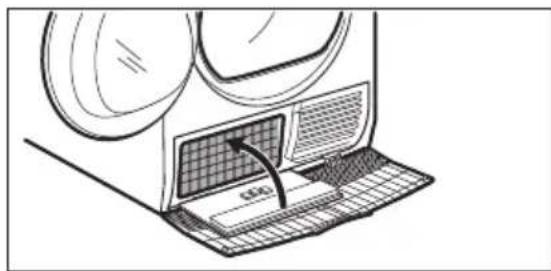
natural_image
Diagram of a device with ventilation grilles and a grid-patterned base, showing airflow direction (no text or symbols)7.8.

natural_image
Line drawing of a kitchen appliance with a gridded base and ventilation cover (no text or symbols)
natural_image
Diagram of a mechanical component with a meshed base and curved arrow indicating rotation (no text or symbols)

CAUTION!
Do not touch the metal surface with bare hands. Risk of injury. Wear protective gloves. Clean carefully to avoid damaging the metal surface.
12.4 Cleaning the drum

WARNING!
Disconnect the appliance before you clean it.
Use a standard neutral soap detergent to clean the inner surface of the drum and drum lifters. Dry the cleaned surfaces with a soft cloth.

CAUTION!
Do not use abrasive materials or steel wool to clean the drum.
12.5 Cleaning the control panel and housing
Use a standard neutral soap detergent to clean the control panel and housing.
Use a moist cloth to clean. Dry the cleaned surfaces with a soft cloth.

CAUTION!
Do not use furniture cleaning agents or cleaning agents which can cause corrosion.
12.6 Cleaning the airflow slots
Use a vacuum cleaner to remove fluff from the airflow slots.
- TROUBLESHOOTING
| Problem Possible solution | |
| You cannot activate the appliance. Make sure that the mains plug is connected to the mains socket. | |
| Check fuse in fuse box (domestic installation). | |
| The programme does not start. Press Start/Pause. | |
| Make sure that the appliance door is closed. | |
| The appliance door does not close. Make sure that the installation of the filter is correct. | |
| Make sure that the laundry is not caught | between the appliance door and the rubber seal. |
| The appliance stops during operation. Make sure that the water container is empty. Press Start/Pause to start the programme again. | |
| Load is too small, increase the load or use the Time Drying programme. | |
| The cycle time is too long or unsatisfactory drying result.1) | Make sure that the weight of the laundry is suitable for the duration of the programme. |
| Make sure that the filter is clean. | |
| The laundry is too wet. Spin the laundry in the washing machine again. | |
| Ensure that the room temperature is higher than +5°C and lower than +35°C. Optimal room temperature is 19°C to 24°C. | |
| Set the Time Drying or the Extra Dry programme.2) | |
| The App cannot connect to the dryer. Check if your smart device is connected to the wireless network. Check your home network and router. Restart the router. Contact your wireless service provider if there are problems with the wireless network. | |
| The dryer, the smart device, or both, need to be configured again. | |
| The App frequently cannot connect to the dryer. | Try to move the home router as near the dryer as possible or consider purchasing a wireless range extender. |
| Turn the microwave off. Avoid using the | microwave and the Remote Control of the oven at the same time. The microwaves disrupt the Wi-Fi signal. |
| The display shows — — — | If you want to set a new programme, de-activate and activate the appliance. |
| Make sure that the options are suitable | for the programme. |
| The display shows Error code (e.g. E51). | Deactivate and activate the appliance.Start a new programme. If the problem occurs again, contact the Service centre. |
1) After maximum 5 hours, the programme ends automatically.
2) It can happen that some area remains humid when drying big items (e.g. bed sheets).
13.1 If the drying results are not satisfactory
- The set programme was incorrect.
- The filter is clogged.
• The Heat Exchanger is clogged. - There was too much laundry in the appliance.
-
The drum is dirty.
-
Incorrect setting of the conductivity sensor (See chapter "Settings - Adjustment of the remaining laundry moisture degree" for better setting).
• The airflow slots are clogged. - Room temperature is too low or too high ( optimal room temperature 19^ to 24^ )
14. TECHNICAL DATA
| Height x Width x Depth 850 x 600 x 600 mm (maximum 665 mm) |
| Max. depth with the appliance door open 1100 mm |
| Max. width with the appliance door open 950 mm |
| Adjustable height 850 mm (+ 15 mm - feet regulation) |
| Drum volume 118 l |
| Maximum load volume 9 kg |
| Voltage 220-240 V |
| Frequency 50 Hz |
| Total power 900 W |
| Type of use Household |
| Permitted ambient temperature + 5°C to + 35°C |
| Level of protection against ingress of sol-IPX4id particles and moisture ensured by the protective cover, except where the low voltage equipment has no protection against moisture |
| This product contains fluorinated greenhouse gases, hermetically sealed |
| Gas designation R134a |
| Weight 0,26 kg |
| Global-warming potential (GWP) 1430 |
15. QUICK GUIDE
15.1 Daily use

- Push the On/Off button to turn on the appliance.
- Use the programme dial to set the programme.
- Together with the programme you can set 1 or more special options. To
activate or deactivate an option touch the relevant button.
-
To start the programme, Touch the Start/Pause button.
-
The appliance starts.
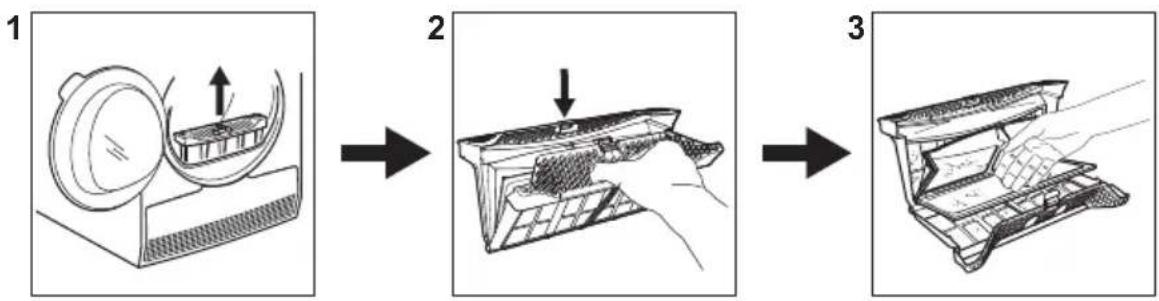
15.2 Cleaning the filter
flowchart
graph LR
    A["1: Display with lid and upper part"] --> B["2: Finishing into a container with hand"]
    B --> C["3: Packaging with hand holding lid and tray"]
At the end of each cycle the filter symbol
appears on the display and you must clean the filter.
15.3 Programme table
| Programme | Load 1) | Properties / Fabric type2) | |
Fav  | The load depends on a mem-orised pro-gramme | You can do your configuration of programme and options and memorise in the appliance memory (See chapter "Settings - Favourite ☆"). | |
| Cottons 9 kg Cotton fabrics. |  | ||
| Mixed + 6 kg | Mix of garments made of cotton, cotton-synthetic blend and syn-thetic fabric. |  | |
| Bedding + 4,5 kg | Up to three bed linen sets, one of which can be double size. |  | |
| Energy Saver 9 kg | Cycle to be used to dry cotton with "cotton cupboard" dryness level, with maximum energy sav-ing. |  | |
| Refresh 1kg Refreshing textiles that were in storage. | |||
| □ App Program | The load depends on a selec-ted pro-gramme in the app | App Program gives you additional pro-grammes that you can select from the App (see chapter "WI-FI - CONNECTIVITY SET-UP" to connect the smart appliance to the Wi-Fi network and to link it to a mobile devices). | |
| Drying Rack | 1kg (or 1 pair of sport shoes) | For drying sport shoes only with Drying Rack (see separate user manual provided with Dry-ing Rack). | |
| Sports 2 kg | Sportswear, thin and light fabrics, microfiber, polyester. / [IMAGE] | ||
| Silk 1 kg | Gentle drying of hand-washable silks. | ||
| Synthetics 3,5 kg Synthetic and mixed fabrics. / [IMAGE] | |||
| Wool [IMAGE] | 1 kg |  The wool drying cycle of this machine has been approved by The Woolmark Company for the drying of wool garments labelled as "hand wash" provided that the garments are dried according to the instructions issued by the manufacturer of this machine. Follow the garment care label for other laundry instructions. M1717 The wool drying cycle of this machine has been approved by The Woolmark Company for the drying of wool garments labelled as "hand wash" provided that the garments are dried according to the instructions issued by the manufacturer of this machine. Follow the garment care label for other laundry instructions. M1717 | |
| Delicates 4 kg | Delicate fabrics such as viscose, rayon, acrylic, and their blends. / [IMAGE] | ||
1) The maximum weight refers to dry items.
2) For fabric mark meaning see chapter HINTS AND TIPS: Preparing the laundry.
16. ENVIRONMENTAL CONCERNS
Recycle materials with the symbol Put the packaging in relevant containers to recycle it. Help protect the environment and human health by recycling waste of electrical and electronic appliances. Do not dispose of
appliances marked with the symbol 23 with the household waste. Return the
product to your local recycling facility or contact your municipal office.
Being ensured permissible content limitation of some toxic chemicals (RoHS compliant).
RoHS
Compliant
MỤC LỤC
- THÔNG TIN AN TOAN....27
- HƯỚNG DÂN VỀ AN TOÀN......30
- MÔ TẢ SẢN PHẨM....31
- BẢNG ĐIỀU KHIỂN......32
- THIẾT LÂP KẾT NỔI - WI-FI 33
- BẢNG CHƯƠNG TRÌNH...... 35
- TÙY CHÔN....37
- CAI ĐẶT....39
- TRƯỚC KHI SỬ DUNG LẦN ĐẦU 40
- SỬ DUNG HÀNG NGÀY 41
- CÁC MEO VÀ LỜI KHUYÊN 42
- BẢO TRÌ VÀ LÀM SACH 42
- KHẢC PHUC SƯ CỔ 45
- Dữ LIÊU KỸ THUÂT 46
- HƯỚNG DÂN NHANH......47
flowchart
graph TD
    A["App Store"] -->|Wireless Signal| B["W-Fi Signal"]
    C["ia"] -->|Wireless Signal| B
    B --> D["Smartphone"]
    D --> E["electrolux.com/app"]
    style A fill:#f9f,stroke:#333
    style C fill:#ccf,stroke:#333
    style D fill:#cfc,stroke:#333
    style E fill:#fcc,stroke:#333

electrolux.com/app


CHÚNG TÔI NGHĨ ĐẾN BẠN
natural_image
Line drawing of a washing machine with a circular inset showing a grid pattern (no text or symbols)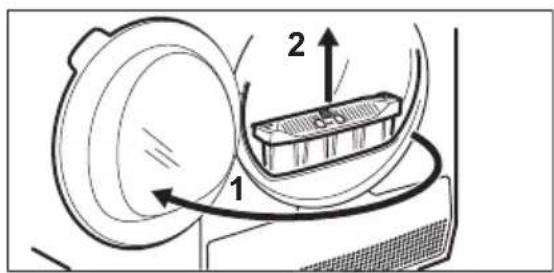


natural_image
Line drawing of a hand inserting into a device into a tray (no text or symbols)5.1)
6.
1
2
natural_image
Diagram showing a hand pressing down on a textured surface with an arrow indicating rotation (no text or symbols)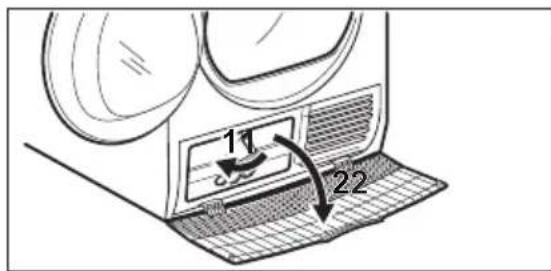
5.6.

natural_image
Line drawing of a hand using a tool to adjust or install a component on a grid-patterned surface (no text or symbols)
natural_image
Diagram of a device with ventilation grilles and a grid-patterned base, no text or symbols present7.8.
natural_image
Line drawing of a kitchen appliance with a gridded base and ventilation duct (no text or symbols)
natural_image
Diagram of a mechanical component with a meshed base and curved arrow indicating rotation (no text or symbols)

CẦN TRỌNG!
flowchart
graph TD
    A["1: Start Screen"] --> B["2: Rotation Arrow"]
    B --> C["3: Hand Press with Buttons"]
    C --> D["4: Finish with Hand Press"]
    D --> E["5: Display Time: 1:50, 90min"]
flowchart
graph LR
    A["Step 1: Device with lid and handle"] --> B["Step 2: Processed device with handle"]
    B --> C["Step 3: Screen with hand holding handle"]
flowchart
graph TD
    A["Electricity Phone"] -->|Wireless Signal| B["Smart Home Device"]
    B --> C["Electronic Device with Electrolux icon"]
    C --> D["Mobile Device"]


electrolux.com/app

Available on the App Store

GETTON Google Play
The software included in this product contains copyrighted software that is licensed under the BSD, GPL-2.0, LGPL-2.0, LGPL-2.1, zLib, MIT, ISC, Apache 2.0 and others. It is possible to display the complete copy of the licenses in the Electrolux App that can be downloaded from the corresponding App store from the License menu section. It is possible to download the source code of the open source software used in the product by searching for Wi-Fi Module Software version in NIUX subfolder at the following website: http://electrolux.opensoftwarerepository.com.
- WE'RE THINKING OF YOU
- CUSTOMER CARE AND SERVICE
- ⚠SAFETY INFORMATION
- Children and vulnerable people safety
- General Safety
- SAFETY INSTRUCTIONS
- Installation
- Electrical connection
- WARNING!
- Use
- Internal lighting
- Care and cleaning
- Compressor
- PRODUCT DESCRIPTION
- Disposal
- CONTROL PANEL
- Display
- WI-FI - CONNECTIVITY SETUP
- Installing and configuring Electrolux Life
- Configuring the dryer wireless connection
- To switch the wireless connection
- To remove the wireless
- Remote Start
- Activate Remote Start
- Deactivate Remote Start
- Over-the-air update
- PROGRAMME TABLE
- OPTIONS
- Extra Anticrease
- Dryness Level
- Time Dry
- Time Dry on Wool programme
- Time Dry on Drying Rack programme
- Reverse Plus
- Extra Silent
- End Alert
- Options table
- SETTINGS
- Child lock function
- Activating the child lock option:
- Favourite
- To memorise your configuration:
- To activate your memorised configuration:
- Adjustment of the remaining moisture
- Water container indicator
- Deactivating the water container indicator:
- BEFORE FIRST USE
- DAILY USE
- Start a programme without delay start
- CAUTION!
- Starting the programme with delay start
- Change a programme
- At the end of the programme
- HINTS AND TIPS
- Preparing the laundry
- Stand-by function
- CARE AND CLEANING
- Cleaning the filter
- Emptying the water container
- 1.2.
- 3.4.
- i
- Cleaning the Heat Exchanger
- Cleaning the drum
- Cleaning the control panel and housing
- Cleaning the airflow slots
- If the drying results are not satisfactory
- TECHNICAL DATA
- QUICK GUIDE
- Daily use
- Cleaning the filter
- Programme table
- ENVIRONMENTAL CONCERNS
- MỤC LỤC
- CHÚNG TÔI NGHĨ ĐẾN BẠN
- CẦN TRỌNG!
Brand : ELECTROLUX
Model : EDH903BEWA
Category : Tumble dryer