
DLZ1514I - Washing machine DE DIETRICH - Free user manual and instructions
Find the device manual for free DLZ1514I DE DIETRICH in PDF.


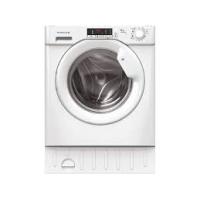
| Product Type | Front-loading washing machine |
| Brand | De Dietrich |
| Model | DLZ1514I |
| Capacity (dry) | 8 kg |
| Height (adjustable) | 820 mm to 840 mm |
| Supply Voltage | 220-240 V |
| Water Pressure | 0.05 - 0.8 MPa |
| Programs | Cotton, Mixed Fabrics, Synthetics, Delicates, Hand Wash, Wool, Cotton 20°C, Rapid (14/30/44 min), Rinse, Spin, Drain |
| Special Features | Sensor System, Delay Start (up to 24h), Crease Guard |
| Detergent Drawer | 3 compartments (prewash I, main wash II, additives ☕) |
| Filter | Yes, cleanable |
| Energy Efficient Programs | Cotton 60°C and 40°C (EU standard) |
| Installation | Leveling feet, door reversible |
| Safety Features | Earth connection, door lock, child supervision recommended |
| Accessories | Plastic caps, outlet tube bend, liquid detergent container |
| User Manual | Included (48 pages) |
Frequently Asked Questions - DLZ1514I DE DIETRICH
User questions about DLZ1514I DE DIETRICH
0 question about this device. Answer the ones you know or ask your own.
Ask a new question about this device
Download the instructions for your Washing machine in PDF format for free! Find your manual DLZ1514I - DE DIETRICH and take your electronic device back in hand. On this page are published all the documents necessary for the use of your device. DLZ1514I by DE DIETRICH.
USER MANUAL DLZ1514I DE DIETRICH
natural_image
Illustration of a single washing machine with front panel and control buttons (no text or symbols)FR
TOUS NOS COMPLIMENTS
This appliances is intended to be used in household and similar applications such as:
- staff kitchen areas in shops, offices and other working environments;
- farm houses;
- by clients in hotels, motels and other residential type environments;
- bed and breakfast type environments.
A different use of this appliance from household environment or from typical housekeeping functions, as commercial use by expert or trained users, is excluded even in the above applications.
If the appliance is used in a manner inconsistent with this it may reduce the life of the appliance and may void the manufacturer's warranty. Any damage to the appliance or other damage or loss arising through use that is not consistent with domestic or household use (even if located in a domestic or household environment) shall not be accepted by the manufacturer to the fullest extent permitted by law.
Please read this booklet carefully as it provides important guide lines for safe installation, use and maintenance and some useful advise for best results when using your washing machine.
Keep this booklet in a safe place for further consultation.

On delivery, check that the following are included with the machine:
A) INSTRUCTION MANUAL
B) CAPS
C) BEND FOR OUTLET TUBE
D) LIQUID DETERGENT OR
LIQUID BLEACH
COMPARTMENT
(CONTAINER)
KEEP THEM IN A SAFE PLACE
Check that the machine has not incurred damage during transport. If this is the case, contact your nearest Technical Assistance Centre.

natural_image
Illustration of a washing machine with front panel and side panels, no text or symbols present
B


natural_image
Metallic curved bracket with a labeled letter 'C' (no other text or symbols)D


CHAPITRE 2
MESURES DE SECURITE
ATTENTION: EN CAS D'INTERVENTION DE NETTOYAGE ET D'ENTRETIEN
- Remove the plug
● Turn off the water inlet tap.
● All appliances are earthed. Ensure that the main electricity circuit is earthed. Contact a qualified electrician if this is not the case.
CE Appliance complies with European Directives 73/23/EEC and 89/336/EEC, replaced by 2006/95/EC and 2004/108/EC, and subsequent amendments.
- Do not touch the appliance with wet or damp hands or feet.
- Do not use the appliance when bare-footed.
● Extreme care should be taken if extension leads are used in bathrooms or shower rooms. Avoid this where possible.
WARNING: DURING THE WASHING CYCLE, THE WATER CAN REACH A TEMPERATURE OF 90°C.
● Before opening the washing machine door, ensure that there is no water in the drum.

natural_image
Hand inserting a plug into an electrical socket (no text or symbols visible)
natural_image
Mechanical component diagram showing a bolt and nut assembly with a curved arrow indicating rotation (no text or symbols)
natural_image
Illustration of a hand holding a plug with a cracked socket inside, next to a power plug (no text or symbols)
natural_image
Illustration of a washing machine next to a person's foot with a large 'X' symbol, indicating laundry or disinfection (no text or symbols present)
natural_image
Illustration of a mechanical component with a cross mark, no visible text or symbols

natural_image
Illustration of a washing machine with a water-filled vent and a black arrow pointing to the door (no text or symbols)FR
- Do not use adaptors or multiple plugs.
● This appliance is not intended for use by persons (including children) with reduced physical, sensory or mental capabilities, or lack of experience and knowledge, unless they have been given supervision or instruction concerning use of the appliance by a person responsible for their safety.
Children should be supervised to ensure that they do not play with the appliance.
- Do not pull the mains lead or the appliance itself to remove the plug from the socket.
- Do not leave the appliance exposed to atmospheric agents (rain, sun etc.)
● In the case of removal, never lift the appliance by the knobs or detersive drawer.
● During transportation do not lean the door against the trolley.
Important!
When the appliance location is on carpet floors, attention must be paid so as to ensure that there is no obstruction to the bottom vents.
● Lift the appliance in pairs as illustrated in the diagram.
- In the case of failure and/or incorrect operation, turn the washing machine off, close the water inlet tap and do not tamper with the appliance. Contact a Technical Assistance Centre for any repairs and ask for original spare parts. Avoidance of these norms may compromise the safety of the appliance.
● Should the supply cord (mains cable) be demaged, this is to be replaced by a specific cable available from the after sales service centre.

natural_image
Two technical diagrams showing a switch and plug installation (no text or symbols present)
natural_image
Illustration of a washing machine with a handle and wheels (no text or symbols)
natural_image
Illustration of three household appliances: washing machine, person using a phone, and washing machine with fan (no text or symbols)
CHAPITRE 3

CHAPTER 3

| DONNÉES TECHNIQUES | TECHNICAL DATA | ||
| CAPACITE DE LINGE SEC | MAXIMUM WASH LOAD DRY | kg | 8 |
| PUISSANCE ABSORBEE | POWER INPUT | W | CONSULTER LA PLAQUE TECHNIQUE |
| AMPERAGE | POWER CURRENT FUSE AMP | A | |
| ESSORAGE (Tours/min.) | SPIN r.p.m. | SEE RATING PLATE | |
| PRESSION DANS L'INSTALLATION HYDRAULIQUE | WATER PRESSURE | MPa | min. 0,05 max. 0,8 |
| TENSION | SUPPLY VOLTAGE | V | 220-240 |

CHAPITRE 4
MISE EN PLACE INSTALLATION
SETTING UP INSTALLATION
Move the machine near its permanent position without the packaging base.
Carefully cut the securing strip that holds the main cold and the drain hose.
Remove the 4 fixing screws marked (A) and remove the 4 spacers marked (B)
Cover the 4 holes using the caps provided in the instruction booklet pack.
WARNING: DO NOT LEAVE THE PACKAGING IN THE REACH OF CHILDREN AS IT IS A POTENTIAL SOURCE OF DANGER.

natural_image
Illustration of a washing machine with a curved arrow pointing to it (no text or symbols)
natural_image
Illustration of scissors cutting a curved pipe with sparks (no text or symbols)
natural_image
Illustration of a washing machine casing with mounting holes and internal compartments (no text or symbols)FR
ATTENTION: NE PAS OUVRIR LE ROBINET
Fix the sheet of corrugated material on the bottom as shown in picture.
Connect the fill hose to the tap.
The appliance must be connected to the water mains using new hose-sets. The old hose-sets should not be reused.
IMPORTANT: DO NOT TURN THE TAP ON AT THIS TIME.
Position the washing machine next to the wall. Hook the outlet tube to the edge of the bath tub, paying attention that there are no bends or contractions along the tube.
It is better to connect the discharge hose to a fixed outlet of a diameter greater than that of the outlet tube and at a height of min. 50 cm. If is necessary to use the plastic sleeve supplied.


natural_image
Illustration of a hairdryer being inserted into a device, showing the bulb, screw, and handle (no text or symbols)
FR
Use the 4 feet to level the machine with the floor:
a) Turn the nut clockwise to release the screw adjuster of the foot.
b) Rotate foot to raise or lower it until it stands firmly on the ground.
c) Lock the foot in position by turning the nut anti-clockwise until it comes up against the bottom of the machine.
Ensure that the knob is on the "OFF" position and the load door is closed
Insert the plug.
ATTENTION:
should it be necessary to replace the supply cord, connect the wire in accordance with the following colours/codes:
BLUE - NEUTRAL (N)
BROWN - LIVE (L)
YELLOW-GREEN - EARTH (

After installation, the appliance must be positioned so that the plug is accessible.


By pressing this button you can activate a special new wash cycle in the Colourfast and Mixed Fabrics programs, thanks to the new Sensor System. This option treats with care the fibres of garments and the delicate skin of those who wear them.
The load is washed in a much larger quantity of water and this, together with the new combined action of the drum rotation cycles, where water is filled and emptied, will give you garments which have been cleaned and rinsed to perfection. The amount of water in the wash is increased so that the detergent dissolves perfectly, ensuring an efficient cleaning action. The amount of water is also increased during the rinse procedure so as to remove all traces of detergent from the fibres.
This function has been specifically designed for people with delicate and sensitive skin, for whom even a very small amount of detergent can cause irritation or allergy.
You are advised to also use this function for children's clothing and for delicate fabrics in general, or when washing garments made of towelling, where the fibres tend to absorb a greater quantity of detergent.
To ensure the best performance for your wash, this function is always activated on the Delicates and Woollens/Handwash programs.

TOUCHE "DEPART DIFFERE"
This button allows you to pre-programme the wash cycle to delay the start of the cycle for up to 24 hours.
To delay the start use the following procedure: Set the required programme. Press the button once to activate it (h00 appears on the display) and then press it again to set a 1 hour delay (h01 appears on the display); the pre-set delay increases by 1 hour each time the button is pressed, until h24 appears on the display, at which point pressing the button again will reset the delay start to zero.
Confirm by pressing the "START/PAUSE" button (the light on the display starts to flash). The countdown will begin and when it has finished the programme will start automatically.
It is possible to cancel the delay start by taking the following action: Press and hold the button for 5 seconds until the display will show the settings for the programme selected. At this stage it is possible to start the programme previously selected by pressing the "START/PAUSE" button or to cancel the process by setting the selector to the OFF position and then selecting another programme.

TOUCHE "REPASSAGE FACILE"
The Crease Guard function (Not available on COTTON programmes) minimizes creases as much as possible with a uniquely designed anti-crease system that is tailored to specific fabrics.
MIXED FABRICS - the water is gradually cooled throughout the final two rinses with no spinning and then a delicate spin assures the maximum relaxation of the fabrics.
DELICATE FABRICS – final two rinses with no spinning and then the fabrics are left in water until it is time to unload. When you are ready to unload, press the "Crease Guard" button – this will drain.
WOLLENS/SILK – after the final rinse the fabrics are left in water until it is time to unload and the button indicator blinking.
When you are ready to unload, press the "Crease Guard" button, this will drain and spin ready for emptying.
If you do not want to spin the clothes and activate drain only:
- Turn the programme selector to the "OFF" position;
- Select programme drain only ↓;
- Switch on the appliance again by pressing the "Start/Pause" button.
L


TOUCHE MARCHE/PAUSE
Press to start the selected cycle.
NOTE: WHEN THE START BUTTON HAS BEEN PRESSED, THE APPLIANCE CAN TAKE FEW SECONDS BEFORE STARTS WORKING.
CHANGING THE SETTINGS AFTER THE PROGRAMMES HAS STARTED (PAUSE)
Press and hold the "START/PAUSE" button for about 2 seconds, the flashing lights on the options buttons and time remaining indicator will show that the machine has been paused, adjust as required and press the "START/PAUSE" button again to cancel the flashing lights.
If you wish to add or remove items during washing, wait 2 minutes until the safety device unlocks the door. When you have carried out the manoeuvre, close the door, press START button and the appliance will continue working where it left off.
CANCELLING THE PROGRAMME
To cancel the programme, set the selector to the OFF position. Select a different programme. Re-set the programme selector to the OFF position.
M

The display's indicator system allows you to be constantly informed about the status of the machine:
1) WASH TEMPERATURE
When a programme is selected the relevant indicator will light up to show the maximum possible wash temperature.
Selecting a lower temperature using the special button will cause the corresponding indicator to light up.
If you want carry out a cold wash all the indicators must be off.
2) DOOR LIGHT
Once the START/PAUSE button has been pressed the light first flashes then stops flashing and remains on until the end of the wash.
2 minutes after the end of the wash the light goes off to show that the door can now be opened.
3) SPIN SPEED
Once the programme has been selected, the maximum spin speed allowed for that programme appears on the display. Pressing the spin button will reduce the speed by 100 rpm each time the button is pressed. The minimum speed allowed is 400 rpm, or it is possible to omit the spin by pressing the spin button repeatedly.
4) DELAY START LIGHT
This flashes when delay start
has been set.
P


FR
5) DUREE DU CYCLE
When a programme is selected the display automatically shows the cycle duration, which can vary, depending on the options selected.
Once the programme has started you will be kept informed constantly of the time remaining to the end of the wash.
The appliance calculates the time to the end of the selected programme based upon a standard loading, during the cycle, the appliance corrects the time to that applicable to the size and composition of the load.
6) PROGRAMME START LIGHT This lights up when the START button has been pressed.
7) WASH TIME
Once the programme has been selected the indicator light will automatically show the wash time set for that programme. Selecting a different wash time the relevant indicator will light up.


CHAPITRE 6
FR
TABLEAU DES PROGRAMMES
natural_image
Illustration of a bag being poured into a drawer with a flower nearby (no text or symbols)
flowchart
graph TD
    A["Handwash"] --> B["Wool"]
    B --> C["Cotton 20°"]
    C --> D["Delicates"]
    D --> E["Flash 14-30-44 Min"]
    E --> F["Textiles"]
    F --> G["+ Prewash"]
    G --> H["Recycle icon"]
    H --> I["Recycle icon"]
    I --> J["Recycle icon"]
Notes importantes
**Programmes coton standard selon EU No 1015/2010 et No 1061/2010
| PROGRAM FOR: | PROGRAMME SELECTOR ON: | WEIGHT MAX kg | TEMP. °C | CHARGE DETERGENT | ||
| II | # | I | ||||
| Resistant fabricsCotton, linen with prewash | 1) + Prewash + Prewash | 8 | Up to: 90° | ● | ● | ● |
| Cotton, mixed resistant, Coloureds | 1) ** ** | 8 | Up to: 60° | ● | ● | |
| Mixed fabrics and syntheticsCotton, mixed fabrics, synthetics | 1) | 4 | Up to: 40° | ● | ● | |
| Very delicate fabrics | [4482] | 2,5 | Up to: 40° | ● | ● | |
| Rinse |  | - | - | △ | ● | |
| Fast spin |  | - | - | |||
| Drain only |  | - | - | |||
| Hand wash | Handwash  | 1,5 | Up to: 30° | ● | ● | |
| "MACHINE WASHABLE" woollens |  [DWBK] [DWBK] | 2 | Up to: 40° | ● | ● | |
| Resistant fabrics Mixed fabrics and synthetics |  | 8 | Up to: 20° | ● | ● | |
| Resistant fabrics Mixed fabrics and synthetics Rapid 14 minute | 2) Flash Flash | 1,5 | Up to: 30° | ● | ● | |
| Resistant fabrics Mixed fabrics and synthetics Rapid 30 minute | 2,5 | Up to: 40° | ● | ● | ||
| Resistant fabrics Mixed fabrics and synthetics Rapid 44 minute | 3,5 | Up to: 40° | ● | ● | ||

natural_image
Illustration of a washing machine with liquid being poured into it, no text or symbols present
flowchart
graph TD
    A["Handwash"] --> B["Wool"]
    B --> C["Cotton 20°"]
    C --> D["Delicates"]
    D --> E["Flash 14-30-44 Min"]
    E --> F["+ Prewash"]
    F --> G["TEXTILES"]
    G --> H["Recycle icon"]
    H --> I["Recycle icon"]
    I --> J["Recycle icon"]
    J --> K["Recycle icon"]
    K --> L["Recycle icon"]
    L --> M["Recycle icon"]
    M --> N["Recycle icon"]
    N --> O["Recycle icon"]
    O --> P["Recycle icon"]
    P --> Q["Recycle icon"]
    Q --> R["Recycle icon"]
    R --> S["Recycle icon"]
    S --> T["Recycle icon"]
    T --> U["Recycle icon"]
    U --> V["Recycle icon"]
    V --> W["Recycle icon"]
    W --> X["Recycle icon"]
    X --> Y["Recycle icon"]
    Y --> Z["Recycle icon"]
    Z --> AA["Recycle icon"]
    AA --> AB["Recycle icon"]
    AB --> AC["Recycle icon"]
    AC --> AD["Recycle icon"]
    AD --> AE["Recycle icon"]
    AE --> AF["Recycle icon"]
    AF --> AG["Recycle icon"]
    AG --> AH["Recycle icon"]
    AH --> AI["Recycle icon"]
    AI --> AJ["Recycle icon"]
    AJ --> AK["Recycle icon"]
    AK --> AL["Recycle icon"]
    AL --> AM["Recycle icon"]
    AM --> AN["Recycle icon"]
    AN --> AO["Recycle icon"]
    AO --> AP["Recycle icon"]
    AP --> AQ["Recycle icon"]
    AQ --> AR["Recycle icon"]
    AR --> AS["Recycle icon"]
    AS --> AT["Recycle icon"]
    AT --> AU["Recycle icon"]
    AU --> AV["Recycle icon"]
    AV --> AW["Recycle icon"]
    AW --> AX["Recycle icon"]
    AX --> AY["Recycle icon"]
Please read these notes
** STANDARD COTTON PROGRAMMES ACCORDING TO (EU) No 1015/2010 and No 1061/2010
COTTON PROGRAMME with a temperature of 60^ C COTTON PROGRAMME with a temperature of 40^ C
These programmes are suitable to clean normally soiled cotton laundry and they are the most efficient programmes in terms of combined energy and water consumptions for washing cotton laundry.
These programmes have been developed to be compliant with the temperature on the wash label on the garments and the actual water temperature may slightly differ from the declared temperature of the cycle.
The spin speed may also be reduced, to match any guidelines suggested on the fabric label, or for very delicate fabrics cancel the spin completely this option is available with a spin speed button.
- Pressing the wash temperature button makes it possible to wash at any temperature below the maximum allowed.
1) For the programmes shown you can adjust the duration and intensity of the wash using the Wash Time button.
2) Using the Wash Time button on the Rapid cycle will enable you to select either a 14,30 or 44 minute wash cycle.
When only a limited number of articles have stains which require treatment with liquid bleaching agents, preliminary removal of stain can be carried out in the washing machine.
Pour the bleach into the liquid bleach container, inserted into the compartment marked "II" in the detergent drawer, and set the special programme "RINSE".
When this phase has terminated, turn the programme selector on the "OFF" position, add the rest of the fabrics and proceed with a normal wash on the most suitable programme.
CHAPITRE 7
SELECTION
For the various types of fabrics and various degrees of dirt the washing machine has different programme bands according to: wash cycle, temperature and lenght of cycle (see table of washing cycle programmes).
RESISTANTS FABRICS
The programmes have been designed for a maximum wash and the rinses, with spin intervals, ensure perfect rinsing.
The final spin gives more efficient removal of water.
MIXED AND SYNTHETIC FABRICS
The main wash and the rinse gives best results thanks to the rotation rhythms of the drum and to the water levels.
A gentle spin will mean that the fabrics become less creased.
SPECIAL DELICATE FIBRES
This is a new wash cycle which alternates washing and soaking and is particularly recommended for very delicate fabrics. The wash cycle and rinses are carried out with high water levels to ensure best results.

+ Prewash


FR
PROGRAMME SPÉCIAL "RINÇAGE"
This programme carries out three rinses with a intermediate spin (which can be reduced or excluded by using the correct button). It can be used for rinsing any type of fabric, eg. use after hand-washing.
This program can be also used as cycle of Bleaching (see table of washing cycle programmes).
SPECIAL "FAST SPIN" PROGRAMME
Programme "FAST SPIN" carries out a maximum spin (which can be reduced by using the correct button).
DRAIN ONLY
This programme drains out the water.
SPECIAL "HAND WASH"
This washing machine also has a gentle Hand Wash programme cycle. This programme allows a complete washing cycle for garments specified as "Hand Wash only" on the fabric care label. The programme has a temperature of 30^ and concludes with 3 rinses and a slow spin.


Handwash

FR
PROGRAMME LAINE
A programme dedicated to washing fabrics labelled with the woolmark. The cycle comprises of alternate periods of activity and pauses. The programme has a maximum temperature of 40^ C and concludes with 3 rinses and a short spin.
"COTTON 20°C" PROGRAMME
This innovative programme, allows you to wash different fabrics and colours together, such as cottons, synthetics and mixed fabrics at only 20°C and provides an excellent cleaning performance. Consumption on this program is about 40% of a conventional 40°C. cottons wash.
RAPID PROGRAMME
The Rapid programme allows a washing cycle to be completed in just 14 minutes! This programme is particularly suited to slightly dirty cottons and mixed fabrics. Using the Wash Time button on the Rapid cycle will enable you to select either a 14, 30 or 44 minute wash cycle. When selecting the rapid programme, please note that we recommend you use only 20% of the recommended quantities shown on the detergent pack. For information about these programmes please refer to the programmes table.
Wool

Cotton 20^

Flash
14-30-44 Min
CHAPITRE 8
TIROIR A LESSIVE
The detergent draw is split into 3 compartments:
- the compartment labelled "I" is for prewash detergent;
- the compartment labelled "☐" is for special additives, fabric softeners, fragrances, starch, brighteners etc;
- the compartment labelled "II" is for main wash detergent.
If liquid detergents are used, please insert the special container supplied into the compartment marked "II" in the detergent drawer. This ensures that the liquid detergent enters the drum at the right stage of the wash cycle.
This special container must be inserted into the compartment marked "II" in the detergent drawer, also when you wish to use the "RINSE" programme as BLEACHING cycle.
NOTE: SOME DETERGENTS ARE DIFFICULT TO REMOVE. FOR THESE, WE RECOMMEND YOU USE THE SPECIAL DISPENSER WHICH IS PLACED IN THE DRUM.
NOTE: ONLY PUT LIQUID PRODUCTS IN THE COMPARTMENT
LABELLED “☐”. THE MACHINE IS PROGRAMMED TO AUTOMATICALLY TAKE UP ADDITIVES DURING THE FINAL RINSE STAGE FOR ALL WASH CYCLES.

natural_image
Illustration of a bottle being poured into a container with a flower, no text or symbols present
natural_image
Diagram of a mechanical device with internal components and a directional arrow indicating motion (no text or symbols)
natural_image
3D rendering of a spherical object with a central circular opening and leaf-like cutouts (no text or symbols)
CHAPITRE 9
LE PRODUIT
ATTENTION:
When washing heavy rugs, bed spreads and other heavy articles, it is advisable not to spin.
To be machine-washed, woollen garments and other articles in wool must bear the "Machine Washable Label".
IMPORTANT:
When sorting articles ensure that:
- there are no metal objects in the washing (e.g. brooches, safety pins, pins, coins etc.).
- cushion covers are buttoned, zips and hooks are closed, loose belts and long tapes on dressing gowns are knotted.
- runners from curtains are removed.
- attention is paid to garment labels.
- when sorting, any tough stains should be removed prior to washing using stain removers only recommended on label.


CHAPITRE 10
CONSEILS UTILES POUR L'UTILISATEUR
SUGGESTION POUR L'UTILISATION DE VOTRE LAVE-LINGE
A guide environmentally friendly and economic use of your appliance.
MAXIMISE THE LOAD SIZE
Achieve the best use of energy, water, detergent and time by using the recommended maximum load size. Save up to 50% energy by washing a full load instead of 2 half loads.
DO YOU NEED TO PRE-WASH?
For heavily soiled laundry only! SAVE detergent, time, water and between 5 to 15% energy consumption by NOT selecting Prewash for slight to normally soiled laundry.
IS A HOT WASH REQUIRED?
Pretreat stains with stain remover or soak dried in stains in water before washing to reduce the necessity of a hot wash programme. Save up to 50% energy by using a 60°C wash programme.
FR
LAVAGE
CAPACITÉ VARIABLE AUTOMATIQUE
This washing machine automatically adapts the level of the water to the type and quantity of washing. In this way it is also possible to obtain a "personalized" wash from an energy saving point of view. This system gives a decrease in energy consumption and a sensible reduction in washing times.
EXAMPLE:
A net bag should be used for particularly delicate fabrics.
Let us suppose that the washing consists of HEAVILY SOILED COTTON (tough stains should be removed with suitable stain removal).
It is advisable not to wash a load made up entirely of articles in towelling fabric which absorb a lot of water and become too heavy.
● Open the detergent drawer (P).
● Put 120 g in the main wash compartment marked II.
● Put 50 ml of the desired additive in the additives compartment 🌿.
- Close the detergent drawer (P).

natural_image
Illustration of a washing machine with clothes and a basket, no text or symbols present
natural_image
Illustration of a medical procedure with tubing and a device (no text or symbols)FR
● Ensure that the water inlet tap is turned on.
● And that the discharge tube is in place.
PROGRAMME SELECTION
Refer to the programme guide to select the most suitable programme.
Turning the selector knob required programme is activate.
The display will show the settings for the programme selected.
Adjust the wash temperature if necessary.
Press the option buttons (if required)
Then press the START button. When the START button is pressed the machine sets the working sequence in motion.
The programme carries out with the programme selector stationary on the selected programme till cycle ends.
Warning: If there is any break in the power supply while the machine is operating, a special memory stores the selected programme and, when the power is restored, it continues where it left off.
- When the programme has ended the word "End" will appear on the display
● Wait for the door lock to be released (about 2 minutes after the programme has finished). - Switch off the machine by turning the programme selector to the "OFF" position.
● Open the door and remove the laundry.
● Turn off the water supply after every use.
FOR ALL TYPES OF WASH CONSULT THE PROGRAMME TABLE AND FOLLOW THE OPERATIONS IN THE ORDER INDICATED.

natural_image
Diagram of a mechanical component with a bolt and threaded shaft, showing a curved arrow indicating rotation or movement (no text or symbols present)FR
CHAPITRE 11
NETTOYAGE ET ENTRETIEN ORDINAIRE
Do not use abrasives, spirits and/or diluents on the exterior of the appliance. It is sufficient to use a damp cloth.
The washing machine requires very little maintenance:
● Cleaning of drawer compartments.
- Filter cleaning
● Removals or long periods when the machine is left standing.
CLEANING OF DRAWER COMPARTMENTS
Although not strictly necessary, it is advisable to clean the detergent, bleach and additives compartments occasionally.
Remove the compartments by pulling gently.
Clean with water.
Put the compartments back into place

natural_image
Illustration of a silver front-loading washing machine with control panel and door (no text or symbols)
natural_image
Illustration of a hand using a tool to lift or lift a tray into a storage bin (no text or symbols)FR
NETTOYAGE FILTRE
The washing-machine is equipped with a special filter to retain large foreign matter which could clog up the drain, such as coins, buttons, etc. These can, therefore, easily be recovered. The procedures for cleaning the filter are as follows:
● Before removing the filter, place an absorbent towel below the filter cap to collect the small amount of water likely to be inside the pump
● Turn the filter anticlockwise till it stops in vertical position.
- Remove and clean.
● After cleaning, replace by turning the notch on the end of the filter clockwise. Then follow all procedures described above in reverse order.
REMOVALS OR LONG PERIODS WHEN THE MACHINE IS LEFT STANDING
For eventual removals or when the machine is left standing for long periods in unheated rooms, the drain hose should be emptied of all remaining water.
The appliance must be switched off and unplugged. A bowl is needed. Detach the drainage hose from the clamp and lower it over the bowl until all the water is removed.
Repeat the same operation with the water inlet hose.

natural_image
Illustration of a washing machine with a hand holding a button, showing a circular action diagram (no text or symbols)
CHAPITRE 12
| FAULT | CAUSE | REMEDY |
| 1. Does not function on any programme | Mains plug not plugged in | Insert plug |
| Mains switch not on | Turn on mains switch | |
| No power | Check | |
| Electric circuit fuses failure | Check | |
| Load door open | Close load door | |
| 2. Does not load water | See cause 1 | Check |
| Inlet tap turned off | Turn on water inlet tap | |
| Timer not set correctly | Set timer on correct position | |
| 3. Does not discharge water | Discharge tube bent | Straighten discharge tube |
| Odd material blocking filter | Check filter | |
| 4. Water on floor around washing machine | Leak from the washer between the tap and inlet tube | Replace washer and tighten the tube on the tap |
| 5. Does not spin | The washing machine has not discharged water | Wait a few minutes until the machine discharges water |
| “No spin” setting (some models only) | Turn the programme dial onto spin setting | |
| 6. Strong vibrations during spin | Washing machine not perfectly level | Adjust special feet |
| Transport bracket not removed | Remove transport bracket | |
| Washing load not evenly distributed | Distribute the washing evenly | |
| 7. Display reads error 0, 1, 5, 7, 8, 9 | - | Call service. |
| 8. Display reads error 2 | No water fill. | Check water supplies are on. |
| 9. Display reads error 3 | No pump out. | Check drain is clear.Check drain hose is not kinked. |
| 10. Display reads error 4 | Machine overfilled with water. | Turn off water supply to machine.Call service. |
If the fault should persist, contact a Technical Assistance Centre. For prompt servicing, give the model of the washing machine, to be found on the label placed on the cabinet inside of the porthole or on the guarantee certificate.
Important
1 The use of environment friendly detersives without phosphates may produce the following effects:
- The discharge rinse water may result cloudier due to the presence of zeolites in suspension. This does not compromise the efficiency of the rinses.
- The presence of white powder (zeolites) on the washing at the end of the washing cycle. This does not remain incorporated in the fabric and does not alter the colour.
- The presence of foam in the last rinse water which is not necessarily a sign of inadequate rinsing.
- The non-ionic surface-active agents present in the composition of washing machine detersives are often difficult to remove from the washing itself and, even in small quantities, may produce visible signs of the formation of foam.
- Carrying out further rinses, in cases such as this, is not useful.
2 If your washing machine fails to function, carry out the above-mentioned checks before calling the Technical Assistance Service.
Recommendations on the use of detergent at various temperatures
When washing heavily soiled whites, we recommend using cotton programs of 60^ C or above and a normal washing powder (heavy duty) that contains bleaching agents that at medium/high temperatures provide excellent results. For washes between 40^ C and 60^ C the type of detergent used needs to be appropriate for the type of fabric and level of soiling. Normal powders are suitable for “white” or colour fast fabrics with high soiling, while liquid detergents or “colour protecting” powders are suitable for coloured fabrics with light levels of soiling. For washing at temperatures below 40^ C we recommend the use of liquid detergents or detergents specifically labeled as suitable for low temperature washing. For washing wool or silk, only use detergents specifically formulated for these fabrics. For dosage amounts please follow the instructions on the detergent package label.

This appliance is marked according to the European directive 2012/19/EU on Waste Electrical and Electronic Equipment (WEEE).
WEEE contains both polluting substances (which can cause negative consequences for the environment) and basic components (which can be re-used). It is important to have WEEE subjected to specific treatments, in order to remove and dispose properly all pollutants, and
recover and recycle all materials. Individuals can play an important role in ensuring that WEEE does not become an environmental issue; it is essential to follow some basic rules:
- WEEE should not be treated as household waste;
- WEEE should be handed over to the relevant collection points managed by the municipality or by registered companies. In many countries, for large WEEE, home collection could be present.
In many countries, when you buy a new appliance, the old one may be returned to the retailer who has to collect it free of charge on a one-to-one basis, as long as the equipment is of equivalent type and has the same functions as the supplied equipment.
CHAPITRE 13
INSTRUCTION POUR LE MONTAGE DE LA PORTE


natural_image
Technical line drawing of a mechanical assembly with a bolted base and support structure (no text or symbols)CHAPITRE 13
INSTRUCTIONS FOR MOUNTING DOOR
Drill holes in the door using the cardboard template as indicated in Fig. 1 to mount the hinges and closure magnet in the right or left-hand position according to your requirements. The position of the hinges refers to the upper edge.
Screw the hinges in place with the 4 screws (A). Screw on the magnet (B) with screw (C).
Mount the plate (D) in the right or left-hand position, according to your requirements. Place the rubber washers under the plate and screw in place with screw (G). Snapmount cap (H) in the lower position.

EN
Mount the door with hinges by screwing with screws (L) to the front of the washing machine.
NOTE: You are advised to mount the door so that it opens towards the left, in the same direction as the washing machine load door for more loading space.
Slide the washing machine into an opening of adequate size. The lower skirting may be applied as preferred but within the size provided for.
The four adjustable feet allow the height of the washing machine to be adjusted from 820 mm (by removing the nuts supplied and substituting with 5 mm nuts) to a max. 840 mm by raising the feet and blocking the lock nut to the base of the plate.


natural_image
Technical line drawing of a mechanical assembly with a bolted base and support structure (no text or symbols)The manufacturer declines all responsibility in the event of any printing mistakes in this booklet. The manufacturer also reserves the right to make appropriate modifications to its products without changing the essential characteristics.
Service Après-Vente France
RELATIONS CONSOMMATEURS
- FR
- TOUS NOS COMPLIMENTS
- KEEP THEM IN A SAFE PLACE
- CHAPITRE 2
- MESURES DE SECURITE
- ATTENTION: EN CAS D'INTERVENTION DE NETTOYAGE ET D'ENTRETIEN
- WARNING: DURING THE WASHING CYCLE, THE WATER CAN REACH A TEMPERATURE OF 90°C.
- Important!
- CHAPITRE 4
- MISE EN PLACE INSTALLATION
- SETTING UP INSTALLATION
- ATTENTION: NE PAS OUVRIR LE ROBINET
- IMPORTANT: DO NOT TURN THE TAP ON AT THIS TIME.
- ATTENTION:
- BLUE - NEUTRAL (N)
- TOUCHE "DEPART DIFFERE"
- TOUCHE "REPASSAGE FACILE"
- TOUCHE MARCHE/PAUSE
- CHANGING THE SETTINGS AFTER THE PROGRAMMES HAS STARTED (PAUSE)
- CANCELLING THE PROGRAMME
- 5) DUREE DU CYCLE
- 6) PROGRAMME START LIGHT This lights up when the START button has been pressed.
- 7) WASH TIME
- CHAPITRE 6
- TABLEAU DES PROGRAMMES
- Notes importantes
- Please read these notes
- CHAPITRE 7
- SELECTION
- RESISTANTS FABRICS
- MIXED AND SYNTHETIC FABRICS
- SPECIAL DELICATE FIBRES
- PROGRAMME SPÉCIAL "RINÇAGE"
- SPECIAL "FAST SPIN" PROGRAMME
- DRAIN ONLY
- SPECIAL "HAND WASH"
- PROGRAMME LAINE
- "COTTON 20°C" PROGRAMME
- RAPID PROGRAMME
- CHAPITRE 8
- TIROIR A LESSIVE
- CHAPITRE 9
- LE PRODUIT
- IMPORTANT:
- When sorting articles ensure that:
- CHAPITRE 10
- CONSEILS UTILES POUR L'UTILISATEUR
- SUGGESTION POUR L'UTILISATION DE VOTRE LAVE-LINGE
- MAXIMISE THE LOAD SIZE
- DO YOU NEED TO PRE-WASH?
- IS A HOT WASH REQUIRED?
- LAVAGE
- CAPACITÉ VARIABLE AUTOMATIQUE
- EXAMPLE:
- PROGRAMME SELECTION
- CHAPITRE 11
- NETTOYAGE ET ENTRETIEN ORDINAIRE
- CLEANING OF DRAWER COMPARTMENTS
- NETTOYAGE FILTRE
- REMOVALS OR LONG PERIODS WHEN THE MACHINE IS LEFT STANDING
- Important
- Recommendations on the use of detergent at various temperatures
- CHAPITRE 13
- INSTRUCTION POUR LE MONTAGE DE LA PORTE
- INSTRUCTIONS FOR MOUNTING DOOR
- EN
- Service Après-Vente France
- RELATIONS CONSOMMATEURS
Brand : DE DIETRICH
Model : DLZ1514I
Category : Washing machine