ERC-E1060(WH) - Rice cooker Elba - Free user manual and instructions
Find the device manual for free ERC-E1060(WH) Elba in PDF.


| Product Type | Digital Rice Cooker |
| Model | ERC-E1060(WH) |
| Brand | Elba |
| Capacity (Rice) | Up to 4 cups (uncooked) |
| Functions | Rice, Quick, Porridge, Cake, Yogurt, Rahsaat, Soup, Baby Porridge, Reheat, Keep Warm, Preset Timer |
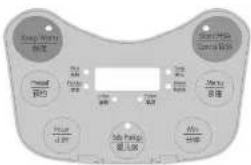
| Control Panel | LCD display with Menu, Hour, Minute, Keep Warm, Preset Timer, ON/OFF keys |
| Power Source | AC 220-240V, 50/60Hz (estimated 600W) |
| Inner Pot Coating | Non-stick coating |
| Safety Features | Automatic keep warm, overheat protection, steam vent |
| Cleaning | Hand wash inner pot and inner lid with mild detergent; wipe exterior with damp cloth |
| Storage | Cool and dry place after complete cooling |
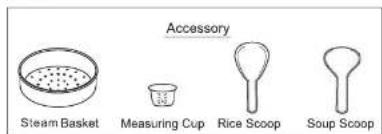
| Accessories Included | Measuring cup, rice scoop, steam tray (if applicable), power cord |
| Keep Warm Duration | Up to 5 hours recommended |
| Preset Timer Range | Up to 24 hours |
| Power Cut Memory | Resumes cooking within 2 hours of power interruption |
Frequently Asked Questions - ERC-E1060(WH) Elba
User questions about ERC-E1060(WH) Elba
0 question about this device. Answer the ones you know or ask your own.
Ask a new question about this device
Download the instructions for your Rice cooker in PDF format for free! Find your manual ERC-E1060(WH) - Elba and take your electronic device back in hand. On this page are published all the documents necessary for the use of your device. ERC-E1060(WH) by Elba.
USER MANUAL ERC-E1060(WH) Elba
DIGITAL INI RICE COOKER
MODEL: ERC-E1060(WH)
Owner's Manual
Please read this manual carefully
before operating your set
Retain it for future reference.
Record model number and serial
number of the set.
See the label attached on the set and
quote this information to your dealer
when you require service
For The Warranty Terms & Conditions, Please Refer To Warranty Certificate.
IMPORTANT SAFEGUARDS
When using this appliance, basic precautions should always be followed, including the following.
1 Read all instructions before using
2. Do not operate the appliance with damaged power cord or plug, after the appliance malfunction, or if it is dropped or damaged in any manner. Return the appliance to the nearest authorized dealer or after-sales service center for examination, repair, electrical or mechanical adjustment.
3. Do not use the appliance if the plug, the mains cord or other parts are damaged.
4 When removing the plug from wall outlet, grasp the plug to pull and not the cable.
5. Do not let the power cord hang over edge of table or counter or hot surface.
6. Do not expose the appliance to high temperature, nor place it on or near gas stove or electric burner, or in a heated oven.
7. Do not expose the appliance to direct sunlight.
8. Place the appliance on a stable, horizontal and level surface.
9. Always put the inner pot in the appliance before you put the plug in the wall outlet and switch it on.
10. Do not place the inner pot directly over an open fire to cook rice.
11. Do not use the inner pot if it is deformed.
12. The accessible surfaces may become hot when the appliance is operating. Only contact the control panel and lid.
13. Beware of hot steam coming out from the steam vent during cooking or when you open the lid. Keep hands and face away from the rice cooker to avoid the hot steam.
14. Do not lift and move the appliance while it is operating.
15. Do not exceed the maximum water level indicated in the inner pot to prevent overflow.
16. Do not place the cooking utensils inside the inner pot while cooking, keep warm, or reheating rice
17. Do not place any metallic objects or any other foreign object into the steam vent.
18. Make sure the heating element, the outside of the inner pot are clean and dry before you put in the power outlet.
19. Do not plug in the appliance or press any of the button on the control panel with wet hands.
20. Always let the appliance to cold down before starting the cleaning process.
21. Always clean the appliance after use. Do not clean the appliance in the dishwasher!
22. Never use any accessories or parts from other manufacturer or that ELBA does not specifically recommended.
23. Should the product body become moist or wet, remove the plug from the wall outlet immediately.
24. Never immerse any part of the product body in water or any other liquids nor rinse it under the tap. Use only a moist cloth to clean the exterior product body.
25. This appliance is only be used with the power cord provided.
26. Children should be supervised to ensure that they do not play with the appliance.
27. Close supervision is necessary when your appliance is being used near children or infirm persons.
28. Do not operate the appliance for other than its intended use
29. Do not use this rice cooker outdoors.
30. This appliance is for domestic use only.
- This appliance is not intended for used by persons (including children) with reduced physical, sensory or mental capabilities, or lack of experience and knowledge, unless they have been given supervision or instruction concerning use of the appliances by a person responsible for their safety.
- Save these instructions for future reference.
PRODUCT DESCRIPTION
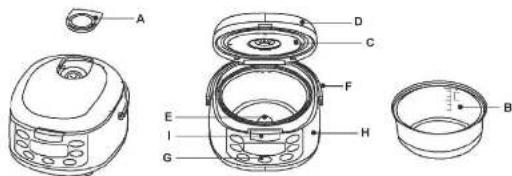
| A: Steam vent | F: Handle |
| B: Inner pot | G: Control panel |
| C: Inner lid | H: Main body |
| D: Lid | I: Lid open button |
| E: Heating plate |
Control Panel
4. Operation Instructions
4.1 The cooking amount and time of each function
| Function | Min. amount of cooking | Max. amount of cooking | Default cooking time | Cooking time | Keep warm | Preset |
| Quick | 1 cup of rice | 4 cups of rice | Not applicable | 35-50 mins.(non-adjustable) | √ | √ |
| Rice | 1 cup of rice | 4 cups of rice | Not applicable | 50-60 mins.(non-adjustable) | √ | √ |
| Porridge | 1/2 cup of rice | 3/4 cup of rice | 1 hr 30 mins | 1-4 hrs | √ | √ |
| Cake | Please refer to the recipe | 50 mins. | 10-60 mins. | √ | X | |
| Yogurt | (Rice) marking 1 | (Rice) marking 4 | 8 hrs. | 6-12 hrs. | X | X |
| Rahsaat | (Rice) marking 1 | (Rice) marking 4 | 25 mins. | 25-50 mins. | X | X |
| Soup | (Rice) marking 1 | (Rice) marking 4 | 1 hr 30 mins | 1-4 hrs | √ | √ |
| Baby Porridge | 1/2 cup of rice | 3/4 cup of rice | 1 hr 30 mins | 1-4 hrs | √ | √ |
※ The actual rice cooking time is varied with different rice amount, water volume, voltage, room temperature, and volume and ice quality.
temperature, water temperature and rice quality.
※ The rice texture is affected by different rice amount, water volume and rice quality which may form
The rest of the second class, which is not only one class, has a crust.
※ Set the current time display
Connect the power, the rice cooker under stand-by mode, press the Hour and Minute key for 3 seconds, and the LCD display flashing, press the Hour to set the hour, then press the Minute to set the minute, the press ON/OFF key to confirm setting, or wait until the display stop flashing.
4.2 Basic Functions - Rice / Porridge/Reapldgaby
- Please use the original measuring cup, one full cup of rice is approximately
for one person
- Wash rice and add water
(1) Put the rinsed rice in the inner pot. Do not wash rice directly inside the inner pot to avoid scratching the coating.
(2) Add suitable amount of water. To cook 2 cups of rice, please add water until reaching marking 2 on the "白米" (Rice) indication line. To cook 1/2 cups of porridge, please add water until reaching marking 1/2 on the "粥" (Congee) indication line.
※ The water amount can be adjusted according to personal preference on the rice texture.
※ Do not cook with hot water, it will affect the thermostat operation and the rice texture.
※ Make sure the rice is evenly distributed in the inner pot.
- Put the inner pot in the main body.
(1) Before putting the inner pot, make sure the outer and bottom surface of the inner pot is wiped dry and clean. If foreign substance is attached on the heating plate, please remove it immediately. Otherwise, it will cause nose while cooking and possibly a malfunction.
(2) Put the inner pot in the main body and ensure it is directly in contact with the heating plate.
- Close the lid until a "click" sound is heard.
- Connect the power, a beep sound will be heard. The ON/OFF indication light will flash, which indicate the appliance is in stand-by mode.
- Press [Menu] key to select the function until the indication light of the desired function is on and the display screen will show the default cooking time (except the rice cook function). Press [ON/OFF] key to start the cooking process and the indication light will keep on.
※ Except rice-cook function, the cooking time is adjustable by pressing [Hour] and [Min] key. - When cooking is completed, beep sounds will be heard. The start indication light will be off and the keep warm indication light will turn on which means the rice cooker is in keep warm status. ※ After changing to keep warm status, you may keep the rice in the rice cooker for 10-15 minutes, the rice would become softer and taste better.
- When the rice cooker is not in use, please unplug it from the power socket.
4.3 Cake
- Recipe for reference -
| Cake | |
| Egg | 3 pcs (medium size) |
| Low-gluten flour | 90g |
| Butter | 30g |
| Sugar | 80g |
Before using the cake function, please prepare the cake batter and pour into the inner pot for cooking. Prepare the cake batter:
- Melt the butter in a bowl bathed in warm water
- Add sugar into the egg in 2 to 3 times, use a hand mixer to beat the egg mixture in a bowl bathed in a warm water (about 38^ ) until it becomes stiff and fluffy.
※ Make sure the sugar is well blended and melted in the mixture - Sift the low-gluten flour over the egg mixture. Stir it gently and quickly by a rubber spatula in order to keep the air in the mixture. Blend the mixture until well combined.
Set the rice cooker:
- Take out the inner pot and spread a butter layer on the inner pot cavity evenly. Then pour the cake batter into the inner pot.
- Use a rubber spatula to make the surface of cake batter flat. Put the inner pot in the main body and close the lid.
- Press [Menu] key to select cake function, the display screen will show the default cooking time. Set the cooking time if needed.
- Press [ON/OFF] key to start the cooking process and the start indication light will keep on.
-
When cooking is completed, beep sounds will be heard and rice cooker will turn to keep warm
status. Press [ON/OFF] key to return to stand-by mode, then remove the plug. -
Remove the cake from the inner pot and let it cool down for 10 minutes before served
4.4 Yogurt
- Recipe for reference
| Yogurt | |
| Yogurt (with live cultural bacteria) | 125ml |
| Milk | 1000ml |
| Sugar | 30g (2 tablespoon) |
Hint: The fresh yogurt has no preservative, please freeze it in refrigerator and consume as soon as
possible.
Set the rice cooker.
- Take out the inner pot and sterilize the inner pot with 100°C hot water.
- Put the ingredients into inner pot. Put the inner pot in the main body and close the id
- Press [Menu] key to select yogurt function and the indication light will be on and the display screen will show the default cooking time. Set the cooking time if needed.
- Press [ON/OFF] key to start the cooking process.
- When cooking is completed, beep sounds will be heard. Press [ON/OFF] key to return to stand-by mode, then remove the plug.
- Take out the inner pot and use a rubber spatula to remove the yogurt. ※ Keep warm is not available for yogurt function.
4.5 Reheat
This function can reheat food such as cold rice, porridge or soup.
Set the nice cooker.
-
Put the food in the inner pot.
-
Spray around 1/2 to 1 cup water on the food and loose it by rice scoop. Close the lid.
-
Press [Menu] key to select reheat function, the display screen will show the default cooking time
Set the cooking time if needed.
-
Press [ON/OFF] key to start the cooking process and the start indication light will keep on
-
When cooking is completed, beep sounds will be heard. Press [ON/OFF] key to return to stand-by
mode, then remove the plug.
Keep warm is not available for reheat function.
5. Other Functions
5.1 Keep warm function
- In the stand-by mode, keep warm function can be operated by pressing the [Keep Warm] key and the
keep warm indication light will be on.
-
When keep warm function is activated, the display screen will show the accumulated keep warm time
-
To avoid the rice become dry and clamp, please scarify the rice and keep the lid closed tightly during
keep-watt.
-
Do not keep warm over 5 hours, otherwise the rice may change color, generate odour or form crust.
-
To quit the keep warm function, press [Start/Cancel] key, then remove the plug.
5.2 Preset function
User can use the preset function to set the cooking completion time. It is only applicable for rice porridge,
soup and baby portridge function.
- Connect the power, press [Menu] key to select the function, the display screen will show the default
cooking time.
-
Press [Preset Timer] key to enter the preset procedure.
-
Press [Hour] key and [Min] key to set the cocking completion time. One press of [Hour] key or [Min]
key will increase the cooking time by 1 hour or 5 minutes respectively. Long press [Hour] key or [Min]
key, the time digit will increase quickly
-
After set, press [ON/OFF] key to start the preset function
-
The rice cooker will be in the stand-by mode and start cooking until it counts down to the function default
cooking time.
※ The preset function is 24 hour setting. The maximum setting is to finish cooking after 24 hours.
※ Do not presat the time over 12 hours to avoid food deterioration and bad smell
※ If the preset completion time is less than the default cooking time of the selected function, the
appliance will start immediately after pressing the [ON/OFF] key.
6. Power Cut Off Memory
Under the situation of abnormal power supply, plug being removed by accident or moving the rice
cooker during operation, the rice cooker can resume the process if it is re-connected to the power
within 2 hours.
7. Cleaning and Storage
-
Before cleaning, the plug must be removed and let the rice cooker cool down completely.
-
When clean the inner pot and inner lid, please use soft material such as sponge and mild detergent
to clean. Rinse with water and rub them dry. Put them in place after cleaned. Never clean with harsh
cleaning tools (e.g. metal-wired brush)
-
If food residues stick on the inner pot, please soak the inner pot for a while before cleaning.
-
If dirt is attached on the heating plate, main body or lid, use a damp cloth to clean and wipe them dry.
-
To avoid damage on the inner pot coating, please use original rice scoop when serving rice, never
use metal utensils or cut food in the inner pot
-
Never use poisonous or corrosive deterrent for cleaning.
-
The color of inner pot may change after using some time, however it does not affect the fond
hygiene and function of the inner pol.
- Always let the rice cooker cool down completely and cleaned before storage. Put it in a box and store
in a dry place.
- Troubleshooting
| Problem | Cause | Solution |
| 1. Indication light is not on. | The power source is not connected properly. | Check whether the plug, socket and the power cord is in good condition and make sure the plug is firmly inserted into the socket. |
| The plug or the internal parts are damaged. | Please contact Service Centre for checking and repairing. | |
| 2. Indication light is on but the heating plate is not heated. | The internal parts or the heating plate is damaged | Please contact Service Centre for checking and repairing. |
| 3. Rice is under-cooked. | The proportion of rice to water is incorrect. | Adjust the amount of water to rice with the correct proportion. |
| Heating plate is deformed or the internal parts are damaged. | Please contact Service Centre for checking and repairing. | |
| The inner pot sits improperly on the heating plate. | Slightly turn the inner pot left and right until it fully contacts with the heating plate | |
| There are foreign objects between the inner pot and heating plate. | Remove the foreign objects. | |
| 4. The rice is burnt. | Too little rice or water is added | Add proper amount of rice or water. |
| The internal parts are damaged. | Please contact Service Centre for checking and repairing. | |
| 5. The pomidge overflowed. | Too much rice or water is added. | Reduce proper amount of water or rice. |
| 6. Display screen shows E1.E2, E3 or E4 | There is PCB failure. | Please contact Service Centre for checking and repairing. |
| 7. After set the preset function and press the [ON/OFF] key, the appliances starts to cook immediately without stand by process. | The preset competition time is shorter than the default cooking time of the selected function. | Please refer to "Preset function" to reset the rice cooker. |
| 8. The appliance fails to complete the cooking process according to the preset setting. | Forget to press [ON/OFF] key to start the preset function. | Press [ON/OFF] key to start the preset function. |
| 9. Ticking sound is coming from the rice cooker. | The sound is produced when the thermostat is adjusting the temperature which is normal. | The appliance is safe to use. |
If the above solutions cannot fix the problem, please contact Service Centre for checking and repairing.
Brand : Elba
Model : ERC-E1060(WH)
Category : Rice cooker