
SG E12 AA0 UK - Iron HOTPOINT - Free user manual and instructions
Find the device manual for free SG E12 AA0 UK HOTPOINT in PDF.


| Product Type | Iron |
| Brand | Hotpoint |
| Model | SG E12 AA0 UK |
| Power Rating | 2400 W |
| Voltage | 220-240 V ~ 50 Hz |
| Soleplate Material | Ceramic |
| Water Tank Capacity | 250 ml |
| Cord Length | 3 m |
| Weight | 1.2 kg |
| Dimensions (L x W x H) | 280 x 115 x 140 mm |
| Spray Function | Yes |
| Continuous Steam Rate | Up to 30 g/min |
| Shot of Steam | Yes |
| Anti-Drip System | Yes |
| Self-Cleaning System | Yes |
| Auto Shut-Off | Yes |
| Vertical Steaming | Yes |
| Indicator Light | Yes |
| Heating Time | Approximately 1-2 minutes |
| Warranty | 2 years |
| Country of Origin | China |
Frequently Asked Questions - SG E12 AA0 UK HOTPOINT
User questions about SG E12 AA0 UK HOTPOINT
0 question about this device. Answer the ones you know or ask your own.
Ask a new question about this device
Download the instructions for your Iron in PDF format for free! Find your manual SG E12 AA0 UK - HOTPOINT and take your electronic device back in hand. On this page are published all the documents necessary for the use of your device. SG E12 AA0 UK by HOTPOINT.
USER MANUAL SG E12 AA0 UK HOTPOINT
natural_image
Line drawing of a Hotpoint air iron with handle and control panel (no text or symbols on device)EN Operating Instructions

A

natural_image
Illustration of a hand using a kitchen grater with a water droplet nearby (no text or symbols)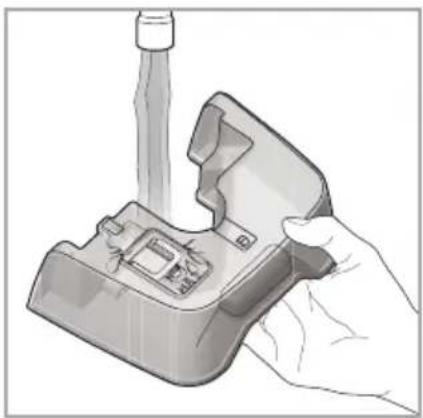
natural_image
Illustration of a hand holding a mechanical device with a piping bag (no text or symbols visible)
natural_image
Hand operating a mechanical device with a control panel and handle (no visible text or symbols)B
natural_image
Illustration of a hand using a power switch to press down a small appliance (no text or symbols visible)
natural_image
Close-up of a hand holding a car interior with a handle and seat (no visible text or symbols)
natural_image
Illustration of a hand holding a small appliance with a handle, no visible text or symbols
natural_image
Illustration of a white electric shaver with a fan-shaped handle and ventilation slots (no text or symbols)C

natural_image
Illustration of a steam iron with a flame inside, mounted on a base (no text or symbols)
natural_image
Illustration of a steam iron with attached fabric and accessories (no text or symbols)
natural_image
Illustration of a person using an iron on an ironboard (no text or symbols present)D

natural_image
Hand inserting a small component into a machine (no text or symbols visible)
natural_image
Illustration of a welding machine with visible sparks and tool handle (no text or symbols)
natural_image
Illustration of a person using an iron on a table with fabric (no text or symbols)E

natural_image
Hand placing a small component into a machine handle, with icons indicating air pollution (no text or symbols)
natural_image
Illustration of a welding torch with a flame inside, no text or symbols present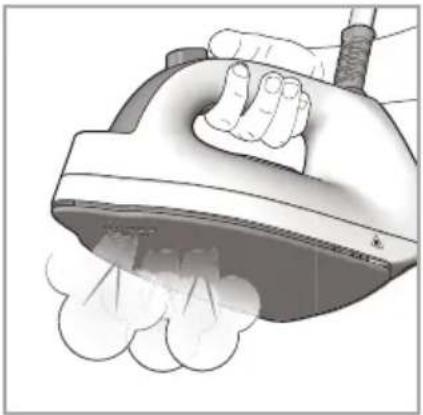
natural_image
Illustration of a hand using a steam iron to clean or smoke from a surface (no text or symbols)F
natural_image
Hand inserting a small component into a machine, with no visible text or symbols
natural_image
Illustration of a mechanical device with a highlighted component and tool, no visible text or symbols
natural_image
Illustration of a hand using an iron on a steam iron, emitting smoke (no text or symbols)G

natural_image
Illustration of a garment with a hanger hanging and emitting smoke or dust from a surface, no text or symbols present.H

natural_image
Illustration of a hand using a cleaner machine to press a button labeled 'Eco' (no other text or symbols visible)|
J

natural_image
Illustration of a hand pouring liquid into a basin (no text or symbols)
natural_image
Illustration of hands operating a steam iron with a lock icon (no text or symbols)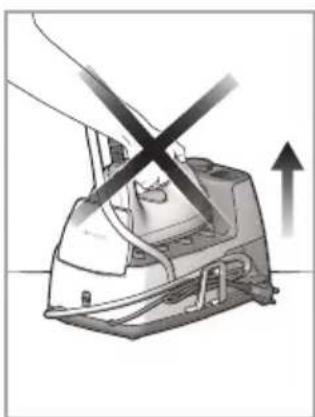
natural_image
Diagram of a steam iron with a crossed iron, showing mechanical components and an upward arrow (no text or symbols)
natural_image
Illustration of a hand using a power iron to lift a machine, with an upward arrow indicating motion (no text or symbols present)K
natural_image
Illustration of a hand cleaning a kitchen appliance with a cloth (no text or symbols visible)
natural_image
Illustration of a hand using a cloth to clean or fabricate material on an iron (£) (no text or symbols)
natural_image
Illustration of a hand operating a computer device with a handle, showing internal components and no visible text or symbols.
natural_image
Hand inserting a small component into a plastic case, with an arrow indicating direction (no text or symbols)
natural_image
Diagram of a mobile phone device attached to a vertical pipe, showing fluid flow and sensor placement (no text or symbols)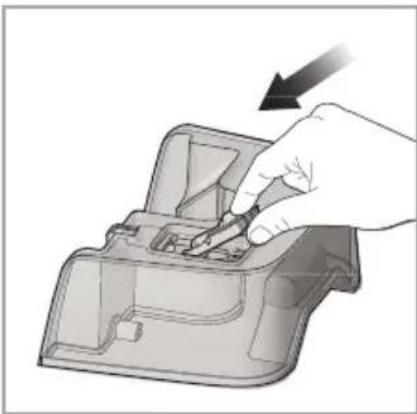
natural_image
Hand inserting a small component into a plastic case (no text or symbols visible)L

natural_image
Hand holding a white industrial blender with a circular lid, showing a hand pressing down (no text or symbols visible)
natural_image
Hand inserting a screw into a device component (no text or symbols visible)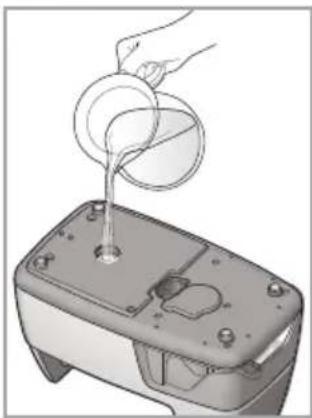
natural_image
Illustration of a hand pouring liquid into a small electronic device (no text or symbols visible)
natural_image
Illustration of a hand washing clothes in a basin with an electric machine (no text or symbols visible)
natural_image
Hand inserting a screw into a device casing (no text or symbols visible)
natural_image
Illustration of hands holding a device with visible internal components and sound waves (no text or symbols)
natural_image
Illustration of a hand using a power tool to clean or wash a basin (no text or symbols visible)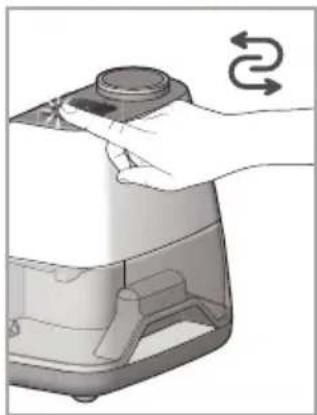
natural_image
Hand holding a small appliance with a circular button, showing a rotating arrow (no text or symbols)en GENERAL SAFETY INSTRUCTIONS
- If the plug, power cord or appliance appear to be damaged or if any visible damage or water leaks are found, do not operate the iron. In such cases have it checked by Hotpoint's authorised staff in order to avoid any hazardous situation.
• If the appliance was dropped, do not operate it. - This appliance can be used by children aged from 8 years and above and persons with reduced physical, sensory or mental capabilities or lack of experience and knowledge if they have been given supervision or instruction concerning use of the appliance in a safe way and understand the hazards involved.
• Supervise children to prevent them from playing with the appliance. - Never leave the appliance unattended when it is plugged into an electrical socket.
- After each use of the appliance and when filling the place the appliance in a stable position - using the special iron pad supplied - and disconnect the plug from the electrical socket.
- The appliance must be used and placed on a stable flat horizontal surface. We recommend using an ironing board.
- For your safety, all repairs or maintenance operations on the appliance must be carried out exclusively by Hotpoint's authorised staff.
- Cleaning and user maintenance shall not be made by children without supervision.
- Keep the iron and its cord out of reach of children less than 8 years of age when it is energized or cooling down.

This symbol warns operators that surfaces are liable to get hot during use and can burn your skin.
DESCRIPTION OF THE APPLIANCE
- Power cord holder
- Temperature indicator light
- Iron
- Soleplate
- Iron supporting base
- Boiler
- Plastic protection lid
7a. Boiler closing cap - Water reservoir
- Cord-rewinding clip
INTRODUCTION
Welcome to Hotpoint's Garment Care. Thank you for purchasing our new Power Perfection steam generator. We recommend registering this product on www.hotpoint.eu to make sure you are entitled to all the benefits made available by Hotpoint's Customer Service.
This appliance was developed for household use only and is not intended for industrial use.
Before you begin using the appliance, it is important that you thoroughly read these instructions and carefully keep them for further reference.
GENERAL SAFETY INSTRUCTIONS
The safety features of your iron comply with the technical specifications and regulations in force.
The mains voltage must match the voltage of the iron (220-240 V). Any connection error could cause irreversible damage to the appliance and void its warranty.
- Use the appliance only for its intended use as described in this manual.
- This product is intended only for ironing of clothing and household laundry.
- Only connect the appliance to a grounded socket. When using an extension cord, make sure that a grounded socket is available.
• Regularly check the condition of the power cable.
Do not use the steam function with no water in the reservoir to prevent any damage to the pump.
- Electric power cord
- Iron locking button
- Iron locking door
- Steam cable
- Steam button
- Shot-of-steam button
- Steam control
- No-water indicator light
- On/Off button
- Descaling button
- Steam Ready indicator light
-
Pure water filter
-
Temperature control (if available)
-
Do not fill the water reservoir by holdir appliance directly under the tap. Always use the water measurer supplied with the appliance.
- Make sure you have disconnected the plug from the electrical socket before filling and emptying the water reservoir and in any case after each use.
- Disconnect the plug from the socket by holding the plug and not by pulling the cable.
- Avoid any contact between the power cable and the iron plate when hot.
- Do not wind the power cable around the plate when hot. Use the special cable winder instead.
- Before storing the appliance, wait until it has cooled down completely - a steam iron takes about one hour to cool down. Use the handle to store the appliance after use.
- Do not direct steam towards people or animals and do not iron garments while worn.
• After use, store the appliance in a stable position using the special pad supplied. - Never add any perfume, vinegar, starch, scale-removing agents, ironing products or other chemicals in the water reservoir - unless recommended by Hotpoint. Never use contaminated water.
- Never immerse the appliance in water or any other liquid.
- Do not leave the appliance in the open air and exposed to inclement weather conditions.
- Never leave or use the appliance over or close to flames, ovens, flammable materials or sources of heat.
- Do not use the appliance for any use other than its intended use.
- Should you suspect a failure, immediately unplug it from the electrical socket.
- The manufacturer shall assume no responsibility in case of damage resulting from any improper
en
use of the appliance.
- Use the supplied mat with compact generator, and keep iron in a horizontal position.
Replacing the fuse
When replacing a faulty fuse, a 13 amp ASTA approved fuse to BS 1362 should always be used, and the fuse cover re-fitted. If the fuse cover is lost, the plug must not be used until a replacement is obtained.
Replacement fuse covers
If a replacement fuse cover is fitted, it must be of the correct colour as indicated by the coloured marking or the colour that is embossed in words on the base of the plug. Replacements can be obtained directly from your nearest Service Depot.
Removing the plug
If your appliance has a non-rewireable moulded plug and you should wish to re-route the mains cable through partitions, units etc., please ensure that either:
- the plug is replaced by a fused 13 ampere rewireable plug bearing the BSI mark of approval.
or:
- the mains cable is wired directly into a 13 amp cable outlet, controlled by a switch, (in compliance with BS 5733) which is accessible without moving the appliance.
Disposing of the plug
Ensure that before disposing of the plug itself, you make the pins unusable so that it cannot be accidentally inserted into a socket.
Instructions for connecting cable to an alternative plug

The wires in the mains lead are coloured in accordance with the following code:
As the colours of the wires in the lead may not correspond with the coloured markings identifying the terminals in your plug, proceed as follows:
- Connect Green & Yellow wire to terminal marked E or 12 or coloured Green or Green & Yellow.
- Connect Brown wire to terminal marked L or coloured Red.
- Connect Blue wire to terminal marked N or coloured Black.
If a 13 amp plug (BS 1363) is used it must be fitted with a 13 amp fuse, either in the plug or adaptor or at the distribution board.
If you are in any doubt regarding the electrical supply to your machine, consult a qualified electrician before use.
How to connect an alternative plug
The wires in this mains lead are coloured in accordance with the following code:
BLUE NEUTRAL (N)
BROWN LIVE (L)
GREEN & YELLOW EARTH (E)


The power supply cable must never be bent or dangerously compressed.

The power supply cable must only be replaced by an authorised serviceman.
BEFORE USE
Before using the Power Perfection for the fir remove all stickers, protective plastic or cardboard packaging from the soleplate of the iron.
Make sure that all adhesive parts have been removed from the soleplate using a damp soft cloth and remove any residues or particles from the manufacturing process by repeatedly filling and emptying the water reservoir.

When you switch on the Power Perfection for the first time, you may notice an
unpleasant smell, a little smoke and some impurities. They will disappear in a few minutes. When using the steam function for the first time, do not direct the steam jet on the garments because manufacturing residues may be present in the steam dispenser.
FILLING THE WATER RESERVOIR
Water plays an essential role both in the ironing
process and in the good operation of the appliance over a long lifespan. In particular, a high concentration of limescale may damage some parts of the iron and cause its early deterioration.
Power Perfection water tank has a capacity of 1000ml with extra 200ml boiler.
Suitable water
Although the Power Perfection steam generator can be used with tap water, if the water is very hard (as measured in French degrees), we recommend mixing tap water and demineralised water according to the following table.
| Hardness degree [°f] | Proportion [tap water:demineralised water] |
| 7°f 1:0 | |
| 7°f - 14°f 1:0,5 | |
| 14°f - 22°f 1:1 | |
| 22°f - 32°f 1:2 | |
| 32°f - 54°f 1:3 | |
| >54°f 0:1 |
To determine the hardness degree of the water in your area, contact your local water board or body. This data is sometimes available on the board/body's website too.
Filling the water reservoir (A)
Before every use and every time the no-water indicator light turns on, fill the water reservoir:
- Use the special handle to remove the water reservoir (8).
- When filling the reservoir, make sure the maximum level shown on the reservoir is not exceeded.
- Re-place the water reservoir in the relevant housing until it clicks into place.
- Repeat the operation every time the water-level indicator light (17) turns on.
- Press the On / Off button to restart ironing after filling the water tank.

Never add any perfume, vinegar, starch, scale-removing agents, ironing products or chemicals in the water reservoir - unless amended by Hotpoint. Never use minated water.
USING YOUR IRON
Temperature selection and steam adjustment (B)
If your Power Perfection is equipped with the Optimal Soleplate Temperature technology, you need not adjust the temperature.
- Connect the plug of the appliance to a grounded socket (220/240V).
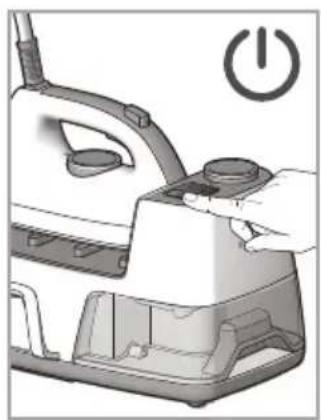
- Press the ON button (18) - it will light up to show that the steam generator is ON.
- Wait until the temperature indicator light turns off before starting ironing.
- Select the appropriate steam setting by means of the steam control (16) or set it to the Min position to iron without steam. As soon as the selected steam quantity is available, the Steam Ready indicator light (20) will turn on.
- You can iron all the types of fabrics that can be ironed in any order.
In the version with no Optimal Soleplate Temperature technology, follow the instructions below.
- Connect the plug of the appliance to a grounded socket (220/240V).
- Press the ON button (18) - it will light up to show that the steam generator is ON.
- Use the temperature control (21) to select the desired temperature. Every time you rotate the temperature control, the temperature indicator light (2) turns on to show that the temperature is changing.
- When the iron reaches the set temperature, the temperature indicator light turns off to show that the iron is ready for use.
- Check the type of fabric on the garment label. If you don't know the type of fabric, we recommend ironing a hidden part in order to determine the most appropriate temperature and avoid damaging the fabric. Silk, wood and synthetic fabrics: iron the garment inside out to prevent any shiny marks. Start with the garments that require a low temperature, e.g. synthetic fabrics.
- Select the appropriate steam setting by means of the steam control (16) or set it to the Min position to iron without steam. As soon as the selected steam quantity is available, the Steam Ready indicator light (20) will turn on.

Fabrics with this symbol on the label must not be ironed.
| GARMENT LABEL | FABRIC TYPE | TEMPERATURE INDICATION | STEAM INDICATION |
| synthetic |  | Min | |
| silk mixed cotton | Min | ||
| wool mixed wool | |||
| cotton | |||
| linen jeans |
USING THE APPLIANCE

When you switch on the steam generator for the first time, you may notice an unpleasant smell, a little smoke and some impurities. They will disappear in a few minutes.
Optimal Soleplate Temperature (C)
If your Power Perfection is equipped with the Optimal Soleplate Temperature technology, you need not adjust the temperature and you need not sort out the garments based on their fabrics. Just connect the plug of the appliance to a grounded socket (220/240V). As soon as the temperature indicator light turns off, you can simply start ironing all the fabric types that can be ironed in any order.
Ironing without steam (D)
- Set the steam control (16) to the Min position (= no steam).
- Select the recommended ironing temperature using the temperature control (21) - see step B, chapter "Temperature selection and steam adjustment".
- Wait for the temperature indicator light to turn off and start ironing without pressing the steam button.Ironing with steam (E)
- Make sure that the water level in the reservoir is higher than 1/4.
-
Select the appropriate steam adjustment using the steam control (16) and the recommended ironing temperature using the temperature control (21) - see step B, chapter "Temperature selection and steam adjustment".
-
Press the steam button (14) to use the steam ironing function. We recommend using the steam button function when the temperature is higher than ●.●●

Wait for the temperature indicator light to turn off and for the Steam Ready indicator to turn on, before pressing the steam button.
Ironing with shot of steam (F)
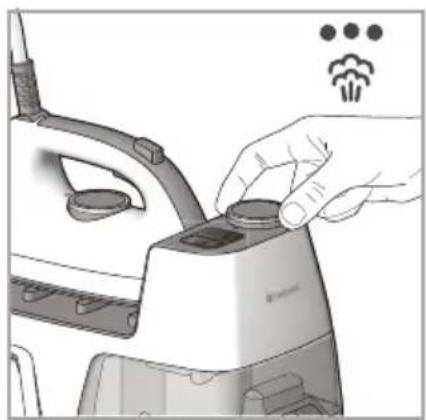
The shot-of-steam function is useful to iron out any persistent wrinkles through a uniform emission of steam onto the fabrics. You can use this function both in no-steam and steam ironing mode.
- Make sure that the water level in the reservoir is higher than 1/4.
- Select the appropriate steam adjustment using the steam control (16) and the recommended ironing temperature using the temperature control (21) - see step B, chapter "Temperature selection and steam adjustment".
- Press the shot-of-steam button (15) to get an extra steam flow when ironing. We recommend using the shot-of-steam button when the temperature is higher than ●.●●

Wait for the temperature indicator light to turn off and for the Steam Ready indicator to turn on, before pressing the steam button.
FEATURES
Vertical steam function (G)
The vertical steam function is useful to iron out wrinkles from hanging garments, curtains etc. To use this function just place your iron in a vertical position. All the functions of the steam generator will remain unchanged in this position - refer to paragraph "Using the appliance".
We also recommend using the shot-of-steam function to iron any hanging garments, because it ensures an extra steam flow that is excellent for such garments.

Do not direct steam towards people or animals and do not iron garments while
Eco function (H)
Your Power Perfection steam generator is equipped with an Eco function that allows energy savings of 30% compared to normal consumption in terms of maximum steam level, thus always ensuring the
steam quantity needed to iron your garments.
To start the Eco function set the steam control (16) to Eco (Eco). When the Steam Ready indicator light (20) turns on, you can start steam ironing.
Automatic switch-off function (I)
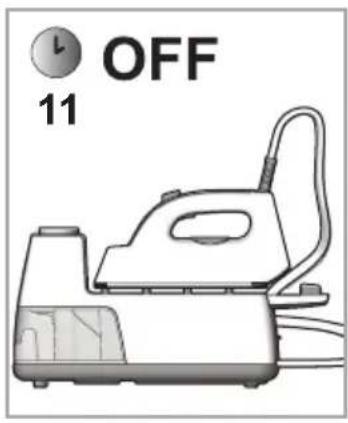
The automatic switch-off function ensures total safety. This function automatically switches off the steam generator when it is not used for a few minutes. In particular, your Power Perfection will automatically switch off after 11 minutes if it is left unused in the ironing position, on one side or in a vertical position.
If you leave the steam generator unattended, a buzzer will sound to inform you that the automatic switch-off function is active. To restart it, just press the ON/OFF button.

Wait for the Steam Ready indicator light to turn on again and for the temperatureator light to turn off before start ironing.
CLEANING AND MAINTENANCE
After use (J)
- Disconnect the appliance plug from the electrical socket and let the steam generator cool down.
- Empty the water reservoir (8).
- Place the iron into its housing, making sure that its tip fits into the special groove and close the iron locking lid (11) using the special iron locking button (12).
- Wind the steam cable (13) and the power-supply cord (10) around the special cord-rewinding clip (9).
- Store the steam generator in a safe dry place.
- Let the steam generator cool down and store it in a safe dry place.

You cannot use the handle to carry the iron when it is locked in its special housing. To the iron, first make sure the locking device place (closed lock) and the iron is locked in special housing. Then lift the iron by holding a roller base.
Cleaning (K)

Never use aggressive and/or abrasive products to clean the plastic parts and the soleplate.
- Disconnect the appliance plug from the electrical
socket and let the steam generator cool down.
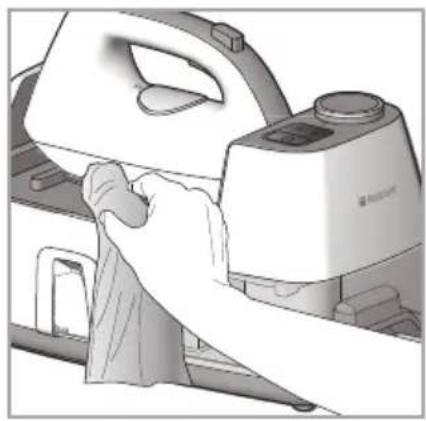
- Clean the plastic parts of the steam generator with a soft damp cloth and dry.
- For routine cleaning and/or the removal of stains or other residues deposited on the plate, use a damp soft cloth and dry.
- Use a damp cotton tip to remove any scale in the steam holes that may impair the performance of your steam generator.

In order to keep the soleplate perfectly smooth and polished, avoid any contact metal objects and do not iron sharp objects as buttons, studs and hinges - they may ch the plate.
- To clean the Pure Water filter (22), remove the water reservoir and slide out the Pure Water filter. Wash the filter under running water, taking care that the jet of water is not too strong, and then re-place it.
- Regularly rinse the water reservoir (8) under clean water. After cleaning, always empty the water reservoir.
Scale removal (L)
If your steam generator is not equipped with the descaling system Calc Proof, clean the vaporisation chamber to remove any residual calcareous salts. We recommend cleaning it every time the descaling button (19) lights up. Follow the procedure below.

The descaling system Calc proof does not purify water from impurities other than scale. We recommend to check that mains is not contaminated by these impurities could affect the performance of the Power ction. Water may drip out of the soleplate an compromise the ironing quality.

If you wish to clean it after using the Power Perfection, wait at least 3 hours until the generator has completely cooled down.
- Make sure the appliance is disconnected from the electrical socket.

Clean it near a sink and away from fabrics so that they don't get stained.
- Remove the water reservoir (8) and place the steam generator on a steady flat surface.
- Turn the steam generator upside down. Unscrew the protection plastic lid (7) and the boiler closing cap (7a) using an Allen spanner.
en
- Empty the boiler of any residual water.
- Fill the boiler with 500 ml of water. Then close, shake the steam generator and empty it. Repeat the operation at least twice.
- Close the boiler, making sure its closing cap has been fastened all the way. Then re-place the protection plastic lid.
- Re-place the boiler in its ordinary usage position.
- Connect the appliance to a socket and press the ON/OFF button (18).
- Hold down the descaling button for at least 5 seconds or until a buzzer sounds and the descaling button turns.

When you start the steam generator again, before using the steam function on the events press the steam button for at least one time to eject any residues or particles that stain the fabrics.
HINTS
If your steam generator is equipped with the Optimal Soleplate Temperature technology, you need not adjust the temperature and/or steam. You can iron all the types of fabrics that can be ironed in any order.
- Sort the garments out according to the fabric types. This will reduce the need to adjust the temperature according to the different fabrics.
- Start with the garments that require a low ironing temperature and continue with the garments requiring higher ironing temperatures.
- If you are not sure about the composition of the fabric, try ironing a hidden part such as a seam, hem or internal section. Start with low temperature and gradually increase it until you find the ideal ironing setting.
- When you reduce the steam generator's temperature to iron delicate garments, wait approximately 2 minutes to let the steam generator reach the new settings.
- Pure wool (100% wool) garments can be steam-ironed as long as the temperature is set to wool. We recommend using a cotton cloth to prevent any shiny marks on the garment.
- Never iron areas with obvious perspiration marks because the heat will make the stains fast and permanent.
TROUBLESHOOTING
Problem Possible causes / Solutions
The soleplate stays cold and does not warm up.
• The plug was not inserted or is not making contact.
• Make sure the temperature is not set to Min.
The temperature indicator light goes on and off.
- The temperature indicator light is on. This shows that the iron is warming up. The indicator light will turn off when the set temperature is reached.
Steam comes out in a reduced quantity or does not come out at all.
• Not enough water in the water reservoir. Fill up the water reservoir.
- The iron is not hot enough. Place the iron on the special supporting base and wait until the temperature indicator light turns off before you start ironing.
- The plate temperature may be too low because the steam button has been activated too frequently. Slightly increase the time interval between steam shots.
• Make sure the steam control is not set to Min.
Impurities coming out of the soleplate stain the garments.
- There may be residues in the vaporisation chamber. Clean it as shown in the chapter “Cleaning and maintenance” under paragraph “Descaling”.
- You are using perfume, vinegar, starch, scale-removing agents, ironing products or other chemicals. Remember that these substances may damage the product. Rinse the water reservoir.
- You are not using the correct water type. Rinse the water reservoir and add tap water only. In case of very hard water, we recommend mixing it proportionally with demineralised water - see chapter "Filling the water reservoir".
- You are using starch. You can use starch directly on the reverse side of the fabrics and in any case never in the water reservoir.
• The garment was not washed correctly or it has some soap residues.
• You are ironing a new garment not yet washed for the first time.
Water is dripping out of the soleplate.
- The plate temperature may be too low because the steam button has been activated too frequently. Slightly increase the time interval between steam shots.
• The soleplate temperature is set to a temperature that is too low. - You used the shot-of-steam function and/or the steam function at a temperature that was too low. We recommend using these functions at temperatures higher than ●●●.
The soleplate is dirty or dark and may stain the fabrics.
• You are using a temperature that is too high.
- Clean the soleplate - see chapter "Cleaning and maintenance" under paragraph "Cleaning".
- You are using starch. You can use starch directly on the reverse side of the fabrics and in any case never in the water reservoir.
• The garment was not washed correctly or has some soap residues.
• You are ironing a new garment not yet washed for the first time.
The no-water indicator light is on.
• The water reservoir needs filling.
- The water reservoir was not fitted correctly. Place the water reservoir in the relevant housing until it clicks into place.
The Steam Ready indicator light turns on and off.
- The Steam Ready indicator light turns on to show that the steam generator has reached the desired steam settings. When you use the steam function, the indicator light turns off. It turns on again when such settings are reached again.
GUARANTEE
12 months Parts and Labour Guarantee
This certificate of guarantee represents the guarantee (“Guarantee” hereinafter) offered by Indesit Company UK Limited with registered office at Peterborough PE2 9JB in relation to products purchased in the United Kingdom and Indesit Ireland Limited with registered office in Dublin 9, Ireland for products purchased in the Republic of Ireland. This Guarantee does not affect your statutory rights.
Your product has the benefit of our manufacturer's Gu covers the product for twelve months from the date of purchase.
This gives you the reassurance that if, within that time, your product is proven to be defective because of either workmanship or materials, we will, at our discretion, either repair or replace the product at no cost to you.
This Guarantee is subject to the following conditions:
• Documentary proof of original purchase date is provided.
- Cosmetic damage must be reported within 14 days from the date of purchase.
• The product has been installed and operated correctly and in accordance with our operating and maintenance instructions.
- The product is used only on the electricity supply printed on the rating plate.
• The product has been used for normal domestic purposes only.
- The product has not been altered, serviced, maintained, dismantled, or otherwise interfered with by any person not authorised by us.
- Any repair work must be undertaken by us or our appointed agent.
- Any parts removed during repair work or any product that is replaced become our property.
- The product is used in the United Kingdom or Republic of Ireland. The Guarantee does not cover:
- Damage resulting from transportation, improper use, neglect or interference or as a result of improper installation.
- Accidental damage, this includes but is not limited to, damage which occurs as a result of an external action.
- Replacement of any consumable item or accessory. These include but are not limited to:
- plugs, cables, light bulbs, hoses, brushes, covers and filters.
- Replacement of any removable parts made of glass or plastic.
After Sales Service
No one is better placed to care for your Hotpoint product during the course of its working life than us – the manufacturer.
Essential Contact Information
Advice Line
We have a dedicated team who can provide free advice and assistance with your product if you experience any technical difficulties. Simply call our Hotpoint Service Hotline on 08448 240 055 (Republic of Ireland 0818 904 041) for telephone assistance.
Please note:
Our advisors will require the following information:
Model number:
Serial number:
Consumables and Accessories
We supply a full range of consumables and accessories to keep your product whichtioning efficiently throughout its life.
UK: 08448 225 225
Republic of Ireland: 0818 313 413
www.hotpoint.co.uk
Recycling and Disposal Information
As part of Hotpoint's continued commitment to helping the environment, Hotpoint reserves the right to use quality, recycled components to keep down customer costs and minimise material wastage.
Please dispose of packaging and old products carefully.
Register your new product and get a second year FREE!
We want to give you additional benefits of ownership of your price and offer you an additional free 1 year guarantee when you register your product with Hotpoint within 28 days of purchase. If you do not register your product with Hotpoint within 28 days, your product is guaranteed for 1 year only.
To activate your 2 year guarantee register with us online at www.hotpoint.co.uk. Please note that the 2 year guarantee is only available in UK and Ireland and is subject to the same conditions as the 1 year Guarantee. Please refer to the certificate of guarantee for more information.
DISPOSAL OF OLD ELECTRICAL APPLIANCES



The European Directive 2002/96/EC on Waste Electrical and Electronic Equipment (WEEE), requires that old household electrical appliances must not be disposed of in the normal unsorted municipal waste stream.
Old appliances must be collected separately in order to optimise the recovery and recycling of the materials they contain and reduce the impact on human health and the environment.
The crossed out “wheeled bin” symbol on the product reminds you of your obligation, that when you dispose of the appliance it must be separately collected. Consumers should contact their local authority or retailer for information concerning the correct disposal of their old appliance.

Hotpoint
Indesit Company UK Ltd
Morley Way,
Peterborough PE2 9JB
www.indesitcompany.com
Power Perfection UK
03/2014 - ver.3.0
- en GENERAL SAFETY INSTRUCTIONS
- DESCRIPTION OF THE APPLIANCE
- INTRODUCTION
- GENERAL SAFETY INSTRUCTIONS
- en
- Replacing the fuse
- Replacement fuse covers
- Removing the plug
- Disposing of the plug
- Instructions for connecting cable to an alternative plug
- How to connect an alternative plug
- BEFORE USE
- FILLING THE WATER RESERVOIR
- Suitable water
- Filling the water reservoir (A)
- USING YOUR IRON
- Temperature selection and steam adjustment (B)
- USING THE APPLIANCE
- Optimal Soleplate Temperature (C)
- Ironing without steam (D)
- Ironing with shot of steam (F)
- FEATURES
- Vertical steam function (G)
- Eco function (H)
- Automatic switch-off function (I)
- CLEANING AND MAINTENANCE
- After use (J)
- Cleaning (K)
- Scale removal (L)
- HINTS
- TROUBLESHOOTING
- Problem Possible causes / Solutions
- GUARANTEE
- months Parts and Labour Guarantee
- After Sales Service
- Essential Contact Information
- Advice Line
- Consumables and Accessories
- Recycling and Disposal Information
- DISPOSAL OF OLD ELECTRICAL APPLIANCES
- Hotpoint
Brand : HOTPOINT
Model : SG E12 AA0 UK
Category : Iron