
DTB-B270Z - Receiver SAMSUNG - Free user manual and instructions
Find the device manual for free DTB-B270Z SAMSUNG in PDF.


| Type | Digital Terrestrial Receiver |
| Brand | Samsung |
| Model | DTB-B270Z |
| Dimensions (W x H x D) | 430 mm x 60 mm x 260 mm |
| Weight | 2.5 kg |
| Power Supply | AC 100-240V, 50/60Hz |
| Power Consumption | 20 W (max) |
| Tuner | DVB-T/T2, MPEG-4/H.264 |
| Video Output | HDMI, Composite (RCA) |
| Audio Output | HDMI, Digital Optical, Analog Stereo |
| USB Port | 1 x USB 2.0 for media playback and recording |
| Supported Media | MPEG, AVI, MKV, MP3, JPEG |
| Recording | Pause/Record to USB (PVR Ready) |
| Electronic Program Guide (EPG) | 7-day EPG with timer recording |
| Remote Control | IR remote with batteries (included) |
| Display | Front panel LED indicators |
| Connectivity | RF in/out, HDMI, Composite, Optical, USB, Power |
| Safety Features | Overvoltage protection, auto-off after 4 hours idle |
| Maintenance | Clean exterior with soft dry cloth; no liquids |
| Operating Temperature | 0°C to 40°C |
| Storage Temperature | -10°C to 60°C |
| Spare Parts Availability | Remote control and power adapter available via Samsung support |
| Warranty | 2 years (varies by region) |
Frequently Asked Questions - DTB-B270Z SAMSUNG
User questions about DTB-B270Z SAMSUNG
0 question about this device. Answer the ones you know or ask your own.
Ask a new question about this device
Download the instructions for your Receiver in PDF format for free! Find your manual DTB-B270Z - SAMSUNG and take your electronic device back in hand. On this page are published all the documents necessary for the use of your device. DTB-B270Z by SAMSUNG.
USER MANUAL DTB-B270Z SAMSUNG
Instructions for use ....GB
Bruksanvisning ....SWE
Käyttöohjeet FIN
REV. 1.1
Instructions for use ....GB
Bruksanvisning ....SWE
Käyttöohjeet FIN


DTB-B270Z
Instructions for use
GB
SAFETY INSTRUCTIONS
This STB has been manufactured to satisfy international safety standards. Please read the following recommended safety precautions carefully.
MAINS SUPPLY: AC 100-240V\~, 50/60Hz
OVERLOADING: Do not overload wall outlets, extension cords or adapters as this can result in fire or electrical shock.
LIQUIDS: Keep liquids away from the STB.
CLEANING: Before cleaning, disconnect the STB from the wall socket. Use a cloth lightly dampened with water(no solvents) to clean the exterior.
VENTILATION: Do not block the STB ventilation holes. Ensure that free airflow is maintained around the STB. Never store the STB where it is exposed to direct sunlight or near heating equipment e.g. a radiator. Never stack other electronic equipment on top of the STB. Place the STB at least 30mm from the wall. Need at least 10mm from the top and both side of the STB for ventilation.
ATTACHMENTS: Do not use any attachment that is not recommended by the manufacturer; it may cause a hazard or damage the equipment.
SERVICING: Do not attempt to service this product yourself. Any attempt to do so will make the warranty invalid. Refer all servicing to a qualified service agent.
LIGHTNING: If the STB is installed in an area subject to intense lightning activity, protection devices for the STB mains connector and modem telephone line are essential. The individual manufacturer's instruction for safeguarding other equipment, such as TV set, Hi-Fi, etc., connected to the STB must also be followed during lightning storms.
GROUNDING: CATV cable MUST BE EARTHED or GROUNDED. The grounding system must comply with local regulations.
Note : 1. Dispose the used batteries at designated place for environment protection.
2. The Mains plug is used as a disconnect device and shall stay readily operable at any time.
3. Apparatus shall not be exposed to dripping or splashing and no objects filled with liquids, such as vases, shall be placed on the apparatus.
WARNING!
-
Follow these directions in order not to damage the power cord or plug.
-
Do not modify or process the power cord or plug arbitrarily.
- Do not bend or twist the power cord too much.
● Make sure to disconnect the power cord with holding the plug. -
Separate heat appliances from the power cord as distantly as possible in order to prevent the cover from being melted.
-
Failure to follow one of them may cause electric shock or fire.
-
Do not open the main body.
- Do not insert metals or inflammable objects inside the product.
- Do not touch the power plug with a wet hand.
- Disconnect the power cord in case of lightning.
- Do not cover the receiver ventilation openings with items such as newspapers, clothes etc.
- Do not place the receiver on top of household appliances that emit heat.
-
Do not expose the receiver to rain or moisture.
-
Do not use the product when it is out of order. If you continue to use the product with a defect, it can cause a serious damage to the product. Make sure to contact your local product distributor when the product is out of order.

Correct Disposal of This Product (Waste Electrical & Electronic Equipment)
(Applicable in the European Union and other European countries with separate collection systems)

This marking shown on the product or its literature, indicates that it should not be disposed with other household wastes at the end of its working life. To prevent
possible harm to the environment or human health from uncontrolled waste disposal, please separate this from other types of wastes and recycle it responsibly to promote the sustainable reuse of material resources.
Household users should contact either the retailer where they purchased this product, or their local government office, for details of where and how they can take this item for environmentally safe recycling.
Business users should contact their supplier and check the terms and conditions of the purchase contract. This product should not be mixed with other commercial wastes for disposal.
CONTENTS
Safety Instructions....2
General Features 5
Connecting Your "STB" 6
Description 8
Front Panel 8
Rear Panel 9
Remote Control Unit 10
Basic Functions 12
Operating The Receiver 16
Initial Installation 16
Main Menu....16
-
EPG - Electronic Program Guide ..... 17
-
Channel 18
2.1 Auto Scan 18
2.2 Manual Scan 18
2.3 Channel List....19
2.4 Favorite Channel 19
2.5 Parental Guide 20
2.5.1 Program Grade 20
2.5.2 Change PIN Code 20
- Timer 21
3.1 Scheduled Timers....21
3.2 Manual Setting 21
- Setup 22
4.1 Preference 22
4.1.1 TV Aspect Ratio 22
4.1.2 Aspect Ratio 22
4.1.3 TV Setting....23
4.1.4 Automatic Subtitles 23
4.1.5 Banner Time 23
4.1.6 Dolby Digital 23
4.2 Transparency 24
4.2.1 OSD 24
4.2.2 Subtitles 24
4.2.3 Teletext. 24
4.3 Language....25
4.3.1 OSD 25
4.3.2 Primary and Secondary Audio Out ..... 25
4.3.3 Primary and Secondary Subtitles ..... 26
4.4 System....27
4.4.1 Product Info....27
4.4.2 Reset....27
Troubleshooting 28
Disposal 28
Technical Specifications 29
GENERAL FEATURES
1. USER SECTION
▶ SOFTWARE DOWNLOAD VIA Network & PC(Secured)
ADVANCED ELECTRONIC PROGRAM GUIDE
MULTI LANGUAGE SUPPORTED FOR OSD
SUBTITLE & TELETEXT(OSD & VBI) SUPPORTED WITH MULTI LANGUAGE
FULL FUNCTION INFRARED REMOTE CONTROL UNIT
SCART OUTPUT
- LOW POWER CONSUMPTION
4 FAVORITE LISTS
AUTO UPDATED EPG
PASS LOOP FOR RGB SIGNAL
15 TIMERS TO RESERVE PROGRAMS(EVENTS) FOR TURNING ON/OFF
2. TUNER SECTION
50\~860 MHz WIDE BAND TUNER
RF LOOP-THROUGH OUTPUT (MALE) FOR ANALOG RECEIVER
3. VIDEO SECTION
DVB-T COMPLIANT
MPEG-2 VIDEO(MP@ML)
2 SCART OUTPUT
SUPPORTS ASPECT RATIO 4:3(NORMAL) AND 16:9(WIDE SCREEN)
4. AUDIO SECTION
MPEG-1 AUDIO LAYER I & II
MONO, DUAL, STEREO AND JOINT STEREO AUDIO MODE
32, 44.1 AND 48 kHz SAMPLING FREQUENCIES
VOLUME CONTROL AND MUTE FUNCTION THROUGH REMOTE CONTROL UNIT
SPDIF DIGITAL AUDIO OUTPUT
CONNECTING YOUR "STB"
1. LOCATION OF THE RECEIVER
Your STB should be placed under proper ventilation.
Don't put in completely enclosed cabinet that will restrict the flow of air, resulting in overheating.
The location should be safeguarded from direct sunlight, excess moisture, rough handling or household pets.
Avoid stacking other electronic components on the top of the receiver.
The location should be safely accessible by the cable from your antenna system.
2. CONNECTING THE RECEIVER WITH AERIALS
You can connect the receiver to the following type of aerials:
- Use a standard outdoor roof aerial intended for receiving channels between VHF and UHF.
- Because many older roof-mounted aerials may only receive a limited number of channels, it is difficult or impossible to receive digital channels transmitted on higher frequencies. If so, you may replace the roof aerial.
- Some outdoor aerials are directed towards an analog transmitter. The aerial must be directed towards a digital TV transmitter.
- It is not desirable to use indoor or window mounted aerials, as it will be difficult or impossible to receive digital channels.
3. CONNECTING THE RECEIVER TO TV
To connect the receiver with your television, you can use SCART cable.
In the case of connecting your TV through SCART cable, connect the SCART connector marked AV1 (TV) to the respective SCART port on the TV.
4. CONNECTING YOUR VCR or DVD
To connect a VCR or DVD player, the STB has been provided with SCART at the rear marked "AV2 (EXT)".
Using a SCART connector, the VCR or DVD player can be connected to the receiver.
5. CONNECTING DIGITAL AUDIO SYSTEM
Connect a fiber optic cable between DIGITAL AUDIO OUT on the receiver and Optical SPDIF on the Digital Audio System.
Connecting Figure

6. INSERTING SMARTCARDS FOR CONAX SERVICES
In order to view a scrambled service, you need to have a valid Smartcard. This STB has the Conax embedded to view Conax programmes.
Note : Insert the Smartcard with the gold coloured chip facing downwards.
DESCRIPTION
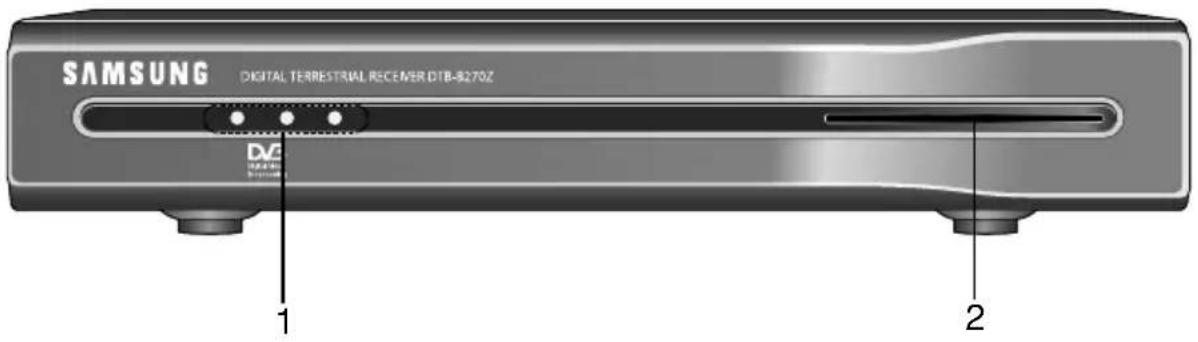
Front Panel
-
LED Display When the Red LED lights, the set-top box enters standby mode When the Green LED lights, it enters the operation mode. When the Yellow LED lights, it starts work and check internal systems.
-
Card Slot 1 Slot for Conax smartcard.
Rear Panel

- ANT. IN This port is connected the coaxial cable from your terrestrial system.
- ANT. LOOP To enable the connection of an Analog receiver. The receiver is provided with this "LOOP" port.
- AV1 (TV) This is used to connect to your TV.
- AV2 (EXT) This is used to connect to your VCR or DVD.
- DIGITAL AUDIO OUT Output for connection to a digital amplifier.
- AC MAINS This is to plug in the AC mains power cord. The input AC voltage range is 100V to 240V, 50Hz/60Hz supply.
Remote Control Unit
DESCRIPTION

Note: When inserting batteries, make sure that the polarity(+/-) is correct.
- STANDBY/ON Turns the STB on and off.
- 0-9 Numeric key Press to enter numeric value and select the channel directly by entering number on the service list.
- FAV.CH Displays the favorite channel lists.
- VOL+/VOL- Press to increase or decrease the volume.
- MENU Displays the main on-screen menu.
- Arrow Key Controls the cursor in the menu.
- OK Confirms a selection.
- Color key (Red, Green, Yellow, Blue) Used to select special operation for the STB.
- GUIDE Displays the on-screen Electronic Program Guide (EPG).
- PG+/PG- Press to move up or down pages on Teletext mode.
- TEXT Select the teletext mode.
- ALT Select the soundtrack list for the current service.
- TV/Radio toggle between the TV and Radio channel.
- INFO Press to display information for current program.
- PRE.CH Turns to the previous channel.
- ✉ (MUTE) This key is for toggling between normal & muted audio.
- CH ^/CH ▼ Press to change channels.
- RETURN Returns to the previous menu.
- TIMER Press this key to reserve the programs in EPG.
- SUBTITLE Press to change a subtitle language.
- AUDIO Press to select a Audio mode.
BASIC FUNCTIONS
1. Display Screen
Before you can view the television program, you must perform the installation.
Therefore you will see only menu images at first.
After the television channels have been programmed, you will see the following picture (banner) each time you switch channels:
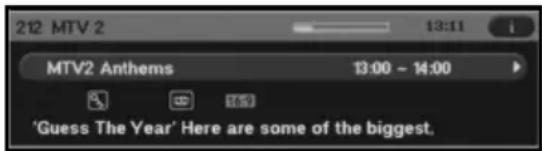
- Press the INFO key in view mode.
- Select the channel by pressing Numeric (0\~9) keys or ▲/▼keys or CH ∧/CH ∨ keys and press TV/RADIO key to move to TV or Radio channel.
- When the INFO key is pressed in second time, detailed information for current program can be displayed on another window.

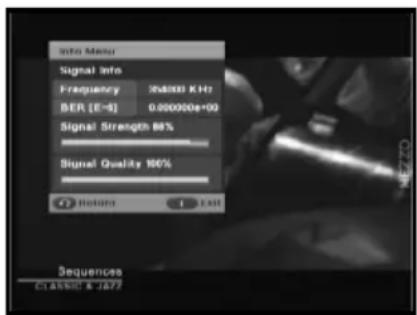
- When the INFO key is pressed in third time, another detailed information window appears. You can see the informations such as time, audio track, video track and signal information. For more detailed signal information, press OK key. Then you can see the frequency of current channel, BER(Bit Error Rate), signal strength and signal quality.

- If program is supported, you can see following icon list.

You will also see this picture each time you change channels.
When you press TV/RADIO key on the Remote Control Unit, TV and RADIO program are toggled.
2. Volume Control
To control the volume level :
- Press the VOL+/VOL- keys or ◀/▶ keys to adjust the volume level.
- Press the ⚙ (MUTE) key to turn to silence mode.
- Press the Ⓧ (MUTE) key again or VOL+ / VOL- keys in order to cancel the mute function.

3. Select Soundtrack
- Press the ALT key to see the soundtrack list.
- Press the ▲/▼ and OK keys to select one.

4. Service List
- Press the OK key while you are viewing a program.
- Select list by pressing the TV/RADIO or FAV.CH key.
- Select the channel by pressing the ▲/▼.
- Press the OK key to watch that channel.
The colour key corresponds the following service list.
- Red key : Sort
- Yellow key : Edit FAV.
- Green key : Lock

5. Setting the Favorite Channel
If you set favorite channel first time, when you press the FAV.CH key you will see the following message "Favorite Channel Lists are empty!". In this case, press the OK key while you are viewing a program. Then press YELLOW key and select the favorite channel list you want to edit. (Four lists are supported.) Finally you can add or remove channels as pressing YELLOW key.
Once you proceed the steps above, you can immediately register the present channel to the favorite channel list.
- Press the FAV.CH key while you are viewing a program.
● To add the current channel to the Favorite channels, press the YELLOW key.
To delete a favorite channel from the Favorite channel list, press the RED key.
To watch the favorite channel
- Press the FAV.CH key and then select the channel by using ▲/▼ keys.
- To return to whole channel list, press the FAV.CH key repeatedly.
6. Changing the Subtitle Language
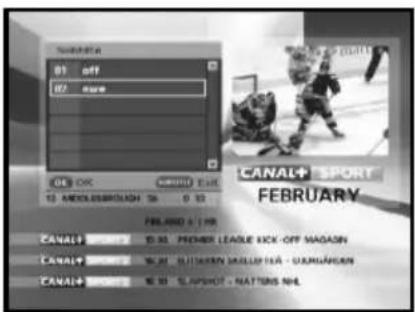
When the current broadcasting program provides subtitle, press the SUBTITLE key to see the current subtitle language list.
- Press the SUBTITLE key to see the subtitle language List.
- Use the ▲/▼ keys to select a subtitle language you want.
- Press the OK key and then the subtitle language you want is displayed. To do text off, press the SUBTITLE key and select '01 off'. Then, press OK key.


7. Selecting the Audio mode
Depending on the particular program being broadcast, you can listen to stereo, mono, right, or left.
- Press the AUDIO key to see the Audio menu.
- Use the ◀/▶ keys to select a Audio menu.
Stereo: Select this to listen to the audio track in stereo.
Left: Select to listen to the left audio track through both speakers.
Right: Select this to listen to the right audio track through both speakers.
Mono: Select this to listen to the audio track in mono.

8. Changing the Teletext OSD
- When the current broadcasting program provides Teletext OSD, press the TEXT key to see the current Teletext OSD list.
- Use the ▲/▼ keys to select a Teletext OSD you want.
- Press the OK key and then the Teletext OSD you want is displayed on the screen.
- When Teletext screen is displayed, press the ▲/▼, ◀/▶, PG+, PG-, or Numeric keys to go to desired page. Pressing PG+ or PG- moves the page by 100 pages.
- Press the RETURN key to exit.


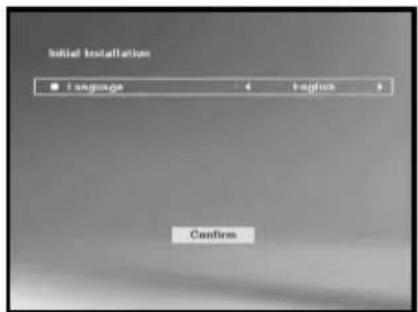
Initial Installation
Before you can view the TV or radio programs, you must perform the installation procedure first.
You will see the Initial Installation menu at first when you plug in your system.
Selecting language gives you the convenience of installation. The menu will be displayed with the language you have selected.
- After pressing the Confirm button, auto scanning will start. Then you can see this screen.

Main Menu
After installing your antenna system and STB with appropriate connectors.
● Plug in the AC main power and switch on the receiver.
- Press the MENU key to bring up the main menu.
The following on screen display main menu will appear:
The sub menu topics; Guide, Channel, Timer and Setup will be displayed.

1. EPG-Electronic Program Guide
The electronic program guide gives you a channel list for the channels.
- Select "GUIDE" in the main menu, then press the OK key.
RED key : Time interval can be adjusted by pressing this key. It is rotated by 30 minutes.1st: 30 minutes 2nd: 1 hour 3rd: 1 hour and 30 minutes
GREEN key : Green key is for moving back to the previous date.
YELLOW key : Yellow key is for moving to the next coming date.
- Press the PG+/PG- or ▲/▼ keys to select the desired channel, then press the OK key.
Note: Quick way to access the GUIDE menu: Just press the GUIDE key while you are viewing a program.
- If the information of highlighted program doesn't appear fully, INFO key will be available any time. You can scroll the window by pressing ▲/▼ keys.
- When the TIMER key on the remote control is pressed in the EPG screen, if the current channel involves an event, timer is set immediately and the set timer is indicated on the EPG screen. A program that has been set in this way is indicated on "Scheduled Timers" menu in "Timer" menu.


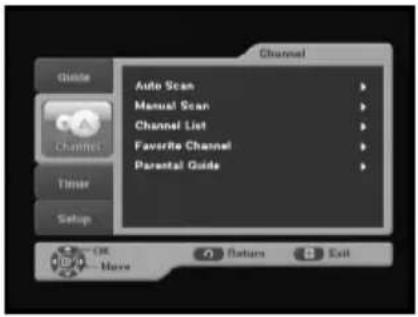
2. Channel
This menu consists of 5 sub-menus:
Auto Scan, Manual Scan, Channel List, Favorite Channel and Parental Guide.
- Select "Channel" in the main menu by using ▲/▼ keys.
- Place the cursor on this sub menu and press the OK key.
2.1 Auto Scan
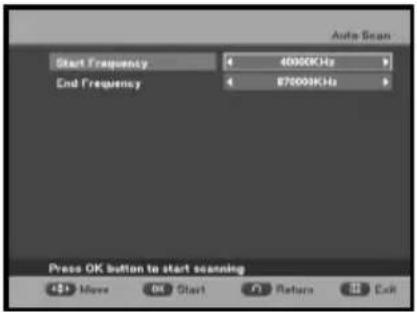
The sub menu "Auto Scan" will enable download the channels automatically.
To download channels automatically:
- Press OK key. After pressing the PIN code, auto scanning menu will be displayed.
- Enter the start frequency and end frequency by using ◀/▶ or numeric keys. It's recommended to use default value from 40000 to 870000KHz. Then press OK key to start scanning.
● After scanning is finished, you should press OK key to store all channels into STB.
2.2 Manual Scan
To tune-in new channels, the STB has been provided with "Manual Scan" where the channel data can be entered by the user.
After selecting the "Manual Scan" from the Channel Menu, the following screen will be displayed:
- Select the target broadcasting channel number, frequency and bandwidth. Then press OK key.
● After scanning is finished, you should press OK key to store the channels into STB.

2.3 Channel List
- Press the OK key while you are watching the program.
- Select the list by pressing the TV/RADIO or FAV.CH key.
- Select the channel by pressing the ▲/▼ keys.
- Press the OK key to watch that channel.
The color key corresponds the following service list.
- To sort the channels in order of alphabet or default (channel number) press the RED key.
- To lock the channel press GREEN key, then enter the PIN. Whenever you need to view the channel, you will have to enter the PIN at the request window. It means that you can access all parental locked channels with entering PIN Code on any parental locked channel successfully.
- To edit favorite channel list press the YELLOW key. Select favorite channel list you want to edit. (Four lists are supported.)
Note : Quick way to access the channel list menu : Just press the OK key while you are viewing a program

2.4 Favorite Channel
You can edit the favorite channel list.
- To delete a favorite channel from the favorite channel list, press the RED key.
- To change the current channel number into new one, press the GREEN key. After selecting the channel number by using ◀/▶ keys, press OK key.
● To sort the channels in order of alphabet or default(channel number) press the BLUE key.
Note : Quick way to access the Favorite channel menu : Just press the FAV.CH key while you are viewing a program.

2.5 Parental Guide
2.5.1 Program Grade
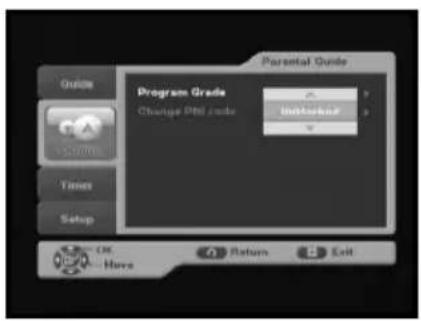
You can block the specific channel by selecting age. If the available age of the channel is older than age which you set, that channel will be blocked.
● You can choose age from 4 to 17.
● "All blocked" means that you cannot any channels regardless of the grade.
● "Unblocked" means that you can watch the all channels regardless of the grade.

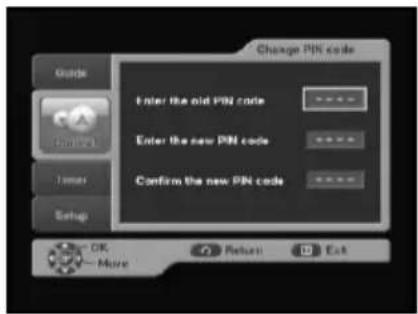
2.5.2 Change PIN code
You can change current PIN code into new one.
Note: If you forgot the PIN code, please call SAMSUNG Service Hotline. You can find the phone number inside the cover.
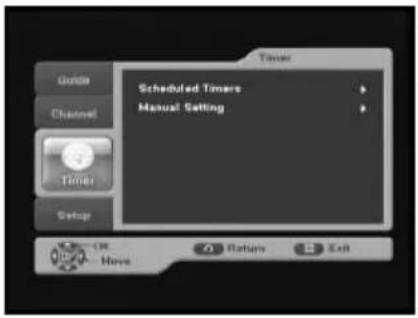
3. Timer
Through this menu you can reserve the programs and configure the settings.
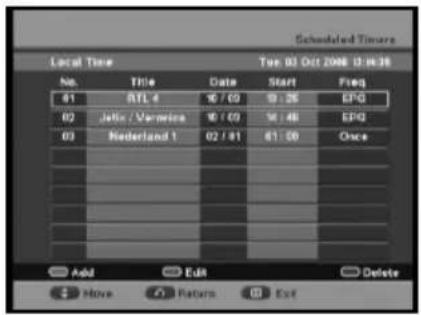
3.1 Scheduled Timers
You can see the channels you reserved through EPG or manual settings.
● To add the timers press the RED key. You can reserve the program manually.
- To edit the timers press the GREEN key after highlighting the cursor on the program you want to edit. But it is impossible to edit the timers which was set through EPG.
- To delete the timers press the BLUE key after highlighting the cursor on the program you want to delete.
3.2 Manual Setting
You can reserve the programs manually.
Set channel, date, start/end time and frequency by using
◀/▶ or ▲/▼ keys.

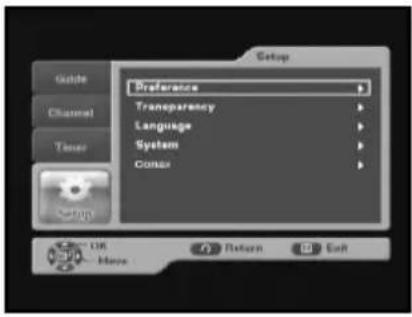
4. Setup
4.1 Preference
This option enables you to change preset setting such as Aspect Ratio, TV setting as per your requirement. You can set the various preference settings you want.
- Place the cursor on this sub menu and press OK key.
4.1.1 TV Aspect Ratio
- Select the TV Aspect Ratio : STANDARD 4:3 ratio or WIDE SCREEN 16:9 ratio type.

4.1.2 Aspect Ratio
- 16:9 LB: LB means the letter box. Select this when you want to see a 16:9 ratio image on the 4:3 ratio TV monitor. It shrinks the 16:9 ratio image with no screen distortion so the top and bottom of the screen are black empty.
- Pan Scan: The image is centered focused so the other edges that exceed the screen limits are cropped.
● Full: Select this when you want to see an image with converted to full screen regardless of the aspect ratio of sources.
Note : This menu will appear only when you set TV Aspect Radio with 4:3.

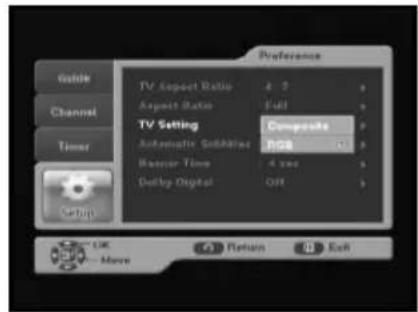
4.1.3 TV Setting
- Select the TV setting : Composite or RGB. You can select the Video signal type.
4.1.4 Automatic Subtitles
- Select Automatic Subtitles "On", "Off" or "Hard of hear". If you select "On" and the channels support subtitles, you can see the subtitles automatically. In this case, you don't need to press SUBTITLE key. "Hard of hear" option enables the hearing-impaired to see the special subtitles.

4.1.5 Banner Time
- Set the display duration of the banner(information) box displayed in the screen. The time ranges from 1 to 60 seconds.
- Setting is made with the numeric keys or ▲/▼ keys.

4.1.6 Dolby Digital
- Select Dolby Digital: Use the ▲/▼ keys to select ON or OFF, then press the OK button.

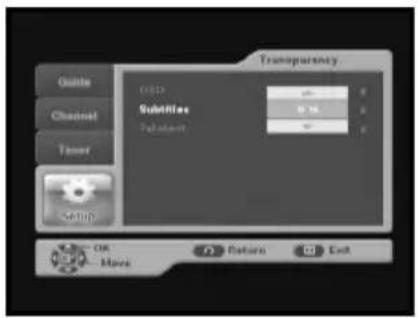
4.2 Transparency
4.2.1 OSD
- Select OSD transparency level from 0 to 100%. Setting is made with numeric keys or ▲/▼ keys.


4.2.2 Subtitles
- Select Subtitles transparency level from 0 to 100%. Setting is made with numeric keys or ▲/▼ keys.
4.2.3 Teletext
- Select Teletext transparency level from 0 to 100%. Setting is made with numeric keys or ▲/▼ keys.

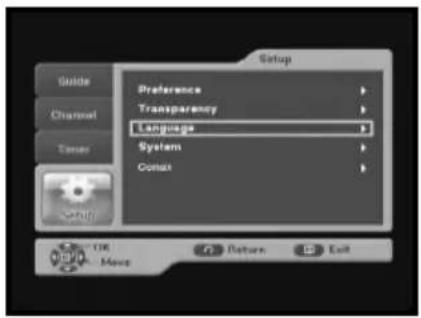
4.3 Language
The Language option allows the user to select the desired language for OSD, Audio Out and Subtitles. 5 languages are available.
4.3.1 OSD
You can set the OSD language. To accommodate user from different regions speaking different languages, OSD languages are available 5 languages. (English, Dansk, Suomi, Norsk and Svenska provided currently)
- Use the ▲/▼ keys to select a desired language, then press the OK key.

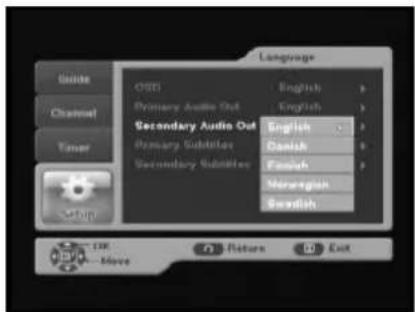
4.3.2 Primary and Secondary Audio Out
You can set the primary and secondary audio languages. When the current channel supports multi audio languages, you can hear the corresponding audio as you select in order of languages.
If there is no audio language that corresponds with primary or secondary language in the channel, the first audio language will be set automatically.
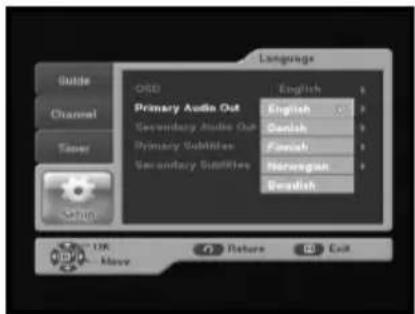
- Use the ▲/▼ keys to select a desired language, then press the OK key.
- Five languages are supported.(English, Danish, Finnish, Norwegian and Swedish)
4.3.3 Primary and Secondary Subtitles
You can set the primary and secondary subtitles. When the current channel supports multi subtitles, you can see the corresponding subtitle as you select in order of languages.
If there is no subtitle that corresponds with primary or secondary language in the channel, any subtitles will not be displayed. This is on the assumption that Automatic Subtitles mode is "On".(Setup → Preference → Automatic Subtitles) In this case, you can set the subtitle manually by pressing the SUBTITLE key.
- Use the ▲/▼ keys to select a desired language, then press the OK key.
- Five languages are supported. (English, Danish, Finnish, Norwegian and Swedish)


4.4 System
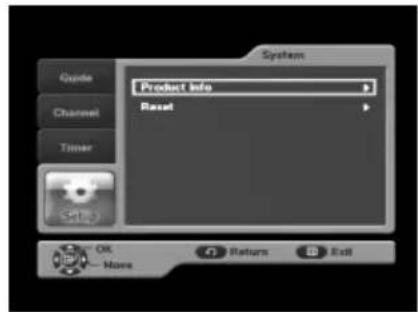
This menu consists of 2 sub-menus : Product Info and Reset.
- Place the cursor on this sub menu and press OK key.
4.4.1 Product Info
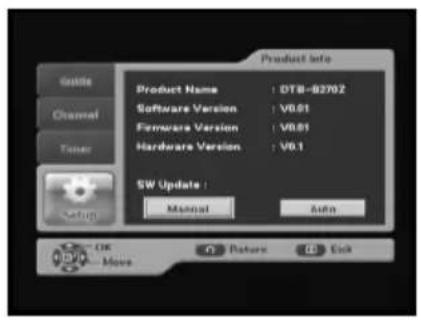
If you have to contact your service provider or a service center they might ask for information available from this menu.
Place the cursor on this sub menu and press the OK key.
- If new software is available "SW Update" buttons will be activated so you can update the receiver. There are two types of updates. In the Manual mode, you can select the channel number directly by using ◀/▶ or numeric keys. If you don't know this information, press the Auto mode.
Note : If the receiver is updated via "SW Update", the version number may be changed.
4.4.2 Reset
This is to restore the factory set values in case the user has encountered some problems after changing any new values of channel data and others, which may be in error. Select Reset menu in System menu and press OK key. If you want to continue, select "YES" in the warning window. The receiver will be reset to settings automatically. Please note that the Factory Default procedure may take a few seconds.

TROUBLESHOOTING
| Problem Possible cause Solution of the problem | ||
| No display LED on Power cord Power cord plug in correctly the front panel; not plugged in correctly No power supply | ||
| No pictures on the screen | Receiver in Standby mode; Set receiver to “On”; SCART not connected tightly Check connection; to video output of television; incorrect channel or video Check channel and video output output selected on television (TV instruction manual) | |
| No sound SCART connected | incorrectly; Check connection; Loudness level = 0; Muting active | Increase loudness on television set; Press the MUTE key |
| Remote Control does not operate directly | Incorrect operation; Batteries dead or inserted Replace incorrectly | Point remote control towards the Receiver. batteries or insert correctly |
| Poor picture quality signal strength in | Signal strength too low | Check all wire connections. |
| On-Screen Error Messages: “Searching for signal” “No signal” | cable not connected or not tight | Check connection |
| On-Screen Error Message “No programs are stored” | Channel lists not installed | Scan channels. Please go to Installation menu |
| On-Screen Error Messages: “Smartcard failure” “Unknown smartcard” “Please insert Smartcard”. | Smartcard: - not plugged in correctly; - not plugged in. | (depend on model) Check the Smartcard. “Insert the Smartcard.” |
Note : Some local networks may not transmit the digital broadcasting. In that case, please contact with corresponding networks.
DISPOSAL
The device, packaging material (e.g. Styrofoam) and the batteries must never be disposed of with household refuse. Please obtain appropriate information about the regulations in your community, and dispose of all refuse in accordance with regulations at the separate locations provided.
TECHNICAL SPECIFICATIONS
Power supply
Type
SMPS
Input voltage AC 100-240V\~, 50/60 Hz
Fuse rating 250 V/T1.6AH
Demodulator
Type
COFDM DEMODULATION (DVB-T)
FFT 2K or 8K
Code Rate
1/2, 2/3, 3/4, 5/6, 7/8
Guard Intervals
Input Connector IEC, Female
Frequency range 50 \~ 860 MHz
Input Signal Level -78 \~ -20 dBm
Loop Through 50 \~ 860 MHz, IEC, Male
Video decoder
System decoding
MPEG 2 ISO/IEC 13818-2
(Transport Stream)
Profile and level
MPEG 2 MP@ML (4:2:2)
Data rate 1 \~ 15 Mb/s
Video formats 4:3 (normal) & 16:9 (widescreen)
Picture resolution
720(H) × 576(V) × 50 fields/sec
Audio Decoder
System decoding
MPEG 1 ISO/IEC 11172\~3
layer I & II
Audio mode
MONO, DUAL, STEREO, JOINT STEREO
Sampling frequency
32, 44.1, 48 kHz
BASE-BAND AUDIO/VIDEO OUTPUT
VIDEO
PAL
Interface
2 SCART (AV1, AV2)
Impedance
75 Ω
Output level
1Vp-p
AUDIO Interface
Scart
Impedance 600 balance
Output level
2.0Vp-p max (controllable)
S/PDIF (Digital Audio Output)
Connector : Fiber-optic
MEMORY
Flash
2MB
SDRAM
16MB
PHYSICAL SPECIFICATION
Size (W x D x H)
233 × 176 × 38 mm
Weight (Net)
0.95Kg


DTB-B270Z
Bruksanvisning
SWE
SÄKERHETSANVISNINGAR
6. SÄTTA I SMARTCARD FÖR CONAX-TJÄNSTER


8. Teletext OSD
2. Kanal
2.5.2 Ändra PIN-kod
4.2.3 Teletext
Input Connector IEC, Female
Frequency range 50 \~ 860 MHz
Input Signal Level -78 \~ -20 dBm
Loop Through 50 \~ 860 MHz, IEC, Male
Video decoder
Systemavkodning: MPEG 2 ISO/IEC 13818 (Transport Stream)
Audio Mode: single channel, dual channel, stereo, joint stereo
Samplingsfrekvens: 32, 44.1, 48 KHz
BASE-BAND AUDIO/VIDEO OUTPUT
Videotyp: PAL
2. Kanava
Input Connector IEC, Female
Frequency range 50 \~ 860 MHz
Input Signal Level -78 \~ -20 dBm
Loop Through 50 \~ 860 MHz, IEC, Male
Videodekooderi
System decoding MPEG 2 ISO/IEC 13818-2
(Transport Stream)
Profile and level MPEG 2 MP@ML (4:2:2)
Data rate 1 \~ 15 Mb/s
Video formats 4:3 (normal) & 16:9 (widescreen)
Picture resolution
720(H) × 576(V) × 50 fields/sec
Audiodekooderi
System decoding
MPEG 1 ISO/IEC 11172\~3 layer I & II
Audio mode
MONO, DUAL, STEREO, JOINT STEREO
Sampling frequency
32, 44.1, 48 kHz
PERUSKAISTA AUDIO/VIDEO -ULOSTULO
VIDEO
Videotyyppi:
PAL
Liitännät:
2 SCART (AV1, AV2)
Impedanssi:
75Ω
Ulostulotaso:
1Vp-p
AUDIO
Liitännät:
2 SCART (AV1, AV2)
Impedanssi:
600Ω
Taajuusvaste:
3dB (20-15kHz)
DIGITAALINEN AUDIO (S/PDIF):


- DTB-B270Z
- INSTRUCTIONS FOR USE
- SAFETY INSTRUCTIONS
- WARNING
- CORRECT DISPOSAL OF THIS PRODUCT (WASTE ELECTRICAL & ELECTRONIC EQUIPMENT)
- CONTENTS
- GENERAL FEATURES
- USER SECTION
- TUNER SECTION
- VIDEO SECTION
- AUDIO SECTION
- CONNECTING YOUR "STB
- LOCATION OF THE RECEIVER
- CONNECTING THE RECEIVER WITH AERIALS
- CONNECTING THE RECEIVER TO TV
- CONNECTING YOUR VCR OR DVD
- CONNECTING DIGITAL AUDIO SYSTEM
- INSERTING SMARTCARDS FOR CONAX SERVICES
- DESCRIPTION
- FRONT PANEL
- REAR PANEL
- REMOTE CONTROL UNIT
- BASIC FUNCTIONS
- DISPLAY SCREEN
- VOLUME CONTROL
- SELECT SOUNDTRACK
- SERVICE LIST
- SETTING THE FAVORITE CHANNEL
- TO WATCH THE FAVORITE CHANNEL
- CHANGING THE SUBTITLE LANGUAGE
- SELECTING THE AUDIO MODE
- CHANGING THE TELETEXT OSD
- INITIAL INSTALLATION
- MAIN MENU
- EPG-ELECTRONIC PROGRAM GUIDE
- CHANNEL
- 2.1 AUTO SCAN
- 2.2 MANUAL SCAN
- 2.3 CHANNEL LIST
- 2.4 FAVORITE CHANNEL
- 2.5 PARENTAL GUIDE
- 2.5.1 PROGRAM GRADE
- 2.5.2 CHANGE PIN CODE
- TIMER
- 3.1 SCHEDULED TIMERS
- 3.2 MANUAL SETTING
- SETUP
- 4.1 PREFERENCE
- 4.1.1 TV ASPECT RATIO
- 4.1.2 ASPECT RATIO
- 4.1.3 TV SETTING
- 4.1.4 AUTOMATIC SUBTITLES
- 4.1.5 BANNER TIME
- 4.1.6 DOLBY DIGITAL
- 4.2 TRANSPARENCY
- 4.2.1 OSD
- 4.2.2 SUBTITLES
- 4.2.3 TELETEXT
- 4.3 LANGUAGE
- 4.3.1 OSD
- 4.3.2 PRIMARY AND SECONDARY AUDIO OUT
- 4.3.3 PRIMARY AND SECONDARY SUBTITLES
- 4.4 SYSTEM
- 4.4.1 PRODUCT INFO
- 4.4.2 RESET
- TROUBLESHOOTING
- DISPOSAL
- TECHNICAL SPECIFICATIONS
- POWER SUPPLY
- DEMODULATOR
- VIDEO DECODER
- AUDIO DECODER
- BASE-BAND AUDIO/VIDEO OUTPUT
- MEMORY
- PHYSICAL SPECIFICATION
- BRUKSANVISNING
- SÄKERHETSANVISNINGAR
- SÄTTA I SMARTCARD FÖR CONAX-TJÄNSTER
- TELETEXT OSD
- KANAL
- 2.5.2 ÄNDRA PIN-KOD
- KANAVA
- VIDEODEKOODERI
- AUDIODEKOODERI
- PERUSKAISTA AUDIO/VIDEO -ULOSTULO
- VIDEO
- AUDIO
Brand : SAMSUNG
Model : DTB-B270Z
Category : Receiver