19567 - Ice cream maker Lakeland - Free user manual and instructions
Find the device manual for free 19567 Lakeland in PDF.


| Product Type | Ice Cream Maker (Sorbetière) |
| Brand | Lakeland |
| Model | 19567 |
| Capacity | 1 liter (approx.) |
| Bowl Material | Double-insulated freezer bowl |
| Body Material | Plastic |
| Power Consumption | 100 W (approx.) |
| Dimensions (L x W x H) | 25 x 20 x 20 cm (approx.) |
| Weight | 2.5 kg (approx.) |
| Power Source | AC 220-240 V, 50/60 Hz |
| Functions | Ice cream, sorbet, frozen yogurt, gelato |
| Churning Paddle | Removable plastic paddle |
| Pre-freezing Required | Yes, bowl must be pre-frozen for 12-24 hours |
| Processing Time | 20-40 minutes per batch |
| Safety Features | Automatic shut-off, overheat protection |
| Cleaning | Hand wash bowl and paddle; wipe body with damp cloth |
| Storage | Store in a cool, dry place with lid off |
| Spare Parts Available | Replacement bowl and paddle sold separately |
| Warranty | 1 year manufacturer warranty |
Frequently Asked Questions - 19567 Lakeland
User questions about 19567 Lakeland
0 question about this device. Answer the ones you know or ask your own.
Ask a new question about this device
Download the instructions for your Ice cream maker in PDF format for free! Find your manual 19567 - Lakeland and take your electronic device back in hand. On this page are published all the documents necessary for the use of your device. 19567 by Lakeland.
USER MANUAL 19567 Lakeland
natural_image
White ceramic kitchen appliance with clear glass lid and logo (no visible text or symbols)Model: 19567


DIGITAL ICE CREAM MAKER
Thank you for choosing the Lakeland Digital Ice Cream Maker.
Please take a little time to read this booklet before you use your maker and keep it in a safe place for future reference.
The Lakeland Digital Ice Cream Maker creates your favourite flavours of home-made ice cream, sorbet and frozen yoghurt quickly and easily from fresh ingredients. The digital timer counts down until your frozen treats are ready. It's very easy to use... pre-freeze the bowl, add the lid, set the timer according to your recipe and pour your mixture through the opening. The Ice Cream Maker will churn and stir to a creamy, smooth consistency.
An award winning family-owned business, here at Lakeland we still have the same values of excellent quality, value for money and exceptional customer care as we did when we first set up the company in the 1960s.
Our products are carefully selected and rigorously tested to meet our high standards, so you can be assured that any product you purchase will be easy-to-use and highly durable.
CONTENTS
Product features .... 5
Safety cautions....6-7
How to assemble the Ice Cream Maker and using for the first time....8-9
Instructions for use 10-11
Hints and tips....11
Recipes....12-18
Care and cleaning 19
Recycling your electricals....19
Electrical connections....20
PRODUCT FEATURES
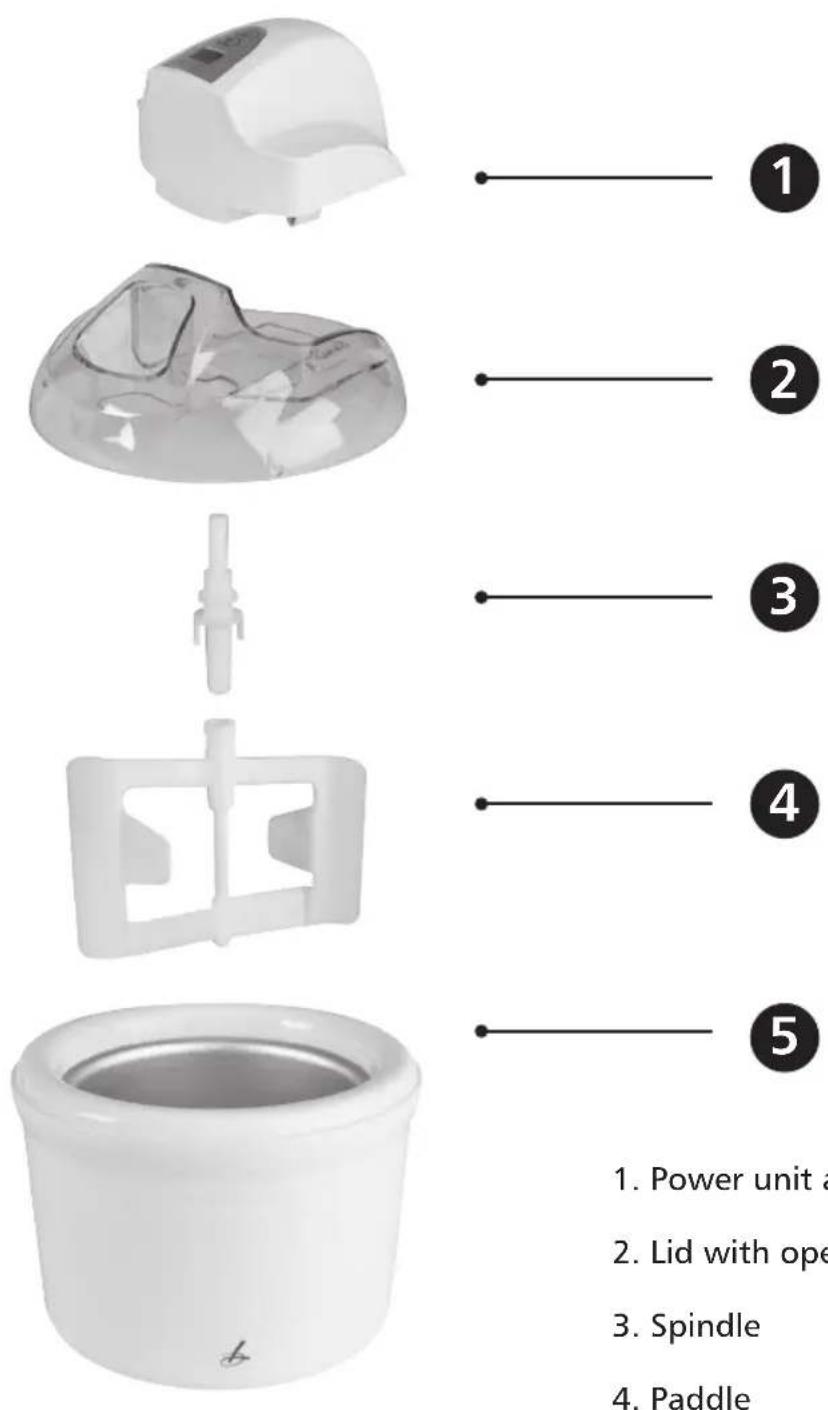
1
2
3
4
5
- Power unit and timer
- Lid with opening
- Spindle
- Paddle
- 1.5 litre freezer bowl
SAFETY CAUTIONS
Carefully read all the instructions before using the appliance and keep in a safe place for future reference. Always follow these safety cautions when using the appliance to avoid personal injury or damage to the appliance. This appliance should be used only as described in this instruction book.
- Make sure your electricity supply matches the voltage shown on the appliance.
- Ensure all packaging materials and any promotional labels or stickers are removed from the appliance before the first use.
- Always inspect the appliance before use for noticeable signs of damage. Do not use if damaged or has been dropped. In the event of damage, or if the appliance develops a fault contact the Lakeland customer care team on 015394 88100.
- Do not use this appliance if the lead is damaged. If the lead is damaged it must be replaced with a special lead contact the Lakeland customer care team on 015394 88100.
• Always use the appliance on a dry, level, heat resistant surface. - Unplug from the mains when not in use and before cleaning. Allow to warm up to room temperature before cleaning the appliance. To disconnect, turn the socket to "off" and remove the plug from the mains socket.
- This appliance is not intended for use by persons including children with reduced physical, sensory or mental capabilities, or lack of experience and knowledge, unless they have been given supervision or instruction concerning the use of the appliance by a person responsible for their safety.
- Children should always be supervised to ensure they do not play with this product.
- Do not use any accessories or attachments with this appliance other than those recommended by Lakeland.
- To protect against fire, electric shock or personal injury, do not immerse cord, plug or unit in water or other liquids.
- Do not leave the lead hanging over the edge of a kitchen table or worktop. Avoid contact between the lead and hot surfaces.
- For indoor use only.
- For domestic use only.
- This appliance should be used for preparation of food as described within the instructions for use that accompany it.
- Always ensure that your hands are dry before removing the plug from the mains socket. Never pull the plug out of the mains socket by its lead. Do not allow the lead to be compressed or curled.
- To avoid injury or possible fire, do not cover the appliance when in use.
- Do not connect this appliance to an external timer or remote control system.
- An extension cable may be used with care. The electrical rating of the cable should be at least as great as the appliance. Do not allow the cable to hang over the edge of the worktop or touch any hot surfaces.
- This appliance complies with the basic requirements of Directives 04/108/EC (Electromagnetic Compatibility) and 06/95/EC (Safety of Domestic Electrical Appliances).
- WARNING: A cut off plug inserted into a socket is a serious safety (shock) hazard. Ensure the cut off plug is disposed of safely.

CAUTION: The plastic bags used to wrap this appliance or the packaging may be dangerous. To avoid risk of suffocation, keep these bags out of reach of babies and children. These bags are not toys.
- Keep the Ice Cream Maker, plug and lead away from hot ovens, electric and gas burners, flames and hot surfaces.
- Never use the Ice Cream Maker in areas where certain vapours may be present (paint thinner, flammable material, oil based paint and varnish, flammable liquids and gases) for a risk of possible explosion.
- To prevent freezer burn, protect your hands when handling the freezer bowl, especially when first removing it from the freezer. Never touch with wet hands.
- When the Ice Cream Maker is churning, please do not attempt to move it, and never put your hands or any other utensils inside.
- Never attempt to take the freezer bowl apart, or to separate the timer from the power unit. If the bowl becomes damaged, discontinue use.
- Ice cream or sorbet containing raw ingredients should be consumed within one week. Ice cream tastes best when fresh.
- Ice cream or sorbet which contains raw eggs should not be given to children, pregnant women or the elderly.
- Never freeze ice cream that has been fully or partially defrosted.
HOW TO ASSEMBLE THE ICE CREAM MAKER AND USING FOR THE FIRST TIME
- Unpack the Ice Cream Maker, remove all the packaging materials.
- Clean all the parts, following the instruction in 'Care and Cleaning'.
- Make sure that all parts are clean and dry before assembling the product.
Warning: Do not insert the plug into the electrical outlet or turn on the maker before you have assembled the Ice Cream Maker.
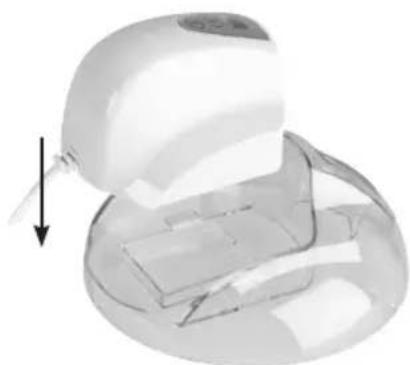
- Place the lid on a flat surface, for example, a kitchen table. Press the power unit and timer into the lid. You will hear a click when it is connected correctly.
natural_image
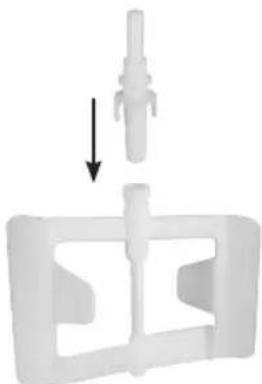
Close-up of a transparent medical device with a white cap and internal components, showing a downward arrow (no text or symbols visible)- Attach the spindle to the paddle by inserting the thickest end into the paddle.
natural_image
Mechanical component diagram showing a pin inserted into a housing with a downward arrow indicating force or direction (no text or symbols)- Insert the spindle and paddle into the bottom of the power unit and timer.
natural_image
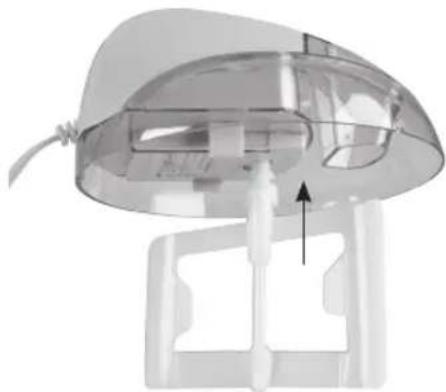
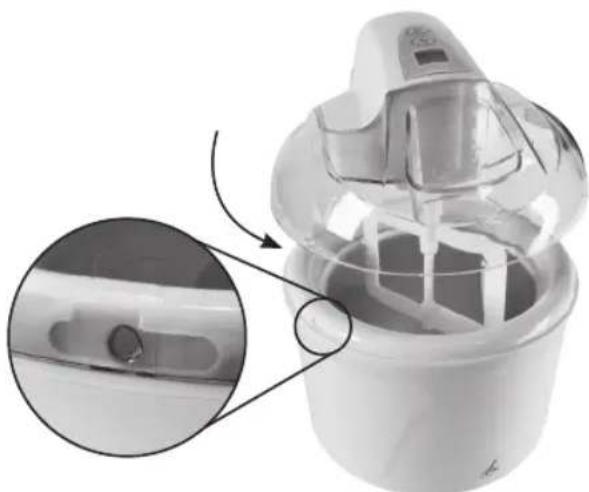
3D rendering of a transparent medical device with internal components and an arrow indicating a specific part (no text or symbols visible)- Place the lid with the power unit, timer and the paddle on top of the freezer bowl, lining up the notches on the lid with the grooves on the bowl. Twist the lid anti-clockwise to lock it.
natural_image
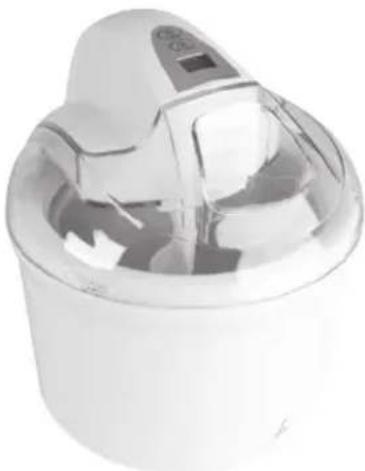
Close-up of a white kitchen mixer with a close-up inset showing internal components (no text or symbols visible)- The maker is now ready for use.
natural_image
Close-up of a white ceramic or plastic appliance with a lid and internal components (no visible text or symbols)INSTRUCTIONS FOR USE
BEFORE USE
- The beauty of home-made ices are you can tailor the ingredients to your tastes and dietary requirements, and use seasonal fruits to flavour. For some simple ideas to get you started, see RECIPES.
-
Place the freezer bowl in the freezer for at least 12 hours before use.
-
Choose a recipe and prepare your mixture and let it cool. Note: Chill the ingredients in the fridge before use. Warm ingredients or ingredients at room temperature will prolong the preparation time.
- Take the freezer bowl from the freezer and attach the lid with the power unit, timer and paddle.
Warning: Use a dry towel to hold the freezer bowl. Direct contact with the frozen bowl may make your hands stick to the freezer bowl. If this happens, hold your hands under warm running water for a few moments.
- Insert the plug into the socket and switch it on. The screen will light up for a second to show it is connected. Press the "Power" button, the LCD screen will light up and read 00.00.
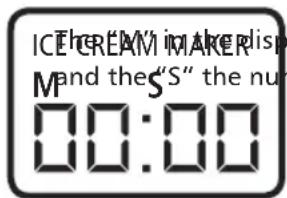
lay indicates the number of minutes mber of seconds.
- Set the selected preparation time (00.05 – 40.00 mins) by pressing the "Timer" button. Each time you press the "Timer" button, 5 minutes will be added to the preparation time. The paddle starts turning a couple of seconds after you have stopped pressing the "Timer" button and the time starts to count down on the LCD screen.
- Pour your mixture into the maker through the filler opening.
Note: The maker must be switched on with the paddle turning before you pour your mixture into the freezer bowl. This stops the mixture immediately freezing against the inside wall of the container.
DO NOT pour too much mixture into the bowl. Leave at least 4cm from the top of the bowl, so that the mixture can expand in volume during preparation.
-
Let the maker run until the ice has reached the correct consistency. The maker will stop turning when the timer has finished. The preparation time depends on the recipe and the temperature of the ingredients and the room.
-
Do not turn off the maker before the ice cream is ready. If it is switched off too early, the ingredients may freeze against the inside wall of the freezer bowl.
- The time needed to reach the consistency you require may be shorter or longer than the time in the recipe due to the temperature of the ingredients or the room temperature. If you need less time; switch off the maker and take out the rotation blade. You can set the Ice Cream Maker for a longer time if you need a thicker consistency.
- Use a plastic or wooden spoon or spatula to scoop the ice cream from the ice container. Metal spoons or spatulas can cause damage to the freezer bowl.
When you've finished, turn off the maker by pressing the power switch and unplug the maker from the socket. Serve the ice cream or transfer to a separate container and store in your freezer.
HINTS AND TIPS
• Always remember to put the bowl in your freezer 12 hours in advance.
- Chill the ingredients in the fridge before use.
- The times indicated in these recipes are guidelines. The actual preparation time depends on the ingredients used, the temperature of the ingredients and the room temperature. Monitor the mixture through the transparent lid and adjust the timer if necessary.
- Make sure all the ingredients are thoroughly mixed, the sugar has completely dissolved and the mixture has cooled before pouring your mixture into the maker.
- For the fullest flavour, choose ripe fruits. Wash carefully, remove all seeds, skin and core, and chop into small pieces.
- Metal spoons or scoops will scratch the freezer bowl. Use plastic or wooden utensils.
RECIPES
VANILLA ICE CREAM - Makes 500ml
| Ingredients Quantity |
| Whipping cream 180ml |
| Whole milk 180ml |
| Vanilla pods 112 – slit down the centre |
| Egg yolks 4 |
| Caster sugar 65g |
METHOD
1) Whip the cream and place in a saucepan with the milk and whole vanilla pods. Gently bring to the boil, then take off the heat and allow to cool.
2) In a bowl, beat together the egg yolks and sugar.
3) Scrape out the vanilla seeds and add to the milk mixture.
4) Return the saucepan to the heat and gently bring back to the boil. Pour in the egg mixture and beat together.
5) Allow to cool. Set the timer on your Ice Cream Maker for 25 minutes. Pour the mixture into the pre-chilled freezer bowl with the paddle running and leave to freeze-churn.
6) If you prefer a firmer consistency, place the bowl of ice cream in your freezer for a further 30 minutes or so.
STRAWBERRY ICE CREAM - Makes 500ml
| Ingredients | Quantity |
| Fresh strawberries 200g | |
| Lemon juice 34 tablespoon | |
| Whole milk 220ml | |
| Egg yolk 1 | |
| Caster sugar 90g | |
| Whipping cream 100ml | |
METHOD
1) Wash and hull the strawberries. Purée them with the lemon juice and milk, using a hand blender.
2) Beat together the egg yolk and sugar.
3) Whip the cream. Mix the cream, the egg mixture and the strawberry mixture until they are thoroughly combined.
4) Set the timer on your Ice Cream Maker for 25 minutes. Pour the mixture into the pre-chilled freezer bowl with the paddle running and leave to freeze-churn.
5) If you prefer a firmer consistency, place the bowl of ice cream in your freezer for a further 30 minutes or so.
LEMON SORBET - Makes 500ml
| Ingredients | Quantity |
| Lemons 6 | |
| Caster sugar 290g | |
| Hot water 435ml |
METHOD
1) Wash the lemons. Zest 5 of them, and squeeze the juice from all 6.
2) Put the sugar and hot water into a bowl. Stir until dissolved, then add the lemon zest. Leave to soak for 10 minutes.
3) Add the lemon juice and leave to cool completely.
4) Set the timer on your Ice Cream Maker for 25 minutes. Pour the mixture into the pre-chilled freezer bowl with the paddle running and leave to freeze-churn.
5) Place the bowl of sorbet in your freezer for a further 30 minutes or so, to achieve a firm texture.
SERVING TIP
Scoop into champagne saucers and garnish with fresh mint.
PISTACHIO ICE CREAM - Makes 500ml
| Ingredients | Quantity |
| Unsalted pistachio nuts 125g (shelled weight) | |
| Caster sugar 65g | |
| Whipping cream 180ml | |
| Whole milk 180ml | |
| Egg yolks 4 | |
METHOD
1) In a food processor, chop half the pistachios with half the sugar until finely ground.
2) Whip the cream and place in a saucepan with the milk and the ground nut mixture. Gently bring to the boil, then take off the heat and allow to cool.
3) In a bowl, beat together the egg yolks and the remaining sugar.
4) Return the saucepan to the heat and gently bring back to the boil. Pour in the egg mixture and beat together. Take off the heat and allow to cool.
5) Meanwhile, roughly chop the remaining pistachios with a sharp knife. Add to the ice cream mixture.
6) Set the timer on your Ice Cream Maker for 25 minutes. Pour the cooled mixture into the pre-chilled freezer bowl with the paddle running and leave to freeze-churn.
7) If you prefer a firmer consistency, place the bowl of ice cream in your freezer for a further 30 minutes or so.
MINT CHOC CHIP ICE CREAM - Makes 500ml
| Ingredients | Quantity |
| Single cream 375ml | |
| Egg yolks 3, beaten | |
| Caster sugar 75g | |
| Crème de menthe(or peppermint extract) 2 tbsp | |
| Dark or milk chocolate chips(or squares, roughly chopped) 25g | |
METHOD
1) Pour the cream, egg yolks and sugar into a saucepan and place over a medium heat, stirring frequently to prevent the mixture burning. Gently bring to the boil, then take off the heat and allow to cool.
2) Stir the crème de menthe (or peppermint extract) and the chocolate pieces into the mixture.
3) Set the timer on your Ice Cream Maker for 25 minutes. Pour the cooled mixture into the pre-chilled freezer bowl with the paddle running and leave to freeze-churn.
4) If you prefer a firmer consistency, place the bowl of ice cream in your freezer for a further 30 minutes or so.
MIXED BERRY SORBET - Makes 500ml
| Ingredients | Quantity |
| Mixed blackberries, redcurrants raspberries and strawberries 500g | |
| Caster sugar 250g | |
| Juice of small lemon 12 | |
| Water Splash | |
METHOD
1) Place all the ingredients in a thick-bottomed saucepan. Bring to simmering point, then remove from the heat and allow to cool.
2) Blend the fruit mixture using a hand blender, then press it through a sieve to create a smooth purée.
3) Set the timer on your Ice Cream Maker for 25 minutes. Pour the cooled mixture into the pre-chilled freezer bowl with the paddle running and leave to freeze-churn.
4) To achieve a firm-textured sorbet, place the bowl of sorbet in your freezer for a further 30 minutes or so.
DARK CHOCOLATE ORANGE FROZEN YOGHURT - Makes 500ml
| Ingredients | Quantity |
| Natural yoghurt 450g | |
| Whole milk 250ml | |
| Caster sugar 100g | |
| Double cream 125ml | |
| Cocoa powder (unsweetened) 25g | |
| Dark chocolate (cut into chips) 75g | |
| Orange 1, juice and rind finely grated | |
| Cointreau (optional) Dash | |
METHOD
1) Sieve cocoa, then combine with sugar, using a splash of milk to form a paste.
2) Warm the remaining milk until just below boiling, add to the mixture and stir until dissolved.
3) When completely cool, add the orange juice, rind and Cointreau.
4) Fold in the yoghurt and cream, transfer to your Ice Cream Maker and churn until it reaches the desired consistency.
5) Stir in the chocolate chips and serve.
CARE AND CLEANING
- Always switch off and unplug the Ice Cream Maker from the wall socket before cleaning.
- Let the freezer bowl come back up to room temperature before cleaning.
- Wash the inside and outside of the freezer bowl by hand with a soft cloth and warm soapy water. Rinse with a damp, clean cloth, then dry thoroughly.
- Wash the lid, spindle and paddle in warm soapy water. Rinse well, then dry.
- Wipe the power unit with timer with a damp cloth, then dry.
CAUTION: Never immerse the power unit with timer or power cord in water or any other liquids.
- Do not use abrasive cleaners, bleaching agents or metal scourers on any parts. This will damage the Ice Cream Maker
- Do not place any parts in the dishwasher.
- Make sure that the maker and the attachments are completely clean and dry before you store them.
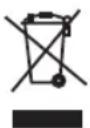
RECYCLING YOUR ELECTRICALS
Along with many other high street retailers, Lakeland has joined a scheme whereby customers can take their unwanted electricals to recycling points set up around the country.
Visit www.recycle-more.co.uk to find your nearest recycling point.
ELECTRICAL CONNECTIONS
THIS APPLIANCE MUST BE EARTHED.
This appliance is fitted with a fused three-pin plug to BS1363 which is suitable for use in all homes fitted with sockets to current specifications. If the fitted plug is not suitable for your socket outlets, it should be cut off and carefully disposed of. To avoid an electric shock, do not insert the discarded plug into a socket.
FITTING A NEW PLUG
If for any reason you need to fit a new plug, the flexible mains lead must be connected as shown here. The wires in the mains lead fitted to this appliance are coloured in accordance with the following code:
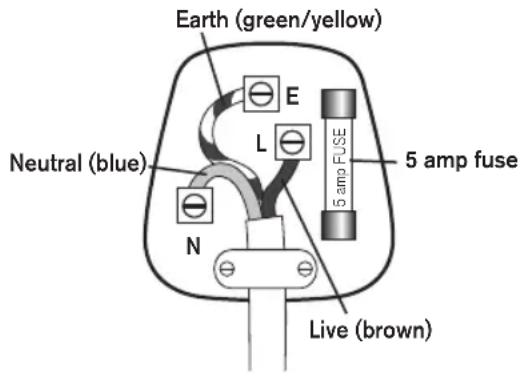
Connect BLUE to Neutral (N)
Connect GREEN & YELLOW to Earth (E)
Connect BROWN to Live (L)
5 amp fuse to be used
If the colours of the wires in the mains lead of this appliance do not correspond with the coloured markings identifying the terminals in your plug, proceed as follows. The wire which is coloured green and yellow MUST be connected to the terminal which is marked with the letter E (Earth). The wire which is coloured blue MUST be connected to the terminal which is marked with the letter N (Neutral). The wire which is coloured brown MUST be connected to the terminal which is marked with the letter L (Live).
Before refitting the plug cover, check that there are no cut or stray strands of wire inside the plug. Use a 5 amp BS1362 fuse. Only BSI or ASTA approved fuses should be used. If you are at all unsure which plug or fuse to use, always refer to a qualified electrician.
Note: after replacing or changing a fuse on a moulded plug which has a fuse cover, the cover must be refitted to the plug; the appliance must not be used without a fuse cover. If lost, replacement fuse covers can be obtained from an electrical shop. This appliance complies with the following EU Directives: 2006/95/EC (Low Voltage Directive) and 2004/108/EC (EMC Directive).
GEBRAUCHSANWEISUNG
DIGITALE EISMASCHINE
natural_image
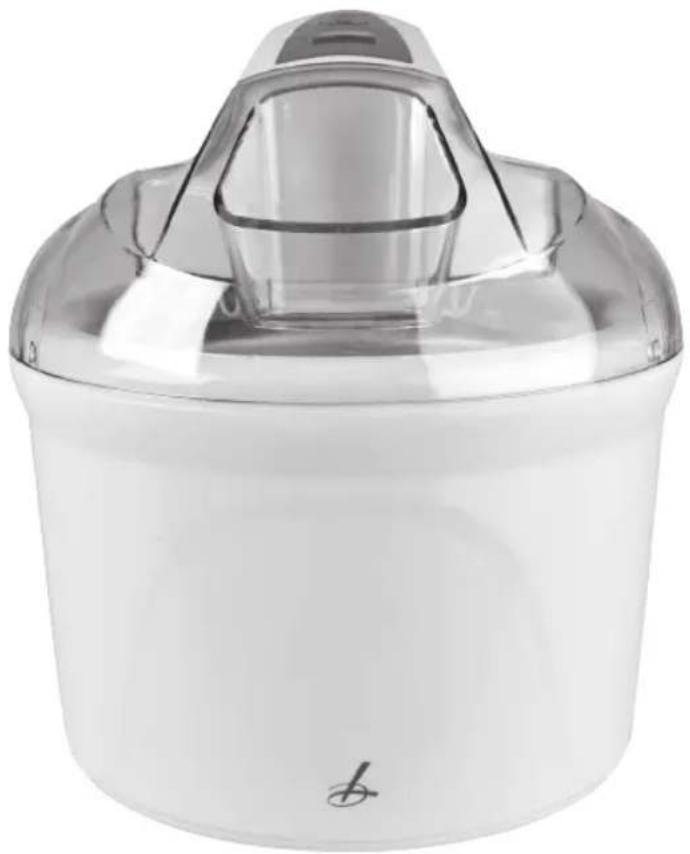
White ceramic kitchen appliance with clear glass lid and logo (no visible text or symbols)Modell: 19567
DIGITALE EISMASCHINE
natural_image
Close-up of a transparent medical device with a pointed tip and arrow indicating insertion (no visible text or symbols)natural_image
Pure mechanical component diagram without any text, numbers, or symbolsnatural_image
3D rendering of a transparent medical device with internal components and an arrow indicating a specific part (no text or symbols visible)natural_image
Close-up of a white kitchen blender with a close-up inset showing internal components (no text or symbols visible)natural_image
White ceramic kitchen appliance with a lid and glass interior (no visible text or symbols)GEBRAUCHSANWEISUNG
VOR DER VERWENDUNG
Alexandra Buildings, Windermere, Cumbria, UK LA23 1BQ
Tel: +44(0)15394 88100 lakeland.co.uk
D Tel:0800 444 1500 lakeland.de
- DIGITAL ICE CREAM MAKER
- CONTENTS
- PRODUCT FEATURES
- SAFETY CAUTIONS
- HOW TO ASSEMBLE THE ICE CREAM MAKER AND USING FOR THE FIRST TIME
- INSTRUCTIONS FOR USE
- BEFORE USE
- HINTS AND TIPS
- RECIPES
- METHOD
- SERVING TIP
- CARE AND CLEANING
- CAUTION: Never immerse the power unit with timer or power cord in water or any other liquids.
- RECYCLING YOUR ELECTRICALS
- ELECTRICAL CONNECTIONS
- THIS APPLIANCE MUST BE EARTHED.
- FITTING A NEW PLUG
- GEBRAUCHSANWEISUNG
- DIGITALE EISMASCHINE
- VOR DER VERWENDUNG
Brand : Lakeland
Model : 19567
Category : Ice cream maker