
TechniRadio 5 IR - Radio TECHNISAT - Free user manual and instructions
Find the device manual for free TechniRadio 5 IR TECHNISAT in PDF.


| Product type | Digital alarm clock radio |
| Brand | TechniSat |
| Model | TechniRadio 5 IR |
| Receivers | DAB+, FM, Internet (Wi-Fi) |
| Main functions | Internet radio, UPnP media player, Bluetooth, alarm, night light |
| Display | 3.5-inch color TFT screen |
| Power supply | 12V / 2A mains adapter |
| Power consumption | 9 W max, standby < 1 W |
| Dimensions (W x H x D) | 260 x 155 x 125 mm |
| Weight | 1.6 kg |
| Connectivity | Wi-Fi b/g/n, Bluetooth 4.0, 3.5 mm headphone jack, USB-A, Ethernet |
| Care and cleaning | Wipe with a soft, dry cloth. Do not use abrasive products. |
| Safety | Use only the supplied adapter. Do not expose to moisture. |
| Spare parts and repairability | Repairability index 7.8/10. Parts available on the TechniSat website. |
| General information | 2-year warranty. Made in Europe. |
Frequently Asked Questions - TechniRadio 5 IR TECHNISAT
User questions about TechniRadio 5 IR TECHNISAT
0 question about this device. Answer the ones you know or ask your own.
Ask a new question about this device
Download the instructions for your Radio in PDF format for free! Find your manual TechniRadio 5 IR - TECHNISAT and take your electronic device back in hand. On this page are published all the documents necessary for the use of your device. TechniRadio 5 IR by TECHNISAT.
USER MANUAL TechniRadio 5 IR TECHNISAT
Thank you for choosing a TechniSat digital radio.
This instruction manual is intended to help you get to know the extensive functions that your new unit offers and to make the best use of them. It will help you to use the product as intended and safely. It is intended for anyone installing, operating, cleaning or disposing of the unit.
Store the instruction manual in a safe place for later use.
A current version of the instruction manual can be found in the download area for your product on the TechniSat website at www.technisat.de.
We hope you enjoy your
TechniSat digital radio!
The TechniSat Team
1 Contents
1 Contents....37
2 Illustrations ....39
3 Safety instructions....40
3.1 Signs and symbols used....40
3.2 Intended use 41
3.3 Using the product safely 41
3.3.1 Legal notices 42
3.3.2 Service instructions 43
4 Description of the TECHNIRADIO 5 IR....43
4.1 Scope of delivery....43
4.2 Features of the TECHNIRADIO 5 IR....43
4.3 Preparing the TECHNIRADIO 5 IR for operation....44
4.3.1 Connecting the mains adapter....44
4.3.2 Aligning the telescopic antenna 44
4.3.3 Setting up the TECHNIRADIO 5 IR....44
4.3.4 Using headphones 45
4.4 General device functions.... 46
4.4.1 Switching on the device 46
4.4.2 Switching off the device 46
4.4.3 Source selection.... 46
4.4.4 Adjusting the volume....46
4.4.5 Retrieving displays....47
4.4.6 Display....47
5 Menu operation 47
5.1 Main menu 48
6 Internet radio....48
6.1 Last listened to....48
6.2 Station list....48
6.2.1 Saving Internet Radio stations in the device's favourites memory 49
6.2.2 Selecting the programmed stations 49
6.2.3 Deleting a saved memory slot....49
7 Playing music (UPnP media) 50
7.1 Playing media....50
7.1.1 Providing music via the Windows media player....50
7.1.2 Controlling playback 51
8 DAB+ (digital radio) function.... 51
8.1 What is DAB+? 51
8.2 DAB+ (digital radio) reception....51
8.2.1 Performing a complete scan ....51
8.2.2 Selecting stations....52
8.2.3 Storing DAB+ stations in a memory slot....52
8.2.4 Retrieving DAB+ stations from a memory slot 52
8.2.5 Overwriting/deleting a station memory slot....52
8.2.6 Signal intensity 53
8.2.7 Manual setting 53
8.2.8 Volume adjustment (DRC) 53
8.2.9 Deleting inactive stations....54
8.2.10 Station sequence 54
9 FM mode....54
9.1 Switching on FM radio mode 54
9.2 FM reception with RDS information....54
9.3 Automatic station scan 55
9.4 Manual station scan....55
9.5 Scan setting 55
9.6 Audio settings....55
9.7 Saving FM stations to a memory slot 55
9.8 Retrieving FM stations from a memory slot....56
9.9 Overwriting/deleting a station memory slot....56
10 AUX mode 56
11 Other functions....56
11.1 Sleep timer....56
11.2 Alarm 57
11.2.1 Setting the alarm....57
11.2.2 Switching off the alarm after being woken....58
11.3 Equaliser....58
11.3.1 MyEQ 58
12 System settings....58
12.1 Time and date settings....58
12.1.1 Manually setting the date and time....58
12.1.2 Time update....59
12.1.3 Setting the time format....59
12.1.4 Setting the time zone....60
12.1.5 Summer time 60
12.2 Internet settings....60
12.2.1 WPS connection....60
12.3 Set-up wizard....61
12.4 Backlight 61
12.5 Language....62
12.6 Factory settings....62
12.7 Info....62
12.8 Software update....62
13 Cleaning the radio....62
14 Troubleshooting 63
15 Technical data....64
2 Illustrations
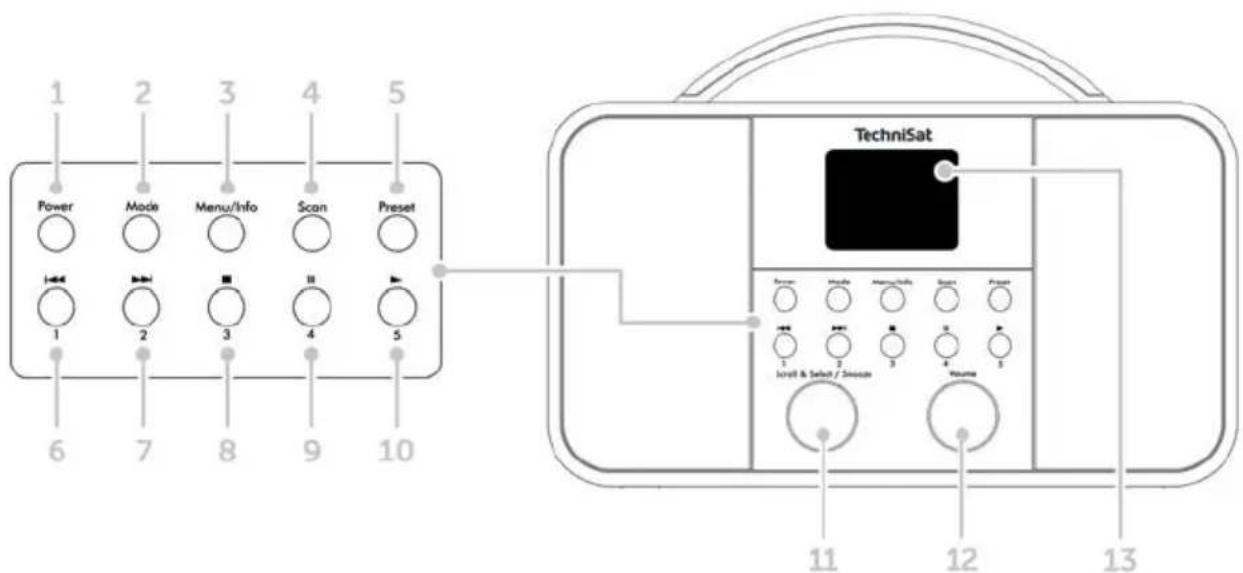
1 Power - On/Standby
2 Mode - Switch source
3 Menu/Info - Main menu and info displays
4 Scan - Station scan
5 Preset - Favourites memory slots
6 Previous Track/Search (UPnP music playback), One-touch button 1
7 Next Track/Search (UPnP music playback), One-touch button 2
8 Stop (UPnP music playback), One-touch button 3
9 Pause (UPnP music playback), One-touch button 4
10 Play (UPnP music playback), One-touch button 5
11 Scroll&Select/Snooze rotary knob
12 Volume +/- (Volume rotary knob)
13 Colour display
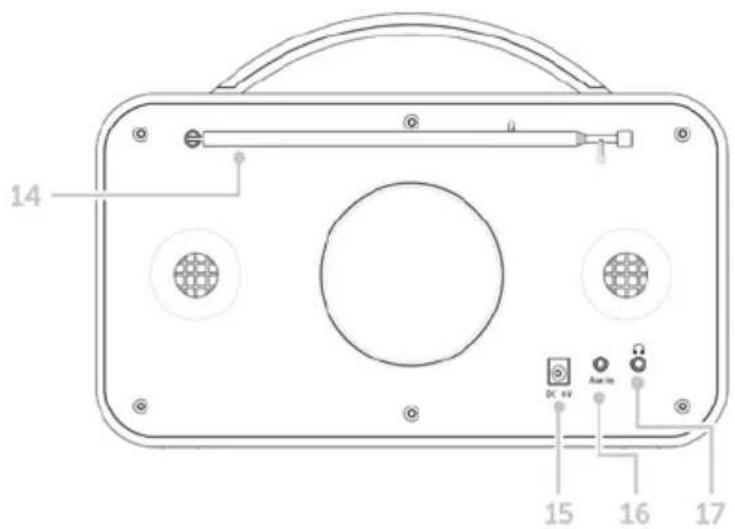
14 Telescopic antenna
15 Mains power supply DC In, 8 V, 2 A
16 Aux In (3.5 mm)
17 Headphone socket (3.5 mm)
3 Safety instructions
3.1 Signs and symbols used
In this instruction manual:

Indicates a safety instruction which can lead to serious injuries or death if not observed. Note the following signal words:
DANGER - Serious / fatal injury
WARNING - Serious injury, possibly fatal
CAUTION - Injury

This identifies information that must always be observed to prevent defects, data loss/misuse and undesired operation. It also describes additional functions of your unit.

Beware of electrical voltage. Follow all safety instructions to avoid electric shock. Do not open the device under any circumstances.
On the unit:

Indoor use - Devices with this symbol are only suitable for indoor use.

Protection class II - Electrical devices of protection class II are electrical devices with continuous double and/or reinforced insulation and no connection options for a protective conductor. The casing of an electrical device of protection class II, which is enclosed in an insulating material, can form part or all of the additional or reinforced insulation.

Your device bears the CE symbol and complies with all requisite EU standards.

Electronic devices do not belong in the household waste and must be disposed of properly in accordance with Directive 2002/96/EC of the European Parliament and of the Council dated January 27, 2003 concerning waste electrical and electronic equipment. Please return this unit to the designated public collection point for disposal at the end of its service life.
3.2 Intended use
The TECHNIRADIO 5 IR has been developed for the reception of DAB+/FM/Internet radio stations.
The device has been designed for private use and not for commercial purposes.
3.3 Using the product safely
Please take note of the following information to minimise safety risks, to prevent damage to the device and to make a contribution to environmental protection.
Please read all of the safety information carefully and keep it for future reference.
Always follow all warnings and instructions in this instruction manual and on the back of the device.

WARNING!
Never open the device!
Touching live parts can be fatal!

WARNING!
Risk of suffocation! Keep packaging and parts thereof away from children. Risk of suffocation from films and other packaging materials.

Observe all of the following instructions for the intended use of the device and to prevent damage to the device and injury to persons.
- Do not repair the device yourself. Repairs should only be carried out by trained experts. Contact our customer service department
- The device should only be operated under the intended environmental conditions.
- Do not expose the device to dripping or splashing water. If water has penetrated the device, switch it off and inform the Service department.
- Do not expose the device to heat sources which could heat it up more than normal use will.
- If you detect a device defect, odour or smoke, a major malfunction, or damage to the housing, inform the Service department immediately.
- The device must only be operated using the supplied mains adapter. Never try to operate the device at any another voltage.
- If the device shows signs of damage, it must not be put into operation.
-
Do not put the device into operation in the vicinity of bath tubs, showers, swimming pools or running/splashing water. There is a risk of electric shock and/or device defects.
-
Foreign bodies, e.g. nails, coins, etc. must not be allowed to fall inside the device. Do not touch the connection contacts with metal objects or your fingers. This could lead to short-circuits.
- This device is not intended to be used by people (including children) with limited physical, sensory or mental capacities or lack of experience and/or knowledge, unless they are supervised by a person responsible for their safety or they are instructed by them as to how to use the device.
- Modifications to the device are prohibited.
3.3.1 Legal notices

TechniSat herewith declares that the radio system model TECHNIRADIO 5 IR corresponds to Directive 2014/53/EU. The complete text of the EU Declaration of Conformity is available at the following web address:
TechniSat accepts no liability for product damage as a result of external influences, wear or improper handling, unauthorised repairs, modifications or accidents.

Changes and printing errors reserved. Version 12/19. Copying and reproduction are subject to the publisher's consent. The respective current version of the instructions can be downloaded in pdf format from the download area of the TechniSat Homepage at www.technisat.de.

TechniSat and TECHNIRADIO 5 IR are registered trademarks of:
D-54550 Daun/Eifel, Germany
www.technisat.de
The names of the companies, institutions or brands referred to are trademarks or registered trademarks of the respective owners.
3.3.2 Service instructions

This product is quality-tested and provided with the legally-specified warranty period of 24 months from the date of purchase. Please keep your receipt as proof of purchase. In the event of warranty claims, please contact the product dealer.

Should you experience a problem with this unit, or for queries and information, our Technical Hotline is available:
Mon. - Fri. 8:00 am - 6:00 pm on:
+49 (0) 3925 9220 1800.

Repairs can also be ordered directly online at www.technisat.de/reparatur.
If the device needs to be returned, please use the following address only:
39418 Stassfurt, Germany
4 Description of the TECHNIRADIO 5 IR
4.1 Scope of delivery
The scope of delivery includes:
1 x TECHNIRADIO 5 IR, 1 x Instruction manual, 1 x Mains adapter
4.2 Features of the TECHNIRADIO 5 IR
The TECHNIRADIO 5 IR is comprised of a DAB+/FM/Internet radio receiver with the following functions:
- You can store up to 40 DAB+/FM and Internet stations respectively.
- The radio can receive the following frequencies: FM 87.5-108 MHz (analogue) and DAB+ Band III, 174-240 MHz (digital).
- Music playback via UPnP network sharing.
- The device has a colour display showing the date and time.
- 5 one-touch buttons.
- Alarm function and sleep timer
4.3 Preparing the TECHNIRADIO 5 IR for operation
4.3.1 Connecting the mains adapter
Insert the mains adapter DC plug into the socket marked DC 8V 2A on the back of the TECHNIRADIO 5 IR. Then insert the mains plug into a 100-240V \~ 50/60Hz mains socket.
i Ensure that the operating voltage of the power supply unit matches the mains voltage before you insert it into the wall socket.
Do not operate the device if the power supply unit/cable is defective or if the device is damaged in any other way.
Even when switched off and on standby, the device is still connected to the mains power supply. If you do not intend to use the device for a prolonged period, remove the mains plug from the power outlet. Only pull on the plug, not on the cable.
4.3.2 Aligning the telescopic antenna
The number and quality of the stations to be received depend on the reception conditions at the installation location. Excellent reception can be achieved using the telescopic antenna.
Align the telescopic antenna and extend it.
The exact alignment of the telescopic antenna is often important, in particular at the outskirts of the DAB+ reception area. On the Internet you can quickly find the location of the nearest transmission tower by visiting www.dabplus.de.
i Start the first scan at a window pointing in the direction of the transmission mast. If the weather conditions are poor, DAB+ reception may be limited.
Do not touch the telescopic antenna during station playback. This could compromise the reception and lead to sound dropouts.
4.3.3 Setting up the TECHNIRADIO 5 IR
Place the device on a firm, secure and horizontal base. Make sure the area is well ventilated.
WARNING!
Do not place the radio on soft surfaces such as carpets and blankets, or near to curtains and wall hangings. These could obstruct the ventilation openings. The necessary flow of air could be interrupted as a result. This could potentially lead to fire in the device.
Do not place the device near to sources of heat, such as radiators. Avoid direct sunlight and very dusty environments.
i Please note that the device feet could leave coloured marks on some types of furniture surfaces in certain situations. Place a protective layer between your furniture and the device.
Keep the TECHNIRADIO 5 IR away from devices that emit intense magnetic fields.
Do not place any heavy objects on the device.
Route the mains cable in such a way that nobody can trip over it.
i Ensure that the mains cable or the power supply unit are always easily accessible, so that the device can be quickly disconnected from the power supply! The power outlet should be as close to the device as possible. Avoid using multiple sockets!
In the case of malfunctions or detecting smoke or odour from the housing, remove the plug from the power outlet immediately!
4.3.4 Using headphones

WARNING!
Hearing impairment! Do not listen to music at a high volume. Doing so can cause permanent hearing impairment. Turn down the radio volume to the lowest volume before using headphones.
i Only use headphones with a 3.5mm stereo jack plug.
Insert the headphone jack into the headphone socket on the back of the device. Sound will now only be heard via the headphones, the speaker is switched to mute.
If you would like to use the speakers again, unplug the headphones from the headphone jack on the radio.
4.4 General device functions
4.4.1 Switching on the device
Switch on the TECHNIRADIO 5 IR by pressing the Power button (1).

After switching on the device for the first time, you must first set the [Language]. To do this, select one of the available languages by turning the Scroll&Select/Snooze knob, then press the Scroll&Select/Snooze knob to confirm the selection. You can then launch the initial set-up wizard. Do this by selecting Yes using the Scroll&Select knob. Here you can set the date and time either via DAB/FM, Internet or no update (manual). An attempt is then made to establish a connection to a WLAN network. To do so, select the corresponding WiFi network and, if required, enter the WiFi password.
4.4.2 Switching off the device
By briefly pressing the Power button you can switch the device to standby mode. The date and time are shown on the display. The display brightness in standby mode can be adjusted by following the instructions in Section 12.4.
4.4.3 Source selection
Press the MODE button (2) to switch between DAB+ (Digital Radio), FM, Internet radio/music playback and Aux In sources. Press the button repeatedly to do so.
Alternatively:
Hold down the Menu/Info button until the main menu opens.
Use the Scroll&Select/Snooze knob to select the [Mode Selection] item, then press the Scroll&Select knob.
Use the Scroll&Select knob to select the source you want, then confirm your selection by pressing the Scroll&Select knob.
4.4.4 Adjusting the volume
Adjust the volume using the Volume knob. Turning to the right increases the volume; turning to the left reduces it.
The set volume is shown on the display by way of a bar chart.
4.4.5 Retrieving displays
By repeatedly pressing the Menu/Info button, the following information can be viewed and scrolled through:
Internet radio:
Track, artist, description, genre, reliability, bit rate, playback buffer, date.
Playing music (UPnP media):
Playback progress, artist, album, bit rate, playback buffer, date.
DAB+
DLS: continuous text with additional information that broadcasters may provide - genre, ensemble/multiplex (group name) frequency, channel, signal strength, signal error rate, bit rate, sound format, date, station name.
FM mode:
RT radio text (if transmitted), PTY - programme type, frequency, date.
4.4.6 Display
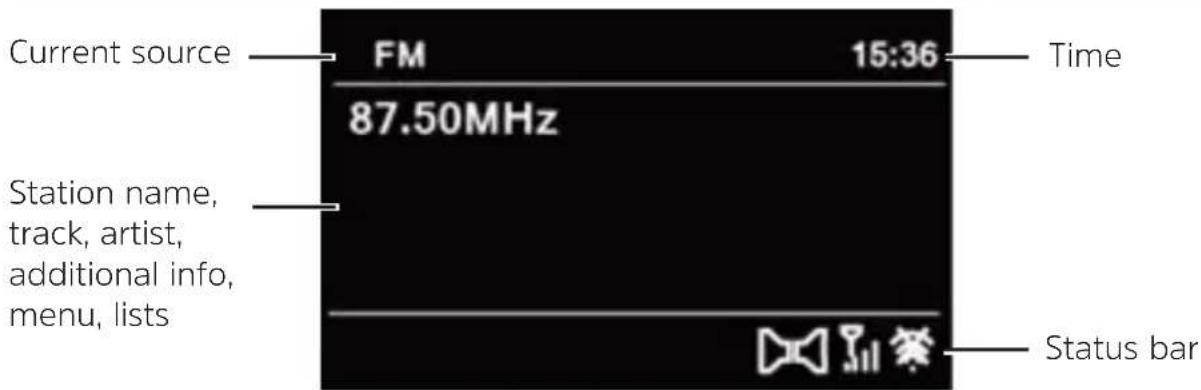

Depending on the selected function/source, the visual display shown may vary. Take note of the instructions on the display.
5 Menu operation
Navigation mostly involves using the Menu/Info button and turning/pressing the Scroll&Select knob:
Turn > Navigate within menus (right: scroll downwards, left: scroll upwards), change values (right = increase value, left = reduce value).
Press > Confirm/save selection.
The menu is separated into the respective submenu for the selected source containing the functions available for this source and the system menu for device-specific settings.
Turn the Scroll&Select/Snooze knob to navigate within menus. To confirm a selection, press the Scroll&Select/Snooze knob.
"*" highlights the current selection.
Press the Menu/Info button to go back a step in the menus or settings.
To close a menu, press the Menu/Info button repeatedly (depending on which menu you are in) or wait approx. 15 seconds.
5.1 Main menu
You can use the main menu to access all of the TECHNIRADIO 5 IR's functions and settings.
Hold down the Menu/Info button until the main menu opens.

All the settings for the currently active source are now displayed to start with. In the main menu, use the Scroll&Select/Snooze knob to select the [System settings] item and press the Scroll&Select/Snooze knob to open the system settings.
6 Internet radio
The TECHNIRADIO 5 IR is equipped with an Internet radio receiver.
In order to receive Internet radio stations/broadcasts, you need a WiFi router with Internet access.
Press the Mode button until Internet Radio appears on the display.
Alternatively:
Select Main Menu > Select Mode > Internet Radio

If you are starting Internet radio for the first time without having configured a WiFi connection, the search wizard appears showing you all the WiFi networks within range. Use the Scroll&Select/Snooze knob to select the WiFi network you recognise and enter the relevant password using the displayed keyboard. Then select OK. If the password entered is correct, a connection to the network is now established. The signal bar is the status bar of the display indicates whether the connection has been established.

Select CANCEL to abort the data entry. If you make a typing error you can delete the last letter entered using BKSP
6.1 Last listened to
Select Main Menu > Last Listened To to view a list of the stations last played.
Use the Scroll&Select/Snooze knob to select a station, and play it by pressing the Scroll&Select/Snooze knob again.
6.2 Station list
Select Main Menu >Station List and press the Scroll&Select/Snooze knob.

Under Station List, all Internet radio stations are displayed, separated into different categories.
Moreover, you also have access to your favourites here.
Based on a category/country/genre, select a station and confirm your selection.
To add a station to the My Favourites list, hold down the Scroll&Select/Snooze knob during playback until "Favourite added" appears.
To obtain additional information on the station currently being played, press the Menu/Info button.
To add your own stations, please register them on the website https://smartradio.frontier-nuvola.net/. To do so, you need an access code that you can request in the TECHNIRADIO 5 IR under Internet Radio > Main Menu > Station List> Help. Note the "Instructions on saving favourites" in the download area of the TECHNIRADIO 5 IR.
6.2.1 Saving Internet Radio stations in the device's favourites memory
The device memory can store up to 40 stations.
Setting the desired stations.
Hold down the Preset button until the Favourites list is displayed.
Use the Scroll&Select/Snooze knob to select a storage slot and confirm the selection by pressing the Scroll&Select/Snooze knob.
"Saved" appears in the display and the station can immediately be accessed in this favourites slot.
Alternatively:
Hold down one of the One-touch buttons 1...5.
6.2.2 Selecting the programmed stations
Briefly press the Preset button and use the Scroll&Select/Snooze knob to select a favourites memory slot.
Press the Scroll&Select/Snooze knob to play the station.
Alternatively:
Hold down one of the One-touch buttons 1...5.
6.2.3 Deleting a saved memory slot
Save a new station to the respective favourites memory slot.
7 Playing music (UPnP media)
You have the option of using the TECHNIRADIO 5 IR to play music located on a UPnP server. To do so, a connection to the WiFi network on which a UPnP server is located is required. Please observe the instructions in Section 12.1 for setting up a WiFi connection.

The UPnP media server must be located on the same network as the TECHNIRADIO 5 IR.
Press the Mode button as often as required until Play Music is shown on the display.
Alternatively:
Select Main Menu > Select Mode > Play Music

If you are starting Internet radio for the first time without having configured a WiFi connection, the search wizard appears showing you all the WiFi networks within range. Use the Scroll&Select/Snooze knob to select the WiFi network you recognise and enter the relevant password using the displayed keyboard. Then select OK password entered is correct, a connection to the
network is now established. The signal bar 📋 the status bar of the display indicates whether the connection has been established.

Select CANCEL to abort the data entry. If you make a typing error you can delete the last letter entered using BKSP
7.1 Playing media
Select Shared Media followed by the server on which your music is located.

The folder structure display depends on the folder structure on your media server.

Select Playback list, to play lists on your media server.

The menu has random playback and repeat playback options available. A corresponding symbol appears in the status bar.
7.1.1 Providing music via the Windows media player
As an alternative to a UPnP server, it is also possible for you to play music using Windows Media Player starting from version 10. To do so, music sharing must be set up in Windows Media Player.
Ensure that the Windows PC and the TECHNIRADIO 5 IR are located in the same network and switched on.
Start the Media Player and enable media streaming sharing.
If required, select the TECHNIRADIO 5 IR in the following device overview and select Allow.
i The procedure may vary depending on the Windows/Media Player version.
7.1.2 Controlling playback
Play close track (buttons 10 and 9).
Next track/Search (hold down for Search).
Prev a Track/Search (hold down for Search).
Stop playback.
8 DAB+ (digital radio) function
8.1 What is DAB+?
DAB+ is a new digital format through which crystal clear sound with no noise can be heard. In contrast to conventional analogue radio stations, DAB+ can be used to broadcast multiple stations on one and the same frequency. This is referred to as an ensemble or multiplex. An ensemble is comprised of the radio station, as well as several service components or data services which are broadcast individually by the radio stations. For further information, please visit e.g. www.dabplus.de or www.dabplus.ch.
8.2 DAB+ (digital radio) reception
Press the Mode button until [DAB] appears on the display.
If DAB+ is being started for the first time, a complete scan will be performed. After the scan is complete, the first station is played back in alphanumeric order.
8.2.1 Performing a complete scan
The automatic scan (Complete scan) scans all DAB+ band III channels and thereby finds all stations being broadcast within the reception area.
i After the scan is complete, the first station is played back in alphanumeric order.
In order to perform a complete scan, press the Scan button.
Alternatively:
Select Main Menu > Full Scan and press the Scroll&Select/Snooze knob.
[Scanning...] appears on the display.

During the scan a progress bar and the number of stations found is displayed.

If no stations are detected, check the telescopic antenna and, if required, change the installation location.
8.2.2 Selecting stations
Turn the Scroll&Select/Snooze knob to access the station list and scroll through the available stations.
Press the Scroll&Select/Snooze knob to play a station.
8.2.3 Storing DAB+ stations in a memory slot
The device memory can store up to 40 stations.
Setting the desired stations.
Hold down the Preset button until the Favourites list is displayed.
Use the Scroll&Select/Snooze knob to select a storage slot and confirm the selection by pressing the Scroll&Select/Snooze knob.
"Saved" appears in the display and the station can immediately be accessed on this favourites slot.
Alternatively:
Hold down one of the One-touch buttons 1...5.
8.2.4 Retrieving DAB+ stations from a memory slot
Briefly press the Preset button and use the Scroll&Select/Snooze knob to select a favourites memory slot.
Press the Scroll&Select/Snooze knob to play the station.
Alternatively:
Hold down one of the One-touch buttons 1...5.
8.2.5 Overwriting/deleting a station memory slot
Simply save a new station in a favourite memory slot as described.

When retrieving the factory settings all memory slots are deleted.
8.2.6 Signal intensity
Briefly press the Menu/Info button repeatedly until the signal strength bar is displayed.
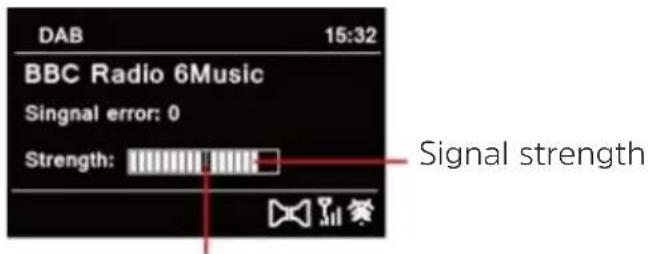
Minimum signal strength
The display shows the signal strength using a bar graph. The mark shows the minimum signal strength.
i Stations with a signal intensity below the required minimum signal intensity are not transmitting a strong enough signal. Readjust the telescopic antenna.
8.2.7 Manual setting
This menu item is used to check the reception channels and can be used to align the antenna. Furthermore, stations can be added manually.
Select Main Menu > Set Manually and press the Scroll&Select/Snooze knob.
Select a channel (5A to 13F) using the Scroll&Select/Snooze knob. The signal intensity will now be shown on the display. If a DAB+ station is being received on a channel, the station ensemble name is displayed. The antenna can now be aligned to the maximum signal intensity.
i Stations with a signal intensity below the required minimum signal intensity are not transmitting a strong enough signal.
If there are stations on the set frequency or channel that have not yet been stored in the station list, they will now also be saved.
8.2.8 Volume adjustment (DRC)
With the Volume Adjustment menu item, the compression rate is set which balances the dynamic variations and thereby the accompanying volume variations.
Select Main Menu > Adjust Volume and press the Scroll&Select/Snooze knob.
Use the Scroll&Select/Snooze knob to select one of the options:
DRC high - High compression
DRC low - Low compression
DRC off - Compression switched off.
Confirm the selection by pressing the Scroll&Select/Snooze knob.
8.2.9 Deleting inactive stations
This menu item is for removing old stations and those no longer being received from the station list.
Select Main Menu > Delete Inactive Stations and press the Scroll&Select/Snooze knob.
This is followed by the [Delete] prompt asking if the inactive stations are to be deleted.
Using the Scroll&Select/Snooze knob, select the [Yes] item and confirm by pressing the Scroll&Select/Snooze knob.
8.2.10 Station sequence
The stations in the station list are usually displayed in alphanumeric sequence. If you want to change this, please proceed as follows:
Select Main Menu > Station Sequence and press the Scroll&Select/Snooze knob.
Select Alphanumeric, Provider or Valid and press the Scroll&Select/Snooze knob to accept the setting.
9 FM mode
9.1 Switching on FM radio mode
Switch to FM mode by pressing the MODE button.
[FM] is shown on the display.
When switching on for the first time, the frequency 87.5 MHz is set.
i If you have already set or saved a station, the radio plays the last station set.
i In the case of RDS stations, the station name appears.
i Align the telescopic antenna to improve reception.
9.2 FM reception with RDS information
RDS is a procedure for broadcasting additional information via FM stations.
Broadcasters with RDS broadcast their station name or the programme type, for example. This is shown on the display. The device can show the RDS information RT (Radio text), PS (Station name), PTY (Programme type).
9.3 Automatic station scan
Press the Scan button to automatically search for the next station with sufficient signal intensity.
If an FM station with sufficient signal intensity is found, the scan stops and the station is played. If an RDS station is being received, the station name appears and, possibly, radio text.
i Please use the manual station scan for setting weaker stations.
9.4 Manual station scan
Turn the Scroll&Select/Snooze knob to set the station or frequency you want.
i The display shows the frequency in steps of 0,05 MHz.
9.5 Scan setting
In this menu item it is possible to set the sensitivity of the scan.
Select Main Menu > Scan Settings and press the Scroll&Select/Snooze knob.
Select whether the scan should only stop for stations with a strong signal [> YES] or for all stations (including stations with a weak signal) [> NO].
i With the > NO setting, the scan stops automatically upon detecting each available station. This can result in weak stations being played with background noise.
Press the Scroll&Select/Snooze knob to save.
9.6 Audio settings
Select Main Menu > Audio Settings and press the Scroll&Select/Snooze knob.
Using the Scroll&Select/Snooze knob, select [Mono Only] > YES or NO to play back in stereo (Mono Only = No) or only in mono if the FM reception is weak.
Press the Scroll&Select/Snooze knob to save.
9.7 Saving FM stations to a memory slot
The device memory can store up to 40 stations.
Setting the desired stations.
Hold down the Preset button until the Favourites list is displayed.
Use the Scroll&Select/Snooze knob to select a storage slot and confirm the selection by pressing the Scroll&Select/Snooze knob.
"Saved" appears in the display and the station can immediately be accessed in this favourites slot.
Alternatively:
Hold down one of the One-touch buttons 1...5.
9.8 Retrieving FM stations from a memory slot
Briefly press the Preset button and use the Scroll&Select/Snooze knob to select a favourites memory slot.
Press the Scroll&Select/Snooze knob to play the station.
Alternatively:
Hold down one of the One-touch buttons 1...5.
9.9 Overwriting/deleting a station memory slot
Simply save a new station in the respective memory slot as described.

When retrieving the factory settings all memory slots are deleted.
10 AUX mode
In Aux mode you can connect external devices and music players such as smartphones to the TECHNIRADIO 5 IR and play music. To do this you need a standard jack on a cinch cable (3.5 mm stereo). Insert the cable into the Aux In port on the back of the TECHNIRADIO 5 IR and connect this to the headphone socket on your music player or smartphone.
Press the MODE button to switch to AUX mode.
[AUX In] appears on the display.
Start playing music on your external device.

Set your external device to maximum volume and then set the normal volume level on your TECHNIRADIO 5 IR. If the volume on the external device is set too low, this can cause background noise.
11 Other functions
11.1 Sleep timer
The sleep timer automatically switches the TECHNIRADIO 5 IR to Standby after the set time.
Select Main Menu > System Settings > Sleep and press the Scroll&Select/Snooze knob.
Use the Scroll&Select/Snooze knob to select a period after which the TECHNIRADIO 5 IR should switch off. You can choose between Off, 10, 15, 30, 45 and 60 minutes.
Press the Scroll&Select/Snooze knob to accept the setting.

When the sleep timer is active, a moon symbol appears on the display showing the time still available.
11.2 Alarm
The alarm switches on the TECHNIRADIO 5 IR at the set time. 2 alarm times can be programmed. The description of how to programme Alarm 1 serves as an example.
11.2.1 Setting the alarm
Select Main Menu > System Settings > Alarm and press the Scroll&Select/Snooze knob.
Use the Scroll&Select/Snooze knob to select an alarm you want to set up, then press the Scroll&Select knob.
The specific alarm parameters can then be set.
Repeat
Here you can select from Off (alarm is switched off), Daily (every day of the week), Once, Weekdays (Mon - Fri) or Weekends (Sat and Sun). Press the Scroll&Select/Snooze knob to accept the setting.
Time and date
Here you can enter the alarm time and date (if required). First use the Scroll&Select/Snooze knob to select the hours and press the Scroll&Select knob to accept. Then enter the minutes. Accept these in the same way, by pressing the Scroll&Select/Snooze knob.

If Repeat> [Once] has been selected, you must also enter the date as well as the time.
Mode
You then enter the source. The available options are BUZZER, Internet Radio, DAB or FM. Press the Scroll&Select/Snooze knob to accept the setting.
Programme
If you have selected Internet Radio, DAB or FM, you can then enter whether or not you want to be woken up by the last station listened to or by one from your Favourites list.
Volume
Finally you can set the alarm volume using the Scroll&Select/Snooze knob. Press the Scroll&Select/Snooze knob to accept.
Save
Press the Scroll&Select/Snooze knob to save the alarm.

The time must be read for the alarm to function properly. For more details, see Section 12.1.2.

When an alarm is active, an alarm symbol appears on the display.
11.2.2 Switching off the alarm after being woken
Press the Power button to switch the alarm off.

If you want to activate the snooze function, press the Scroll&Select/Snooze knob repeatedly when an alarm is active.
11.3 Equaliser
You can use the equaliser to adjust the sound according to your preferences.
Select Main Menu > System Settings > Equaliser and press the Scroll&Select/Snooze knob.
Use the Scroll&Select/Snooze knob to select one of the available equaliser presets (Normal, Middle, Jazz, Rock, Soundtrack, Classic, Pop, News or MyEQ). Press the Scroll&Select/Snooze knob to accept.
11.3.1 MyEQ
Select Main Menu > System Settings > Equaliser > MyEQ and press the Scroll&Select/Snooze knob.
Use the Scroll&Select/Snooze knob to select either [Treble] to adjust the treble, or [Bass] to adjust the bass. Then press the Scroll&Select/Snooze knob.
You can now use the Scroll&Select/Snooze knob to set a value between -10 and +10. Press the Scroll&Select/Snooze knob to accept the setting.
12 System settings
12.1 Time and date settings
12.1.1 Manually setting the date and time
Depending on the setting for time updates (Section 12.1.2), the date and time might have to be set manually.
Select Main Menu > System Settings > Time and Date and press the Scroll&Select/Snooze knob.
Use the Scroll&Select/Snooze knob to select the [Time/Date Setting] item, then press the Scroll&Select knob.
The first digits (day) of the date flash and can be changed using the Scroll&Select/Snooze knob.
Press the Scroll&Select/Snooze knob to accept the setting.
The next date digits (month) then start to flash and can again be changed as described above.
Press the Scroll&Select/Snooze knob after every additional setting in order to go to the next setting.
Proceed with the time in the same way as described above.
After all settings have been made and the Scroll&Select/Snooze knob has been pressed for the final time, [Time Saved] appears on the display.
12.1.2 Time update
Here you can specify whether time updates should be carried out automatically via DAB+, FM or the Internet, or whether you wish to enter them manually (Section 12.1.1).
In System Settings > Time and Date, select the [Time Updating] item.
Use the Scroll&Select/Snooze knob to select one of the following options:
[Update from DAB] (Update via DAB+ only)
[Update from FM] (update only via FM)
[Update from Net] (update via Internet)
[No Updates] (time/date must be entered manually, see Section 12.1.1).
Press the Scroll&Select/Snooze knob to save the setting.
12.1.3 Setting the time format
Under Set format you can activate the 12 or 24 hour format.
Use the Scroll&Select/Snooze knob to select one of the following options:
[24 hours]
[12 hours]
Press the Scroll&Select/Snooze knob to save.
12.1.4 Setting the time zone
Under Set Time Zone you can enter the current location of the device.
Use the Scroll&Select/Snooze knob to select a time zone, then save by pressing the Scroll&Select knob.

The setting is only visible and relevant if updating via the Internet has been selected.
12.1.5 Summer time
Use the Scroll&Select/Snooze knob to select Summer Time > On or > Off.

The setting is only visible and relevant if updating via the Internet has been selected.
12.2 Internet settings
Select System settings > Internet settings to establish a connection to a WiFi network.
In this menu you will find some settings and information about Internet connection.
Select Network wizard to establish a WiFi connection.

The network wizard shows you all the WiFi stations within range. Select the WiFi network you recognise and select Skip WPS. Then enter the appropriate password using the displayed keyboard. Then select OK to be password entered is correct, a connection to the network is now established. The signal bar in the status bar of the display indicates whether the connection has been established.

Select CANCEL to abort the data entry. If you make a typing error you can delete the last letter entered using BKSP
12.2.1 WPS connection
Select PBC WLAN set up if your router has the WPS 2.0 function. This establishes a direct connection to the router without having to enter the WiFi password.

If you activate WPS on your router, please observe its instruction manual.
Start WPS on your router by pressing the corresponding button.
After you have called up the PBC WLAN set up function, press the Scroll&Select/Snooze knob button to establish the WPS connection.
You can also use the WPS function in the network wizard. To do this first select a WiFi network and then select the Press Button or PIN option. You can otherwise use Skip WPS to reach manual password entry.
i To find out more about the current connection select Settings.
i Select Manual setting, if you know your network parameters and would like to configure them manually. Take note of the instructions on the display.
i Select Delete network profile to delete connections no longer required.
If the network connection should be retained in standby, select Enable Network Connection in Standby > Yes. However, doing so will increase the power consumption.
12.3 Set-up wizard
On first switching on and after a factory settings reset, the set-up wizard is automatically launched.
First select the Display Language and then > YES as soon as Perform now is shown on the display.
i If you select No, the wizard closes and you must perform the required settings manually.
You will be taken through the settings in various steps.
Under Time format, select the desired display format for the time display (Section 12.1.3).
During the next step you must select via which source the time is to be synchronised (for more information refer to Section 12.1.2).
You can then set up a WiFi network connection. For more details, see Section 12.2.
Press the Scroll&Select/Snooze knob to close the wizard when Set-up Wizard Completed appears in the display.
12.4 Backlight
Under System settings > Backlight you can adjust the brightness of the display for Operation and for Standby. You can choose between High, Medium and Low. Confirm the selection by pressing the Scroll&Select/Snooze knob. Under Auto Dim you can set the time after which the display is automatically dimmed.
12.5 Language
You can alter the system language under System settings > Language. Confirm the selection by pressing the Scroll&Select/Snooze knob.
12.6 Factory settings
Select System Settings > Factory settings to reset the TECHNIRADIO 5 IR to its delivery status. Calling up the factory settings resets all changes and settings you have made!
12.7 Info
Under System Settings > SW Version you will see the currently installed software version.
12.8 Software update
The TECHNIRADIO 5 IR's software can be updated via the Internet.
Select Auto Update to switch periodic checks for new software versions On or Off.
Select Check Now to start checking for new software.

If new software is being installed, the device should not be switched off or disconnected from the mains. Doing so can damage the unit.

If a software update has been located, follow the instructions on the display.

In order to find and upload software updates, the device must be connected to the Internet. Do not switch the device off during the update process and do not disconnect it from the mains power supply!
13 Cleaning the radio

WARNING!
To prevent the risk of electric shock, you must not clean the device using a wet cloth or under running water. Remove the plug from the mains socket before cleaning.

You must not use scouring pads, scouring powder and solvents such as alcohol or petrol.
Clean the housing using a soft, damp cloth.
14 Troubleshooting
| Symptom Possible cause/remedy | |
| No radio station is being received. The device is not currently in radio mode. Press the MODE button. | |
| No DAB signal is being received. Check with whether DAB reception is possible in your region. Readjust the antenna. Try to receive other stations. | |
| The sound is weak or of poor quality. | Other devices such as televisions are disrupting reception. Move the unit further away from these devices. |
| The antenna is not extended or correctly orientated. Extend the antenna. Rotate the antenna to improve reception. | |
| The device cannot be switched on. Check the mains adapter. | |
| No sound can be heard. Increase the volume. Remove the headphone jack from the device if you want to listen via the speaker. It is possible that the wrong source was selected. | |
| Distorted sound can be heard. In the vicinity of the device, a mobile phone or other device is emitting disruptive radio waves. Remove the mobile phone or device from the vicinity of the radio. | |
| Other operational malfunctions occur, such as loud noises or a malfunctioning display. | Electronic device components are faulty. Remove the mains plug. Leave the device disconnected from the power source for approx. 10 seconds. Reconnect the device. |
| The display does not switch on. Switch the device off. Remove the mains plug, reinsert it and switch the device on. Check the display brightness setting. | |
15 Technical data
| Power supply DC 8V, 2A | |
| WiFi 802.11 b/g/n. | WEP and WPA/WPA2 encryption |
| WiFi frequencies and transmission capacity | 2.412 ~ 2.472 GHz (802.11 b/g/n)1.5 dB |
| Reception frequencies DAB: Band III, 174 | MHz - 240 MHzFM: 87.5 MHz - 108 MHz |
| Music output 2 x 5W RMS | |
| Power consumption Operating (max): < 15 WStandby: < 2 W | |
| Operating ambient conditions 5~35 °C | |
| Dimensions 270x114x188 mm | |
| Weight 1.7 kg |
Technical data for supplied power cable
| Manufacturer TechniSat Digital GmbH, TechniPark,D-54550 Daun/Eifel, Germany | |
| Model number OBL-0802000E | |
| Input voltage AC 100 - 240 V | |
| Input AC frequency 50/60 Hz | |
| Output voltage | DC 8.0 V |
| Output current | 2.0 A |
| Output capacity | 16.0 W |
| Average efficiency during operation | 85.2 % |
| Efficiency under low load (10%) | 74.9 % |
| Power consumption under zero load | 0.06 W |
The dimensions are approximate values.
2 Illustrations....71
13 Apparaat schoonmaken....126
14 Problemen oplossen 127
8.2.8 Volume regelen (DRC)
- Contents
- FM mode....54
- AUX mode 56
- System settings....58
- Cleaning the radio....62
- Illustrations
- Safety instructions
- Signs and symbols used
- In this instruction manual:
- On the unit:
- Intended use
- Using the product safely
- WARNING!
- Legal notices
- Service instructions
- Description of the TECHNIRADIO 5 IR
- Scope of delivery
- Features of the TECHNIRADIO 5 IR
- Preparing the TECHNIRADIO 5 IR for operation
- Connecting the mains adapter
- Aligning the telescopic antenna
- Setting up the TECHNIRADIO 5 IR
- Using headphones
- General device functions
- Switching on the device
- Switching off the device
- Source selection
- Alternatively:
- Adjusting the volume
- Retrieving displays
- Internet radio:
- DAB+
- FM mode:
- Display
- Menu operation
- Main menu
- Internet radio
- Last listened to
- Station list
- Saving Internet Radio stations in the device's favourites memory
- Selecting the programmed stations
- Deleting a saved memory slot
- Playing music (UPnP media)
- Playing media
- Providing music via the Windows media player
- Controlling playback
- DAB+ (digital radio) function
- What is DAB+?
- DAB+ (digital radio) reception
- Performing a complete scan
- Selecting stations
- Storing DAB+ stations in a memory slot
- Retrieving DAB+ stations from a memory slot
- Overwriting/deleting a station memory slot
- Signal intensity
- Manual setting
- Volume adjustment (DRC)
- Deleting inactive stations
- Station sequence
- FM mode
- Switching on FM radio mode
- FM reception with RDS information
- Automatic station scan
- Manual station scan
- Scan setting
- Audio settings
- Saving FM stations to a memory slot
- Retrieving FM stations from a memory slot
- Overwriting/deleting a station memory slot
- AUX mode
- Other functions
- Sleep timer
- Alarm
- Setting the alarm
- Repeat
- Time and date
- Mode
- Programme
- Volume
- Save
- Switching off the alarm after being woken
- Equaliser
- MyEQ
- System settings
- Time and date settings
- Manually setting the date and time
- Time update
- Setting the time format
- Setting the time zone
- Summer time
- Internet settings
- WPS connection
- Set-up wizard
- Backlight
- Language
- Factory settings
- Info
- Software update
- Cleaning the radio
- Troubleshooting
- Apparaat schoonmaken....126
- Problemen oplossen 127
- Volume regelen (DRC)
Brand : TECHNISAT
Model : TechniRadio 5 IR
Category : Radio