V-LA03 - Drone Valore - Free user manual and instructions
Find the device manual for free V-LA03 Valore in PDF.


| Product Type | Mini Drone |
| Brand | Valore |
| Model | V-LA03 |
| Drone Dimensions (L x W x H) | 130 x 130 x 30 mm |
| Controller Dimensions (L x W x H) | 97 x 60 x 34 mm |
| Drone Weight | 44.2 g |
| Controller Weight | 55.3 g |
| Battery Type | 3.7V 300mAh Li-Po (included) |
| Charging Time | Approx. 35 minutes |
| Flight Time | Approx. 6-8 minutes |
| Camera Resolution | 2.0 MP |
| Video Resolution | 1280 x 720 @ 30fps |
| Camera Lens | 120° wide-angle |
| Max Speed | 7.2 km/h |
| Control Range (outdoor) | Up to 50 m |
| Frequency | 2.4 GHz |
| Supported Storage | micro SD card up to 32 GB (Class 6 or above) |
| Material | ABS + PC |
| Flight Modes | 3-channel and 4-channel |
| Gyroscope | 6-axis |
| Stunt Features | Roll over (flip) |
| Speed Settings | Multiple levels (indicated by LEDs) |
| Package Includes | Drone, controller (AAA batteries not included), extra blades (x8), USB cable |
| Warranty & Support | Email v.info@valore.sg, visit www.valore.sg |
| Safety Precautions | Keep dry, avoid heat, do not disassemble, replace damaged blades |
Frequently Asked Questions - V-LA03 Valore
User questions about V-LA03 Valore
0 question about this device. Answer the ones you know or ask your own.
Ask a new question about this device
Download the instructions for your Drone in PDF format for free! Find your manual V-LA03 - Valore and take your electronic device back in hand. On this page are published all the documents necessary for the use of your device. V-LA03 by Valore.
USER MANUAL V-LA03 Valore
Thank you for purchasing the Valore Mini Drone With 2.0 Camera.
Get superior stability for both indoor and outdoor footage capturing while enjoying a smooth piloting experience with the latest built-in 6 axis technology to resist strong wind.
Important: Please read the user manual thoroughly before using your Mini Drone.
Specifications:
- Camera lens: 120^ wide-angle
• Video resolution: 2.0 MP
• Image resolution: 1280 x 720 @30fps
• Maximum speed: 7.2 km/h
• Maximum charging time: 35mins max - Controller wireless range: 50m max (outdoor)
- Storage: Up to 32GB micro SD card (class 6 and above)
- Material: ABS + PC
- Battery for drone: 3.7V 300mAh (included)
- Drone dimensions (L x W x H): 130 x 130 x 30mm
- Controller dimensions (L x W x H): 97 x 60 x 34mm
- Drone weight: 44.2g
- Controller weight: 55.3g
Package Cor
- Mini drone with 2.0 MP camera
• 2.4G remote controller (2 x AAA batteries not included) - Extra blade x 8
- USB cable
UNDERSTANDING THE PRODUCT

① On/Off connector
② Micro SD card slot
③ Battery
④ Blades
⑤ Protecting frame
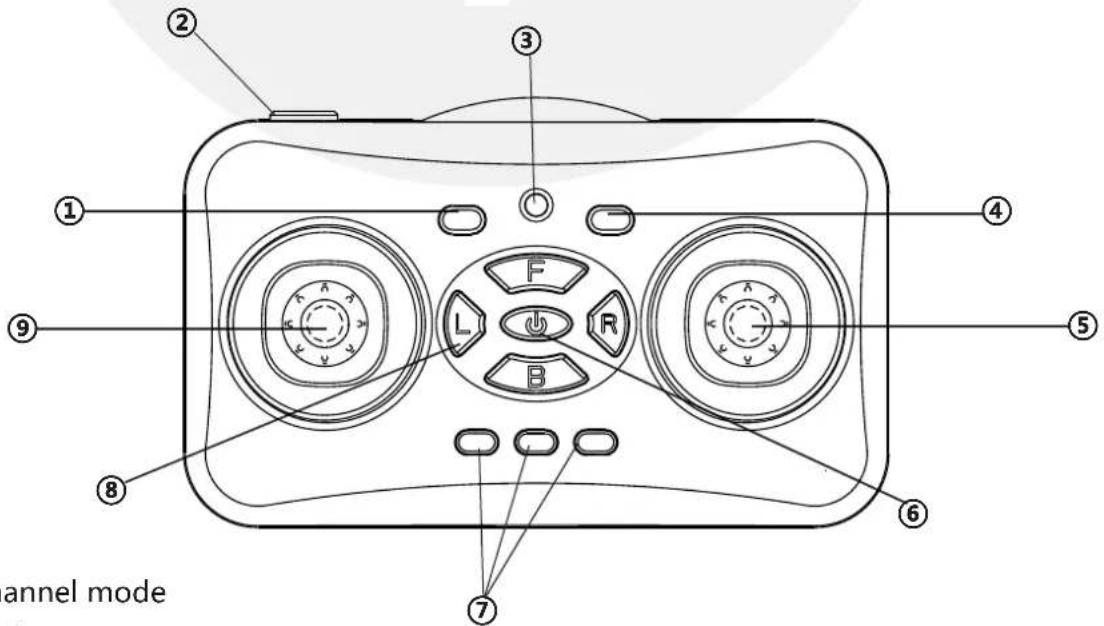
3 Channel Mode

① Photo/3 channel mode
② Speed/Stunt
③ Indicator
④ Video/4 channel mode
⑤ Turning/Forward/Backward
⑥ On/Off switch
⑦ Speed indicator
⑧ Trim
⑨ Side to side/Altitude
4 Channel Mode
① Photo/3 channel mode
② Speed/Stunt
③ Indicator
④ Video/4 channel mode
⑤ Side to side/Forward/Backward
⑥ On/Off switch
⑦ Speed indicator
⑧ Trim
⑨ Turning/Altitude
START USING MINI DRONE
1) Charging the battery
a) Insert battery plug into charger and charging cable provided to a charging adaptor or PC. When the battery is fully charge, the red light on the charger will go off.
Note: Average charging time is approx. 35 minutes. The mini drone operates for approx. 6-8 minutes.

natural_image
Simple line drawing of a device with cable and plug, no text or symbols present2) Switching On/Off
a) Switch on the mini drone by connecting the On/Off connector located at the back of the mini drone.
b) Switch on the controller by pressing onto the On/Off switch. The indicator will be red.
3) Pairing the controller to the mini drone
a) After switching both the mini drone and controller on, push the left control lever all the way up (there will be a beep) and down (there will be another beep). The mini drone and controller is now connected.
After it is connected, your left control lever acceleration is on zero.

a) Hovering up and down
Push left control lever up or down, the mini drone flies upward or downward.

natural_image
Diagram of a drone with four wheels and directional arrows indicating flight or movement (no text or symbols)
b) Forward and backward
Push right control lever up or down, the mini drone flies forward or backward.

natural_image
Top-down line drawing of a four-blade drone with propellers and directional arrows indicating flight or movement (no text or symbols)
natural_image
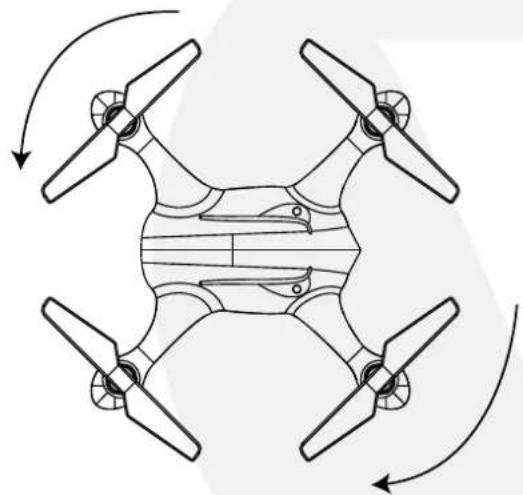
Front view of a control panel with three rotary buttons labeled L, F, R and B, showing directional arrows (no text or symbols beyond labels)c) Rotating clock-wise and anti clock-wise
natural_image
Diagram of a four-bladed drone with propellers and directional arrows indicating rotation (no text or symbols)
natural_image
Line drawing of a portable air conditioner front panel with control buttons and indicator lights (no text or symbols)d) Side to side

natural_image
Two identical line-drawn drones with directional arrows indicating motion or rotation (no text or symbols)
e) Changing speed

natural_image
Line drawing of a car front bumper with a black arrow pointing to the top edge (no text or symbols)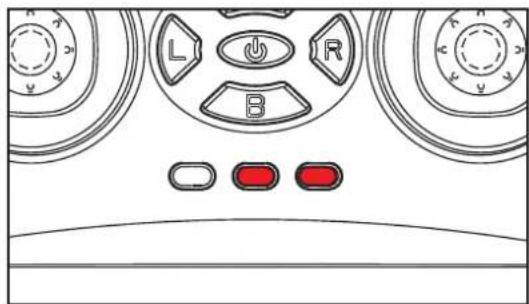
Press the button on the top left of the controller to set the speed for the drone.
The 3 LED indicator located at the bottom of the controller will tell you the speed of the drone.
5) Replacing the propeller blade
When replacing the propeller blades, make sure to match both the colour of the blades and the letter indicated at th bottom of the blade.
Grey Blade Front (Left)= F Grey Blade Front (Right)= R
Black Blade Back (Left)= R Black Blade Back (Right)= F

6) Changing channels
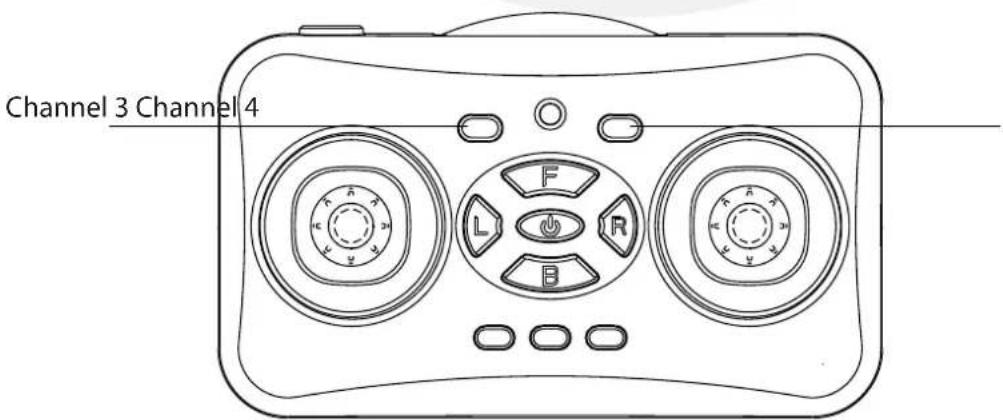
Short press onto the channel 3 button located on the controller, there will be 3 beeps to indicate connected.
Short press onto the channel 4 button located on the controller, there will be 4 beeps to indicate connected.
7) Stunt flying
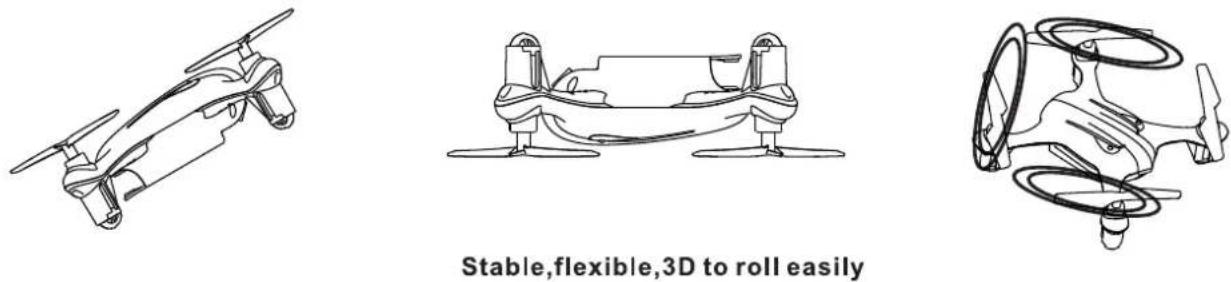
Fly the mini drone more than 2 meters high, press and hold the stunt button the push the control lever of forward/backward or side/side. The mini drone can roll over.
8) Video recording and photo taking
After inserting the Micro SD card into the slot, short press the photo button located on the controller to take a photo. The tail (red LED) of the mini drone lamp flashes after photo is taken.
Short press the video button to start recording, short press again to stop recording. When in recording mode, the tail of the mini drone lamp flashes slowly.

Trouble Shooting During Flight
Situation:
After mini drone is switched on, the LED indicators keeps flashing, no response when operating.
Cause:
a) Unable to pair to transmitter
b) Mini drone battery is insufficient
Solution:
Pair remote controller and mini drone when battery is fully charged.
Situation:
Blades continue to spin after landing.
Cause:
Accelerating control lever is not on the lowest position.
Solution:
Make sure accelerating control lever is on the lowest position.
Situation:
The mini drone keeps turning after trim/has inconsistent speed during left/right turn.
Cause:
a) The blade is not packed in place.
b) Blades are deformed.
c) Blades do not match code.
Solution:
Replace the blades and make sure to place it in the right front/back position.
TECHNICAL SUPPORT & WARRANTY
- For Technical Support, email us at v.info@valore.sg.
- For Warranty Registration, visit www.valore.sg.
Cautions:
Read all the instructions and warnings carefully prior to using this product.
- Do not store the mini drone in a high temperature environment.
- Do not place the mini drone near a fire or other excessively hot environments.
- Do not expose this mini drone to moisture or submerge it in liquid. Keep mini drone dry at all times.
- Do not disassemble this mini drone or attempt to repair or modify it in any manner.
- Be cautious of excessive drops, bumps, abrasions or other impacts to this mini drone. If there is any damage to the mini drone such as dents, punctures, tears, deformities or corrosion, stop using the mini drone and contact us immediately via email at v.info@valore.sg, or return this product to the store where you have purchased it from.
- If the product produces an abnormal smell, high temperature (low temperature during normal use), discolours or changes shape abnormally, stop using the product and contact us immediately via email at v.info@valore.sg.
DISCLAIMER & TRADEMARKS
All information, trademarks, logos, graphics, and images (“Materials”) provided on this user manual are copyrighted or trademarked and are the property of Valore Lifestyle Pte Ltd. Any unauthorized use of any material contained on the instruction manual may violate copyright laws, trademark laws, laws of privacy and communications statutes.
The trademarks, service marks and logos used and displayed in the Materials are registered and unregistered trademarks and service marks of Valore and others. All other registered and unregistered company names, product names and marks mentioned herein the (“Materials”) are the property of their respective owners and may be trademarks or registered trademarks.
Complies with
IDA standards
DA 103331


- Specifications:
- Package Cor
- Channel Mode
- Channel Mode
- START USING MINI DRONE
- 1) Charging the battery
- 2) Switching On/Off
- 3) Pairing the controller to the mini drone
- 5) Replacing the propeller blade
- 6) Changing channels
- 7) Stunt flying
- 8) Video recording and photo taking
- Trouble Shooting During Flight
- Situation:
- Cause:
- Solution:
- TECHNICAL SUPPORT & WARRANTY
- Cautions:
- DISCLAIMER & TRADEMARKS
Brand : Valore
Model : V-LA03
Category : Drone