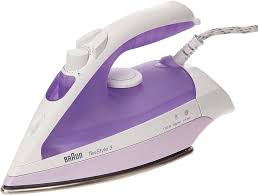
USER MANUAL TS320 TEXSTYLE 3 BRAUN
TR/RO/MD/GR/RU/UA/KZ/Arab
4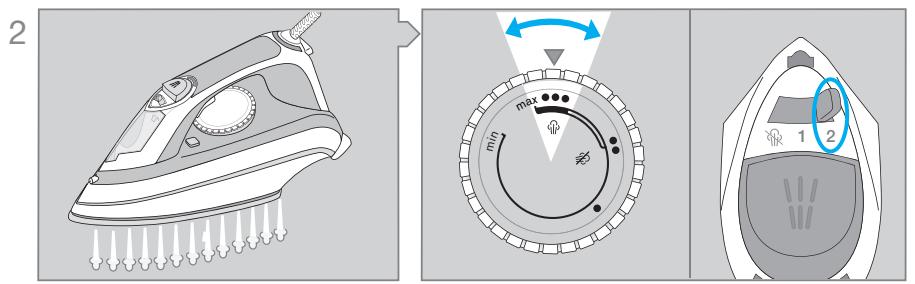
3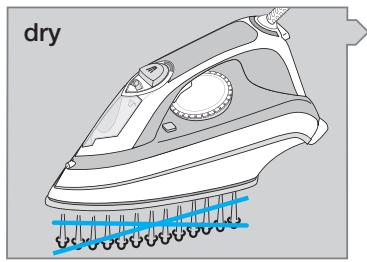
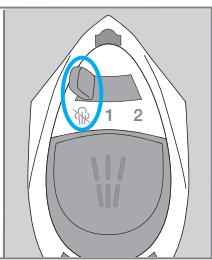
4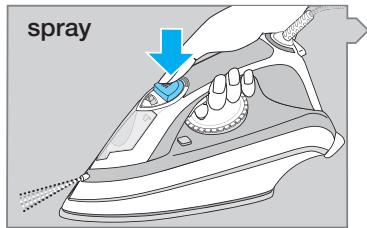
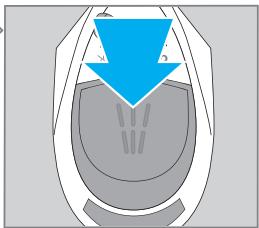
5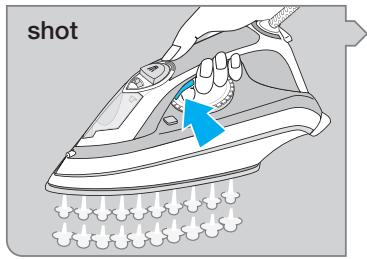
D auto-off (TS 355 A only)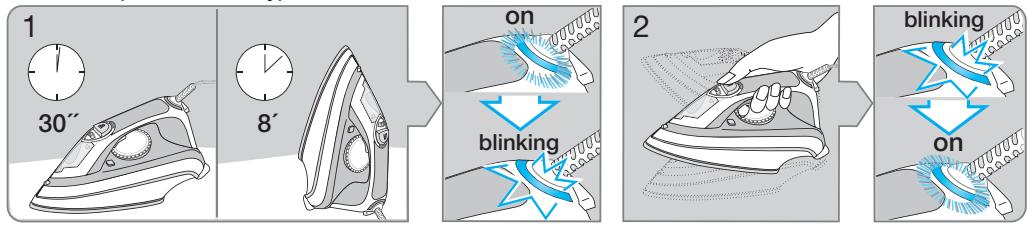
E self clean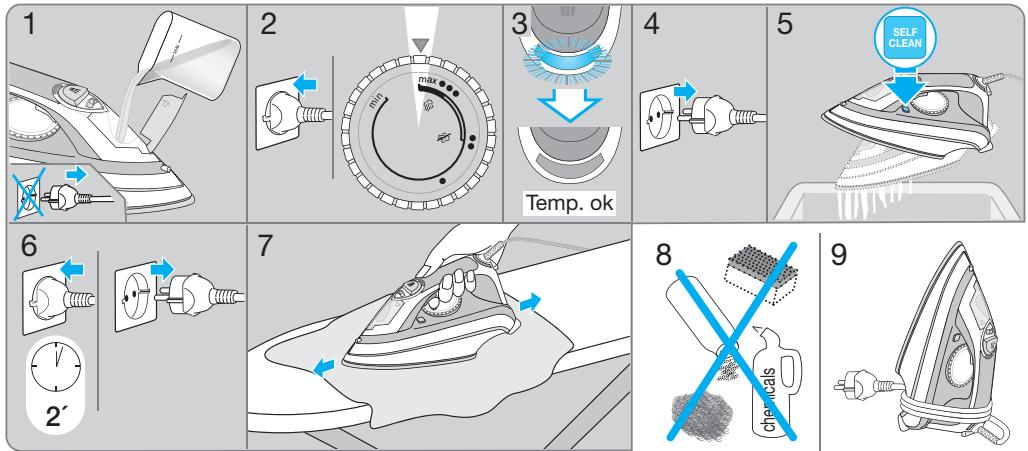
Deutsch
Our products are engineered to meet the highest standards of quality, functionality and design. We hope you enjoy your new Braun steam iron.
Important safeguards
- Before using the iron, read these instructions completely. Keep these instructions for the entire life of the appliance.
- Make sure your voltage corresponds to the voltage printed on the iron.
- The appliance is not intended for use by persons (including children) with reduced physical, sensory or mental capabilities, or lack of experience and knowledge, unless they are older than 8 years and understand the hazards involved and are being supervised or instruction is given concerning use of the appliance by a person responsible for their safety. Children should be supervised to ensure that they do not play with the appliance. Cleaning and user maintenance shall not be carried out by children unless they are older than 8 years and supervised.
- During operation and cool-down, the appliance and its mains cord shall be kept out of reach of children.
- Caution: Hot surfaces! Electric irons combine high temperatures and hot steam that could lead to burns. Always unplug the iron before filling with water. Always pull the plug, not the cord.
- Do not open the water tank cover during ironing.
- The cord should never come in contact with hot objects or the sole plate.
- Never immerse the iron in water or other liquids.
- The iron must be used and rested on a stable surface. During ironing pauses, always place the iron upright on its heel rest and
ensure that the heel rest is placed on a stable surface.
- The iron must not be left unattended while it is connected to the mains supply.
- Never iron or dampen clothes while wearing them.
- The iron is not to be used if it has dropped, if there are visible signs of damage or if it is leaking.
- Regularly check the cord for damage.
- If the appliance (including cord) shows any defect, stop using it and take it to a Braun Service Centre for repair. Faulty or unqualified repair work may cause accidents or injury to the user. Braun electric appliances meet applicable safety standards.
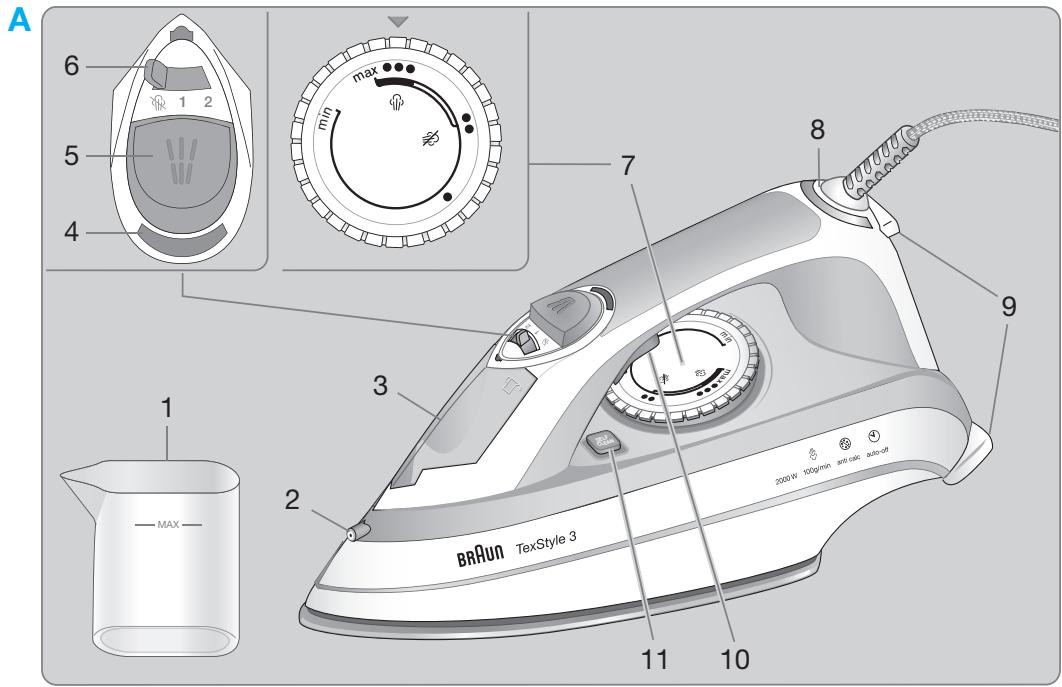
A Description
1 Water beaker 2 Spray nozzle 3 Water tank opening 4 Pilot light 5 Spray button 6 Steam regulator pos. no steam pos. 1: min. steam pos. 2: max. steam 7 Temperature selector 8 Auto-off light (Auto Shut Off) (certain models only) 9 Heel rest 10 Steam shot button 11 Self clean button
B Before starting off
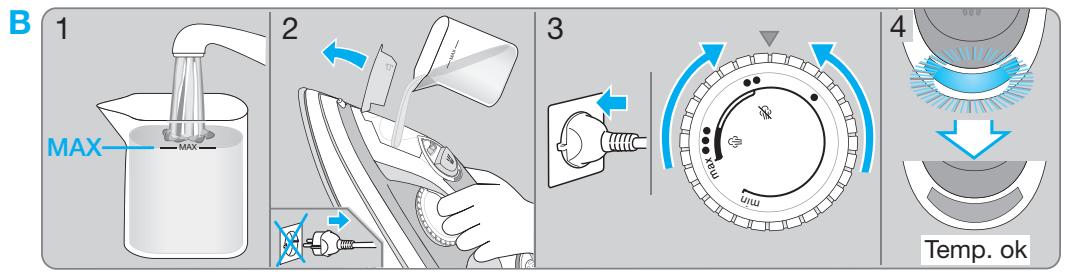
This iron is designed for tap water. If you have extremely hard water, we recommend that you use a mixture of 50% tap water and 50% distilled water.
Never use distilled water exclusively.
Do not add any additives (e.g. starch). Do not use condensation water from a tumble dryer.
- Before filling with water, turn off the steam regulator (R = steam off).
- Fill the water tank.
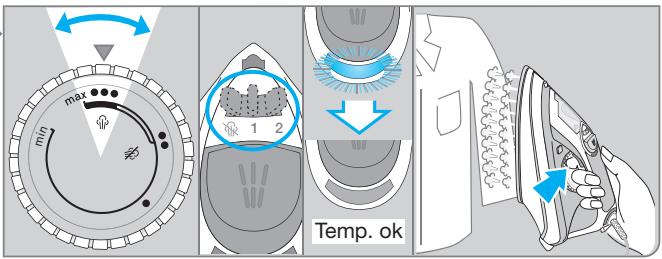
- Place the iron upright on its heel rest and connect it to the mains. Select the temperature according to the label in your garments or the ironing guide on the heel rest of the iron. The pilot light (4) turns off when the desired temperature is reached.
C Ironing
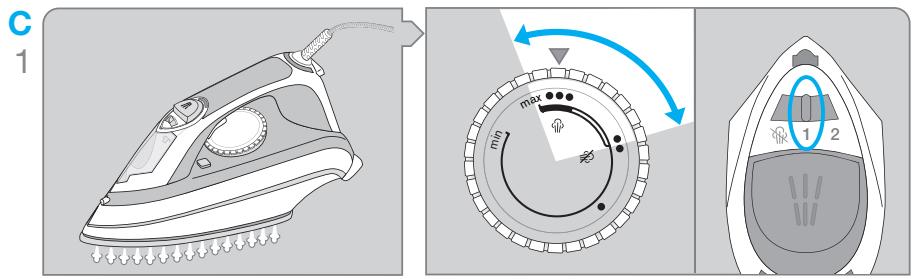
1 + 2 Variable steam
You can select the steam quantity using the steam regulator (6) (0 = no steam, 1 = minimum steam,
2 = maximum steam). The temperature selector must be set between «●●●» and «max».
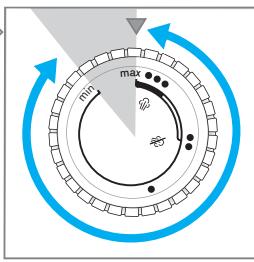
3 Dry ironing
Set the steam regulator (6) on position R (=steam off).
4 Spray function
Press the spray button (5).
5 Steam shot function
Steam shot can be activated when dry ironing. The temperature selector must be set between «●●» and «max».
To obtain a good steam jet, wait a few seconds between one shot of steam and the next.
The steam shot function can also be used in the vertical position for steaming hanging clothes.
D Auto-off (certain models only)
The orange «auto-off» light (8) will flash when the automatic shut-off is activated. This happens when the iron is left unused:
- horizontally on its sole plate for about 30 seconds or
- vertically on its heel rest for about 8 minutes.
To begin ironing again, shake the iron slightly forwards until the light (8) comes on steadily
E Self cleaning
Over time, the lime in the water causes scale to build up inside the iron. To prevent the scale reducing steam production, you should perform the «self clean» procedure every two weeks.
Proceed as described on page 5:
- Place the steam regulator on «» and fill the water tank.
- Plug the appliance into the mains and place the temperature selector in the «max» position. The pilot light is on.
- The pilot light turns off (the iron is at temperature).
- Unplug the appliance from the mains.
- Hold the appliance over a sink, press the self clean button (11) and, holding the button down, shake the iron delicately forwards and backwards. Residues of scale and other impurities mixed with boiling water come out of the sole plate. Release the Self Clean button when the water tank is empty.
- Plug the appliance into the mains socket and leave in operation for at least two minutes to dry
the sole plate. Unplug the appliance from the mains socket.
- Move the sole plate over a cloth to remove any residues.
- Never use steel wool, abrasive scouring pads, powders or other chemicals to clean the sole plate.
- Leave the iron to cool down completely, then store away.
After ironing
Unplug the iron and turn the steam regulator to position «». To prolong the life of the iron, empty the water tank. Store the cool iron in a dry place always standing on its heel rest.
Maintenance and cleaning
To prevent damaging the sole plate, do not iron over metal buttons or zippers.
Clean the sole plate regularly with a damp cloth. To remove mineral/starch residues, use a vinegar/ water mixture in the ratio of 1 : 2 . Never use steel wool, abrasive scouring pads, powders or other chemicals to clean the sole plate.
Do not use commercial decalcifiers, they may damage the iron.
Trouble-shooting guide
| Problem | Remedy |
| Drops coming out of the steam vents | Select steam regulator to pos. «1» or turn the steam off.
Take longer intervals when pressing the steam shot button.
Select a higher temperature setting. |
| Less steam develops or no steam at all | Check water level.
Perform self cleaning procedure (E). |
| Calcium particles coming through the steam vents | Perform Self Cleaning procedure (E). |
Subject to change without notice.
Please do not dispose of the product in the household waste at the end of its useful life.
Disposal can take place at a Braun Service Centre or at appropriate collection points provided in your country.

For UK Only
Guarantee Information
All Braun Household products carry a minimum guarantee period of two years. The rights and benefits under this guarantee are additional to your statutory rights, which are not affected.
In the unlikely event of a breakdown, you have access to professional help from our team simply by calling:
02392 392333
For service in the Republic of Ireland, please call:
012475471
Braun Household undertakes, within the specified period, to repair or replace any part of the appliance, free of charge (with the exception of any glass or porcelain-ware incorporated in the product), found to be defective, provided that:
- We are promptly informed of the defect.
- The product is used and maintained in accordance with the User Instructions.
- The appliance has not been altered in any way or subjected to misuse or repair by a person other than an authorized service agent for Braun Household.
- No rights are given under this guarantee to a person acquiring the appliance second hand or for commercial or communal use.
- Any repaired or replaced appliance will be guaranteed on these terms for the unexpired portion of the guarantee.
- The need for repair has not been caused by insufficient aftercare or cleaning, or damage caused by the chemical or electrochemical effects of water.
Under no circumstances shall the application of this guarantee give rise to the complete replacement of the appliance or entitle the consumer to damages.
Braun Household, New Lane, Havant, Hampshire PO9 2NH
www.braunhousehold.co.uk
Français
7 Temperature regulator
8 Automatic shut-off indicator light (auto off) (some models only) 9 Resting base 10 Steam shot switch 11 Self-clean switch
B Before you start ironing
Safety instructions:

Read all instructions before using the appliance. Keep the instructions in a safe place. The appliance is designed for household use only. - This appliance can be used by children aged 8 and above and by persons with reduced physical, sensory or mental capabilities, or lack of experience and knowledge, if they have been given supervision or instruction concerning use of the appliance in a safe way and understand the hazards involved. Children shall not play with the appliance. Cleaning and user maintenance shall not be made by children unless they are older than 8 and supervised. Keep the appliance and its cord out of reach of children less than 8 years old. Caution: Hot surfaces! Electric irons can cause burns. Never touch the soleplate while the iron is hot. Always unplug the iron before filling with water. Do not pull the cord to unplug; instead, grasp the plug and pull. Do not let the cord touch hot surfaces or the hot soleplate. Do not immerse the iron in water or other liquids. Always place the iron on its heel rest on a stable surface. Do not leave the iron unattended while it is connected to the mains. Do not use the iron if it has been dropped, if there are visible signs of damage, or if it is leaking. Check the cord regularly for damage. If the cord is damaged, it must be replaced by the manufacturer, its service agent, or similarly qualified persons to avoid a hazard.
We recommend that you have the appliance checked by an authorized service center. Repairs or maintenance carried out by unqualified persons can be dangerous and may void the warranty. Braun complies with the applicable safety standards for electrical appliances.
A Description
1 Water tank 2 Steam burst button 3 Water spray button 4 Temperature control 5 Steam burst button 6 Steam control
Pos. 1: steam burst, Pos. 2: steam control
7 Temperature settings 8 Auto Off Light 9 Auto Shut Off (depending on model) 10 Steam burst button 11 Self Clean button
In the water tank
The appliance is designed for use with tap water. If the tap water in your area is very hard, we recommend mixing tap water with 50% distilled water and 50% tap water. Do not use distilled water alone. Add a few drops of starch (potato starch). Do not use condensation water from the dryer.
To select the temperature, turn the steam selector (≡ to steam). Set the temperature. Place the iron on its heel, unplug it from the power supply. If the iron is not on its heel, set the temperature to the lowest setting. - After the selected temperature is reached, the indicator light (4) goes out.
Ironing
1+2 Without steam
To select the steam setting, turn the steam selector (6) (≡ = steam, 1 = low steam, 2 = high steam). The temperature must be between "..." and "max".
3 Steam ironing
Turn the steam selector (6) to "≡" (steam).
4 Spray function
This iron, Braun TexStyle 3,
Type 12730000 (TS 345)
Type 12730001 (TS 355 A)
220-240 V, 50/60 Hz, 2000 W
For household use only
DeLonghi Haushalts GmbH
Terminal für:
DeLonghi Haushalts GmbH
Karl-Ulrich-Straße H
63263 Neu-Isenburg
Bitte lesen Sie diese Anleitung sorgfältig durch, bevor Sie das Gerät benutzen. Die Bedienungsanleitung ist für den bestimmungsgemäßen Gebrauch des Geräts aufbewahren.
Importeur: «DeLonghi» GmbH,
Russland, 127055, Moskau, Sushchevskaya-Straße, 27/3
(Gebäude 27, Gebäude 3)
Tel. +7 (495) 781-26-76

Russisch
Unsere Produkte entsprechen den höchsten Qualitäts-, Funktions- und Designanforderungen. Wir hoffen, dass Sie mit Ihrem neuen Dampfbügeleisen zufrieden sein werden.
Sicherheitshinweise
- Before using the iron, carefully read the instructions. Keep them for future reference while using the product. - Make sure the mains voltage matches the value indicated on the iron. Children under 8 years of age, as well as persons with reduced physical, sensory or mental capabilities or lack of experience and knowledge, may use the appliance only under supervision or after having been given instructions concerning safe use and understanding the hazards involved. The iron is not a toy. Do not allow children under 8 years of age to use or clean the iron without supervision. - Children under 8 years of age must be kept away from the iron and its cord while it is heating up or cooling down. Caution! Hot surface! During operation, the soleplate becomes very hot and emits steam, which can cause burns. - Before filling or emptying the water tank, unplug the iron from the mains. Pull the plug, not the cord. Do not open the water tank cap while the iron is in use. Do not allow the power cord to come into contact with hot objects or the soleplate. - Never immerse the iron in water or other liquids. For ironing, choose a stable surface. During pauses between ironing, always place the iron on its heel. Make sure the iron is on a stable surface. Do not leave the iron unattended while it is plugged in. Never iron or steam clothes while they are being worn. Do not use the iron if it leaks or shows other signs of damage. - Regularly check the cord for damage. In case of malfunction of the iron (or cord), take it to a Braun service center for repair. Unqualified repairs can lead to accidents or injury. Braun electrical appliances comply with the relevant safety standards.
Description
1 Measuring cup 2 Sprayer opening 3 Water tank opening 4 Temperature regulator indicator 5 Sprayer button 6 Steam regulator:
—without steam;
1 - minimum steam supply; 2 - maximum steam supply
7 Thermostat 8 Automatic shut-off indicator (only in certain models) 9 Steam button 10 Steam supply button 11 Self-cleaning activation button
Before first use
For this iron, you can use tap water. If the water is very hard, we recommend using a mixture of tap water and distilled water (1:1). Never use only distilled water. Do not add any substances to the water (e.g., starch). Do not use water from a tumble dryer.
- Before filling the water tank, turn the steam regulator to the appropriate position (without steam). Fill the water tank with water. - Place the iron on the base and connect it to the power. Set the temperature switch to the desired mode (according to the thermostat values for the fabric). The regulator indicator (4) goes out as soon as the iron reaches the selected temperature.
Steaming
1+2 Adjusting the amount of steam
You can choose the amount of steam released during steaming using the steam regulator (6) (without steam, 1 - minimum amount, 2 - maximum amount). The thermostat position should be in the range from «***» to «max».
3 Dry ironing
For ironing without steam, turn the steam regulator (6) to the position (without steam).
4 Sprayer
Press the sprayer button (5).
5 Steam burst
The steam burst function can be tested during ironing.
Follow the instructions on page 5.
- 1. Set the steam regulator to position «0» and fill the reservoir with water. 2. Connect the iron to the mains. 3. Then set the thermostat to position «max»; the temperature indicator light will come on.
- The indicator light will go out when the iron has reached the appropriate temperature.
- 4. Unplug the iron. 5. Hold the iron over a sink, press the button (11). While holding the button, gently shake the iron several times. Steam and water with scale and other impurities will start to come out of the holes in the soleplate. Release the button when the water in the reservoir runs out. 6. Connect the iron to the mains and leave it for a few minutes to allow the soleplate to dry completely. Then unplug the iron.
- Iron a piece of cloth to remove any remaining scale.
- Never use a metal scourer, abrasive sponge, or chemical substances for cleaning.
- After use, when the iron has cooled down, store it away.
After ironing
Unplug the iron and turn the steam regulator to position «0». To keep the iron longer, always empty the water from the reservoir. Store
the cooled iron in an upright position in a dry place.
Care and cleaning
To avoid damage to the soleplate, do not iron over metal zippers, buttons, etc.
Regularly wipe the soleplate with a damp cloth. To remove starch residues, use a mixture of vinegar and water in a 1:2 ratio. Never use a metal scourer, abrasive sponge, or chemical substances.
Troubleshooting
Made in China
1 Steam outlet 2 Steam valve opening 3 Water tank opening 4 Temperature indicator 5 Steam valve button 6 Steam regulator:
- steamless;
1 - minimum steam amount; 2 - maximum steam amount
7 Temperature regulator 8 Automatic switch-off indicator (on some models) 9 Handle 10 Steam button 11 Self-cleaning activation button
D Automatic switch-off
Troubleshooting
Country of origin: China
Year of manufacture
To determine the year of manufacture, refer to the 5-digit production code located near the type plate. The first digit of the production code refers to the last digit of the year of manufacture. The next 2 digits refer to the calendar week in the year of manufacture. And the last 2 digits show the print date automatically calculated since 1992. Example: 30421 - The product was manufactured in week 4 of 2013.