LBD2000 - Blu-ray player Logik - Free user manual and instructions
Find the device manual for free LBD2000 Logik in PDF.
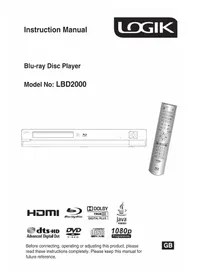


| Product Type | Blu-ray Player |
| Brand | Logik |
| Model | LBD2000 |
| Disc Compatibility | BD-ROM, BD-R/RE, DVD-Video, DVD±R/RW, CD-DA, CD-R/RW |
| Video Output | HDMI (1080p, 720p, 480p/576p), Composite Video |
| Audio Output | HDMI, Digital Coaxial, Stereo RCA |
| Upscaling | Up to 1080p Full HD |
| Connectivity | HDMI (1.4), USB 2.0, Ethernet, Digital Coaxial |
| Media Playback | Blu-ray, DVD, CD, JPEG, MP3, DivX, MKV, AVI |
| Dimensions (W x D x H) | Approx. 430 x 220 x 45 mm |
| Weight | Approx. 2.0 kg |
| Power Supply | AC 100-240V, 50/60Hz |
| Power Consumption | 20 W (typical), <0.5 W standby |
| Region Code | Blu-ray: B; DVD: 2 (Europe) |
| Remote Control | Included (batteries required: 2x AAA) |
| Cleaning | Wipe with a soft, dry cloth; do not use liquids or solvents |
| Safety | Do not expose to moisture, heat sources, or direct sunlight; unplug during storms |
| Spare Parts & Repairability | Contact Logik support for genuine spare parts; repair by qualified personnel |
| General Information | User manual available for free download at notice-facile.com |
Frequently Asked Questions - LBD2000 Logik
User questions about LBD2000 Logik
0 question about this device. Answer the ones you know or ask your own.
Ask a new question about this device
Download the instructions for your Blu-ray player in PDF format for free! Find your manual LBD2000 - Logik and take your electronic device back in hand. On this page are published all the documents necessary for the use of your device. LBD2000 by Logik.
USER MANUAL LBD2000 Logik
HDMI




Before connecting, operating, or adjusting this product, please read these instructions completely. Please keep this manual for future reference.
GB
Safety Information and Precaution
Safety Precaution
CAUTION!
THIS PRODUCT UTILIZES A LASER
USE OF CONTROLS OR ADJUSTMENTS OR PERFORMANCE OF PROCEDURES OTHER THAN THOSE SPECIFIED HEREIN MAY RESULT IN HAZARDOUS RADIATION EXPOSURE.
DO NOT OPEN COVERS AND DO NOT REPAIR YOURSELF. REFER SERVICING TO QUALIFIED PERSONNEL.
WARNING:
TO REDUCE THE RISK OF FIRE, ELECTRIC
SHOCK OR PRODUCT DAMAGE. DO NOT
EXPOSE THIS APPARATUS TO RAIN, MOISTURE, DRIPPING OR SPLASHING AND THAT NO OBJECTS FILLED WITH LIQUIDS, SUCH AS VASES, SHALL BE PLACED ON THE APPARATUS.

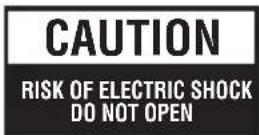

CAUTION: TO REDUCE THE RISK OF ELECTRIC SHOCK, DO NOT REMOVE SCREWS. NO USER-SERVICEABLE PARTS INSIDE.
REFER SERVICING TO QUALIFIED SERVICE PERSONNEL.

The lightning flash with arrowhead symbol, within an equilateral triangle, is intended to alert the user to the presence of uninsulated "dangerous voltage" within the product's enclosure that may be of sufficient magnitude to constitute a risk of electric shock to persons.

The exclamation point within an equilateral triangle is intended to alert the user to the presence of important operating and maintenance (servicing) instructions in the literature accompanying the appliance.
CAUTION!
DO NOT INSTALL OR PLACE THIS UNIT IN A BOOKCASE, BUILT-IN CABINET OR IN ANOTHER CONFINED SPACE. ENSURE THE UNIT IS WELL VENTILATED. TO PREVENT RISK OF ELECTRIC SHOCK OR FIRE HAZARD DUE TO OVERHEATING, ENSURE THAT CURTAINS AND ANY OTHER MATERIAL DO NOT OBSTRUCT THE VENTILATION VENTS.
Before moving the unit, ensure the disc tray is empty.
Failure to do so will risk severely damaging the disc and the unit.
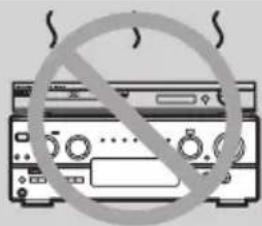
Do not place the unit on amplifiers or equipment that may become hot.
The heat can damage the unit.
Read these operating instructions carefully before using the unit. Follow the safety instructions on the unit and the applicable safety instructions
listed below. Keep these operating instructions handy for future reference.
1) Read these instructions.
2) Keep these instructions.
3) Heed all warnings.
4) Follow all instructions.
5) Do not use this apparatus near water.
6) Clean only with dry cloth.
7) Do not block any ventilation openings. Install in accordance with the manufacturer's instructions.
8) Do not install near any heat sources such as radiators, heat registers, stoves, or other apparatus (including amplifiers) that produce heat.
9) Protect the power cord from being walked on or pinched particularly at plugs, convenience receptacles, and the point where they exit from the apparatus.
10) Only use attachments/accessories specified by the manufacturer.
11) Use only with the cart, stand, tripod, bracket, or table specified by the manufacturer or sold with the apparatus. When a cart is used, use caution when moving the cart/apparatus combination to avoid injury from tip-over.
12) Unplug this apparatus during lightning storms or when unused for long periods of time.
13) Refer all servicing to qualified service personnel. Servicing is required when the apparatus has been damaged in any way, such as power-supply cord or plug is damaged, liquid has been spilled or objects have fallen into the apparatus, the apparatus has been exposed to rain or moisture, does not operate normally, or has been dropped.
Class 1 Laser Product
Use of controls, adjustments, or performance of procedures other than those specified herein may result in hazardous radiation exposure.
Caution!
This product utilizes a laser. Use of controls, adjustments, or performance of procedures other than those specified herein may result in hazardous radiation exposure. Do not open the cover and do not repair yourself. Refer servicing to qualified personnel.
Safety Information and Precaution
NOTES on HANDLING
- The top and rear panels of the unit may become warm after a long period of use. This is not a malfunction.
- When the unit is not in use, be sure to remove the disc and turn off the power.
- If you do not use the unit for a long period of time, the unit may not function properly in the future. Turn on and use the unit occasionally. • Do not place foreign objects on the tray.
LOCATION
Do not locate the unit in places such as:
• Near heating devices or in an enclosed vehicle. - High temperature (40°C or higher) or high humidity (90% or higher). - Dirty places. - Avoid direct exposure to sunlight.
ELECTRICAL DISTURBANCE
When you place this unit near a TV, radio or VCR, the playback picture may become poor and the sound may be distorted. In this case, place the unit away from the TV, radio or VCR.
NOTES ON MOISTURE CONDENSATION
The pickup may suffer from condensation under the following situations.
- When you bring the unit directly from a cold place to a warm place.
- When you use the unit in a room where you just turned on the heater, or a place where the cold air from the air conditioner directly hits the unit.
- During the summer, when you use the unit in a hot and humid place just after you move the unit from an air conditioned room. • The room is vaporous or damp.
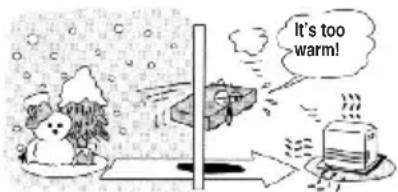
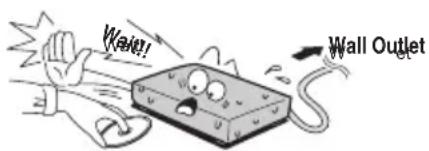
If condensation exists, the unit will not operate properly. Remove the disc, connect the power cord of the unit to the wall outlet, turn on the unit, and leave it for two or three hours. After two or three hours, the unit will have warmed up and evaporated any moisture. Keep the unit connecting to the wall outlet will ensure moisture condensation will seldom occur.
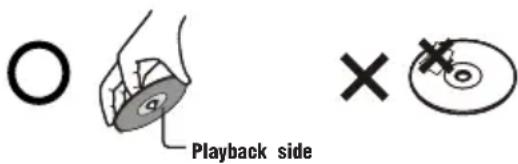
ON HANDLING DISCS
- Do not touch the playback side of the disc. Do not attach paper or tape to disc.
ON CLEANING DISCS
Fingerprints and dust on the disc cause picture and sound deterioration. Wipe the disc from the centre outwards with a soft cloth. Always keep the disc clean.
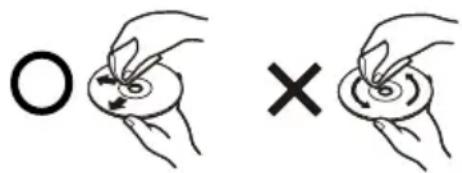
- If you cannot wipe off the dust with a soft cloth, wipe the disc lightly with a slightly moistened soft cloth and finish with a dry cloth.
- Do not use any type of solvent such as thinner, benzine, commercially available cleaners or antistatic spray for vinyl. It may damage the disc.
ON STORING DISCS
- Do not store discs in a place subject to direct sunlight or near heat source.
- Do not store discs in a place subject to moisture and dust such as bathroom or near a humidifier.
- Store discs vertically in a case. Stacking or placing objects on discs outside their case may cause warping.
The mark is in compliance with the Waste Electrical and Electronic Equipment Directive 2002/96/EC (WEEE). The mark indicates the requirement NOT to dispose the equipment including any spent or discarded batteries as unsorted municipal waste, but use the return and collection systems available. If the batteries or accumulators included with this equipment display the chemical symbol Hg, Cd, or Pb, then it means that the battery has a heavy metal content of more than 0.0005% Mercury, or more than 0.002% Cadmium or more than 0.004% Lead.
Notes for battery disposal
Your product contains batteries covered by the European Directive 2006/66/EC, which cannot be disposed of with normal household waste. Please inform yourself about the local rules on separate collection of batteries. The correct disposal of batteries helps prevent potentially negative consequences on the environment and human health.
Table of contents
Safety Information and Precaution
Safety Precaution....2 Notes on handling....3 Location 3 Electrical Disturbance 3 Notes on Moisture Condensation 3 On Handling Discs .... 3 On Cleaning Discs 3 On Storing Discs 3
Table of Contents
Table of Contents....4-5
Key Features of your new Blu-ray Disc Player
Player Features 6 Support a Variety of Video Disc Types 6 HDMI (High Definition Multimedia Interface)....6 Blu-ray Disc Features 6 Video Highlights....6 Blu-ray Disc Features (cont')......6 For High-Definition Playback 6 Graphic Planes 6 Menu Graphics 6 Menu Sounds 6 Multi-page / PopUp Menus 6 Interactivity 6 User Browsable Slideshows 6 Subtitles 6 Structure of Disc Contents 6 Compatible Disc Types 7 Discs that cannot be played 7 Region Code 7 Blu-ray Disc Compatibility 7
Package Content
Package Content 8
Functions and Controls
Front Panel....9 Rear Panel....10 Display 10
Remote Control
Remote Control....11 Loading Batteries 12 Handling the Remote Control....12 Effective Range....12
Setting up the Blu-ray Disc Player
Connections 13-15 Connecting to HDTV with HDMI Cable 13 Connecting to HDTV with DVI Cable 13
Connecting to TV with Component Video Cable 13 Connecting to TV with Composite Video Cable 14 Connecting to an External Hi-Fi system via 2 Channels Analog Audio Output ....14 Connecting to an Audio Receiver (Multi-channels) via SPDIF 14 Connecting to a High Definition Audio Receiver via HDMI 15 Connecting to an Audio System via 7.1 Analog Audio Output .... 15
Playback Functions
Basic Playback....16 Pause Playback....16 Stop Playback....16 Fast Forward and Fast Reverse 16 Previous and Next....16 Frame-by-Frame Playback 16 Advanced Playback....17-18
Special Playback Functions
Blu-ray Disc Bonus View 19 Blu-ray Disc Java....19
System Set-up
Language Menu 20 Display Setting....21-22 Audio Output Setting....22-23 Speaker Setting 23-24 Parental Control Setting....24-25 System Menu Setting....26-27
Troubleshooting
Troubleshooting 28-29
Technical Specification
Technical Specification 30
Important Notices
Copy Protection ....31 Compliance and Compatibility Notice 32
Key Features of your new Blu-ray Disc Player
Player Features
Support a Variety of Video Disc Types
Support Blu-ray (BD-ROM), DVD Video, and DVD±RW, DVD±R/DL (V mode and finalised only) discs.
HDMI (High Definition Multimedia Interface)
HDMI reduces pictures noise by allowing a pure digital video/audio signal path from the player to your TV.
HDMI, High Definition Multimedia Interface, supports EDID and DDC2B. This connection operates quickly and conveniently, providing the best in both audio and video playback.
HDMI can transfer uncompressed, high-resolution picture and multichannel audio digitally up to speeds of 5GBps. HDMI can support all ATSC HDTV standards, not only meeting resolution 1080p, which can supply the highest picture quality, but it also supports DVD Audio and other most advanced digital audio formats, including 8 channel 96kHz digital audio transmission. You only need one HDMI line connected, and disconnect the other audio connection. At the same time, the spare space which HDMI standard supplied can apply in the video updating. HDMI can allocate with HDCP (High-bandwidth Digital Content Protection), avoid copyright film being copied without authorization.
Blu-ray Disc Features
Blu-ray Discs can store 25GB (single layer) or 50GB (dual layer) on a single sided disc - about 5 to 10 times the capacity of a DVD. Blu-ray Discs also support the highest quality HD video available in the industry - Large capacity means no compromise on video quality. Furthermore, a Blu-ray Disc has the same familiar size and look as a DVD.
*The following Blu-ray Disc features are disc dependant and will vary.
Appearance and navigation of features will also vary from disc to disc.
Not all discs will have the features described below.
Video highlights
The BD-ROM format supports three highly advanced video codecs, including AVC, VC-1, and MPEG-2.
HD video resolutions are also available:
• 1920 x 1080 High Definition
• 1280 x 720 High Definition
For High-Definition Playback
To view high-definition contents on a Blu-ray Disc, an HDTV (High Definition Television) is required. Some Blu-ray Discs may require using the player's HDMI OUT to view high-definition content. The ability to view high-definition content on Blu-ray Discs may be limited depending on the resolution of your TV.
Blu-ray Disc Features (cont')
Graphic Planes
Two individual, full HD resolution (1920x1080) video layers are available, on top of the HD video layer. One layer is assigned to video-related graphics (like subtitles), and the other layer is assigned to interactive elements, such as buttons or menus. Various wipes, fades and scroll effects may be available on both layers.
Menu Graphics
Support full colour resolution graphics and animation, thereby greatly surpassing the capabilities of DVD-Video. Unlike DVD, menus can be accessed during video playback.
Menu Sounds
When you highlight or select a menu option on a disc, sounds can be heard such as button clicks or a voice-over explaining the highlighted menu choice.
Multi-page/ PopUp Menus
Unlike DVD-Video, playback is not interrupted each time a new menu screen is accessed. Due to Blu-ray Disc's ability to preload data from the disc without interrupting playback, a menu may consist of several pages. You can browse through the menu pages or select different menu paths, while the audio and video continues playing in the background.
Interactivity
Certain Blu-ray Discs may contain animated menus and trivia games.
User Browsable Slideshows
With Blu-ray Discs, you can browse through various still pictures while the audio remains playing.
Subtitles
Depending on what is contained on the Blu-ray Disc, you may be able to select different font styles, sizes, and colours for the subtitles. Subtitles may also be animated, scrolled or faded in and out.
Structure of Disc Contents
Normally, DVD discs are divided into titles, and the titles are subdivided into chapters. Audio CDs are divided into tracks.
![graph LR subgraph DVD_DISC A1["CHAPTER1"] --> B1["TV"] A2["CHAPTER2"] --> B2["TV"] A3["CHAPTER3"] --> B3["House"] A4["CHAPTER4"] --> B4["Book"] A5["CHAPTER5"] --> B5["Building"] end subgraph AUDIO_CD C1["TRACK1"] --> D1["STOCK"] C2["TRACK2"] --> D2["STOCK"] C3["TRACK3"] --> D3["STOCK"] C4["TRACK4"]…](/content/2026/05/967131/images/497eb6073a6eee95bb1191eb7e8d49530a21b01bca58e3accbf96dc8128f1e08.jpg)
Each title, chapter, or track is assigned a number, which is called title number, chapter number, or track number respectively.
There may be discs that do not have these numbers.
Key Features of your new Blu-ray Disc Player
Compatible Disc Types
| Disc Types | Disc Logo Recorded Content Disc Shape Maximum Playing | Minute | ||
| BD-ROM |  | AUDIO + VIDEO SINGLE SIDED (25GB/ 50GB) Playing time depends on the Title | ||
| DVD-VIDEO |  | AUDIO + VIDEO Single sided (5 inches)Double sided (5 inches)Single sided (31⁄2 inches)Double sided (31⁄2 inches) | 24048080160 | |
| DVD±RW (V mode and finalised only) |  | AUDIO + VIDEO 5 inches (4.7GB) 480 (EX: Extended | Play) | |
| DVD±R/±R DL (V mode and finalised only) |  | AUDIO + VIDEO 5 inches (4.7GB) 480 (EX: Extended | Play) | |
| AUDIO-CD AUDIO | [IMAGE] | (5 inches) | Single sided (31⁄2 inches) | 7420 |
Discs that cannot be played
- Blu-ray Discs with a region code other than "Region B".
- DVD Video with a region number other than "2" or "ALL". • *BD-R • *BD-RE
HD DVD, DVD-RAM, 3.9 GB DVD-R Disc for Authoring, MP3, WMA, AVI and DivX, DVD-ROM/PD/MV-Disc, etc.
Region Code
Both the Blu-ray Disc Player and the discs are coded by region. These regional codes must match in order to play the disc. If the codes do not match, the disc will not play. The Region Number for this Blu-ray Disc Player is described on the rear panel of the Blu-ray Disc Player.
| Disc Type Blu-ray DVD-VIDEO | ||||
| Region code |  |  | ||
Blu-ray Disc Compatibility
Blu-ray Disc is a new and evolving format. Accordingly, disc compatibility issues are possible. Not all discs are compatible and not every disc will play back. For additional information, refer to the Compliance and Compatibility Notice section of this Manual.
- Playback may not work for some types of discs, or when specific operations, such as angle change and aspect ratio adjustment, are being performed. Information about the discs is written in detail on the disc box. Please refer to this if necessary.
- Do not allow the disc to become dirty or scratched. Fingerprints, dirt, dust, scratches, or deposits of cigarette smoke on the recording surface may make it impossible to use the disc for playback.
- Discs with
- When a BD-Java title is played, loading may take longer than a normal title, or some functions may perform slowly.

Blu-ray Disc Player
Check for the supplied accessories below.
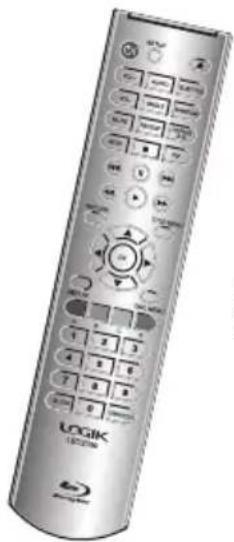
Remote Control (PN#06-RC-2400-A005)
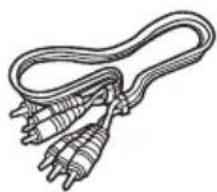
Composite (Video) Audio L/R cable (PN#41-UH1500-0KKCD)
Batteries for Remote Control (AAA size) (PN#49_382380_BAT)
Instruction Manual (PN#72-BD2000-US0B1)
Quick Start Guide (PN#72-BD2000-QSGB1)

Make sure all of the above contents are included. If there are any missing item, please return this product to the original place of purchase.
Front panel
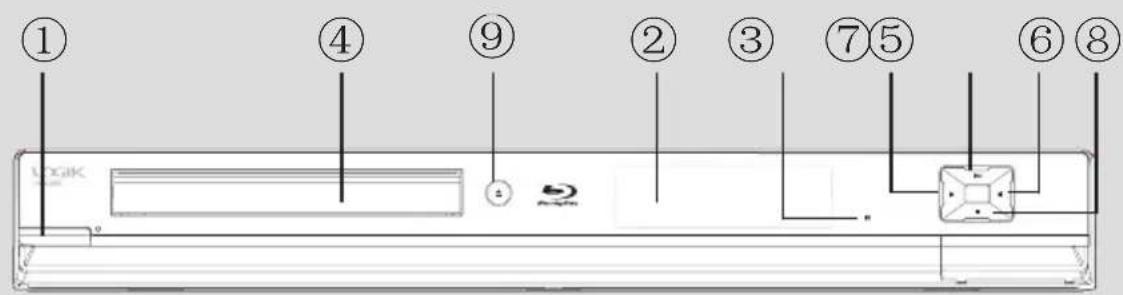
| NO Control Function | |
| 1 STANDBY/ ON buttonTurns the power on or restores the unit to the standby mode. | |
| 2 Front panel display Shows information about the current status of this unit | |
| 3 Remote sensor Receives infrared signals from the remote control. | |
| 4 Disc tray Loads a disc into the disc drive. | |
| 5 Skips to the previous title/chapter/track | |
| 6 Skips to the next title/chapter/track | |
| 7 PLAY/PAUSE Starts playback/Stops playback momentarily. | |
| 8 STOP Stops playback. | |
| 9 OPENCLOSE Opens and closes the disc tray. | |

This player has auto shutdown function. If it passed the 5 minutes idle time, it will display black screen safeguard. Press any buttons during this time, and the player will restore to its normal operation state. If the player passed the 10 minutes idle time, it will shut down.
Rear panel
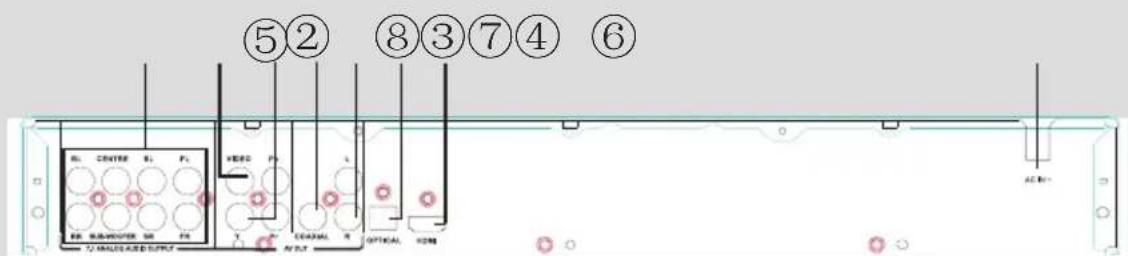
| NO Control Function | |
| 1 AC IN | socket Connect the supplied power cord. |
| 2 COAXIAL | socket Output digital audio signals when connecting the coaxial digital cable. |
| 3 HDMI | OUTPUT jack Outputs video/audio signals to a connected TV, monitor or AV amplifier.Connect to a TV, monitor or AV amplifier equipped with HDMI input. |
| 4 7.1 Analog audio output Outputs 7.1-channel | surround sound, and are only available on some Blue-ray disks. |
| 5 COMPONENT VIDEO OUTPUT jacks | Outputs video signals to a connected TV or monitor.Connect to a TV or monitor equipped with component video jacks. |
| 6 VIDEO | Output video signals to a connected TV. |
| 7 ANALOG AUDIO OUTPUT jacks | Outputs audio signals to a connected TV or AV amplifier. |
| 8 OPTICAL | Output digital audio signals when connecting the optical digital cable, fit the connector into the jack firmly. |

HDMI plug with bulky dimension cannot be inserted when an LAN cable is connected.
Display
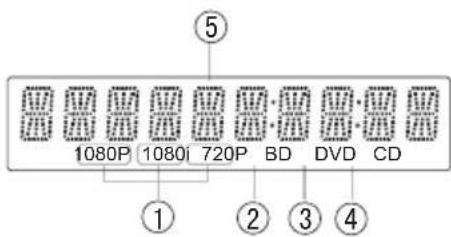
| NO Function |
| 1 Displays the video output resolution currently selected.(i: interlaced, p: progressive) |
| 2 A BD is loaded. |
| 3 A DVD is loaded. |
| 4 A CD is loaded. |
| 5 Displays the total playing time of the disc, a number of title, chapter or track. |
Remote control
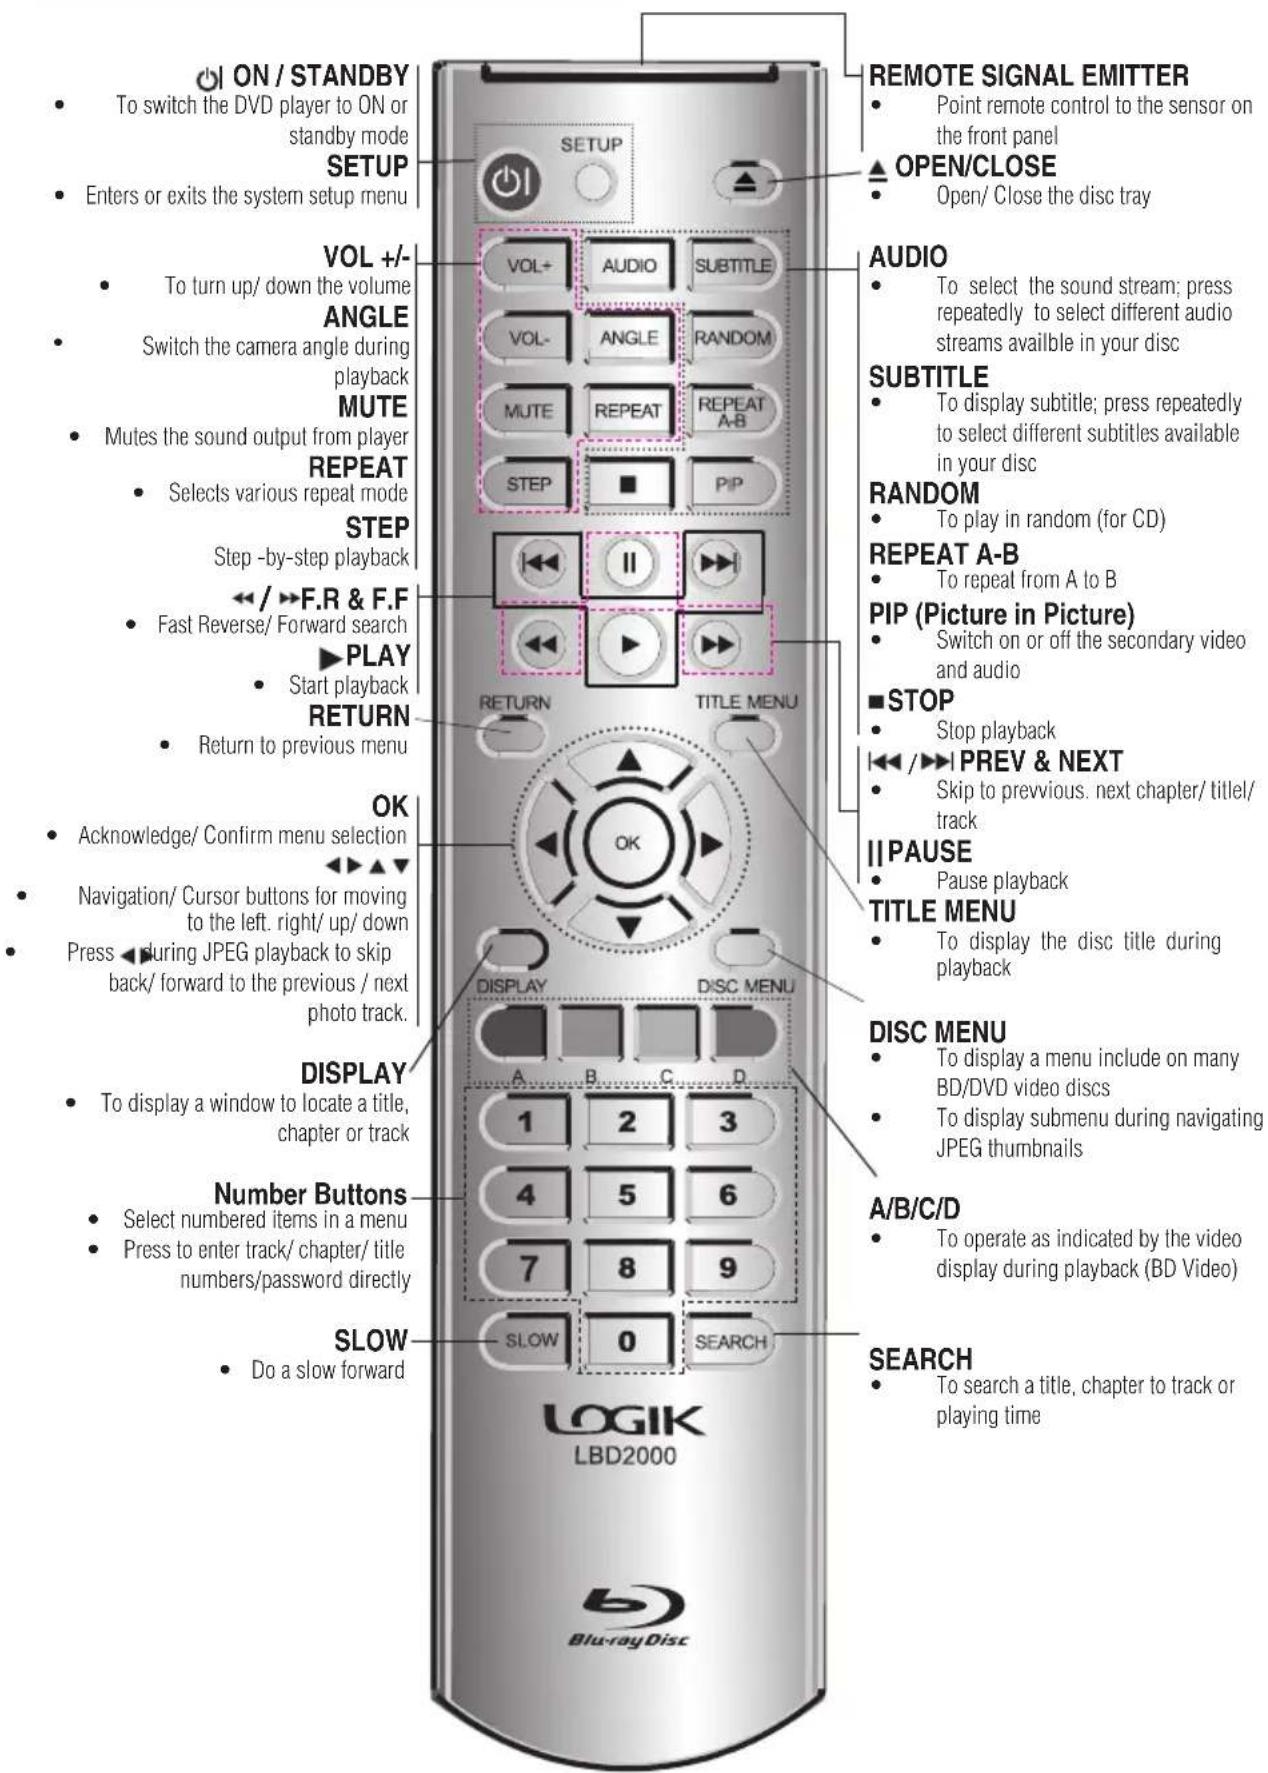
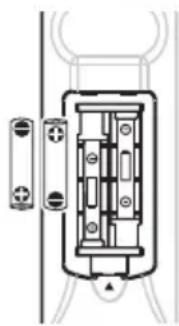
Loading batteries
- Press and lift the back cover up to open the battery compartment of the remote control.
- Insert two AAA size batteries. Make sure to match the (+) and (-) ends of the batteries with the (+) and (-) ends indicated in the battery compartment. To
close the battery compartment cover, slide the cover in the direction of an arrow till it clicks shut.

- Do not use caustic cleaners (porcelain, stainless steel, toilet, or oven cleaner etc.) on the unit and remote control, as they may be damaged.
- Remove the battery from remote control handset when it is not to be used for a long period. Otherwise, it can be damaged due to battery leakage.
Handling the Remote Control
- Improper use could cause corrosion or battery leakage and may result in physical injury and/or property damage including fire.
- Never mix used and new batteries in the device.
- Replace all the batteries in a device at the same time.
- Remove the batteries if the remote control is not going to be used for an extended period of time.
- To avoid possible failure, read the following instructions and handle the remote control properly.
- Do not drop or cause impact to the remote control.
- Do not spill water or any liquid on the remote control.
- Do not place the remote control on a wet object.
- Do not place the remote control under the direct sunlight or near sources of excessive heat.
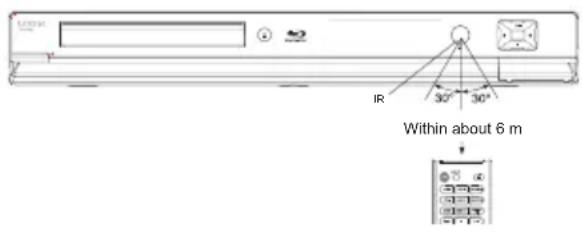
Effective Range
Your remote control can be activated from up to the unit 6m away when pointed directly at the receiver.
Connections
- Be sure to turn off the power and unplug all units from the wall outlet before making any connections.
Connecting to HDTV with HDMI Cable
- Using an HDMI-HDMI cable (not included) connect the HDMI OUT terminal on the rear of the Blu-ray Disc Player to the HDMI IN terminal of your TV.
- Press the input selector on your TV remote control until the HDMI signal from the Blu-ray Disc Player appears on your TV screen.
![graph TD A["To HDMI OUTPUT"] --> B["HDMI"] B --> C["HDMI INPUT"] C --> D["TV"]](/content/2026/05/967131/images/3a50623e117a2978767aa6727a4bbb0468d490bf33e86f19780578532059c0c1.jpg)
Connecting to HDTV with DVI Cable
- Using the HDMI-DVI cable (not included), connect the HDMI OUT terminal on the rear of the Blu-ray Disc Player to the DVI IN terminal of your TV.
- Using the audio cables, connect the AUDIO OUT (red and white) terminals on the rear of the Blu-ray Disc Player to the AUDIO IN (red and white) terminals of your TV.
![graph TD A["To Analog Audio Output"] --> B["Analog Cable (Supplied)"] A --> C["To HDMI OUTPUT"] D["TV"] --> E["Analog Audio Input"] D --> F["DVI INPUT"] G["HDMI-DVI cable (not supplied)"] --> H["To Analog Cable (Supplied)"] G --> I["HDMI-DVI cable (not supplied)"]](/content/2026/05/967131/images/6337557675dd1a930a1db978e5301c0e37b0fc8cb310bffc24610ad95afc23b6.jpg)
- Press the input selector on your TV remote control until the DVI signal from the Blu-ray Disc Player appears on your TV screen.

- Depending on your TV, certain HDMI output resolution may not work. Please refer to the Instruction Manual of your TV.
- When you connect the player to the TV using the HDMI cable for the first time or to a new TV, the HDMI output resolution will
be automatically set to the highest provided by the TV.
Connecting to TV with Component Video Cable
- Connecting to your TV using Component Video Cables.
- You will enjoy high quality images with accurate colour reproduction. Component video separates the picture element into black and white (Y), blue (PB), and red (PR) signals to present clear and clean images. (Audio signals are delivered through the audio output.)
- Using Component Video Cables (not included), connect the COMPONENT VIDEO OUT terminals on the rear of the Blu-ray Disc Player to the COMPONENT IN terminals of your TV.
- Using the audio cables, connect the AUDIO OUT (red and white) terminals on the rear of the Blu-ray Disc Player to the AUDIO IN (red and white) terminals of your TV. Turn on the Blu-ray Disc Player and TV.
- Press the input selector on your TV remote control until the Component signal from the Blu-ray Disc Player appears on the TV screen.
![graph TD A["TV"] --> B["Audio Cable"] B --> C["Component Cable (not included)"] C --> D["(AudioRed WhiteRedBlueGreen"]](/content/2026/05/967131/images/6a16ef21ddd66715c86ec6d377e3e42ac0d366fdc3c37705fe7426649f8d52e2.jpg)
Setting up the Blu-ray Disc Player

- Depending on the Manufacturer, the component terminals on your TV may be marked "R-Y, B-Y, Y" or "Cr, Cb, Y" instead of "Pr, Pb, Y". The number and position of terminals may vary depending on the TV set. Please refer to the instruction manual of your TV.
- You can select from a variety of resolution settings for Blu-ray Discs such as 1080i, 720p, 480p, and 480i, depending on the disc type.
- The actual resolution may differ from the setting in the SETUP menu if both Component and HDMI cables are connected. The resolution may also be different depending on the disc.
- In DVD playback, if both HDMI and Component jacks are connected and you select the Component mode, the Display Setup menu will show the output resolution as 1080p. The resolution is actually 480i.
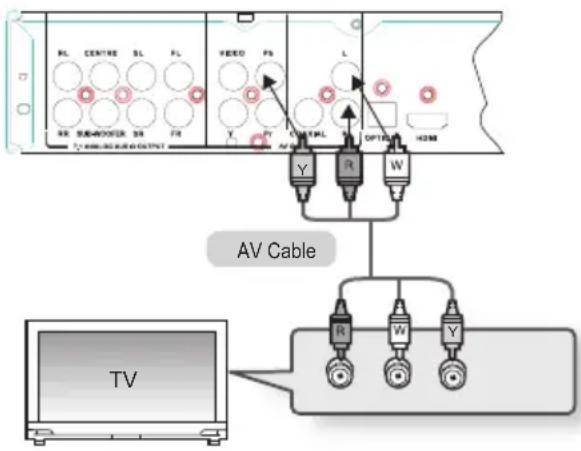
Connecting to TV with Composite Video Cable
- Using video/audio cables, connect the VIDEO OUT (yellow) and AUDIO OUT (red and white) terminals on the rear of the Blu-ray Disc Player to the VIDEO IN (yellow) and AUDIO IN (red and white) terminals of your TV.
- Turn on the Blu-ray Disc Player and TV.
- Press the input selector on your TV remote control until the video signal from the Blu-ray Disc Player appears on the TV screen.
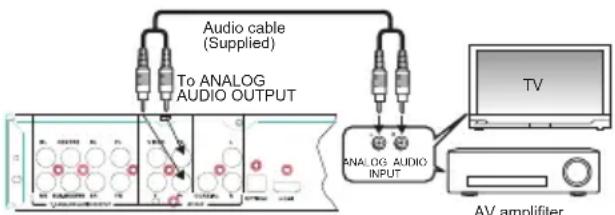
Connecting to an External Hi-Fi System via 2-Channel Analog Audio Output
- Using the audio cables, connect the AUDIO OUT (red and white) terminals on the rear of the Blu-ray Disc Player to the AUDIO IN (red and white) terminals of your amplifier.
- Using the video signal cable(s), connect the HDMI, COMPONENT, or VIDEO OUT terminals on the rear of the Blu-ray Disc Player to the HDMI, COMPONENT, or VIDEO IN terminals of your TV.
- Turn on the Blu-ray Disc Player, TV, and amplifier.
- Press the input selector button on the amplifier to select the external input in order to hear sound from the Blu-ray Disc Player. Refer to your amplifier's instruction manual to set the amplifier's audio input.
Connecting to an Audio Receiver (Multi-Channels) via SPDIF
- Using the optical or coaxial cable (not included), connect the OPTICAL or COAXIAL terminal on the rear of the Blu-ray Disc Player to the DIGITAL AUDIO IN (OPTICAL or COAXIAL) terminal of your amplifier.
- Using the video signal cable(s), connect the HDMI, COMPONENT, or VIDEO OUT terminals on the rear of the Blu-ray Disc Player to the HDMI, COMPONENT, or VIDEO IN terminals of your TV.
- Turn on the Blu-ray Disc Player, TV, and amplifier.
- Press the input selector button on the amplifier to select the external input in order to hear sound from the Blu-ray Disc Player. Refer to your amplifier's instruction manual to set the amplifier's audio input.
![graph TD A["Optical digital cable (not supplied)"] --> B["To DIGITAL AUDIO OUTPUT BITSTREAM/PCM OPTICAL"] B --> C["Coaxial digital cable (not supplied)"] C --> D["AV amplifier"] D --> E["Digital INPUT COVAIL"] E --> F["Digital INPUT OPTICAL"] F --> G["Optical cable"]](/content/2026/05/967131/images/bd3ea4f0547dd56d6e768d093451ed4a1fbf1734856e83dd215b09f994ad77aa.jpg)

- Please turn the volume down when you turn on the amplifier. Sudden loud sound may cause damage to the speakers and your ears.
- Please set the audio in the menu screen according to the amplifier.
- The position of terminals may vary depending on the amplifier. Please refer to the instructional manual of your amplifier.
- When using this connection, discs with LPCM audio soundtracks will only be heard over the front two channels.
- Additional number of channels that SPDIF can support (5.1 channels only).
- The SPDIF digital audio output can support a maximum of 5.1 channels only. For discs carrying 7.1 channel audio streams, they will be downmixed to 2.1 or 5.1 channels before output.
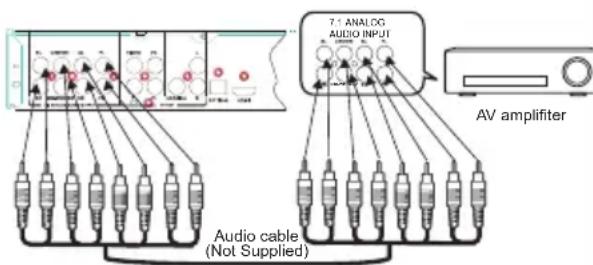
Connecting to an Audio System via 7.1 Analog Audio Output
- Using the audio cables, connect the 7.1 ANALOG AUDIO OUT terminals on the rear of the Blu-ray Disc player to the 7.1 CHANNEL ANALOG AUDIO IN (Front R, Front L, CENTRE, SUBWOOFER, Surround L, Surround R, SURR. BACK L, SURR. BACK R) terminals of your amplifier.
- Using the video signal cable(s), connect the HDMI, COMPONENT, or VIDEO OUT terminals on the rear of the Blu-ray Disc player to the HDMI, COMPONENT, or VIDEO IN terminal of your TV.
- Turn on the player, TV, and amplifier.
- Press the input select button of the amplifier to select external input in order to hear sound from the Blu-ray Disc player. Refer to your amplifier's user manual to set the amplifier's audio input.

- Please turn the volume down when you turn on the amplifier. Sudden loud sound may cause damage to the speakers and your ears.
- The position of terminals may vary depending on the amplifier. Please refer to the user's manual of your amplifier. • The front left and right outputs on your player
and 7.1 channel amplifier must be connected to hear disc menu audio from certain Blu-ray discs.
- When connecting to a 5.1 channel home theater or receiver, connect all the analog audio output jacks from the player except for the Surround Back Left (SL)/Surround Back Right (SR) outputs.
Connecting to a High Definition Audio Receiver via HDMI
- Using the HDMI-HDMI cable (not included), connect the HDMI terminal on the rear of the Blu-ray Disc player to the HDMI IN terminal of your amplifier.
- Using the HDMI-HDMI cable, connect the HDMI OUT terminal of the amplifier to the HDMI IN terminal of your TV.
- Turn on the Blu-ray Disc Player, TV, and Amplifier.
- Press the input selector button of the amplifier to select the external input in order to hear sound from the Blu-ray Disc Player. Refer to your amplifier's instruction manual to set the amplifier's audio input.
![graph TD A["HDMI cable(not supplied)"] --> B["To HDMI OUTPUT"] C["HDMI cable(not supplied)"] --> D["AV amplifier"] E["HDMI INPUT"] --> F["TV"] G["HDMI comparable device"] --> F H["Graphs: 1-3, 4-5, 6-7, 8-9"] --> I["Output"]](/content/2026/05/967131/images/df57a2618b2547bdeeaf2cb082276f2f366d97d154ba85c11cb75404b14bd348.jpg)

- Please turn the volume down when you turn on the amplifier. Sudden loud sound may cause damage to the speakers and your ears.
- Please set the audio in the menu screen according to the amplifier.
- The position of terminals may vary depending on the amplifier. Please refer to the instructional manual of your amplifier.
Basic Playback
- Press STANDBY/ON switch on the front panel or the remote control, your player will turn on.

The unit will take around 30 seconds to warm up.
- Turn on the TV, and then select the input setting on the TV that matches the connection method you used to connect your player.
- Press OPEN/CLOSE ▲ to slide out the disc tray.
- Place a disc on the disc tray with the label facing up, and then press OPEN/CLOSE ▲ to slide back and close the disc tray.
The disc loading time depends on the types of disc you are loading, and loading a Blu-ray Disc will take longer time.
- If the disc does not start playing automatically, please press PLAY ▶ to start playback.
- If a Blu-ray disc or DVD menu displays, press CURSOR button to select PLAY. Then, press OK to confirm.
- To eject the disc, press OPEN/CLOSE ▲
Pause Playback
- Press PAUSE I to pause playback. The sound will be muted.
- Press PAUSE for PLAY to resume the playback.
Stop Playback
- Press STOP button once to go to Pre-stop mode, the TV screen will show the Pre-stop logo.
- Press STOP ■ twice to stop the playback completely.
- Press PLAY▶ to resume playback from the point where playback is pre-stopped or from the beginning of the disc after the playback is completely stopped.

Not all Blu-ray Discs support the resume feature.
Fast Forward and Fast Reverse
- Press F.FWD ▶ to fast forward through the disc. The fast forward speed changes based on how many times you pressed the button. The speed will increase through the following sequence: Fast x 1 Fast x 2 Fast x 3 Fast x 4 Fast x 5 Fast x 6
- Press PLAY ▶ to resume playback.
- Press F.REV to fast reverse through the disc. The fast reverse speed changes based on how many times you press the button. The speed will increase through the following sequence:
Fast x 1, Fast x 2, Fast x 3, Fast x 4, Fast x 5, Fast x 6
- Press PLAY ▶ to resume playback.
Previous and Next
During playback, press the PREV button to skip back to the start of the chapter. Each press of this button will allow you to skip a chapter until the beginning of the disc.
Pressing the NEXT▶ button during playback will allow you to skip the playback to the next chapter.
Frame-by-Frame Playback
- Press the STEP button repeatedly to do frame-by-frame playback in the video.
- Press PLAY ▶ to resume normal playback.

"may appear on the TV screen during operation. This means that the operation is not permitted by the player or the disc.
Frame-by-Frame Playback
- To view the video contents of the disc at a slow forward speed, press SLOW for forward slow-motion effects. Press SLOW again to increase the slow-motion speed. Each time the SLOW key is pressed, the slow-motion speed will increase through the following sequence: Slow Forward Slow_1, Slow_2, Slow_3. To resume normal (1x forward) playback at any time, press PLAY.
Advanced Playback
DISPLAY


Press this button and the screen will display some information about the disc, such as: title number, chapter number, and time elapsed.
Press this button twice to turn off the information display.
REPEAT


Press once or more times to select different repeat modes as the following looped sequences: Repeat Off, Repeat Chapter, and Repeat Title.
REPEAT A-B


To play a certain section within the video or song, press the REPEAT A-B button to set the start point. Then, press the REPEAT A-B button again to set the end point and complete the setting. The selected section will be played repeatedly.
Press the REPEAT A-B button a third time to cancel this function.

The end point cannot be set until 5 seconds of playback has elapsed from the start point.
RANDOM

Press this button during Audio CD/VCD playback, and the tracks will play in random sequence.
SEARCH


During playback, press the SEARCH button repeatedly to select different search modes as the following sequences:
- Title ---
- Chapter
- Time
- Cancelled
Press the numeric buttons and then the OK button on the remote control, and the playback will skip to the chosen point that you want to play.
SUBTITLE


Press this button repeatedly and the screen will display "SUBTITLE X of XX XXX" and "SUBTITLE Off". The "X" indicates the current number of this language; "XX" indicates the total number of languages; "XXX" indicates the language name.

The number of available languages depends on the disc.
RETURN


Press this button to return to the previous on-screen menu. (This option is only available for JPEG discs.)
ANGLE

During playback, press this button to change the angle of the picture. The screen will display "Angle X of X." The first "X" indicates the current number of the angle, and the second "X" indicates the total number of angles.

Not all BD or DVD discs have the multi-angle feature. The screen will take around 5 seconds to change.
DISC MENU


During JPEG disc playback, press this button, and the screen will display the operation sub-menus.

You may press this button at any time, and the BD or DVD video disc playback will pop up the disc menu.
TITLE MENU


During Blu-ray Disc playback, press TITLE MENU to display the disc title. The playback will not be stopped even when the menu is on the screen.
- Press the NAVIGATION/CURSOR (◀▶▲▼) buttons to select an option, then press OK to confirm.
- Press POPUP MENU to close the menu. During DVD playback, press TITLE MENU to open the disc menu.
SETUP


Press the SETUP button, and the screen will display some information about the player, such as:
- Language Menu
- Display Menu
- Audio Menu • Speaker Menu, and etc...
COLOUR BUTTONS (Red/Green/Yellow/Blue)

The Colour buttons are used when operating a BD-Video disc that includes Java TM applications (BD-J). For more operating information about this kind of disc, refer to the instructions that came with the disc.
Advanced Playback (cont')
AUDIO


Press the AUDIO button on the remote control to select the audio streams that are set within the Blu-ray or DVD disc.
The screen will display:
AUDIO: X of XX XXX/XXXX/XXXXX/XXXXXX
"X" - the Current Audio Stream Number
"XX" - The total number of Audio Streams
"XXX" - Audio Language Name
"XXXX" - Audio Technology
"XXXXX" - Channel Number
"XXXXXX" - PCM Frequency
VOLUME and MUTE


Press VOL+ to increase the volume and VOL- to decrease the volume.
Press MUTE once to display mute on (no sound), and press the button twice to resume the volume.
This volume setting is effective only if the player is connected to the external audio receiver via the 7.1 Channel Analog Audio input ports.
Blu-ray Disc Bonus View
Playing Secondary Video (Picture-in-Picture) and Secondary Audio for Blu-ray Disc only
Secondary video can be played from a disc compatible with the Picture-in-Picture (PIP) function.
For the playback method, refer to the instructions for the disc.
- Turn on secondary video and secondary audio by pressing the PIP button, and a PIP ON sign will display.
- Press the PIP button again to turn off the secondary video.
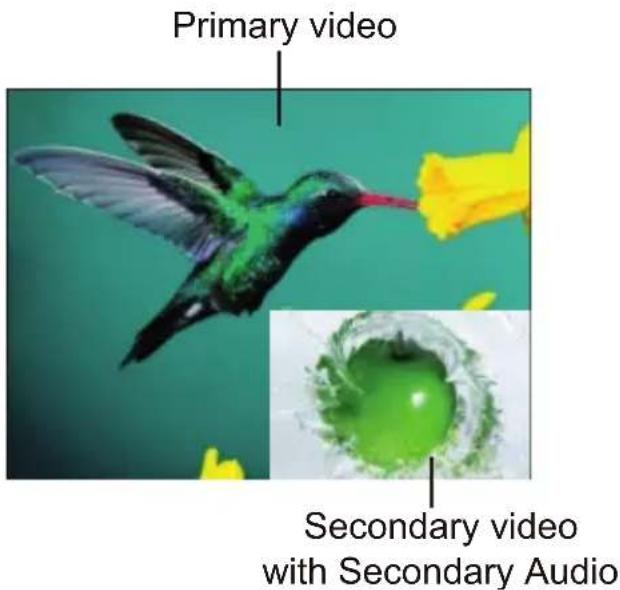
To turn on or off the audio of the secondary video, press the PIP button again. PIP: OFF sign will display.

This function is not available when the primary video is played in Search, Slow-Motion, or Frame-by-Frame or Fast Forward/ Reverse mode. To listen to the secondary audio, the digital audio output must be set to PCM Stereo, PCM 7.1 or Bitstream Mixed. Otherwise, only the secondary video can be seen.
Blu-ray Disc Java
BD-J Application

The BD-ROM format supports Java for interactive functions. "BD-J" offers content providers almost unlimited functionality when creating interactive BD-ROM titles.
*Java and all Java-based trademarks and logos are trademarks or registered trademarks of Sun Microsystems, Inc. in the U.S. and other countries.
System Set-up
When you press SETUP button on the remote control, the Set-up Menu will be displayed. It includes Languages, Display, Audio, Speaker, Parental, and System.
Within the Set-up Menu, you can use the NAVIGATION/ CURSOR buttons (◀▶▲▼) to move the cursor, and press OK button to make and confirm your selection.
To exit the Set-up Menu, you can press SETUP button.
Setup Menu
| Language | Audio | Auto |
| Display | Subtitle | None |
| Audio | Disc Menu | Auto |
| Speaker | OSD | English |
| Parental | ||
| System |

Language Menu
Audio Language
Setup Menu
| Language | Audio | Auto |
| Display | Subtitle | English |
| Audio | Disc Menu | Norwegian |
| Speaker | OSD | Finnish |
| Parental | Danish | |
| System | Swedish |
You can set your preferred Audio Language as the default language for the disc.

Not all languages are available on all the discs. Some discs do not allow the users to select the audio language from the Blu-ray Disc Player Set-up Menu. However, it can be selected from the BD/DVD disc setup menu.
Setup Menu
| Language | Audio | None |
| Display | Subtitle | English |
| Audio | Disc Menu | Norwegian |
| Speaker | OSD | Finnish |
| Parental | Danish | |
| System | Swedish |
Subtitle Language
You can set your preferred Subtitle Language as the default language for the disc.

Not all languages are available on all the discs. Some discs do not allow the users to select the audio language from the Blu-ray Disc Player Set-up Menu. However, it can be selected from the BD/DVD disc setup menu.
Disc Menu Language
Setup Menu
| Language | Audio | Auto |
| Display | Subtitle | English |
| Audio | Disc Menu | Norwegian |
| Speaker | OSD | Finnish |
| Parental | Danish | |
| System | Swedish |
You can set your preferred Disc Menu Language as the default language for the disc.

Not all languages are available for all the discs.
OSD Language
Setup Menu
| Language | Audio | English |
| Display | Subtitle | |
| Audio | Disc Menu | |
| Speaker | OSD | |
| Parental | ||
| System |
You can select the entire Set-up Menu's languages and On-Screen Display languages.
Display Setting
Display Setting
If your player is connected to the TV via HDMI, then setting up the display would not be necessary. The player and your TV will communicate to each other and the display will set up accordingly.
This section is mainly intended for those who have connected their TV via the Component Output, or for advanced users with TVs with HDMI ports.
TV Type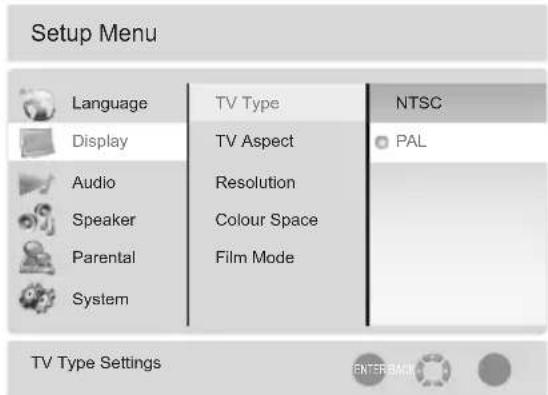
This player supports different TV output, including NTSC and PAL systems.
TV Aspect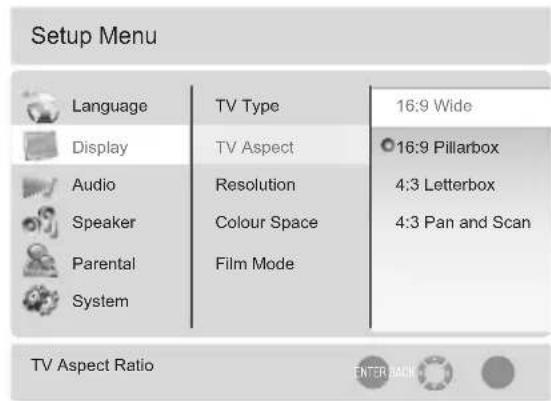
Select the picture size according to the aspect ratio of the connected TV. You can select:-
16:9 Wide
16:9 Pillarbox
4:3 Letterbox
4:3 Pan and Scan
• 16:9 Wide: You can view the full 16:9 picture on your widescreen TV. • 16:9 Pillarbox: Certain movies are in 4:3 source and will be displayed in 4:3 Pillarbox (black bars on sides of pictures) if 16:9 Pillar is selected. • 4:3 Letterbox: Select this when you want to see the total 16:9 ratio screen Blu-ray Disc/DVD
supplies despite you have a TV with a 4:3 ratio screen. Black bars will appear at the top and bottom of the screen.
• 4:3 Pan and Scan: Select this option when you want to see the 16:9 video supplied by the Blu-ray Disc/DVD without the black bars on top and bottom despite the fact that you have a 4:3 ratio screen (Extreme left and right portion of the movie picture will be cut off).
Resolution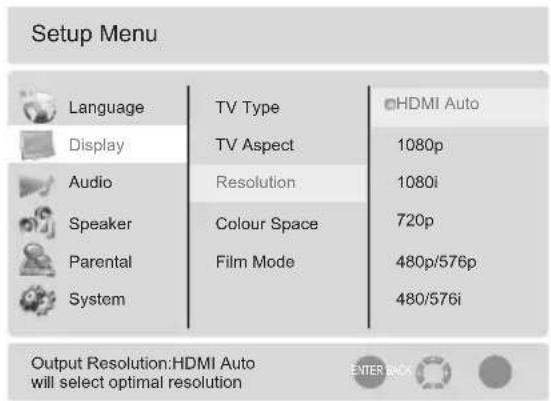
Select the output resolution based on the type of TV connected to the player as in the table below.
| TV TYPE Correct Resolution Setting | |
| If you TV is an enhanced-definition TV (EDTV) | 480p/576p |
| If your TV is a high-definition TV (HDTV) capable of 720p only | 720p |
| If your TV is a high-definition TV (HDTV) capable of 1080i only | 1080i |
| If your TV is HDMI equipped, and if your TV is a high-definition TV (HDTV) capable of 1080p [any frame rate], and you are connected to you TV via HDMI. | 1080p |
Resolution (cont')
| TV TYPE Correct Resolution Setting | |
| If your TV is HDMI equipped, and it is connected to your TV via HDMI, and you wish the BD player to set the video output to the TV's optimum resolution based on information exchanged between the TV and the player over the HDMI cable. | HDMI Auto |
Setting the player for an output resolution not supported by your TV will result in unpredictable results. Only the HDMI output of the player is capable of supporting 1080p video output at any frame rate. If the HDMI cable is not connected, the component outputs are limited to 1080i.
Colour Space
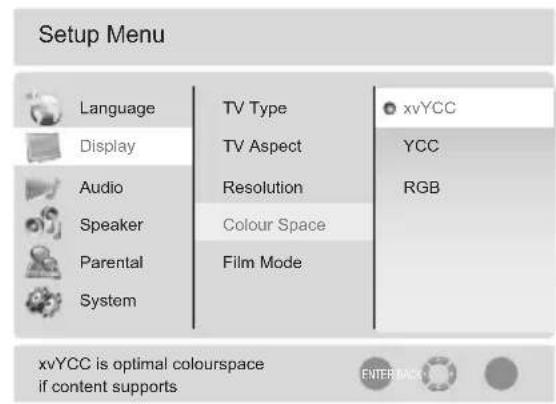
You can set colour space output.
xvYCC: Set to xvYCC (default)
YCC: Set to YCC
RGB: Set to RGB
Film Mode
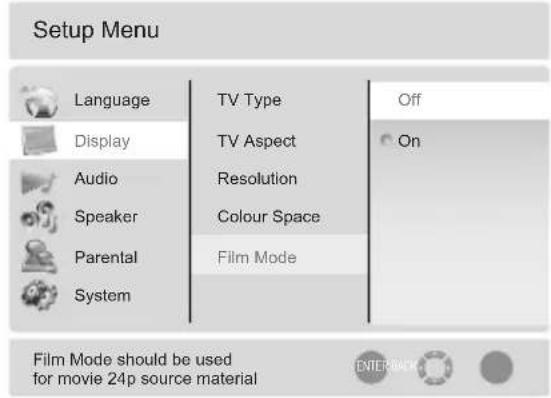
Movies are recorded on film at a rate of 24 pictures or frames per second. Many of the movies on Blu-ray Disc are placed on the disc at this frame rate. However, not all TV can display 24 progressive frames second of video. Select Off or On for 60 frames/second output format.

Only HDMI output of the player is capable of supporting 1080p video output at any frame rate. The component outputs are limited to 1080i, regardless of the Film Mode Setting.
Audio Output Setting
Digital Output
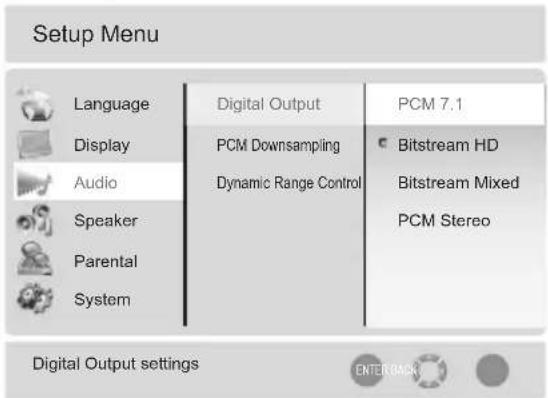
This allows you to set the Digital Audio Output, such as PCM7.1, Bitstream HD, Bitstream Mixed, and PCM Stereo.
PCM 7.1: Mixed digital audio sent over HDMI in 7.1CH PCM (if supported by HDMI device) and SPDIF in 2-channel PCM format.
Bitstream HD: Original bitstream from disc is passed over HDMI and SPDIF using highest quality possible. HDMI has higher quality capabilities with advanced audio codecs like TrueHD and DTS-HD. BD audio limited to soundtrack for main movie (i.e. no PIP audio and no effects audio).
Bitstream Mixed: BD audio streams are mixed and encoded into a single bitstream. Primarily intended for users with SPDIF 5.1CH receivers who want to enjoy mixed BD audio in surround sound.
PCM Stereo: Mixed digital audio sent over HDMI and SPDIF in 2-channel PCM format. This should be set if the player is connected to TV directly via HDMI.
PCM Downsampling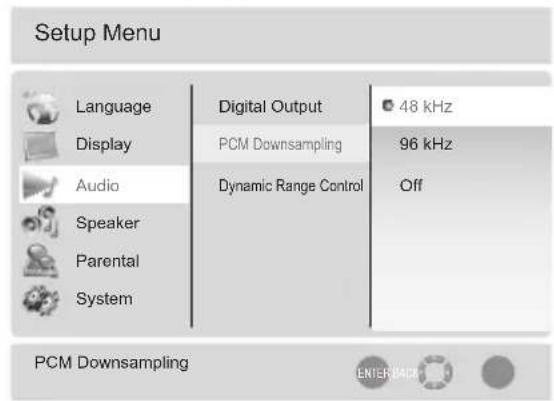
To set player's digital output PCM sampling rate with following options:-:
48kHz
96kHz
Off

Incorrectly set the digital audio output's PCM sampling rate may result in unpredictable audio playback.
Dynamic Range Control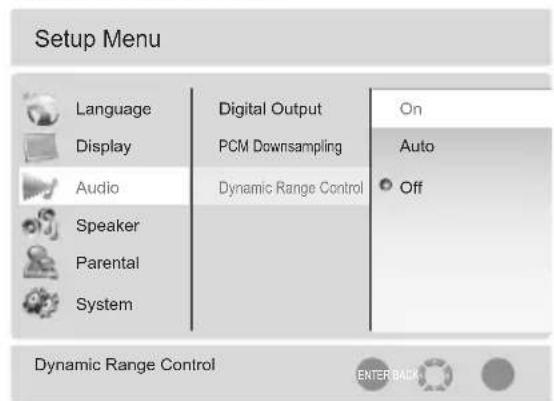
This function is only active when a Dolby Digital signal is detected.
On: When movie soundtracks are played at low volume or from smaller speakers, the system can apply appropriate compression to make low-level content more intelligible and prevent dramatic passages from getting too loud.
Auto: The Dynamic Range Control will operate automatically when the movies with Dolby True-HD soundtracks are played. For other audio format soundtracks, the compression is always On.
Off: The movie soundtracks play at the Standard Dynamic Range.
Speaker Setting
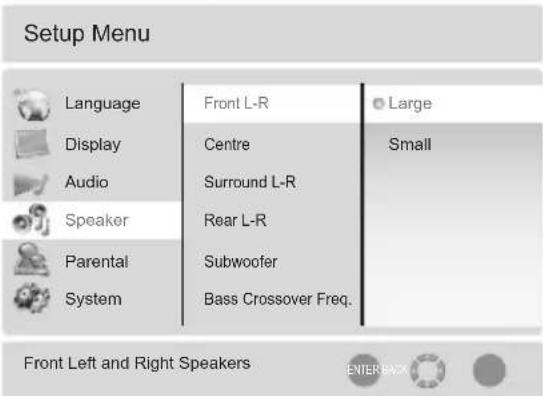
Speaker Setting
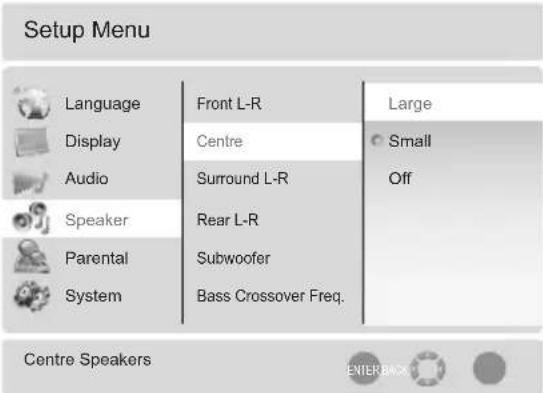
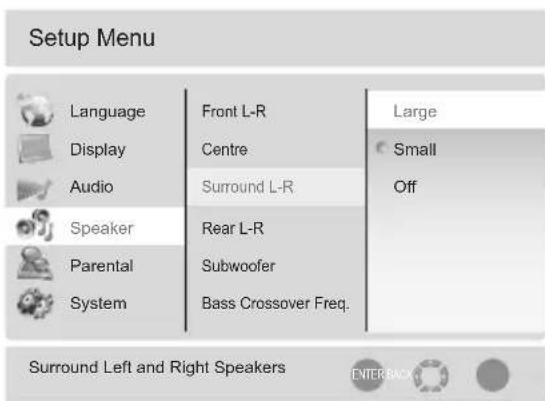
This is to set up the built-in multi-channel surround decoder. If the speakers with low frequency of 100Hz or below, select "Large." Otherwise, select "Small."
Speaker Setting (cont')
Setup Menu

Language
Display
Audio

Speaker
[Unreadable]

Front L-R
Centre
Surround L-R
Rear L-R
Subwoofer
Bass Crossover Freq.
Large
Small
Off
Rear Left and Right Speakers


Setup Menu

Language
Display
Audio

Speaker
Parental

System
Front L-R
Centre
Surround L-R
Rear L-R
Subwoofer
Bass Crossover Freq.
On
Off
Subwoofer Settings


This setting allows you to activate and deactivate subwoofer output.
Setup Menu

Language
Display
Audio

Speaker
Parental
System
Front L-R
Centre
Surround L-R
Rear L-R
Subwoofer
Bass Crossover Freq
Off
80 Hz
100 Hz
120 Hz
Bass Crossover Frequency


This setting is to indicate to the player the bass frequency response of the connected subwoofer.

This setting is not valid if the Blu-ray Disc player is connected with audio system via HDMI or SPDIF.
Parental Control Setting
Setup Menu

Language
Display
Audio
Speaker
Parental
System
Parental Control
Parental Level
Off
Adult

Parental
System


Setup Menu

Language
Display
Audio
Speaker
Parental
System
Parental Control
Parental Level
Input Password
[OK] Exit
Off
On

Parental Control


Enter 4 numeral password, and then press OK button on the remote control to confirm.
The default password is 0000. Once confirmed, the following setup screen will display:
Parental Control
Setup Menu

Language
Display
Audio
Speaker
Parental
System
Off
On

System


The Parental Control function works in conjunction with the different censorship classes assigned to Blu-ray Disc. These classes help to control the types of Blu-ray Disc that the family watches. There are up to 8 censorship classes for Blu-ray Disc.
Parental Level
Setup Menu


Language
Display
Audio
Speaker
Parental
System
Parental Control
Parental Level
1 [Kid Safe]
2 [G]
3 [PG]
4 [PG-13]
5 [PG-R]
6 [R]
7 [NC-17]
8 [Adult]

The Parental Level sets different censorship classes assigned to DVDs.
1 [Kid Safe] - Suitable for all children. 2 [G] - General audiences. 3 [PG] - Parental guidance suggested. 4 [PG-13] - Not suitable for anyone under 13. 5 [PG-R] - Parental guidance recommended. 6 [R] - Not suitable for anyone under 17 unless supervised by a parent or adult guardian. 7 [NC-17] - Not suitable for anyone under 17. 8 [Adult] - All DVDs can be played.
System Menu Setting
Set Password
Setup Menu


Language
Display
Audio
Speaker
Parental
System
Set Password
Software Version
Reset Settings
Clear BD Storage
Old ____
New
Confirm

Set new parental password


To set a new password, please follow the steps below.
- Input the old password and press OK button.
- Then, input the new password.
- Input the new password again to confirm the setting.
- Press OK button to confirm the password.

Record your password in some secure, easy-to-find place. We assume no responsibility for lost, misplaced, or forgotten password.
Software Version
Setup Menu

Language

Display

Audio

Speaker

Parental

System
Set Password
Software Version
Reset Settings
Clear BD Storage
Show some software and hardware version


Setup Menu

Language

Display

Audio

Speaker

Parental

System
Version Information
CFE Version: 1.27.17
Software Version: LGK_BD_0482_V03_B2
Servo Version: B025
[OK] Exit
Show some software and hardware version


The System Information of the player can be viewed by the option (such as CFE Version, Software Version, and Servo Version. Press OK button to quit the system information.

The information in the above screenshot is not necessary the same as that on your unit.
Reset Settings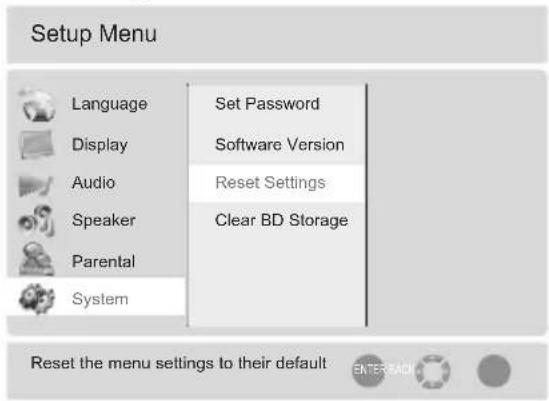
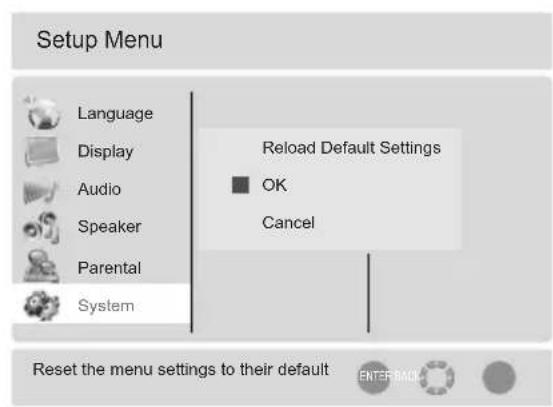
This function allows you to reset all settings back to the manufacturer's original settings for this Blu-ray Disc player. Select OK option to perform the reset.
Clear BD Storage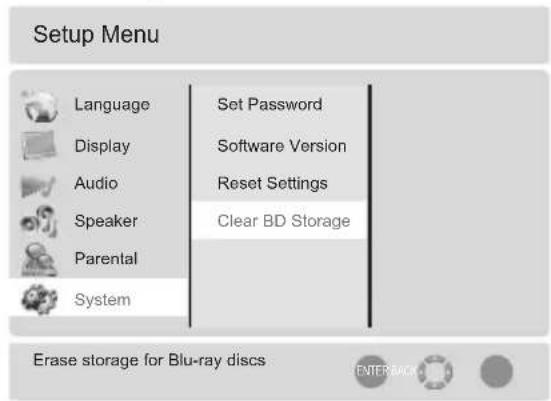
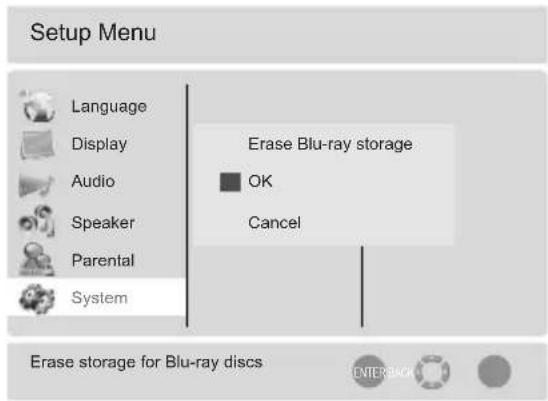
This functions allows you to erase the BD "Application Data Area". Select OK option to perform the erase.
| PROBLEM SOLUTION | |
| No operation can be performed with the remote control. | Check the batteries in the remote control. They may need replacing.Operate the remote control at a distance of no more than 6m.Removes batteries and hold down one or more buttons for several minutes to drain the microprocessor inside the remote control to reset it. Reinstall batteries and try to operate the remote control again. |
| Disc does not play. | Ensure that the disc is installed with the label side facing up.Check the region number of the Blu-ray Disc/DVD. |
| Disc Menu does not appear. | Check if the disc has a Menu. |
| The icon appears on the screen. | This icon appears when an invalid button is pressed.The features or action cannot be completed at this time because:1. The Blu-ray Disc/ DVD's software restricts it.2. The Blu-ray Disc/ DVD's software does not support the feature (e.g. angles).3. The feature is not available at the moment.4. You've requested a title/chapter number or search time that is out of range. |
| Play mode differs from the Setup Menu selection. | Some of the functions selected in the Setup Menu may not work properly if the disc is not encoded with the corresponding function. |
| The screen ratio cannot be changed. | The Screen Ratio is fixed on your Blu-ray Disc/DVDs.This is not a problem with the player. |
| No audio. | Make sure you have selected the correct Digital Output in the Audio Options Menu. |
| The screen is blocked. | Press the ▶▶I button (at the front panel) for more than 5 seconds with no disc inside. All settings will revert to the factory settings.When the manufacturer's default settings are restored, all the user data stored in the storage will be deleted. |
| If the HDMI output is set to a resolution you TV cannot support (for example, 1080p), you may not see a picture on your TV.Forgot password. | Press the ▶▶I button (at the front panel) for more than 5 seconds with no disc inside. All settings will revert to the factory settings.When the manufacturer's default settings are restored, all the user data stored in the storage will be deleted.When the manufacturer's default settings are restored, all the user data stored in the storage will be deleted. |
| If you experience other problems. | Go to the contents and find the section of the instruction manual that contains the explanations regarding the current problem, and follow the procedure once again.If abnormality occurs to your unit, please disconnect the unit from the mains, and wait for a few seconds before reconnecting the unit to the mains.If the problem still cannot be solved, please contact your nearest Techguy. |
| The picture is noisy or distorted. | Make sure that the disc is not dirty or scratched.Clean the disc. |
| No HDMI output. | Check the connection between the TV and the HDMI socket of the Blu-ray Disc Player.Check if your TV supports 480p/ 720p/ 1080i/ 1080p HDMI input resolution. |
| Abnormal HDMI output screen. | If random noise appears on the screen, it means that TV does not support HDCP (High-bandwidth Digital Content Protection). |
| General | Power Requirements AC110V-240V; 50/60Hz |
| Power Consumption 28W | |
| Weight 4.8kg | |
| Dimensions 430mm(W) x 54mm (H) x 320mm (D) | |
| Operating Temperature Range 5°C - 45°C | |
| Operating Humidity Range 5% - 80% - RH | |
| Video Output | Composite Video 480i / 576i |
| Component Video 480i/576i, 480p/576p, 720p, 1080i | |
| Video / Audio HDMI 480p/576p, 720p, 1080i, 1080p | |
| Audio Output | 7.1 Analog Audio Output RL, RR, CENTRE, SUB-WOOFER, SL, SR, FL, FR |
| 2 Channel L, R | |
| Digital Audio Output Optical / Coaxial | |
| *Frequency Response 8Hz - 44kHz (96kHz sampling) 8Hz - 22kHz (48kHz sampling) | |
| *S/N Ratio ≥ 90dB (1kHz) | |
| *Dynamic Range ≥ 80dB (1kHz) | |
| *Total Harmonic Distortion ≤ 50db (1kHz) | |
*: Nominal Specification Features and specifications are subject to change without notice.
Appendix for icons throughout the manual

- NOTE

- ALERT

- Suitable for BD-ROM

- Suitable for CD

- Suitable for DVD
Macrovision
This product incorporates copyright protection technology that is protected by method claims in certain U.S. patents and other intellectual property rights owned by Macrovision Corporation and other rights owners. Use of this copyright protection technology must be authorized by Macrovision Corporation, and is intended for home and other limited viewing uses only unless otherwise authorized by Macrovision Corporation. Reverse engineering or disassembly is prohibited.
Consumers should not assume that all high definition television sets are fully compatible with this product and may cause artifacts to be displayed in the picture.
In case of 525 or 625 progressive scan picture problems, it is recommended that the user switch the connection to the "standard definition" output. If there are questions regarding our TV set compatibility with this model 525p and 625p Blu-ray player, please contact our customer service center.

TRUEHD
DIGITAL PLUS
Manufactured under license from Dolby Laboratories. Dolby and the double-D symbol are trademarks of Dolby Laboratories.

DTS-HD™
Advanced Digital Out
Manufactured under license under U.S. Patent #'s: 5,451,942; 5,956,674; 5,974,380; 5,978,762; 6,487,535 & other U.S. and worldwide patents issued & pending. DTS is a registered trademark and the DTS logos, Symbol, DTS-HD and DTS-HD Advanced Digital Out are trademarks of DTS, Inc. © 1996-2008 DTS, Inc. All Rights Reserved.
COPY PROTECTION
Because AACS (Advanced Access Content System) is approved as content protection system for Blu-ray Disc format, similar to use of CSS (Content Scramble System) for DVD format, certain restrictions are imposed on playback, analog signal output, etc., of AACS protected contents. The operation of this product and restrictions on this product may vary depending on your time of purchase as those restrictions may be adopted and/or changed by AACS after the production of this
product. Furthermore, BD-ROM Mark and BD+ are additionally used as content protection system for Blu-ray Disc format, which imposes certain restrictions including playback restrictions for BD-ROM.
Mark and/or BD+ protected contents. To obtain additional information on AACS, BD-ROM Mark, BD+, or this product, please contact Techguy.
Many Blu-ray Disc/DVD discs are encoded with copy protection. Because of this, you should only connect your Blu-ray Disc Player directly to your TV, not to a VCR. Connecting to a VCR results in a distorted picture from copy-protected Blu-ray Disc/DVD discs.
For Blu-ray Disc Players progressive scan output : CONSUMERS SHOULD NOTE THAT NOT ALL HIGH DEFINITION TELEVISION SETS ARE FULLY COMPATIBLE WITH THIS PRODUCT AND MAY CAUSE ARTIFACTS TO BE DISPLAYED IN THE PICTURE. IN CASE OF PROGRESSIVE SCAN PICTURE PROBLEMS, IT IS RECOMMENDED THAT THE USER SWITCH THE CONNECTION TO THE 'STANDARD DEFINITION' OUTPUT. IF THERE ARE QUESTIONS REGARDING OUR TV SET COMPATIBILITY WITH THIS PRODUCT, PLEASE CONTACT OUR CUSTOMER SERVICE CENTRE.
Compliance and Compatibility Notice
NOT ALL discs are compatible
Subject to the restrictions described below and those noted throughout this Manual, including the Disc Type and Characteristics section of this Manual, disc types that can be played are: pre-recorded commercial BD-ROM, DVD-Video, and Audio CD discs; DVD-RW / DVD-R discs; and CD-RW/CD-R discs.
Discs other than the above cannot and/or is not intended to be played by this player. And some of the above discs may not play due to one or more reasons provided below.
Logik cannot assure that this player will play every disc bearing the BD-ROM, DVD-Video, DVD-RW / DVD-R and CD-RW/CD-R logos, and this player may not respond to all operating commands or operate all features of every disc. These and other disc compatibility and player operation issues with new and existing format discs are possible because:
- Blu-ray is a new and evolving format and this player may not operate all features of Blu-ray Discs because some features may be optional, additional features may have been added to the Blu-ray Disc format after the production of this player, and certain available features may be subject to delayed availability;
- not all new and existing disc format versions are supported by this player;
- new and existing disc formats may be revised, changed, updated, improved and/or supplemented;
- some discs are produced in a manner that allows specific or limited operation and feature during playback;
- some features may be optional, additional features may have been added after the production of this player or certain available features may be subject to delayed availability;
- some discs bearing the BD-ROM, DVD-Video, DVD-RW/ DVD-R and CD-RW/CD-R logos may still be non-standardized discs;
- some discs may not be played depending on their physical state or recording conditions;
- Problems and errors can occur during the creation of Blu-ray Disc, DVD software and/or the manufacture of discs;
- this player operates differently than a standard
DVD player or other AV equipment; and/or
If you encounter disc compatibility or player operation problems, please contact Techguy.
You may also contact Techguy for possible updates on this player.
For additional information on playback restrictions and disc compatibility, refer to the Precautions, Before Reading the User's Manual, Disc Types and Characteristics, and Before Playing sections of this Manual.

Visit Partmaster.co.uk today for the easiest way to buy electrical spares and accessories. With over 1 million spares and accessories available we can deliver direct to your door the very next day.
Visit www.partmaster.co.uk
or call
0870 6001 338
(UK customers only)
Calls charged at National Rate.
For a replacement of the accessories, you may quote their respective part number and order via our Partmaster.
| Remote Control | 06-RC2400-A001 |
| Composite (Video) and Audio (L/R)Cable | 41-UH1500-0KKCD |
| Instruction Manual | 72-BD1000-050B1 |
| Quick Start Guide | 72-BD1000-QSGB1 |
| Batteries for Remote Control (2x AAA) | 49_382380_BAT |
For product help or out of guarantee support:
Dixons customers please call: 08701 54 55 60
Currys customers please call: 08701 54 55 70
(All calls charged at national rates)
This product is exclusively available through Dixons Stores Group. In the unlikely event of a problem with your product, please return to the store where your purchase was made.
- SAFETY INFORMATION AND PRECAUTION
- SAFETY PRECAUTION
- CAUTION
- WARNING
- CLASS 1 LASER PRODUCT
- NOTES ON HANDLING
- LOCATION
- ELECTRICAL DISTURBANCE
- NOTES ON MOISTURE CONDENSATION
- ON HANDLING DISCS
- ON CLEANING DISCS
- ON STORING DISCS
- NOTES FOR BATTERY DISPOSAL
- TABLE OF CONTENTS
- KEY FEATURES OF YOUR NEW BLU-RAY DISC PLAYER
- PACKAGE CONTENT
- FUNCTIONS AND CONTROLS
- REMOTE CONTROL
- SETTING UP THE BLU-RAY DISC PLAYER
- PLAYBACK FUNCTIONS
- SPECIAL PLAYBACK FUNCTIONS
- SYSTEM SET-UP
- TROUBLESHOOTING
- TECHNICAL SPECIFICATION
- IMPORTANT NOTICES
- PLAYER FEATURES
- SUPPORT A VARIETY OF VIDEO DISC TYPES
- HDMI (HIGH DEFINITION MULTIMEDIA INTERFACE)
- BLU-RAY DISC FEATURES
- VIDEO HIGHLIGHTS
- FOR HIGH-DEFINITION PLAYBACK
- BLU-RAY DISC FEATURES (CONT')
- GRAPHIC PLANES
- MENU GRAPHICS
- MENU SOUNDS
- MULTI-PAGE/ POPUP MENUS
- INTERACTIVITY
- USER BROWSABLE SLIDESHOWS
- SUBTITLES
- STRUCTURE OF DISC CONTENTS
- DISCS THAT CANNOT BE PLAYED
- REGION CODE
- BLU-RAY DISC COMPATIBILITY
- FRONT PANEL
- REAR PANEL
- DISPLAY
- LOADING BATTERIES
- HANDLING THE REMOTE CONTROL
- EFFECTIVE RANGE
- CONNECTIONS
- CONNECTING TO HDTV WITH HDMI CABLE
- CONNECTING TO HDTV WITH DVI CABLE
- CONNECTING TO TV WITH COMPONENT VIDEO CABLE
- CONNECTING TO TV WITH COMPOSITE VIDEO CABLE
- CONNECTING TO AN EXTERNAL HI-FI SYSTEM VIA 2-CHANNEL ANALOG AUDIO OUTPUT
- CONNECTING TO AN AUDIO RECEIVER (MULTI-CHANNELS) VIA SPDIF
- CONNECTING TO AN AUDIO SYSTEM VIA 7.1 ANALOG AUDIO OUTPUT
- CONNECTING TO A HIGH DEFINITION AUDIO RECEIVER VIA HDMI
- BASIC PLAYBACK
- PAUSE PLAYBACK
- STOP PLAYBACK
- FAST FORWARD AND FAST REVERSE
- PREVIOUS AND NEXT
- FRAME-BY-FRAME PLAYBACK
- ADVANCED PLAYBACK
- REPEAT
- REPEAT A-B
- RANDOM
- SEARCH
- SUBTITLE
- RETURN
- ANGLE
- DISC MENU
- TITLE MENU
- SETUP
- COLOUR BUTTONS (RED/GREEN/YELLOW/BLUE)
- ADVANCED PLAYBACK (CONT')
- AUDIO
- VOLUME AND MUTE
- BLU-RAY DISC BONUS VIEW
- PLAYING SECONDARY VIDEO (PICTURE-IN-PICTURE) AND SECONDARY AUDIO FOR BLU-RAY DISC ONLY
- BLU-RAY DISC JAVA
- BD-J APPLICATION
- LANGUAGE MENU
- AUDIO LANGUAGE
- SUBTITLE LANGUAGE
- DISC MENU LANGUAGE
- OSD LANGUAGE
- DISPLAY SETTING
- WIDE
- PILLARBOX
- LETTERBOX
- PAN AND SCAN
- RESOLUTION (CONT')
- COLOUR SPACE
- FILM MODE
- AUDIO OUTPUT SETTING
- DIGITAL OUTPUT
- SPEAKER SETTING
- SPEAKER SETTING (CONT')
- SETUP MENU
- PARENTAL CONTROL SETTING
- PARENTAL CONTROL
- PARENTAL LEVEL
- SYSTEM MENU SETTING
- SET PASSWORD
- SOFTWARE VERSION
- VERSION INFORMATION
- APPENDIX FOR ICONS THROUGHOUT THE MANUAL
- MACROVISION
- ADVANCED DIGITAL OUT
- COPY PROTECTION
- COMPLIANCE AND COMPATIBILITY NOTICE
Brand : Logik
Model : LBD2000
Category : Blu-ray player