
MCH90BLK - Range hood MATSUI - Free user manual and instructions
Find the device manual for free MCH90BLK MATSUI in PDF.


| Product Type | Cooker Hood (Range Hood) |
| Model | MCH90BLK |
| Brand | Matsui |
| Dimensions (H x W x D) | 28 x 90 x 50 cm |
| Weight | 12 kg |
| Rated Voltage | 230 V ~ 50 Hz |
| Rated Power | 160 W |
| Number of Speeds | 3 (Low, Medium, High) plus Off |
| Lighting | 2 x 40W max (E14 bulbs) |
| Filter Type | Aluminum grease filters (dishwasher safe) |
| Filter Cleaning | Every 3 months |
| Carbon Filter Option | Yes (for recirculation mode, 2 required) |
| Installation Type | Wall-mounted with chimney flue |
| Minimum Height Above Hob | 70 cm |
| Ducting Diameter | 125 mm |
| Control Type | Push buttons (On/Off, Speed, Light) |
| Color | Black |
| Material | Steel |
| Electrical Protection | 13 Amp fuse (BS1362) |
| Compliance | EEC Low Voltage Directive (73/23/EEC) and EMC Directive (89/336/EEC) |
Frequently Asked Questions - MCH90BLK MATSUI
User questions about MCH90BLK MATSUI
0 question about this device. Answer the ones you know or ask your own.
Ask a new question about this device
Download the instructions for your Range hood in PDF format for free! Find your manual MCH90BLK - MATSUI and take your electronic device back in hand. On this page are published all the documents necessary for the use of your device. MCH90BLK by MATSUI.
USER MANUAL MCH90BLK MATSUI
natural_image
3D rendering of a kitchen range hood with chimney and base (no text or symbols)Instruction Book
Cod:0103071747
Safety
- The appliance must be installed according to the manufacturer's instructions. Improper installation may result in injury or damage, for which the manufacturer cannot be held responsible.
- The electrical safety of this appliance is guaranteed only if it is connected to a properly earthed system which complies with the electrical safety standards in force. If you cannot verify that this fundamental safety requirement is in place, consult a qualified electrician. The manufacturer cannot be held responsible for an appliance which has not been correctly earthed.
- Check that the voltage (230 Volts AC) printed on the rating label at the back of the Cooker hood corresponds to the mains voltage in your home. If in doubt call a qualified electrician.
-
Never replace the power supply cable yourself. Damaged cables must only be replaced by an authorised service centre.
-
Adaptors, multiple sockets and/or extension leads must not be used.
• To avoid electrical shock, never touch the Cooker hood or plug with wet hands. - Ventilation outlets on the Cooker hood should never be covered, as obstructions may cause overheating or fire.
• Always disconnect the plug from the mains supply before cleaning the Cooker hood or carrying out maintenance work. - Do not flambé under the Cooker hood as this may cause a fire hazard.
- Avoid leaving a gas hob on when there is no pan on the stove.

WARNING!
It is hazardous for anyone other than authorised service personnel to carry out Servicing or repairs which involves the removal of covers.
To avoid the risk of an electric shock do not attempt to repair this appliance yourself.
Disposal
Old appliances still have some residual value. An environmentally friendly method of disposal will ensure that valuable raw materials can be recovered and used again. Up to date information concerning options for disposing of your old appliance and packaging from the new one can be obtained from your local council office.
Introducing Your New Cooker Hood
Before use
Please read these instructions carefully before using your new Matsui Cooker hood. The Cooker hood is for indoor, domestic use only. WARNING- Please be careful when unpacking and installing this appliance as sheet metal can cause injury if not handled with care.

Install Your New Cooker Hood
Installation and electrical wiring must be carried out by a qualified engineer to ensure all applicable codes and standards are followed. Before installing check that the voltage indicated on the rating plate is suitable for your home.

Location
The Cooker hood is designed to be a permanent fixture in the home, therefore needs to be located in a place that the lowest part of the hood will be set at least 70cm above the hob. The Cooker hood will need to be positioned with adequate ventilation directly over the cooker. The air that is discharged from the Cooker hood should NOT be filtered into a flue that is used for other appliances that use gas or other fuels. Regulations concerning the discharge of air MUST be fulfilled.
IMPORTANT: The Cooker hood flue MUST not be connected to a previously installed appliance i.e. water heaters, boilers or cooker. The Cooker hood MUST have a separate flue and MUST NOT be installed above a cooker with eye-level grills.
IMPORTANT: Easy access to the electrical socket must be maintained to ensure that you can carry out simple maintenance.
Before plugging in YOU MUST Check that you have a socket, which is compatible with the Cooker hood. If not see the section called ELECTRICAL CONNECTIONS on page 6.
Installation
Before beginning any installation work ensure the mains power has been turned off.
Ducting
1 Using a Phillips screwdriver fix the ducting hose connector onto the air outlet of the hood.
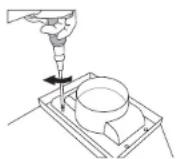
2 Connect the hose to the air duct. Use the adaptor provided to connect to a 125mm hose.

3 The ducting can pass through your wall. Alternatively if your kitchen has a soffit, then the ducting can be positioned to run horizontally through an outside wall directly to a wall cap. NOTE: A soffit is the underside of the roof overhang, normally wood or plastic.
Stencil
Use the stencil provided to help position the hood onto the wall directly below the ducting. NOTE: Take extreme care when drilling holes into your wall to avoid hidden electrical wiring.
1 With the stencil positioned on the wall, drill 4 holes onto the back wall. Push 4 raw plugs into the drill holes and then first screw in the top 2 screws.

2 Fix the hood onto the wall by positioning the upper 2 screws through the key holes on the back of the hood.

3 Attach the lower part of the hood by removing the filter panels to gain access to the lower screw holes.
Attaching the Chimney flue wall bracket
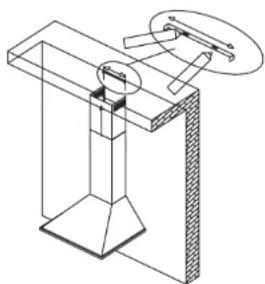
1 Using the wall bracket as a template, drill 2 holes into the wall and push raw plugs into the drill holes.
2 Place the wall bracket over the raw plugs and screw into position.
natural_image
Technical line drawing of a mechanical assembly with no visible text or symbols3 Screw the inner chimney flue section to the wall bracket.
Adjusting the telescopic hood
The telescopic chimney flue can be adjusted in height to fit your ceiling once fully attached to the wall.
Installation
Re-Circulation using Carbon filters
Two carbon filters can also be added to your Cooker hood, when air is to be re-circulated instead of external ducting. Attach to either side of the motor.
Please see the Partmaster Direct details on the back cover to order one.
(2 carbon filters required)

In Use
Control panel

0

1

2

3

0 = Switches the Cooker hood off.
1 = Low speed. Is suitable when low levels of steam are created whilst cooking.
2 = Medium speed.
3 = High speed. Is suitable when high levels of steam are created whilst cooking.
☀️ = Switches the overhead light on.
The Cooker hood should be left on for at least 15 minutes after cooking has finished to ensure efficient filtering of the air.
Cleaning
Regular cleaning will help to maintain the effectiveness of your Cooker hood.
1 Switch off and unplug the Cooker hood before cleaning.
2 Clean the outside of the Cooker hood with a damp cloth and a mild detergent.
NOTE: Do not use solvents or abrasives as this may damage the Cooker hood.
Cleaning the filters
To ensure the filters do not become a fire hazard we recommend they are washed every 3 months. Do not check the filter panels whilst the Cooker hood is in use.
1 Before cleaning the filters always switch off and disconnect the electrical supply.
2 Remove the filter panels by holding down the buttons on each panel and lifting towards you. They can then be taken out of the cooker hood.
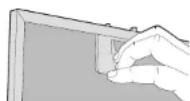
3 Wash each filter in warm water and a mild detergent, leave to soak and drain. Ensure it is completely dry before replacing into the Cooker hood.
4 Place the bottom of each panel into the back of the Cooker hood and raise the top to click into position.
NOTE: The filter panels are also dishwasher proof. The filter panels may alter in colour slightly after several washes, this is not a fault.
Maintenance and Troubleshooting
Changing the internal light
Allow the Cooker hood to cool for at least 30 minutes after use before changing the light bulb.
1 Before carrying out the bulb replacement always switch off and disconnect the electrical supply.
2 Remove the removable filters by holding down the buttons on each panel and lifting towards you. They can then be taken out of the Cooker hood.
3 Remove the old bulb by unscrewing it in an anti-clockwise direction.
4 Replace with a new bulb (maximum 40w) by screwing it in a clockwise direction. Make sure that it is secure in the bulb holder (your cooker hood is fitted with 2x 40w bulbs).
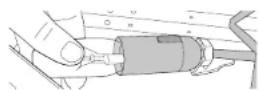
5 Replace the filters.
The Cooker hood is not working
- Check it is plugged in and switched on.
- Check that the fuse in the plug has not blown.
- Plug in another appliance, such as a lamp, to see if the socket is working.
Servicing
Only an authorised, qualified technician should perform repairs and maintenance of the appliance.
Technical specifications
Electrical information
Model
MCH60SS
MCH90SS
MCH60BLK
MCH90BLK
Rated Voltage 230 230
(V)
Rated Frequency 50 50
(Hz)
Rated Power 160 160
(W)
Weight 9.5 12
(kg)
Product Dimension
h/w/d 26x60x50 28x90x50
(cm)
Bulbs 2x40W max 2x40W max
(E14)
Weight and Dimensions are approximate. Because we continually strive to improve our products we may change specifications and designs without prior notice.
THIS APPLIANCE MUST BE EARTHED.
This appliance is fitted with a fused three pin plug to BS 1363 which will be suitable for use in all houses fitted with sockets to current specifications.
If the fitted plug is not suitable for your socket outlets, it should be cut off and carefully disposed of. To avoid a possible shock hazard, do not insert the discarded plug into a socket.
Fitting a new plug
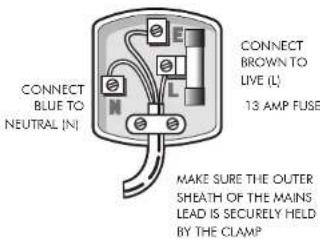
If for any reason you need to fit a new plug, the flexible mains lead must be connected as shown here. The wires in the mains lead fitted to this appliance are coloured in accordance with the following code
CONNECT GREEN AND YELLOW TO EARTH (E)
CE
If the colours of the wires in the mains lead of this appliance do not correspond with the coloured markings identifying the terminals in your plug, proceed as follows:
The wire which is coloured Green and Yellow MUST be connected to the terminal which is marked with the letter E (Earth) or symbol 12 or coloured Green. The wire which is coloured Blue MUST be connected to the terminal which is marked with the letter N or coloured Black. The wire which is coloured Brown MUST be connected to the terminal which is marked with the letter L or coloured Red.
Before refitting the plug cover, check that there are no cut or stray strands of wire inside the plug. Use a 13 Amp BS1362 fuse, only BSI or ASTA approved fuses should be used. If you are in any way unsure which plug or fuse to use, always refer to a qualified electrician.
Note: After replacing or changing a fuse on a moulded plug which has a fuse cover, the cover must be refitted to the plug, the appliance must not be used without a fuse cover. If lost, replacement fuse covers can be obtained from an electrical shop.
This appliance complies with the following EEC Directives:
73 / 23 EEC (Low Voltage Directive)
89 / 336 EEC (EMC Directive).
Partmaster
.co.uk
Visit Partmaster.co.uk today for the easiest way to buy electrical spares and accessories.
With over 1 million spares and accessories available we can deliver direct to your door the very next day.
Visit www.partmaster.co.uk
or call
0870 6001 338
(UK customers only)
Calls charged at National Rate.
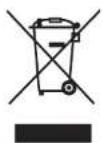
This symbol on the product or in the instructions means that your electrical and electronic equipment should be disposed at the end of its life separately from your household waste. There are separate collection systems for recycling in the EU.
For more information, please contact the local authority or your retailer where you purchased the product.
- Safety
- WARNING!
- Disposal
- Introducing Your New Cooker Hood
- Before use
- Install Your New Cooker Hood
- Location
- Installation
- Ducting
- Stencil
- Attaching the Chimney flue wall bracket
- Adjusting the telescopic hood
- Re-Circulation using Carbon filters
- In Use
- Control panel
- Cleaning
- Cleaning the filters
- Maintenance and Troubleshooting
- Changing the internal light
- The Cooker hood is not working
- Servicing
- Technical specifications
- Electrical information
- Fitting a new plug
- Partmaster
- .co.uk
Brand : MATSUI
Model : MCH90BLK
Category : Range hood