
MEH60WH - Cooker MATSUI - Free user manual and instructions
Find the device manual for free MEH60WH MATSUI in PDF.


| Product Type | Electric Hob |
| Brand | Matsui |
| Model | MEH60WH |
| Number of Hotplates | 4 (two large, two small) |
| Control Type | Rotary dials |
| Power Levels | 6 (1 to 6) |
| Rated Voltage | 230 V |
| Rated Frequency | 50 Hz |
| Total Power | 5.2 kW |
| Current Rating | 23 A |
| External Dimensions (Width x Depth) | 58 cm x 51 cm |
| Cutout Dimensions (Width x Depth) | 55 cm x 48 cm |
| Cable Type | H05V V-F 3 x 2.5 mm² |
| Required Fuse | 30 A |
| Switch Requirement | Double-pole switch |
| Minimum Distance to Adjacent Units | 15 cm |
| Minimum Height Above Hob | 65 cm |
| Minimum Space Below Hob | 10 cm |
| Cleaning Recommendation | Use damp cloth with mild detergent; avoid abrasives and steam cleaners |
| Safety Features | Must be earthed; do not use for heating rooms |
| Energy Saving Tips | Use lids, match pan size, utilise residual heat |
| Installation Requirement | By qualified electrician; improper installation voids warranty |
| Warranty | Invalid if improperly connected or installed |
Frequently Asked Questions - MEH60WH MATSUI
User questions about MEH60WH MATSUI
0 question about this device. Answer the ones you know or ask your own.
Ask a new question about this device
Download the instructions for your Cooker in PDF format for free! Find your manual MEH60WH - MATSUI and take your electronic device back in hand. On this page are published all the documents necessary for the use of your device. MEH60WH by MATSUI.
USER MANUAL MEH60WH MATSUI
natural_image
Illustration of a four-wheft electric stove with four black ovens and a control panel (no text or symbols on the stove itself)MEH60WH
MATSUI
contents
getting to know your hob .3
important safety notes 4
control panel 6
instructions for use 7
hints and tips 8
installation guide 9
specifications 13
getting to know your hob
Thank you for choosing the Matsui MEH60WH electric hob. We hope the following information will help you to quickly familiarise yourself with the features of the hob and to use it successfully and safely.
Please read this user guide before using the hob and keep it for future reference.
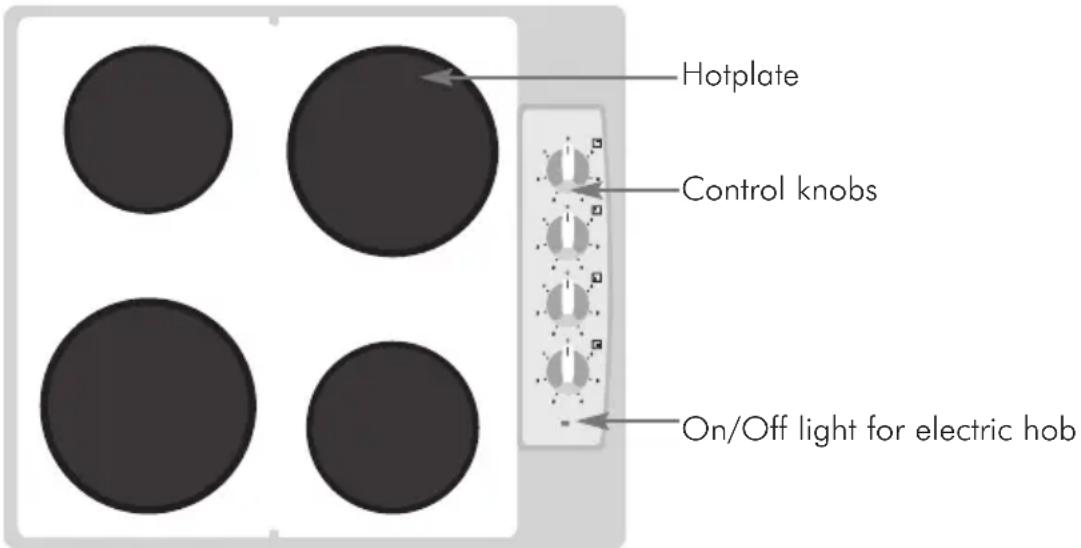
Please note: The electrical connection of this electric hob should be carried out by a qualified electrician, according to the instructions in this guide and in compliance with the current regulations. Give this guide to your electrician, the installation connection instructions are on page 9-12.
important safety notes
We have included this section for your safety. Please read this information carefully before using your electric hob.
WARNING:
It is hazardous for anyone other than authorised service personal to carry out servicing or repairs which involves the removal of covers.
To avoid the risk of an electric shock, do not attempt repairs yourself.
In the event of any damage that occurs as a result of improper connection or installation, the warranty will not be valid.
Safety notes
n Make sure all the packaging has been removed before you use the hob.
n Retain this user guide and your receipts for future reference.
Never leave the hob unattended when cooking.
This hob must only be used for the purpose of heating or cooking food, any other use, for example heating rooms, is dangerous. The manufacturer cannot be liable for damages resulting from improper, incorrect or negligent use.
n Be careful when using small household appliances, such as irons, near the hob and make sure the power cable is kept well away from hot surfaces.
n Make sure all the controls are in the off position when not in use.
When using the hob only use stable flat-based pans. They should be placed on the hob with handles turned inwards so that they are not accidentally knocked or pulled over.
Do not use flammable liquids (alcohol, petrol) near the hob when it is in use.
It is advisable to have a smoke detector fitted in your home and have a fire blanket or extinguisher close to the hob.
The hob must be installed according to the instructions in this user guide, by a qualified electrician. Improper installation may result in injury or damage, for which the manufacturer cannot be held responsible.
important safety notes
The electrical safety of this hob is guaranteed only if it is connected to a properly earthed system, which complies with the electrical safety standards in force. If you cannot verify that this fundamental safety requirement is in place, consult a qualified electrician.
Never replace the power supply cable yourself. Damaged cables must only be replaced by an authorised service centre.
n Do not use a steam cleaner to clean your hob.
n Harsh abrasive cleaners should not be used.
Any maintenance must be carried out by a qualified electrician with the mains supply disconnected.
control panel
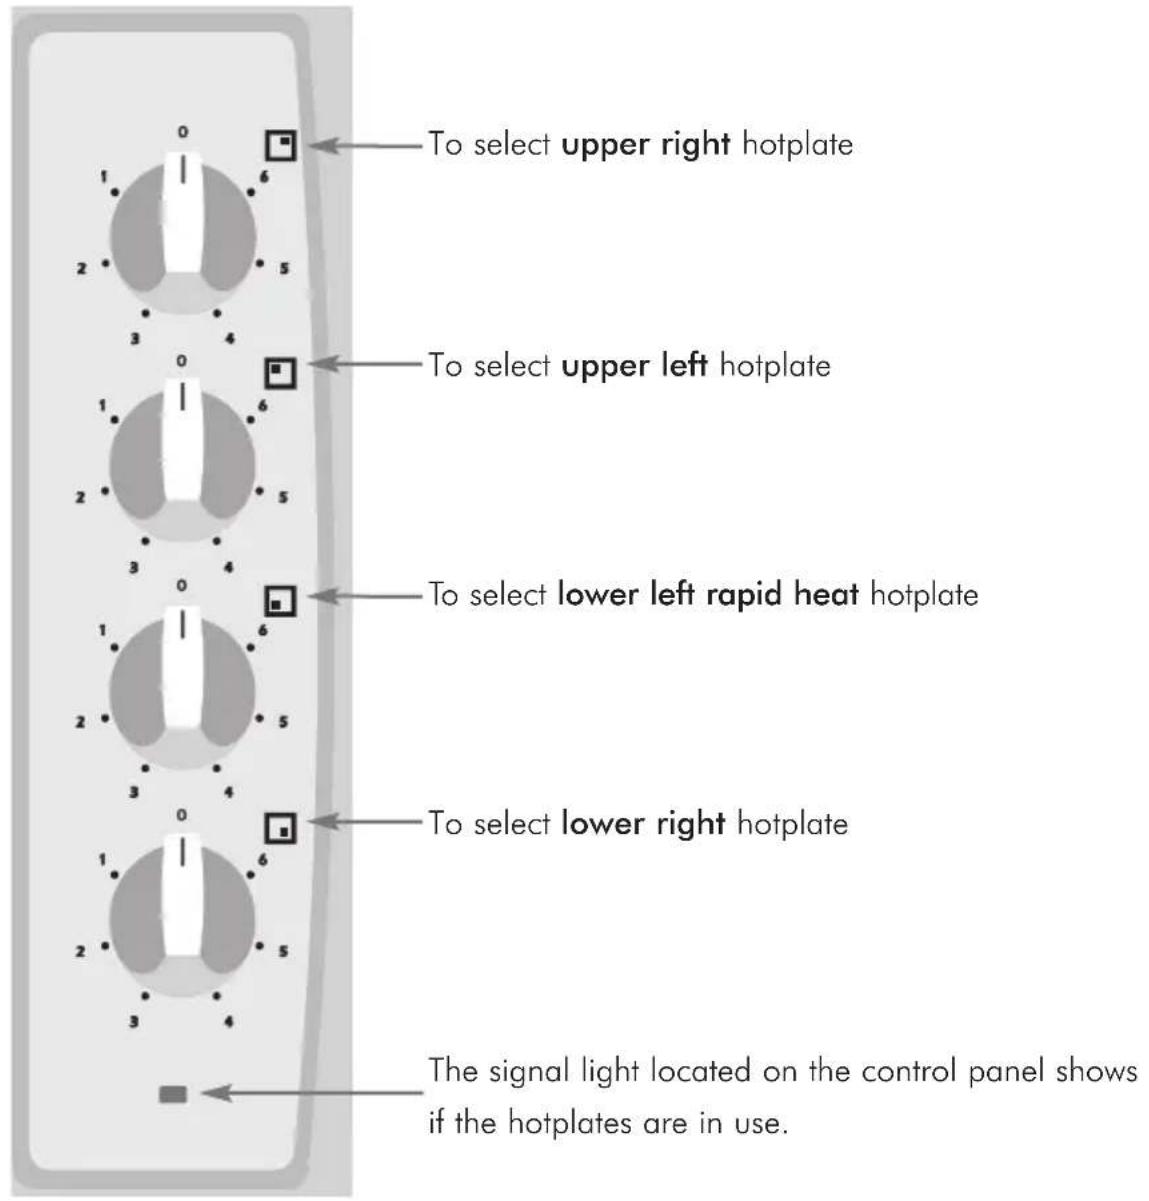
Your electric hob has four hotplates. Each dial has a symbol above it, which indicates which hotplate it controls. The electric hob is designed for operating at 6 different levels.
instructions for use
Using the hotplates
1 Switch the hotplates on by turning the knob from 1-6, depending on the temperature required, 6 is the highest setting.
2 There are two different types of hotplate. Two for larger cooking pans and two for smaller pans.
3 A signal light, located on the control panel, shows if the hotplates are in use.
Turning a hotplate off
Turn the knob until the '0' position is reached. You can turn the dials clockwise or anti-clockwise to your desired cooking level.
Temperature setting guide
| 1-2 Gentle simmering, slow warming | |
| 3-5 | Reheating and rapid simmering |
| 6 | Boiling, sauté and searing – maximum heat |
WARNING:
When operating for the first time, or whenever the hob has not been used for prolonged periods of time, some smoke may be produced. It is necessary to burn off any built up residue, which may have accumulated on and around the hotplates.
hints and tips
Cookware
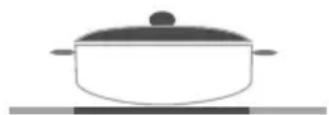
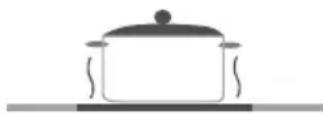
n Use heavy gauge, flat, smooth bottom pans that conform to the diameter of the hotplate. This will provide good contact with the hotplate and help reduce cooking times.
Never use plastic or aluminium foil dishes on the hotplates.
n Clean the hob after every use.

√
×
×
Energy saving
n Using a lid will reduce cooking times.
When liquids come to the boil reduce the temperature setting to a simmer.
Place a pan on the hob prior to turning on the heat, and retain the heat.
Choose cookware of the proper size, material and construction.
n Minimise the amount of liquid or fat to reduce cooking times.
n Use residual heat retained in the hob after the hob has been turned off to continue the cooking process or to keep foods warm.
n Select the proper temperature setting for the cooking task, please refer to Temperature setting guide on page 7.
Cleaning Tips
1 Do not use abrasive pads, corrosive cleaners, aerosol cleaners or sharp objects to clean the surfaces of the hotplates.
2 To remove burnt on food, soak off with a damp cloth and washing-up liquid.
1 Do not use abrasive pads, corrosive cleaners, aerosol cleaners or sharp objects to clean the surfaces of the hotplates. 2 To remove burnt on food, soak off with a damp cloth and washing-up liquid.
installation guide
WARNING:
The electric connection for this appliance should be carried out by a qualified electrician, according to the instructions in this guide and in compliance with the current regulations. In the event of any damage that occurs as a result of improper connection or installation, the warranty will not be valid. This appliance must be gathered.
Installation Safety
Any adjacent units or furniture, which are higher than the hobs, must be at least 15cm from the hobs. This includes objects such as spice racks.
Any overhanging surface should be at least 65cm above the hobs.
A board must be installed to the underside of the hob to prevent access.
The minimum spacing required between the bottom of the hob and the installed board is 100mm.
n Extractor fans must be fitted in accordance with the manufacturers instructions.
n Wall cabinets may be fitted at least 42cm above the work surface. The minimum height for kitchen units that are not heat proofed is 70cm above the work surface.
The wall in contact with the rear of the hobs must be made of flameproof material.
The power cable length should not exceed 2 metres.
installation guide
Fitting the hob into a work surface
1 The hob can be fitted into any work surface provided it is heat resistant up to at least 90°C.
2 Create an opening with the dimensions shown in the picture below. The distance between the rear edge of the hob and any adjacent wall depends on wall surface. Please don't use easily combustible metarial like curtain, paper at nearby the hob.
![Installation of 60cm Electric Hob with Side Knob Control 510mm 580mm 39mm 560mm 490mm Min. 25mm Min. B Min. A Min. 130mm Neighborhood walls A [mm] B [mm] Combustible 60 150 Non-combustible 25 40](/content/2026/05/967102/images/bac081873e2c92f29bb045112cefd904dc4a33972c5dee6c789c03792bcf92fe.jpg)
3 Apply the self-adhesive seal to each edge of the opening and carefully fit the hob into the opening.
4 Secure the hob in place by tightening the clamps around its perimeter edge, as the picture below shows. The clamps can be fitted in one of two ways, to accommodate the thickness of the worktop. If the worktop is too thick to accommodate the clamps, cut slots within the thickness of the worktop to reduce its thickness.
installation guide

5 If there is any self-adhesive seal protruding from the edge of the hob, trim it off, being careful not to scratch the worktop.
6 If the hob is being fitted over a cupboard or drawer unit which has no top panel, a top panel must be fitted. This panel will form a separation between the contents of the cupboard or drawer and the underside of the hob. The panel should be removable, to allow for access to the underside of the hob, and can be fitted at least 10cm from the underside of the hob.
Making an electrical connection
Before making a connection, check that:
The mains voltage is the same as that quoted on the ratings plate which is situated on the hob.
The home electrical system can support the hob load (see the rating plate).
The power supply system has an efficient earthing connection which complies with the provisions of current regulations and is in good working order.
The fused switch is easily accessible once the hob has been installed.
If there is no dedicated hob circuit and fused switch, this must be installed by a qualified electrician before the hob is connected.
installation guide
An approved suitable cable must be connected from the Consumer Unit (main fuse box) and be protected by its own 30amp fuse or Micro Circuit Breaker (MCB). The electrician must provide a fused double-pole switch, which disconnects both the line (live) and neutral conductors.
The switch should be fitted to the kitchen wall and must be placed in an easy accessible position in accordance with IEE regulations. One end of the suitable power supply cable connects to the switch and other end connects to hob's power connection box which is located at the back of the hob. Remove the cover of the power connection box and install the cable in accordance with the connection diagram.
The power supply cable must be positioned away from direct heat sources. It should not be subjected to a temperature rise of more than 50 C above room temperature.
This appliance conforms with the requirements of the following EEC Directives:
n EEC/73/23 and 93/68, EEC/89/336 relating to radio interference,
EEC/89/109 relating to contact with foods.
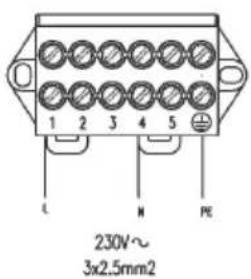

Power connection box
For this hob the cable type must be H05V V-F 3 x 2.5mm ^4 and the connection should be made as in this diagram.
specifications
Model MEH60WH
Rated Voltage (V) 230
Rated 'Frequency (Hz) 50
Power (Kw) 5.2
Current (A) 23
Product Dimensions (cm)
External Width 58
External Depth 51
Product Dimensions (cm)
Internal Width 55
Internal Depth 48
Partmaster
.co.uk
Visit Partmaster.co.uk today for the easiest way to buy electrical spares and accessories.
With over 50,000 products in stock we can deliver direct to your door the very next day.
Visit www.partmaster.co.uk
or call 0844-80034566
(UK customers only)
Calls charged at National Rate

This symbol on the product or in the instructions means that your electrical and electronic equipment should be disposed at the end of its life separately from your household waste. There are separate collection systems for recycling in the EU.
For more information, please contact the local authority or your retailer where you purchased the product.
52006811
- contents
- getting to know your hob
- important safety notes
- WARNING:
- Safety notes
- control panel
- instructions for use
- Using the hotplates
- Turning a hotplate off
- hints and tips
- Cookware
- Energy saving
- Cleaning Tips
- installation guide
- Installation Safety
- Fitting the hob into a work surface
- Making an electrical connection
- Before making a connection, check that:
- Power connection box
- specifications
- Partmaster
- .co.uk
Brand : MATSUI
Model : MEH60WH
Category : Cooker