
CAS-D6323 - Cordless phone SANYO - Free user manual and instructions
Find the device manual for free CAS-D6323 SANYO in PDF.


| Product Type | DECT 6.0 Cordless Phone with Answering Machine and Caller ID |
| Brand | SANYO |
| Model | CAS-D6323 |
| Frequency Range | 1.9 GHz (DECT 6.0) |
| Power Supply | 9V DC Power Adapter (included) |
| Battery Type | Ni-MH rechargeable, model BT-1008S |
| Standby Time | Approximately one week (normal use) |
| Number of Handsets | 3 handsets (model CAS-D6323) |
| Phone Directory | 70 entries |
| Call Log (Caller ID) | 30 numbers |
| Main Functions | Speakerphone, Intercom, Conference, Call Transfer, Last 5 Number Redial, Call Screening, Digital Answering Machine (13 min), Voice Mail |
| Display | LCD Screen with Icons and Backlight |
| Menu Languages | French and English |
| Maximum Range | Up to 50 meters indoors, 300 meters outdoors (approx.) |
| Maintenance and Cleaning | Clean charging contacts with a damp cloth once a month. Do not use solvents. |
| Safety | Use only specified adapter and battery. Do not expose to water. Recycle batteries properly. |
| Spare Parts and Repairability | Replacement battery (BT-1008S), optional headset. After-sales service via SANYO Canada. |
| General Information | One-year warranty. Made for Canada. Complies with Industry Canada technical specifications. |
Frequently Asked Questions - CAS-D6323 SANYO
User questions about CAS-D6323 SANYO
0 question about this device. Answer the ones you know or ask your own.
Ask a new question about this device
Download the instructions for your Cordless phone in PDF format for free! Find your manual CAS-D6323 - SANYO and take your electronic device back in hand. On this page are published all the documents necessary for the use of your device. CAS-D6323 by SANYO.
USER MANUAL CAS-D6323 SANYO
DECT 6.0 Cordless Telephone with Answering System & Caller ID
IMPORTANT
Charge the handset battery pack for a full 15-20 hours before using your cordless handset for the first time.
SANYO
CAS-D6320
CAS-D6322
CAS-D6323
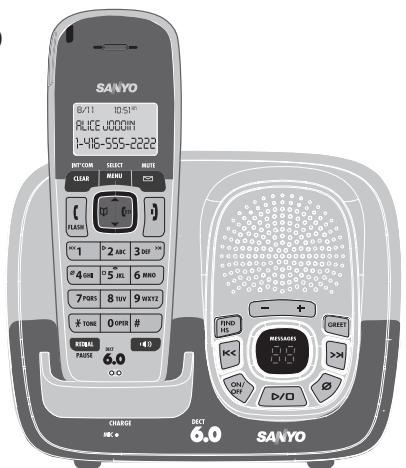
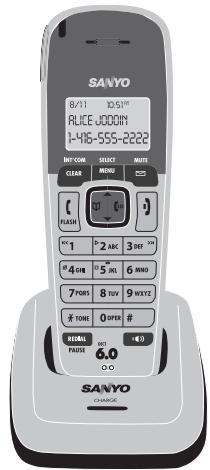
This picture depicts two handsets model CAS-D6322
SANYO Canada Inc.
www.ca.sanyo.com
Introduction
Congratulations on your purchase of the CAS-D6320 / D6322 / D6323 cordless telephone from SANYO.
This phone is designed for reliability, long life, and outstanding performance utilizing the latest in DECT 6.0 technology.
Note:
Some illustrations in this manual may differ from the actual unit for explanation purposes.
Features
1.9GHz DECT 6.0 System
- Caller ID/Call Waiting with Phonebook Match
- Store 30 Caller ID Numbers
- Advanced Phonebook Features:
- Store 70 Phonebook Entries
- Alphabetical Search
- Personalized Ring by Party
-
Transfer Single Listing or Entire Phonebook
-
Speakerphone on Handset
- 7 Ringer Options on Handset (3 Tones/4 Melodies)
- Last 5 Number Redial
- Bilingual Menu Displays (English and French)
- Call Transfer
- Conferencing
- Intercom
Answering System Features
- Digital Tapeless Recording
- Up to 13 Minutes of Recording Time
- Call Screening
- Personal or Pre-recorded Outgoing Messages
- Bilingual Voice Prompts (English and French)
Day and Time Announcement
Remote Message Retrieval
Toll Saver - Message Alert
- Records Up to 59 messages
CONTENTS
Introduction... .inside front cover
Features......inside front cover
CONTENTS.E1
Manual Conventions E2
Checking the Package Contents. E3
Terminology Used in this Manual...E3
Parts of the Phone . E4
GETTING STARTED. E6
Installing the Phone.. E6
Using the Interface . E12
Using Multiple Bases. E15
Selecting a Language. E16
Activating Personal Ring. E17
Activating the Key Touch Tone .E17
Activating the Caller ID Phonebook Match. E17
Changing the Handset Banner... E18
Selecting a Ring Tone (Handset only)...E18
Activating Auto Talk. E19
Activating Any Key Answer E19
SETTING UP THE PHONEBOOK.....E20
Creating Phonebook Entries .E20
Finding a Phonebook Entry. E21
Editing an Existing Phonebook Entry....E21
Storing Caller ID or Redial Numbers in the Phonebook. E22
Deleting Phonebook Entries E22
Copying Phonebook Entries to Another Handset. E23
USING YOUR PHONE.E24
Making a Call from the Phonebook.....E24
Chain Dialing from the Phonebook......E25
Switching to the Handset Speakerphone During a Call....E25
Adjusting the Ringer, Earpiece and Speaker Volume. E25
Finding a Lost Handset. E26
Using Hold, Conference and Transfer...E27
Privacy Mode . E28
Using the Intercom. E29
Muting the Ringer (One call only) E30
Muting the Microphone E30
Seven-Digit Dialing. E30
Tone Dialing Switch Over. E31
Line Mode Setup (Base only).E31
Using the Voice Mail Service. E32
Getting Started
Phonebook
Using Your Phone
Caller ID and Redial List
Answering System
Additional Information
USING CALLER ID, CALL WAITING, AND REDIAL Lists. E33
Using the Caller ID List E33
Making a Call from a Caller ID Record..E33
Deleting Caller ID Numbers E34
Using Call Waiting. E34
Redialing a Number. E35
Deleting a Redial Record.. E35
SETTING UP THE ANSWERING SYSTEM
Using the Answering System Setup. E36
Recording a Personal Greeting...E36
Selecting a Greeting. E37
Deleting Your Personal Greeting...E37
Selecting the Language.. E37
Setting the Number of Rings... E38
Setting the Day & Time. E38
Setting the Record Time (or Announce only).E38
Activating the Message Alert. E39
Activating Call Screening. E39
Setting a Security Code or Personal Identification Number (PIN).E39
USING THE ANSWERING SYSTEM
Turning Your Answering System On and Off.... E40
Reviewing Messages. E40
Screening Calls E42
Turning Off the Message Alert Tone.....E42
Operating the Answering System While You Are Away from Home...E42
ADDITIONAL INFORMATION.E44
Installing the Belt Clip . E44
Optional Headset E44
Note on Power Sources E45
Cleaning the Battery Contacts. E46
Low Battery Alert E46
Troubleshooting E47
Weak or Hard to Hear Audio E51
Technical Information E52
THE SANYO COMFORT WARRANTY .E54
SOS HELP LINE. E55
Manual Conventions
This manual uses several different type styles to help you distinguish between different parts of the phone:
- Bold text indicates a key, a status light or a connection jack on the phone
- ALL CAPITALS indicates text on the display, such as menu options, prompts, and confirmation messages
Checking the Package Contents
Make sure you have received the following items in the package.
CAS-D6320
-
Base unit (1)
-
Rechargeable batteries (1)
-
Telephone cord (1)
-
Answering system wallet card (1)
-
Belt clips (1)
-
Wall mount bracket (1)
-
Quick reference guide (1)
-
Handsets (1)
-
AC adapters (1)
-
Battery order sheet (1)
This instruction manual (1)
CAS-D6322 (additional)
-
Changer (1)
-
Rechargeable batteries (1)
-
Belt clips (1)
-
Handsets (1)
-
AC adapters (1)
CAS-D6323 (additional)
-
Changer (2)
-
Rechargeable batteries (2)
-
Belt clips (2)
-
Handsets (2)
-
AC adapters (2)
Terminology Used in this Manual
| Standby | The handset is not in use. If it is off the cradle, no line has been activated. No dial tone is present. |
| CID | Caller ID is available from your Telephone provider and is offered to users on a subscription basis. With this service, you will be able to see the incoming caller information such as name and phone number. |
| CID/CW or CIDCW | Caller ID with Call Waiting is available by subscription from your Telephone provider. With this service, you will be able to view incoming caller information while on a call with another user. |
| Base | The main part of the phone that connects to your phone line and lets you make and receive calls. |
| Charger | A cradle that charges the handset battery. It connects to power but does not connect to a phone line. |
| Global Settings | This term relates to feature settings that will apply to all registered handsets and the base. These features are available by selecting "GLOBAL SETUP" in the handset menu. Only one handset can change global settings at a time, and you have to make sure the phone is not currently being used. If you have multiple bases, the different bases have each global settings; select the base before changing the global setting (see Selecting the Base on page E16). |
| Talk | A telephone line has been activated on the handset or base, enabling a dial tone. |
Parts of the Phone
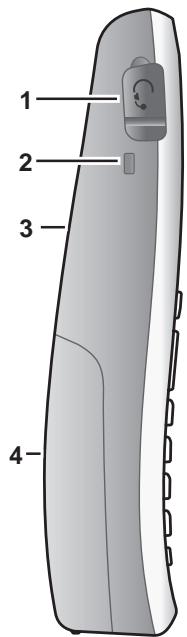
Handset
- Headset jack cover
- Belt clip hole
- Speaker
- Handset battery compartment
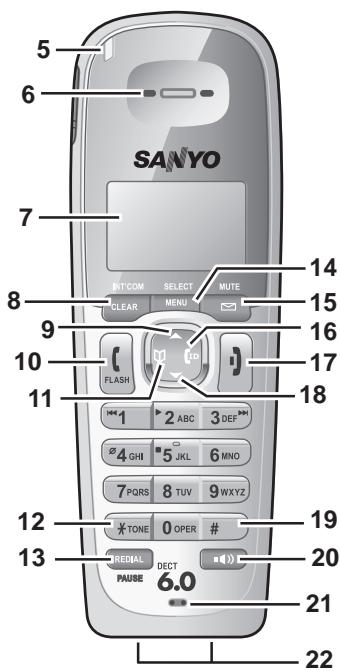
- new message LED
- Handset earpiece
- LCD display
- CLEAR/INT'COM key
- key (up)
- /FLASH key (talk/flash)
- key (phonebook/left)
- /TONE key
- REDIAL/PAUSE key
- MENU/SELECT key
- l /MUTE key (messages/mute)
- ID key ( caller ID/right)
- key (end call)
- key (down)
-
key
- key (speaker)
- Handset microphone
- Handset charging contacts
E4
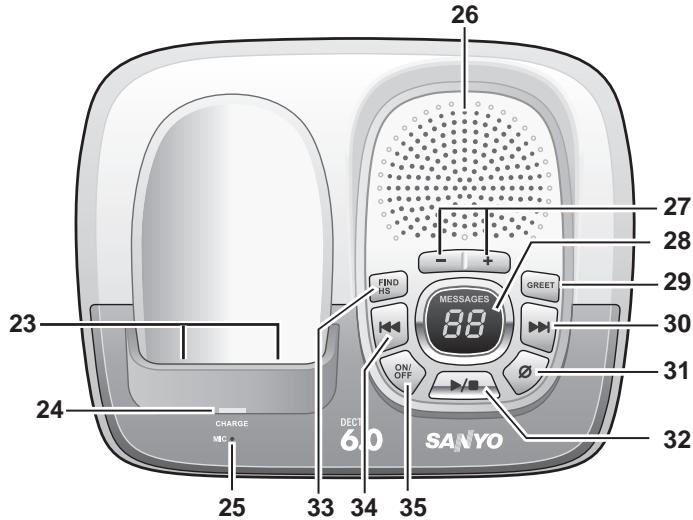
Base
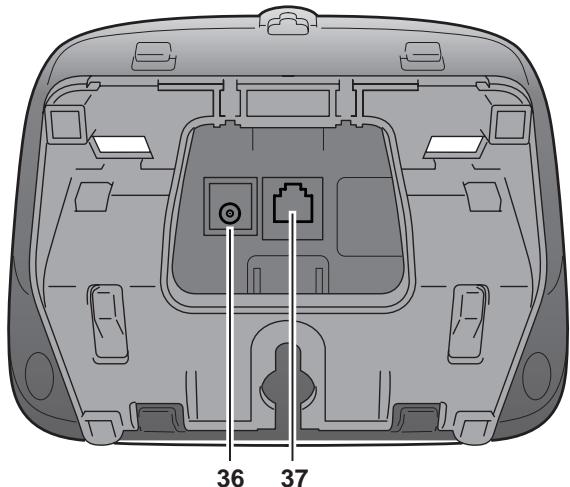
- Base charging contacts
- CHARGE LED
- Base microphone
- Base speaker
- VOLUME +/- keys
- message counter LED
- GREET key (record/select greeting)
-
key (skip)
-
key (delete)
- key (play/stop)
- FIND HS key (find handset)
- key (repeat)
- ON/OFF key (answering system on/off)
- DC IN 9V jack
- TEL LINE jack
GETTING STARTED
Installing the Phone
Choosing the Best Location
When choosing a location for your new phone, here are some important guidelines you should consider:
- The location should be close to both a phone jack and a continuous power outlet (one which is not connected to a switch).
- For optimum range and reception, place the base in an open area, as high as possible.
- If your home has wired alarm equipment connected to a phone line, be sure that installing the system does not disable your alarm equipment. If you have questions about what will disable alarm equipment, contact your telephone company or a qualified installer.
Avoid heat sources, such as radiators, air ducts, and sunlight
Avoid television sets and other electronic equipment
Choose a central location
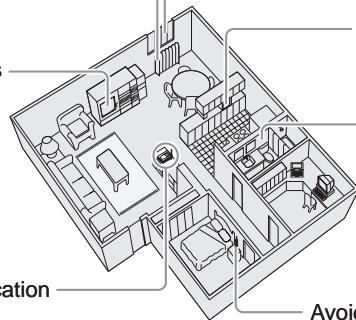
Avoid noise sources such as a window by a street with heavy traffic
Avoid sources of electrical noise such as motors
Avoid excessive moisture, extremely low temperatures, dust, mechanical vibration, or shock
Avoid other cordless telephones
Notes:
For maximum range:
- Keep both the base and handset antennas free of obstruction.
- When the handset is not in use, place the handset in an upright position.
- Metal and reinforced concrete may affect cordless telephone performance.
GETTING STARTED
Installing the Battery
IMPORTANT
Use only the SANYO rechargeable battery pack supplied with your cordless telephone.
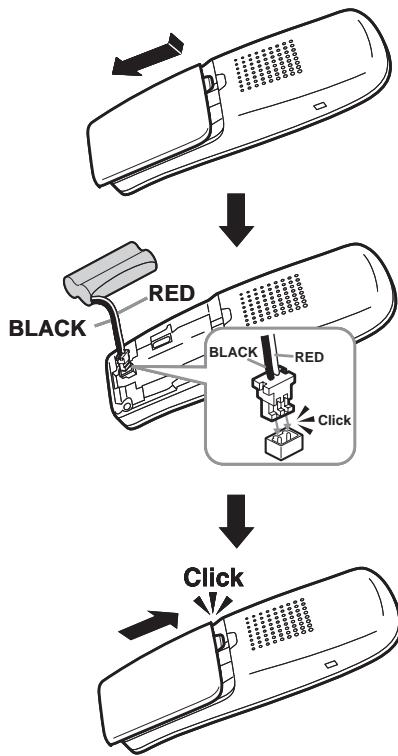
- Press in on the handset battery case cover (use the finger indentation for a better grip) and slide the cover downward to remove.
- Plug the battery cable into the battery jack. Be sure to match the red and black wires to the label near the jack. The cable should snap into place. Gently pull on the battery cable. If the battery connector comes loose, try connecting again until the battery connector clicks into place.
- Place the battery case cover back on the handset and slide it upwards until it clicks into place.
GETTING STARTED
Connecting the Base and Charging the Handset
- Connect the yellow-tipped AC adapter cord to the DC IN 9V jack.
- Connect the AC adapter to a standard 120V AC wall outlet. DO NOT use an AC outlet controlled by a wall switch.
- Place the handset in the base with the LCD screen facing forward.
- Make sure that the CHARGE LED illuminates. If the LED does not illuminate, check to see that the AC adapter is plugged in and the handset makes good contact with the charging contacts.
- Charge your handset at least 15 to 20 hours before plugging into the phone line.
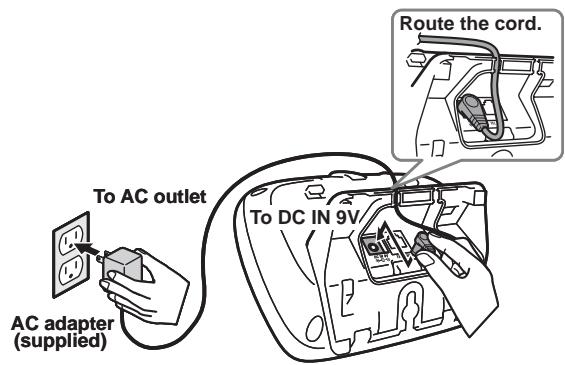
Notes:
- Connect the AC adapter to a continuous power supply.
- Place the base unit close to the AC outlet so that you can plug the AC adapter easily.
- It is normal for the handset and base to get warm, when the handset is charging in the base unit.
IMPORTANT
- Use only the supplied SANYO AC adapter. Do not use any other AC adapter.
- Do not place the power cord so that it creates a trip hazard or where it could become damaged and create a fire or electrical hazard.
GETTING STARTED
Connecting the Charger
- Connect the black-tipped AC adapter cord to the DC IN 9V jack and to a standard 120V AC wall outlet.
- Place the handset in the charger with the LCD screen facing forward.
- Charge the handset battery pack for at least 15-20 hours before using your new cordless telephone for the first time.
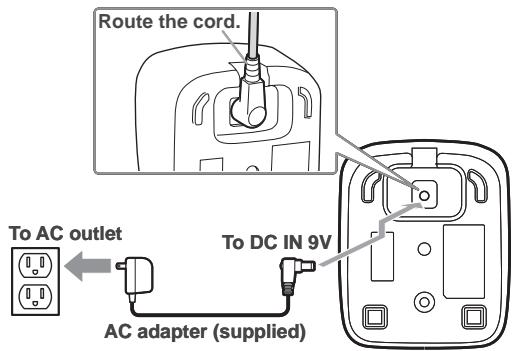
Connecting to the Phone Line
- Once the battery pack is fully charged, connect the telephone cord to the TEL LINE jack.
- Connect the telephone cord to a telephone wall jack.
Testing the Connection
Try making a call. If your call does not connect or you cannot get a dial tone, try the following steps:
- Make sure the AC adapter cord is securely connected to the DC IN 9V jack and a standard power outlet.
- Check to make sure the battery is fully charged. (If you don't see the "battery full" icon, check to make sure the battery is properly connected).
- Change the dial mode.
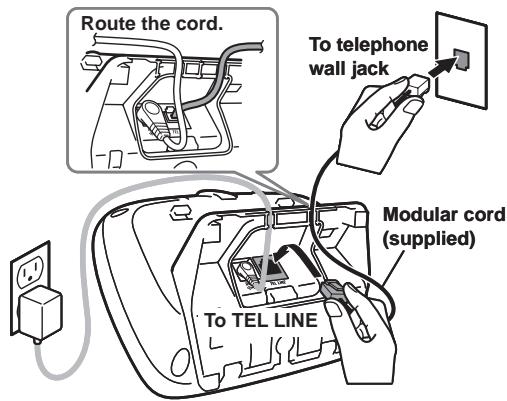

GETTING STARTED
Changing the Dial Mode
Your phone can communicate with the telephone network in two different ways: tone dialing or pulse dialing. These days, most base networks use a method called tone dialing, so your phone comes programmed for tone dialing. If your phone company uses pulse dialing, you will need to change your phone's dial mode. If you don't get a dial tone or can't connect to the telephone network, please follow the steps below to modify your phone's settings:
- Press MENU/SELECT. Select the GLOBAL SETUP menu, and then the DIAL MODE submenu.
- Scroll to select PULSE.
- Press MENU/SELECT. You will hear a confirmation tone.
Dial Mode Tone Pulse
If you ever need to change the dial mode back to tone dialing, follow the same procedure, but select TONE in step 2.
Note:
- If you have multiple bases, select the base before changing the dial mode (see Selecting the Base on page E16).
Wall Mounting the Base
This phone can be mounted on any standard wall plate.
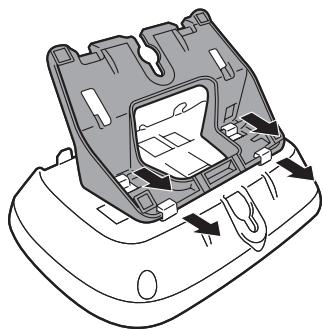
- Turn the base upside down to reach the wall mount bracket.
- On the bracket, press in on the latch near the bottom of the base, then lift to remove the stand.
- Line up the four tabs on the other side of wall mount bracket with the four notches on the back of the base. Slide the bracket into place.
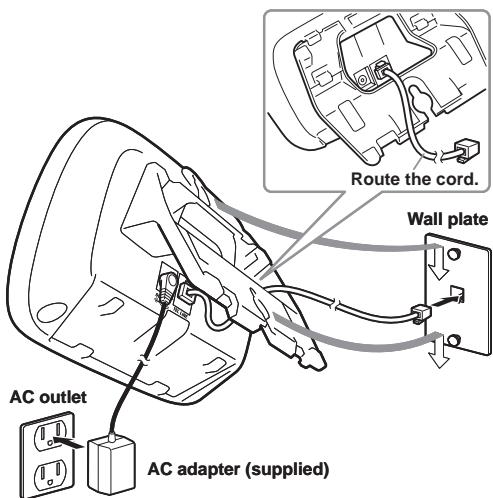
- Plug the AC adapter into the DC IN 9V jack.
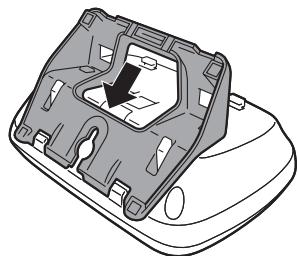
GETTING STARTED
- Plug the AC adapter into a standard 120V AC wall outlet.
- Plug the modular cord into the TEL LINE jack.
- Route the modular cord through the hole of the wall mount bracket as shown.
- Plug the modular cord into the telephone wall jack.
- Align the mounting slots on the base with the mounting posts on the wall. Then push in and down until the phone is firmly seated.
Notes:
- DO NOT use an AC outlet controlled by a wall switch.
- To mount the phone directly on the wall, insert two #10 screws (minimum length of 1 3/8 inches (34.9 mm), not supplied) into the wall, 3 15/16 inches (100 mm) apart; leave the screw heads 1/8 inch (3.175 mm) away from the wall to allow room for mounting the phone. Be sure the wall is capable of supporting the weight of the phone, and use the proper type of anchoring device for the wall material. No need to route the telephone cord through the hole of the wall mount bracket when mounting directly on the wall.
GETTING STARTED
Using the Interface
Reading the Display
In standby
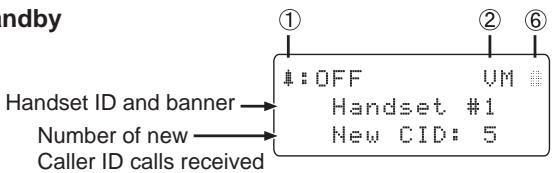
| ① | # OFF | The ringer off icon indicates that the ringer is turned off. |
| ② | UM | The voice mail icon appears when you have messages waiting in your voice mailbox. |
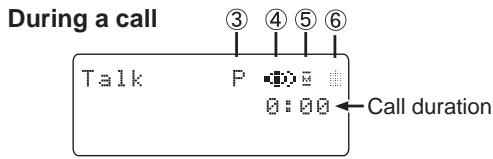
| ③ | P | The privacy icon appears when the Privacy Mode is turned on. |
| ④ | # | The speaker icon appears when the speaker phone is in use. |
| ⑤ | # | The mute icon appears while the microphone is muted. |
| ⑥ | # | The battery icon indicates the handset battery status: full, medium, low, and empty. |
GETTING STARTED
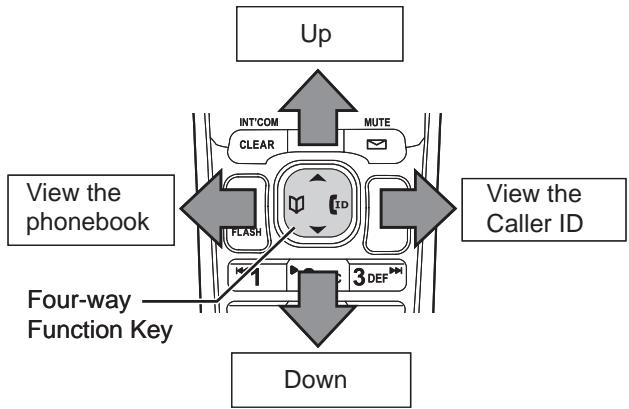
Using the Four-way Function Key
Your handset has a four-way function key that allows you to move the cursor or pointer on the display and access the most commonly used features at the touch of a button. By moving this key to the left, you open the phonebook. Move the key to the right to access Caller ID information. To use this four-way key, place your thumb over the key on the handset and move to the four positions to get the feel of how it moves and operates.
Using the Handset Menu
To open the menu, press MENU/SELECT. Press or on the four-way function key to move the cursor. To select an option, press MENU/SELECT. To go back to the previous screen, press left on the four-way function key. To exit the menu and return to standby, press .
If you do not press a key within thirty seconds, the phone will time out and exit the menu. When setting the day and time, the time-out period is extended to two minutes.
Note:
- For ANSW. SETUP and GLOBAL SETUP menu options, make sure the line is not in use and the handsets are within range of the base.
GETTING STARTED
Entering Text from Your Handset
You can use the number keypad on your handset to enter text by referring to the letters printed on each number key. When you press the number key in a text entry field, the phone displays the first letter printed on the number key. Press the number key twice to display the second letter and three times to display the third. Capital letters are displayed first, then lower case letters, and then the number on the key.
If two letters in a row use the same number key, enter the first letter, then use right on the four-way function key to move the cursor to the next position to enter the second letter.
For example, to enter the word "Movies":
- Press 6 once to enter M .
- Use right on the four-way function key to move the cursor to the right.
- Press 6 six times to enter o
- Press 8 six times to enter v.
- Press 4 six times to enter i .
- Press 3 five times to enter e .
- Press 7 eight times to enter s .
- Press MENU/SELECT to end your text entry.
If you make a mistake while entering a name, use right or left on the four-way function key to move the cursor to the incorrect character. Press CLEAR/INT'COM to erase the wrong character, and then enter the correct character
To delete all characters, press and hold CLEAR/INT'COM.
| Number of times key is pressed | |||||||||
| keys | 1 | 2 | 3 | 4 | 5 | 6 | 7 | 8 | 9 |
| 1 | 1 | ||||||||
| 2 ABC | A | B | C | a | b | C | 2 | ||
| 3 DEF | D | E | F | d | e | f | 3 | ||
| 4 GHI | G | H | I | g | h | i | 4 | ||
| 5 JKL | J | K | L | j | k | l | 5 | ||
| 6 MNO | M | N | O | m | n | O | 6 | ||
| 7 PQRS | P | Q | R | S | P | q | r | s | ? |
| 8 TUV | T | U | V | t | u | v | 8 | ||
| 9WXYZ | W | X | Y | Z | w | x | y | z | 9 |
| 0 OPER | & | ( | ) | < | > | / | (blank) | - | ... |
| " | " | " | ? | ! | ü | " | " | * | |
| # | # | ||||||||
Note:
- When you enter the text, you can also use # to move the cursor to right and */TONE to move the cursor to left.

GETTING STARTED
Using Multiple Bases
The handsets supplied with your phone can be registered to a total of four different bases (CAS-D6320 / D6322 / D6323). Once your handset is registered to more than one base, you can set the handset to search automatically the available base, or you can select manually which base the handset should connect to (for example, if you have one base with an answering machine, you can tell the handset to connect that base to check messages).
Note:
- To confirm how many bases the handset is registered to, open the SELECT BASE menu (follow the step 1 of Selecting the Base on page E16). Press to close the list and return to standby.
Registering the Handset to Another Base
To register a handset to another base:
- Make sure the handset battery is fully charged.
- Disconnect the base AC adapter. Then press and hold FIND HS while you reconnect the adapter. Keep pressing FIND HS until the charge LED starts to blink.
- On the handset, press MENU/SELECT. Select the REGISTER BASE menu. HANDSET REGISTERING will appear in the display. (After step 2, you have thirty seconds to complete this step 3 before the system returns to standby.)
- Wait approximately thirty seconds. REGISTRATION COMPLETE will be displayed to indicate the handset has been registered to the base and a handset ID will be automatically assigned.
If REGISTRATION Failed appears in the LCD, please try these steps again.
GETTING STARTED
Selecting the Base
When your handset is registered to another base, it will automatically connect to the base. A base ID (that is for the handset only) will be assigned in the order of registration. You can either select a base you want to use manually, or set to AUTO. If you set to AUTO, and the handset is out of range, it automatically searches the available base in order of base ID.
- With the phone in standby, press MENU/SELECT. Select the HANDSET SETUP menu, and then the SELECT BASE submenu.
- Move the cursor to select the base you want to connect to, or choose AUTO to have the handset automatically select the base.
- Press MENU/SELECT. SEARCHING will appear in the display.
- When the base is found, the handset will return to standby. If the base is not found, "SEARCHING" continues to appear. You can repeat the procedure listed above to return back to the original connection or to find the different base.
Note:
- You cannot change bases during a call.
Selecting a Language
Your phone supports two languages: English and French. Once you select a language, the menus on the handset will display in that language. The default language is English.
- Press MENU/SELECT. Select the HANDSET SETUP menu, and then the HANDSET LANGUAGE submenu.
- Move the cursor to choose ENGLISH or FRANÇAIS (French).
- Press MENU/SELECT. You will hear a confirmation tone.
Handset Language
■ English
Français
GETTING STARTED
Activating Personal Ring
You can assign special ring tones to anyone in your phonebook. When your phone gets a call, it looks up the Caller ID information in your phonebook. If you've assigned a personal ring to a specific number, the selected ring will sound so you know who is calling. (See page E21 for how to assign a personal ring tone.) To turn the personal ring on or off, follow these steps:
- Press MENU/SELECT. Select the HANDSET SETUP menu, and then the PERSONAL RING submenu.
- Move the cursor to select ON or OFF.
- Press MENU/SELECT. You will hear a confirmation tone.
Personal Ring On Off
Activating the Key Touch Tone
Key Touch Tone is the tone your keypad makes when keys are pressed. You can turn this tone on or off.
- Press MENU/SELECT. Select the HANDSET SETUP menu, and then the KEY TOUCH TONE submenu.
- Move the cursor to select ON or OFF.
- Press MENU/SELECT. You will hear a confirmation tone.
Key Touch Tone On Off
Activating the Caller ID Phonebook Match
If you subscribe to Caller ID service, the phone will display the name from your phonebook instead of the name received with the Caller ID data. When a call is received, the phone compares the received phone number to the phone numbers stored in your phonebook. If the phone number matches one in your phonebook, the phone will use the name stored in the phonebook for the Caller ID display.
To turn the CID Phonebook Match on or off, follow these steps:
GETTING STARTED
- Press MENU/SELECT. Select the GLOBAL SETUP menu, and then the CID/PHBK MATCH submenu.
- Move the cursor to select ON or OFF.
- Press MENU/SELECT. You will hear a confirmation tone.
CID/Phbk Match On Off
Changing the Handset Banner
Each handset will display a banner name once it is registered to the base. The default banner is Handset #1, Handset #2, etc. You can change the name your phone displays by changing the banner display. If you have more than one handset, the banner name identifies your handset.
- Press MENU/SELECT. Select the HANDSET SETUP menu, and then the BANNER submenu.
- Use the keypad to enter or edit the banner name. (See Entering Text from Your Handset on page E14 for detailed instructions on entering text.)
- Press MENU/SELECT. You will hear a confirmation tone.
Note:
- When you have multiple bases and even if the handset ID is changed when you switch to a different base, the handset will keep the banner name.
Banner Mom'sPhone #1
Selecting a Ring Tone (Handset only)
You may choose from four melodies or three tones for your phone's primary ring tone. Each handset can use a different ring tone or melody. The available ring tones are as listed:
| Melodies | Fur Elise (ELISE) | Tones | Flicker |
| We Wish You A Merry Christmas (MERRY-XMAS) | Clatter | ||
| Wake Up | |||
| Aura Lee (AURA LEE) | |||
| Star Spangled Banner (STAR SPNGL) |
GETTING STARTED
- Press MENU/SELECT. Select the HANDSET SETUP menu, and then the RINGERTONES submenu.
- Move the cursor to select a ring tone. As each ring tone is highlighted, you will hear a sample.
- When you hear the tone you want to use, press MENU/SELECT. You will hear a confirmation tone.
Ringer Tones Flicker Clatter
Activating Auto Talk
AutoTalk allows you to answer the phone simply by picking up the handset from the cradle. You do not have to press a button to answer the call.
- Press MENU/SELECT. Select the HANDSET SETUP menu, and then the AUTO TALK submenu.
- Move the cursor to select ON or OFF.
- Press MENU/SELECT. You will hear a confirmation tone.
AutoTalk
On
Off
Activating Any Key Answer
Any Key Answer allows you to answer the phone by pressing any key on the dial pad.
- Press MENU/SELECT. Select the HANDSET SETUP menu, and then the ANY KEY ANSWER submenu.
- Move the cursor to select ON or OFF.
- Press MENU/SELECT. You will hear a confirmation tone.
Any Key Answer On
Off
SETTING UP THE PHONEBOOK
Your handset can store up to seventy names and numbers in your phonebook. When the phonebook entries are full, you will hear a beep and MEMORY FULL appears. You cannot store any additional names and numbers unless you delete some of the existing ones.
You can also use the phonebook entries to store a group of numbers (up to twenty digits) that you may need to enter once your call connects. This is referred to as chain dialing. (See Chain Dialing from the Phonebook on page E25.)
Creating Phonebook Entries
To store names and numbers in your phonebook, please follow these steps:
- When the phone is in standby mode, press (on the left side of the four-way key).
- To create a new phonebook entry, press MENU/SELECT. Select the CREATE NEW menu. EDIT NAME appears.
- Enter the name for this entry (EDIT NAME).

Edit Name
Use the keypad to enter a name for this entry; the name can contain up to sixteen characters. (See Entering Text from Your Handset on page E14 for instructions on entering text.) If you do not want to enter a name for this entry, your phone will store this entry as
- Enter the number for this entry (EDIT NUMBER).
Once you have stored a name, EDIT NUMBER appears next. Use the number keypad to enter the phone number; the phone number can contain up to twenty digits. If you need the phone to pause between digits when it's dialing (for example, to enter an extension or an access code), press REDIAL/PAUSE to insert a two-second pause. You will see a P in the display. You can also use more than one pause together if two
seconds is not long enough. Each pause counts as one digit. Press MENU/SELECT when you are finished.
Edit Number
8007303456
Notes:
- If you want to correct a number, press CLEAR/INT'COM repeatedly to erase numbers one by one until you erase the wrong number, and then enter the correct number.
- To delete all numbers at once, press and hold CLEAR/INT'COM.

SETTING UP THE PHONEBOOK
- Assign a personal ring tone for this entry (PERSONAL RING).
You can attach a special ring tone to each phonebook entry; the phone will use this ring tone when this person calls. Use and to select one of the seven different ring tone options (see Selecting a Ring Tone on page E18 for a complete list of ring tones). As you scroll through the tones, you will hear a sample of each tone. When you hear the ring tone you want to use, press MENU/SELECT. If you do not want to use a personal ring tone for this phonebook entry, choose NO SELECTION; the phone will use your standard ring tone setting. (See page E17 to turn the personal ring on or off.)
Personal Ring No Selection Flicker
- You will hear a tone confirming that the new entry has been stored, and DONE! appears in the display.
Finding a Phonebook Entry
Press to open the phonebook. Phonebook entries are stored in alphabetical order. To scroll through the phonebook from A to Z, press . To scroll through the phonebook from Z to A press .
You can also use the letters on the number keys to jump to a name that starts with that letter. For example, to search for an entry beginning with the letter M, press 6 once. The phonebook jumps to the first entry that begins with the letter you entered; you can then use and to scroll to other entries.
To close the phonebook, press J. During a call, press again instead of to close the phonebook.
Editing an Existing Phonebook Entry
- When the phone is in standby, press to open the phonebook.
- Find the entry you want to edit and press MENU/SELECT.
- Select EDIT. Follow the steps for Creating Phonebook Entries on page E20. If you do not wish to change the information at any step, simply press MENU/SELECT to go to the next step.
SETTING UP THE PHONEBOOK
Storing Caller ID or Redial Numbers in the Phonebook
You can store Caller ID records or radial numbers in the phonebook so you can use them later. Go to the Caller ID or radial list and select the number you want to store. (If the Caller ID information did not include the number, then you will not be able to store it.)
- When the phone is in standby, press ID to open the Caller ID list or REDIAL/PAUSE to open the radial list.
- Use and to scroll through the Caller ID records or radial numbers. When you come to the information you want to store, press MENU/SELECT.
- Select STORE INTO PB. EDIT NAME appears. If the phone number is already stored in memory, you will hear a beep, and THIS DATA IS ALREADY SAVED! appears in the display. The number will not be stored.
- Continue by following the steps for Creating Phonebook Entries on page E20.

Deleting Phonebook Entries
You can delete a single phonebook entry at a time or all phonebook entries at once:
To delete a single phonebook entry:
- When the phone is in standby, press
- Find the entry that you want to delete and press MENU/SELECT.
- Select DELETE. DELETE ENTRY? appears in the display.
- Move the cursor to select YES.
- Press MENU/SELECT. You will hear a confirmation tone, and DELETED! appears in the display.
Edit
Copy
Delete
SETTING UP THE PHONEBOOK
To delete all phonebook entries:
- When the phone is in standby, press
- Press MENU/SELECT, and then select DELETE ALL. DELETE ALL? appears in the display.
- Move the cursor to select YES.
- Press MENU/SELECT. You will hear a confirmation tone, and DELETED! appears in the display.
Create New
Copy All
Delete All
Copying Phonebook Entries to Another Handset
If you have more than one handset, you can transfer phonebook entries from one handset to another without having to re-enter names and numbers. You can transfer one phonebook entry at a time or all phonebook entries at once.
- When the phone is in standby, press
- To copy one entry, find the phonebook entry you want to copy. Press MENU/SELECT, and then select COPY. To copy all entries, press MENU/SELECT, and then select COPY ALL.
- Move the cursor to select the handset which you want to transfer the entries to and then press MENU/SELECT. If you select COPY ALL, ARE YOU SURE? appears on the display screen. Move the cursor to select YES, and then press MENU/SELECT.
- The phonebook entries will be transferred to the designated handset. During the copy process, the receiving handset shows RECEIVING and the Handset ID of the sending handset.
- When the transfer is completed, DONE! appears on the handset.
Notes:
- The handsets must be currently registered to the same base (see page E16).
- If your phonebook contains seventy entries, you cannot store any new phonebook entries. You will hear a beep, and NOT ENOUGH MEMORY IN RECEIVING UNIT appears on the display. If the selected handset is out of range or data transfer is cancelled, UNAVAILABLE appears in the display. Phonebook listings will not be transferred.
USING YOUR PHONE
| From a cordless handset | From a handset speaker phone | |
| Making a call | 1. Pick up the handset from the cradle. 2. Press /FLASH. 3. Listen for the dial tone. 4. Dial the number. OR 1. Pick up the handset from the cradle. 2. Dial the number. 3. Press /FLASH. | 1. Pick up the handset from the cradle. 2. Press / 3. Listen for the dial tone. 4. Dial the number. OR 1. Pick up the handset from the cradle. 2. Dial the number. 3. Press / 1. Pick up the handset. 2. Press / FLASH. If Auto Talk is on, the phone will answer when you pick up the handset from the cradle. Press / FLASH. (If Any Key Answer is on, you can also press any key on the dial pad.) |
| Answering a call | 1. Pick up the handset. (If Auto Talk is on, the phone will answer when you pick up the handset from the cradle.) 2. Press / FLASH. (If Any Key Answer is on, you can also press any key on the dial pad.) | 1. Pick up the handset. 2. Press / 3. Answering a call Press or return the handset to the cradle. |
| Hanging up | Press or return the handset to the cradle. | Press or return the handset to the cradle. |
Making a Call from the Phonebook
- When the phone is in standby, press to open the phonebook.
- Find the phonebook entry you want to call (see Finding a Phonebook Entry on page E21).
- Press /FLASH or to dial the number.
Note:
- You can also press /FLASH or before you open the phonebook. When you come to the phone number you want to dial, press MENU/SELECT.
USING YOUR PHONE
Chain Dialing from the Phonebook
You can use the phonebook entries to store a group of numbers (up to twenty digits) that you may need to enter once your call connects.
- Dial the number normally.
- After the call connects, press
- Use or to select the phonebook entry that contains the digits you want to send.
- Press MENU/SELECT.
Switching to the Handset Speakerphone During a Call
To switch a normal call to the speakerphone, press on the handset. To switch from a speakerphone call to a normal call, press.
Adjusting the Ringer, Earpiece and Speaker Volume
Adjusting the Ringer Volume
You can choose from four ringer volume settings (off, low, medium, and high) on the handset on the base.
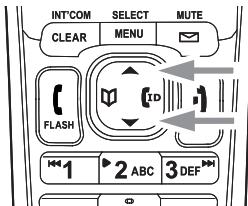
Handset: With the phone in standby, use to make the ringer volume louder or to make it softer or turn it completely off.
Base: While the phone is ringing or in standby, use VOLUME + to make the ringer volume louder or VOLUME - to make it softer or turn it completely off.
Adjusting the Earpiece Volume
You can choose from six volume levels for the earpiece. To adjust the earpiece volume while on a call, press (to make it louder) or (to make it softer).


USING YOUR PHONE
Adjusting the Speaker Volume
Handset Speakerphone: You can choose from six volume levels for the handset speakerphone. To adjust the speaker volume while on a speakerphone call, press (to make it louder) or (to make it softer).
Base Speaker: You can choose from ten volume levels for the base speaker. To adjust the speaker volume while call screening or playing messages, press VOLUME + (to make it louder) or VOLUME - (to make it softer).
Adjusting the Audio Tone
If you aren't satisfied with the audio quality of your phone, you can adjust the Audio Tone of the earpiece while on a call. Your phone gives you three audio tone options: low, natural and high; the default setting, Natural Tone, is recommended for hearing aid users. Audio tone adjustments only apply to the earpiece, not the speakerphone.
To adjust the audio tone:
- While on a call, press MENU/SELECT.
- Move the cursor to select AUDIOTONE, and then press MENU/SELECT.
- Move the cursor to select desired option (HIGH TONE, NATURAL TONE, or LOW TONE), and then press MENU/SELECT. Selected option appears in the display for two seconds, and then the display returns to normal.
Finding a Lost Handset
To locate a misplaced handset, press FIND HS on the base when the phone is in standby. The handsets registered to the paging base will beep for one minute, and PAGING appears on the handset display. To cancel paging, press FIND HS again or any key on the found handset.
Note:
- Handsets that are not currently registered to this base will not be paged.
USING YOUR PHONE
Using Hold, Conference and Transfer
Placing a Call on Hold
- During a call, press CLEAR/INT'COM on the handset to place the caller on hold. If you leave a caller on hold for more than ten seconds, the display screen will read, Line On Hold.
- To return to the party on hold, press /FLASH or on a handset. The phone will return to the holding party.
Notes:
- You can only place a caller on hold for five minutes. Once five minutes has passed, that party's line will be disconnected and the phone will return to standby.
- While a call is on hold, Caller ID and Call Waiting cannot be received.
Conferencing
If you have more than one handset, up to three people can participate in a conference call. A three-way conference call consists of an outside line and two handsets. You can easily join a call already in progress. The handsets must be currently registered to the same base (see page E16).
- Press /FLASH or to join the call.
- To hang up, return the handset to the cradle or press 1). The other party will still be connected to the call.
Transferring a Call
You can transfer a call from one handset to another. The handsets must be currently registered to the same base (see page E16).
- During a call, press CLEAR/INT'COM.
- Use or to select the handset you want to transfer the call to, and then press MENU/SELECT. Select ALL to page all other handsets. The call will automatically be placed on hold, and a paging tone sounds. To cancel the transfer, press /FLASH or
USING YOUR PHONE
Note:
-
Once the call is on hold, any handset can pick up the call, not just the handset you are paging.
-
When another handset accepts the transferred call, you will be disconnected. If you want to rejoin the call, press /FLASH again or
Note:
- If the other handset hangs up before you rejoin the call, you will not be able to connect.
Answering a Transferred Call
When a handset receives a call transfer, it sounds a paging tone; handsets also show the ID of the handset that is paging. To accept the call transfer:
- To answer the page and speak to the transferring handset, press /FLASH or CLEAR/INT'COM.
- To accept the call and speak to the caller, press /FLASH.
- When you accept the transferred call, the transferring handset will be disconnected.
Only the first handset to answer the transfer page will be connected to the call. If the transfer page is not picked up within one minute, the operation will be canceled. The phone will go to Line On Hold mode. To return to the party on hold, press /FLASH or on the handset.
Privacy Mode
If you don't want other handsets to interrupt you while on a call, turn on privacy mode. As long as your handset is in privacy mode, other handsets can't join your call or make any calls of their own: their displays will show UNAVAILABLE.
- While on a call, press MENU/SELECT.
- Select CALL PRIVACY. PRIVACY MODE ON appears in the display for two seconds; appears and remains in the display until the feature is turned off.
To turn privacy mode off, repeat the procedure listed above. PRIVACY MODE OFF appears.

USING YOUR PHONE
Using the Intercom
You can use the intercom to talk to another handset without using the phone line. The handsets must be currently registered to the same base (see page E16).
Making an Intercom Page
- When the phone is in standby, press CLEAR/INT'COM.
- Use or to select the handset you want to talk with, and then press MENU/SELECT. Select ALL to page all other handsets.
- To cancel the intercom page, press).
Notes:
Intercom paging will be cancelled if any of the following things occurs:
- You receive an outside call or an intercom page while selecting the other handset.
- You do not select a handset within thirty seconds.
- Your handset is out of range (OUT OF RANGE appears in the display).
- The party does not answer the page within one minute.
The party is busy.
- The party is out of range (UNAVAILABLE appears in the display).
Answering an Intercom Page
When the intercom page tone sounds, the display will show the ID of the handset that is paging.
- Press /FLASH or CLEAR/INT'COM. If AutoTalk is on, the handset will automatically answer the page when you pick up the handset from the cradle.
- To hang up an intercom page, press 1.
USING YOUR PHONE
Muting the Ringer (One call only)
While the phone is ringing, press on the handset or on the base to mute the ringer for this call. The phone will ring again on the next call.
Muting the Microphone
Mute turns off the microphone so the caller can't hear you. This only works while you are on a call.
- Press MUTE.MUTE ON and appear in the display; remains while muting is on.
- To cancel muting, press 一 MUTE again. MUTE OFF appears.
Seven-Digit Dialog
In some areas, the telephone company may allow you to place a local call by dialing only seven digits (instead of ten). If this is the case in your area, you can program your local area code in your phone. Programming your area code will allow you to see the caller's seven-digit phone number which will allow you to easily return the local call without modifying the number before dialing. If you get a call from outside your area code, you will see all ten digits.
To program your local area code:
- Press MENU/SELECT. Select the GLOBAL SETUP menu, and then the AREA CODE submenu.
- Use the number keypad (0 through 9) to enter a three-digit area code. If an area code has already been stored, it appears in the display. Press CLEAR/INT'COM to delete the stored code, and then enter a new one.
- Press MENU/SELECT. You will hear a confirmation tone.
Note:
- If you have multiple bases, select the base before programming the area code (see page E16).
USING YOUR PHONE
Tone Dialing Switch Over
If your phone is set to pulse dialing, you can temporarily switch to tone dialing after the call connects. This feature is useful when you need tone dialing to use automated menu systems, such as telephone bank tellers, telephone prescription refills, customer support menus, etc. Make your call normally. Once your call connects, press */TONE on the handset. Any digits you enter from then on will be sent with tone dialing. When this particular call ends, the phone automatically returns to pulse dialing.
See Changing the Dial Mode on page E10 for instructions on setting your phone for pulse or tone dialing.
Line Mode Setup (Base only)
The Line Mode Setup feature is only used in instances where you have multiple phones where users may pick up an extension while someone else is on the phone. Only in very rare instances where your phone system is not detecting that an extension phone is picked up will you ever need to change this feature. There are three settings for this feature: TYPE-A, TYPE-B, or OFF, but change this option only when instructed to by customer service. In most all situations, this feature will never need to be used or modified from the factory default setting of TYPE-A.
- If you have multiple bases, select the base you need to change the setting (see page E16).
- Press MENU/SELECT. Select the GLOBAL SETUP menu, and then the SET LINE MODE submenu.
- IF INSTRUCTED BY CUSTOMER SERVICE PRESS [SELECT] appears. Press MENU/SELECT.
- Move the cursor to select TYPE - A, TYPE - B, or OFF.
- Press MENU/SELECT. You will hear a confirmation tone.
USING YOUR PHONE
Using the Voice Mail Service
If you subscribe to a voice mail service, you can use your phone to access your voice mailbox. The new message LED on the handset flashes and appears in the handset display whenever you have messages waiting in your voice mailbox. When you subscribe to the service, your voice mail provider provides you with the access number and the required voice mail signaling tone. You can use your phonebook to store the access number.
Resetting the Voice Message Waiting Indicator
When you receive a new voice mail message, the new message LED on the top of the handset flashes and appears in the handset display. In the event your message alert tone gets out of sync with your phone company's voice messaging system, you can reset back to its original "no messages waiting" state. To reset, press and hold FIND HS on the base for five seconds. A beep sounds and the message alert tone is reset.


USING CALLER ID, CALL WAITING, AND REDIAL Lists
If you subscribe to Caller ID service from your phone company, your phone will show you the caller's phone number and name (if available) whenever a call comes in. If you subscribe to Caller ID on Call Waiting, the phone will also show you the name and the number of any call that comes in while you're on the line.
If your telephone provider supports seven-digit dialing, you can save your local area code so it does not display in the Caller ID list. See Seven-Digit Dialing on page E30 for more information.
Note:
- If you answer a call before the second ring, the caller information may not be stored.
Using the Caller ID List
You can store up to thirty Caller ID numbers in each handset. Caller ID records are stored from newest to oldest. Once your Caller ID list is full, the oldest record will be automatically deleted when a new call is received.
To open the Caller ID list, press ID (on the right side of the four-way key). The phone will show the number of new Caller ID records and the total number of stored records. Use and to scroll through the list.
Caller ID
New 1
Total:30

Making a Call from a Caller ID Record
- When the phone is in standby, press ID to open the Caller ID list.
- Use and to find the Caller ID record you want to dial.
- To add (or delete) a "1" to the beginning of the displayed phone number, press */TONE. To add (or remove) area code, press #.
- Press (/FLASH or to dial the number.
Note:
- You can also press /FLASH or before you open the caller ID list. When you come to the phone number you want to dial, press MENU/SELECT.

12/21 12:00PM
Alice Jodoin
1-416-555-2222
USING CALLER ID, CALL WAITING, AND REDIAL Lists
Deleting Caller ID Numbers
To delete only one Caller ID number, press ID when the phone is in standby, and then find the number you want to delete. Press MENU/SELECT and select DELETE ENTRY. When the phone asks you to confirm, select YES.
To delete all the Caller ID numbers, press ID when the phone is in standby, and then press MENU/SELECT. When the phone asks you to confirm, select YES.
Note:
- When you delete a Caller ID number, you delete it permanently.
Using Call Waiting
If you have Call Waiting service and a second call comes in when you are on the phone, a call waiting tone will sound. Press /FLASH to accept the waiting call. There is a short pause, and then you will hear the new caller. To return to the original caller, press /FLASH.
Note:
- You must subscribe to Call Waiting service for this feature to operate. Not all features are available in all areas.
USING CALLER ID, CALL WAITING, AND REDIAL Lists
Redialing a Number
You can quickly redial the last five numbers dialed on each handset.
- When the phone is in standby, press the REDIAL/PAUSE to open the radial list.
- Use and or REDIAL/PAUSE to scroll through the redial list.
- When you find the number you want to dial, press (/FLASH or).
Notes:
- If the number exceeds 32 digits, only the first 32 digits are retained in radial memory.
- If the radial memory is empty, EMPTY appears in the display and you will hear a beep.
- You can also press (FLASH or before you open the radial list. When you come to the phone number you want to dial, press MENU/SELECT.
Deleting a Redial Record
If you want to delete a phone number from the handset's radial list, follow the steps below:
- When the phone is in standby, press REDIAL/PAUSE.
- Use and to scroll through the radial list.
- When you find the radial number you want to delete, press MENU/SELECT and select DELETE ENTRY.
- When the phone asks you to confirm, select YES. The radial number is deleted.


SETTING UP THE ANSWERING SYSTEM
Using the Answering System Setup Menus
Your handset controls all of the answering system setup options except for the personal greeting (personal greetings must be changed directly at the base). Here are some hints on using your handset to access your answering system:
- If you have multiple bases, select the base with answering system you want to access (see page E16).
- When the phone is in standby, press = /MUTE on the handset to access the answering system. REMOTE ANSWERING MACHINE OPERATION appears on the handset display, and the system announces the number of new and old messages.
- After the first announcement, you have thirty seconds to enter your first command before the system returns to standby.
- If you receive a call, remote operation is cancelled.
- If another handset makes a call, remote operation is cancelled.
- During remote operation " - - " appears on the base.
Note:
- For ANSW. SETUP and GLOBAL SETUP menu options, make sure the line is not in use and the handsets are within range of the base.
Recording a Personal Greeting
Your answering system comes with a pre-recorded outgoing message or greeting that plays when you receive a call: "Hello, no one is available to take your call. Please leave a message after the tone." You can record your own personal outgoing greeting. Your recorded greeting must be between two seconds and thirty seconds long.
- On the base, press and hold GREET.
- The system announces, "Record greeting." Begin recording after the beep.
The message counter LED displays "---" and then begins to count down thirty seconds.
- When you finish recording, press GREET again or press /■. You will hear a confirmation tone, and your recorded greeting plays back for you.
SETTING UP THE ANSWERING SYSTEM
Selecting a Greeting
Once you have recorded a personal greeting, the phone automatically switches to your personal greeting. You can also switch back and forth between the pre-recorded greeting and your own greeting at any time.
- When the phone is in standby, press GREET on the base. The system plays the current greeting.
- To keep this greeting, do nothing.
- To switch to the other greeting, press GREET while the system is playing the current greeting.
- Each time you press GREET, the system switches between the pre-recorded and the personal greeting. The last greeting you hear is used as the current greeting.
Deleting Your Personal Greeting
You can delete your personal greeting from the base. You cannot delete the pre-recorded greeting.
- When the phone is in standby, press GREET on the base.
- While the personal greeting is playing, press .
- The system announces "Greeting has been deleted," and switches back to the pre-recorded greeting.
Selecting the Language
You can select the language of your answering system announcements. The default system language is English.
- On the handset, press MENU/SELECT. Select ANSW. SETUP, and then the ANSW. LANGUAGEsubmenu.
- Move the cursor to choose ENGLISH or FRANÇAIS (French).
- Press MENU/SELECT. You will hear a confirmation tone.
SETTING UP THE ANSWERING SYSTEM
Setting the Number of Rings
The ring time setting allows you to set the number of rings the caller hears before your answering system plays the outgoing message. You can set the ring time to answer after two, four, or six rings. If you enable the Toll Saver (TS) setting, the answering system picks up after two rings if you have new messages, and after four rings if there are none. This way, if you make a long distance call to check your messages, you can hang up after the third ring to avoid long distance billing charges.
- On the handset, press MENU/SELECT. Select the ANSW. SETUP menu, and then the RING TIME submenu.
- Move the cursor to select a ring time (TOLL Saver, 2TIMES, 4TIMES, or 6TIMES).
- Press MENU/SELECT. You will hear a confirmation tone.
Setting the Day & Time
If you do not set the clock on your answering system, your messages may not have the correct time and day stamp.
- On the handset, press MENU/SELECT.
- Move the cursor to DAY & TIME and press MENU/SELECT.
- Use and to select the day of the week, and press MENU/SELECT.
- Use the number keypad (0 through 9) to enter the hour and minutes.
- Use and to select AM or PM, and press MENU/SELECT. You hear a confirmation tone.
Setting the Record Time (or Announce only)
You can choose how long callers have to record a message. Set the record time to "1 minute" or "4 minutes" to limit the time for incoming messages. If you set the record time to "Announce only," the answering system answers the call but prevents callers from leaving a message.
- On the handset, press MENU/SELECT. Select the ANSW. SETUP menu, and then the RECORD TIME submenu.
- Move the cursor to select a record time (1 MINUTE, 4 MINUTES, or ANNOUNCE ONLY).
- Press MENU/SELECT. You will hear a confirmation tone.
SETTING UP THE ANSWERING SYSTEM
While your answering system is set to "Announce only," the message counter LED on the base displays "A." If you are using the prerecorded greeting, the system automatically switches to the following message: "Hello, no one is available to take your call. Please call again." If you are using a personal greeting, the system continues to use that greeting. You may need to change your personal greeting.
Activating the Message Alert
The message alert feature sounds a short alert tone every fifteen seconds after you receive a new message.
To turn on the message alert:
- On the handset, press MENU/SELECT. Select the ANSW. SETUP menu, and then theMESSAGE ALERT submenu.
- Move the cursor to select ON or OFF.
- Press MENU/SELECT. You will hear a confirmation tone.
Activating Call Screening
Your phone allows you to listen to callers leaving you a message. This call screen feature can be turned on or off.
- On the handset, press MENU/SELECT. Select the ANSW. SETUP menu and then the CALL SCREENsubmenu.
- Move the cursor to select ON or OFF.
- Press MENU/SELECT. You will hear a confirmation tone.
Setting a Security Code or Personal Identification Number (PIN)
To play your messages from a remote location, you will need to enter a two-digit security code or Personal Identification Number (PIN). The default security code is 80.
- On the handset, press MENU/SELECT. Select the ANSW. SETUP menu, and then the SECURITY CODE submenu.
- Use the number keypad (0 through 9) to enter a two-digit security code (01-99).
- Press MENU/SELECT. You will hear a confirmation tone.
USING THE ANSWERING SYSTEM
Turning Your Answering System On and Off
| From the base | From the handset | |
| Turning On | 1. When the phone is in standby, press ON/OFF. 2. The system announces “Answering System is on” and plays the current greeting. 3. The message counter LED displays the number of messages stored in memory. If the counter flashes, then you have new messages waiting. | 1. Press MENU/SELECT. 2. Select the ANSW. SETUP menu, and then the ANSWER SETUP submenu. 3. Move the cursor to select ON. 4. Press MENU/SELECT. You will hear a confirmation tone. |
| Turning Off | 1. When the phone is in standby, press ON/OFF. 2. The phone announces “Answering System is off.” 3. The message counter LED is no longer illuminated. If memory is full, the message counter LED always displays [FL]. | 1. Press MENU/SELECT. 2. Select the ANSW. SETUP menu, and then the ANSWER SETUP submenu. 3. Move the cursor to select OFF. 4. Press MENU/SELECT. You will hear a confirmation tone. |
Reviewing Messages
The message counter LED on the base displays the number of messages stored in memory. When you have new messages (that you have not listened to yet), the message counter LED on the base and the new message LED on the handset flash. The answering system plays your new messages first. If you have no new messages, the system plays your old messages. You can review your messages from the base or from the handset:
USING THE ANSWERING SYSTEM
| From the base | From the handset | |
| Playing new messages | Press▶/■. The system announces the number of new and old messages, then plays the first new message followed by the day and time it was received. Then the system plays the new messages in the order they were received. | Press▶/MUTE. The system announces the number of new and old messages, then plays the first new message followed by the day and time it was received. Then the system plays the new messages in the order they were received. |
| Repeating a message | Press▶ once to go to the beginning of the current message. Press▶ repeatedly to go back to a previous message. | Press 1 once to go to the beginning of the current message. Press 1 repeatedly to go back to a previous message. |
| Skipping a message | Press▶ to go to the beginning of the next message. | Press 3 to go to the beginning of the next message. |
| Deleting a message | While a message is playing, press ⋆. The message is permanently deleted. | While a message is playing, press 4. The message is permanently deleted. |
| Deleting all messages | While the phone is in standby, press ⋆. When the system asks you to confirm, press ⋆ again. All messages are permanently deleted. Note: New messages cannot be deleted unless they have been played. | Not available. |
| Playing old messages | After you listen to your new messages, press▶/■ again to play your old messages. | After you listen to your new messages, press▶/MUTE again to play your old messages. |
| Ending the message review | Press▶/■ to stop the message playback and return to standby. | Press 5 to stop the message playback. Press▶ to exit the system and return to standby, or press 2 to restart the message playback. |
USING THE ANSWERING SYSTEM
Screening Calls
If you activate the call screening feature, you can listen to callers leaving messages without answering the phone (see Activating Call Screening on page E39). You can always hear callers from the base speaker. During call screening, press on the base to mute the call screening temporarily. To cancel muting, press VOLUME + / - . Call screening will be on again on the next call. To screen an incoming call from the handset:
- Press l MUTE when the system is answering. If another handset is screening a call, you will hear a beep and you will not be able to screen the call.
- To answer the call, press /FLASH.
To stop screening the call, press
Turning Off the Message Alert Tone
When all new messages are played back, the message alert tone will automatically deactivate. The tone will not deactivate until all new messages are played back. To quickly turn off the tone, press any key on the base.
Operating the Answering System While You Are Away from Home
You can access your answering system while you are away from home to check, play, and delete messages, or turn your answering system on and off.
For your convenience a wallet-size card is enclosed to be used as a reference.
Notes:
- The answering system will only playback messages for four minutes and then it returns to the command waiting mode. To continue playing your messages, press 0 then 2 again within fifteen seconds.
- If you enter an incorrect security code three times, you will hear a beep and the answering system will return to standby.
- If memory is full and the answering system is not set to "Announce only", the message counter LED will display [FL] and it will answer a call after about ten rings.
USING THE ANSWERING SYSTEM
To operate from a remote location, use any touch-tone telephone, and follow these steps:
- Call your telephone number and wait for the system to answer. If the answering system is off, it will answer after about ten rings and sounds a series of beeps.
- During the greeting (or the beeps if answering system is off), press 0 and enter your security code/PIN within two seconds (see Setting a Security Code or Personal Identification Number (PIN) on page E39).
- The answering system announces the current time and the number of messages stored in memory. You hear "To play incoming messages, press zero-two. For help, press one-zero" followed by a beep.
- Enter a remote command from the chart below. You have fifteen seconds to enter the first command; after the first command, you have two seconds to enter each command.
Remote Commands
| Command | Function | Command | Function | Command | Function |
| 0 then 1 | Repeat a message* | 0 then 4 | Delete a message | 0 then 9 | Answering system off |
| 0 then 2 | Play incoming messages | 0 then 5 | Stop operation | 1 then 0 | Help |
| 0 then 3 | Skip a message | 0 then 6 | Answering system on |
-
If you press 0 then 1 in the first four seconds of a message, the system skips to the previous message. If you press 0 then 1 after the first four seconds of a message, the system repeats the current message.
-
When you finish, you will hear intermittent beeps indicating that the system is in the command waiting mode. Enter another command from the chart within fifteen seconds.
- Hang up to exit the system. The answering system automatically returns to its normal standby setting.
ADDITIONAL INFORMATION
Installing the Belt Clip
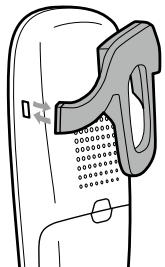
To attach the belt clip
Insert the belt clip into the holes on each side of the handset. Press down until it clicks.
To remove the belt clip
Pull either side of the belt clip to release the tabs from the holes.
Optional Headset
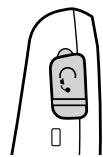
Your phone can be used with an optional headset (not included). To use this feature, insert the headset plug into the headset jack. Your phone is ready for hands-free conversations.
For purchasing, servicing or replacement, please contact our service centre.
SANYO Canada Inc.
201 Creditview Rd
Woodbridge, ON L4L 9T1
Tel. 1-800-263-2244
www.ca.sanyo.com
ADDITIONAL INFORMATION
Note on Power Sources
Battery Replacement and Handling
When the operating time becomes short even after a battery is recharged, please replace the battery.
With normal usage, your battery should last about one year.
Warning: To avoid the risk of personal injury or property damage from fire or electrical shock, only use the SANYO battery model and SANYO adapter model specifically designated for this product.
Replacement battery part number: BT-1008S
RECYCLING NICKEL-METAL-HYDRIDE BATTERIES
NICKEL-METAL-HYDRIDE BATTERIES MUST BE DISPOSED OF PROPERLY.
Nickel-metal-hydride cells are used in the battery pack. Please take your used nickel-metal-hydride battery packs to a store that recycles nickel-metal-hydride batteries.

Power Failure
During the period that the power is off, you will not be able to make or receive calls with the telephone.
Caution
- Use only the specified SANYO battery pack.
- Do not remove the battery from the handset to charge it.
- Never throw the battery into a fire, disassemble it, or heat it.
- Do not remove or damage the battery casing.
ADDITIONAL INFORMATION
Cleaning the Battery Contacts
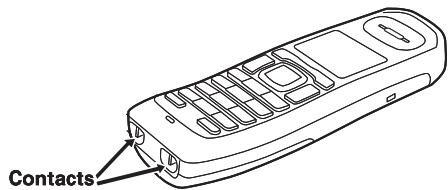
To maintain a good charge, clean the charging contacts on the handset once a month. dampen a cloth with plain water. Gently rub the damp cloth over the charging contacts until all visible dirt is removed. Dry the contacts thoroughly before returning the handset to the cradle.
Caution: Do not use paint thinner, alcohol, or other chemical products. Doing so may discolor the surface of the telephone and damage the finish.
Low Battery Alert
When the battery pack is very low, the phone is programmed to eliminate functions in order to save power. When LOW BATTERY - CHARGE HANDSET appears in the display and the phone is in standby, none of the keys will operate. If you are on a call, you will hear the Low Battery warning tone. Complete your conversation as quickly as possible, and return the handset to the cradle.
The battery pack needs to be charged when the empty battery icon appears.
0
Low Battery Charge Handset

ADDITIONAL INFORMATION
Troubleshooting
Resetting the Handset
You will usually only reset the handset if you are having a problem with your phone. When you are instructed to by one of call centre representatives, you may need to reset your handset in the following instances:
- You lose a handset.
- You get the message Registration Failed when you try to register the handset.
- You are unable to register any handsets to the base.
-
When you register new handsets to the base, the handset IDs do not match. (For example, the handset registers as "Handset #4" but you only have two handsets.)
-
Select the base you want to de-register the handset from (see Selecting the Base on page E16) if you have multiple bases.
- Press and hold and # for more than five seconds. Select Deregister HS.
- Select the handset which you are operating, and then press MENU/SELECT.
- The phone will ask you to confirm the deregistration. Select YES. The selected handset will clear its registration information only from the base it is currently connected to, and then delete the link to the base from its own memory.
- When the base information is deleted, the handset displays HANDSET NOT REGISTERED-PLACE HANDSET ON BASE TO REGISTER. SEE YOUR OWNER'S MANUAL FOR HELP.
- After de-registering the handset, place the handset to the base to register. You must re-register the handset before you can use it.
If the handset cannot contact the base, it will display OUT OF RANGE. Make sure the handset is in range of the base and the base is connected to power; you can also reset the handset without the base (see the next section).
ADDITIONAL INFORMATION
Resetting the Handset Without the Base
If your original base is not available for some reason, you can still reset the handset and use it with another base.
- Press and hold! and # for at least five seconds.
- Move the cursor to select BASE UNAVAILABLE and then press MENU/SELECT. WHICH BASE? appears.
- Select the base which you want to de-register from, and then press MENU/SELECT. BASE UNAVAILABLE appears.
- Move the cursor to select YES, and then press MENU/SELECT. You hear a confirmation tone, and the handset deletes its own base information without contacting the base. If the handset was registered to only one base, it displays HANDSET NOT REGISTERED-PLACE HANDSET ON BASE TO REGISTER. SEE YOUR OWNER'S MANUAL FOR HELP. If the handset is still registered to another base, it searches for the other base and then returns to standby.
- After de-registering the handset, place the handset to the base to register. You must re-register the handset before you can use it.
Traveling Out of Range
During a call, if you move your handset too far from your base, noise may increase. If you pass the range limit of the base, the handset will beep, display OUT OF RANGE, and then go to standby. The base will maintain the connection for thirty seconds after the handset goes out of range. If you move the handset back within range of the base within thirty seconds, press /FLASH or to pick up the call again.
Note:
- If it is set to automatically select the available base, the handset will begin searching for another base thirty seconds after going out of range. (see Selecting the Base on page E16).
ADDITIONAL INFORMATION
Common Issues
If your phone is not performing to your expectations, please try these simple steps first. If these steps do not solve your problem, please call our SOS HELP LINE (see page E55).
| Symptom | Suggestion |
| The CHARGE LED won't illuminate when the handset is placed in the cradle. | ·Make sure the AC adapter is plugged into the base or the charger (if you have more than one handset) and wall outlet. ·Make sure the AC outlet is not connected to a wall switch. ·Make sure the handset is properly seated in the cradle. ·Make sure the charging contacts on the handset are clean. |
| Can't make or receive calls. | ·Make sure that you are not too far from the base. ·Make sure the line is not in use. If an outside call is already using a line, you cannot use that line to make another outside call. ·Make sure your handset is registered to the base. ·Check the telephone cord connection. If CHECKTEL LINE appears on the handset display, the telephone cord may not be connected correctly. ·Make sure the AC adapter is plugged into the base and wall outlet. ·Disconnect the AC adapter and reconnect. |
| The Caller ID does not display. | ·The call was placed through a switchboard. ·Call your telephone provider to verify your Caller ID service is current. There may be a problem with your Caller ID service. |
| The handset doesn't ring or receive a page. | ·Make sure that you are not too far from the base. ·Make sure that your handset is registered to the base. ·Charge the battery in the handset for 15 to 20 hours. |
| You cannot register the handset at the base. | ·Charge the battery pack in the handset for 15 to 20 hours. ·Try resetting the handset (see Resetting the Handset on page E47). |
ADDITIONAL INFORMATION
| Symptom | Suggestion |
| The handset doesn’t communicate with other handsets. | ·Make sure that you have registered all handsets to the same base, and all handsets are selecting the base (see page E16). |
| An extra handset can’t join the conversation. | ·Make sure there are not two handsets already using the conference feature (see page E27). ·Make sure that another handset is not in privacy mode. ·Make sure that you have registered both handsets to the same base, and both handsets are selecting the base (see page E16). |
| You tried to accept a call transfer, but cannot speak to the outside caller. | ·Make sure another handset hasn’t already picked up the call (see page E27). |
| The answering system does not work. | ·Make sure the base is plugged in. ·Make sure that the answering system is turned on. ·Make sure that the message record time is not set to announce only. |
| Time stamp cannot be heard. | ·Make sure you have set the time (see Setting the Day & Time on page E38). |
| Messages are incomplete. | ·Incoming messages may be too long. Ask callers to leave a brief message. ·The memory may be full. Delete some or all of the saved messages. |
| There is no sound on the base or handset speaker during call monitoring or message review. | ·Adjust the speaker volume on the base or handset. ·Make sure the call screen feature is set to on. |
| Cannot access answering system from a remote phone. | ·Make sure you are using the correct PIN number. ·Make sure that the touch-tone phone you’re using can transmit the tone for at least two seconds. If it cannot, try using a different touch-tone phone. |
ADDITIONAL INFORMATION
Weak or Hard to Hear Audio
If the caller's voice sounds weak or soft, the signal might be blocked by large metal objects or walls; you might also be too far from the base, or the handset's battery may be weak.
- Try adjusting the volume of the earpiece (see page E25) or the audio tone (see page E26).
- Try moving around while you're on a call or moving closer to the base to see if the sound gets louder.
- Make sure the handset's battery is fully charged.
Noise or Static on the Line
The most common cause of noise or static on a cordless phone is interference: other wireless or electronic devices can radiate energy that disturbs the radio signal between the base and the handset (much like overhead power lines can cause static on your car radio). Some common household sources of interference are
- electrical appliances, especially microwave ovens
- computer equipment, especially wireless LAN equipment and DSL modems
- radio-based wireless devices, such as room monitors, wireless controllers, or wireless headphones or speakers
- large fluorescent light fixtures (particularly ones that give off a "buzzing" noise)
- other services that use your phone line, like alarm systems, intercom systems, or broadband Internet service
| For static on only one handset or in a specific location: | For static on more than one handset: |
| ·Check nearby for one of the common interference sources. ·Try moving the handset away from a suspected source, or try moving the suspected source so it's not between the handset and the base. | ·Check near the base for the source of interference. ·Try moving the base away from a suspected source, or try turning off the source if possible. ·If you have any services that might use your phone line, see if you need a filter on the phone line. |
ADDITIONAL INFORMATION
Installing a telephone line filter or DSL filter
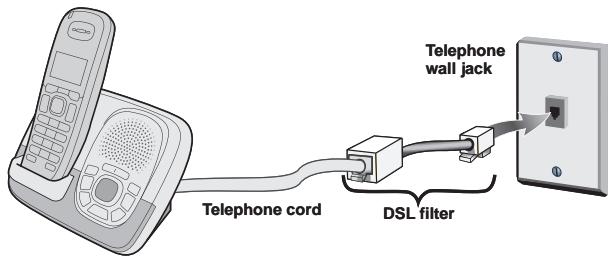
Any broadband Internet service that uses your telephone line might interfere with standard phones. The most common type of these services, DSL, often causes static on your telephone. Fortunately, an easy-to-install filter removes this static from the line. Technicians who install DSL service usually leave several filters for the customers; if you can't find them, call your DSL provider or look in any electronics store.
Just plug the DSL filter into the telephone wall jack and then plug your phone's base into the filter. Make a test call to make sure the noise is gone.
Technical Information
IMPORTANT SAFETY INSTRUCTIONS
When using your telephone equipment, basic safety precautions should always be followed to reduce the risk of fire, electric shock and injury to persons, including the following:
- Do not use this product near water, for example, near a bath tub, wash bowl, kitchen sink or laundry tub, in a wet basement or near a swimming pool.
- Avoid using a telephone (other than a cordless type) during an electrical storm. There may be a remote risk of electric shock from lightning.
- Do not use the telephone to report a gas leak in the vicinity of the leak.
- Use only the power cord and batteries indicated in this manual. Do not dispose of batteries in a fire. They may explode. Check with local codes for possible special disposal instructions.
SAVE THESE INSTRUCTIONS
Caution: Risk of explosion if battery is replaced by an incorrect type. Dispase of used batteries according to the instructions.


ADDITIONAL INFORMATION
I.C. Notice
TERMINAL EQUIPMENT
NOTICE:
This equipment meets the applicable Industry Canada Terminal Equipment Technical Specifications. This is confirmed by the registration number. The abbreviation, IC, before the registration number signifies that registration was performed based on a Declaration of Conformity indicating that Industry Canada technical specifications were met. It does not imply that Industry Canada approved the equipment.
NOTICE:
The Ringer Equivalence Number (REN) for this terminal equipment is marked on the equipment itself. The REN assigned to each terminal equipment provides an indication of the maximum number of terminals allowed to be connected to a telephone interface. The termination on an interface may consist of any combination of devices subject only to the requirement that the sum of the Ringer Equivalence Numbers of all the devices does not exceed five.
RADIO EQUIPMENT
The term "IC:" before the radio certification number only signifies that Industry Canada technical specifications were met.
Operation is subject to the following two conditions: (1) this device may not cause interference, and (2) this device must accept any interference, including interference that may cause undesired operation of the device. "Privacy of communications may not be ensured when using this telephone."
THE SANYO COMFORT WARRANTY
WARRANTY APPLICATION
SANYO Communications products purchased new, unused in Canada through a SANYO Authorized Dealer are warranted against manufacturing defects in materials and workmanship for ONE YEAR covering parts and labour, from the date of purchase by the original retail purchaser. This warranty only applies in favour of the original retail purchaser of the warranted product.
SANYO CANADA INC.'S RESPONSIBILITY
During the warranty period, SANYO Canada Inc. will repair, or at our option, replace a Communications product which shows evidence of a manufacturing defect in materials or workmanship. Replacement PARTS are warranted for the remaining portion of the warranty period.
WHAT IS NOT COVERED
(a) Communications products purchased outside Canada.
(b) Communications products purchased in a used condition.
(c) Communications products purchased from non SANYO-authorized dealer.
(d) Communications products not intended for Canadian usage or products without appropriate Canadian regulatory approvals.
(e) Problems due to product set-up and installation.
(f) Adjustments that are outlined in the Operating Manual.
(g) Accessory items including antenna, and batteries,
(h) Damage in or due to transportation.
(i) Damage due to improper maintenance, accident, abuse, misuse or negligence.
(j) Damage caused by lightning and power surges.
ORIGINAL RETAIL PURCHASER'S RESPONSIBILITY
You, the original retail purchaser, must present your original, dated bill-of-sale together with this warranty to SANYO Canada Inc. or to an authorized SANYO Service Depot when you make a claim under this warranty.
You, the original retail purchaser, are responsible for any costs of TRANSPORTING the product to and from SANYO Canada Inc. or an authorized SANYO Service Depot. You also are responsible for the cost of any MAINTENANCE necessary in respect of the product.
WARRANTY BECOMES VOID
This warranty becomes void if the product's serial numbers are altered or removed or if any repair to the product is made other than by SANYO Canada Inc. or by an authorized SANYO Service Depot.
LIMITATIONS
(a) SANYO Canada Inc. reserves the right to change or improve the design of the model of the product warranted hereunder without incurring any obligation to make any modifications to or to install any improvement in or on the product.
(b) In no event shall SANYO Canada Inc. or any of its Authorized Dealers be liable for special or consequential damage arising from the use of this product.
STATUTORY WARRANTY
The above provisions do not preclude the operation of any applicable provincial statute which in certain circumstances may not allow some of the limitations and exclusions described in this Warranty. Where any terms of this Warranty are prohibited by such a statute, they shall be deemed null and void but the remainder of this warranty shall remain in effect.
HOW TO OBTAIN WARRANTY SERVICE
Please contact the SANYO Authorized Dealer from whom the product was purchased, or contact us directly at:
SANYO Canada Inc.
201 Creditview Road
Woodbridge, ON L4L 9T1
1-800-263-2244
SOS HELP LINE
At SANYO, fulfilling the needs of our customers is a priority.
That's why we created our SOS customer service program that guarantees satisfaction.
NATIONWIDE CUSTOMER SUPPORT
SOS is there to help you. Our friendly and knowledgeable product specialists will quickly answer your questions about setup and use of SANYO telephone products. Simply call toll free from anywhere in Canada to connect to our no-charge, SOS support and service network:
1-800-263-2244
Or visit our website at www.sanyoservice.com, and click the Customer Relations button to get access to our FAQ's (Frequently Asked Questions) and other helpful features.
It's a nuisance making another trip to the store when you're stuck.
Now with SOS, all that's necessary is a quick call from your home for product assistance.
HASSLE-FREE EXCHANGE
Should your SANYO telephone require servicing due to a manufacturing defect during the warranty period, SANYO Canada will ship prepaid a replacement unit* within two business days after receiving your defective unit. Consumers are responsible for the shipping costs of the unit back to SANYO.
- For older, non-current models, replacement units may not be available, in which case our regular warranty conditions will apply.
GUARANTEED QUALITY
All SOS replacement sets are checked and serviced by factory-authorized technicians before being sent out. SOS means you never have to worry.
C.O.D. and/or Collect shipments will not be accepted.
Unit must be returned to SANYO in its original box with all accessories, i.e.: owner's manual, battery, adaptor, telephone cord, etc.
MEMO


E56

MEMO


E57

May be covered under one or more of the following U.S. patents:
| 5,491,745 | 5,533,010 | 5,574,727 | 5,581,598 | 5,650,790 | 5,660,269 | 5,663,981 | 5,671,248 |
| 5,717,312 | 5,732,355 | 5,754,407 | 5,758,289 | 5,768,345 | 5,787,356 | 5,794,152 | 5,801,466 |
| 5,825,161 | 5,864,619 | 5,893,034 | 5,912,968 | 5,915,227 | 5,929,598 | 5,930,720 | 5,960,358 |
| 5,987,330 | 6,044,281 | 6,070,082 | 6,076,052 | 6,125,277 | 6,253,088 | 6,314,278 | 6,321,068 |
| 6,418,209 | 6,618,015 | 6,714,630 | 6,782,098 | 6,788,920 | 6,788,953 | 6,839,550 | 6,889,184 |
| 6,901,271 | 6,907,094 | 6,914,940 | 6,940,867 | 6,953,118 | 7,023,176 | 7,030,819 | 7,146,160 |
| 7,203,307 | 7,206,403 | 7,310,398 |
Other patents pending.
- IMPORTANT
- SANYO
- Introduction
- Note:
- Features
- Answering System Features
- CONTENTS
- CONTENTS.E1
- GETTING STARTED. E6
- SETTING UP THE PHONEBOOK.....E20
- USING YOUR PHONE.E24
- Getting Started
- Phonebook
- Using Your Phone
- Caller ID and Redial List
- Answering System
- Additional Information
- USING CALLER ID, CALL WAITING, AND REDIAL Lists. E33
- SETTING UP THE ANSWERING SYSTEM
- USING THE ANSWERING SYSTEM
- ADDITIONAL INFORMATION.E44
- THE SANYO COMFORT WARRANTY .E54
- Manual Conventions
- Checking the Package Contents
- CAS-D6320
- CAS-D6322 (additional)
- CAS-D6323 (additional)
- Terminology Used in this Manual
- Parts of the Phone
- key
- Installing the Phone
- Choosing the Best Location
- Notes:
- Connecting the Base and Charging the Handset
- Connecting the Charger
- Connecting to the Phone Line
- Testing the Connection
- Changing the Dial Mode
- Wall Mounting the Base
- Using the Interface
- In standby
- Using the Four-way Function Key
- Using the Handset Menu
- Entering Text from Your Handset
- Using Multiple Bases
- Registering the Handset to Another Base
- Selecting the Base
- Selecting a Language
- Activating Personal Ring
- Activating the Key Touch Tone
- Activating the Caller ID Phonebook Match
- Changing the Handset Banner
- Selecting a Ring Tone (Handset only)
- Activating Auto Talk
- Activating Any Key Answer
- SETTING UP THE PHONEBOOK
- Creating Phonebook Entries
- Finding a Phonebook Entry
- Editing an Existing Phonebook Entry
- Storing Caller ID or Redial Numbers in the Phonebook
- Deleting Phonebook Entries
- Copying Phonebook Entries to Another Handset
- Making a Call from the Phonebook
- Chain Dialing from the Phonebook
- Switching to the Handset Speakerphone During a Call
- Adjusting the Ringer, Earpiece and Speaker Volume
- Adjusting the Speaker Volume
- Adjusting the Audio Tone
- Finding a Lost Handset
- Using Hold, Conference and Transfer
- Placing a Call on Hold
- Conferencing
- Transferring a Call
- Answering a Transferred Call
- Privacy Mode
- Using the Intercom
- Making an Intercom Page
- Answering an Intercom Page
- Muting the Ringer (One call only)
- Muting the Microphone
- Seven-Digit Dialog
- Tone Dialing Switch Over
- Line Mode Setup (Base only)
- Using the Voice Mail Service
- Resetting the Voice Message Waiting Indicator
- USING CALLER ID, CALL WAITING, AND REDIAL Lists
- Using the Caller ID List
- Making a Call from a Caller ID Record
- Deleting Caller ID Numbers
- Using Call Waiting
- Redialing a Number
- Deleting a Redial Record
- Using the Answering System Setup Menus
- Recording a Personal Greeting
- Selecting a Greeting
- Deleting Your Personal Greeting
- Selecting the Language
- Setting the Number of Rings
- Setting the Day & Time
- Setting the Record Time (or Announce only)
- Activating the Message Alert
- Activating Call Screening
- Setting a Security Code or Personal Identification Number (PIN)
- Turning Your Answering System On and Off
- Reviewing Messages
- Screening Calls
- Turning Off the Message Alert Tone
- Operating the Answering System While You Are Away from Home
- Installing the Belt Clip
- Optional Headset
- Note on Power Sources
- Power Failure
- Caution
- Cleaning the Battery Contacts
- Low Battery Alert
- Troubleshooting
- Resetting the Handset
- Resetting the Handset Without the Base
- Traveling Out of Range
- Common Issues
- Weak or Hard to Hear Audio
- Noise or Static on the Line
- Installing a telephone line filter or DSL filter
- Technical Information
- IMPORTANT SAFETY INSTRUCTIONS
- SAVE THESE INSTRUCTIONS
- I.C. Notice
- TERMINAL EQUIPMENT
- NOTICE:
- RADIO EQUIPMENT
- THE SANYO COMFORT WARRANTY
- WARRANTY APPLICATION
- SANYO CANADA INC.'S RESPONSIBILITY
- WHAT IS NOT COVERED
- ORIGINAL RETAIL PURCHASER'S RESPONSIBILITY
- WARRANTY BECOMES VOID
- LIMITATIONS
- STATUTORY WARRANTY
- HOW TO OBTAIN WARRANTY SERVICE
- SOS HELP LINE
- NATIONWIDE CUSTOMER SUPPORT
- 1-800-263-2244
- HASSLE-FREE EXCHANGE
- GUARANTEED QUALITY
- MEMO
Brand : SANYO
Model : CAS-D6323
Category : Cordless phone