TB51RS - Refrigerator Tricity Bendix - Free user manual and instructions
Find the device manual for free TB51RS Tricity Bendix in PDF.


| Product Type | Freestanding Refrigerator |
| Model | TB51RS |
| Brand | Tricity Bendix |
| Height | 85 cm |
| Width | 55 cm |
| Depth | 58 cm |
| Weight | 28 kg |
| Net Capacity | 145 L |
| Energy Class | F (EU 2019/2016) |
| Annual Energy Consumption | 164 kWh |
| Noise Level | 40 dB (A) |
| Climate Class | N-ST (16°C - 38°C) |
| Thermostat Type | Mechanical dial |
| Refrigerant | R600a (Isobutane) |
| Defrost Type | Automatic (frost-free) |
| Interior Light | Yes, LED |
| Door Reversibility | Yes, user reversible |
| Number of Shelves | 3 glass shelves |
| Crisper Drawers | 1 vegetable drawer |
| Door Shelves | 3 (1 bottle, 2 dairy) |
| Cooling Function | Static cooling |
| Cleaning Recommendation | Wipe interior with mild soap and water |
| Spare Parts Availability | Available through Tricity Bendix service centers |
| Warranty | 2 years standard |
Frequently Asked Questions - TB51RS Tricity Bendix
User questions about TB51RS Tricity Bendix
0 question about this device. Answer the ones you know or ask your own.
Ask a new question about this device
Download the instructions for your Refrigerator in PDF format for free! Find your manual TB51RS - Tricity Bendix and take your electronic device back in hand. On this page are published all the documents necessary for the use of your device. TB51RS by Tricity Bendix.
USER MANUAL TB51RS Tricity Bendix
natural_image
Abstract green brushstroke design with a circular element, resembling a stylized animal or plant (no text or symbols)REFRIGERATOR
TB 51 RS
CONTENTS
Instructions for the User
Important Safety Instructions 3
Description of the Appliance 4
Operation 4
Before use 4
Setting the temperature 4
Fresh food refrigeration 5
The ☑-star compartment 5
Frozen food storage 5
Thawing 6
Making ice cubes 6
Normal operating sounds 6
Health and Safety Guidelines 7
Defrosting 7
Maintenance and Cleaning 8
Internal cleaning 8
External cleaning 8
Changing the light bulb 8
When the appliance is not in use 8
Something Not Working? 9
Service and Spare Parts 10
Customer Care Department 10
Service Force Addresses 11
Guarantee Conditions 13
Instructions for the Installer
Technical Specifications 14
Installation 14
Positioning 14
Door reversal 15
Electrical Connection 16

IMPORTANT SAFETY INSTRUCTIONS
These warnings are provided in the interests of your safety. Ensure that you understand them all before installing or using this appliance. Your safety is of paramount importance. If you are unsure about any of the meanings of these warnings contact the Customer Care Department.
Prior to Installation
- Check the appliance for transport damage. Under no circumstance should a damaged appliance be installed. In the event of damage please contact your retailer.
Installation
■ This appliance is heavy. Care should be taken when moving it.
■ It is dangerous to alter the specifications or attempt to modify this product in any way.
■ Ensure that the appliance does not stand on the electrical supply cable.
Important: if the supply cable is damaged, it must be replaced by a cable available from the manufacturer or your local Service Force Centre.
■ Any electrical work required to install this appliance should be carried out by a qualified electrician or competent person.
■ Parts which heat up should not be exposed. Whenever possible, the back of the appliance should be close to a wall, but leaving the required distance for ventilation, as stated in the installation instructions.
■ The appliance should be left for 2 hours after installation before it is turned on, in order to allow the refrigerant to settle.
■ During transportation and installation of the appliance, be certain that none of the components of the refrigerant circuit become damaged.
- If the refrigerant circuit should become damaged: - avoid open flames and sources of ignition. - thoroughly ventilate the room in which the appliance is situated.
Child Safety
- Do not allow children to tamper with the controls or play with the product.
■ There is a risk of suffocation! Keep packaging material away from children!
During Use
■ This appliance is designed for domestic use only, specifically for the storage of edible foodstuffs. It is not intended for commercial or industrial use.
- Attention! The worktop of this appliance is heat resistant at max 70°C.
- Containers with flammable gases or liquids can leak at low temperatures. Do not store any containers with flammable materials, such as spray cans, fire extinguisher refill cartridges etc. in the refrigerator.
■ Frozen food should not be refrozen once it has thawed out. - Do not place carbonated or fizzy drinks in the freezer compartment.
■ Ice lollies can cause 'frost/freezer burns' if consumed straight from the ** -star compartment.
■ Do not remove items from the freezer compartment if your hands are damp/wet, as this could cause skin abrasions or frost/freezer burns.
■ Bottles and cans must not be placed in the freezer compartment they can burst when the contents freeze.
■ Manufacturers' recommended storage times should be adhered to. Refer to relevant instructions.
Maintenance and Cleaning
■ Before cleaning, always switch off the appliance and disconnect from the electrical supply.
■ When unplugging always pull the plug from the mains socket, do not pull on the cable.
Servicing
■ This product should be serviced by an authorised engineer and only genuine spare parts should be used.
■ Under no circumstances should you attempt to repair the appliance yourself. Repairs carried out by inexperienced persons may cause injury or serious malfunctioning. Contact your local Service Force Centre.
At the end of the Appliance Life
■ When disposing of your appliance use an authorised disposal site.
■ Remove the plug and ensure that any locks or catches are removed, to prevent young children being trapped inside.
i DESCRIPTION OF THE APPLIANCE
① Dairy compartment with egg tray
② Can storage shelf
③ Bottle storage shelf
④ Salad bin
⑤ Glass shelf (for storing fresh meat)
⑥ Storage shelves
⑦ Thermostat control
⑧ Freezer compartment
⑨ Conveyor

i OPERATION
Before use
Remove all securing tapes. Wash inside the appliance with lukewarm water and bicarbonate of soda (5 ml to 0.5 litre of water). Do not use soap or detergent as the smell may linger. Dry thoroughly.
Setting the temperature
The temperature inside the refrigerator and the ×× -star compartment is regulated by a thermostat with 6 temperature positions and one «OFF» (O) position.
Position 1 = minimum coldness
Position 6 = maximum coldness
Turn the thermostat dial to the required position.
An intermediate position is usually the most suitable, although the temperature will be affected by:
- Room temperature
• How often the door is opened
• How much food is stored - Position of the appliance
In determining the correct temperature control setting all these factors have to be considered and some experimentation may be necessary.
When altering the temperature setting, allow 24 hours for the temperature to stabilise before making further changes.
Important The tempe
The temperature inside the refrigerator and × -star compartment can be regulated by adjusting the conveyor located under the × -star compartment.
To obtain a lower temperature in the star compartment when frozen food is stored inside and when the ambient temperature is 25^ C or lower slightly raise the conveyor (A) and push it all the way in. When frozen food is not stored in the star compartment and when the ambient temperature is higher than 25^ C return the conveyor to its initial position. This reduces the temperature in the refrigerator compartment.

Fresh food refrigeration
To obtain the best performance, do not store warm food or evaporating liquids in the refrigerator; do cover or wrap the food, particularly if it has a strong flavour.
Do not cover the shelves with any protective material, such as paper, cardboard or plastic, which may obstruct the air circulation through them.
To help you use your refrigerator correctly, here are some more useful hints:
Raw meat (beef, pork, lamb, chicken or poultry): wrap in polythene bags and place on the shelf on top of the salad bin.
Meat can only be stored safely in this way for one or two days at the most.
Fruit & vegetables: these should be thoroughly cleaned and placed in the bottom salad drawer.
Butter & cheese: these should be placed in special airtight containers or wrapped in aluminium foil or polythene bags, to exclude as much air as possible.
Milk bottles: these should have a cap and should be stored in the bottle rack on the door.
The walls of the refrigerator are equipped with runners so that shelves can be positioned as desired.

natural_image
Technical line drawing of a structural panel with diagonal bracing and vertical supports (no text or symbols)The ☐-star compartment
This compartment is suitable for the storage of commercially frozen food and for ice cube making.
Frozen food storage
Storing ready-frozen foods is quite straightforward.
The packs can be placed beside each other or on top of each other.
You are strongly advised to place ready-frozen food in the compartment as quickly as possible after purchase and we therefore recommend that you buy them last. Also ensure that the external packaging is intact.
Packaging which is swollen or has traces of refrozen water droplets on the pack could indicate that the product has not been kept at a suitable temperature and that it may have lost its original quality.
Partially thawed food must not be refrozen, it must be consumed within 24 hours.
Never exceed the storage times indicated.
Do not open the star compartment door too often and do not leave open longer than necessary.

Important
In the event of a power cut do not open the door. The food in the star compartment will not be affected if the power cut is short and if the compartment is full. Should the food begin to thaw, it must be consumed quickly and must not be re-frozen.
Thawing
Food can be thawed in a number of ways, depending on the type of food and the size of the packs.
Meat, fish and fruit should be thawed in the refrigeration compartment and small pieces of meat can even be cooked while still frozen, but you must ensure that it is thoroughly cooked through.
Vegetables should be directly immersed in boiling water; ready-cooked dishes can be placed directly in the oven in their aluminium wrapping.
A microwave oven is particularly suitable for thawing any type of frozen or deep-frozen food: follow the oven instructions, particularly regarding the placement of aluminium wrapping in the oven.
Making ice cubes
The appliance is provided with a plastic ice cube tray. Fill the tray 3/4 full to allow the ice to expand and place it in the star compartment. To turn out the ice cubes simply give the tray a slight twist to release the cubes.
Never try to free an ice tray that is frozen to the ×× -star compartment using a sharp or pointed object.

Important
Do not consume ice-lollies which have just come out of the star compartment. Their extremely low temperature can cause frost burns. Do not remove items from the star compartment if your hands are damp/wet, as this could cause skin abrasions or "frost/freezer burns".
Normal Operating Sounds
You may hear faint gurgling or bubbling sounds when the refrigerant is pumped through the coils or tubing at the rear, to the cooling evaporator.
When the compressor is on, the refrigerant is being pumped round, and you will hear a whirring sound or pulsating noise from the compressor.
A thermostat controls the compressor, and you will hear a faint 'click' when the thermostat cuts in and out.
i HEALTH AND SAFETY GUIDELINES
Because of consumer demand, preservatives have been removed from many pre-prepared foods. This together with the changes in shopping habits to a once-a-week shop, mean that safe handling and storage of food is even more important than ever.
The following tips should help you to ensure that the food in your home is in as perfect condition as possible.
- Keep the time between buying chilled food and placing it in your fridge as short as possible. Tests showed that the temperature of 1 litre of orange juice rose to 22^ in an hour between the supermarket and home. It then took 11 hours to get down to 7^ in the refrigerator.
- Keep the refrigerator door closed as much as possible.
- Do not push food together too much, try to allow air to circulate around each item.
■ Cool cooked food as quickly as possible but do NOT place in the refrigerator until cool. (Leave food in a cool place in order that it can then be placed in the refrigerator as soon as possible). - Do NOT mix raw and cooked meat, they must be in separate containers. Take care not to let the meat juices drip onto other food. If the meat does drip, remove everything and clean thoroughly.
■ Do not store food uncovered. - Remove suspect food from your refrigerator and clean (Refer to “Maintenance and cleaning”).
■ Never allow spillages to dry and harden.
■ Store eggs in the egg rack provided in the refrigerator door. Discard any broken or chipped eggs.
■ Regularly check the refrigerator door seal to ensure that it is clean and free from debris.
■ Always wash your hands with soapy water and dry them with a clean towel before handling food.
- Keep work surfaces clean and avoid cross contamination by not using the same work surface or knife, without washing them thoroughly in between.
DEFROSTING
While in operation the star compartment becomes progressively covered with frost. This frost, which acts as an insulator and thus prevents the cold from reaching the food should be removed whenever the thickness of the frost exceeds 1/4".
To carry out complete defrosting proceed as follows:
- Push the conveyor completely in.
- Place a tray on the upper shelf of the refrigerator under the drain hole of the conveyor.
- Remove any food from inside the star compartment, wrap it in several sheets of newspaper and store in a cool dry place.
-
Push the button at the centre of the thermostat knob. To accelerate defrosting, place a bowl of hot water inside the compartment (with a piece of cardboard underneath the bowl as protection).
-
When defrosting is completed, dry thoroughly and remove the water collected in the tray. The refrigerator starts operating automatically following defrosting.
After letting the appliance run for at least half an hour, replace the previously removed food into the ** star compartment.
When defrosting it is not necessary to remove the foods from the inner door and the refrigerator compartment.
Important A temperat
A temperature rise of the frozen food packs during defrosting may shorten their storage life. Never use sharp metal tools to scrape off frost from the evaporator as you could damage it beyond repair.
MAINTENANCE AND CLEANING
Before any maintenance or cleaning work is carried out, DISCONNECT the appliance from the ELECTRICITY supply.
Internal cleaning
Clean the inside and accessories with warm water and bicarbonate of soda (5ml to 0.5 litre of water). Rinse and dry thoroughly.
NEVER USE DETERGENTS, ABRASIVE POWDERS, HIGHLY PERFUMED CLEANING PRODUCTS OR WAX POLISHES, TO CLEAN THE INTERIOR AS THESE WILL DAMAGE THE SURFACE AND LEAVE A STRONG SMELL.
Clean the drain hole of the water trough at regular intervals and make sure that the drain hole is never obstructed, so that the defrost water may flow freely.

Important
Do not use abrasive products.
External cleaning
Wash the outer cabinet with warm soapy water. Do NOT use abrasive products.
Once or twice a year dust the condenser (black grill) and the compressor at the back of the appliance, with a brush or vacuum cleaner, see the figure.
You MUST ensure that the appliance is switched OFF. An accumulation of dust will affect the performance of the appliance and cause excessive electricity consumption.
Changing the light bulb
Should the interior light fail to work, switch off and disconnect the appliance from the electricity supply.
Replace the bulb as follows:
- Remove conveyor
- Unscrew light bulb
- Replace with a 12 watt bulb available from your nearest Service Centre.
- Replace conveyor
When the appliance is not in use
When the appliance is not in use for long periods, disconnect from the electricity supply, empty all foods and clean the appliance, leaving the door ajar to prevent unpleasant smells.


natural_image
Diagram of a microwave oven with a directional arrow indicating airflow or movement (no text or symbols)SOMETHING NOT WORKING?
Before contacting your local Service Force Centre check the following points.
IMPORTANT: If you call out an engineer to a fault listed below, or to repair a fault caused by incorrect use or installation, a charge will be made even if the appliance is under guarantee.
| Symptom | Solution |
| No power to appliance | - Check there is power at the socket.- Check there is not a power cut by checking the household lights.- Check the fuse has not blown. |
| The light does not come on | - Ensure that the bulb is correctly fitted.- Replace the bulb if it has blown.- Check the door light switch is not jammed. |
| The temperature in the fridge or freezer section is too high | - Check the thermostat control knob in the fridge is turned to the correct setting relative to ambient conditions.- Check the ambient temperature is within the appliances operating limits of 16°C to 32°C.Relocate the appliance if necessary. |
| The compressor runs continuously | - Adjust the thermostat control knob to give correct temperature control. See page 4.- Check that the doors are closed.- Large quantities of food have recently been placed in the cabinet and/or door is frequently opened.- Check that air ventilation is not obstructed. |
| Excessive frost and ice has built up | - Ensure the door is not left open.- Check that nothing is preventing the doors from closing.- Is the door gasket intact and clean?- Has advised periodic defrosting been carried out? |
| Noise | - Refer to normal operating sounds. |
If after the above checks, there is still a fault, call your local Service Force Centre.
In-guarantee customers should ensure that the above checks have been made as the engineer will make a charge if the fault is not a mechanical or electrical breakdown.
Please note that proof of purchase is required for any in-guarantee service calls.
SERVICE AND SPARE PARTS
SERVICEFORCE
In the event of your appliance requiring service, or if you wish to purchase spare parts, please contact your local Tricity Bendix Service Force Centre by telephoning:
08705 929929
Your telephone call will be automatically routed to the Service Force Centre covering your post code area. The addresses are listed on the following pages.
Before calling out an engineer, please ensure you have read the details under the heading 'Something Not Working'.
When you contact the Service Centre you will need to give the following details.
- Your name, address and post code
- Your telephone number
- Clear and concise details of the fault
- The model serial no. of the appliance (found on the rating plate)
- The purchase date
CUSTOMER CARE DEPARTMENT
For general enquiries concerning your Tricity Bendix appliance or for further information on Tricity Bendix products, you are invited to contact our Customer Care Department by letter or telephone as follows:
Customer Care Department
Tricity Bendix
55-77 High Street
Slough
Berkshire
SL1 1DZ
Tel: 08705 950 950 (*)
(*) calls to this number may be recorded for training purposes.
SERVICE FORCE
To contact your local Service Force Centre telephone 08705 929 929
| CHANNEL ISLANDS | ISLE OF LEWIS ND Macleod16 James StreetStornowayIsle of Lewis PA87 2QW | NORTH EAST | |||
| GUERNSEY Guernsey ElectricityPO Box 4Vale, GuernseyChannel Islands GY1 3AD | GATESHEAD | Unit 356aDukesway CourtDukeswayGateshead NE11 0BH | |||
| KELSO 2, 6 & 8 WoodmarketKelsoBordersTD5 7AX | |||||
| JERSEY Jersey Electricity CompanyHaut De L'ormeRue De Haut De L'ormeTrinityJerseyChannel Islands JE3 5FG | ORKNEY | 7 King StreetKirkwallOrkneyKW15 1JF | GRIMSBY | 15 Hainton AvenueGrimsbyN. E. LincsDN32 9AS | |
| HULL | Unit 1Boulevard Industrial EstateHullHU3 4AY | ||||
| SCOTLAND | PERTH(OWN SALES) | Scottish Hydro ElectricCentral WarehouseInveralmondPerth PH1 3AF | LEEDS | 64-66 Cross Gates RoadCross GatesLeedsLS15 7YS | |
| ABERDEEN 54 Claremont StreetAberdeen AB10 6RA | |||||
| AUCHTERMUCHTY 33a BurnsideAuchtermuchtyFife KY14 7AJ | SHETLAND(OWN SALES) | 3-4 Carlton PlaceLerwickShetlandZE1 0PW | NEWTON AYCLIFFE | Unit 23Northfield WayAycliffe Industrial ParkNewton AycliffeDL5 6EJ | |
| BLANTYRE Unit 5Block 2Auchenraith Ind. EstateRosendale WayBlantyre G72 0NJ | SHETLAND(OWN SALES) | Bolts Shetland26 North RoadLerwickShetland ZE1 0PE | SHEFFIELD Pennine HouseRoman Ridge RoadSheffieldS9 1GB | ||
| DUMFRIES 93 Irish StreetDumfriesDG1 2 PQ | WHALSAY(OWN SALES) | Leask ElectricalHarisdaleSymbister, WhalsayShetland ZE2 9AA | |||
| DUNOON 7 Hill StreetDunoonArgyllPA23 7AL | NORTHERN IRELANDBELFAST | OWenmore HouseKilwee Business ParkDunmurryBelfastBT17 0HD | NORTH WESTBIRKENHEAD | 1 Kelvin ParkDock RoadBirkenheadCH41 1LT | |
| EDINBURGH Unit 12Dumbryden Ind. Estate2 Dumbryden RoadEdinburghEH14 2AB | CARLISLE | Unit 7James Street WorkshopsJames StreetCarlisleCumbria CA2 5AH | |||
| GLASGOW Unit 4Wellington RoadBishopriggsGlasgow G64 2SA | CARDIFF | WALESUnit 4Guardian Industrial EstateClydesmuir RoadCardiffCF2 2QS | ISLE OF MAN | South Quay Ind. EstateDouglasIsle of ManIM1 5AT | |
| INVERNESS Unit 3BISmithton Ind. EstateSmithtonInverness IV2 7WL | CLYWD | Unit 6-7 Coed ParcAbergele RoadRhuddianClwydLL18 5UG | BOLTON | Unit BCentral Industrial EstateSt Marks StreetBoltonBL3 6NR | |
| ISLE OF ARRAN Arran DomesticsThe Douglas CentreBrodickIsle of Arran KA27 8AJ | |||||
| ISLE OF BARRA J Zerfah244 BruernishIsle of BarraWestern Islands HS9 5QY | DYFED | Unit 9St. Clears Business ParkTenby RoadSt. ClearsCarmarthenSA33 4JW | PRESTON | Unit 250Dawson PlaceBamber BridgePrestonLancashire PR5 8AL | |
| ISLES OF BUTE Walker EngineeringGlenmhorUpper Serpentine RoadRothesayIsle of Bute PA20 9EH | OSWESTRY | Plas Fhynnon WarehouseMiddleton RoadOswestrySY11 2PP | STOCKPORT | Unit 20 Haigh ParkHaigh AvenueStockportSK4 1QR | |
SERVICE FORCE
To contact your local Service Force Centre telephone 08705 929 929
| MIDLANDS | LONDON & EAST ANGLIA | SOUTH EAST | ||
| BIRMINGHAM 66 Blrch Road EastWyrley Trading EstateWittonBirminghamB6 7DB | BECKENHAM 11a Gardner Ind. EstateKent House LaneBeckenhamKent BR3 1QZ | ASHFORD Unit 2Bridge Road Business CentreBridge RoadAshfordKent TN23 1BB | ||
| CHELMSFORD Hanbury RoadWidford Ind. EstateChelmsfordEssexCM12 3AE | FLEET | Unit 1Redfields Ind. EstateChurch CrookhamFleetHampshire GU13 0RD | ||
| BOURNE Pinfold RoadBournePE10 9HT | ||||
| BRIDGNORTH 68 St. Mary's StreetBridgnorthShropshireWV16 4DR | COLINDALE Unit 14Capitol ParkCapitol WayColindaleLondon NW9 0EQ | HAYWARDSHEATH | 21-25 Bridge RoadHaywards HeathSussex RH16 1UA | |
| GLOUCESTER | 101 Rycroft StreetGloucesterGL1 4NB | TONBRIDGE | Unit 30Deacon Trading EstateMorley RoadTonbridgeTN9 1RA | |
| ELTHAM 194 Court RoadMottinghamElthamLondon SE9 4EW | ||||
| HEREFORD Units 3 & 4Bank BuildingsCattle marketHerefordHE4 9HX | ENFIELD 284 Alma RoadEnfieldLondonEN3 7BB | SOUTH WEST | ||
| BARNSTAPLE | Main RoadFremingtonBarnstapleNorth Devon EX31 2NT | |||
| HIGHAM FERRERS | 30 High StreetHigham FerrersNorthantsNN10 8PL | GRAVESEND Unit B4Imperial Business EstateWest MillGravesendKentDA11 0DL | ||
| ILKESTON | Unit 2Furnace RoadIlkeston DE7 5EP | BOURNEMOUTH | 63-65 Curzon RoadBournemouthDorsetBH1 4PW | |
| LEICESTER | Unit 7Oaks Industrial EstateCoventry RoadNarboroughLeicestershireLE9 5GF | IPSWICH Unit 6CElton Park Business CentreHadleigh RoadIpswichIP2 0DD | BRIDGEWATER | 6 Herswell Business ParkSalmon ParadeBridgwaterSomerset TA6 5PY |
| LETCHWORTH 16-17 Woodside Ind. ParkWorks RoadLetchworthHertsSG6 1LA | BRISTOL 11 Eldon WayEldonwall Trading EstateBristolBS4 3QQ | |||
| LINCOLN | Unit 8Clifton StreetStone Field ParkLincolnLN5 8LQ | LONDON 2 - 4 Royal LaneYiewsleyWest DraytonMiddlesexUB7 8DL | EMSWORTH | 266 Main RoadSouthbourneEmsworthPO10 8JL |
| NEWCASTLE 18-21 Croft RoadUNDER LYME Brampton Ind. EstateNewcastle under LymeStaffordshireST5 0TW | ISLE OF WIGHT | Unit 8Enterprise CourtRyde Business ParkRydeIsle of Wight PO33 1DB | ||
| REDDITCH | 13 Thornhill RoadNorth Moons MoatRedditchWorcestershireB96 9ND | MAIDENHEAD Reform RoadMaidenheadBerkshireSL6 8BY | NEWTON ABBOT | Unit 2Zealley Ind. EstateKingsteigntonNewton AbbotTQ12 3TD |
| MOLESEY 10 Island Farm AvenueWest MoleseySurreyKT8 2UZ | ||||
| TAMWORTH | Unit 3Sterling ParkClaymoreTamworthB77 5DQ | NEWBURY 9 Pipers CourtBerkshire DriveThatchamBerkshireRG19 4ER | REDRUTH Unit 7DPool Ind. EstateDruids RoadRedruthCornwall TR15 3RH | |
| WORCESTER Units 1 & 2Northbrooks CloseGregorys Mill Ind. EstateWorcesterWR3 8BP | NORWICH 2b Trafalgar StreetNorwichNR1 3HN | |||
| SUNBURY Unit 1aThe SummitHanworth RoadSunbury on ThamesTW16 5DB | ||||
GUARANTEE CONDITIONS
Standard guarantee conditions
We, Tricity Bendix, undertake that if within 12 months of the date of purchase this Tricity bendix appliance or any part thereof is proved to be defective by reason only of faulty workmanship or materials, we will, at our option repair or replace the same FREE OF CHARGE for labour, materials or carriage on condition that:
■ The appliance has been correctly installed and used only on the electricity supply stated on the rating plate.
- The appliance has been used for normal domestic purposes only, and in accordance with the manufacturer's instructions.
- The appliance has not been serviced, maintained repaired, taken apart or tampered with by any person not authorised by us.
■ All service work under this guarantee must be undertaken by a Tricity bendix Service Force Centre.
■ Any appliance or defective part replaced shall become the Company's property.
■ This guarantee is in addition to your statutory and other legal rights.
Home visits are made between 8.30am and 5.30pm Monday to Friday. Visits may be available outside these hours in which case a premium will be charged.
Exclusions
This guarantee does not cover:
- Damage or calls resulting from transportation, improper use or neglect, the replacement of any light bulbs or removable parts of glass or plastic.
- Costs incurred for calls to put right an appliance which is improperly installed or calls to appliances outside the United Kingdom.
■ Appliances found to be in use within a commercial environment, plus those which are subject to rental agreements.
■ Products of Tricity bendix manufacture which are not marketed by Tricity bendix.
European Guarantee
If you should move to another country within Europe then your guarantee moves with you to your new home subject to the following qualifications:
■ The guarantee starts from the date you first purchased your product.
- The guarantee is for the same period and to the same extent for labour and parts as exists in the new country of use for this brand or range of products.
■ This guarantee relates to you and cannot be transferred to another user.
- Your new home is within European Community (EC) or European Free Trade Area.
■ The product is installed and used in accordance with our instructions and is only used domestically, i.e. a normal household.
■ The product is installed taking into account regulations in your new country.
Before you move please contact your nearest Customer Care centre, listed below, to give them details of your new home. They will then ensure that the local Service Organisation is aware of your move and able to look after you and your appliance.
France Senlis +33 (0) 44 62 22 22
Germany Nurenberg +49 (0) 911 323 2600
Italy Pordenone +39 (0) 1678 47053
Sweden Stockholm +46 (0) 20 78 77 50
UK Slough +44 (0) 1753 219898
i TECHNICAL SPECIFICATIONS
DIMENSIONS Height 85 cm
Width 49.5 cm
Depth 60 cm
POWER SUPPLY VOLTAGE AND FREQUENCY 220-240 V / 50 Hz
TOTAL POWER ABSORBED 90 W
AVERAGE DAILY UNITS ELECTRICITY(*) 0.74 kWh
TOTAL GROSS CAPACITY 140 I
NET CAPACITY Fridge 106 I
NET CAPACITY -compartment
12 |
STAR RATING

(*)This figure is based on standard test results in accordance with European Standard EN153. Actual consumption will depend on how the appliance is used and where it is located).
i INSTALLATION
Positioning
For this appliance to work efficiently, it must not be located where the temperatures will fall below 16^ C ( 61^ F) or rise above 32^ C ( 90^ F), e.g. conservatories.
For correct operation this appliance must be located in a dry atmosphere, away from heat sources, e.g. cookers, radiators, boilers and direct sunlight.
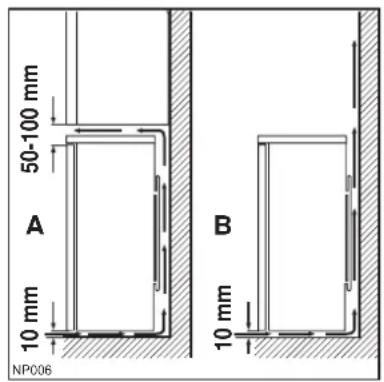
You should also ensure that air can circulate freely around the back and the top of the cabinet. There should be 100mm (4") between the top of the cabinet and any overhanging kitchen furniture. Alternatively allow 50mm (2") between the top of the cabinet and any overhanging kitchen furniture and a gap of 25mm (1") on either side of the appliance.
Do not obstruct the space underneath. The back of the cabinet may be placed close to the wall but must not touch it. DO NOT install in places with restricted ventilation.
Adjust the level of the appliance by screwing out the adjustable foot, or feet, at the bottom of the cabinet using your fingers.

natural_image
Technical diagram showing a screw fastener mounted on a base with two separate clamps (no text or symbols)Door reversal
Before carrying out the operations described below, pull out the mains plug from the wall socket.
To carry out this reversal go through the following steps:
- Gently lay the appliance on its back with the top held away from the floor by 5-8 cm (2-3 inches) of packing.
- Remove the bottom door hinge (5).
- Remove the door (4) by opening it and pulling it gently downwards to remove it from the top hinge pin (2).
- Unscrew the top hinge pin (2) from the top hinge (1) and replace it in the opposite hole on the left hand side.
- Unscrew the foot at the base (6) of the appliance and refit it on the opposite side.
- Refit the door and the bottom hinge (5) to the left hand side.
- Unscrew the handle (3). Refit it on the opposite side after having pierced the plugs with a punch. Cover the holes left open with the plugs contained in the documentation pack.
When positioning the bottom hinge blade on the reverse side, the securing screws will require a degree of force when fitting.
It is therefore advisable to lubricate the screw tips before starting this operation.

Important
After completion of the door reversal operation, verify that the door gasket is sealing onto the cabinet. If the ambient temperature is cold (i.e. in Winter), the gasket may not fit perfectly to the cabinet. In that case, wait for the natural fitting of the gasket or accelerate this process by heating up the part involved with a normal hairdryer on a low setting.

ELECTRICAL CONNECTION

WARNING:
THIS APPLIANCE MUST BE EARTHED. The manufacturer declines any liability should this safety measure not be observed.
If the plug that is fitted to your appliance is not suitable for your socket outlet, it must be cut off and the appropriate plug fitted.
Remove the fuse from the cut off plug.
The cut off plug should then be disposed of to prevent the hazard of shocks in case it should be plugged into a 13amp socket in another part of your home.

Important
The wires in the mains lead are coloured in accordance with the following code:
Green and Yellow - Earth
Blue - Neutral
Brown - Live
If you fit your own plug, the colours of the wires in the mains lead of your appliance, may not correspond with the markings identifying the terminals in your plug, proceed as follows:
Connect the Green and the Yellow (earth) wire to the terminal in the plug which is marked with the letter «E» or the earth symbol or coloured green and yellow.
Connect the blue (neutral) wire to the terminal in the plug which is marked with the letter «N» or coloured black.
Connect the brown (live) wire to the terminal in the plug which is marked with the letter «L» or coloured red.
The plug moulded onto the lead incorporates a fuse. For replacement, use a 13amp BS1362 fuse. Only ASTA or BSI approved fuses should be used.
The plug must not be used if the fuse cover/carrier is lost. The cover/carrier is indicated by the coloured insert at the base of the plug.
A replacement cover/carrier must be obtained from your local Service Force Centre.
This appliance complies with the E.E.C. Directive No. 87/308 of 2.6.87 relative to radio interference suppression.

This appliance complies with the following E.E.C. Directive:
- 73/23 EEC of 19.2.73 (Low Voltage Directive) and subsequent amendments.
- 89/336 EEC of 3.5.89 (Electromagnetic
- Compatibility Directive) and subsequent amendments.
Please ensure that when the appliance is installed it is easily accessible for the engineer in the event of breakdown.

Consumer care telephone number 08705 950 950

From the Electrolux Group. The world's No.1 choice.
The Electrolux Group is the world's largest producer of powered appliances for kitchen, cleaning and outdoor use. More than 55 million Electrolux Group products (such as refrigerators, cookers, washing machines, vacuum cleaners, chain saws and lawn mowers) are sold each year to a value of approx. USD 14 billion in more than 150 countries around the world.
- CONTENTS
- Instructions for the User
- Important Safety Instructions 3
- Description of the Appliance 4
- Operation 4
- Health and Safety Guidelines 7
- Defrosting 7
- Maintenance and Cleaning 8
- Something Not Working? 9
- Service and Spare Parts 10
- Customer Care Department 10
- Service Force Addresses 11
- Guarantee Conditions 13
- Instructions for the Installer
- Technical Specifications 14
- Installation 14
- Electrical Connection 16
- IMPORTANT SAFETY INSTRUCTIONS
- Prior to Installation
- Installation
- Child Safety
- During Use
- Maintenance and Cleaning
- Servicing
- At the end of the Appliance Life
- i DESCRIPTION OF THE APPLIANCE
- i OPERATION
- Before use
- Setting the temperature
- Important The tempe
- Fresh food refrigeration
- The ☐-star compartment
- Frozen food storage
- Important
- Thawing
- Making ice cubes
- Normal Operating Sounds
- i HEALTH AND SAFETY GUIDELINES
- The following tips should help you to ensure that the food in your home is in as perfect condition as possible.
- DEFROSTING
- Important A temperat
- Internal cleaning
- External cleaning
- Changing the light bulb
- When the appliance is not in use
- SOMETHING NOT WORKING?
- SERVICE AND SPARE PARTS
- 929929
- CUSTOMER CARE DEPARTMENT
- SERVICE FORCE
- GUARANTEE CONDITIONS
- Standard guarantee conditions
- Exclusions
- This guarantee does not cover:
- European Guarantee
- i TECHNICAL SPECIFICATIONS
- i INSTALLATION
- Positioning
- Door reversal
- ELECTRICAL CONNECTION
- WARNING:
- Green and Yellow - Earth
- Blue - Neutral
- Brown - Live
Brand : Tricity Bendix
Model : TB51RS
Category : Refrigerator