TB80L - Refrigerator Tricity Bendix - Free user manual and instructions
Find the device manual for free TB80L Tricity Bendix in PDF.


| Type of product | Refrigerator |
| Brand | Tricity Bendix |
| Model | TB80L |
| Dimensions (H x W x D) | 840 x 600 x 600 mm |
| Weight | 42 kg |
| Power supply | 220-240 V, 50 Hz |
| Energy consumption | 0.55 kWh/24h (approx.) |
| Energy class | F (EU energy label) |
| Climate class | N, ST (16-38°C) |
| Gross capacity | 95 liters |
| Net capacity | 88 liters |
| Cooling system | Static (manual defrost) |
| Thermostat control | Rotary knob (7 positions) |
| Interior light | LED |
| Number of shelves | 3 glass shelves |
| Crisper drawer | 1 vegetable drawer |
| Door compartments | 3 (butter, eggs, bottles) |
| Defrosting | Manual defrost required |
| Refrigerant | R600a (isobutane) |
| Noise level | 40 dB (approx.) |
| Installation type | Freestanding |
| Door hinge | Reversible (right/left) |
| Spare parts | Shelves, door gaskets, thermostat |
| Repairability index | 7.5/10 (estimated) |
Frequently Asked Questions - TB80L Tricity Bendix
User questions about TB80L Tricity Bendix
0 question about this device. Answer the ones you know or ask your own.
Ask a new question about this device
Download the instructions for your Refrigerator in PDF format for free! Find your manual TB80L - Tricity Bendix and take your electronic device back in hand. On this page are published all the documents necessary for the use of your device. TB80L by Tricity Bendix.
USER MANUAL TB80L Tricity Bendix
Tricity Bendix, 55-77 High Street, Slough, Berkshire SL1 1DZ
Consumer care telephone number.....08705 950950
TRICITY BENDIX

FRIDGE
TB 80 L
© Electrolux Household Appliances Limited 2001
From the Electrolux Group. The world's No. 1 choice.
The Electrolux Group is the world's largest producer of powered appliances for kitchen, cleaning and outdoor use. More than 55 million Electrolux Group products such as refrigerators, cookers, washing machines, vacuum cleaners, chain saves and lawn mowers are sold each year to a value of approx. USD 14 billion in more than 150 countries around the world
2222 105-41
IMPORTANT SAFETY INFORMATION
It is most important that this instruction book should be retained with the appliance for future reference. Should the appliance be sold or transferred to another owner, or should you move house and leave the appliance, always ensure that the book is left with the appliance in order that the new owner can get to know the functioning of the appliance and the relevant safety information.
This information has been provided in the Interest of safety. You MUST read it carefully before installing or using the appliance.
Installation
• This appliance is heavy. Care should be taken when moving it.
- It is dangerous to alter the specifications or attempt to modify this product in any way.
- Care must be taken to ensure that the appliance does not stand on the electrical supply cable. Important: if the supply cable is damaged, it must be replaced by a special cable available from your local Service Force Centre.
- Any electrical work required to install this appliance should be carried out by a qualified electrician or competent person.
- Parts which heat up should not be exposed. Whenever possible, the back of the appliance should be close to a wall but leaving the required distance for ventilation as stated in the installation instructions.
- The appliance should be left for 2 hours after installation before it is turned on, in order to allow the refrigerant to settle.
Child Safety
- Do not allow children to tamper with the controls or play with the product.
- Keep all packaging well away from children.
General Safety
- This appliance contains hydrocarbons in its cooling unit; maintenance and recharging must therefore only be carried out by authorized technicians.
- Take utmost care when handling your appliance so as not to cause any damages to the cooling unit with consequent possible fluid leakages.
- The appliance must not be located close to cookers, radiators or boilers.
- Avoid prolonged exposure of the appliance to direct sunlight.
- Do not use other electrical appliances (such as ice cream makers) inside of refrigerating appliances.
During Use
- This appliance is designed for domestic use only, specifically for the storage of edible foodstuffs.
- Frozen food must NOT be re-frozen once it has thawed out.
• Do not place carbonated or fizzy drinks in the freezer. - Do not remove items from the freezer if your hands are damp/wet, as this could cause skin abrasions or frost/freezer burns.
- Ice lollies can cause 'frost/freezer burns' if consumed straight from the freezer.
- Manufacturers' storage recommendations should be strictly adhered to. Refer to relevant instructions.
• The cooling plate or refrigerated freezer shelves in this appliance contain channels through which the refrigerant passes. If these are punctured this will cause substantial damage to the appliance and result in food loss. DO NOT USE SHARP INSTRUMENTS to scrape off frost or ice. Under NO circumstances should solid ice be forced off the lining or shelves. Solid ice should be allowed to thaw, when defrostling the appliance. See Defrost Instructions.
Maintenance and Cleaning
- Switch off and unplug the appliance before carrying out any cleaning or maintenance work.
Servicing
- This product should be serviced by an authorised engineer and only genuine spare parts should be used.
• Under no circumstances should you attempt to repair the machine yourself. Repairs carried out by inexperienced persons may cause injury or serious malfunctioning. Refer to your local Service Force Centre and always insist on genuine spare parts.
At the end of the Appliance Life
- When disposing of your appliance, use an authorised disposal site.
- Remove the plug and ensure that any locks or catches are removed, to prevent young children being trapped inside.
CONTENTS
Instructions for the User
Important Safety Information 2
Description of the Appliance 4
Operation 5
Before using 5
Setting the temperature 5
Fresh food refrigeration 5
Normal Operating Sounds 5
Positioning the door shelves 6
Positioning the inner shelves 6
Hints and Tips 6
Maintenance and Cleaning 7
Internal cleaning 7
External cleaning 7
When the appliance is not in use 7
Changing the light bulb 7
Defrosting 7
Something Not Working 8
Service and Spare Parts 9
Customer Care 9
Guarantee Conditions 12
Instructions for the Installer
Technical Specification 13
Installation 14
Positioning 14
Rear Spacers 14
Electrical Connection 15
Door Reversal 16
DESCRIPTION OF THE APPLIANCE

A - Thermostat control
B - Dairy compartment
C - Can storage shelves
D - Bottle storage shelf
E - Salad crisper
F - Glass shelf
G - Storage shelves

Door reversal
- Disconnect from the electricity supply.
- Remove all loose items, including food, store food in a cool place.
- Gently lay the fridge on its back with the top held away from the floor by 5-8 cm (2-3 inches) of packing;
- Remove the feet (3).
- Remove bottom hinge (1).
- Slide out the door from pin (G), unscrew the latter and then screw it down into the hinge provided on the opposite side, after having removed the small plugs which should then be filled on the opposite side.
- Refit the door and bottom hinge (1) on the opposite side.
- Refit the feet (3) on the opposite side.
- Unscrew the handle. Refit It on the opposite side after having pierced the plugs with a punch. Cover the holes left open with the plugs contained in the documentation pack.

Attention
After completion of the door reversing operation, check that the door gasket adheres to the cabinet. If the ambient temperature is cold (i.e. in Winter), the gasket may not fit perfectly to the cabinet. In that case, wait for the natural fitting of the gasket or accelerate this process by heating up the part involved with a normal hairdryer on a low setting.


OPERATION
Before using
Remove all securing tapes. Wash inside the appliance with lukewarm water and bicarbonate of soda (5 ml to 0.5 litre of water).
Do not use soap or detergent as the smell may linger. Dry thoroughly.
Setting the temperature
The temperature inside the refrigerator is regulated by a thermostat with 6 temperature positions and an "OFF" (O) position.
Position 1 = minimum coldness
Position 6 = maximum coldness
Turn the thermostat dial to the required position.
The intermediate position is usually the most suitable (3-4).
The thermostat setting can vary as the temperature inside the refrigeration compartment depends on the following factors:
- room temperature
- how often the door is opened
- how much food is stored
- position of the appliance

Important
During prolonged periods of abnormally hot weather, if the thermostat is set on too high a number, the cooling system may operate continuously and the fridge cooling plate may not defrost. Turning the knob to a lower number will cause the automatic defrosting to resume.
Fresh food refrigeration
To obtain the best performance, do not store warm food or evaporating liquids in the refrigerator; do cover or wrap the food, particularly if it has a strong flavour.
Do not cover the shelves with any protective material, such as paper, cardboard or plastic, which may obstruct the air circulation through them.
To help you use your refrigerator correctly, here are some more useful hints:
Raw meat (beef, pork, lamb & poultry or chicken): wrap in polythene bags and place on the glass shelf above the salad crispers.
Meat can only be stored safely in this way for one or two days at the most.
Fruit & vegetables: these should be thoroughly cleaned and placed in the bottom salad crispers. Butter & cheese: these should be placed in special airtight containers or wrapped in aluminium foil or polythene bags to exclude as much air as possible.
Milk bottles: these should have a cap and should be stored in the bottle rack on the door.
Normal Operating Sounds
- You may hear faint gurgling or bubbling sounds when the refrigerant is pumped through the coils or tubing at the rear, to the cooling plate/evaporator.
- When the compressor is on, the refrigerant is being pumped round, and you will hear a whirring sound or pulsating noise from the compressor.
- A thermostat controls the compressor, and you will hear a faint 'click' when the thermostat cuts in and out.

Printed on recycled paper
Positioning the door shelves
The door shelves can be easily removed for cleaning. Gently ease the shelf in the directions shown.
Adjustment of the door shelves can be made to accommodate varying heights of bottles and other containers. Store light items such as small cartons and jars on the door shelves. The bottle shell can be used for the storage of heavier bottles.
Positioning the inner shelves
The walls of the refrigerator have runners so that shelves can be positioned as desired.
i HINTS AND TIPS
Food Storage
• To obtain the best results from the appliance neither hot foods nor liquids which may evaporate, should be placed in the larder compartment.
- Keep the time between buying chilled food and placing it in your refrigerator as short as possible.
- Do not push food together too much, try to allow air to circulate around each item.
- Do not store food uncovered.
- Remove suspect food from your refrigerator and clean, refer to Maintenance and Cleaning.


Energy Saving Advice
- Do not install the appliance close to sources of heat, such as a boiler or radiator.
- Locate the appliance in a cool well ventilated room and make sure that the air openings of the appliance are not obstructed.
• Always leave warm food to cool down to room temperature before placing in the fridge. - Try to avoid keeping the door open for long periods or opening the door too frequently as warm air will enter the cabinet and cause the compressor to switch on unnecessarily often.
- Ensure there are no obstructions preventing the door from closing properly.
- It is advisable to peridocally clean the refrigeration system at the back of the appliance with a duster or vacuum cleaner.
Electrical connections
Any electrical work required to install this appliance should be carried out by a qualified electrician or competent person.
WARNING: THIS APPLIANCE MUST BE EARTHED.
The manufacturer declines any liability should this safety measure not be observed.
If the plug that is fitted to your appliance is not suitable for your socket outlet, it must be cut off and the appropriate plug fitted.
Remove the fuse from the cut off plug.
The cut off plug should then be disposed of to prevent the hazard of shocks in case it should be plugged into a 13amp socket in another part of your home.
⚠️ Important
The wires in the mains lead are coloured in accordance with the following code:
Green and Yellow - Earth Blue - Neutral
Brown - Live
If you fit your own plug, the colours of the wires in the mains lead of your appliance may not correspond with the markings identifying the terminals in your plug, proceed as follows:
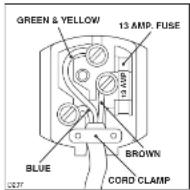
Connect the Green and Yellow (earth) wire to the terminal in the plug which is marked with the letter «E» or the earth symbol or coloured green and yellow.
Connect the blue (neutral) wire to the terminal in the plug which is marked with the letter «N» or coloured black.
Connect the brown (live) wire to the terminal in the plug which is marked with the letter «L» or coloured red.
The plug moulded onto the lead incorporates a fuse. For replacement, use a 13amp BSI362 fuse. Only ASTA or BSI approved fuses should be used.
The plug must not be used if the fuse cover/carrier is lost. The cover/carrier is indicated by the coloured insert at the base of the plug.
A replacement cover/carrier must be obtained from your local Tricity Bendix Service Force Centre.
This appliance complies with the E.E.C. Directive No. 87/308 of 2.6.87 relative to radio interference suppression.
CE This appliance complies with the following E.E.C. Directives:
- 73/23 EEC of 19.2.73 (Low Voltage Directive) and subsequent modifications;
- 89/336 EEC of 3.5.89 (Electromagnetic Compatibility Directive) and subsequent modifications.
Please ensure that when the appliance is installed it is easily accessible for the engineer in the event of a breakdown.
INSTALLATION

Warning
IF YOU ARE DISCARDING AN OLD APPLIANCE THAT HAS A LOCK OR CATCH ON THE DOOR YOU MUST ENSURE THAT IT IS MADE UNUSABLE TO PREVENT YOUNG CHILDREN BEING TRAPPED INSIDE.
Depending upon the position which you choose for your appliance, you may wish to reverse the way in which the door opens. To do this, refer to instructions on "Door reversal directions" paragraph.
Positioning
This appliance is designed to operate in ambient temperatures between 10°C (50°F) and 32°C (90°F). It should be located in a dry atmosphere, out of direct sunlight and away from extreme temperature e.g. not next to a boiler or radiator, or in a very cold room e.g. an outhouse, where the temperatures may fall below 10°C (50°F). If these temperatures are exceeded i.e. colder or warmer, then the appliance may not operate correctly.
You should also ensure that air can circulate freely around the back and the top of the cabinet. There must also be at least 100 mm (4") distance between the top of the cabinet and any overhanging kitchen furniture (A). Ideally, the appliance should not be positioned beneath overhanging furniture (B).
There should also be a gap of 25 mm either side of the appliance. Do not obstruct the space underneath.
Rear spacers
The plastic bag containing all relevant documentation also contains two spacers to be filled into special holes in the back of the appliance.
Fit the spacers into the holes, taking care to ensure that the arrow (A) is positioned as shown in the diagram. Then turn them through 45^ (arrow (A) vertical) until they lock into place.
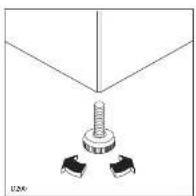
DO NOT install in places with restricted ventilation. Adjust the level of the appliance by screwing out the adjustable foot, or feet, at the bottom of the cabinet using your fingers.
Important
It must be possible to disconnect the appliance from the mains power supply; the plug must therefore be easily accessible after installation.


MAINTENANCE AND CLEANING
Before any maintenance or cleaning work is carried out, DISCONNECT the appliance from the ELECTRICITY supply.
Internal cleaning
Clean the inside and accessories with warm water and bicarbonate of soda (5ml to 0.5 litre of water). Rinse and dry thoroughly.

NEVER USE DETERGENTS, ABRASIVE EERS, HIGHLY PERFUMED CLEANING UCTS OR WAX POLISHES. TO CLEAN THE HOR AS THESE WILL DAMAGE THE ACE AND LEAVE A STRONG ODOUR.
External cleaning
Wash the outer cabinet with warm soapy water. Do NOT use abrasive products.
An accumulation of dust will affect the performance of the appliance and cause excessive electricity consumption.
Changing the light bulb
Unscrew the light cover and then pull it outward toward the middle of the cabinet. Unscrew the bulb and replace it with a new 15 watt bulb (available from your nearest Service Force Centre).
Replace the light cover by sliding it into its original position and replacing the screw.
Defrosting
The refrigerator automatically defrosts every time the compressor stops. The water is discharged, via the pipe, into a tray located at the back of the appliance above the compressor, where it evaporates.

Important
To avoid defrost water overflowing into the fridge, periodically clean the water discharge hole in the centre of the V shaped drip collector at the back of the refrigerator compartment behind the salad crispers. Use the defrost cleaner provided which you will find already inserted into the discharge hole.
Remember to wash the defrost cleaner in hot soapy water at regular intervals. Dry thoroughly before replacing.
Once or twice a year dust the condenser (black grill) and the compressor at the back of the appliance, with a brush or vacuum cleaner. see figure.

When the appliance is not in use
When the appliance is not in use for long periods, disconnect from the electricity supply, empty all foods and clean the appliance, leaving the doors ajar to prevent unpleasant smells.


SOMETHING NOT WORKING
If the appliance is not working correctly, please carry out the following checks before contacting your local Service Force Centre
| Symptom | Solution |
| No power to the appliance | Check there is power at the socket. |
| Check there is not a power cut by checking the household lights. | |
| Check the fuse has not blown. | |
| The light does not come on | Ensure that the bulb is correctly fitted. |
| Replace the bulb if it has blown. | |
| Check the door light switch is not jammed. | |
| The temperature in the fridge | Check the thermostat control knob in the fridge is turned to the correct setting relative to ambient conditions. |
| Check the ambient temperature is within the appliance's operating limits of 10^ to 32^ . Relocate the appliance if necessary. | |
| The compressor runs continuously | Adjust the thermostat control knob to give correct temperature control. See “Setting the temperature”. |
| Check that the door is closed. | |
| Check that air ventilation is not obstructed. | |
| Large quantities of food have recently been placed in the cabinet and/or door is frequently opened. | |
| Noise | Refer to normal operating sounds. |
| Water under the salad crispers | Check the drain hole is not blocked. (see Maintenance and Cleaning). |
If, after the above checks, there is still a fault, call your local Service Force Centre.
In-guarantee customers should ensure that the above checks have been made as the engineer will make a charge if the fault is not a mechanical or electrical breakdown.
Please note that proof of purchase is required for any in-guarantee service calls.
TECHNICAL SPECIFICATIONS
DIMENSIONS
Height 124 cm
Width 55 cm
Depth 60 cm
POWER SUPPLY VOLTAGE AND FREQUENCY 220-240 V / 50 Hz
TOTAL POWER ABSORBED 110 W
AVERAGE DAILY UNITS ELECTRICITY * 0.55 kWh
GROSS CAPACITY 2351
NET CAPACITY 230
* This figure is based on standard test results in accordance with European Standard EN 153. Actual consumption will depend on how the appliance is used and where it is located.
GUARANTEE CONDITIONS
Standard guarantee conditions
We, Tricity Bendix, undertake that if within 12 months of the date of the purchase this Tricity Bendix appliance or any part thereof is proved to be defective by reason only of faulty workmanship or materials, we will, at our option repair or replace the same FREE OF CHARGE for labour, materials or carriage on condition that:
The appliance has been correctly installed and used only on the electricity supply stated on the rating plate.
The appliance has been used for normal domestic purposes only, and in accordance with the manufacturer's instructions.
The appliance has not been serviced, maintained, repaired, taken apart or tampered with by any person not authorised by us.
All service work under this guarantee must be undertaken by a Tricity Bendix Service Force Centre. Any appliance or defective part replaced shall become the Company's property.
This guarantee is in addition to your statutory and other legal rights.
Home visits are made between 8.30am and 5.30pm Monday to Friday. Visits may be available outside these hours in which case a premium will be charged.
Exclusions
This guarantee does not cover:
Damage or calls resulting from transportation, improper use or neglect, the replacement of any light bulbs or removable parts of glass or plastic.
Costs Incurred for calls to put right an appliance which is improperly installed or calls to appliances outside the European Community (EC) or European Free Trade Area.
Appliances found to be in use within a commercial environment, plus those which are subject to rental agreements.
Products of Tricity Bendix manufacture which are not marketed by Tricity Bendix.
European Guarantee
If you should move to another country within Europe then your guarantee moves with you to your new home subject to the following qualifications:
The guarantee starts from the date you first purchased your product.
The guarantee is for the same period and to the same extent for labour and parts as exists in the new country of use for this brand or range of products.
This guarantee relates to you and cannot be transferred to another user.
Your new home is within the European Community (EC) or European Free Trade Area.
The product is installed and used in accordance with our instructions and is only used domestically. i.e. a normal household.
The product is installed taking into account regulations in your new country.
Before you move please contact your nearest Customer Care centre, listed below, to give them details of your new home. They will then ensure that the local Service Organisation is aware of your move and able to look after you and your appliances.
France Senlis +33 (0)3 44 62 28 28
Germany Nürnberg +49 (0)911 323 2600
Italy Pordenone +39 (0)1678 47053
Sweden Stockholm +46 (0)20 78 77 50
UK Slough +44 (0)1735 219898
SERVICE AND SPARE PARTS
In the event of your appliance requiring service, or if you wish to purchase spare parts, please contact your local Tricity Bendix Service Force Centre by telephoning:-
0870 5 929929
Your telephone call will be automatically routed to the Service Force Centre covering your post code area. For further details please see the accompanying Customer Care Booklet.
Before calling out an engineer, please ensure you have read the details under the heading 'Something Not Working?
When you contact the Service Force Centre you will need to give the following details:
-
Your name, address and post code
-
Your telephone number
-
Clear and concise details of the fault
-
The model and serial number of the appliance (found on the rating plate)
-
The purchase date
CUSTOMER CARE DEPARTMENT
For general enquiries concerning your Tricity Bendix appliance or for further information on Tricity Bendix products, please contact our Customer Care Department by letter or telephone as follows:-
Customer Care Department
Tricity Bendix
55-77 High Street
Slough
Berkshire
SLI IDZ
08705 950 950
* calls to this number may be recorded for training purposes.
SERVICEFORCE
To contact your local Service Force Centre telephone 08705 929 929
| CHANNEL ISLANDS | ISLE OF LEANS | ND March 16 James StreetStomowayIsle of Lewis PA87 20W | NORTH EAST | |
| GUERNESY | Guernsey ElectricityPO Box 4Volo, GreenwayChannel Islands GY1 3AD | GATESHEAD Unit 35thDutresway CourtDutreswayDutreshead NE11 00H | ||
| JERSEY | Jersey Electricity CompanyHad Do S someRua Do Muat De LomreTrinityJerseyChannel Islands JE3 1PG | KELSO | 2.5 & 5 WoodmarketKelsoStowersTDS TAK | ORNEEY Unit 12 Easton AvenueStenneyN. E. Lucas2K32 SAS |
| ORNEY | 7 King StreetKirkwallOrneyKMSI UF | FULL JHT 1Boulevard Industrial EstateFull HLD 5AY | ||
| SCOTLAND | PERTH | Scottish Hydro ElectricCentral WarehouseInterslamentPath. PH1 3AF | LEEOS $4.65 Cross Gate RoadDress GatesLeeds | |
| AIR REFAL | 54 Centromont StreetAmdondry, NRD USA | KOWN SALES | 1-4 Carlton PlaceLamnickShetlandZE1 0PW | NEONAT OYCUFFE Unit 23Northfield WayApostle Industrial ParkMordie AysilifeOLS 6CJ |
| AUDITIMNICITY | 26 BurminderAuchemudryFile K714 7AJ | SHETLAND | delta Shetland26 North RoadLamickShetland ZE1 0PE | |
| BLANTYRE | Unit 5Block 2Auchemuth Ind. EstateRounddale WayBlantyre G72 0NJ | KOWN SALES | Level ElectricalHerndaleSymbolter, WhiskeyShetland ZE1 0AA | |
| BLUEFEE | 93 Irish StreetBuffay 65DG1 2FG | WHIPSLAY | NORTHERN IRELAND | |
| DLNOON | 7 Hill StreetSunconAmyolPA21 7AJ | KOWN SALES | Overnight HouseKhane Business ParkDonnburyRoadfordBT1T 010 | NORTH WESTBIRKENHARD 1 Kelvin ParkDock RoadBirkenwoodCH11 TL |
| EDIMBURGH | Unit 12Durinayden Ind. Estate2 Durinayden RoadEdinburghEH14 2AB | NORTHERN IRELAND | CARLSLE Unit 7James Street WorkhouseJames StreetCarlsleyCumbria CA2 5AH | |
| CLASSDAY | Unit 4Wellington RoadBismoripgaGlasgow 064 2SA | BELFAST | WALESUnit 4Guardian Industrial EstateClydenmuk RoadCarditCF2 20S | |
| OVERNESS | Unit 3DJSmithton Ind. EstateSmithtonAmpresse, NV 27 WL | ISLE OF MAN South Gray Ind. EstateDouglasMin of ManNI SAT | ||
| ISLE OF ARRAN | Arnie DoreosalesThe Douglas CentreBrookeIsle of Arion KA27 5AJ | CLYAND | Unit 5-7 Crowd ParkAlongela RoadRhoddonChydanLL10 5UG | BOLTON Unit 8Central Industrial EstateSI Marks StreetBoltonBL 3SNR |
| ISLE OF BARRA | 2 Kentah241 BrunswickIsle of Carrawoodam Islands HS3 52Y | DYFFED | Unit 9St. Clews Business ParkTedby RoadSt. ClewsCambridgeSA33 4W | PRESTON Unit 250Elmason PlaceBarnier BridgePrameleLancashire PRS 6AL |
| BLES OF BUTIE | Walker EngineeringClemingerUpper Serpentine RoadRoithawayIsle of Bola PA20 8DH | STOCKPORT Unit 22 High ParkHigh AvenueStoughtportSR4 4CR | ||
| OSHETRY | Plan Brighton WarehouseModerton RoadOwesleySY11 2PP | |||
SERVICEFORCE
To contact your local Service Centre telephone 08705 929 929
| MIDLANDS | LONDON & EAST ANGLIA | SOUTH EAST | |||
| BRANCHAM | 09 3rd Road EastWorley Trading EstateWittonBirminghamRJ1 DB | BECKENHAM | 11a Cemner Ind. EstateKent Power LaneBeckinghamKent SR2 1Q2 | ASFCHU | Unit 2Bridge Road Business CentreBridge RoadAkshiraKent TH23 1BB |
| BOURNE | Portfield RoadRouinsPE 10 8HT | CHELKEFORD | Hunbury RoadWatford Ind. EstateCheminfordEssexCM12 3AE | FLEET | Unit 1Redford's Ind. EstateChurch CreekshamPilotHannipshire GU13 9HU |
| BRONDORTK | 64 St. Mary's StreetBridgriathShinoshoreWV45 4DR | COLONALE | Unit 1xCapitol RoadCapitol WayColonaleLondon NWS 5EQ | HYWARDSHEAT* | 21-23 Bridge RoadPlaymans HeathBossex RH12 1UA |
| GLOUCESTER | 101 Rycoft StreetWhaslanderSL1 4NB | RTHAM | 19th Court RoadModrighamEthamLondon SE1 4EW | TOWRIDGE | Unit 10Raccon Trading EstateMowley RoadTonbridgeTN8 1RA |
| HERFORD | Unit 2 & 4Bank BuildingsCattle marketHarvardNBA 5PH | EMFIELD | 264 Alma RoadEnfieldLondonEN7 7BD | ||
| HENRI FERRERS | 10 High StreetHigham ForestNorthansNH10 SPL | GRAVESEND | Unit B4Imperial Business EstateAvec DBGravorendKoolSDAH11 1OL | SOUTH WEST | |
| LEDESTOW | Unit 2Furnace RoadElection DE7 SEP | IPSWICH | Unit 6CEllon Park Business CentreHadleigh RoadIpsdenJP2 1DD | BARNETAPLE | Main RoadFrengstonBarnetapleEast Dairy EAST 2NT |
| LEEOSTER | Unit 7Gaks Industrial EstateGoverning RoadNatlonoughLeCostrishtinoLES 5GP | LEITCHWORTH | 16-17 Woodlands Inc. ParkWorke RoadLettworthHopfSG4 1LA | BOURNEMOUTH | 63-65 Curzon RoadBournemouthDurextBH1 4PW |
| LINCOLN | Unit 3Cilton StreetStone Field ParkLincolnLINK 8LO | LONDON | 2 - 4 Royal LaneYersheyWest EingtonMidwayeWeb 8DL | RADDEEVWATER | 6 Harawall Business ParkSolomon ParadeEnuguaterSomswell T&E SPV |
| KIONCASTLECOGEN LYSIE | 18-21 Critt RoadBrampion Ind. EstateNewcastle under LymeStrathmoretheS15 3TW | MALDEHEAD | Reform RoadMalvern HeadBerkshireSL6 8BY | 11 Ellos WayEldenhall Trading EstateBristolB34 3QQ | |
| KLSOOTCH | 13 Thornhill RoadNorth Rooms RoadResditchGroentenshireS90 9ND | MOLESEY | 10 Islano Farm AvenueWest MolsleySurreyK19 2HZ | EMSWORTH | 266 Main RoadSouthorneErmsworthPD19 8JL |
| TANNORTH | Unit 1Starling ParkCitytownTamworthS77 3DG | NEWBURY | 3 Pipens CourtBedshire DriveThatchamBerlicshireRS19 3ER | ISLE OF WORTH | Unit 8Enterprise CourtRedy Business ParkRydaNee of West PCC1 12B |
| YUMICESTER | Unit 1 & 2North towns ChileGregory Mill Ind. EstateWerchesterWR3 1BP | NORwich | 2b Tufallape StreetNorwichNR1 3HN | NEWTOK ABBIT | Unit 2Zazeky Ind. EstateKingpighitonNewton AlbottTD12 1TD |
| SUNBUCK | Unit 1aThe SammRHasouth RoadSombury on ThamesTW16 3DR | REDRUTH | Unit TOPool Ind. EstateDivside RoadReinuthCornwall TR15 2RR | ||
- TB 80 L
- IMPORTANT SAFETY INFORMATION
- Installation
- Child Safety
- General Safety
- During Use
- Maintenance and Cleaning
- Servicing
- At the end of the Appliance Life
- CONTENTS
- Instructions for the User
- Instructions for the Installer
- DESCRIPTION OF THE APPLIANCE
- Door reversal
- Attention
- OPERATION
- Before using
- Setting the temperature
- Important
- Fresh food refrigeration
- Normal Operating Sounds
- Positioning the door shelves
- Positioning the inner shelves
- i HINTS AND TIPS
- Food Storage
- Energy Saving Advice
- Electrical connections
- WARNING: THIS APPLIANCE MUST BE EARTHED.
- ⚠️ Important
- Warning
- Positioning
- Rear spacers
- Internal cleaning
- External cleaning
- Changing the light bulb
- Defrosting
- When the appliance is not in use
- SOMETHING NOT WORKING
- TECHNICAL SPECIFICATIONS
- GUARANTEE CONDITIONS
- Standard guarantee conditions
- Exclusions
- This guarantee does not cover:
- European Guarantee
- SERVICE AND SPARE PARTS
- 5 929929
- CUSTOMER CARE DEPARTMENT
- SERVICEFORCE
Brand : Tricity Bendix
Model : TB80L
Category : Refrigerator