
Marbella Junior - Tent RACLET - Free user manual and instructions
Find the device manual for free Marbella Junior RACLET in PDF.


| Product Type | Tent |
| Model | Marbella Junior |
| Brand | Raclet |
| Capacity | 2-3 persons |
| Floor Dimensions | 200 x 200 cm |
| Height | 130 cm |
| Weight | 5 kg |
| Poles | Fiberglass |
| Flysheet | Polyester, waterproof coating |
| Floor Material | Polyethylene, welded seams |
| Waterproof Rating | 2000 mm |
| Ventilation | Mesh panels with zippered cover |
| Seasons | 3-season (spring, summer, fall) |
| Setup Time | Approximately 10 minutes |
| Package Includes | Tent body, flysheet, poles, stakes, guy lines, carry bag |
| Care Instructions | Hand wash with mild soap, air dry, store in dry place |
| Safety Features | Reflective guy lines, fire retardant fabric |
| Spare Parts Available | Replacement poles, stakes, and flysheet available from manufacturer |
| Repairability | Repair patches included for minor tears |
Frequently Asked Questions - Marbella Junior RACLET
User questions about Marbella Junior RACLET
0 question about this device. Answer the ones you know or ask your own.
Ask a new question about this device
Download the instructions for your Tent in PDF format for free! Find your manual Marbella Junior - RACLET and take your electronic device back in hand. On this page are published all the documents necessary for the use of your device. Marbella Junior by RACLET.
USER MANUAL Marbella Junior RACLET
REF.
RACLET Haut-Éclair 72600 MAMERS (FRANCE)
Tél.: 02 43 31 12 30 - Télex: 720 493 F - Fax: 02 43 31 12 31
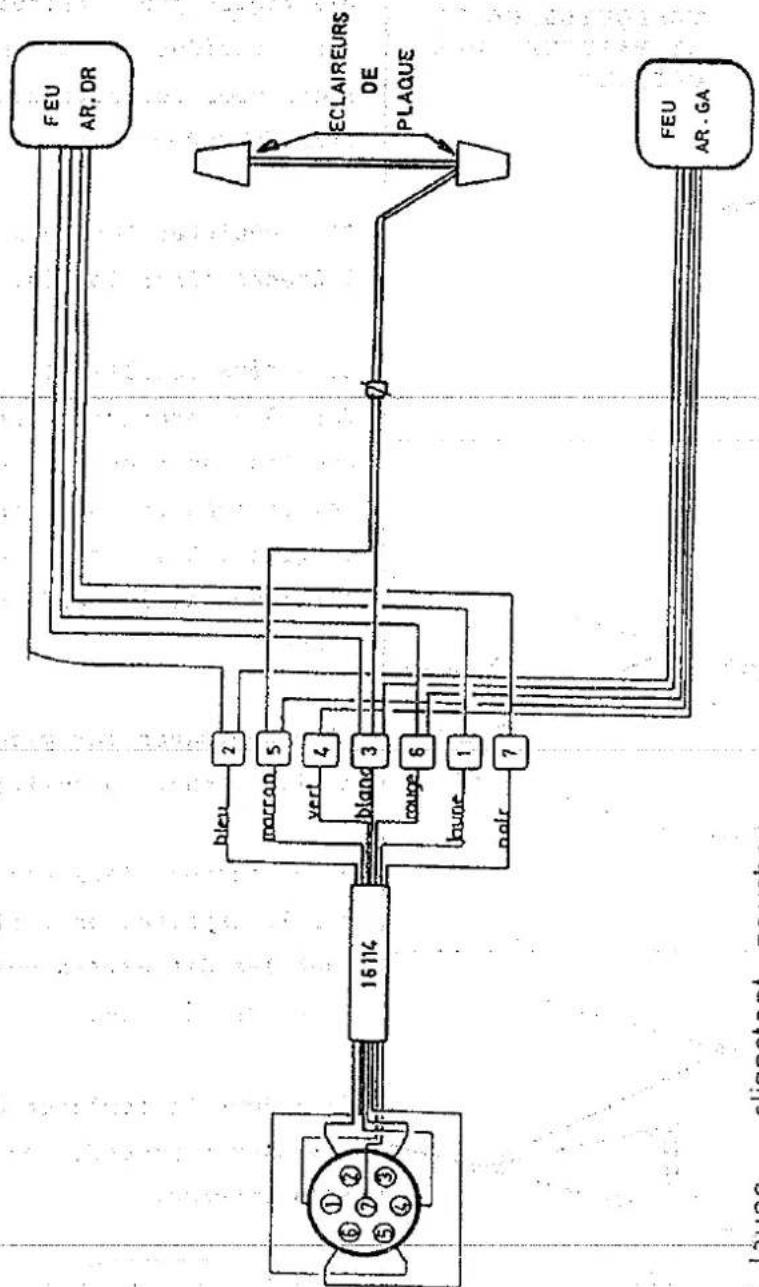
flowchart
graph TD
    A["16114 Pin"] --> B["16114"]
    B --> C["bleu 2"]
    B --> D["marran 5"]
    B --> E["vert 4"]
    B --> F["plane 3"]
    B --> G["marge 6"]
    B --> H["jaune 1"]
    B --> I["polar 7"]
    C --> J["ECLAIREURS DE PLAQUE"]
    D --> J
    E --> J
    F --> J
    G --> J
    H --> J
    I --> J
    J --> K["FEU AR. GA"]
clignotant gauche
feu de brouillard
masse
clignotant droit
natural_image
Abstract line drawing of a mechanical or structural assembly with multiple arms and arrows, no text or symbols present.2

natural_image
Simple line drawing of a rectangular frame with directional arrows indicating rotation or movement (no text or symbols)ATTENTION :
VERROUILLAGE DE LA FAITIERE PAR CLIQUET.
3

4
ATTENTION :
AU REPLIAGE DEVERROUILLAGE DE LA FAITIERE CENTRALE PAR CLIQUET.

You have just become the owner of a RACLET trailer tent.
This model has been strictly controlled at every stage of manufacturing.
In order to ensure you full satisfaction and many pleasant moments of relaxation, we advise you to read carefully the following instructions.
BEFORE TAKING THE ROAD
CHECK
- Tyre pressure (correct pressure is indicated on the trailer body.
- That wheel mounting nuts are tight (the tightening torque shall be verified after 25 to 40 km, after 100 km and then periodically).
- That all lighting and signalling equipment functions properly.
- Loading (the maximum authorized weight under load must
not be exceeded). See that load is properly distributed (a bearing pressure of approximately 20 kg on auto coupling gear). - That caravan coupling head is firmly secured to the coupling sphere of your auto.
ON THE HIGHWAY
- MAINTAIN a sufficient DISTANCE from the vehicle in front of you.
- When OVERTAKING do not forget when pulling back into your lane that the length of your vehicle is increased by that of the caravan.
And HAVE A GOOD TRIP!
TO ERECT
1 - Detach and bring trailer into position.
2 - Using the crank, lower stabilizer legs making sure that trailer is horizontal. If ground is soft place extra pads under the stabilizer shoes.
3. - Remove cover; spread underneath one of the platforms (it will provide a means of waterproof storage).
4 - Open out the sleeping platforms.

Automatic Fold-out
First swing out the left platform, then the right. Both platforms are supported by adjustable telescopic bars to ensure a horizontal sleeping surfaces. The canvas is firmly attached to the two platforms and opens out with its framework.
5 - Enter the center part of the caravan and force the roof bar upwards; it will automatically lock into position. The sliding parts (black spherical heads) provide a rapid means of adjustment.
6 - Close door in tenting and stake latter to ground.
The bedding is ready for an overnight stop!
TO ERECT AWNING
• “AUTOMATIC” ALUMINIUM AWNING FRAME
- Unfold the framework according to the notes on the reverse of the plan.
- Position the sliding metal pieces along the ridge poles, over the folding joints. (Adjust the uprights (legs) to their minimum position).
- Take the awning canvas out of the bag and lay it on the ground. Position the main zips towards the trailer cabin. Slide the awning canvas over the frame. Connect the awning zips to the trailer cabin zips. (To assist you, attach the centre awning frame hook into the cabin frame). Raise the uprights (legs) to a higher position.
- Use the tie-tapes to fasten the canvas to the frame. Adjust the tension using the ridge pole adjustments. (Ensure the framework is centrally positioned with respect to the roof canvas reinforcing). Finally adjust the uprights to achieve a suitable « set » of the canvas.
• STEEL AWNING FRAME
- Lay out the different framework elements on the ground (see diagram attached).
- Remove canvas from bag, spread out on ground with junction slide enclosures facing caravan. Attach awning ridge elements to main caravan ridge bar. Tie cloth retainers and adjust the tension of the tenting by means of sliding framework elements. Adjust the height of the feet.
• Completely close awning and stake tending to ground.
IMPORTANT: A protective flap is provided to shelter the zippers; make sure it is correctly positioned.
- If your caravan is equipped with a ceiling lining, attach it starting from the center and stake side drops to the ground.
HAVE A PLEASANT STAY!
TO DISMANTLE
- The caravan canvas must never be detached from the platforms or the framework elements.
1 - Dismount awning either fold it back over the roof of the trailer or detach and place inside.
2 - Unlock the two sliding elements of the framework.
3.- Swing the right platform onto the summit of the trailer body, and then the left.
4 - Close the door and install the cover.
5 - Raise stabilizer legs.
If the canvas was wet when folded it must be aired and dried as soon as possible (within 24 hours at least).
MAINTENANCE
CHANGING A WHEEL
- Lower the two stabilizer legs opposite the wheel to be changed.
- Loosen wheel mounting bolts.
- Lift the trailer by means of your car jack by placing it underneath the axle or chassis longeron.
CAUTION : NEVER PLACE JACK UNDERNEATH FLOORING.
- Before removing wheel lower the other two stabilizer legs.
- Change wheel, replace and tighten bolts; check tightness after several kilometers.
TRAITER BODY
- In sheetsteel zinc-plated by electrolysis and coated with polyester. It should receive the same care as your car body.
CANVAS
- Must not remain folded while wet more than 24 hours.
• RACLET cotton cloth is treated against mildew. Never use detergents or solvents. - Never allow the canvas to come in contact with insecticide spray.
STORAGE
• RACLET trailer tents take up little space.
- If your trailer must be stored in the open, it is advisable that all canvas be removed.
Brand : RACLET
Model : Marbella Junior
Category : Tent