
S-RS55TB - Loudspeaker PIONEER - Free user manual and instructions
Find the device manual for free S-RS55TB PIONEER in PDF.


| Product Type | Bookshelf Speaker |
| Brand | Pioneer |
| Model | S-RS55TB |
| Speaker Configuration | 2-way Bass-reflex |
| Woofer Size | 5.25 inches (13 cm) |
| Tweeter Size | 1 inch (2.5 cm) Soft Dome |
| Impedance | 6 ohms |
| Frequency Response | 45 Hz - 20 kHz |
| Sensitivity | 87 dB |
| Recommended Amplifier Power | 20 - 100 Watts |
| Dimensions (H x W x D) | 350 x 200 x 300 mm (13.8 x 7.9 x 11.8 in) |
| Weight | 6.0 kg (13.2 lbs) per speaker |
| Enclosure Material | MDF with wood veneer finish |
| Magnetic Shielding | Yes |
| Input Terminals | Gold-plated binding posts |
| Grille | Removable cloth grille |
| Power Handling (RMS) | 50 Watts |
| Power Handling (Peak) | 120 Watts |
| Cabinet Finish | Black Ash or Cherry |
| Warranty | 2 years limited |
| Safety Features | Stable base, non-slip feet |
| Cleaning Instructions | Wipe with dry cloth; avoid solvents |
| Spare Parts Availability | Through authorized service centers |
| Repairability Score | 7/10 (replaceable drivers) |
Frequently Asked Questions - S-RS55TB PIONEER
User questions about S-RS55TB PIONEER
0 question about this device. Answer the ones you know or ask your own.
Ask a new question about this device
Download the instructions for your Loudspeaker in PDF format for free! Find your manual S-RS55TB - PIONEER and take your electronic device back in hand. On this page are published all the documents necessary for the use of your device. S-RS55TB by PIONEER.
USER MANUAL S-RS55TB PIONEER
Thank you for buying this Pioneer product.
Please read through these operating instructions before using your speaker system to optimize performance.
WHAT'S IN THE BOX

natural_image
Line drawing of two identical 3D speakers with circular speaker holes (no text or symbols)


natural_image
Four bundles of coiled wires, no text or symbols visible- Front speakers (2)
- Surround speakers (2)
- Center speaker (1)
- Speaker cables Center speaker (1) (2 m, Tie color: Red) Front speakers (2) (3 m, Tie color: Black) Surround speakers (2) (10 m, Tie color: Blue)
- Non-skid pads (1) (20 pcs)
- Operating Instructions (This manual)
BEFORE USE
• These speakers have a rated impedance of 8 Ω. Use an amplifier that supports speakers with an impedance of 8 Ω.
- In order to prevent damage to the speaker system resulting from input overload, please observe the following precautions:
- Do not input above the permissible input.
- When connecting this unit and other AV devices to an amplifier, turn the amplifier off first.
- When amplifying the treble with a graphic equalizer, do not increase the volume too much.
- Do not output loud volumes through a low output amplifier. (The harmonic distortion of the amplifier will increase, and there is a possibility of damage to the speakers.)
Operating Instructions Speaker System
- Do not use the speaker to output distorted sound for long periods of time. This can result in a fire hazard.
- Do not install these units near a stove or other heating appliance, or put them in a place exposed to the sun. Such locations may cause the cabinet to change color and the speaker system to break down.
- Do not attach the front and center speakers to the wall or ceiling. It may fall off and cause injury.
- These speakers are not equipped with magnetic shielding. Do not put items easily affected by magnetism (cards with magnetic tape, etc.) near this unit.
- Some color irregularity or distortion may occur on a cathode ray tube television (CRT television) if you use one near this unit. Separate these speakers further from the television if this occurs.
PLACEMENT AND FINE TUNING STANDARD SURROUND SETUP
This is a standard multichannel surround sound speaker setup for optimal 5.1 channel home theater sound.
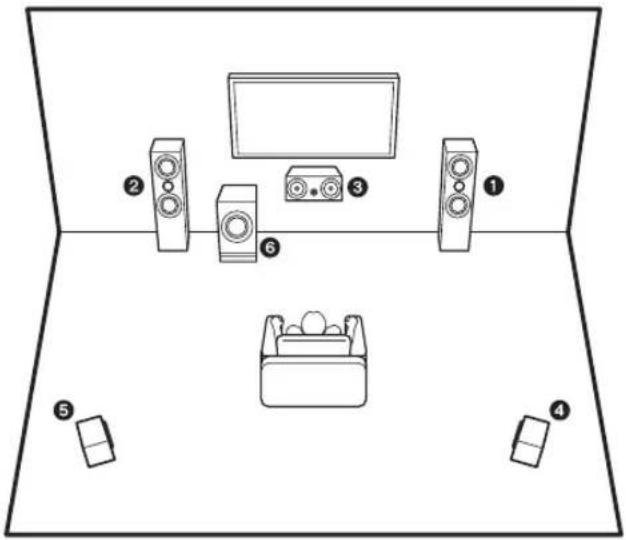
1, 2. Front Speakers
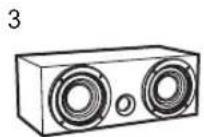
3. Center Speaker
4, 5. Surround Speakers
6. Subwoofer
Front Speakers
For best results the speakers should be separated a distance approximately equal to the listening distance. Angling the speakers inward towards the listener will improve the image stability for non-central listeners. Close proximity to a side or rear wall will enhance the midbass performance, although too close (particularly a corner location) and the bass may be unnaturally high and image performance may be degraded.
Center Speaker
The speaker should be positioned below the TV. For best results align the front of the speaker with the front of the TV. If the speaker is placed under the TV and very close to the floor, then tilting upwards may be beneficial.
Do not place the center speaker on top of TV, the speaker may fall from the TV due to external shocks such as earthquakes, endangering those nearby or damaging the speaker.
Surround Speakers
For best results the speakers should be positioned at or above ear level. Depending upon your room layout and preferences, the left and right rear speakers should be positioned on the side walls just the rear of the listening position, or on the walls.
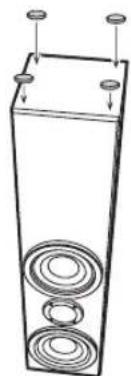
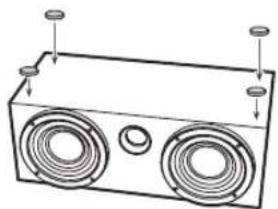
NON-SKID PADS
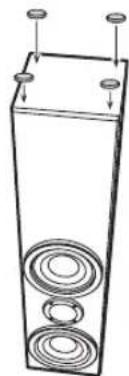
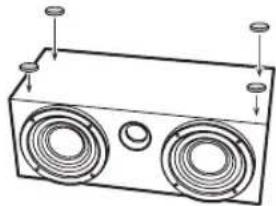
Use the supplied non-skip pads as necessary according to the location chosen for installation. Stick the non-skid pads on the four corners of the surface of the speaker on which it will be installed. There will be locations, however, where there will be little benefit from using the non-skid pads, so avoid putting in slippery places. Put the units on a soft cloth when performing this task.

1. Front Speakers
2. Surround Speakers
3. Center Speaker
MAKING AMPLIFIER SETTINGS
Before connecting the speakers, please read the operating instructions supplied with your amplifier to select the speaker setting of amplifier:
- Front speakers: Large
• Center / surround speakers: Small
CONNECTING YOUR SYSTEM
- Make sure all equipment is turned off before making any connections.
- You will not get the proper surround effects from the speakers if you connect the poles (+ and −) incorrectly.
• These speaker terminals carry HAZARDOUS LIVE voltage. To prevent the risk of electric shock when connecting or disconnecting the speaker cables, disconnect the power cord before touching any uninsulated parts.
Connect to the speaker terminals on the rear of the speakers
Connect the speaker cables to the speaker terminals on the rear of the speakers. The poles of the input terminals are red for positive (+) and black for negative (−). Match the colors of the speaker terminals and speaker cables when connecting.
Front speakers:
After loosening the speaker terminals, push the wires into the terminals, then tighten firmly.

Center and surround speakers:
While pushing the tabs of the speaker terminals, push the wires into the terminals.

Connect to the speaker terminals on the rear of the amplifier
Connect the speaker cables to the speaker output terminals on the rear of the amplifier. (For details, refer to the amplifier's instruction manual.)
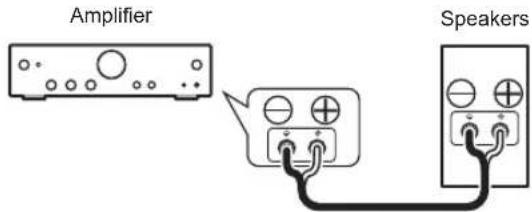
• After connecting the cord to the terminal, pull the cord gently to make sure the end of the cord is firmly connected to the terminal. Incomplete connection may result in the sound jumping or noise being output.
- To prevent damage to the circuits, ensure that the + and - wires of the speaker cables and the left and right wires do not touch each other. Also take care that the bare wires do not touch the rear panel of the amplifier.

natural_image
Symbolic illustration of two bolts tied on a branch with directional arrows, enclosed in a circular border (no text or labels)- The mounting screws are not supplied. Use screws that suit the wall material and that can sufficiently support the weight of the speakers.
- When you intend to attach to the wall, first ensure that the wall is strong enough to sufficiently support the weight of the speakers.
• After attaching, check that the fitting is secure. Continue to check that the fitting is secure at regular intervals thereafter. - If you are unsure of the quality and strength of the walls, consult a professional for advice.
- We are not responsible for any accidents or damage that result from improper installation.
SECURING THE FRONT SPEAKERS
Pass a commercially-available reinforced string through the plastic catch to securely support the speaker to the wall. Also ensure that the wall you are fixing the speaker to is strong enough to sufficiently support the weight of the speaker.
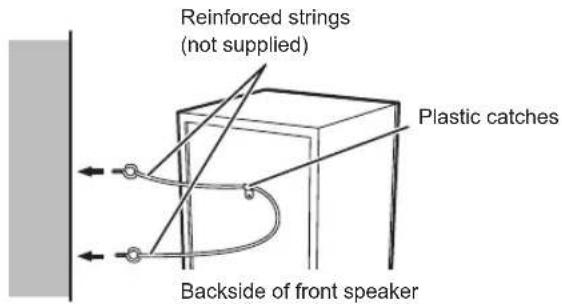
- Do not attach the plastic catches directly to the wall.
• After attaching, check that the fitting is secure. Continue to check that the fitting is secure at regular intervals thereafter. - If you are unsure of the quality and strength of the walls, consult a professional for advice.
• We are not responsible for any accidents or damage that result from improper installation.
CABINET MAINTENANCE
Use a polishing cloth or dry cloth to wipe off dust and dirt. When the cabinet is very dirty, clean with a soft cloth dipped in some neutral cleanser diluted five or six times with water, and then wipe again with a dry cloth. Do not use furniture wax or cleaners. Never use thinners, benzine, insecticide sprays and other chemicals on or near the cabinets, since these will corrode the surfaces.
TROUBLESHOOTING
| Symptom Possible cause Remedy | ||
| No sound. | Bad speaker cable or connection.Amplifier is off.Volume control is at zero. | Connect correctly or replace cable.Turn on amplifier.Slowly turn up volume. |
| Sound is distorted. | Extreme signal condition. | Turn down the amplifier's output level (volume, bass control, bass boost) to lower the level. |
Names of the parts
Front speakers

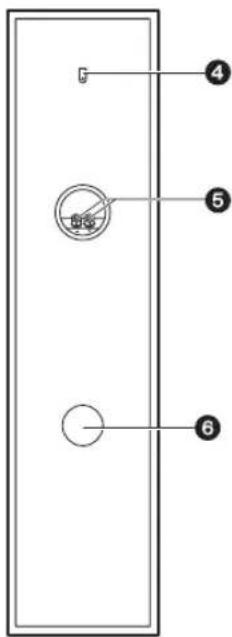
- Cabinet
- Woofer
- Tweeter
- Plastic catches
- Speaker terminals
- Bass ref duct
Surround speakers


- Cabinet
- Speaker
- Bass ref duct
- Wall attachment fitting
- Speaker terminals
Center speaker


- Cabinet
- Speaker
- Bass ref duct
- Speaker terminals
Dimensions diagram
Units: mm
(There may be some small difference between the dimensions shown here and the actual product.)
Front Speakers

Surround Speakers

Center Speaker

Front Side
(Including terminal projections)
Pioneer
2-3-12 Yaesu, Chuo-ku, Tokyo 104-0028 JAPAN
18 PARK WAY, UPPER SADDLE RIVER, NEW JERSEY 07458, U.S.A.
Tel: 1-201-785-2600 Tel: 1-844-679-5350
Tel: +49(0)8142 4208 188 (Product Support)
Anteros Building, Odyssey Business Park, West End Road, South Ruislip,
Middlesex, HA4 6QQ United Kingdom
Tel: +44(0)208 836 3612
SPECIFICATIONS
Front Speakers
Enclosure...... Bass-reflex floorstanding type
Configuration 2-way
Woofer 16 cm cone ×2
Tweeter....5 cm cone ×1
Impedance....8 Ω
Frequency response....25 Hz to 40 kHz
Sensitivity (1 m, 1 W)....88.0 dB
Maximum input power 150 W
Exterior dimensions.....(W) 220 mm × (H) 910 mm × (D) 248 mm
Weight 10.5 kg
Surround Speakers
Enclosure.... Bass-reflex bookshelf type
Configuration 10 cm 1-way
Speakers 10 cm cone ×1
Impedance....8 Ω
Frequency response....50 Hz to 30 kHz
Sensitivity (1 m, 1 W)....82.0 dB
Maximum input power 120 W
Exterior dimensions.....(W) 180 mm × (H) 130 mm × (D) 169 mm
Weight 1.4 kg
Center Speaker
Enclosure.... Bass-reflex bookshelf type
Configuration 10 cm 1-way
Speakers 10 cm cone ×2
Impedance 8 Ω
Frequency response....50 Hz to 25 kHz
Sensitivity (1 m, 1 W)....86.0 dB
Maximum input power 120 W
Exterior dimensions.....(W) 350 mm × (H) 130 mm × (D) 169 mm
Weight 2.5 kg
Specifications and design subject to possible modification without notice due to improvements.
6, Avenue de Marais F - 95816 Argenteuil Cedex FRANCE
Tel: +33(0)969 368 050
Корпорация О энд Пи
1, 2. Altavoces delanteros
- Altavoz central
4, 5. Altavoces surround
- Subwoofer
natural_image
Illustration of hands holding a small object with an arrow indicating rotation (no text or symbols)1
2
3
natural_image
Simple line drawing of a rectangular container with three circular cutouts and two side handles (no text or symbols)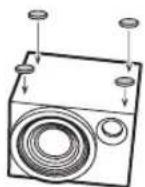
natural_image
Technical line drawing of a rectangular device with two side fans and mounting holes (no text or symbols)- Altavoces delanteros
- Altavoces surround
- Altavoz central
PARA LLEVAR A CABO LOS AJUSTES DEL AMPLIFICADOR
Altavoces central / surround:
natural_image
Symbolic illustration of a rose with directional arrows, enclosed in a circular frame (no text or labels)MONTAJE EN LA PARED DE LOS ALTAVOCES SURROUND

Tel: +49(0)8142 4208 188 (Product Support)
Anteros Building, Odyssey Business Park, West End Road, South Ruislip,
Middlesex, HA4 6QQ United Kingdom
Tel: +44(0)208 836 3612
ESPECIFICACIONES
natural_image
Technical drawing of a vertical panel with three circular components and a dimension label '910' (no text or symbols beyond the number)
natural_image
Simple line drawing of a rectangular frame with no text, numbers, or symbols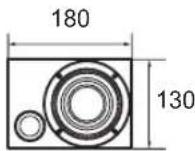
السماعات المحيطة
169

السماعة碾زية

Tel: +49(0)8142 4208 188 (Product Support)
Anteros Building, Odyssey Business Park, West End Road, South Ruislip,
Middlesex, HA4 6QQ United Kingdom
Tel: +44(0)208 836 3612
6, Avenue de Marais F - 95816 Argenteuil Cedex FRANCE
Tel: +33(0)969 368 050
Корпорация О энд Пи
natural_image
Illustration of a hand holding a small object with an arrow indicating rotation (no text or symbols)1
2
3
natural_image
Technical line drawing of a rectangular enclosure with circular cutouts and mounting holes (no text or symbols)
natural_image
Line drawing of a rectangular electronic device with two side fans and mounting holes (no text or symbols)السماعاتolinaية 2.1
.3 السماعة المركزية
natural_image
Line drawing of two identical 3D speakers with circular speaker holes (no text or symbols)4
2

3

5

السماعاتolinaية
- WHAT'S IN THE BOX
- BEFORE USE
- Operating Instructions Speaker System
- PLACEMENT AND FINE TUNING STANDARD SURROUND SETUP
- Front Speakers
- Center Speaker
- Surround Speakers
- NON-SKID PADS
- MAKING AMPLIFIER SETTINGS
- CONNECTING YOUR SYSTEM
- Connect to the speaker terminals on the rear of the speakers
- Front speakers:
- Center and surround speakers:
- Connect to the speaker terminals on the rear of the amplifier
- SECURING THE FRONT SPEAKERS
- CABINET MAINTENANCE
- TROUBLESHOOTING
- Names of the parts
- Dimensions diagram
- Pioneer
- SPECIFICATIONS
- PARA LLEVAR A CABO LOS AJUSTES DEL AMPLIFICADOR
- Altavoces central / surround:
- MONTAJE EN LA PARED DE LOS ALTAVOCES SURROUND
- ESPECIFICACIONES
- السماعاتolinaية
Brand : PIONEER
Model : S-RS55TB
Category : Loudspeaker