
PowerProducer 4 - Photo/Video Software CYBERLINK - Free user manual and instructions
Find the device manual for free PowerProducer 4 CYBERLINK in PDF.


| Product Type | Photo/Video Software |
| Brand | Cyberlink |
| Model | PowerProducer 4 |
| Platform | Windows |
| Main Functions | DVD/Blu-ray authoring, video editing, menu creation, slideshow production |
| Supported Disc Formats | DVD-R, DVD+R, DVD-RW, DVD+RW, BD-R, BD-RE |
| Video Input Formats | AVI, MPEG-2, MPEG-4, MOV, WMV, etc. |
| Audio Input Formats | MP3, WAV, WMA, AAC |
| Image Input Formats | JPEG, BMP, PNG, TIFF |
| Menu Templates | Over 100 customizable templates |
| Burning Engine | CyberLink Power2Go |
| System Requirements | Windows XP/Vista/7; 1 GHz CPU; 512 MB RAM; DirectX 9 |
| License Type | Retail |
| Maintenance | Software updates via official website |
| Safety Instructions | Not applicable for software |
| Spare Parts | Not applicable; repair via reinstallation |
Frequently Asked Questions - PowerProducer 4 CYBERLINK
User questions about PowerProducer 4 CYBERLINK
0 question about this device. Answer the ones you know or ask your own.
Ask a new question about this device
Download the instructions for your Photo/Video Software in PDF format for free! Find your manual PowerProducer 4 - CYBERLINK and take your electronic device back in hand. On this page are published all the documents necessary for the use of your device. PowerProducer 4 by CYBERLINK.
USER MANUAL PowerProducer 4 CYBERLINK
Copyright and Disclaimer
All rights reserved. No part of this publication may be reproduced, stored in a retrieval system, or transmitted in any form or by any means electronic, mechanical, photocopying, recording, or otherwise without the prior written permission of CyberLink Corporation.
To the extent allowed by law, POWERPRODUCER IS PROVIDED "AS IS", WITHOUT WARRANTY OF ANY KIND, EITHER EXPRESS OR IMPLIED, INCLUDING WITHOUT LIMITATION ANY WARRANTY FOR INFORMATION, SERVICES, OR PRODUCTS PROVIDED THROUGH OR IN CONNECTION WITH POWERPRODUCER AND ANY IMPLIED WARRANTIES OF MERCHANTABILITY, FITNESS FOR A PARTICULAR PURPOSE, EXPECTATION OF PRIVACY, OR NON-INFRINGEMENT.
BY USING THIS SOFTWARE, YOU AGREE THAT CYBERLINK WILL NOT BE LIABLE FOR ANY DIRECT, INDIRECT, OR CONSEQUENTIAL LOSS ARISING FROM THE USE OF THIS SOFTWARE OR MATERIALS CONTAINED EITHER IN THIS PACKAGE.
The terms and conditions here under shall be governed and construed in accordance with the laws of Taiwan.
PowerProducer is a registered trademark along with other company and product names mentioned in this publication, used for identification purposes and remain the exclusive property of their respective owners.
International Headquarters
Mailing Address CyberLink Corporation
15F, #100, Minchiuan Road, Shindian City
Taipei 231, Taiwan
Web Site www.cyberlink.com
Telephone 886-2-8667-1298
Fax 886-2-8667-1300
Copyright © 2006 CyberLink Corporation. All rights reserved.
Contents
Introduction...... 1
Welcome 2
Production Flow 3
Pre-Production 3
Disc Production 4
Ready to Burn 4
The PowerProducer Program 5
PowerProducer Projects 6
Upgrade Your Software 7
Production Preferences 8
Project Preferences 8
Video/Audio Preferences 9
Supported Formats 10
System Requirements ....11
Produce a Movie Disc 13
Select a Disc Format ....14
Acquire Content 16
Import Video Files 18
Import Photos ....18
Capture from a DV Camcorder 19
Capture from an HDV Camcorder 21
Capture from a TV 22
Capture from a VCR 23
Capture from a PC Camera 24
Capture from a Digital Camera 25
Adjust a Video Clip's Aspect Ratio 26
Edit Clips 27
AB Cut 27
Merge 28
Split 28
Advanced Editing for Video (Optional) 29
Create a Photo Slide Show 30
Create a New Album 30
Add Photos to an Album ....31
View Album Properties ....31
Add Background Music to an Album 31
Set Durations 32
Back up Photos on Disc 32
Set Photo as Title Thumbnail 32
Advanced Editing for Photos (Optional) 33
Organize Your Story 34
Customize Your Disc's Menu Page 36
Select a Menu Page Template 37
Set Chapters ....41
Set Chapters Automatically 41
Set Chapters Manually ....42
Remove a Chapter 42
Add a Playlist 43
Select a Playlist ....44
Preview Disc Content 45
Preview Your Production 45
View the DVD Structure 47
View Clip Properties 47
View the Production Summary 48
Final Output 49
Set Your Burning Configuration 49
Burn Your Production to Disc 50
Save Your Production as a Disc Image 52
Create a DVD Folder ....54
Edit a Disc After Burning 56
Right-to-Disc 59
Burn Video from a DV Camcorder to DVD or Blu-ray Disc ....60
Burn Video from an HDV Camcorder to Blu-ray Disc ....63
Burn Video from a TV to DVD or Blu-ray Disc 66
Burn Video from a PC Camera to DVD or Blu-ray Disc ....69
Burn Video from a VCR to DVD or Blu-ray Disc ....72
Disc Utilities.... 75
PowerProducer's Disc Utilities 76
Erase a Disc 78
Copy a Disc ....79
Burn a Disc From a Disc Image 81
Save a Disc Image 82
Burn a Disc from a DVD Folder ....83
Reference 85
FAQ 86
Disc Types & Video Recording Formats 88
Disc Types 88
Video Recording Formats 91
Disc Type/Format Compatibility ....92
Formats & Qualities ......93
Video Formats 93
Video Qualities 94
Audio Formats 95
Technical Support...... 97
Before Contacting Technical Support 98
Web Support 99
Telephone Support 99
Email Support 100
Index 101
Chapter 1:
Introduction
This chapter introduces CyberLink PowerProducer and the digital movie production process, including what you need to have on hand before you begin working on a project. If you are looking for instructions on how to start producing a movie immediately, see "Produce a Movie Disc" on page 13.
This chapter contains the following sections:
- "Welcome" on page 2
• "Production Flow" on page 3 - "The PowerProducer Program" on page 5
- "PowerProducer Projects" on page 6
- "Upgrade Your Software" on page 7
• "Production Preferences" on page 8 - "Supported Formats" on page 10
- "System Requirements" on page 11
Welcome
Welcome to the CyberLink family of digital video tools. CyberLink PowerProducer allows you to finalize your digital video productions and burn them to disc. You can use CyberLink PowerProducer for light editing tasks and to capture new media. When it's time to polish your movie, CyberLink PowerProducer is the best production tool to use.
What is a production tool?
A production tool turns the movie on your hard drive into a Blu-ray Disc, HD DVD, DVD or VCD that you can play on a disc player and share with friends. But that's not even half the story. CyberLink PowerProducer's production functions include the following:
- Importing and Capturing Media
- imports video files and photos
• captures from a DV or HDV camcorder
• captures from a TV or VCR
• captures from a web cam or digital camera
• Video and Picture Editing
• cuts, merges and splits video clips
- matches slide show length to background music duration
- adds transitions to slide shows
- Customizing Your Disc
- creates disc menus with video thumbnails and background
- sets chapters within video content
- adds background music to disc menus
• Disc Burning and Utilities
- burns CDs, DVDs, HD DVDs and Blu-ray Discs
- burns video right to disc from a variety of sources
- erases discs that contain unwanted content
- copies discs and burns discs from a disc image
Note: The functions available to you may differ due to the version installed on your computer.
Production Flow
The digital movie production process involves a combination of artistry and technology, beginning with raw video footage and ending with a movie production burned to disc. CyberLink PowerProducer provides the easiest way to produce your finished movie and burn it to the medium of your choice.

Pre-Production

Before you produce your movie using CyberLink PowerProducer, you must first gather (or create) its component parts: video files, photos and background music.
You may collect raw footage yourself with a camcorder or other recording device, or you may simply use non-copyright protected media files that you have on hand.
You may even have already created your own movie in a video editing software program, such as CyberLink PowerDirector.
Whatever the case, you should have all of the bits and pieces of your movie on hand so that the production process goes as smoothly as possible.
Disc Production

When your movie is ready for production, that's the time to use CyberLink PowerProducer. Because CyberLink PowerProducer offers basic video editing tools, your movie does not have to be perfectly polished at this stage.
If you have your media clips on hand, but have not previously edited and polished your movie, you might expect to use CyberLink PowerProducer to perform the following tasks:
- Specify the disc type and video quality you want to use.
- Acquire video content and add a slide show.
- Cut video content to a desired length.
- Split your video into chapters for disc navigation.
- Add background music to a video clip.
- Specify the buttons, background image, background music and layout of your menu page.
- Preview your production.
- Burn your production to disc.
Ready to Burn
When you are ready to burn your movie to disc you should have several discs on hand that are compatible with your burning drive. Make sure not only that the media type is correct (i.e.: that you have DVDs for a DVD drive and so on), but that your discs are all in the correct format (CD-R, DVD+RW, BD-RE, HD DVD-R and so on).
Keep several discs on hand in case your first production doesn't turn out the way you expected, or to make duplicate copies when you are satisfied with the results.
The PowerProducer Program
When you first open CyberLink PowerProducer, the program appears as follows:
Produce Movie Disc
Acquire media, make photo slide shows, create a movie production.
Edit Disc
Edit a disc after burning.

Disc Utilities
Manage your discs and production files.
Right-to-Disc
Burn video directly to a DVD.
Open Project
Open an existing CyberLink PowerProducer project.
PowerProducer Projects

To open a CyberLink PowerProducer project, click Open Project on the main CyberLink PowerProducer window. CyberLink PowerProducer saves your project as a .PPP file. This project file is the collection of all of your movie content, your special effects and your settings, but is not the final production. This file must be rendered (compiled or created) from its component parts in order to create the final production, much like a batter must be baked to make a cake out of eggs, flour and milk.
Changes you make to your video clips, audio files or photos in CyberLink PowerProducer do not affect your original media. Since your settings are all saved in the project file, you can cut, edit or delete clips in CyberLink PowerProducer, but still keep your original files untouched on your hard drive. So let yourself get creative! If you end up changing things too drastically, you can always start over.
You can use the standard Windows buttons to create a new CyberLink PowerProducer project file, as well as open or save existing files. The buttons for these tasks are located at the top of the window under most CyberLink PowerProducer functions.
New Save Preferences

Note: These tools are not always available in all functions.
Upgrade Your Software
Software upgrades may be periodically available from CyberLink. To upgrade your software, click in the row of buttons across the top of the window. A web browser window opens to CyberLink's cyberstore, where you can upgrade your program as well as receive other information about CyberLink and CyberLink's products.
Note: You must be connected to the Internet to use this feature.
Production Preferences
CyberLink PowerProducer offers a range of preferences to better suit the way you work. To set your preferences, click the button, available on most windows. The Preferences dialog box opens, displaying the Project tab and the Video/Audio tab, which contain customizable preferences. These preferences are described below.
Project Preferences
Note: The project options that are available depend on the disc format that you have selected.
- Movie playback mode: Set your video to return to the disc menu or continue on to the next movie after each movie on the disc finishes playing.
- Working directory: This is the directory that CyberLink PowerProducer uses for output. This directory is set during installation. If you change this directory, be sure that the hard disc it is on has enough free space to accommodate your production.
- Temporary directory: This is the directory that CyberLink PowerProducer uses for temporary files that are automatically deleted when you exit CyberLink PowerProducer. This directory is set during installation.
- Default name for captured video: Enter a name to give to each video file you capture. CyberLink PowerProducer adds a unique timestamp to distinguish each captured file.
- Split captured video files according to disc size limit: Split video as you capture to ensure that each captured video file can fit on the type of disc you are using.
- Create new chapter every: Create a new chapter automatically whenever the set time period is reached.
- Enable Cyberlink MPEG@Best technology: Check to balance burning speed and video quality when you burn MPEG video.
- Add thumbnail index: Check to add a thumbnail index to the disc's menu.
- Enable video thumbnail: Check to allow chapter thumbnails to display moving video on the disc's menu. If you select this
option, you can limit the length of video that displays by entering a value for the User-defined motion menu duration option.
- Eject after erasing: Check to have CyberLink PowerProducer automatically eject a disc after erasing is complete.
- Display TV safe zone: Check to display a box in the Author window that indicates the safe zone when creating the disc menu. Utilizing this feature ensures that menu items, including text, thumbnails and buttons, will be within the display range of most TVs.
- Default menu style: Specify your favorite style (.fl file) as the style for each new CyberLink PowerProducer project.
Video/Audio Preferences
Note: The video and audio quality options that are available depend on the disc format that you have selected.
- Video quality: Select a video quality for your disc: HD (High Definition), SD (Standard Definition), HQ (High Quality), SP (Standard Play), LP (Long Play), EP (Extended Play) or Smart Fit. The video quality settings offer different bit rates, resulting in files of different sizes. The higher the quality of the video, the larger the resulting file and the shorter the length of video that can fit onto a disc. Further, more CPU power is required for capturing and rendering higher quality video. The Smart Fit option automatically adjusts the bit rate to the best quality video file that fits exactly to the capacity of the disc you are using.
- Audio quality: The different audio qualities are as follows: LPCM is an uncompressed audio format. Dolby Digital audio uses the Dolby Digital Consumer Encoder format. MPEG audio uses the MPEG-1 audio compression format. (This audio format may have compatibility issues in NTSC.) MP3 uses the MPEG-1 Layer 3 audio format.
- Location: Select the location where your disc will be played. Location determines the TV format (PAL or NTSC) that is used.
Supported Formats
CyberLink PowerProducer allows you to import files into the program in the following formats:
Audio Input Formats: .mp3, .wav, .wma
Image Input Formats: .bmp, .jpg, .jpeg, .gif, .tif, .tiff, .psd
Video Input Formats: .mpg, .mpeg, .avi, .dat, .wmv, .asf, .vob, .dvr-ms
The disc and file formats that CyberLink PowerProducer supports are listed below:
| Disc Types File Formats | |
| BD-RE, BD-R BDAV | |
| HD DVD-R HD DVD Video | |
| DVD-R, DVD-RW, DVD+R, DVD+RW, DVD-RAM, DVD+R DL, DVD-R DL | DVD-Video, DVD-VR, DVD+VR |
| CD-R, CD-RW VCD, SVCD | |
System Requirements
The system requirements listed below are recommended as minimums for working with the program. You may find that your system, while meeting these recommended minimums, requires expanded capacity for specific tasks.
| Minimum System Requirements | |
| OS | • W i n d o w s V i s t a / X P / 2 |
| Memory | • 128MB SDRAM (256MB SDRAM recommended)• 256MB (512MB recommended) for Right-to-Disc• 512MB for direct HDV-to-Blu-ray Disc recording |
| CPU | • VCD (MPEG-1) producing: Intel Pentium II 450 MHz, or AMD Athlon 500 MHz• DVD (MPEG-2) producing: Intel Pentium III 700 MHz or AMD Athlon 700 MHz• DV Tape to MPEG-1 real-time capture: Intel Pentium III 800 MHz or AMD Athlon 800 MHz• DV Tape real-time capture: Intel Pentium 4 2.4 GHz or AMD Athlon XP 2400+• DV Tape non real-time capture: Intel Pentium II 450 MHz or AMD Athlon 500 MHz• Right-to-Disc: Intel Pentium 4 2.2 GHz (Pentium 4 2.4 GHz recommended) or AMD Athlon XP 2200+• HDV Tape real-time capture: Intel Pentium 4 2.4 GHz• Direct DV-to-DVD recording: Intel Pentium 4 2.4 GHz (Pentium 4 2.8 GHz recommended) or AMD Athlon XP 2400+• Direct HDV-to-Blu-ray Disc recording: Intel Pentium 4 2.4 GHz |
| HDD Space | • 1 G B f o r m a k i n g V C D s• 5GB for making DVDs• 15GB for making HD DVDs• 25GB for making Blu-ray Discs |
| Minimum System Requirements | |
| DV/HDV | • OHCI IEEE 1394 compliant device |
| Capture | • Analog video capture: USB or PCI capture devices compliant to WDM standards• DV Camcorder video capture: IEEE 1394 I/O devices compliant with OHCI standards• DSC photo import: USB interface |
Note: To preview HDV content while capturing the video, a nVidia 6200 (or better) or ATI X700 (or better) graphic card is recommended.
Note: Some camcorders are recognized as external disk drives on your PC, and therefore the Right-to-Disc feature is not available. In this case you should use the Import Video Files function to import the files directly from the external drive (camcorder) to your hard drive.
Chapter 2:
Produce a Movie Disc
This chapter leads you through the process of producing a movie, from capturing content to burning your finished production to disc. It includes instructions for creating a full-feature video production or photo slide show, customizing your disc and editing a disc after burning. The focus of this chapter is on the fun, creative side of production.
This chapter contains the following sections:
- "Select a Disc Format" on page 14
- "Acquire Content" on page 16
- "Edit Clips" on page 27
- "Create a Photo Slide Show" on page 30
- "Organize Your Story" on page 34
- "Customize Your Disc's Menu Page" on page 36
- "Set Chapters" on page 41
- "Add a Playlist" on page 43
- "Preview Disc Content" on page 45
• "View the DVD Structure" on page 47 - "Final Output" on page 49
- "Edit a Disc After Burning" on page 56
Note: The functions available to you may differ due to the version installed on your computer.
Select a Disc Format

The first step in producing a movie disc is selecting the format of the disc you want to create. Factors that influence the disc format you should use include the type of disc burner you have on your system, the length and quality of the video you use and the type of player you intend for playback.
To begin producing a movie disc, do this:
- Open CyberLink PowerProducer.

- Click Produce Movie Disc. The Select Your Disc window opens.

-
Select the disc format you want to use:
-
VCD: to create a lower-quality video or a slide show.
- DVD: to create a longer, high-quality video. (Requires a DVD burner.)
- Blu-ray Disc: to create a high-quality high definition video that will play back on a Blu-ray Disc player. (Requires a Blu-ray Disc burner.)
-
HD DVD: to create a high-quality high definition video that will play back on an HD DVD player. (Requires an HD DVD burner.)
-
Set your other options as necessary:
• Video recording format: select a video recording format. For more information, see "Video Recording Formats" on page 91.
• Disc capacity: select the capacity of the disc you are using.
• TV Aspect Ratio: select the TV aspect ratio for your disc. For more information on TV Aspect Ratio, see the "FAQ" on page 86.
- Click to continue.
Acquire Content
In order to assemble a video production you must first acquire your video content. You may already have digital files you simply want to import into CyberLink PowerProducer, or you may have raw footage from either an analog or a digital source that you need to capture.
Note: Some camcorders are recognized as external disk drives on your PC. In this case you can use the Import Video Files function to import the files directly from the external drive (camcorder) to your hard drive.
Your production can contain a mixture of video and photos. If you would like to mix video clips with still photos, you must separately acquire your video media and create a slide show for your photos (see "Import Photos" on page 18).
The import and capture functions are located on the Content window within the Produce Movie Disc function.
To get to the Content window, do this:
-
Start CyberLink PowerProducer.
-
Click Produce Movie Disc.
-
Select your disc type and then click . The Content window opens.
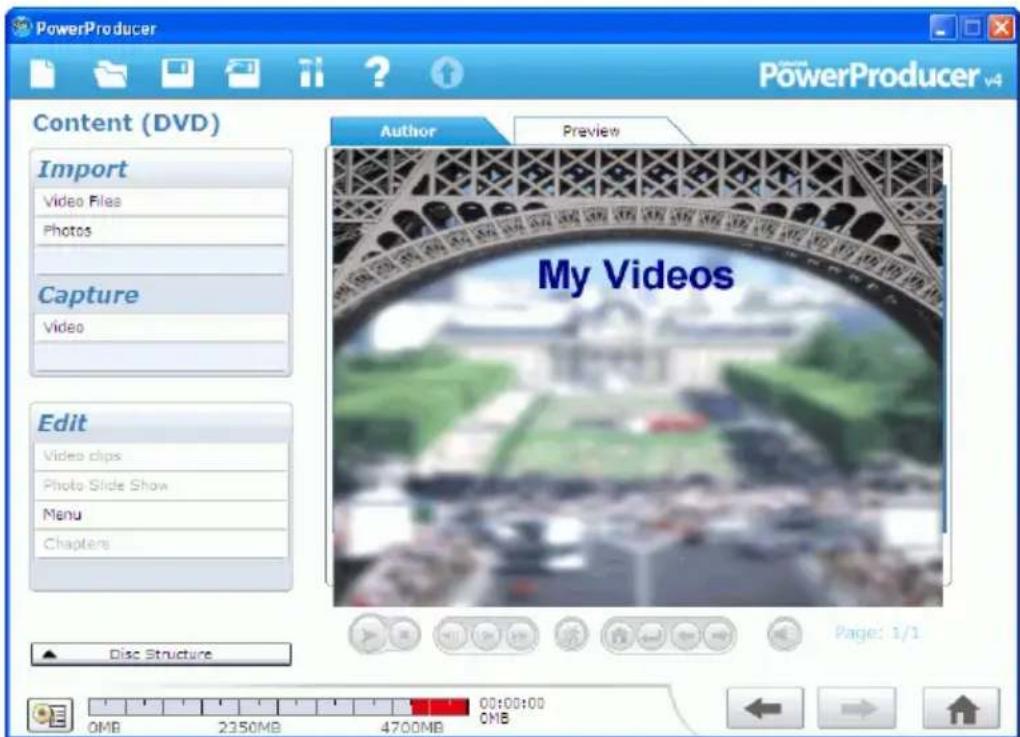
- Select an import or capture source from the list of available devices on the left-hand side.
The procedures for acquiring content depend on the kind of device used. The sections that follow describe the specific steps to take for importing or capturing content using the available devices on your system.
After import, video clips and photos (in albums) appear in the Author pane as thumbnails. To learn about the actions you can perform on video clips, see "Edit Clips" on page 27. To learn about the actions you can perform on your photos, see "Create a Photo Slide Show" on page 30.
Note: The aspect ratio of the imported video clip is determined by the aspect ratio of the original clip. You can also manually adjust the aspect ratio of a video clip, see "Adjust a Video Clip's Aspect Ratio" on page 26.
Import Video Files
You can import video files (including the audio portion) for use in CyberLink PowerProducer by clicking Video Files under the Import option on the Content window.

You import video files using a normal Open dialog box, but with one difference: CyberLink PowerProducer allows you to preview video files before you open them. Use the controls under the preview window to start and stop the preview.
Note: When you import files in the DVR-MS format, CyberLink
PowerProducer converts them into MPEG files for processing. These MPEG files are kept on your hard disk drive for future use unless you manually remove them.
Import Photos
You can import photos for use in CyberLink PowerProducer as a slide show. A slide show is a presentation that can include photos, transitions and background music. The photos and settings in a slide show are contained in units called albums. You can add a single background music file and a single transition type to each album in a slide show.
To import photos, do this:
- Click Photos under the Import option on the Content window. The Add Photos to Album dialog box opens.
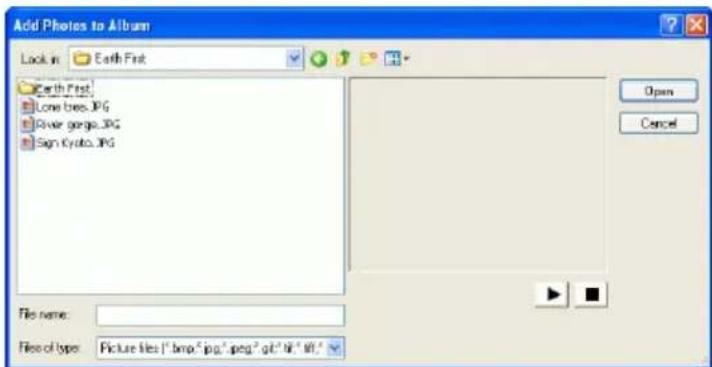
- Open the photos you want to add. The photos appear in the storyboard as slides, with the first slide appearing in the album window as a thumbnail.
- To add more slides to the album, click Add Photos, then open the photos you want to add.
Note: You may add up to 256 photos to an album.
Capture from a DV Camcorder
You can capture video (including the audio portion) from a DV camcorder for use in CyberLink PowerProducer by selecting DV Camcorder.
To capture from a DV camcorder, do this:
-
Click Video under the Capture option on the Content window.
-
In the window that opens, select DV camcorder from the drop-down.

- Locate the content you want to capture.
Note: Be sure that your DV camcorder is set to VCR mode.
- You may use the playback controls under the preview window.
- You may enter the time code of the first frame of the video you want to capture.
-
You may enter a duration (in minutes and seconds) in the Auto-recording duration field to instruct CyberLink PowerProducer to capture this amount of video from the current position when you begin recording.
-
Click to begin capture.
-
Click to end capture when you have captured the video you want.
Note: Non-realtime capture continues capturing and processing after the video has finished playing in order to ensure that no frames are dropped during capture.
Capture from an HDV Camcorder
You can capture video (including the audio portion) from an HDV camcorder for use in CyberLink PowerProducer by selecting HDV Camcorder.
To capture from an HDV camcorder, do this:
-
Click Video under the Capture option on the Content window.
-
In the window that opens, select HDV camcorder from the drop-down.
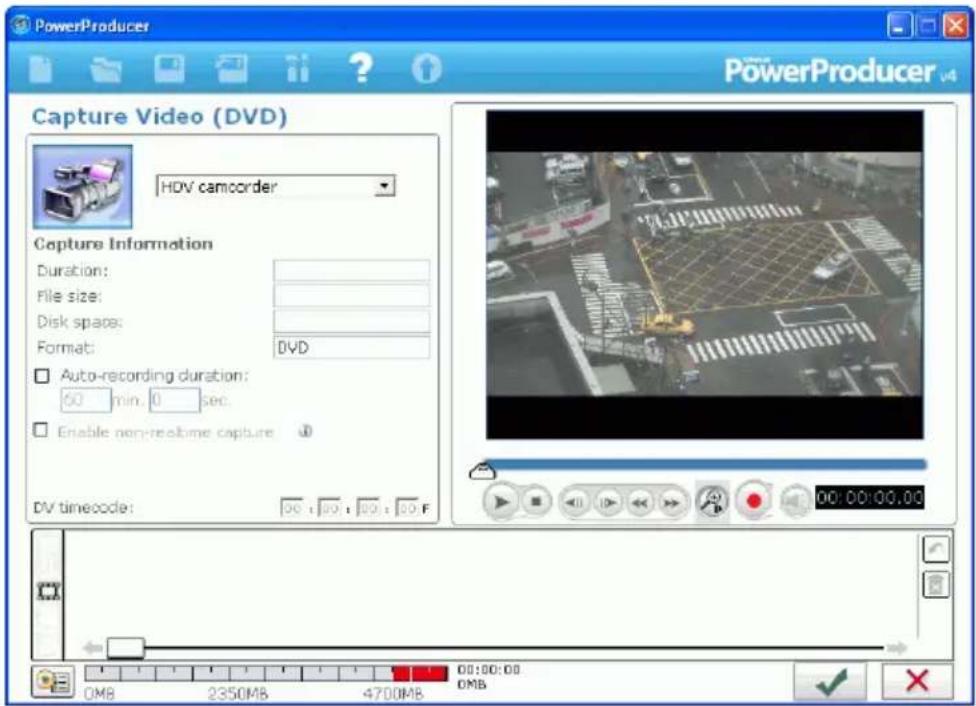
- Locate the content you want to capture.
Note: Be sure that your camcorder is set to VCR mode.
- You may use the playback controls under the preview window.
- You may enter the time code of the first frame of the video you want to capture.
- You may enter a duration (in minutes and seconds) in the Auto-recording duration field to instruct CyberLink PowerProducer to capture this amount of video from the current position when you begin recording.
-
Click to begin capture.
-
Click to end capture when you have captured the video you want.
Note: Non-realtime capture continues capturing and processing after the video has finished playing in order to ensure that no frames are dropped during capture.
Capture from a TV
You can capture video (including the audio portion) from a TV for use in CyberLink PowerProducer by selecting the TV option.
To capture from a TV, do this:
-
Click TV under the Capture option on the Content window.
-
In the window that opens, select Analog TV from the drop-down.
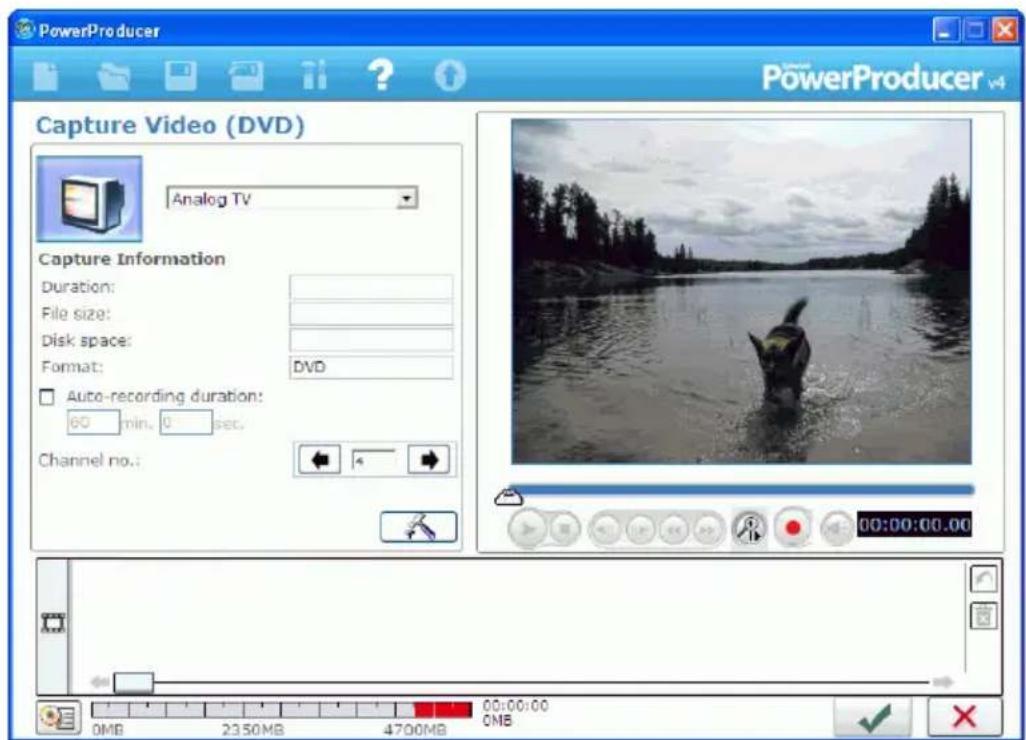
- Select the channel you wish to record.
- You may enter a duration (in minutes and seconds) in the Auto-recording duration field to instruct CyberLink PowerProducer to capture this amount of video from the time you begin recording.
- Click to open a dialog box in which you can set other configuration options.
-
Click to begin capture.
-
Click to end capture when you have captured the video you want.
Capture from a VCR
You can capture video (including the audio portion) from a VCR for use in CyberLink PowerProducer by selecting the VCR option.
To capture from a VCR, do this:
-
Click Video under the Capture option on the Content window.
-
In the window that opens, select VCR from the drop-down.

- Click to open a dialog box in which you can set other configuration options.
- Click to begin capture.
- You may enter a duration (in minutes and seconds) in the Auto-recording duration field to instruct CyberLink PowerProducer to capture this amount of video from the time you begin recording.
- Click to end capture when you have captured the video you want.
Capture from a PC Camera
You can capture video from a PC camera (webcam) for use in CyberLink PowerProducer by selecting the PC Camera option.
To capture from a PC camera, do this:
-
Click Video under the Capture option on the Content window.
-
In the window that opens, select PC camera from the drop-down.

- Click to open a dialog box in which you can set other configuration options.
- Click to begin capture.
- You may enter a duration (in minutes and seconds) in the Auto-recording duration field to instruct CyberLink PowerProducer to capture this amount of video from the time you begin recording.
- Click to end capture when you have captured the video you want.
Capture from a Digital Camera
You can capture still photos from a digital camera for use in CyberLink PowerProducer by selecting the Digital Camera option.
To capture from a digital camera, do this:
- Click Photos under the Capture option on the Content window. The Slide Show Photos dialog box opens.

- Select your camera from the drop-down box.
-
Check the photo(s) you want to capture.
-
Check the Select all option to select all of the photos.
- To switch to a larger or smaller thumbnail, click .
-
If the number of thumbnails on your device surpasses one page, use the and buttons to display further pages of thumbnails.
-
Click, then select the directory where you want to save the photos.
-
Click .
Adjust a Video Clip's Aspect Ratio
When you import or capture a video clip, CyberLink PowerProducer will automatically detect the video clip's aspect ratio. If the video clips you are using have a different aspect ratio, you can manually adjust the video clip's aspect ratio to match your movie's aspect ratio.
To manually adjust the video clip's aspect ratio, do this:
- Select a video clip from the Author window.
- Right-click on the video clip with your mouse and select Properties to open the Video Properties window.
- Choose the aspect ratio you want to use for your video clip and click √.
Edit Clips
Options for editing clips are located on the Edit Clips window within the Produce Movie Disc function. These options are available to edit both video clips and slide shows.
AB Cut
The AB Cut option allows you to trim either the ends of a clip or to cut out the middle and keep the end portions.
To perform an AB cut on a clip, do this:
- Click Video clips under the Edit heading.
- Click the AB Cut tab.
- Click on the clip you want to cut.
- Set the mark in time/slide by doing one of the following:
- Enter the time/slide number of the beginning of the desired portion in the entry boxes, then click ↓
- Drag the slider under the preview window to the beginning of the desired portion, then click ↓
-
Set the mark out time/slide by doing one of the following:
-
Enter the time/slide number of the end of the desired portion in the entry boxes, then click
-
Drag the slider under the preview window to the ends of the desired segment, then click
-
Click:
-
Keep selected to keep the video segment indicated in orange.
-
Delete selected to delete the video segment indicated in orange.
-
Click . The edited clip appears in the Author pane.
Merge
You can merge multiple clips into a single clip that you may find easier to work with.
To merge multiple clips, do this:
- Click Video clips under the Edit heading.
- Click the Merge tab.
-
Select a clip, then click to add the clip to the merge list. Continue to add all the clips you want to merge.
-
Use the button to remove clips from the merge list.
-
Use the and buttons to reorder the clips, if necessary.
-
Click to merge the clips.
The merged clips appear in the Author pane as one clip.
Note: When you merge video clips, all the video clips will be transformed to the aspect ratio you have selected for your movie.
Split
You can split a long video clip into two clips for further editing.
To split a clip, do this:
- Click Video clips under the Edit heading.
- Click the Split tab.
- Set the split time/slide (the frame or slide at the position at which you want to split the clip) by doing one of the following:
• Video clip: Use the slider to seek the split time. - Album: Use the slider to seek the slide to split after.
- Click to split the clip.
The split clip appears in the Author pane as two clips.
Advanced Editing for Video (Optional)
To perform more advanced video editing techniques, you may click on the Advanced Editing button at any time to open CyberLink PowerDirector.
Please see the help file contained in that product for assistance in using that program.
Note: The functions available to you may differ due to the version installed on your computer.
Create a Photo Slide Show
You can create a slide show album from your photos in the Photo Slide Show window. This windows is displayed after you import photos on the Content window or if you select Photo Slide Show under the Edit heading on the Content window. To select an album, click 📄 or . Its preview slide appears within the album preview window and the slides it contains appear in the storyboard.

Create a New Album
To create a new album, use the Import Photos function. For more information, see "Import Photos" on page 18.
Add Photos to an Album
If you have already created a slide show you can add new photos to it in the Photo Slide Show window.
To add photos to an existing album in a slide show, do this:
- Click Photo Slide Show under the Edit heading.
- Select the album you want to modify.
- Click Add Photos. The Add Photos to Album dialog box opens.
- Open the photos you want to add.
View Album Properties
To view album properties, right-click the preview slide in the album window or the thumbnail in the Author pane, then select Properties. A dialog box opens displaying album properties. You may modify the album's name in this dialog box.
Add Background Music to an Album
You may provide background music to an album by adding an audio file.
To add background music to an album, do this:
- Click Photo Slide Show under the Edit heading.
- Select the album you want to modify.
- Click . The Background Music dialog box opens.
-
Click to open an audio track. You may edit the audio file here or click to add it to the video clip you have selected. The following options are available, if desired:
-
Select a fade in/out option.
- Select to repeat the audio track until the video clip ends.
- Trim the audio file using the sliders on the trim bar.
- Adjust the volume.
- Click . The audio track appears in the Background music box.
- To remove the audio track, click .
Set Durations
You can set the time that each photo on a slide is displayed or how long it takes to play an entire slideshow album in the Set Duration section. You may also match the duration of an album slideshow to its selected background music.
- To set the length of time each individual slide (picture) will be displayed, select Slides and enter a duration.
- To set the length of time it will take to display the entire album, select Album and enter a duration.
- To automatically set the length of the album slideshow to match the duration of the audio file selected as the background music, select Match music duration.
Back up Photos on Disc
To back up your slide show photos on the disc that you burn, check the Back up photos on disc option to burn copies of your photos onto your disc. This is especially useful for photos with a resolution higher than a DVD (720x480).
Set Photo as Title Thumbnail
You can select any photo in your slideshow album to be the thumbnail photo that will be displayed on the album cover and in the disc menu.
To set a photo as the title thumbnail, do this:
- Click on the photo in the Author pane that you want to set as the title photo.
- Click on . The photo will be set as the title thumbnail.
Advanced Editing for Photos (Optional)
To perform more advanced photo editing techniques, you may click on the Advanced Editing button at any time to open CyberLink PhotoNow!
Please see the help file contained in that product for assistance in using that program.
Note: The functions available to you may differ due to the version installed on your computer.
Organize Your Story
The order of the thumbnails in the Author pane on the Content window corresponds to the order of the video clips and slide shows in your movie production. You can reorder, remove and preview each of these clips to organize your production into the proper order.

Note: The aspect ratio of the menu thumbnail is always 4:3. Clips with 16:9 aspect ratio will be displayed in letter box format.
Play a Clip
To play a clip in the Author pane, do one of the following:
- Double-click the clip.
- Select the clip, then click .

• Right-click the clip, then select Play from the menu.
Move a Thumbnail
To move a clip, do one of the following:
- Right-click the clip, then select Move forward (towards the beginning of your story) or Move backward (towards the end of your story). The clip moves one position in the direction you have specified.
- Drag and drop the clip onto another clip. Doing this exchanges the positions of the two clips.
Delete a Clip
To remove an unwanted clip from the Author pane, do one of the following:
• Right-click the clip, then select Delete from the menu.
Note: Select it, then press the Delete key on your keyboard.
Customize Your Disc's Menu Page
Menus allow you to navigate around on your final disc. The Customize Menu window gives you complete creative control over the look of your menu page. You can modify the appearance of the menu's buttons, text and overall layout.
To open the Customize Menu window, click Menu under the Edit heading on the Content window.

Note: The Background Image is always displayed at 4:3 aspect ratio. If you select a TV aspect ratio of 16:9, the Background Image is displayed with side panels.
Select a Menu Page Template
Menu page templates combine settings for background images, buttons and frames.
To specify a background template for a menu page, do this:
- Click Template.
- To restrict display for easier selection, choose a category from the drop-down box or select ALL to show all options.
- Select the option you want to use.
- To apply this image to all of your menu pages, click .
- Click to close the customization window.
Add Your Own Image as a Background Image
To add your own image as a background image, do this:
-
Click Template.
-
Click an open an image. The image you select is added to the User-defined category in the drop-down box.
- To remove an image from the User-defined category, select it, then click .—
- Click to close the customization window.
Specify the Number of Buttons Per Menu Page
To specify the number of buttons per menu page, do this:
- Click Buttons Per Page.
- To restrict display for easier selection, choose a category from the drop-down box or select ALL to show all options.
-
Select the option you want to use.
-
Click to close the customization window.
Select a Button Frame Style
To select a button frame style, do this:
- Click Frame.
- To restrict display for easier selection, choose a category from the drop-down box, or select ALL to show all options.
-
Select the option you want to use.
-
Click to close the customization window.
Select a Button Layout
To select a button layout, do this:
- Click Button Layout.
- To restrict display for easier selection, choose a category from the drop-down box, or select ALL to show all options.
-
Select the option you want to use.
-
Click to close the customization window.
Select a Button Style
To select a button style, do this:
- Click Button Style.
- To restrict display for easier selection, choose a category from the drop-down box, or select ALL to show all options.
-
Select the option you want to use.
-
Click to close the customization window.
Download a Template
To download a template from CyberLink's web site, do this:
-
Click More Templates. A web browser window opens to CyberLink's CyberStore.
-
Download the template(s) you would like to use.
Note: You must be connected to the Internet to use this feature.
Save a Template as a Favorite File
If you modify the settings on the Customize Menu window, you can save those settings as a Favorite (.fl) file for later use.
To save a template as a Favorite (.fl) file, click . ☑ the dialog box that opens, save the Favorite file.
Open a Favorite File as a Template
After you save a template as a Favorite file, you can open it for use as a template.
To open a Favorite file as a template, click .the dialog box that opens, open a Favorite (.fl) file.
Modify Menu Text
To edit text that appears on the menu page, double-click it, then enter the new text.
To change the font properties of text that appears on the menu page, click the text, then click .In the dialog box that opens, change the font properties, then click OK.
Set Background Music
The procedure for adding background music to a menu is the same as the procedure for adding background music to an album. See "Add Background Music to an Album" on page 31 for the steps to follow.
Set a First Play Video Clip
A clip designated as first play is the initial sequence that plays as soon as a disc is inserted into a computer for play, and before the menu page appears. No navigation buttons are available during the first play and viewers cannot fast forward past this segment. In a professional production first play typically consists of a copyright notice or warning. However, you may prefer to use a personal introduction or other video clip instead.
To set a clip as first play, click 📂 and open the file that you want. Click to remove the file set as first play. Click ▶ preview the first play video.
Set Chapters
Chapters allow for ease of navigation on a disc. If you set chapters on your disc, viewers can jump from the menu page to the start of these chapters in order to skip previous content. However, you may choose not to include chapters. If you do not set chapters, your movie plays automatically when the disc is inserted into a player.
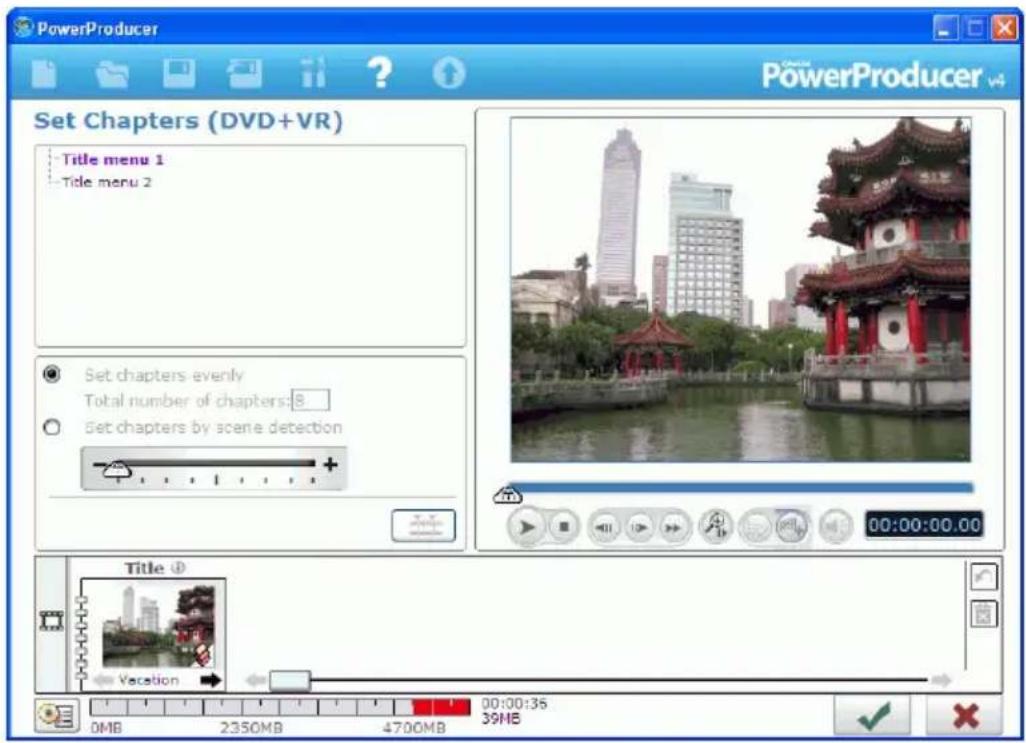
Set Chapters Automatically
To set chapters automatically, do this:
-
Click Chapters under the Edit heading on the Content window.
-
Set the chapters in your disc.
- If you want to specify the number of chapters on your disc, select the Set chapters evenly option, then enter the number in the entry box.
- If you want CyberLink PowerProducer to set chapters for you, select the Set chapters by scene detection option. You can control the relative number of chapters by increasing or decreasing the sensitivity of scene detection. (Increased sensitivity sets more chapters.)
- Click to begin to set chapters. The individual chapters appear on the story board as thumbnails.
4.

Set Chapters Manually
To set chapters manually, do this:
- Click Chapters under the Edit heading on the Content window.
- Use the playback controls to locate points in the video clip where you want to add a chapter, then click 📄 to set chapters at these points.
3.

Remove a Chapter
To remove a chapter, select it, then click 📄You can undelete chapters in the order that you delete them by clicking 🔍
To set a still frame from a video clip within a chapter as that chapter's thumbnail in the storyboard, navigate to the frame in the preview window, then click √
Add a Playlist
Adding a playlist to your DVD allows you to specify which sections of content are shown when you play your DVD. You may include several playlists that display different variations of the original content in order to provide different versions of your movie.

Note: Playlists are available only when you create DVD-VR or BDAV discs.
To add a playlist, do this:
- Click Playlist under the Edit heading on the Content window.
-
Click to create a new playlist. A preview appears in the playlist window.
-
You can remove a playlist by clicking.
- You can preview and select a portion of video in the preview window using the playback controls and the mark in and mark out functions. Click to add the section of video you selected to the playlist.
- Click to select all clips.
- Click to deselect all clips.
-
Click to add the selected clips to the playlist.
-
Click
Select a Playlist
When you create a new playlist, a preview appears in the playlist preview window. You may, however, have other playlists that are not visible.
To select a different playlist, click or . Its preview slide appears within the playlist preview window and the clips it contains appear in the Author pane.
Preview Disc Content
When you have organized your clips and finalized the content, it is a good idea to preview your entire production before burning it to disc. You can also view the production summary and the disc's menu.

Preview Your Production
To preview your entire production, including video, slide shows and any settings you have added, click the Preview tab. The Author pane changes to the Preview pane. Click to see a motion preview of the menu and video thumbnails or click to view a preview of the entire disc video content from the beginning. Use the controls under the preview window to start and stop the preview.
Preview a Video Clip
To preview a video clip in the preview window, click on the clip's thumbnail and then use the playback controls at the bottom of the window.
Preview an Album
To preview a photo album in the preview window, click the album's thumbnail and then use the playback controls at the bottom of the window.
View the DVD Structure
To view the menu structure of your disc, click the Disc Structure bar on the Content window.
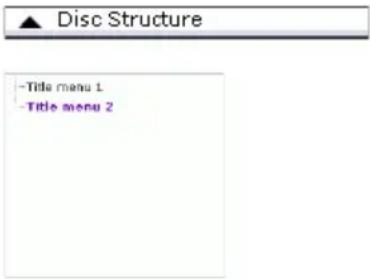
To view a title, click it in the Disc Structure pane. To close the Disc Structure pane, click the bar again.

View Clip Properties
You can view clip-related properties, which include the clip's file name, resolution and playback time (along with other information).
To view clip properties, right-click on the clip and select Properties.
View the Production Summary
You can view up-to-the-minute system and production information by clicking on the CyberLink PowerProducer interface. This button is available on most CyberLink PowerProducer windows.
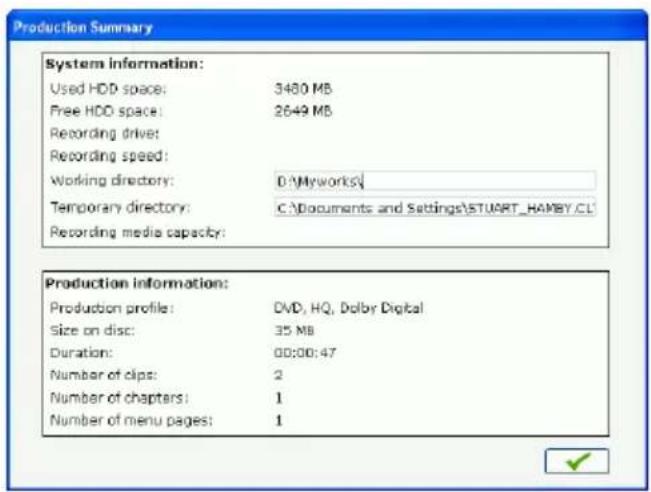
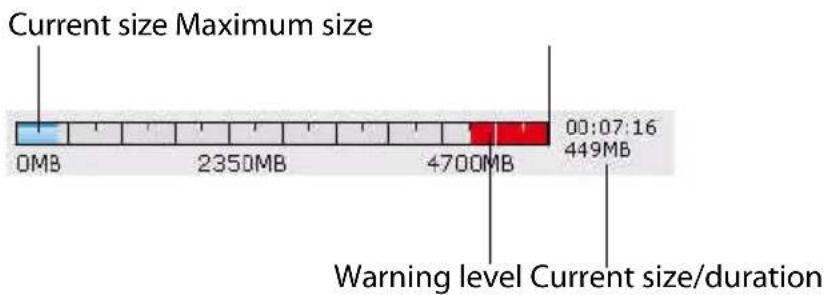
CyberLink PowerProducer gives you an overview of the file size and duration of your production next to this button.
Final Output
After you have acquired your media, assembled your story, edited your clips, added audio and other effects, customized the layout and look of your disc, then it's time to finalize your production.
CyberLink PowerProducer offers several methods to finalize your production, which are useful under different circumstances. You can burn your production to disc as the last step in your movie production process, save your production as a disc image for later burning or create a DVD folder to organize your media files on your hard drive.
Depending on your burning drive and disc type, one or more of these options may be available simultaneously.
Set Your Burning Configuration
Before you burn to disc for the first time, set your burning configuration on the Final Output window. After you set this configuration, CyberLink PowerProducer uses the same configuration each time you burn until you change the settings.
To set your burning configuration, do this:
-
Click
-
Select your recording drive.
-
Select a recording speed.
-
Check the Include buffer under-run protection option to ensure your drive writes without errors when your hard drive is busy or system resources are low.
-
Click to set your configuration and return to the Final Output window.
Note: You can erase a disc before burning to it by clicking . See "Erase a Disc" on page 78 for more information.
Burn Your Production to Disc
Burning your production to disc is the final stage of the movie production process. Once it is burned you will be able to play it on a disc player to share with your family and friends.
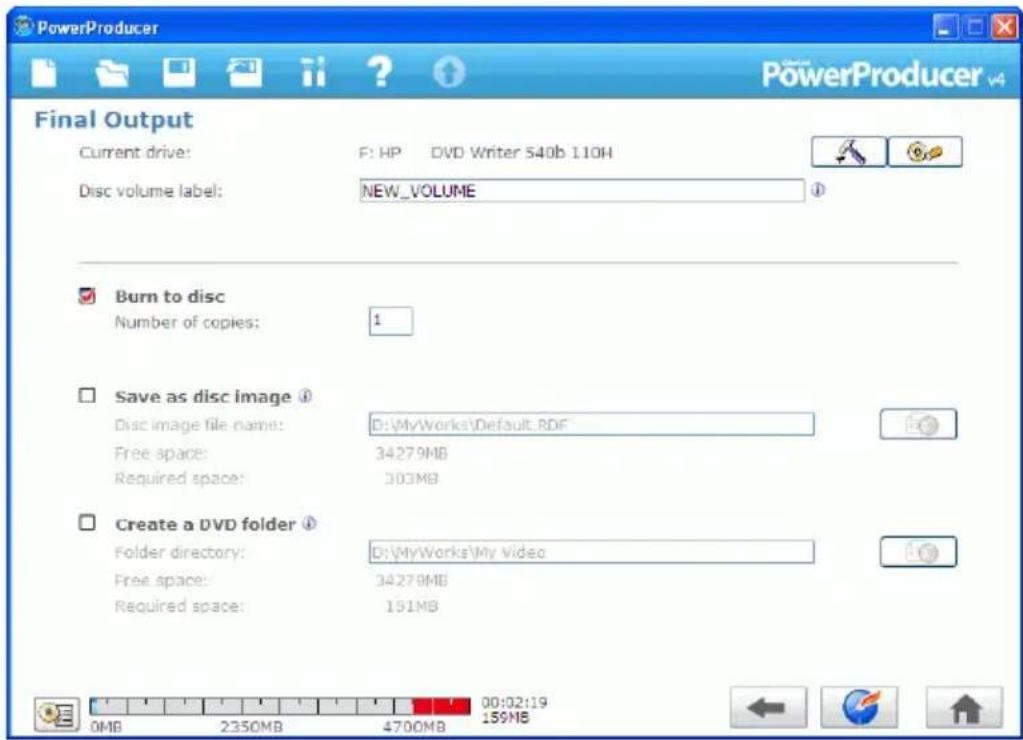
To burn your production to disc, do this:
- Check the Burn to disc option on the Final Output window.
-
Specify your burning options:
-
Enter the number of copies you want to make.
• To give the disc a volume label, enter the desired label. -
Click . The task begins immediately. CyberLink
PowerProducer displays the real-time progress.
Note: The burning process may take at least a few minutes, depending on the length and quality of your video and your computer's processing power. Be prepared for a short wait while CyberLink PowerProducer renders your production.
When the task is completed a window appears displaying a congratulatory message and offering several options to continue.

- Click Go to Main Window to return to the main CyberLink PowerProducer window.
- Click Quit PowerProducer to close the program.
Save Your Production as a Disc Image
You can save your production on your hard drive as a disc image for later burning. This option is particularly useful if your computer currently does not have a disc burning drive installed.

To save your production as a disc image, do this:
- Check the Save as disc image option.
- Click, select the directory where you want to save the disc image and then enter a file name.
- Click . The task begins immediately. CyberLink PowerProducer displays the real-time progress.
When the task is completed a window appears displaying a congratulatory message and offering several options to continue.
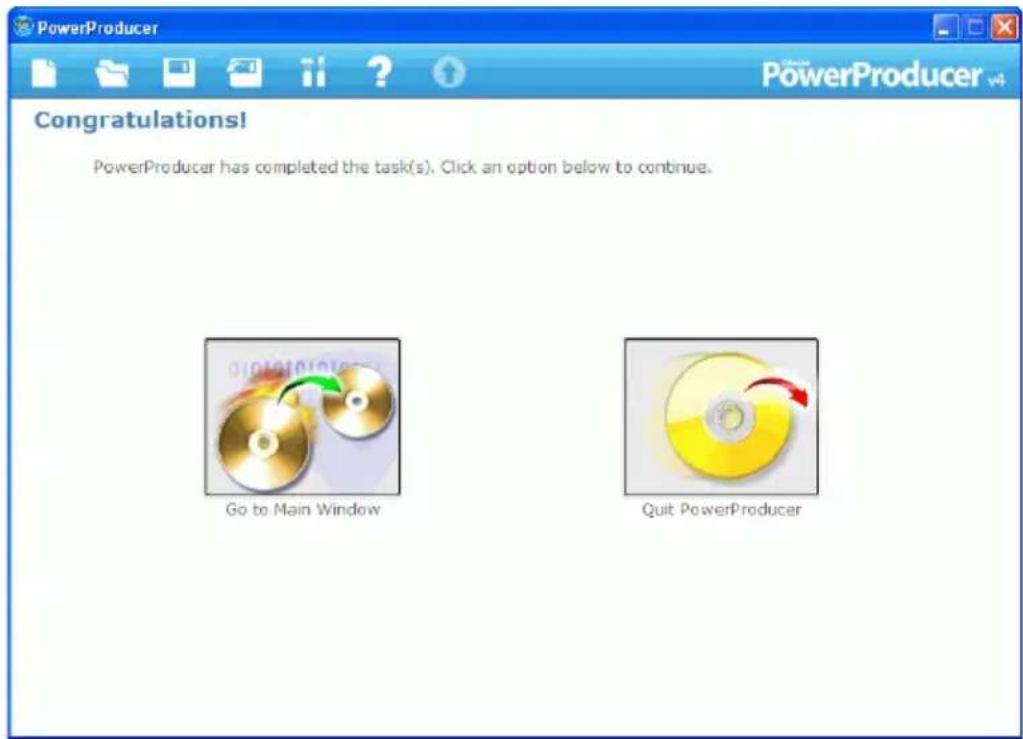
- Click Go to Main Window to return to the main CyberLink PowerProducer window.
- Click Quit PowerProducer to close the program.
Create a DVD Folder
Creating a DVD folder conveniently stores all the files that make up a movie on your hard drive so that it is ready for burning.

To create a DVD folder, do this:
- Check the Create a DVD folder option.
- Click, then select the directory where you want to save the DVD folder.
Note: Creating a DVD folder overwrites existing data in a directory.
- Click . The task begins immediately. CyberLink PowerProducer displays the real-time progress.
When the task is completed a window appears displaying a congratulatory message and offering several options to continue.

- Click Go to Main Window to return to the main CyberLink PowerProducer window.
- Click Quit PowerProducer to close the program.
Edit a Disc After Burning

What happens if you shoot additional video that would complete your production perfectly? Do you have to erase your entire disc or burn a new one? Not necessarily... After you burn your production onto a rewritable disc (i.e.: in - RW/VR or +RW/VR format), you can go back and edit the
content at a later time.
To edit a disc after burning, do this:
- Start CyberLink PowerProducer.
- Click Edit Disc.
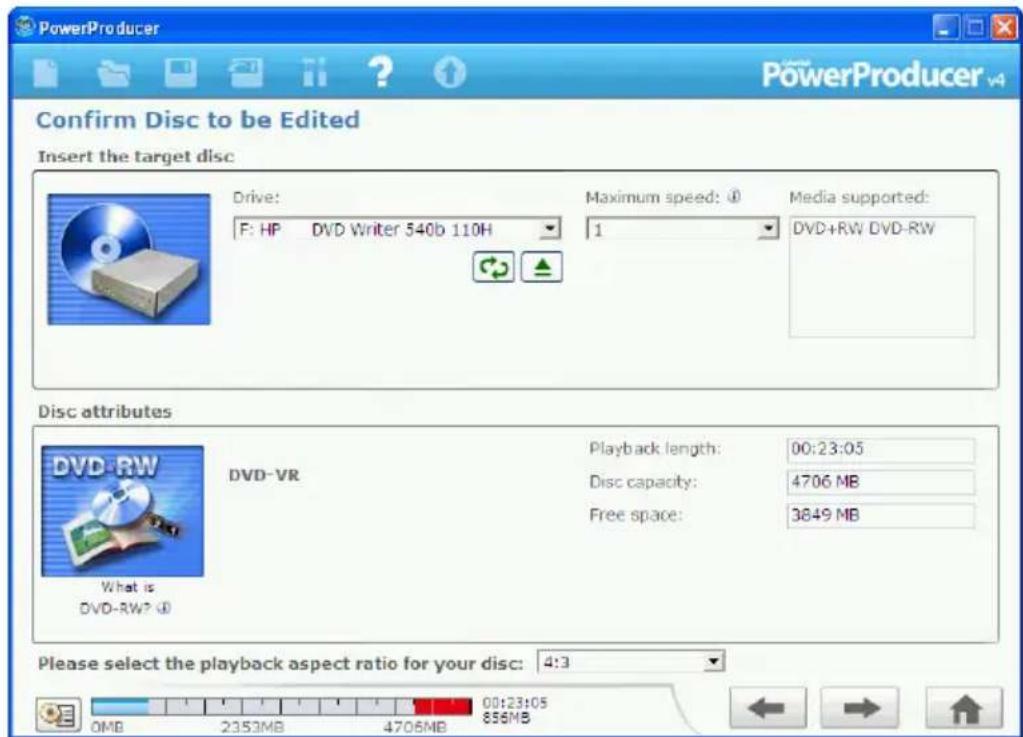
-
Insert your target disc.
-
Click to refresh the display of your drive.
-
Click to open your disc drive door.
-
Select a recording speed.
-
Select the Aspect Ratio for your disc, then click .
-
Make the desired modifications in the CyberLink PowerProducer program, then click . →

- Click . See "Final Output" on page 49.
CyberLink PowerProducer
Chapter 3:
Right-to-Disc
You can burn video content from a DV camcorder, HDV camcorder, TV, webcam or VCR directly onto a DVD or Blu-ray Disc without the intermediary step of first writing to your hard drive. This can save you a lot of time when you want to store video on a disc.
Note: Some camcorders are recognized as external disk drives on your PC, and therefore the Right-to-Disc feature is not available. In this case you should use the Import Video Files function to import the files directly from the external drive (camcorder) to your hard drive.
the simplest scenario, you could burn video content straight onto a DVD or Blu-ray Disc, then immediately play your movie on a DVD player, Blu-ray Disc player or save the content for future projects.
This chapter contains the following sections:
- "Burn Video from a DV Camcorder to DVD or Blu-ray Disc" on page 60
- "Burn Video from an HDV Camcorder to Blu-ray Disc" on page 63
- "Burn Video from a TV to DVD or Blu-ray Disc" on page 66
- "Burn Video from a PC Camera to DVD or Blu-ray Disc" on page 69
- "Burn Video from a VCR to DVD or Blu-ray Disc" on page 72
Note: The functions available to you may differ due to the version installed on your computer.
Burn Video from a DV Camcorder to DVD or Blu- ray Disc
DV camcorders are popular among video hobbyists, as they record in a digital format that does not require conversion before being used on a computer, and often provide a number of advanced recording options.
Note: You must have a DVD or Blu-ray Disc burner to use this function.
To burn video from a camcorder to DVD or Blu-ray Disc, do this:
- Start CyberLink PowerProducer.
- Click Right-to-Disc.

-
Insert your target disc and ensure the correct drive is selected.
-
Select a recording speed in the Maximum speed drop-down list, then click .→

- Select DV from the Recording from drop-down list.
Note: Be sure that your DV camcorder is set to VCR mode.
-
Select the duration of your DV tape under the DV tape length drop-down list.
-
Set the TV format (NTSC or PAL) by selecting the location where you want to play your disc. You may also set other options at this point:
• To record a specific length of video, enter the mark in and out times. The steps are similar to cutting a clip. For more information, see "AB Cut" on page 27.
• To give the disc a volume label, enter the desired label. This name appears when the disc is played on a computer.
• To give the disc a Disc name, enter the desired name. This name appears when the disc is played on a disc player.
- Click the Settings tab to display disc and video settings.
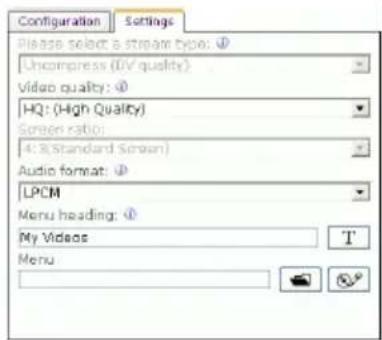
- Click to start burning. CyberLink PowerProducer displays the real-time progress of the task.
Note: The burning process may take at least a few minutes, depending on the length of your video and your computer's processing power.
You may preview the video you have burned by using the controls in the preview window.
Burn Video from an HDV Camcorder to Blu-ray Disc
HDV camcorders are also quite popular among video enthusiasts, as they record in a digital format that does not require conversion before being used on a computer, and often provide a number of advanced recording options.
Note: You must have a Blu-ray Disc burner to use this function.
To burn video from an HDV camcorder to Blu-ray Disc, do this:
- Start CyberLink PowerProducer.
- Click Right-to-Disc.

-
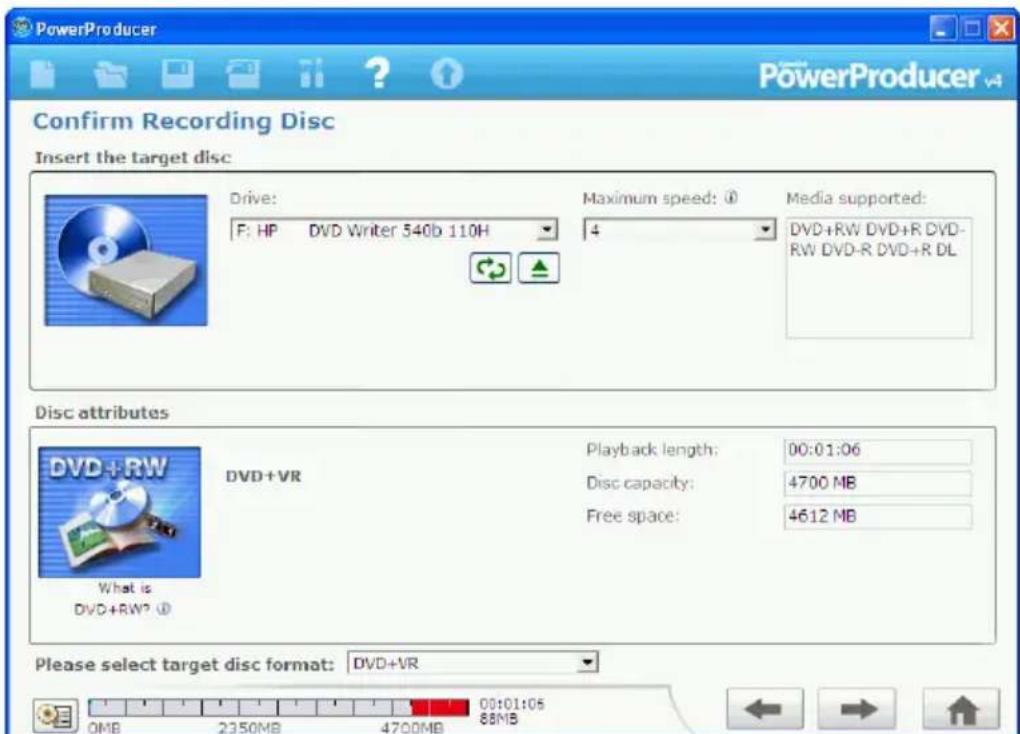
Insert your target disc and ensure that the correct drive is selected.
-
Select a recording speed in the Maximum speed drop-down list, then click .→
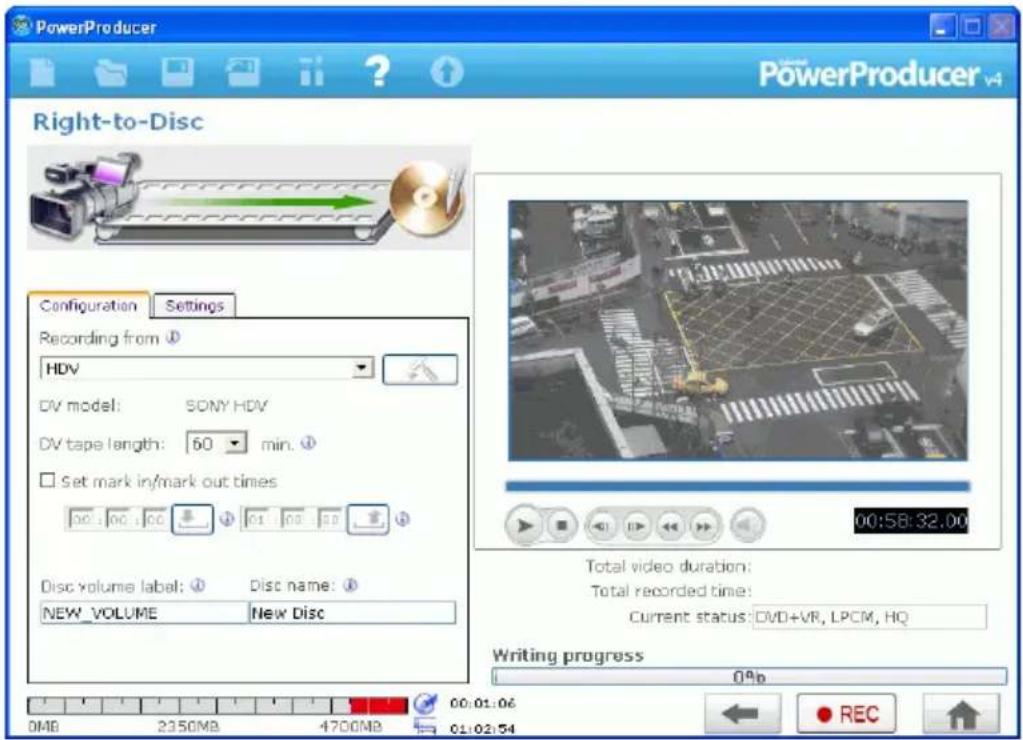
- Select HDV from the Recording from drop-down list.
Note: Be sure that your camcorder is set to VCR mode.
-
Select the duration of your HDV tape under the HDV tape length drop-down list.
-
Set the TV format (NTSC or PAL) by selecting the location where you want to play your disc. You may also set other options at this point:
• To record a specific length of video, enter the mark in and out times. The steps are similar to cutting a clip. For more information, see "AB Cut" on page 27.
• To give the disc a volume label, enter the desired label. This name appears when the disc is played on a computer.
• To give the disc a Disc name, enter the desired name. This name appears when the disc is played on a disc player.
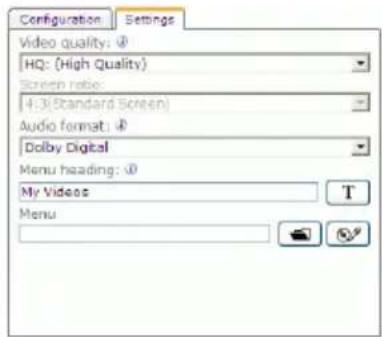
- Click the Settings tab to display disc and video settings.
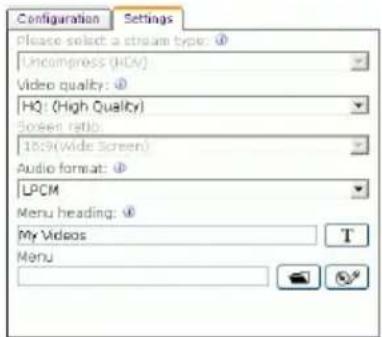
- Click to start burning. CyberLink PowerProducer displays the real-time progress of the task.
Note: The burning process may take at least a few minutes, depending on the length of your video and your computer's processing power.
You may preview the video you have burned to Blu-ray Disc using the controls in the preview window.
Note: HD format will be supported on the high capacity HD DVD discs when it becomes available.
Burn Video from a TV to DVD or Blu-ray Disc
You may wish to store segments from your favorite TV programs for use in your movie production, or simply burn other segments for different uses.
To burn video from a TV to DVD or Blu-ray Disc, do this:
Note: You must have a DVD burner or a Blu-ray Disc burner to use this function.
- Start CyberLink PowerProducer.
- Click Right-to-Disc.

-
Insert your target disc and ensure that the correct drive is selected.
-
Select a recording speed in the Maximum speed drop-down list, then click .→

-
Select Tuner from the Recording from drop-down list.
-
Select the channel you want to record.
-
Set the TV format (NTSC or PAL) by selecting the location where you want to play your disc. You may also set other options at this time:
• To burn a specific length of video, check the Auto-recording duration option, then enter a time in the entry box.
• To give the disc a Disc volume label, enter the desired label. This name appears when the disc is played on a computer.
• To give the disc a Disc name, enter the desired name. This name appears when the disc is played on a disc player.
- Click the Settings tab to display disc and video settings.
- Click to open a window containing TV settings.

- Select your TV in the Video device drop-down list.
- Select your audio device in the Audio device drop-down list.
- Select an audio source in the Audio input drop-down list.
• Video source: select Antenna if your TV has an antenna, or Cable if you have CATV. -
Select the channel you want to record.
-
Click to start burning. CyberLink PowerProducer displays the real-time progress of the task.
Note: The burning process may take at least a few minutes, depending on the length of your video and your computer's processing power.
You may preview the video you have burned by using the controls in the preview window.
Burn Video from a PC Camera to DVD or Blu-ray Disc
PC cameras (also known as web cams) are inexpensive, handy video cameras that you can use for simple video capturing.
Note: You must have a DVD burner or a Blu-ray Disc burner to use this function.
To burn video from a PC camera to DVD, do this:
- Start CyberLink PowerProducer.
- Click Right-to-Disc.
-
Insert your target disc and ensure that the correct drive is selected.
-
Select a recording speed in the Maximum speed drop-down list, then click .→

-
Select PC Camera from the Recording from drop-down list.
-
Set the TV format (NTSC or PAL) by selecting the location where you want to play your disc, and select a video quality. You may also set other options at this time:
• To burn a specific length of video, check the Auto-recording duration option, then enter a time in the entry box.
• To give the disc a Disc volume label, enter the desired label. This name appears when the disc is played on a computer.
• To give the disc a Disc name, enter the desired name. This name appears when the disc is played on a disc player.
- Click the Settings tab to display disc and video settings.

- Click to open a window containing PC camera settings.

- Select your PC camera in the Video device drop-down list.
- Select your audio device in the Audio device drop-down list.
-
Select an audio source in the Audio input drop-down list.
-
Click to start burning. CyberLink PowerProducer displays the real-time progress of the task.
Note: The burning process may take at least a few minutes, depending on the length of your video and your computer's processing power.
You may preview the video you have burned by using the controls in the preview window.
Burn Video from a VCR to DVD or Blu-ray Disc
If you have video that is stored on VHS tapes, you can burn that video content directly from your VCR to a DVD or Blu-ray Disc. You may wish to later edit your DVD to create a movie production or simply find storing your video on disc is more convenient.
Note: You must have a DVD burner or a Blu-ray Disc burner to use this function.
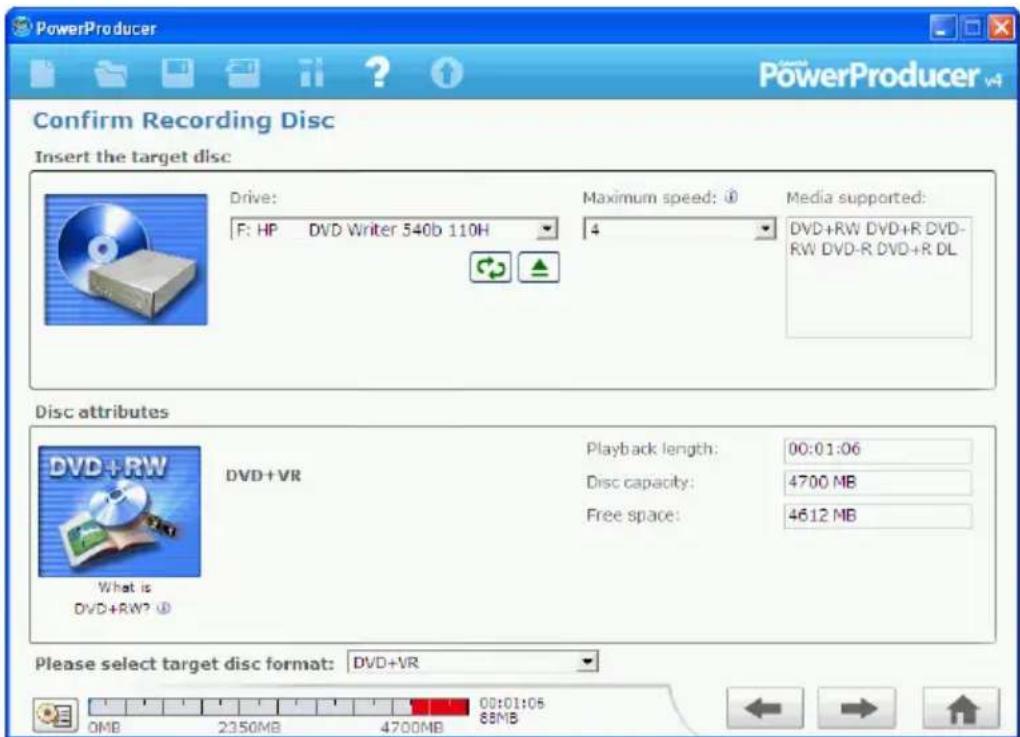
To burn video from a VCR to DVD or Blu-ray Disc, do this:
- Start CyberLink PowerProducer.
- Click Right-to-Disc.
-
Insert your target disc and ensure that the correct drive is selected.
-
Select a recording speed in the Maximum speed drop-down list, then click .→

-
Select Analog video from the Recording from drop-down list.
-
Set the TV format (NTSC or PAL) by selecting the location where you want to play your disc, and select a video quality. You may also set a number of other options at this time:
• To burn a specific length of video, check the Auto-recording duration option, then enter a time in the entry box.
• To give the disc a Disc volume label, enter the desired label. This name appears when the disc is played on a computer.
• To give the disc a Disc name, enter the desired name. This name appears when the disc is played on a disc player.
- Click the Settings tab to display disc and video settings.
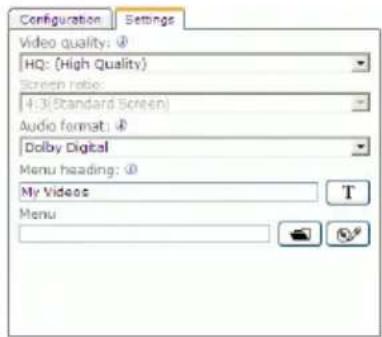
- Click to open a window containing VCR settings.
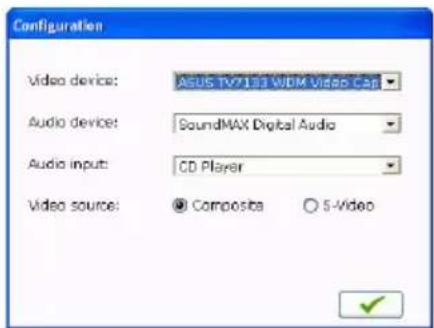
- Select your VCR in the Video device drop-down list.
- Select your audio device in the Audio device drop-down list.
-
Select an audio source in the Audio input drop-down list.
• To specify the type of video your VCR uses, select Composite or S-Video under the Video source option. -
Click to start burning. CyberLink PowerProducer displays the real-time progress of the task.
Note: The burning process may take at least a few minutes, depending on the length of your video and your computer's processing power.
You may preview the video you have burned by using the controls in the preview window.
Chapter 4:
Disc Utilities
In addition to its production, editing and disc burning functions, CyberLink PowerProducer offers a number of other utilities for managing your discs, disc image files and DVD folders.
This chapter contains the following sections:
- "PowerProducer's Disc Utilities" on page 76
- "Erase a Disc" on page 78
- " Copy a Disc " on page 7 9
- "Burn a Disc From a Disc Image" on page 81
- "Save a Disc Image" on page 82
- "Burn a Disc from a DVD Folder" on page 83
Note: The functions available to you may differ due to the version installed on your computer.
PowerProducer's Disc Utilities

CyberLink PowerProducer contains a number of utilities for managing disc content and format, disc image files and DVD folders. Use these utilities to prepare your discs for burning and to organize your media files for further editing or burning to disc.
To open CyberLink PowerProducer's disc utilities, do this:
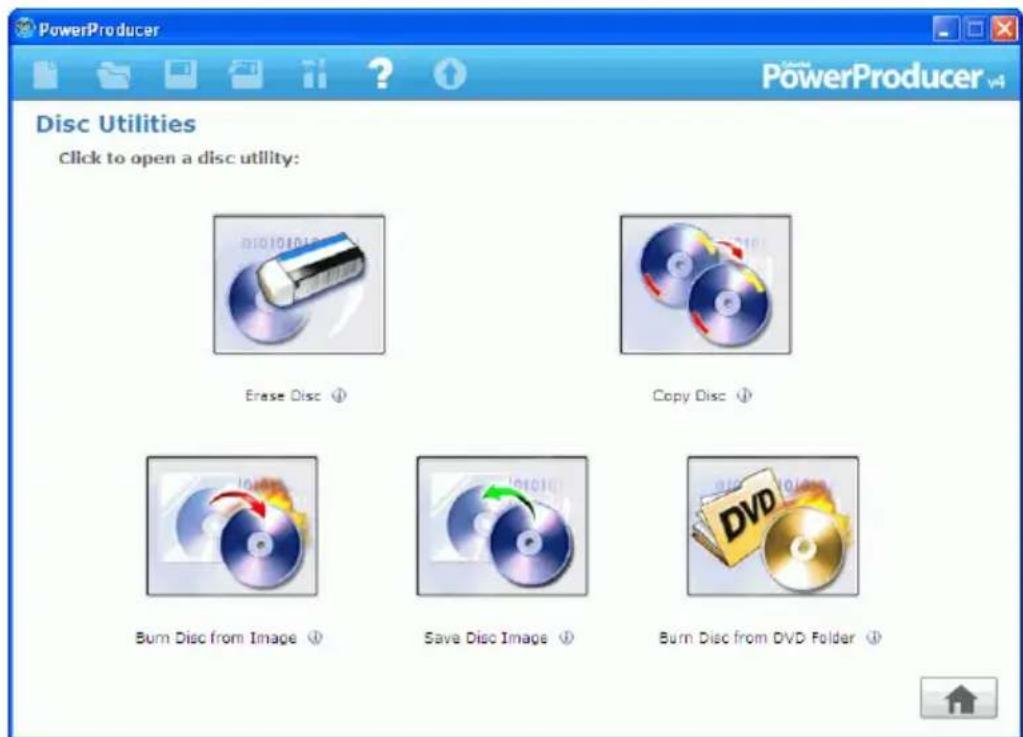
- Open CyberLink PowerProducer and click Disc Utilities.
-
Select the utility you want to use:
-
Erase Disc: click this icon to erase all content on a disc. For more information, see "Erase a Disc" on page 78.
- Copy Disc: click this icon to make a copy of a disc. For more information, see "Copy a Disc" on page 79.
- Burn Disc from Image: click this icon to burn a disc from a disc image. For more information, see "Burn a Disc From a Disc Image" on page 81
- Save Disc Image: click this icon to save a disc image for future burning. For more information, see "Save a Disc Image" on page 82.
- Burn Disc from DVD Folder: click this icon to burn the contents of a folder onto a disc. For more information, see "Burn a Disc from a DVD Folder" on page 83.
Erase a Disc

If you are using a rewritable disc you can erase content that was previously recorded on it. This allows you to reuse the same discs over and over without the need to continually buy new discs. Most manufacturers suggest that current - RW/+RW rewritable discs can be written to about 1,000 times. DVD-RAM discs can be written to 100,000 times.
To erase a disc, do this:
- Start CyberLink PowerProducer.
- Click Disc Utilities.
- Click Erase Disc.

-
Insert your disc and select your drive.
-
Click to refresh the display of your drive.
-
Click to open your disc drive door.
-
Select an erasing method.
• The Quick option erases the disc index contained on the disc.
• The Full option erases all of the content the disc contains.
- Click to start. CyberLink PowerProducer displays the real-time progress of the task.
Copy a Disc
CyberLink PowerProducer allows you to make an exact copy of a disc of any format. However, you must copy the disc onto another disc of the same format. (You cannot, for example, copy a CD onto a DVD.)
To copy a disc, do this:
- Start CyberLink PowerProducer.
- Click Disc Utilities.
- Click Copy Disc.

-
Insert your source disc into your drive.
-
Click to refresh the display of your drive.
-
Click to open your disc drive door.
-
Insert your target disc into your burning drive.
Note: If you use the same drive to copy discs, you must first set a disc image directory so CyberLink PowerProducer can copy the disc contents to your hard drive during the copy function.
- Select the burning options you want:
- Select a recording speed.
- Enter the number of copies you want to make.
- Keep the Enable buffer underrun protection option checked in order to avoid errors during copy.
- The On the fly option burns directly to disc without the intermediary step of first burning to your hard drive. Use this option if you have two disc drives.
- Check the Create disc image option when using one disc drive for the copy function.
- Click to start. CyberLink PowerProducer displays the real-time progress of the task.
Burn a Disc From a Disc Image

A disc image is the collection of all of your movie content and settings that is compressed and saved to disc in .RDF format for storage so you can work on it at a later time. A disc image is saved in the file structure that is destined to be burned to disc.
To burn a disc image, do this:
- Start CyberLink PowerProducer.
- Click Disc Utilities.
- Click Burn Disc From Image.

-
Insert your disc and select your drive.
-
Click to refresh the display of your drive.
-
Click to open your disc drive door.
-
Click, then open the disc image file.
-
Click to start. CyberLink PowerProducer displays the real-time progress of the task.
Save a Disc Image

If you have previously burned a disc image to a disc, you can save that image onto your hard drive. This function is useful for backing up your disc onto your hard drive for future burning (for example, if your computer does not have a burning drive installed).
To save a disc image, do this:
- Start CyberLink PowerProducer.
- Click Disc Utilities.
- Click Save Disc Image.

-
Insert your disc and select your drive.
-
Click to refresh the display of your drive.
-
Click to open your disc drive door.
-
Click , then select the directory where you want to save the disc image and enter a file name.
-
Click to start. CyberLink PowerProducer displays the real-time progress of the task.
Burn a Disc from a DVD Folder

If you have created a DVD folder that contains all of the media files for your production, you can burn this folder to a disc for storage. (Burning a DVD folder to disc is similar to burning a disc image, but does not employ compression and therefore has no compatibility issues.)
To burn a disc from a DVD folder, do this:
- Start CyberLink PowerProducer.
- Click Disc Utilities.
- Click Burn Disc From DVD folder.

-
Insert your disc and select your drive.
-
Click to refresh the display of your drive.
-
Click to open your disc drive door.
-
Click, then select the folder you want to burn from.
-
Click to start. CyberLink PowerProducer displays the real-time progress of the task.
CyberLink PowerProducer
Chapter 5:
Reference
This chapter contains reference information to help answer questions you may have about the digital movie production process or about using CyberLink PowerProducer.
This chapter contains the following sections:
- "FAQ" on page 86
- "Disc Types & Video Recording Formats" on page 88
- "Formats & Qualities" on page 93
FAQ
Answers to the most frequently asked questions concerning CyberLink PowerProducer are listed below. If you require further information, see "Technical Support" on page 97.
1. What's new in CyberLink PowerProducer 4?
• Authoring functions:
- Blu-ray Disc authoring: create high-quality, high definition video that will play back on a Blu-ray Disc player.
- HD DVD authoring: create high-quality, high definition video that will play back on an HD DVD player.
- 16:9 widescreen authoring: Generate widescreen movies to match your high-end display device perfectly. CyberLink PowerProducer also provides 4:3 and 16:9 preview modes to simulate how the movie will look on your TV.
- Capture functions:
• Capture from HDV camcorders: captures high-definition 1080i or 720p video from HDV camcorders. Includes the option to record directly from HDV device to blank disc.
- Menus:
- Wide screen (16:9) disc menus: create disc menus that utilize the entire display range of your wide screen television or monitor.
- TV safe zone: helps ensure that menu items, including text, thumbnails and buttons, will be within the display range of most TVs when creating disc menus.
- Burning functions:
- Blu-ray Disc support: Burn high definition, widescreen content onto a 25GB single-layer BD-RE disc. You can also burn video right to a Blu-ray Disc from a variety of sources.
- HD DVD support: Burn high definition, widescreen content onto a 15GB single-layer HD DVD-R disc.
2. What is Blu-ray Disc?
Blu-ray Discs (BD) are optical discs developed to enable burning and playing High-Definition video (HD), or to store data. BDs are burned using different technologies from CDs or DVDs, but can be made compatible with the appropriate hardware. BDs can be single-layer (2 hours HD/25GB of data) or dual-layer (4 hours HD or 50GB of data). CyberLink PowerProducer supports burning to rewritable, single-layer Blu-ray discs.
3. What are HD DVD Discs?
HD DVD (High Density Digital Versatile Disc or High Definition Digital Video Disc) is a digital optical media format that can hold high definition video or other data. HD DVD is similar to the competing Blu-ray Disc, which also uses the same CD-size (120 mm diameter), optical data storage media and 405 nm wavelength blue laser.
Disc Types & Video Recording Formats
This section describes the different disc types and disc formats that you can use in CyberLink PowerProducer.
Disc Types
In broad terms, discs are divided into the following categories:
• CD (which, being the earlier technology, is more widely supported)
- DVD (which holds many times the amount of content, but requires a different drive)
- Blu-ray Disc (new technology that enables the playback of High-Definition video (HD))
- HD DVD (new technology that enables the playback of High-Definition video (HD))
The following is a brief description of the different disc types supported by CyberLink PowerProducer.
Multi Session Discs
Multi session discs allow you to append additional data after the original burning session. CyberLink PowerProducer creates a multi session disc whenever you burn a CD-R, CD-RW, DVD-R, DVD+R, BD-RE, BD-R or HD DVD-R disc and choose not to close or finalize the disc. Therefore, you can continue to add content to a multi session disc until the disc is full or closed, at which point you can no longer append any further data.
CD Types
CDs contain up to 74/80 minutes of high quality video or 650/700 MB of data.
| Type Description | |
| CD-R | CD-R is a “write once” CD format. CD-RW burners and most new DVD burners can write in CD-R, and most DVD players can also read this format. |
| CD-RW | CD-RW is an erasable CD format. CD-RW burners and most new DVD burners can write in CD-RW, and most DVD players can also read this format. |
DVD Types
DVD is a high capacity disc that holds anywhere from 4.7-17 GB of data, or from roughly 2-8 hours of video (depending on the type of DVD and the video quality setting). Using the High Quality setting, you can expect to be able to record 1-2 hours of video.
DVDs can be played on DVD players and computers equipped with DVD drives. For more detailed information on DVD-R/RW formats, see www.dvdrhelp.com/dvd or other web sources. For more detailed information on DVD+R/RW formats, see www.dvdrw.com or other web sources.
| Type Description | |
| DVD-R | DVD-R, a “write once” DVD format, is a competitor product to DVD+R, and is therefore not compatible with that format. Some new DVD burners can write in both DVD-R and DVD+R, and most DVD players can read both formats. |
| DVD-RW | DVD-RW, an erasable DVD format, is a competitor product to DVD+RW, and is therefore not compatible with that format. Some new DVD burners can write in both DVD-RW and DVD+RW, and most DVD players can read both formats. |
| DVD+R | DVD+R, a “write once” DVD format, is a competitor product to DVD-R, and is therefore not compatible with that format. Some new DVD burners can write in both DVD-R and DVD+R, and most DVD players can read both formats. |
| DVD+RW | DVD+RW, an erasable DVD format, is a competitor product to DVD-RW, and is therefore not compatible with that format. Some new DVD burners can write in both DVD-RW and DVD+RW, and most DVD players can read both formats. |
| DVD-RAM | DVD-RAM is an erasable DVD format that can be erased about 100,000 times. While DVD-RAM has technological advances, it is incompatible with many DVD burners and players. |
| DVD-R DL | DVD-R DL discs are dual layer writable discs in DVD-R format. A DVD-R DL disc (also called a DVD-R9 DL disc) can hold approximately 8.5 GB of data. |
| DVD+R DL | DVD+R DL discs are dual layer writable discs in DVD+R format. A DVD+R DL disc (also called a DVD+R9 DL disc) can hold approximately 8.5 GB of data. |
Blu-ray Discs
Blu-ray discs (BD) are optical discs developed to enable burning and playing High-Definition video (HD), or to store data. BDs are burned using different technologies from CDs or DVDs, but can be made compatible with the appropriate hardware. BDs can be single-layer (2 hours HD/25GB of data) or dual-layer (4 hours HD or 50GB of data).
CyberLink PowerProducer supports burning to rewritable, single-layer Blu-ray discs.
HD DVD Discs
HD DVD (High Density Digital Versatile Disc or High Definition Digital Video Disc) is a digital optical media format that can hold high definition video or other data. HD DVD is similar to the competing Blu-ray Disc, which also uses the same CD-size (120 mm diameter), optical data storage media and 405 nm wavelength blue laser.
Video Recording Formats
Below is a description of the video recording formats that CyberLink PowerProducer supports for burning discs:
| Format Description | |
| DVD-Video | DVD-Video is the most widely supported DVD movie format, which can be played on almost all DVD players. |
| DVD-VR | A video format on DVD-RW or DVD-RAM discs. DVD-VR discs can be played on a DVD player with the RW Compatible logo. |
| DVD+VR | A video format on DVD+R/RW, DVD-R/RW discs. DVD+VR discs can be played on a DVD-Video player. |
| SVCD | SVCD (Super Video Compact Disc) is a CD video format that uses MPEG compression. SVCD offers much higher video quality than VCD. It can hold 35 minutes of video, and can contain menus and chapters like a DVD, as well as slide shows with background audio. SVCDs can be played on a PC with DVD playback software, and on some standalone DVD players. |
| VCD | VCD (video compact disc) is a CD video format that uses MPEG compression. VCD contains audio and video of a quality about the same as that of VHS, and also contains menus and chapters like a DVD. VCD can be played on a PC with VCD/MPEG playback software and on most stand-alone DVD players. |
| BDAV | BDAV is a video recording format for Blu-ray discs. BDAV is a simplified recording format mainly designed for pure video recording and does not offer advanced interface features like those on a DVD disc. |
| HD DVD Video | HD DVD Video is a video recording format for HD DVD discs. |
Disc Type/Format Compatibility
Since some commercial CD players cannot play CD-RWs, it is recommended that you use CD-R/CD+R discs to burn music CDs.
It is recommended that you use RW or DVD-RAM discs for video in DVD-VR format. DVD-VR discs can be played on a DVD player with the RW Compatible logo.
It is recommended that you use DVD+R/RW or DVD-R/RW discs for video in DVD+VR format. DVD+VR discs can be played on a DVD-Video player.
Formats & Qualities
When you burn video to disc, you must take into consideration not only the quality you want to use, but also the TV format of the country or region in which you want to watch the movie disc you burn. The section below offers information on both of these topics, allowing you to burn video discs that suit your playback capabilities.
Video Formats
The two video formats (NTSC and PAL) have been adopted as standards by television broadcasters around the world. The main difference between the two formats is the number of frames per second they offer: 30 in NTSC, and 25 in PAL. This difference means that a movie recorded in NTSC format is unplayable by a PAL player and vice versa.
Fortunately, the question of whether to use PAL or NTSC television format for your disc can be reduced to the following simple question:
• In which country or region do you plan to play this disc?
Since all countries use either the NTSC or PAL format, knowing the location in which the disc will be played pretty much resolves this issue for you. By selecting the desired country or region in CyberLink PowerProducer, the television format is automatically set.
Note: Generally speaking, the United States, Japan, Canada and Mexico use NTSC, while Germany, Great Britain, South America, Australia and most of Western European and Asian countries use PAL.
Video Qualities
The different video quality settings (HQ, SP, LP, and EP) available in CyberLink PowerProducer result in a final picture of higher or lower quality and a movie file of larger or smaller size. Better quality video also demands more from your computer and limits the video duration you can burn to disc. Below is a comparison of the length of video you can expect to be able to burn to a DVD using the different qualities:
• HQ (High Quality): 60 mins
• SP (Standard Play): 120 mins
• LP (Long Play): 180 mins
• EP (Extended Play): 240 mins
For the best possible image in your final production, select the highest video quality that will allow your production to fit onto the disc type you are using. Your ultimate choice of video quality, however, should be based both on the image quality you want in your final production and on the processing power of your computer. The table below illustrates the availability of video qualities when burning different disc types.
This chapter contains technical support information. It includes all the information to find the answers you need to assist you. You may also find answers quickly by contacting your local distributor/dealer.
This chapter contains the following sections:
- "Before Contacting Technical Support" on page 98
- "Web Support" on page 99
• "Telephone Support" on page 99 - "Email Support" on page 100
Before Contacting Technical Support
Please take advantage of one of CyberLink's free technical support options:
- consult the User Guide or the online help installed with your program.
• refer to the Frequently Asked Questions (FAQs) in the Support section of the CyberLink Web site.
http://www.cyberlink.com/multi/support/product_faq_home.jsp
The FAQs may have information and helpful hints that are more current than the User Guide and online help.
When contacting technical support by email or phone, please have the following information ready:
- r e g i s t e r e d CD-key (located on your CD case)
- the product name, version and build number, which generally can be found by clicking on the product name image on the user interface
- the version of Windows installed on your system
- hardware devices on your system (capture card, sound card, VGA card) and their specifications
- the wording of any warning messages that were displayed (You may want to write this down or take a screen capture)
- a detailed description of the problem and under what circumstances it occurred
Web Support
Solutions to your problems are available 24 hours a day at no cost on the CyberLink web sites:
Note: You must first register as a member before using CyberLink web support.
CyberLink provides a wide range of web support options, including FAQs and a user community forum, in the following languages:
| Language Web Support URL | |
| English | http://support.gocyberlink.com |
| Traditional Chinese | http://tw.cyberlink.com/chinese/cs/support/index.jsp |
| Simplified Chinese | http://cn.cyberlink.com/chinese/cs/support/index.jsp |
| Japanese | http://jp.cyberlink.com/english/cs/support/new_site/support_index_jpn.jsp |
Note: A community forum and some other limited web support features are also available in German.
Telephone Support
In order to provide the best solution to our end-users, Voice Support is part of the service we provide in the following languages:
| Language Voice Support URL | |
| Chinese | http://tw.cyberlink.com/chinese/cs/support/voice_support.jsp |
| English | http://www.cyberlink.com/english/cs/support/new_site/voice_support.jsp |
| French, German, Italian, Spanish | http://de.cyberlink.com/multi/program/page_page_display.jsp?seqno=173 |
| Japanese | http://jp.cyberlink.com/english/cs/support/new_site/support_index_jpn.jsp |
Email Support
Email support is available in a variety of languages, including through the use of the technical inquiry form.
See the following list for contact information for specified languages.
| Language Web Support URL | |
| Traditional Chinese | http://tw.cyberlink.com/english/cs/support/form/index.jsp |
| English | http://www.cyberlink.com/english/cs/support/form/index.jsp |
| French, German, Italian, Spanish | goCyberlink@aixtema.de |
Index
viewing properties 31
Aspect Ratio 15
adjusting 26
audio qualities 9
A
AB Cut 27
acquiring content 16
from digital camera 25
from DV camcorder 19
from file 18
from HDV camcorder 21
from PC camera 24
from TV 22
from VCR 23
adding
background music to albums 31
background music to disc menu 39
images as menu backgrounds 37
photos to an album 31
playlists 43
slides to albums, photos to al- bums 19
albums
adding background music to 31
adding photos 31
adding slides to 19
creating new 30
modifying name 31
number of slides allowed in 19
previewing 46
B
back up photos on disc 32
background music, adding to albums
31
Blu-ray Disc 15
buffer under-run protection 49
buffer underrun protection 80
Burn to disc 50
burning
configuration 49
disc from a DVD folder 83
disc from disc image 81
DV content to DVD 59
editing a disc after 56
from camcorder to Blu-ray Disc 60
from camcorder to DVD 60
from HDV camcorder to Blu-ray Disc 63
from HDV camcorder to DVD 63
from TV to Blu-ray Disc 66
from TV to DVD 66
from VCR to Blu-ray Disc 72
from VCR to DVD 72
from webcam to Blu-ray Disc 69
from webcam to DVD 69
buttons
frame style 38
layout 38
number per page 37
style 38
C
camcorder
burning to Blu-ray Disc 60
burning to DVD 60
capturing from 19, 21
capturing
from digital camera 25
from DV camcorder 19
from HDV camcorder 21
from PC camera 24
from TV 22
from VCR 23
CD
types 89
vs. DVD 88
chapters
removing 42
setting 41
clips
deleting from storyboard 35
editing 27
moving in storyboard 34
previewing 46
viewing properties 47
compatibility of file formats & disc
types 92
content
acquiring 16
mixing video and photos 16
previewing 48
copying discs 79
Create a DVD folder 54
creating
albums 30
disc image file 80
PowerProducer projects 6
customizing menu pages 36
D
default
menu style 9
name for captured video 8
Delete selected 27
deleting clips from storyboard 35
detecting scenes 42
digital camera, capturing from 25
Disc capacity 15
disc formats
selecting for a production 14
supported 10
disc image
burning 81
creating 80
saving 82
disc types
supported 10, 88
disc utilities 75
burn a disc from a DVD folder 83
copying 79
disc images 81
erasing 78
saving a disc image 82
Display TV safe zone 9
download a template 38
durations in slide shows, setting 32
DV camcorder, capturing from 19
DV, burning to DVD 59
DVD 15
vs. CD 88
DVD folder, burning a disc from 83
DVD structure, viewing 47
DVD types 89
E
editing
clips 27
disc after burning 56
text on disc menus 39
erasing discs 78
F
FAQ 86
Favorite files
opening as template 39
saving 39
file formats
supported 10
final output 75
first play 40
Frame 38
full erase 78
H
HD DVD 15
HDV camcorder
burning to Blu-ray Disc 63
burning to DVD 63
HDV camcorder, capturing from 21
HQ (High Quality) 94
|
importing
photos 18
video files 18
K
Keep selected 27
L
location 9
LP (Long Play) 94
M
mark in 27
mark out 27
menus
adding background music 39
Button Layout 38
Button Style 38
Buttons Per Page 37
customizing 36
editing text 39
first play 40
Frame 38
Template 37
merging clips 28
mixing video and photos 16
modifying
name of an album 31
modifying disc menu
adding background music 39
Button Layout 38
Button Style 38
Buttons Per Page 37
editing text 39
Frame 38
Template 37
move a thumbnail 35
movie playback mode 8
moving clips in storyboard 34
MPEG@Best 8
multisession discs 88
N
number of slides allowed in an album 19
O
on the fly copying 80
opening
Favorite files 39
project file 6
P
PC camera
burning to Blu-ray Disc 69
burning to DVD 69
capturing from 24
photos
adding to slide shows 19, 31
backing up on disc 32
importing 18
playback modes 8
playlists
adding 43
selecting 44
pre-production
disc production 4
ready to burn 4
Preview pane 45
previewing
albums 46
clips 46
disc content 48
DVD structure 47
production 45
production summary 48
while importing DVD content 43
while importing video files 18
producing movie discs 13
production
flow 3
functions in PowerProducer 2
pre-production 3
summary, viewing 48
project file, opening 6
project files 6
properties
albums 31
clips 47

quick erase 78

remove a chapter 42
Right-to-disc 60, 63, 66, 69, 72

safe zone 9
Save as disc image 52
saving
disc images 82
Favorite files 39
scene detection 42
select a disc format 14
setting chapters 41
slides, adding to albums, photos,
adding photos 19
Smart Fit 9
SP (Standard Play) 94
splitting clips 28
supported disc and file formats 10
system requirements 11

temp directory 8
Template 37
templates, downloading 38
thumbnail index 8
thumbnails, moving 35
title thumbnail
set photo as 32
TV
burning to Blu-ray Disc 66
burning to DVD 66
capturing from 22
TV safe zone 9

upgrade your software 7
utilities 75

VCD 15
VCR
burning to Blu-ray Disc 72
burning to DVD 72
capturing from 23
video files, importing 18
video qualities 9
video quality
hint on selecting 94
HQ 94
LP 94
SP 94
Video recording format 15, 91
video thumbnail 8
viewing
album properties 31
clip properties 47
production size 48
W
webcam
burning to Blu-ray Disc 69
burning to DVD 69
capturing from 24
welcome 2
what's new in PowerProducer 4? 86
working directory 8


- COPYRIGHT AND DISCLAIMER
- INTERNATIONAL HEADQUARTERS
- CONTENTS
- INTRODUCTION...... 1
- PRODUCE A MOVIE DISC 13
- RIGHT-TO-DISC 59
- DISC UTILITIES.... 75
- REFERENCE 85
- TECHNICAL SUPPORT...... 97
- INDEX 101
- CHAPTER 1
- INTRODUCTION
- WELCOME
- IMPORTING AND CAPTURING MEDIA
- VIDEO AND PICTURE EDITING
- CUSTOMIZING YOUR DISC
- DISC BURNING AND UTILITIES
- PRODUCTION FLOW
- PRE-PRODUCTION
- DISC PRODUCTION
- READY TO BURN
- THE POWERPRODUCER PROGRAM
- PRODUCE MOVIE DISC
- EDIT DISC
- DISC UTILITIES
- RIGHT-TO-DISC
- OPEN PROJECT
- POWERPRODUCER PROJECTS
- UPGRADE YOUR SOFTWARE
- PRODUCTION PREFERENCES
- PROJECT PREFERENCES
- VIDEO/AUDIO PREFERENCES
- SUPPORTED FORMATS
- SYSTEM REQUIREMENTS
- CHAPTER 2
- PRODUCE A MOVIE DISC
- SELECT A DISC FORMAT
- ACQUIRE CONTENT
- IMPORT VIDEO FILES
- IMPORT PHOTOS
- CAPTURE FROM A DV CAMCORDER
- CAPTURE FROM AN HDV CAMCORDER
- CAPTURE FROM A TV
- CAPTURE FROM A VCR
- CAPTURE FROM A PC CAMERA
- CAPTURE FROM A DIGITAL CAMERA
- ADJUST A VIDEO CLIP'S ASPECT RATIO
- EDIT CLIPS
- AB CUT
- MERGE
- SPLIT
- ADVANCED EDITING FOR VIDEO (OPTIONAL)
- CREATE A PHOTO SLIDE SHOW
- CREATE A NEW ALBUM
- ADD PHOTOS TO AN ALBUM
- VIEW ALBUM PROPERTIES
- ADD BACKGROUND MUSIC TO AN ALBUM
- SET DURATIONS
- BACK UP PHOTOS ON DISC
- SET PHOTO AS TITLE THUMBNAIL
- ADVANCED EDITING FOR PHOTOS (OPTIONAL)
- ORGANIZE YOUR STORY
- PLAY A CLIP
- MOVE A THUMBNAIL
- DELETE A CLIP
- CUSTOMIZE YOUR DISC'S MENU PAGE
- SELECT A MENU PAGE TEMPLATE
- ADD YOUR OWN IMAGE AS A BACKGROUND IMAGE
- SPECIFY THE NUMBER OF BUTTONS PER MENU PAGE
- SELECT A BUTTON FRAME STYLE
- SELECT A BUTTON LAYOUT
- SELECT A BUTTON STYLE
- DOWNLOAD A TEMPLATE
- SAVE A TEMPLATE AS A FAVORITE FILE
- OPEN A FAVORITE FILE AS A TEMPLATE
- MODIFY MENU TEXT
- SET BACKGROUND MUSIC
- SET A FIRST PLAY VIDEO CLIP
- SET CHAPTERS
- SET CHAPTERS AUTOMATICALLY
- SET CHAPTERS MANUALLY
- REMOVE A CHAPTER
- ADD A PLAYLIST
- SELECT A PLAYLIST
- PREVIEW DISC CONTENT
- PREVIEW YOUR PRODUCTION
- PREVIEW A VIDEO CLIP
- PREVIEW AN ALBUM
- VIEW THE DVD STRUCTURE
- VIEW CLIP PROPERTIES
- VIEW THE PRODUCTION SUMMARY
- FINAL OUTPUT
- SET YOUR BURNING CONFIGURATION
- BURN YOUR PRODUCTION TO DISC
- SAVE YOUR PRODUCTION AS A DISC IMAGE
- CREATE A DVD FOLDER
- EDIT A DISC AFTER BURNING
- CHAPTER 3
- BURN VIDEO FROM A DV CAMCORDER TO DVD OR BLU- RAY DISC
- BURN VIDEO FROM AN HDV CAMCORDER TO BLU-RAY DISC
- BURN VIDEO FROM A TV TO DVD OR BLU-RAY DISC
- BURN VIDEO FROM A PC CAMERA TO DVD OR BLU-RAY DISC
- BURN VIDEO FROM A VCR TO DVD OR BLU-RAY DISC
- CHAPTER 4
- POWERPRODUCER'S DISC UTILITIES
- ERASE A DISC
- COPY A DISC
- BURN A DISC FROM A DISC IMAGE
- SAVE A DISC IMAGE
- BURN A DISC FROM A DVD FOLDER
- CHAPTER 5
- REFERENCE
- FAQ
- WHAT'S NEW IN CYBERLINK POWERPRODUCER 4
- AUTHORING FUNCTIONS
- CAPTURE FUNCTIONS
- MENUS
- BURNING FUNCTIONS
- WHAT IS BLU-RAY DISC
- WHAT ARE HD DVD DISCS
- DISC TYPES & VIDEO RECORDING FORMATS
- DISC TYPES
- MULTI SESSION DISCS
- CD TYPES
- DVD TYPES
- BLU-RAY DISCS
- HD DVD DISCS
- VIDEO RECORDING FORMATS
- DISC TYPE/FORMAT COMPATIBILITY
- FORMATS & QUALITIES
- VIDEO FORMATS
- VIDEO QUALITIES
- BEFORE CONTACTING TECHNICAL SUPPORT
- WEB SUPPORT
- TELEPHONE SUPPORT
- EMAIL SUPPORT
- INDEX
- A
- B
- C
- D
- E
- F
- H
- K
- L
- M
- N
- O
- P
- W
Brand : CYBERLINK
Model : PowerProducer 4
Category : Photo/Video Software