
MP7730 - Video projector 3M - Free user manual and instructions
Find the device manual for free MP7730 3M in PDF.


| Type de produit | Video projector |
| Marque | 3M |
| Modèle | MP7730 |
| Technologie d'affichage | LCD |
| Résolution native | XGA (1024 x 768) |
| Luminosité | 3000 lumens ANSI |
| Contraste | 2000:1 |
| Durée de vie de la lampe | 3000 heures (mode normal) |
| Dimensions (L x P x H) | 320 x 240 x 110 mm |
| Poids | 3.2 kg |
| Alimentation | AC 100-240V, 50/60Hz |
| Consommation électrique | 280W (max) |
| Entrées vidéo | VGA, S-Vidéo, Composite, HDMI |
| Sortie audio | Haut-parleur intégré 5W |
| Correction trapézoïdale | Verticale ±30° |
| Fonctions principales | Projection avant/arrière, plafond, mise au point manuelle, zoom |
| Entretien et nettoyage | Nettoyer le filtre à air toutes les 100 heures; utiliser un chiffon doux et sec |
| Sécurité | Ventilation adéquate requise; ne pas regarder directement le faisceau lumineux |
| Pièces détachées et réparabilité | Lampe de rechange modèle BL-FP200A; filtre à air disponible |
| Informations générales | Manuel d'utilisation inclus; garantie 2 ans |
Frequently Asked Questions - MP7730 3M
User questions about MP7730 3M
0 question about this device. Answer the ones you know or ask your own.
Ask a new question about this device
Download the instructions for your Video projector in PDF format for free! Find your manual MP7730 - 3M and take your electronic device back in hand. On this page are published all the documents necessary for the use of your device. MP7730 by 3M.
USER MANUAL MP7730 3M
MP7730 Multimedia Projector
Operator's Guide
natural_image
Line drawing of a projector with ventilation slots and control buttons (no text or symbols)Table of Contents
Please click on any section to jump to that section
Introduction
Safeguards 4
Thank You for Choosing 3M 6
Warranty 6
Shipping Box Contents 7
Optional Accessories 7
Part Identification 8
Machine Characteristics 9
Remote Control Identification 10
Remote Control Features 11
System Setup
Screen Chart 13
Digital Keystone Correction 13
Connecting to Various Equipment 14
System Set-Up 15
Operation
Start-up 16
Menu System 17
Shutdown 22
Optional Video Module 23
Attaching the Optional Audio/Visual Module 24
Optional Video Module Menus 25
Maintenance
Lamp Usage 29
Lamp Replacement 30
Resetting Lamp Hours 31
Troubleshooting
Common Problems & Solutions 32
Status Light Messages 33
Service Information
Accessories 34
Ordering Parts or Getting Information 34
Appendix 35
Introduction
Intended Use
Before operating the machine, please read the entire manual thoroughly. The 3M Multimedia Projector MP7730 was designed, built, and tested for use indoors, using 3M lamps, 3M ceiling mount hardware, and nominal local voltages. The use of other replacement lamps, outdoor operation, operation in environments containing heavy cigarette smoke or different voltages has not been tested and could damage the projector or peripheral equipment and/or create a potentially unsafe operating condition.
Important Safeguards
- Read and understand all instructions before using. Pay particular attention to areas where these symbols are shown:

WARNING
Indicates a potentially hazardous situation which, if not avoided, could result in death or serious injury.

Caution
Indicates a potentially hazardous situation which, if not avoided, could result in minor or moderate injury. It may also be used to alert against unsafe practices.
√ Note - Used to emphasize important conditions or details.
-
Close supervision is necessary when any appliance is used by or near children. Do not leave appliance unattended while in use.
-
Never look directly into the projector lens when the lamp is on. The high pressure mercury lamp produces a strong light that could damage your eyesight.
-
Care must be taken, as burns can occur from touching hot parts.

Caution
-
Do not operate appliance with a damaged cord or if the appliance has been dropped or damaged, until it has been examined by a qualified service technician.
-
Position the cord so that it will not be tripped over, pulled or placed in contact with hot surfaces.
-
If an extension cord is necessary, a cord with a current rating at least equal to that of the appliance should be used. Cords rated for less amperage than the appliance may overheat.
-
Always unplug appliance from electrical outlet before cleaning and servicing and when not in use. Grasp plug and pull to disconnect.
-
To reduce the risk of electric shock, do not immerse this appliance in water or other liquids.
-
To reduce the risk of electric shock, do not disassemble this appliance. Take it to a qualified technician when service or repair work is required. Incorrect reassembly can cause electric shock when the appliance is subsequently used.
-
Connect this appliance to a grounded outlet.
-
Do not expose this projector to direct sunlight or use it outside.
-
Keep all ventilation openings free of any obstructions.
-
Always open the lens shutter or remove the lens cap when the projector lamp is on.
-
Do not look directly into light beam of laser pointer. The pointer produces a strong light which could damage your eyesight.
-
The projection lamp contains mercury. Always dispose of it in a proper manner according to local regulations.
-
Always operate machine on a flat, sturdy surface.
Introduction
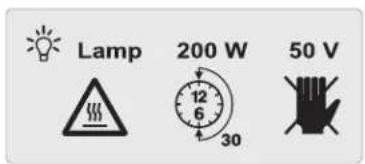
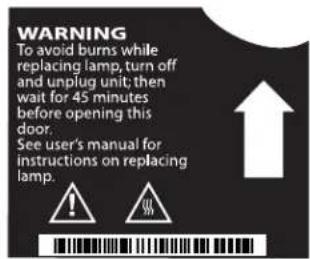
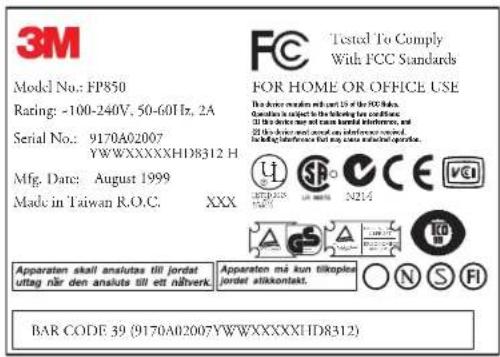
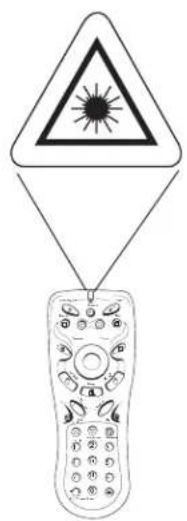
Product Safety Labels
The following safety labels are used on or within the MP7730 projector to alert you to items or areas requiring your attention.

Caution
In some countries, the line voltage is NOT stable. This projector is designed to operate safely within a bandwidth of 110 to 230 volts ± 10 volts, but could fail if power drops or surges of ±10 volts occur. In these high-risk areas, it is recommended to install a power stabilizer unit.
Save These Instructions
The information contained in this manual will help you operate and maintain your 3M™ MP7730 Multimedia Projector.
Introduction
Thank You for Choosing 3M
Thank you for choosing 3M multimedia projection equipment. This product has been produced in accordance with 3M's highest quality and safety standards to ensure smooth and troublefree use in the years to come.
For optimum performance, please follow the operating instructions carefully. We hope you will enjoy using this high performance product in your meetings, presentations, and training sessions.
Warranty
Limited Warranty
3M warrants this product against any defects in material and workmanship, under normal usage and storage, for a period of two years from date of purchase. Exclusion to Warranty: The lamps are considered a consumable item and are warranted for 90 days or 180 hours, whichever occurs first. Proof of purchase date will be required with any warranty claim. In the event this product is found to be defective within the warranty period, 3M's only obligation and your exclusive remedy shall be replacement of any defective parts (labor included). To obtain warranty service, immediately notify the dealer from which you purchased the product of any defects. In the USA call 1-800-328-1371 for warranty or repair service.
Limitation Of Liability
THE FOREGOING WARRANTY IS MADE IN LIEU OF ALL OTHER WARRANTIES, EXPRESSED OR IMPLIED, AND 3M SPECIFICALLY DISCLAIMS ANY IMPLIED WARRANTY OF MERCHANTABILITY AND FITNESS FOR A PARTICULAR PURPOSE. 3M SHALL NOT BE LIABLE FOR ANY DAMAGES, DIRECT, CONSEQUENTIAL, OR INCIDENTAL, ARISING OUT OF THE USE OR INABILITY TO USE THIS PRODUCT.
Important: The above warranty shall be void if the customer fails to operate product in accordance with 3M's written instructions. This warranty gives you specific legal rights, and you may have other rights which vary from state to state.
FCC STATEMENT - CLASS B: This equipment generates, uses and can radiate radio frequency energy and, if not installed and used in accordance with the instructions, may cause harmful interference to radio communications. However, there is no guarantee that interference will not occur in a particular installation. If this equipment does cause harmful interference to radio or television reception, which can by determined by turning the equipment off and on, the user is encouraged to try to correct the interference by one or more of the following measures:
— Reorient or relocate the receiving antenna.
— Increase the separation between the equipment and receiver.
— Connect the equipment into an outlet on a circuit different from that to which the receiver is connected.
— Consult the dealer or an experienced radio/TV technician for help.
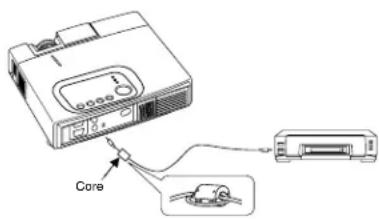

Caution
Changes or modifications not expressly approved by the party responsible for compliance could void the user's authority to operate the equipment.
NOTICE: This Class B digital apparatus complies with Canadian ICES-003.
EEC STATEMENT: This machine was tested against the 89/336/EEC (European Economic Community) for EMC (Electro Magnetic Compatibility) and fulfills these requirements.
Video Signal Cables: Double shielded coaxial cables (FCC shield cable) must be used, and the outer shield must be connected to the ground. If normal coaxial cables are used, the cable must be enclosed in metal pipes or in a similar way to reduce the interference noise radiation.
Video Inputs: The input signal amplitude must not exceed the specified level.
Patents, Trademarks & Copyrights
IBM is a registered trademark of International Business Machines Corporation. Apple Macintosh and Apple Powerbook are registered trademarks of Apple Computer, Inc. Microsoft and Windows 95 and Windows 98 are registered trademarks, and Windows and Windows for Workgroups are trademarks of the Microsoft Corporation. Toshiba is a registered trademark of Toshiba Corporation. All other products are trademarks or registered trademarks of their respective companies.
Introduction
Shipping Box Contents
The 3M ^™ MP7730 Multimedia Projector is shipped with the necessary cables required for standard VCR, PC, Macintosh ^™ or laptop computer connections. Carefully unpack and verify that you have all of the items shown below. If any of these items are missing, please contact your place of purchase.
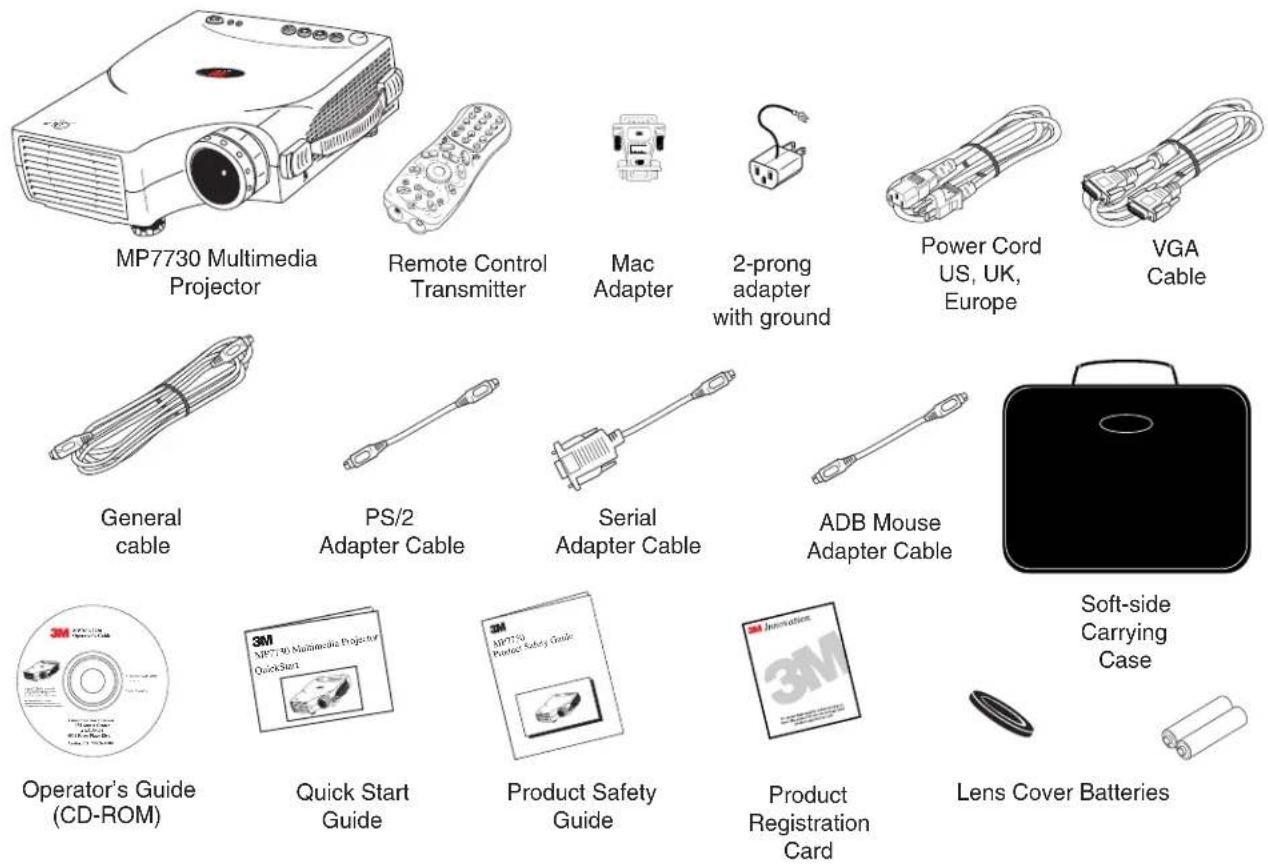
Optional Accessories
Video Module (RCA with tuner) ..... (1)
Video Module (SCART without tuner) ..... (1)
√ Note: For more information on the Optional Video Module and its functions, please see the Optional Video Module section of this manual.
√ Note: Save the shipping box and packing materials in the event the MP7730 should require shipping to a 3M Service Center for repair.
What's Next?
After you have unpacked the MP7730 and identified all the parts, you are ready to set up the projector.
Please read this guide thoroughly before operating your new projector.
Be sure to check our web site (www.3m.com/meetings) regularly for updates and supplemental information. On the CD-ROM, you can link directly to the web site by clicking here or on "3M Innovation" in the lower right corner of the Main Menu.
Introduction
Part Identification
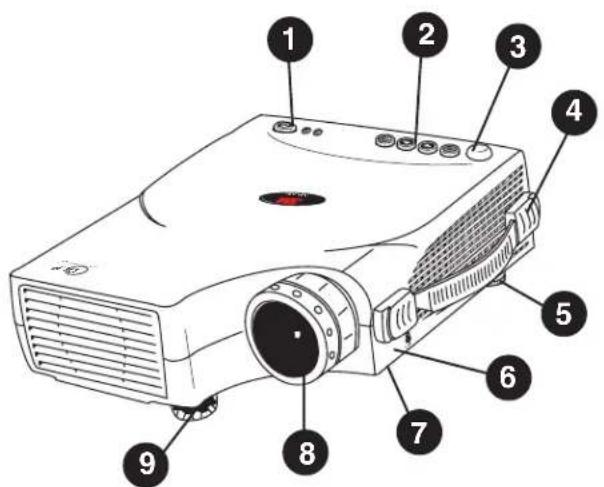
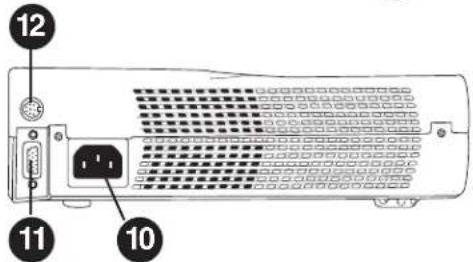
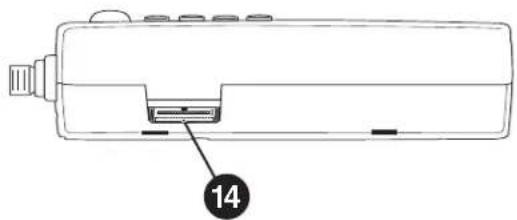
natural_image
Line drawing of a device with labeled component 14 (no text or symbols beyond label)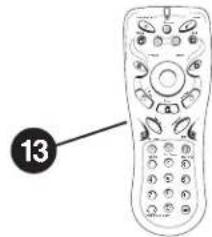
natural_image
Line drawing of a remote control with keypad and buttons, labeled with number 13 (no text or symbols on device)- Standby/On Button 8. Projection Lens
- External Control Pad 9. Height Adjustment Feet
- Remote Control Sensor 10. AC Power Cord Input
- Carrying Handle 11. Serial Port Terminal Connection
- Image Tilt Control 12. Mouse Control Port (Serial • PS/2 • ADB)
- Kensington Lock slot 13. Remote Control Transmitter
- Lamp Access Door (underneath unit) 14. Video Module Connection
Introduction
Machine Characteristics
The MP7730 Multimedia Projector integrates ultra-high bright lamp and TI ^™ DLP ^™ technology into a single unit.
The MP7730 Multimedia Projector offers the following features:
- Small and portable unit • Full function remote control
- Easy to set up and use • Digital keystone correction
• XGA resolution and component video compatible
• Horizontal and vertical image inverting
• Horizontal and vertical image position control - Ultra-high brightness projection lamp
- Ability to display 16.7 million colors
• IR remote control sensor on top
- On screen menus in seven languages
• Color balance control for data/video
• RS-232 control capability
The MP7730 Multimedia Projector offers the following optional features:
- Attachable video module • Cable television (CATV) tuner
√ Note: The brightness of your machine will vary depending on the ambient room conditions and contrast/brightness settings.
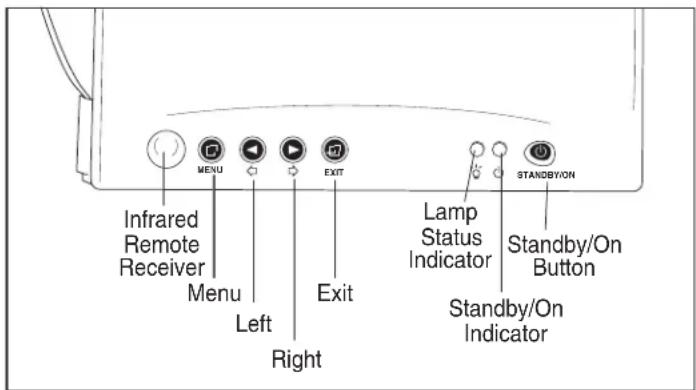
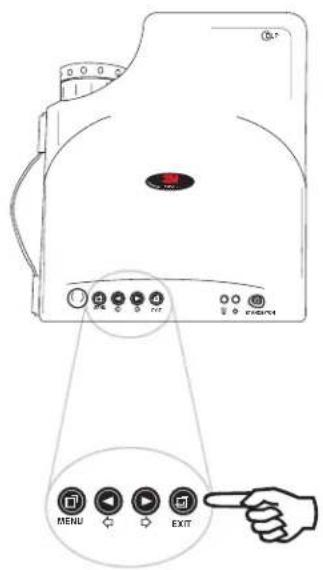
External Control Pad Buttons
The External Control Pad is located on top of the projector, near the back end.
The Infrared Remote Receiver allows the projector to accept signals from the remote control. For best results, be sure to aim the control toward this sensor, without any obstructions between the two, and at a distance no greater than 4 meters (13 feet).
The Menu button will display the menu system onscreen. Press Menu again to access the sub-menus. The Left and Right buttons help you navigate among choices and settings in the menus and sub-menus.
Press the Exit button to go back to the Main Menu. Press Exit again to leave the menu system.
The Lamp Status Indicator will blink or light up when the lamp needs service, cooling or replacement. See page 29 for more detailed information.
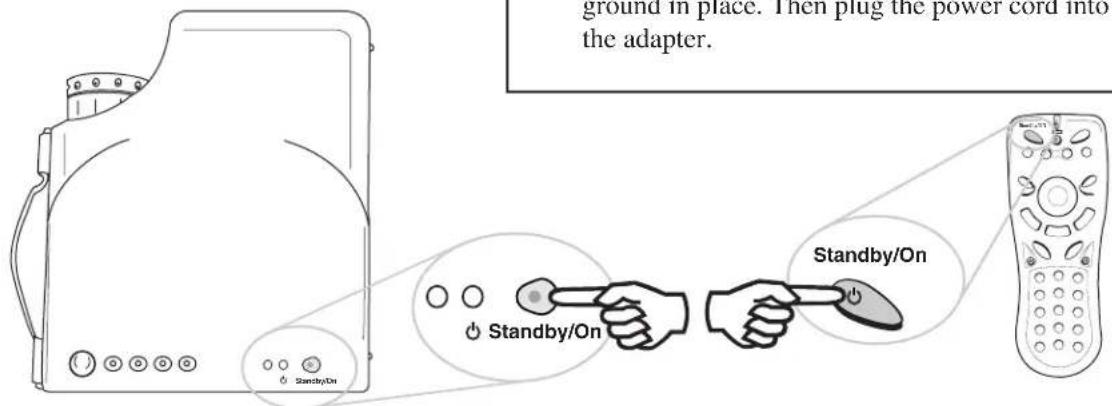
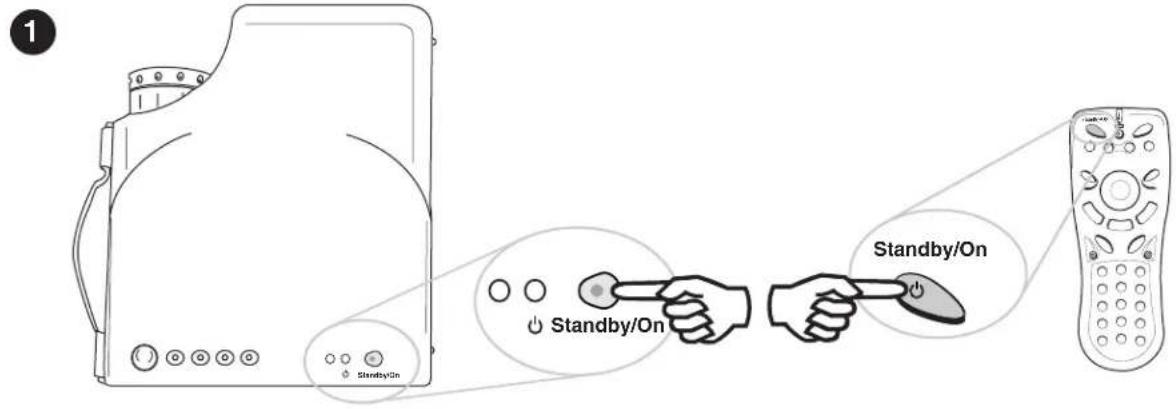
When the projector is turned on, the Standby/On Indicator will blink during warm-up and lamp ignition, then stay green to indicate the projector is ready for use.
Press the Standby/On Button to turn the projector on or off.
Introduction
Remote Control Identification
*√ Note: These features are for use only with the optional video module.
Introduction
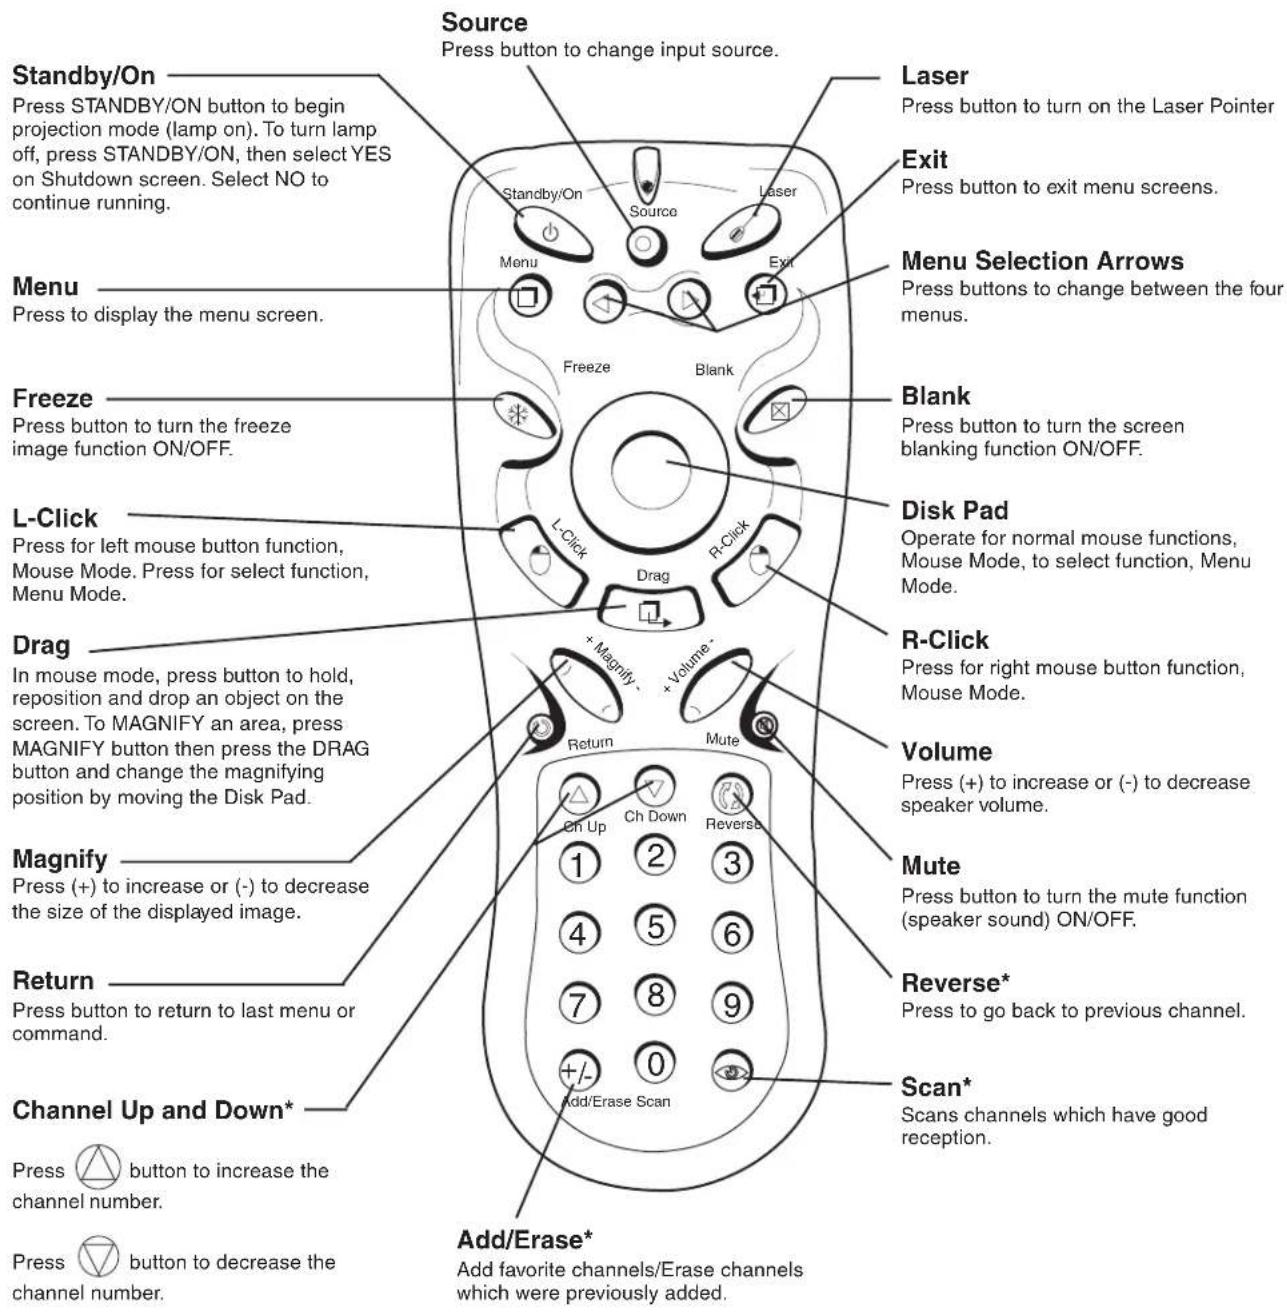
Remote Control Features
The remote control sensor is located near the back of the projector. The distance between the sensor and the remote control unit must be shorter than 4 meters (13 feet).
Freeze
The image will be frozen when the FREEZE button is pressed. A “Pause” icon appears at the lower right of the screen for three seconds during the freeze function. A “Play” icon appears at the lower right of the screen for three seconds when the freeze function is released. To release the freeze function, press the FREEZE button or SOURCE button (when the input source is switched over during display).

Freeze button

"Pause" icon

"Play" icon
Mute
Pressing the MUTE button will mute the sound. A text box saying “Mute” appears at the lower right of the screen. Press MUTE button again or VOLUME +/- button to release the function.

Mute button
Volume
Press the VOLUME + or - buttons to adjust the loudness. The volume slide bar will disappear three seconds after the last adjustment is made.

Volume button

Magnify
By pressing MAGNIFY +, the center of the picture can be magnified, doubling in size. When the button is pressed again, the picture is further magnified, up to four times the original size. By pressing MAGNIFY -, the size of the image is reduced to half its size. When the button is pressed again, the picture is further reduced until it is restored to the original size. To return to the normal display mode, press the RETURN button. (This function can be used in combination with the FREEZE function.)


Magnify button Magnify icon
Introduction
Laser
Press this button to generate the laser beam that functions as a red pointer on the screen.

Laser button
Disk Pad
If the PS/2 (ADB) mouse cable is connected with the PC Notebook or Mac Powerbook mouse port, the Disk Pad can take over the Notebook or Powerbook mouse function. When the MAGNIFY function is activated, use the Disk Pad to move around the display areas.
Note: The mouse function is not available when the MAGNIFY function is turned on.

Disk Pad button
R-Click, L-Click
These two keys are used when the mouse function is activated after the PS/2 port is connected. They act as the right (R) and left (L) buttons of a computer mouse.
L-Click button
R-Click button
Drag
This button toggles between ON and OFF for the drag function of the remote mouse.
Drag button
Blank
Press this button to activate or release the BLANK function. BLANK makes the screen go blank.

Blank button
Installing or Replacing Batteries
- Push and slide the battery compartment lid in the direction shown.
- Install two AAA batteries as indicated by the diagram inside the compartment.
- Position the lid over the compartment and snap back into place.
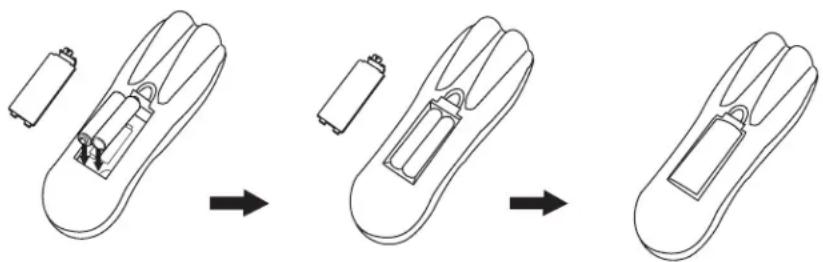
natural_image
Diagram showing three-step battery installation process: adding a battery, adding an internal component, and adding a slot (no text or symbols)
Caution
- Avoid excessive heat and humidity.
- Do not mix old and new batteries or different types of batteries.
System Setup
Screen Chart
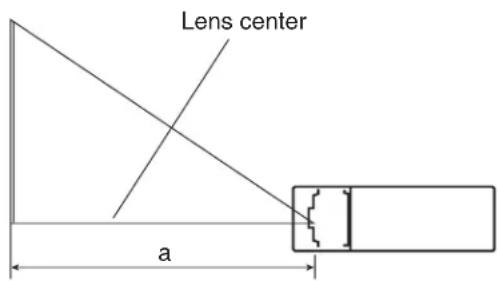
Place the projector at the required distance from the screen according to the desired picture size (see the table below).
| MP7730PROJECTOR-TO-SCREEN DISTANCES | ||||
| Distance to Screen Screen Size | ||||
| Minimum | Maximum | Diagonal | Width | Height |
| 6.0 ft.1.8 m | 8.0 ft.2.4 m | 40.0 in.101.6 cm | 32.0 in.81.3 cm | 24.0 in.61.0 cm |
| 9.0 ft.2.7 m | 12.0 ft.3.7 m | 60.0 in.152.4 cm | 48.0 in.121.9 cm | 36.0 in.91.4 cm |
| 12.0 ft.3.7 m | 16.0 ft.4.9 m | 80.0 in.203.2 cm | 64.0 in.162.6 cm | 48.0 in.121.9 cm |
| 15.0 ft.4.6 m | 20.0 ft.6.1 m | 100.0 in.254.0 cm | 80.0 in.203.2 cm | 60.0 in.152.4 cm |
| 18.0 ft.5.5 m | 24.0 ft.7.3 m | 120.0 in.304.8 cm | 96.0 in.243.8 cm | 72.0 in.182.9 cm |
| 23.0 ft.7.0 m | 30.0 ft.9.1 m | 150.0 in.381.0 cm | 120.0 in.304.8 cm | 90.0 in.228.6 cm |
| 31.0 ft.9.4 m | 40.0 ft.12.2 m | 200.0 in.508.0 cm | 160.0 in.406.4 cm | 120.0 in.304.8 cm |
Note: These sizes are ±1% . This is due to variations in the manufacture of the lens. If you are close to one of the endpoints you should verify with your unit that the image is the proper size at the proper distance.
For your own customized screen chart, please click here (on the CD-ROM) or visit our Projector to Screen Calculator on the 3M web site (www.3m.com/meetings/screen/7630_calc.html).
Digital Keystone Correction
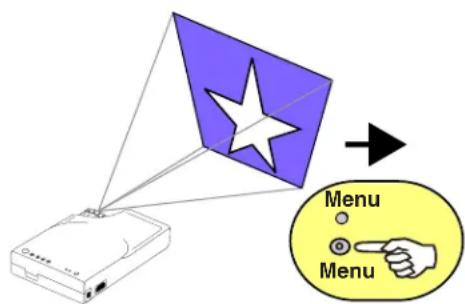
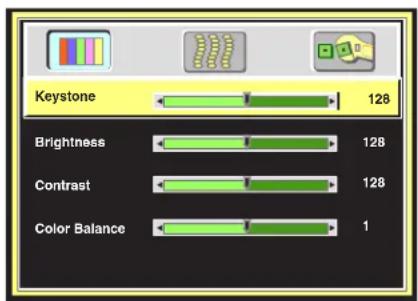
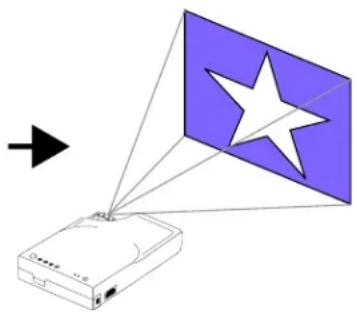
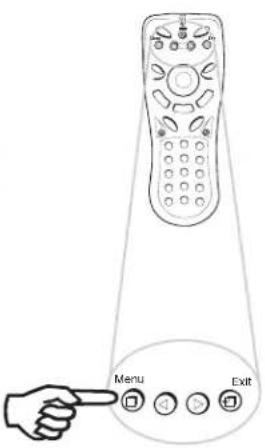
Keystoning is when the projected image is noticeably wider on either the top or bottom. To correct this, press MENU on the remote control or projector, then select the Display menu (first menu bar button on the left), then adjust the sliding bar labeled Keystone, as needed. Pressing the + or ➔ button will correct keystoning at the top of the image. Pressing the - or ➔ button will correct keystoning at the bottom of the image.
natural_image
Diagram showing a device emitting light rays from a purple flag with a white star, no text or symbols presentSystem Setup
Connecting to Various Equipment
It only takes a few minutes to connect the 3M^TM Multimedia Projector MP7730 to your computer, VCR, or other device.

Caution
Turn off power to all devices before making connections. Never plug anything into the projector or computer while any device is in operation.
The MP7730 must be powered down when making connections. The mouse emulation may not work if the unit is not powered down before the mouse cable connections are made.
Connection Terminals
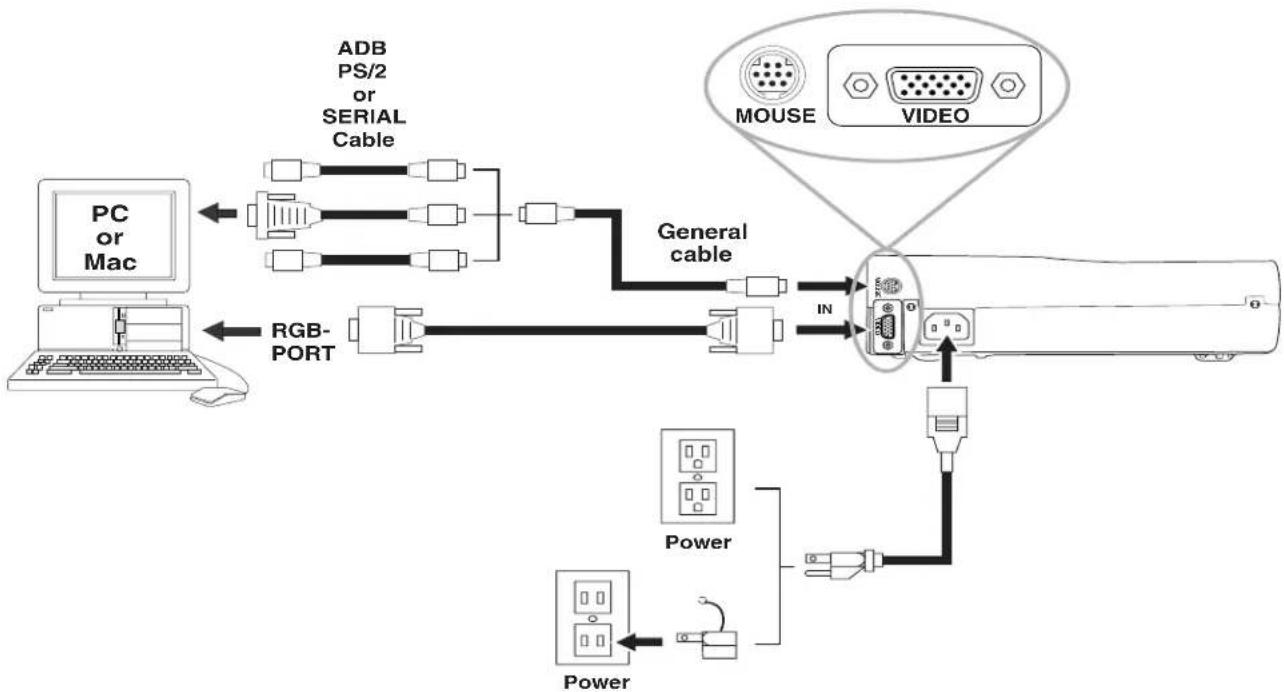
flowchart
graph TD
    A["PC or Mac"] --> B["ADB PS/2 or SERIAL Cable"]
    B --> C["General cable"]
    C --> D["IN"]
    D --> E["Video"]
    F["Power"] --> G["Power"]
    H["Computer"] --> I["RGB-PORT"]
    I --> J["Switch"]
    K["Mouse"] --> L["Video"]
Mouse Connection
The general cable links the projector to the proper mouse adapter cable for your computer.
- Attach the male Mini-DIN end of the general cable to the Mouse port on the rear of the projector.
- Attach the female Mini-DIN end of the general cable to the end of the proper mouse adapter cable for your computer (serial, PS/2 or ADB cable). Line up the arrows on the sides of the plugs before attaching. Be sure not to bend or break the small metal pins inside the plugs.
- Attach the other end of the mouse adapter cable to the proper port on your computer (serial, PS/2 or ADB).
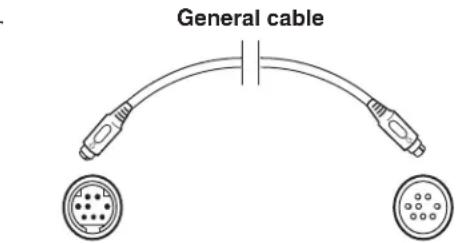
Female Mini-DIN Male Mini-DIN

Apple™ Desktop Mouse
The Macintosh operating system should recognize the MP7730 as a mouse without any drivers being loaded.
VirtualMouse for PC Computer
For IBM ^™ compatible computers, set the operating systems to Serial Mouse or PS/2 Mouse to recognize projector as the mouse pointer device.
To set mouse driver information:
a) Windows ^TM 95/Windows ^TM 98/Windows ^TM NT
- Select Start/Settings/Control Panel.
- Select Add New Hardware.
- "Windows will now search for any PnP devices..." Click Next.
- Hardware Types: Scroll down to Mouse. Click Mouse.
- Select Manufacturer: Standard Mouse Type
- Select Model: Standard Serial Mouse
- Click Next, Finish, Start.
- Restart Windows if prompted.
b) Windows ^TM 3.1
From Program Manager
- Click Main
- Click Windows Setup (make note of the current mouse driver)
- Click Options
- Then Change Systems Settings
- Choose Mouse
- It should be listed as Microsoft or IBM PS/2
√ Note: For proper mouse operation, always turn the projector power on first and power up the computer. For some laptop computers, you may need to disable the internal pointing device (IPD). This is done through the BIOS level set-up of the particular machine, or it could be listed in a “Utilities” program group, i.e., “Toshiba Utilities™,” or “Thinkpad Features™.”
Operation
Startup
1
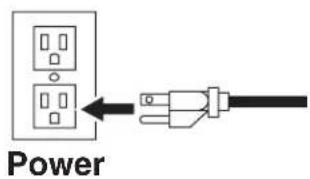
√ Note: Make all cable connections and line hookups with the power off.
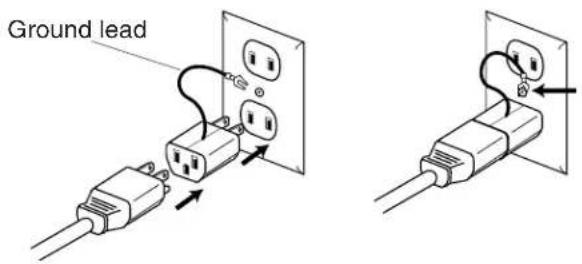
The 2-prong adapter with ground is used with older U.S. electrical outlets that only support 2-prong power cord plugs.
√ Note: When using this adapter, the ground lead MUST be securely fastened to the ground screw on the outlet.
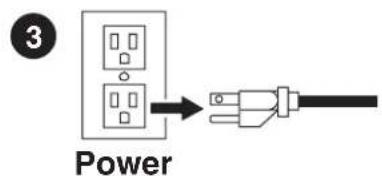
Plug the 2-prong adapter into the bottom socket of the electrical outlet. Hook the end of the ground lead firmly around the neck of the outlet's ground screw. Tighten the screw, if necessary, to hold the ground in place. Then plug the power cord into the adapter.
2
-
Plug power cord into wall socket.
-
Press the STANDBY/ON button and hold for 3 seconds.
• The ON indicator blinks green and then stays green.
• The ON indicator will blink green during warm-up and lamp ignition.
(When power is turned off, there is a 90-second reset period before the STANDBY/ON button will function again.)
- Turn on all connected equipment.
√ Note: If you have the Optional Video Module attached to the unit, press the Source button on the remote to select the source of the signal to be projected onto the screen. The selected signal input is displayed at the top right of the screen. The display will show the last selected input source before power was turned off. (For more information, please refer to the Optional Video Module section of this manual.)
Operation
Main Menu
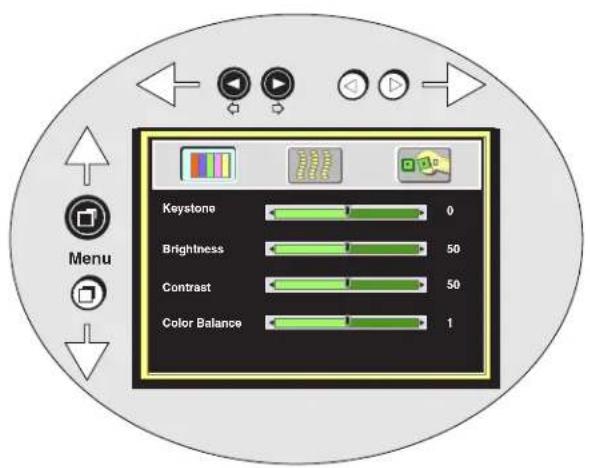
Press “Menu” key and the main menu will display on the screen. Press “Menu” again to enter page items, and press ◊ and ➔ to select sub-menus. The main menu will go off automatically if there is no further action from user for 10 seconds. Press EXIT button to leave the current sub-menu, and press EXIT again to leave the main menu.
Menu Pages
| MENU BAR |  |  |  |  |
| MENU TUOYAL | suneMyalpsiD | suneMegaml | suneMlortnoC | |
| tuoW landpO oediV elucoM Color Balance | eneX esthg a6b Color Balance | ziSotuA Horizontal Phase Horizontal Sync Horizontal Position Vertical Position | egaugnaL Mor rl8 ot0Af Rese | (not applicable) |
| caWRit landpO oediV elucoM esprahS | eneX esthg a6b esprahS | ziSotuA Horizontal Phase Horizontal Sync Horizontal Position Vertical Position | egaugnaL Mor rl8 ot0Af Rese | ceuoS emlu blrT a8 Mute |
| oediV tupnl wit landpO oediV elucoM Color Balance | eneX esthg a6b Color Balance | fiI esprahS egaim meyS | egaugnaL Mor rl8 ot0Af Rese | ceuoS emlu blrT a8 Mute |
Operation
To Menu Items



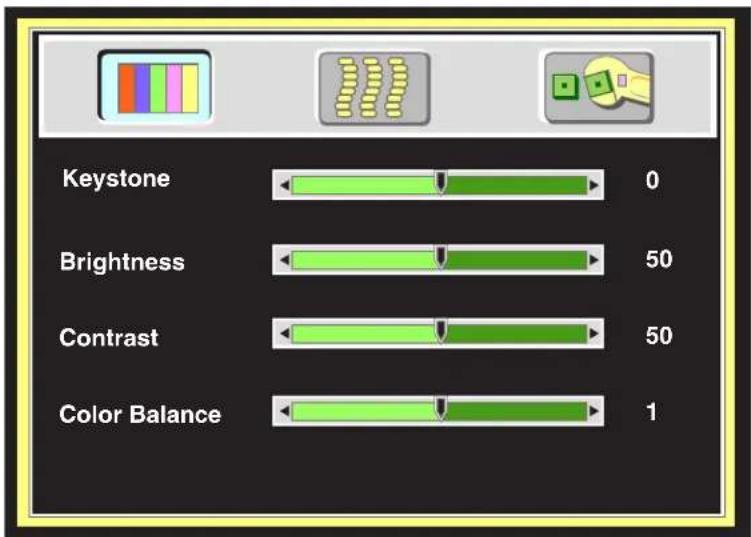
bar
| Category | Value | |---|---| | Keystone | 0 | | Brightness | 50 | | Contrast | 50 | | Color Balance | 1 |Display Menu
Operation
Display Menu
Keystone 5)
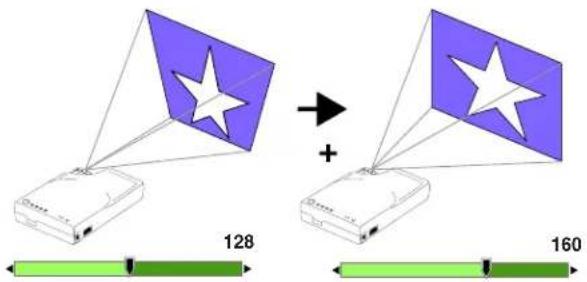
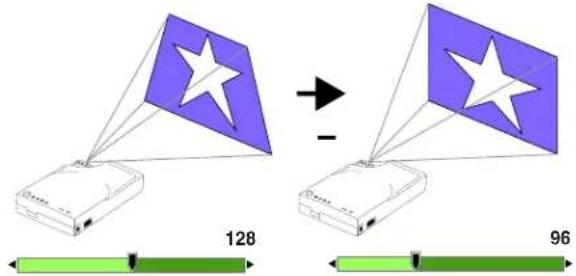
Brightness (255)
Contrast
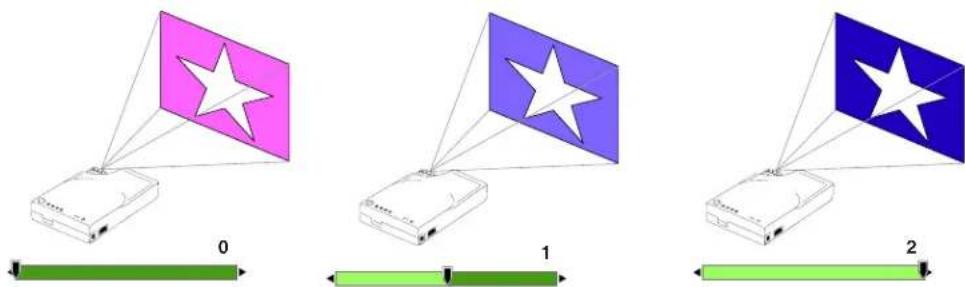
Color Balance (0-2)
Operation
Image Menu
To Menu Items

Menu




Menu




Menu



bar
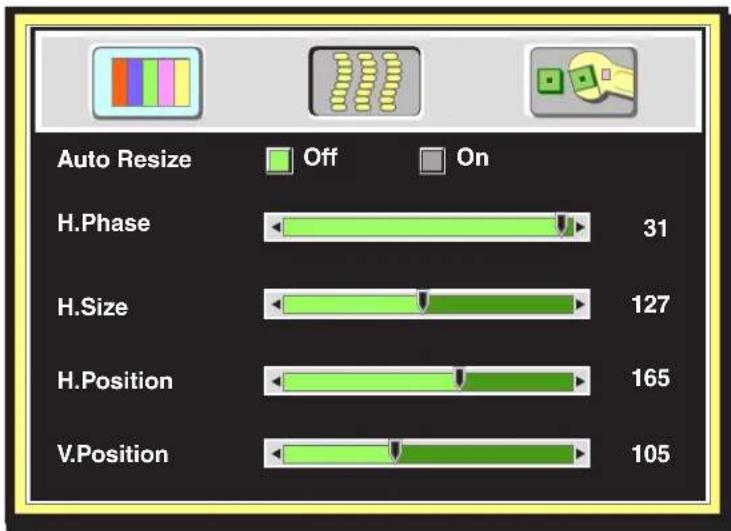
| Feature | Off | On | |---|---|---| | H.Phase | 31 | | | H.Size | 127 | | | H.Position | 165 | | | V.Position | 105 | |Auto Resize
Will automatically adjust image to fit onto screen.
Off On
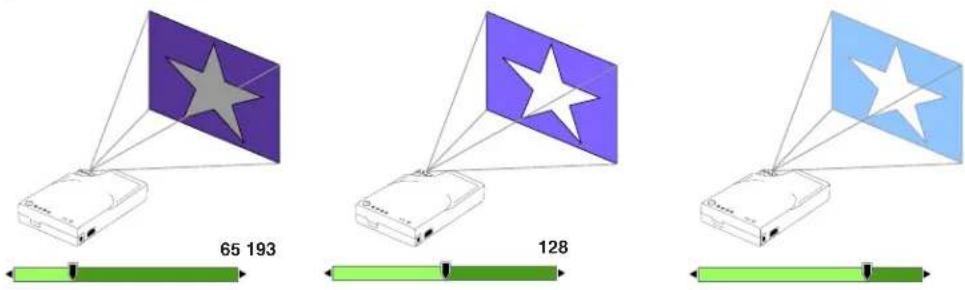
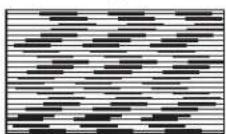
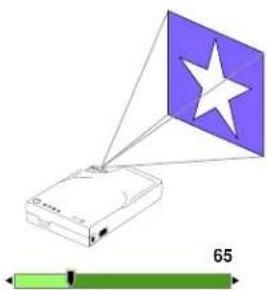
Horizontal Phase
(Auto Resize OFF)
(0-31)
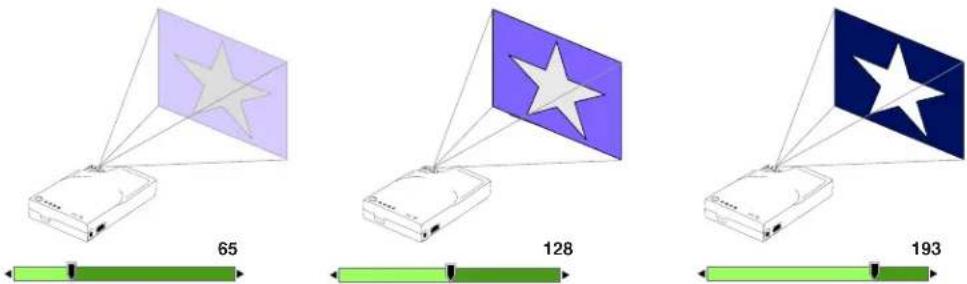
Horizontal Size
(Auto Resize OFF)
natural_image
Diagram showing a device with a flag and a green scale bar labeled 65 (no text or symbols on the diagram itself)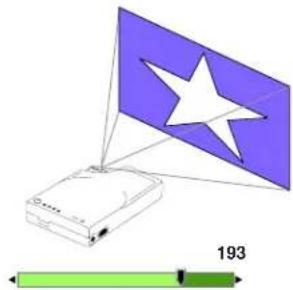
natural_image
Diagram showing a device with a star-shaped flag and a green scale bar labeled 193 (no text or symbols on the device itself)(0-255)
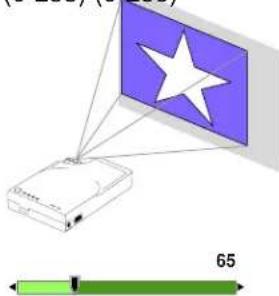
Horizontal Position
(Auto Resize OFF)
(0-255) (0-255)
natural_image
Diagram showing a device with a star symbol and a green scale bar labeled 65 (no text or symbols on the diagram itself)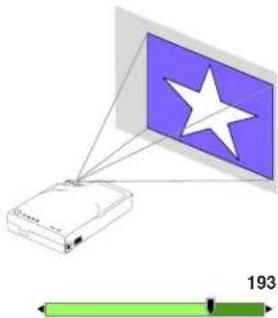
natural_image
Diagram showing a device with a star symbol and a green scale bar labeled 193 (no text or symbols on the device itself)Vertical Position
(Auto Resize OFF)
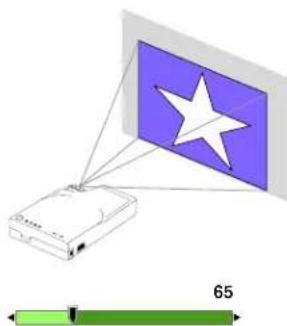
natural_image
Diagram showing a device with a star symbol and a green scale bar labeled 65 (no text or symbols on the device itself)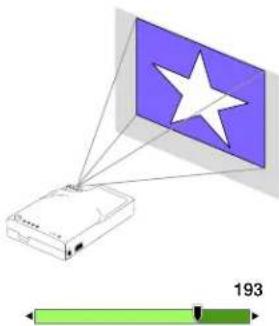
natural_image
Diagram showing a device connected to a purple flag with a white star, alongside a green scale bar labeled 193 (no text or symbols on the diagram itself)Operation
Operation Menu
To Menu Items

Menu


Menu


Menu


Menu


Menu


Menu

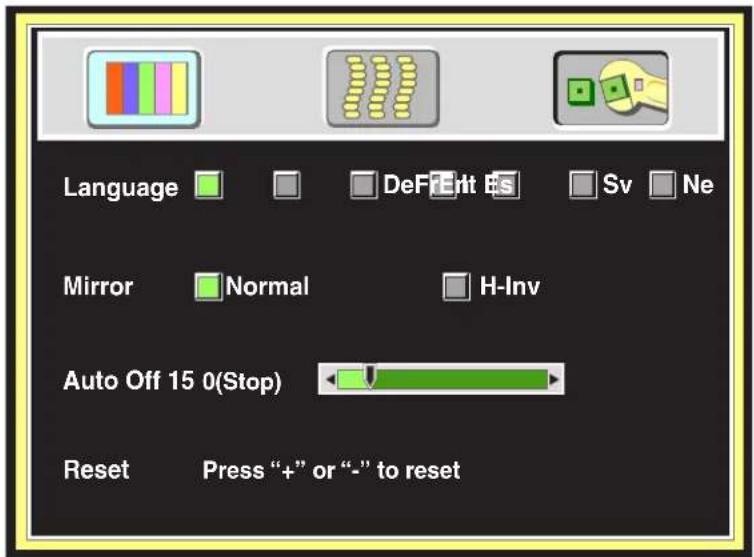
Language
English (En)
Swedish (Sv)
French (Fr)
Dutch (Ne)
Deutsch (De)
Italian (It)
Español (Es)
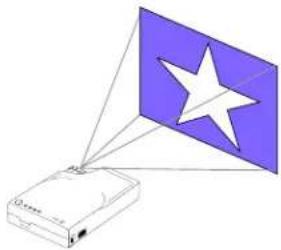
Mirror
Will invert image to display properly according to position of projector.
Normal H-Inv (Horizontally
(Default)
natural_image
Illustration of a projector with a star symbol on its screen, connected to a base (no text or symbols present)Inverted)
(Rear-screen
projection)
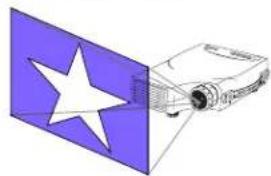
natural_image
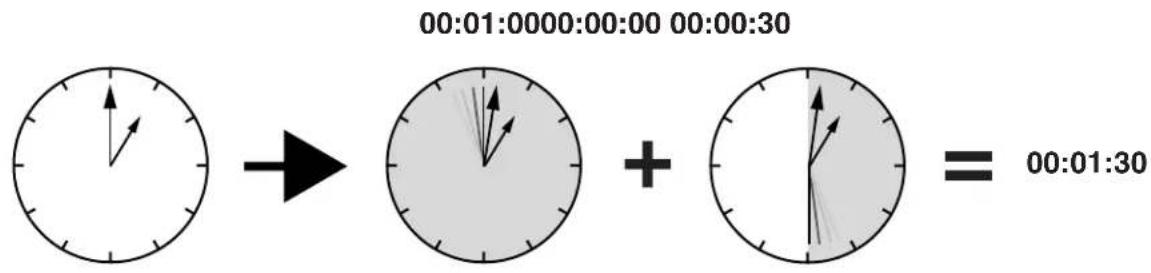
Diagram of a projector with a star-shaped light source, shown in perspective view (no text or symbols)Auto Off
Will turn off the power in 60 minutes.
00:00:00 00:60:00
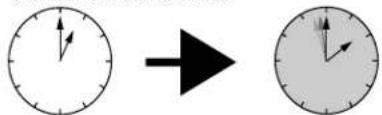
Reset
Will restore the projector to factory default settings.
Off On
Operation
Shutdown
2 Wait 90 seconds
- Press the STANDBY/ON button. The Shutdown screen will display. Select the YES option (press arrow button or disk pad button) to turn off.
- The fan will continue to run for approximately 90 seconds.
- Disconnect power cord from wall socket.
- Disconnect cables if moving projector to new location.

Caution
Do not unplug power cord before pressing the STANDBY/ON button. After the STANDBY/ON button is pressed, the fan rotates for about 90 seconds to cool the projector.
Optional Video Module
Features
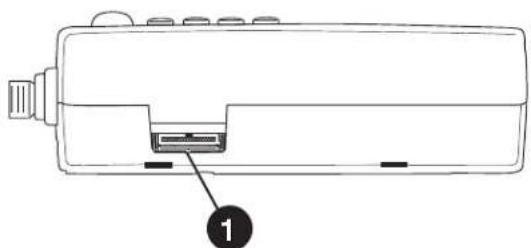
The Optional Video Module makes it possible to hook the MP7730 to a laser disc, VCR, or other video devices. Two versions will be available: an NTSC Package (with RCA connectors and television tuner), and a PAL package (with a SCART connector and no television tuner).
natural_image
Line drawing of a device with a labeled component (1) showing internal structure and ports (no text or symbols beyond label)Back of projector without Optional Video Module
NTSC Package:
• NTSC Tuner Module
• CATV
• S-Video
• 3 RCA
- Audio
PAL Package:
• PAL Video Module
• S-Video
- SCART connector
• Audio
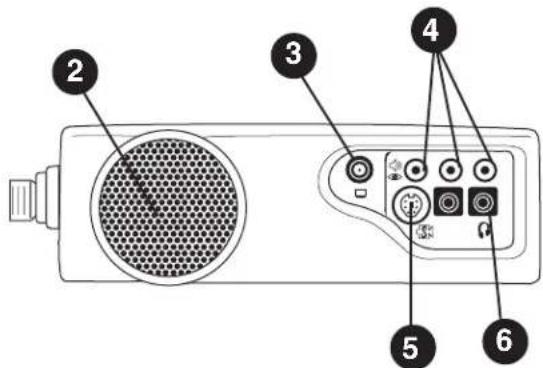
Back of projector with NTSC Tuner Module
- Video Module Connection
- Speaker
- Cable Television (CATV) Connection
- RCA Cable Connection
(a) Video (Yellow)
(b) Audio (White/Red)
- S-Video Connection
- Headphone Jack
- SCART Connection
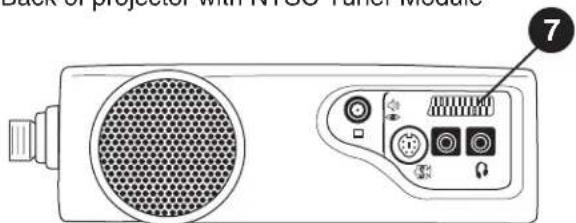
Back of projector with PAL SCART Module Top view of video module
Optional Video Module Connections
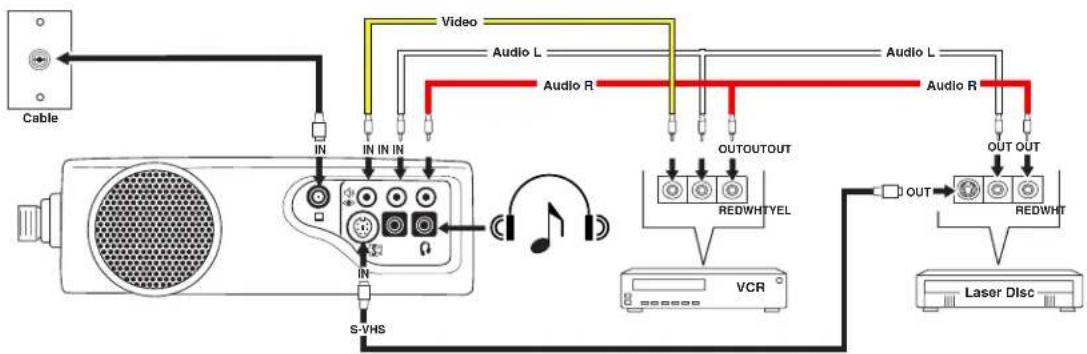
flowchart
graph TD
    A["Cable"] --> B["In"]
    B --> C["S-VHS"]
    C --> D["Audio R"]
    D --> E["Audio L"]
    E --> F["Video"]
    F --> G["Audio R"]
    G --> H["Audio L"]
    H --> I["OUTOUT"]
    I --> J["RedWH TEL"]
    J --> K["VCR"]
    K --> L["Laser Disc"]
    L --> M["OUT"]
    M --> N["RedWHT"]
    N --> O["Audio R"]
    O --> P["Audio L"]
    P --> Q["OUT OUT"]
Attaching the Optional Video Module to the MP7730

Caution
Power down the projector before connecting the Optional Video Module or any other device. Failure to do so may cause serious damage.
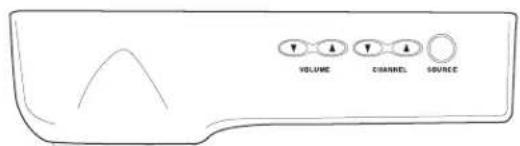
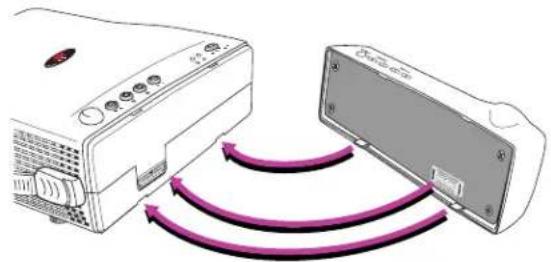
- Precisely align the two metal tabs on the bottom of the module and insert into the corresponding slots on the back of the projector.
- Slowly push the module to fit with the unit. Make sure that the module plugs into the AV connection on the projector.
- Plug the correct cable into the corresponding jack or port in the back of the unit.
- Select inputs by pressing SOURCE key, and select the appropriate source channel by pressing CHANNEL UP/DOWN.
natural_image
Diagram showing two devices connected by purple arrows, one with a display screen and the other with a speaker icon (no text or symbols present)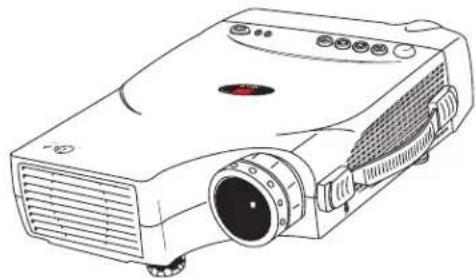
natural_image
Line drawing of a projector with ventilation slots and control panel (no text or symbols)Switching Input Signals
Pressing the Source button on the remote control or the projector will cycle between these choices of input signals: RGB (computer), Video (composite video from a VCR), S-Video, and Tuner. The projector will then search for the selected type of signal until it is found or switched to another type.

Source button

SOURCE
Scanning Channels
The MP7730 can receive over 100 television channels. In Tuner mode (TV and CATV), press the Scan button on the remote control to view all available television channels. The message “DO YOU REALLY WANT TO SCAN? YES NO” will appear onscreen. Press either the left or right arrow buttons on the remote to reach Yes or No, then press the Menu button to enter the selected answer. The message “TUNER IS SCANNING NOW” will display for a few seconds, and then the scanned channels will appear for a few seconds each.

Scan button

Left and Right buttons

Optional Video Module
Image Sub-Menu
This menu is only available when the input signal is from Video, S-Video, TV or CATV.
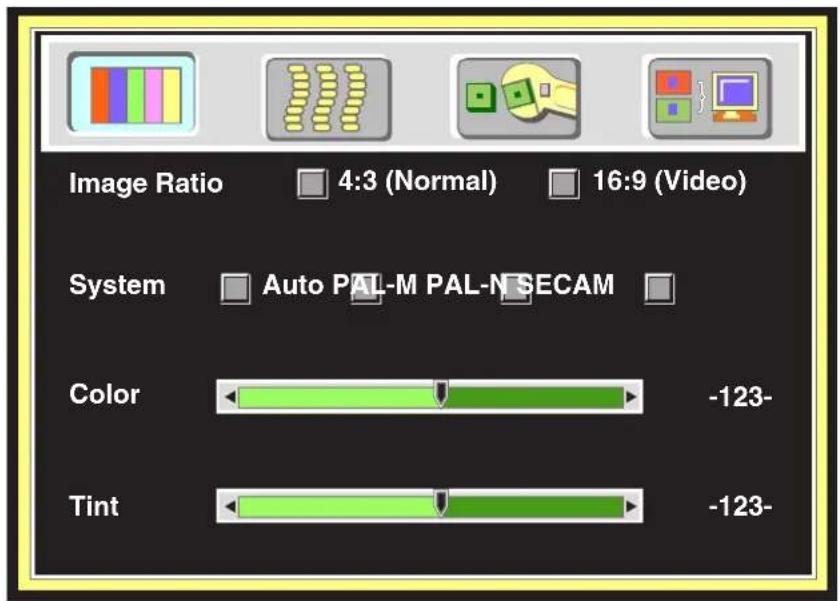
Color
Less More
Tint
Red Green (Source is video or S-video)
Image Ratio
4:3 (Normal) 16:9 (Video)
System
Auto PAL-M PAL-N SECAM
Optional Video Module
Operation
- Go into the menu system and move to the Source sub-menu. Use the Menu key on the control pad or remote control unit to scroll through items in the sub-menu. Select the Tuner items and press or keys to prompt out of the tuner menu.
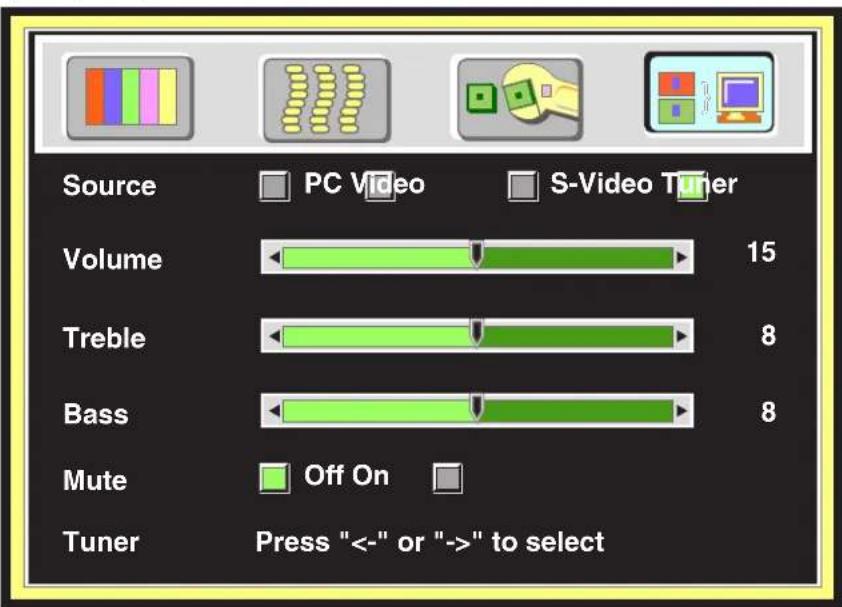
- Use the Menu key on the control pad or remote control unit to scroll through the Tuner sub-menu.
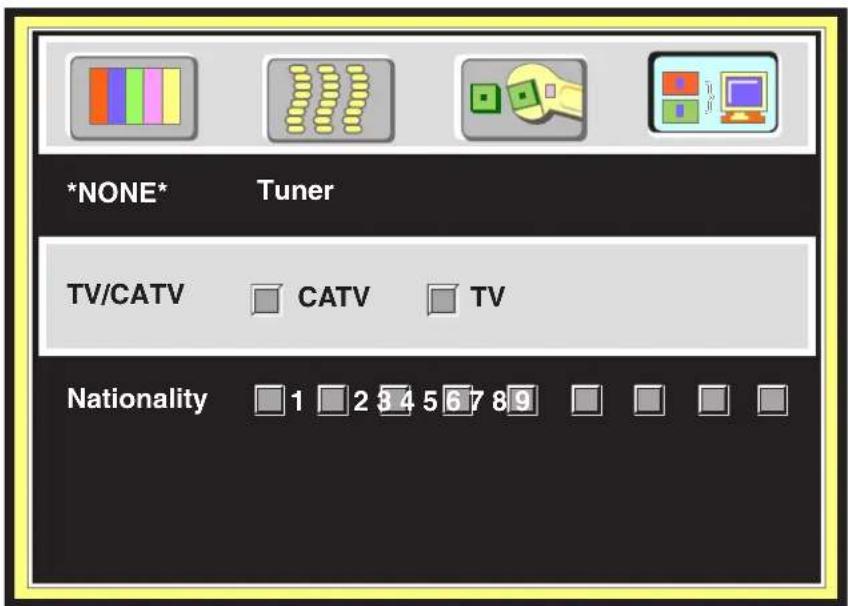
• TV/CATV: Please select the TV signal source. If the source is from CATV, please choose CATV. Otherwise, select TV.
- Nationality: Please select the corresponding number representing the user's country. (See reference chart.)
√ Note: The item "NONE Tuner" is only for the user's information and is not a function. For example, if current A Box is NTSC Tuner box, then "NTSC Tuner" will appear in this section.
Optional Video Module
- After leaving the menu system, press the Scan button to scan all existing channels in that region. √ Note: Scan function must be done for the first use in certain regions to catch all the channels in the local CATV system.
START SCANNING?
Yes No
After the “Start scanning” dialog box prompt, use the channel up/down key to select “Yes” or “No.” Press Return key to set.
Function (Must be performed with remote control unit)
Channel Select
Press the channel number button user wants to select (for example, 12), then press Return key to set.
Channel Up/Down Go up and down through channels by pressing the Up/Down buttons. The channel number will appear in the lower right corner of the screen. If there is no further action for three seconds, the channel number display will disappear automatically.
-123-
Scan Press the Scan button for two seconds to begin scanning TV channels.
Add/Erase Press the Add/Erase button for two seconds to add or erase the channel. To delete channels from memory, press the button to erase the channel. A “Channel Erased” message will display. Users can also add channels to memory by pressing the button after selecting it. A “Channel Added” message will display.
Channel Erased Channel Added
Reverse Press the Reverse button to toggle between the previous and current channels.
Optional Video Module
Source Menu
To Menu Items

Menu


Menu


Menu


Menu


Menu


Menu

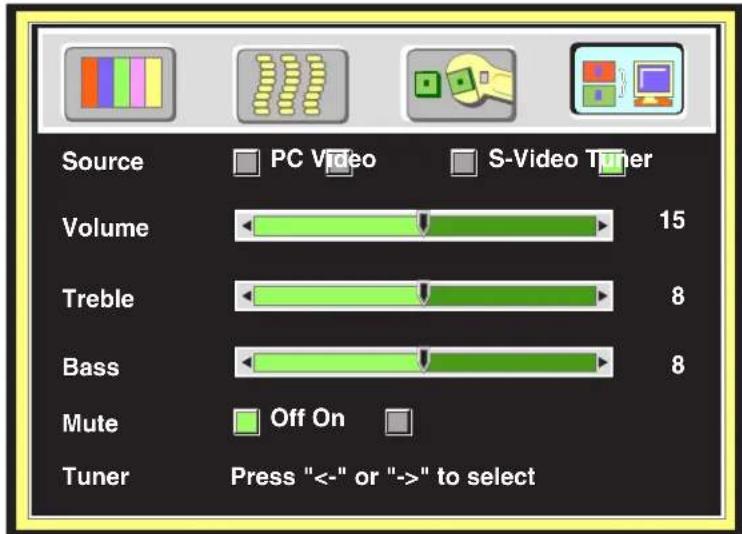
Source
PC
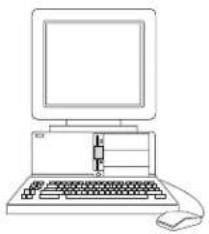
natural_image
Line drawing of a vintage desktop computer with monitor, keyboard, and mouse (no text or symbols)Video
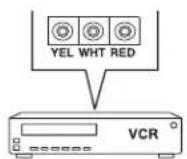
S-Video
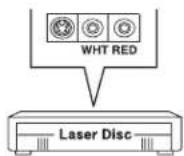
Tuner
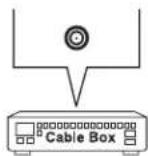
Volume
(0-29)

Treble
(0-15)

Bass
(0-15)
Mute
Off

On

Maintenance
Lamp
Use and Replacement of Lamp
The projector lamp has a normal operating time of approximately 1200 to 1500 hours, called the lamp life. During the normal lamp life, the picture will be bright and the colors clear. If the lamp is used beyond the normal lamp life, the picture will become dark and the colors poor. Always replace lamps with new ones. Using an old lamp in the projector could cause a malfunction. When the power is turned on, the LAMP indicator will light up red or a message will be displayed to indicate when it is time to replace the lamp. Consult your dealer.
Lamp/Temperature Status LED Indicators
Lamp Exceed Service Hours — When this LED lights red continuously, it is warning you that the lamp has exceeded 1500 service hours. Replace the projection lamp immediately.
CHANGE THE LAMP, AND RESET THE LAMP TIMER — The lamp has been operated for 1200 hours.
CHANGE THE LAMP, THE POWER WILL TURN OFF AFTER 20 HOURS — The lamp has been operated for 1479 hours, and the power will turn off after 20 more hours.
CHANGE THE LAMP! — The lamp has been operated for more than 1500 hours, and the power will turn off automatically in 10 minutes.
All of these messages will not display for more than 3 minutes, but each message will be displayed whenever you turn on the lamp again.
Lamp is not well attached — When the LED blinks rapidly, it indicates that the lamp is not attached properly.
Temperature is too high — When the projector's internal temperature is too hot to operate safely, the LED blinks slowly for one minute and the lamp goes off automatically.
If the LED light is off, it means that the projector's lamp and temperature are operating under normal conditions.

Caution
The LAMP indicator will light if the lamp becomes too hot. Turn off the power and let the projector cool for 45 minutes. Turn on. If the LAMP indicator still lights up red, please contact your dealer.
Maintenance
Lamp Replacement

WARNING
To reduce the risk of electrical shock, always turn off projector and disconnect power cord before changing lamp.
-
Turn the main power switch off and disconnect the power cord from the outlet.
-
Loosen screw and remove the lamp cover. If the lamp is hot, avoid burns by waiting 45 minutes until lamp has cooled.
-
Loosen three screws designated by arrows below. (It is strongly recommended to use a magnetic-headed screwdriver, if possible. Pull the handle to remove lamp housing. If the screws are not loosened completely, they could damage your fingers. Do not insert your hand into the box after the lamp is removed. If the optical parts inside are touched by hand, it could cause color unevenness, etc.
-
Replace the lamp with the new one, insert into projector, and tighten the screws. Firmly tighten the lamp screws. Loose screws may cause a bad connection, which may result in a malfunction.
-
Re-install the lamp cover and tighten the screw. Do not turn on the power with lamp cover removed. Whenever the lamp has been replaced, reset the total operation time of the lamp. Do not reset if the lamp was not replaced, as this could cause breakage.
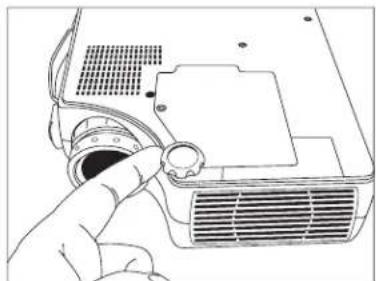
natural_image
Hand inserting a component into a projector case (no text or symbols visible)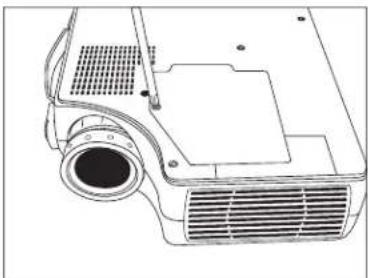
natural_image
Line drawing of a projector with ventilation grilles and mounting holes (no text or symbols)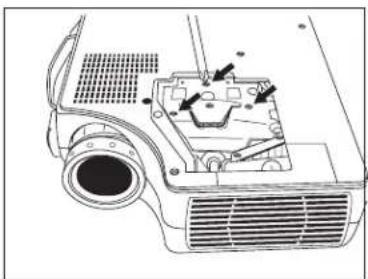
natural_image
Technical line drawing of a projector housing with mounting holes and ventilation slots (no text or symbols)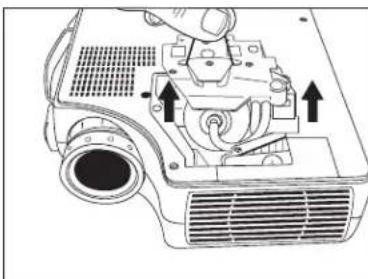
natural_image
Technical line drawing of a projector with labeled components and directional arrows indicating assembly (no text or symbols present)√ Note: For maximum lamp life, do not shock, handle or scratch the lamp glass when it is hot. Also, do not use an old or previously used lamp as a replacement lamp.

Caution
To reduce the risk of cuts to fingers and/or decreasing image quality by touching the lens, do not insert hand into the empty lamp compartment when the lamp has been removed.
This lamp contains mercury. Consult your local hazardous waste regulations and dispose of this lamp in a proper manner.
To reduce the risk of severe burns, allow the projector to cool for at least 45 minutes before replacing the lamp.
To reduce the risk of cuts to fingers and damage to internal components, use caution when removing lamp glass that has failed and shattered into sharp pieces.
Maintenance
Resetting the Lamp Hours
Please do the following within 10 minutes from turning power on if you replace the lamp after 1500 hours.
- Press the Exit button on projector or remote control for three seconds to display the total used lamp time.
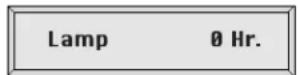
2, Press MENU button on projector or remote control during the lamp hour message. Then an adjustment message will appear.

- Press ⇔ or ⇔ to select the setting. To select the default setting, select "Reset" (or "Cancel" to return to the default setting).
- Press EXIT to leave.
Troubleshooting
| SMELBORP SNOITULOS | |
| REWOPON | ✓ Plug the power cord into the AC inlet.✓ Plug the power cord into the power inlet.✓ Wait 2 minutes after turning off the projector before turning it back on. |
| ERUPION | ✓ Check that you have selected the proper input source to project.✓ Ensure that all cables are connected properly.✓ Adjust the brightness and contrast.✓ Remove the lens cap. |
| IMAGE ISN'T SQUARE ONNEERCS | ✓ Reposition the unit to improve its angle to the screen.✓ Is the vertical offset properly corrected using the keystone function? |
| ROLOBR | ✓ Select the correct video system.✓ Adjust the brightness, contrast, and saturation. |
| IMAGE IS BLURRED | ✓ Adjust the focus.✓ Reposition the unit to improve its angle to the screen.✓ Ensure that the distance between the unit and the screen is within the adjustment range of the lens. |
| LORTNERKROSEOD | ✓ Replace the batteries with new ones.✓ Operate remote control within 4 meters (13 feet) of the unit.✓ Make sure nothing blocks the receiver on the control pad. |
| DNUOSO | ✓ Check the audio cable connection from audio input source.✓ Adjust the audio source.✓ Press VOLUME (+) button.✓ Press MUTE button. |
Troubleshooting
Status Indicator Lights and Messages
| deyalpsiDegasseM)elbacilppafi,noituloSdna(gninaeM | |
| SEARCHING | Projector cannot identify input signal. |
| INPUT SIGNAL DETECTED, ACTIVATING AUTO IMAGE | Projector has identified input signal. |
| SYNC IS OUT OF RANGE | The input signal's horizontal frequency exceeds the range of the projector's. |
| CHANGE THE LAMP AND RESET THE LAMP TIMER | The lamp has been operated for over 1200 hours and needs to be replaced soon. |
| CHANGE THE LAMP,THE POWER WILL TURN OFF.SDH02F | The lamp has been operated for 1479 hours and the power will shut off after 20 more hours. Replace the lamp as soon as possible. |
| CHANGE THE LAMP!(blinking, with LED lighting red) | The lamp has been operated for over 1500 hours. Power will automatically shut off in 10 minutes. Replace the lamp immediately. |
Service Information
Accessories
Description Part Number
Power Cord (EU) DY-0205-1354-4
Power Cord (US) DY-0205-1356-9
Power Cord (UK) DY-0205-1355-1
Adapter, PS/2 Mouse 78-8118-8395-4
Adapter, ADB (Apple Desktop Bus) Mouse 78-8118-8397-0
Adapter, Serial Mouse 78-8118-8396-2
General Cable 78-8118-8394-7
VGA Cable 78-8118-3401-5
Mac Adapter (switchable) 78-8118-3308-2
150W Lamp 78-6969-9036-1
Remote Control 78-8118-8398-8
Soft-side Carrying Case 78-6969-9034-6
Lens Cover 78-8118-8399-6
Not Included with Basic Packet
Description Part Number
NTSC Optional Video Module (RCA with Tuner) 78-6969-9038-7
PAL Optional Video Module (SCART) 78-6969-9104-7
3-Conductor Video/Audio Cable 78-8118-3234-0
Stereo Mini-Jack Cable 78-8118-8290-7
S-Video Cable 78-8118-3538-1
SCART-RCA Adapter DY-0205-1011-0
Ordering Parts or Getting Information
For product information, product assistance, service information, or to order accessories, please contact 3M Customer Service at the following number:
• In U.S. or Canada: 1-800-328-1371
- In other locations, contact your 3M Sales office.
The contents of this manual are subject to revision without prior notice.
3M assumes no responsibility for the infringement of special rights of a third party or other rights that may arise out of the information contained in this manual.
Reproduction of this manual in any form without prior permission is strictly prohibited.
3M will replace the manual if any pages are missing or collated incorrectly.
Appendix
Technical Specifications
√ Note: All specifications are subject to change without notice.
General
Product name Multimedia Projector
Model name MP7730
Optical
Display system 1-CHIP DMD
Lens F/Number: F/2.7 - F/3.4 Focal Length: F = 72 - 108 mm (2.8 in. - 4.3 in.)
Lamp 150 W UHP lamp
Speaker 1 watt
Electrical
Power supply AC100 \~ 240V, 6.5A \~ 2.9A, 50/60 Hz (Automatic)
Power consumption 200 W (Max)
Mechanical
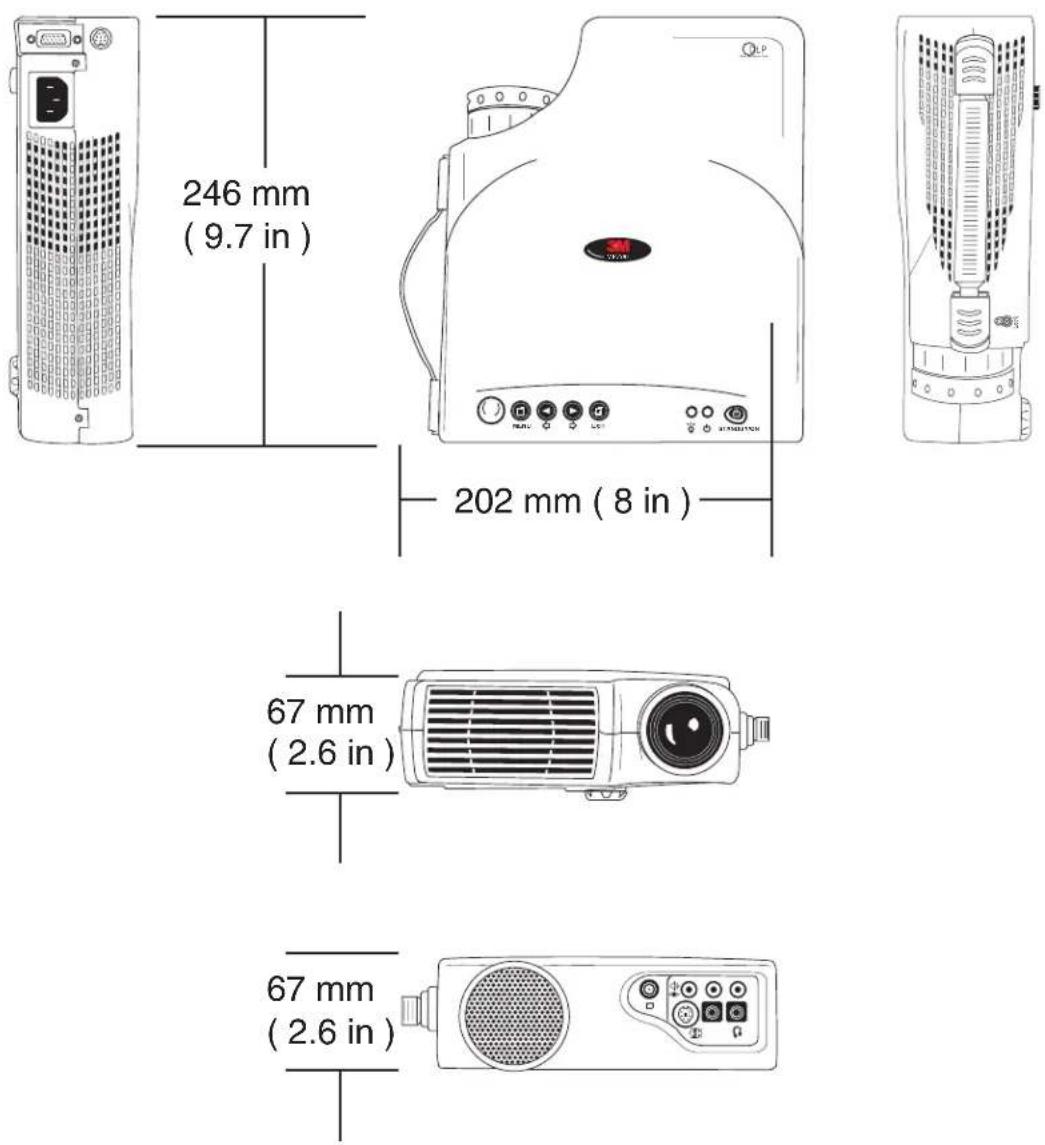
Dimensions 7.7 in. (W) x 2.4 in. (H) x 9.6 in. (D)
198 mm (W) x 62 mm (H) x 245 mm (D)
Operating
temperature range 50° \~ 104°F (10° \~ 40°C)
Weight 2.3 kg (5 lbs.)
Input/Output terminal
Video signal
input terminal S VIDEO : Mini DIN 4-pin terminal
VIDEO : RCA Jack terminal + BNC
AUDIO : RCA Jack terminal
RGB input/output
signal terminal RGB signal : D-sub 15-pin (Female)
AUDIO : RCA Jack + BNC
Control terminal D-sub 9-pin (Male)
Mouse MD 9-pin (serial/PS2/ADB)
Appendix
Dimensions
Appendix
Preset Display Resolution Table
| noituloseR )zHk(cnySH )zHk(cnySV krameR | |||
| 640 x 350 | 31.5 | 70.1 | |
| 640 x 400 | 37.9 | 85.1 | VESA |
| 720 x 400 | 31.5 | 70.0 | |
| 720 x 400 | 37.9 | 85.1 | VESA |
| 640 x 480 | 31.5 | 60.0 | VESA |
| 640 x 480 | 37.9 | 72.8 | VESA |
| 640 x 480 | 35 | 66.7 | Macintosh |
| 640 x 480 | 43.3 | 85.0 | VESA |
| 800 x 600 | 35.2 | 56.3 | VESA |
| 800 x 600 | 37.9 | 60.3 | VESA |
| 800 x 600 | 46.9 | 75.0 | VESA |
| 800 x 600 | 48.1 | 72.2 | VESA |
| 800 x 600 | 53.7 | 85.1 | VESA |
| 832 x 624 | 49.7 | 74.5 | Macintosh |
| 1024 x 768 | 48.4 | 60.0 | VESA |
| 1024 x 768 | 56.5 | 70.1 | VESA |
| 1024 x 768 | 60.0 | 75.0 | VESA |
| 1024 x 768 | 68.7 | 85.0 | VESA |
| 1280 x 1024 | 64.0 | 60.0 | VESA |
Appendix
Nationality Codes
API TV System Code Definition
NTSC Tuner Box
| aerA lennahC | ||||
| NTSC | USA | 1 (STD) | 2 (HRC) | 2 (IRC) |
| CSTN | awT1 | |||
| CSTN | danaC1 | |||
| CSTN | hC1 | |||
| CSTN | ilamuloC | 1 | ||
| NTSC | Mexico | 1 | ||
| NTSC | Peru | 1 | ||
| NTSC | South Korea | 1 | ||
| NTSC | Venezuela | 1 | ||
| NTSC | Japan | 4 | ||
| PAL-N | Argentina | 5 | ||
| PAL-N | Paraguay | 5 | ||
| PAL-N | Uruguay | 5 | ||
| PAL-M | Brazil | 6 | ||

Important Notice
All statements, technical information, and recommendations related to 3M's products are based on information believed to be reliable, but the accuracy or completeness is not guaranteed. Before using this product, you must evaluate it and determine if it is suitable for your intended application. You assume all risks and liability associated with such use. Any statements related to the product which are not contained in 3M's current publications, or any contrary statements contained on your purchase order shall have no force or effect unless expressly set forth in a written agreement signed by an authorized officer of 3M.
Warranty and Limited Remedy. This product will be free from defects in material and manufacture for a period of two years from the date of purchase. Exclusion to Warranty: The lamps are considered a consumable item and are warranted for 90 days or 180 hours, whichever occurs first. 3M MAKES NO OTHER WARRANTIES, INCLUDING BUT NOT LIMITED TO, ANY IMPLIED WARRANTY OF MERCHANTABILITY OR FITNESS FOR A PARTICULAR PURPOSE. If this product is defective within the warranty period stated above, your exclusive remedy shall be, at 3M's option, to replace or repair the 3M product or refund the purchase price of the 3M product.
Limitation of Liability. Except where prohibited by law, 3M will not be liable for any loss or damage arising from this 3M product, whether direct, indirect, special, incidental or consequential regardless of the legal theory asserted.
Let us help you make the most of your next presentation. We offer everything from presentation supplies to tips for better meetings. And we're the only transparency manufacturer that offers a recycling program for your used transparencies. For late-breaking news, handy reference and free product samples, call us toll-free in the continental United States and Canada, 24 hours a day, or visit our Internet Website.

http://www.3m.com/meetings e-mail: meetings@mmm.com
3M Austin Center
Building A145-5N-01
6801 River Place Blvd.
Austin, TX 78726-9000
3M Canada
P.O. Box 5757
London, Ontario
N6A 4T1
3M Mexico, S.A. de C.V.
Copyright © 2000 3M IPC
All Rights Reserved
78-6970-9035-1 Rev. B
- MP7730 Multimedia Projector
- Operator's Guide
- Table of Contents
- Please click on any section to jump to that section
- Introduction
- System Setup
- Operation
- Maintenance
- Troubleshooting
- Service Information
- Intended Use
- Important Safeguards
- WARNING
- Caution
- Product Safety Labels
- Save These Instructions
- Thank You for Choosing 3M
- Warranty
- Limited Warranty
- Limitation Of Liability
- Patents, Trademarks & Copyrights
- Shipping Box Contents
- Optional Accessories
- What's Next?
- Part Identification
- Machine Characteristics
- External Control Pad Buttons
- Remote Control Identification
- Remote Control Features
- Freeze
- Mute
- Volume
- Magnify
- Laser
- Disk Pad
- R-Click, L-Click
- Drag
- Blank
- Installing or Replacing Batteries
- Screen Chart
- Digital Keystone Correction
- Connecting to Various Equipment
- Connection Terminals
- Mouse Connection
- Apple™ Desktop Mouse
- VirtualMouse for PC Computer
- Startup
- Main Menu
- Display Menu
- Image Menu
- Auto Resize
- Operation Menu
- To Menu Items
- Language
- Mirror
- Normal H-Inv (Horizontally
- Inverted)
- Auto Off
- Reset
- Shutdown
- Optional Video Module
- Features
- NTSC Package:
- PAL Package:
- Optional Video Module Connections
- Attaching the Optional Video Module to the MP7730
- Switching Input Signals
- Scanning Channels
- Image Sub-Menu
- Color
- Tint
- Image Ratio
- System
- START SCANNING?
- Yes No
- Function (Must be performed with remote control unit)
- Channel Select
- -123-
- Channel Erased Channel Added
- Source Menu
- Source
- Treble
- Bass
- Lamp
- Use and Replacement of Lamp
- Lamp/Temperature Status LED Indicators
- Lamp Replacement
- Resetting the Lamp Hours
- Accessories
- Description Part Number
- Not Included with Basic Packet
- Ordering Parts or Getting Information
- Appendix
- Technical Specifications
- General
- Optical
- Speaker 1 watt
- Electrical
- Mechanical
- Input/Output terminal
- Dimensions
- Preset Display Resolution Table
- Nationality Codes
- API TV System Code Definition
- NTSC Tuner Box
- Important Notice
Brand : 3M
Model : MP7730
Category : Video projector