
Digital Media System 815 - Video projector 3M - Free user manual and instructions
Find the device manual for free Digital Media System 815 3M in PDF.


| Product Type | Video Projector |
| Brand | 3M |
| Model | Digital Media System 815 (DMS 815) |
| Display Technology | Single panel 0.7" DDR DMD (DLP) |
| Resolution Support | VGA, SVGA, XGA, SXGA, MAC, UXGA (compressed) |
| Video Compatibility | NTSC, PAL, SECAM, Composite, S-Video, Component (YPbPr/YCbCr), SDTV (480i/576i), EDTV (480p/576p), HDTV (720p/1080i) |
| Image Size (diagonal) | 50" to 85" (1270 mm to 2160 mm) |
| Lamp Type | Metal halide / Compact P-VIP |
| Projection Technology | Vikuiti Super Close Projection (SCP) |
| Built-in Speakers | 20W x 2 |
| Remote Control | Infrared with cursor control, mouse emulation, and menu navigation |
| Auto Image Synchronization | Yes (auto-tracking, frequency, position, source detect, phase detect) |
| On-Screen Menu Languages | 9 languages (English, French, German, Portuguese, Spanish, Italian, Japanese, Traditional Chinese, Simplified Chinese) |
| Inputs | Component, DVI, VGA, Computer, S-Video, Composite |
| Audio Inputs | RCA, Stereo Mini 1, Stereo Mini 2 |
| Power Supply | Universal power cable (4.5 m), typical 100-240V AC |
| Safety Features | Lamp rupture protection, auto-shutoff, thermal protection, mercury lamp disposal instructions |
| Warranty | 1 year (projector), 90 days or 180 hours (lamp) |
| Maintenance | Lamp replacement (user-replaceable), reset lamp hours |
| Environmental Operating Conditions | 16°C to 29°C (60°F to 85°F), 10-80% RH non-condensing, 0-1828 m altitude |
Frequently Asked Questions - Digital Media System 815 3M
User questions about Digital Media System 815 3M
0 question about this device. Answer the ones you know or ask your own.
Ask a new question about this device
Download the instructions for your Video projector in PDF format for free! Find your manual Digital Media System 815 - 3M and take your electronic device back in hand. On this page are published all the documents necessary for the use of your device. Digital Media System 815 by 3M.
USER MANUAL Digital Media System 815 3M
Digital Media System 800 Series
Operator and Product Safety Guide
Contents
Introduction
Thank You for Choosing 3M....5
Safety Information
Intended Use: 6
SAVE THESE INSTRUCTIONS 8
Trademarks 8
Warranty; Limited Remedy; Limited Liability....8
What's in the Box
Shipping Contents....10
What's Next?......10
Product Description
Machine Characteristics....11
Parts Identification List....11
Installation & System Setup
Setting Up the Projector ....12
Projector Remote Control
Remote Control Functions....16
Basic Operations
Projector Start Up....17
Stand By Mode 17
Projector Power Down....17
Image Adjustment....18
Menu Navigation....18
Troubleshooting
Common Problems and Solutions ......27
Onscreen Messages....28
Maintenance
Replacing Projection Lamp 29
Reset Lamp Hours 30
Introduction
Thank You for Choosing 3M
Thank you for choosing 3M equipment. This product has been produced in accordance with 3M's quality and safety standards to provide smooth and trouble free use in the years to come.
For optimum performance, please follow the operating instructions carefully. We hope you will enjoy using this high performance product in your meetings, presentations, and training sessions.
This product has the ability to be upgraded via software downloads. To learn about the current product features and capabilities and receive future product software updates visit www.3M.com/meetings and go to the software section of the 3M Digital Media System 800 Series.
Safety Information
Please read, understand, and follow all safety information contained in these instructions prior to the use of the 3M ™ Digital Media System 800 Series. Retain these instructions for future reference.
Intended Use:
The 3M ™ Electronic Digital Media System 800 Series was designed, built and tested for use indoors, using 3M ™ brand lamps, 3M ™ brand wall mount hardware and nominal local voltages. This projector is not intended for household use or use by children. The use of other replacement lamps, outdoor operation or different voltages has not been tested and could damage the projector or peripheral equipment and/or create a potentially unsafe operating condition.
3M ™ Multimedia projectors are designed to operate in a normal office and home environment.
- 16° to 29°C (60° to 85°F)
• 10-80% RH (without condensation)
• 0-1828 m (0-6000 feet) above sea level
The ambient operating environment should be free of airborne smoke, grease, oil and other contaminants that can affect the operation or performance of the projector.
Use of this product in adverse conditions will void the product warranty.
Explanation of Signal Words and Symbols in Safety Labels and Instructions
WARNING: Indicates a potentially hazardous situation, which if not avoided, could result in death or serious injury and/or property damage.
CAUTION: Indicates a potentially hazardous situation, which if not avoided, may result in minor or moderate injury and/or property damage.

Warning: Hazardous Voltage

Warning: Hot Surface – High Temperature Lamp

Attention: Read Accompanying Documentation
WARNING
• To reduce the risk associated with hazardous voltage:
- Do not remove any screws other than those specified in the lamp replacement instructions.
- Always plug projector into a grounded outlet.
- Do not use in wet environments.
- Do not use in an outdoor environment.
- Replace the power cord if damaged.
- Do not attempt to service the projector other than performing routine lamp replacement. Service should only be performed by a 3M authorized service provider. Aside from the projection lamp module, there are no user serviceable parts inside the unit.
- Do not modify this projector or power cord.
- Disconnect power cord when the projector is not in use, during lamp replacement, and while cleaning.
- Do not allow water or other liquids to enter the projector.
• To reduce the risk associated with hazardous voltage and/or fire:
- Use a properly rated extension cord. Consult an electrical professional if you have questions.
- To reduce the risk associated with hot surface of lamp cartridge:
- Wait at least 60 minutes for the lamp assembly to cool before replacing.
• To reduce the risk associated with choking:
- Keep batteries away from children and pets.
• To reduce the risk associated with environmental contamination due to mercury:
- Hg: Lamp in this product contains mercury. Dispose of lamp according to local, state, or federal laws. See www.lamprecycle.org or call 1-800-328-1371.
• To reduce the risk associated with lamp rupture related hazards:
- In event of lamp rupture, call 3M authorized service provider for repair. Ruptured lamp repair is not user serviceable.
- Wash your hands thoroughly if contact with ruptured lamp debris has taken place.
- Ventilate the area where the lamp rupture occurs. The lamp operates at high temperature.
- To reduce the risk associated with hazard voltage, and/or impact, and/or tripping, and/or intense visible light:
- Do not use this projector around unsupervised children.
• To reduce the risk associated with muscular strain:
- Always use more than one person when installing or removing the projector.
- To reduce the risk associated with impact, and/or pinch:
- Use only 3M supplied wall mounting hardware.
- Follow all installation instructions carefully.
- Make sure mounting hardware is securely anchored to a solid structure.
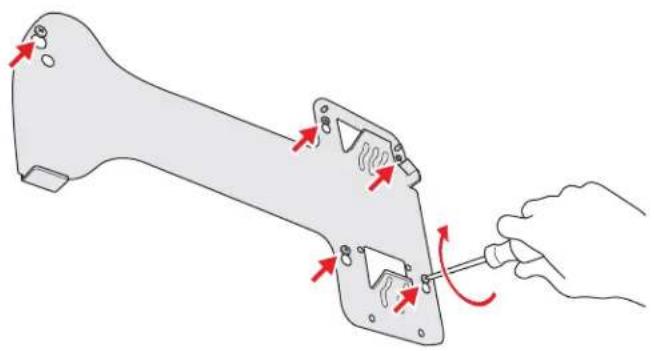
- Make sure set screws are properly secured to wall mounting plate.
• To reduce the risk associated with impact:
- Use only on smooth or level flat surfaces.
- Do not use on a structure that is prone to vibration, movement, or chance of impact.
- Do not hang on, or place weight on the projection arm.
• To reduce the risk associated with various hazards related to the projector:
- Please read, understand and follow all safety information contained in the operator and product safety guide prior to installation and use.
• To reduce the risk associated with sharps, premature lamp failure, exposure to mercury:
- Always handle the fragile lamp module with care.
- Replace the lamp module when the lamp replacement message appears.
- Never replace the lamp module with a previously used lamp module.
• To reduce the risk associated with radio interference
- This is a Class A product. In a domestic environment, this product may cause radio interference in which case the user may be required to take adequate measures.
CAUTION
• To reduce the risk associated with pinch:
- Use caution when latching or unlatching the variable position arm collar.
• To reduce the risk associated with explosion, and/or chemicals from leaking battery:
- Use only with battery type AA.
- Orient the battery's plus (+) and minus (-) terminals according to the markings found on the remote control.
- Do not leave the battery in the remote for an extended period of time.
- Do not heat, disassemble, short, recharge, or expose the batteries to fire or high temperature.
- Do not carry batteries loose in your pocket or purse.
- Avoid eye and skin contact in the event that battery would leak.
- Do not mix used and new batteries.
• To reduce the risk associated with tripping, and/or impact:
- Position the power cord and data cable so that they can not be tripped over.
• To reduce the risk associated with environmental contamination due to battery chemicals
- Dispose of exhausted batteries and product components in accordance with applicable federal, state and local regulations.
and lead:

SAVE THESE INSTRUCTIONS
The information contained in this manual will help you operate and maintain your 3M ™ Digital Media System 800.
Trademarks
The 3M logo and 3M are registered trademarks of 3M Company. Vikuiti is a trademark of 3M Company.
Microsoft, Windows, Windows NT, Word, Excel, PowerPoint, Internet Explorer, and NetMeeting are either registered trademarks or trademarks of the Microsoft Corporation in the United States and/or other countries.
Intel and Pentium are registered trademarks of Intel corporation or its subsidiaries in the U.S. and other countries.
Digital Light Processing is a trademark or registered trademark of Texas Instruments.
eBeam, e-Beam, eBeam Mouse, eBeam Moderator, eBeam Software, ImagePort and eBeam Presenter are registered trademarks of Luidia, Inc.
Warranty; Limited Remedy; Limited Liability
This product will be free from defects in material and manufacture for a period of one year from the date of purchase. 3M MAKES NO OTHER WARRANTIES INCLUDING, BUT NOT LIMITED TO, ANY IMPLIED WARRANTY OF MERCHANTABILITY OR FITNESS FOR A PARTICULAR PURPOSE. If this product is defective within the warranty period stated above, your exclusive remedy shall be, at 3M's option, to replace or repair the 3M product or refund the purchase price of the 3M product. Except where prohibited by law, 3M will not be liable for any indirect, special, incidental or consequential loss or damage arising from this 3M product, regardless of the legal theory asserted. To obtain warranty service outside of the USA, immediately notify the dealer from which you purchased the product of any defects. In the USA call 1-800-328-1371 for warranty or repair service.
The warranty for lamps that are included as original equipment in the projectors is for parts only and is effective for a period of 90 days after the date of purchase of the projector or 180 hours of lamp usage, whichever occurs first.
Important: The above warranty shall be void if the customer fails to operate product in accordance with 3M's written instructions. This warranty gives you specific legal rights and you may have other rights that vary from state to state.
REGULATORY NOTICES
FCC STATEMENT - CLASS A: This equipment generates, uses and can radiate radio frequency energy, and if not installed and used in accordance with the instruction manual may cause interference to radio communications. It has been tested and found to comply with the limits for a Class “A” computing device pursuant to Subpart B of Part 15 of the FCC Rules, which are designed to provide reasonable protection against such interference when operated in a commercial environment. Operation of this equipment in a residential area is likely to cause interference in which case the user at his/her own expense will be required to take whatever measures may be required to correct the interference.
EEC STATEMENT
- This machine was tested against the 89/336/EEC (European Economic Community) for EMC (Electro Magnetic Compatibility) and fulfills these requirements.
- This machine was tested against the 73/23/EEC (European Economic Community) for LVD (Low Voltage Directive) and fulfills these requirements.
This product is compliant with EU Directive 2002/95/EC (Restriction of Hazardous Substances in Electrical and Electronic Equipment), as amended by Commission Decision 2005/618/EC on maximum concentration values.
This product is compliant with EU Directive 2002/96/EC on Waste Electrical and Electronic Equipment (WEEE).
What's in the Box
Shipping Contents
The Digital Media System 800 is shipped with some of the necessary cables required for standard VCR, PC or laptop computer connections. Carefully unpack and verify that you have all of the items shown below. If any of these items are missing, please contact your place of purchase.
- Digital Media System 800
- Remote Control (Two AA Batteries included)
- Universal Power Cable (4.5m)
- Control Panel
- Operator's Guide
Keep Your Packing Materials
Save the shipping box and packing materials in the event the Digital Media System 800 should require shipping to a 3M Service Center for repair. Use packing material to protect projector.
What's Next?
Take a few minutes to familiarize yourself with the Digital Media System 800 machine characteristics and then turn to Installation and System Setup.
We hope you will enjoy using this high performance product in your meetings, presentations and training sessions. This product has been produced in accordance with 3M's highest quality and safety standards to ensure smooth and trouble-free use in the years to come.
Product Description
Machine Characteristics
The Digital Media System 800 integrates metal halide lamp and Digital Light Processor (DLP) technology. It accepts input from computer and/or video sources and projects a super bright image.
The Digital Media System 800 offers the following features:
- One panel 0.7" DDR DMD projection system
- Vikuiti TM Super Close Projection (SCP) technology
- VGA/SVGA/XGA/SXGA/MAC/(UXGA) PC compatibility
- NTSC/PAL/SECAM/Composite/S-video/Component (YPbPr/YCbCr)/SDTV (480i, 576i)/EDTV (480p, 576p) /HDTV (720p & 1080i) video compatibility, ability to display 16.7 million colors
- Auto Image synchronization (Auto-tracking / frequency /position adjustment/source detect/Phase detect)
- Automatically saves user settings
- On-screen menu with 9 languages (English, French, German, Portuguese, Spanish, Italian, Japanese, Tradition Chinese, and Simplified Chinese)
- Built-in 20W x 2 speakers
- Self protect timer for hot re-strike of compact P-VIP lamp
Parts Identification List
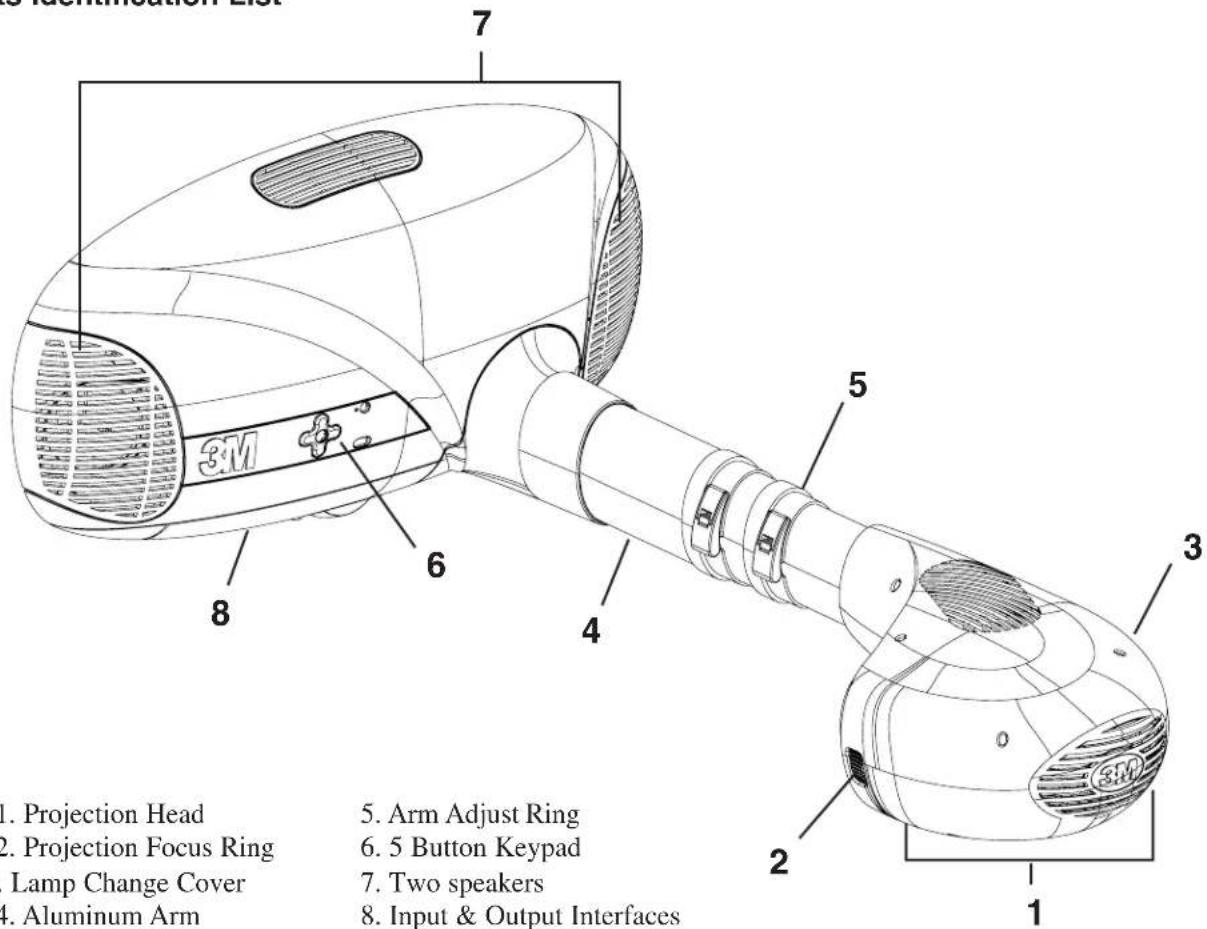
Installation & System Setup
Setting Up the Projector
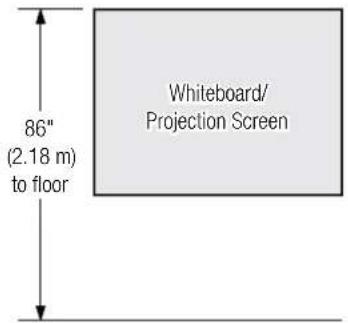
- Mount whiteboard/projection screen in desired location on wall if necessary. The top of the whiteboard/projection screen should be at least 86" (2.18 m) from the floor.
- The DMS 800 can project an image size between 50" (1,270 mm) and 85" (2,160 mm), measured diagonally (when mounted on the same plane as the projected surface). Measure the whiteboard if necessary to determine the size image you intend to use.
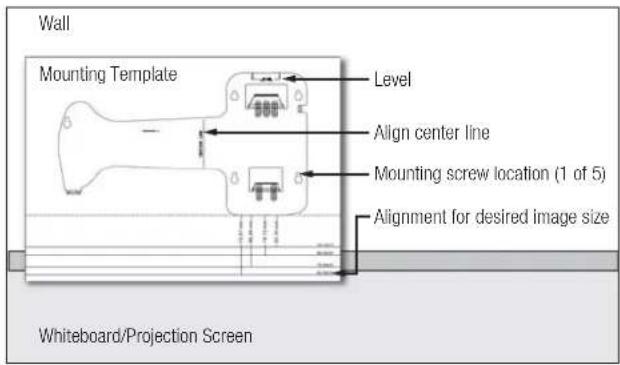
- Attach the paper mounting template to the wall above the whiteboard/projection screen. The center line of template should be aligned with the center of the desired projection area.
- Align the appropriate line on the template with the top of the whiteboard/projection screen according to the image size.
- Ensure that the "level" line on the template is level. Mark the five mounting screw locations on the wall. Remove the template.
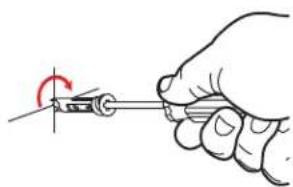
- Determine the appropriate anchor to use with your wall type. Install five anchors at the marked locations.




-
Hang the metal mounting plate on the screws and tighten securely.
-
Hang the projector by aligning and hooking the unit on the metal mounting plate.
Note: Ensure locking pin is engaged. You should hear a click once the unit is securely on mounting plate.
- Using 2 people, slightly push up on the unit to make sure unit is locked on mounting plate
- Attach the safety cable securely to the wall with an appropriate anchor.
Note: Fully extend safety cable and then secure to wall. If necessary, use tie wraps to minimize cable slack.


- Slide the control panel cable tab into the slot at the bottom left of the unit.

- Connect the control panel and power cables as shown.

-
(DMS 815 Only) Attach the Annotation Pod as shown on pages 8–9 of the Digital Media System 815 eBeam Software for Interactive Whiteboard Operator's Guide.
-
Start up the projector.
-
Adjust the projector arm length to achieve the desired image size. Extend the section of the arm closest to the base first by loosening the clamp, sliding the arm out, and tightening the clamp. Extend the second section of the arm as needed.
-
Focus the image by turning the projection focus ring.
-
To adjust the position of the image on the screen, refer to the Digital Media System 800 Series Image Alignment Guide.

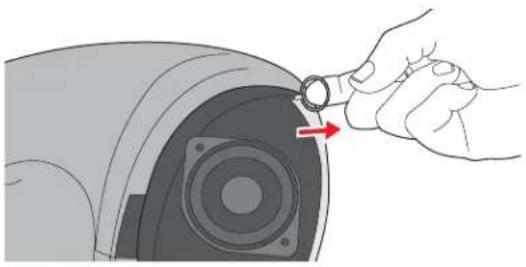
- To remove the projector from the wall, remove the right speaker grill and pull the locking ring out. Carefully lift the projector off the mounting plate.
Note: The locking ring may be temporarily retained in the unlocked position by sliding it into the recess in the corner of the speaker housing.
Projector Remote Control
Remote Control Functions
Aim the remote control toward the projection screen or at the sensor. Press desired remote button to send a signal to the projector.
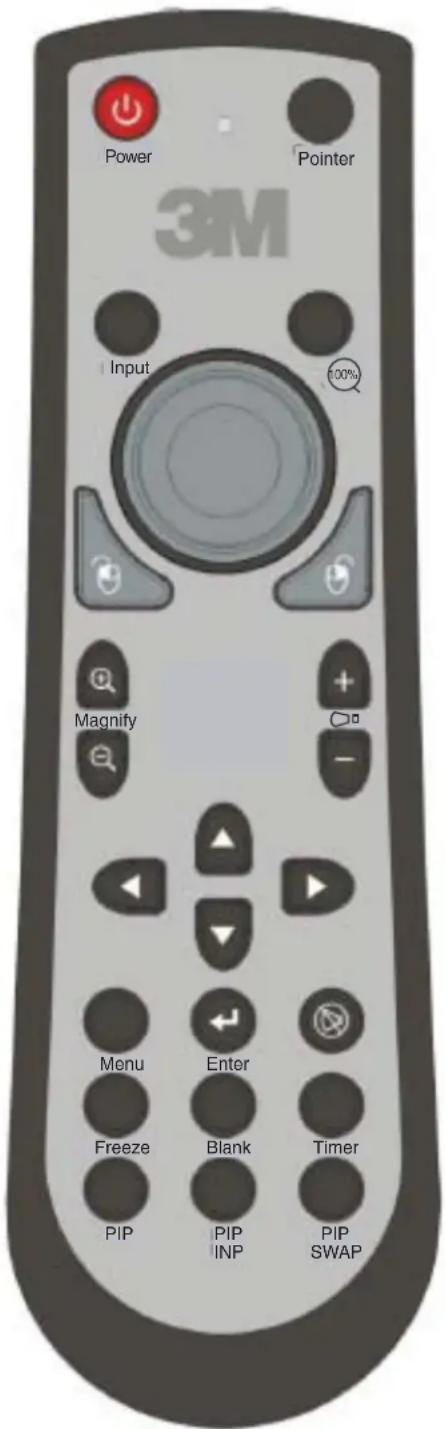
Power: Power ON/OFF Projector
Pointer: Move (point) the cursor on the projected image. Navigate menus.
Mouse L-Click
Mouse R-Click
Enter: Enter button for confirmation of selection.
Volume +: Increase Speaker Volume.
Volume -: Decrease Speaker Volume.
Menu: Display System Menus.
Mute: Toggle ON/OFF the audio sound.
Blank: Replace projected image with white background. Press again to return image.
Read the Safety Information before operating the Digital Media System 800. After all cable connections have been completed, the projector can be powered up.
- Turn off all power to the projector and input sources during cable hook up.
- Connect cables being careful not to bend any pins in the cable plug or input terminal.
- Press the Main Power switch on the control Panel to ON. A red LED indicator will illuminate to indicate there is power.
- Press the Standby button on Remote Control to illuminate the lamp. A red LED indicator will turn green as an image appears and grows brighter on the screen.
- Adjust Zoom button on Remote Control for best image.
- Power up your computer and video source(s).
Stand By Mode
When the projector is not being used, place it into standby mode.
- Press the Standby button on Remote Control.
- The lamp will switch off and the red LED will illuminate.
Note: The fan motor will continue to run for a few minutes until the projector cools down and then the fan will turn off.
- Press the Standby button on Remote Control again to illuminate the lamp and project an image on the screen.
Projector Power Down
- Press the Standby button on controller to place the projector in the standby mode (red LED illuminates).
- Wait until the cooling fan cycles off and the LEDs turn off.
Note: Switching the main power off before the fan has cycled off will decrease the life of the projection lamp. - Press the Main Power switch on Control Panel to Off.
- Turn off the power of your input devices.
Image Adjustment
- Set optical engine (head) adjustment screws to nominal height.
- Set arm mount adjustment screws to nominal height.
- Set base skew adjustment screw to nominal height.
- Adjust image size to 60" +/- 0.5".
-
Adjust head adjustment screws to position image on target.
-
Top center of image on target top center.
-
Top line of image skew to within skew specification.
-
Adjust base only if head adjustment screw range is exceeded.
-
Adjust base for right/left keystone (right height - left height).
-
Adjust head for position.
-
Adjust base for top/bottom keystone (top width - bottom width).
-
Adjust head for position.
-
Repeat 4 to 10 as needed to meet specifications.
-
Lock all adjustment.
Menu Navigation
Most adjustments and settings are available in the main menu and sub-menus. To display and navigate the menu press the projector Menu Keypad button on the unit or the remote control Menu button. Use the Menu Keypad arrow buttons or the Direction Knob to move through the menu. Click the Enter button to change a menu item. Change the menu item by using the Menu Keypad or Direction Pad and then click Enter to return back to menu navigation.

Picture sub menu
| Action Description | ||
| Picture Mode | Picture modes are provided so the user can simply optimize the projector image set-up to suit his/her program type:1) TV2) Business3) Cinema4) Sports | The Color, adjustment values will change, but the user will adjust the Color settings relative to the Picture Modes.Picture Mode Options1) Color Temperature2) Gamma Table3) Brightness4) Contrast5) Noise Reduction |
| Brightness Adjusts the brightness of the image. The higher the setting, the brighter the image. The lower the setting, the darker the image. | ||
| Contrast Adjusts the degree of difference between the dark and light in the image. The higher the value, the greater the contrast. | ||
| Color Adjusts the intensity of the color in the image. | ||
| Hue Adjusts the balance of red-to-green necessary for realistic representation of video signals.If input is NSTC then the Tint/Hue is ActiveIf input is Pal than the Tint/Hue is InActiveFor all other component input, Tint/Hue is Active | ||
| Sharpness Adjusts the image to make it look sharper or softer. (At higher values, will switch to Detail Enhancement) | ||
| Detail Enhance | Brings out the detail of the image: | |
| Position Adjusts the vertical and horizontal position of the projected image.Only VGA, DVI-D and DVI-A is Active. | ||
| Noise Reduction | Adjusts the amount of noise reduction to be applied to the image. There are 4 settings:1) Off2) Low3) Medium4) High |
| Aspect Ratio | There are 4 Aspect Ratio settings:1) Full Screen2) Standard3) Letter Box4) Theatre-Wide(16:9) |
| More... Allows the user to navigate into the advanced picture settings menu. | |
| Reset Resets values in this sub-menu only. | |
Table 1: Picture Sub Menu Function description

Picture "More" Display sub menu
| Action Description | |
| Overscan Adjusts the amount of cropping of the Image boundaries. (On/Off)Change overscan from 90 to 100 percentile (in 1 degree increments) | |
| Black Level | Black Pedestal level1) 0 IRE Pal, NSTC-JP2) 7.5 IRE NSTC |
| Phase This function allows the user to the adjust the clock phase to reduce image distortion. (Only on DVI-A and VGA) | |
| Frequency Adjusts the horizontal width of the image. | |
| HQV Turns HQV video processing On or Off | |
| 3D NR | Adjusts the amount of Temporal Noise reduction in the system |
| CODEC NR | Adjusts the amount of Mosquito and MPEG noise reduction in the system |
| BLOCK NR | Turns MPEG Block noise reduction On or Off |
| Reset Resets values in this sub-menu only | |
Table 2: Advanced sub menu function description

Input Display sub menu
| Action Description | |
| Main Input | Allows the user to select which Input is to be displayed on the main channel:1) Component2) DVI and VGA3) Computer4) S-Video5) Composite |
| Audio Input | Allows the user to select which Audio Input is to be processed:1) RCA2) Stereo Mini 13) Stereo Mini 2 |
Table 3: Input sub menu function description

PIP Display sub menu
| Action Description | |
| PIP (Picture in Picture) | Allows the user to turn the PIP function On or Off. |
| PIP Input Allows | the user to select which Input is to be displayed on the main channel:9) Component 12) S-Video10) DVI and VGA 13) Composite11) Computer |
| PIP Mode Allows | the user to choose which PIP mode to display:1) PIP (Picture-In-Picture) 2) PAP (Picture-and-Picture) 3) POP (Picture-On-Picture) |
| PIP Size Allows | the user to choose the size of the PIP window:1) Small 2) Medium 3) Large |
| PIP Position Adjusts | the vertical and horizontal position of the projected PIP image.Only VGA, DVI-D and DVI-A is Active (Only active when input is DVI or VGA). |
| PIP Location Allows | the user to choose the position of the PIP window:1) Top left 2) Top right 3) Bottom left, Bottom right |
| PIP Brightness Adjusts | Adjusts the brightness of PIP image. The higher the setting, the brighter the image. The lower the setting, the darker the image. |
| PIP Contrast Adjusts | the degree of difference between the dark and light in the PIP. The higher the value, the greater the contrast. |
| PIP Hue Adjusts | the balance of red-to-green necessary for realistic representation of video signals. |
| PIP Color | Adjusts the intensity of the Color in the image. |
| PIP Position Adjusts | the vertical and horizontal position of the projected image. |
| Reset | Reset values in this sub-menu only. |
Table 4: PIP sub menu function description

Speaker Display sub menu
| Cobra Description | |
| Volume Allows | User to adjust volume from 0 to 50. At 0 the sound is muted automatically. |
| Bass Allows User | to adjust bass from 0 to 10. |
| Treble Allows User | to adjust treble from 0 to 10. |
| Mute For the User | to toggle the sound On and Off. |
| Audio Mode Allows User | to change the Audio Mode |
| Audio Delay Adjusts the amount of time delayed in audio. | |
| Reset Adjust the amount of audio delay ± 100ms from the system's default delay. | |
Table 5: Speaker Display sub menu description

Setup Display sub menu
| Action Description | |
| Language Allows the user to select the Menu language:1) English 6) Portugese2) French 7) Japanese3) Spanish 8) Mandarin Traditional4) Deutsch 9) Mandarin Simplified5) Italiano | |
| Auto-Shutoff Powers down unit. (No active signals are present)1) 5 mins 5) 30 mins2) 10 mins 6) 45 mins3) 15 mins 7) 60 mins4) 20 mins | |
| H-Keystone Horizontal Keystone adjustment ( ± 30 ) | |
| V-Keystone Vertical Keystone adjustment ( ± 20 ) | |
| Reset Lamp hrs | Resets the Lamp hours status indicator in the Status window. |
| Lamp Mode | 1) Normal 2) Eco |
| Fan Mode | 3) Normal 4) High |
| Projection Mode | The projector can be installed on a ceiling or behind a screen1) Front Projection2) Rear Projection |
| Auto-Switch Input | Sets whether the projector searches automatically for input signals. If the source scan is on, the projector will scan for input signals until it acquires a signal. If the function is not activated, the projector selects the last used input signal.- Change Function to Cycle through the Signals (On/Off) |
| Factory Reset | Resets all Menu items to Factory default settings. |
| Reset | Resets values in this sub-menu only. |
Table 6: Setup sub menu function description
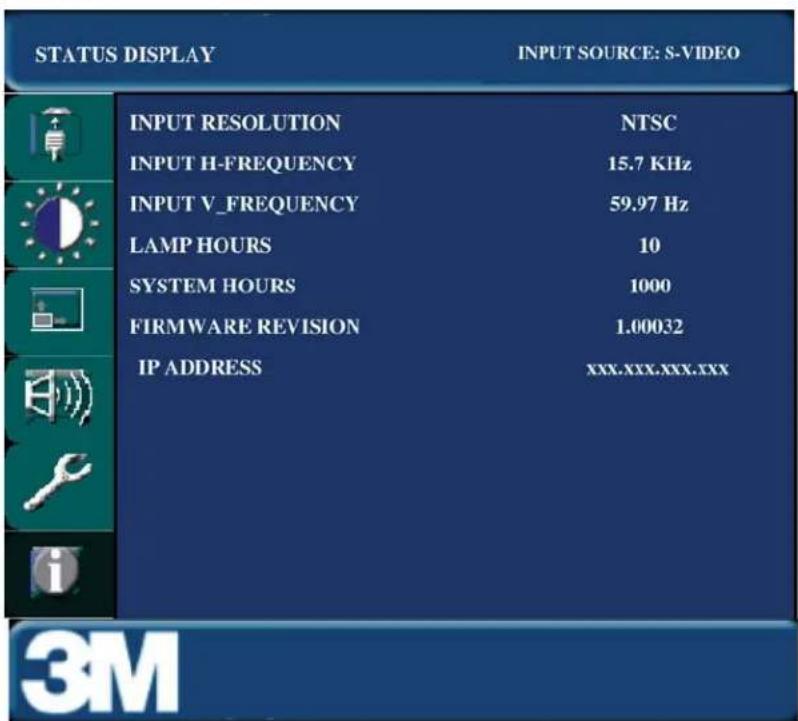
Status Display sub menu
Troubleshooting
| Common Problems and Solutions | ||
| Symptom Cause Solution | ||
| Power cannot be turned on. The power cord is disconnected. Insert the power cord into an AC socket. | ||
| No picture or sound. The desired input source is not selected. | Press the remote control Input button to select a desired input source. | |
| The input source is not turned on or not displaying an image. (e.g. If a notebook computer, the external monitor port is not turned on). | Turn on input source. | |
| The lamp will not ignite or has turned off. | The internal temperature is too high. | Clean the cooling fan screen. |
| The lamp has reached maximum life or has prematurely failed. | Replace lamp. | |
| Sound is heard with no picture. The VGA/Video cables are not connected. | Connect the cables to the correct input source. | |
| Picture is displayed with no sound The audio cables are connected to the wrong input. Check the audio/video configuration. | Connect the cables to the correct input source.Ensure proper configuration through the menu. | |
| Picture is dark or dim. The brightness setting is too low. Adjust the brightness | ||
| Desired input source cannot be detected. | The input source is not active.A signal must be present for the input to be selected. | Connect an active input source to unit. |
| The input device (e.g. computer, DVD player, etc.) is not turned on. | Turn on input source. | |
| The remote control does not work. | The remote control is not facing the remote control sensor. | Face the remote control toward the remote control sensor. |
| The remote control is too far from the sensor. | Operate the remote control within 5 meters. | |
| An obstruction is between the remote control and the sensor. | Remove obstacle. | |
| The remote control's batteries are exhausted or inserted wrong. | Correctly insert batteries. | |
Onscreen Messages
| Message Meaning | |
| No input is detected. Projector is not receiving a signal | from an external source. Check the cable connections and verify power is on and external source is working. |
| Please change the lamp. The lamp has 1400–1499 hours | s on it and needs to be changed. |
| There are (x) hours of lamp life remaining.The unit will shut off in 40 minutes. | The lamp has 1500–1579 hours on it and needs to be changed. |
| There are (x) hours of lamp life remaining.The unit will shut off in 5 minutes. | When the lamp has 1580 hours or more on it, the message will flash, and the power will turn off after 5 minutes. |
Maintenance
Replacing Projection Lamp
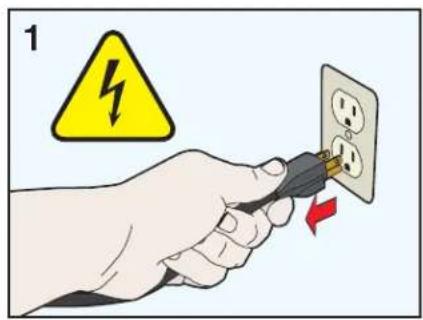


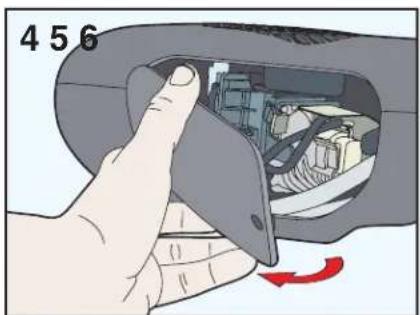
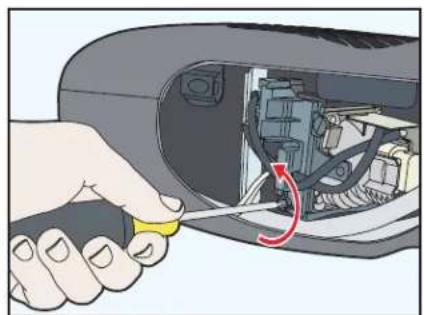


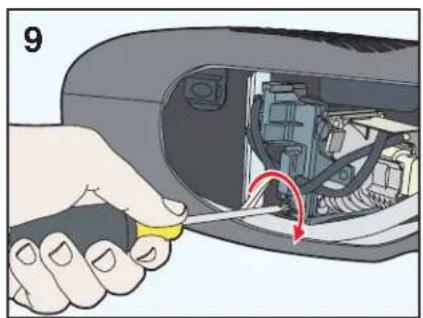
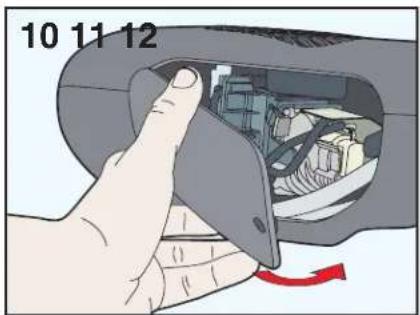


Reset Lamp Hours


Important Notice
All statements, technical information, and recommendations related to 3M's products are based on information believed to be reliable, but the accuracy or completeness is not guaranteed. Before using this product, you must evaluate it and determine if it is suitable for your intended application. You assume all risks and liability associated with such use. Any statements related to the product which are not contained in 3M's current publications, or any contrary statements contained on your purchase order shall have no force or effect unless expressly agreed upon, in writing, by an authorized officer of 3M.
Technical Support Contact:


http://www.3m.com/meetings e-mail: meetings@mmm.com
3M
Austin
Center
3M
Canada
3M
Mexico,
Building A145-5N-01 P.O. box 5757 Apartado Postal 14-139 Boulevard de l'Oise 6801 River Place Blvd. London, Ontario Mexico, D.F. 07000 95006 Cerge Pontoise Cedex Austin, TX 78726-9000 N6A 4TI Mexico France
©
S.a. Printed on 50% recycled wastepaper, including 10% Post-consumer
Litho in USA
@3M 2006
78-6970-9470-0-C
3M


- DIGITAL MEDIA SYSTEM 800 SERIES
- CONTENTS
- INTRODUCTION
- SAFETY INFORMATION
- WHAT'S IN THE BOX
- PRODUCT DESCRIPTION
- INSTALLATION & SYSTEM SETUP
- PROJECTOR REMOTE CONTROL
- BASIC OPERATIONS
- TROUBLESHOOTING
- MAINTENANCE
- THANK YOU FOR CHOOSING 3M
- INTENDED USE
- EXPLANATION OF SIGNAL WORDS AND SYMBOLS IN SAFETY LABELS AND INSTRUCTIONS
- WARNING
- TO REDUCE THE RISK ASSOCIATED WITH HAZARDOUS VOLTAGE
- TO REDUCE THE RISK ASSOCIATED WITH HAZARDOUS VOLTAGE AND/OR FIRE
- TO REDUCE THE RISK ASSOCIATED WITH HOT SURFACE OF LAMP CARTRIDGE
- TO REDUCE THE RISK ASSOCIATED WITH CHOKING
- TO REDUCE THE RISK ASSOCIATED WITH ENVIRONMENTAL CONTAMINATION DUE TO MERCURY
- TO REDUCE THE RISK ASSOCIATED WITH LAMP RUPTURE RELATED HAZARDS
- TO REDUCE THE RISK ASSOCIATED WITH HAZARD VOLTAGE, AND/OR IMPACT, AND/OR TRIPPING, AND/OR INTENSE VISIBLE LIGHT
- TO REDUCE THE RISK ASSOCIATED WITH MUSCULAR STRAIN
- TO REDUCE THE RISK ASSOCIATED WITH IMPACT, AND/OR PINCH
- TO REDUCE THE RISK ASSOCIATED WITH IMPACT
- TO REDUCE THE RISK ASSOCIATED WITH VARIOUS HAZARDS RELATED TO THE PROJECTOR
- TO REDUCE THE RISK ASSOCIATED WITH SHARPS, PREMATURE LAMP FAILURE, EXPOSURE TO MERCURY
- TO REDUCE THE RISK ASSOCIATED WITH RADIO INTERFERENCE
- CAUTION
- SAVE THESE INSTRUCTIONS
- TRADEMARKS
- WARRANTY; LIMITED REMEDY; LIMITED LIABILITY
- REGULATORY NOTICES
- EEC STATEMENT
- SHIPPING CONTENTS
- KEEP YOUR PACKING MATERIALS
- WHAT'S NEXT
- MACHINE CHARACTERISTICS
- SETTING UP THE PROJECTOR
- REMOTE CONTROL FUNCTIONS
- STAND BY MODE
- PROJECTOR POWER DOWN
- IMAGE ADJUSTMENT
- MENU NAVIGATION
- RESET LAMP HOURS
- IMPORTANT NOTICE
Brand : 3M
Model : Digital Media System 815
Category : Video projector