
MP8650 - Video projector 3M - Free user manual and instructions
Find the device manual for free MP8650 3M in PDF.


| Product Type | Video Projector |
| Brand | 3M |
| Model | MP8650 |
| Display Technology | LCD (3 panels) |
| Native Resolution | 1024 x 768 (XGA) |
| Brightness | 2000 ANSI Lumens |
| Contrast Ratio | 400:1 |
| Lamp Type | UHP 200W |
| Lamp Life (Normal Mode) | 2000 hours |
| Dimensions (W x D x H) | 300 x 220 x 100 mm |
| Weight | 3.2 kg |
| Power Consumption | 250W (max) |
| Input Connections | VGA, Composite Video, S-Video |
| Audio | Built-in 1W mono speaker |
| Keystone Correction | Vertical +/- 15° |
| Zoom Ratio | 1.2x manual |
| Noise Level | 35 dB (normal mode) |
| Safety Features | Auto power-off after 15 min idle, overheat protection |
| Maintenance | Clean air filter monthly; replace lamp after 2000 hours |
| Repairability | Lamp accessible via top cover; filter replaceable without tools |
| General Information | Designed for portable presentations; supports 4:3 aspect ratio |
Frequently Asked Questions - MP8650 3M
User questions about MP8650 3M
0 question about this device. Answer the ones you know or ask your own.
Ask a new question about this device
Download the instructions for your Video projector in PDF format for free! Find your manual MP8650 - 3M and take your electronic device back in hand. On this page are published all the documents necessary for the use of your device. MP8650 by 3M.
USER MANUAL MP8650 3M
MP8650 Multimedia Projector Operator's Guide
natural_image
Line drawing of a 3M MP8650 projector with no visible text or symbols on the device bodyAll statements, technical information, and recommendations related to Seller's products are based on information believed to be reliable, but the accuracy or completeness thereof is not guaranteed. Before utilizing the product, the user should determine the suitability of the product for its intended use. The user assumes all risks and liability whatsoever in connection with such use.
Any statements or recommendations of the Seller which are not contained in the Seller's current publications shall have no force or effect unless contained in an agreement signed by an authorized officer of Seller. The statements contained herein are made in lieu of all warranties, expressed or implied, including but not limited to the implied warranties of merchantability and fitness for a particular purpose which warranties are hereby expressly disclaimed.
SELLER SHALL NOT BE LIABLE TO THE USER OR ANY OTHER PERSON UNDER ANY LEGAL THEORY, INCLUDING BUT NOT LIMITED TO NEGLIGENCE OR STRICT LIABILITY, FOR ANY INJURY OR FOR AN DIRECT, INDIRECT, INCIDENTAL OR CONSEQUENTIAL DAMAGES SUSTAINED OR INCURRED BY REASON OF THE USE OF ANY OF THE SELLER'S PRODUCTS.
We're easy to reach

http://www.mmm.com/presentations e-mail: presentations@mmm.com
3M Austin Center
Building A145-5N-01 6801 River Place Blvd. Austin, TX 78726-9000
3M Canada
P.O. Box 5757 London, Ontario, Canada N6A 4T1
3M Mexico, S.A. de C.V.
Apartado Postal 14-139 Mexico, D.F. 07070 Mexico
3M Europe
Boulevard de l'Oise 9500 Cerge Pontoife Cedex France
Let us help you make the most of your next presentation. We offer everything from presentation supplies to tips for better meetings. And we're the only transparency manufacturer that offers a recycling program for your used transparencies. For late-breaking news, handy references and free product samples, call us toll-free in the continental United States and Canada, 7:30 a.m. to 5:30 p.m. (CST). Or visit our Internet Web site.

Printed on 50% recycled wastepaper, including 10% post-consumer wastepaper
Litho in U.S.A.©3M 1997 78-6970-7312-6 Rev. F
Safeguards 1
Warranty 2 ....
Section 1: Unpack .... 3
1-1. Contents of Shipping Box 3
1-2. Inventory List 3
1-3. Keep Your Packing Materials 3
1-4. What's Next? 3
Section 2: Product Description .... 4
2-1. Machine Characteristics 4
2-2. Parts Identification List 4
Section 3: Set Up 5
3-1. Cable Connections 5
3-2. Projector Set Up 9
3-3. Now What? 10
□
Section 4: Operating the Projector ..... 11
4-1. Turning On the Projector 11
□
4-2. Adjusting Image Size and Focus 12
□
4-3. Adjusting the Volume 12
□
4-4. Adjusting the Picture 12
□
4-5. Memory Function 13
□
4-6. Inverting the Image 13
□
4-7. Image Position 13
□
4-8. Video System 13
□
4-9. Setting Apple Macintosh Monitor Mode (Windowed or Compressed) 14
□
4-10. Menu Languages 14
□
4-11. Turning Off the Projector 14
□
Section 5: Remote Control 15
5-1. How to Operate the Remote Control 15
□
Section 6: Lamp Information ...... 17
6-1. Metal Halide Projector Lamp 17
□
Section 7: Maintenance .... 18
7-1. Cleaning 18
□
Section 8: Troubleshooting .... 19
8-1. Service Information 19
□
Section 9: Technical Specifications ..... 20
9-1. Specifications 20
□
9-2. S-Video Input Signal Terminal 20
□
9-3. Projector-to-Screen Distances 21
□
9-4. Physical Dimensions 21
□
9-5. Computer Video (RGB) Input Terminal 22
□
9-6. Computer (RGB) Signal Connection Modes 22
□
Section 10: Accessories 23
10-1. MP8650 Multimedia Projector Accessories 23
□
Appendix: Technical Information A-1
INTENDED USE
Before operating the machine, please read the entire manual thoroughly. The 3M Multimedia Projector MP8650 was designed, built and tested for use indoors, using 3M brand lamps and nominal local voltages. The use of other replacement lamps, outdoor operation or different voltages has not been tested and could damage the projector or peripheral equipment and/or create a potentially unsafe operating condition.
IMPORTANT SAFEGUARDS
- Read and understand all instructions before using. Pay particular attention to areas where this symbol ⚠ is shown.
⚠ WARNING — Indicates a potentially hazardous situation which, if not avoided, could result in death or serious injury.
Caution — Indicates a potentially hazardous situation which, if not avoided, could result in minor or moderate injury. It may also be used to alert against unsafe practices.
-
Close supervision is necessary when any appliance is used by or near children. Do not leave appliance unattended while in use.
-
Never look directly into the projector lens when the lamp is on. The metal halide lamp produces a strong light which could damage your eyesight.
-
Care must be taken as burns can occur from touching hot parts.
-
Do not operate appliance with a damaged cord or if the appliance has been dropped or damaged — until it has been examined by a qualified service technician.
-
Position the cord so that it will not be tripped over, pulled or contact hot surfaces.
-
If an extension cord is necessary, a cord with a current rating at least equal to that of the appliance should be used. Cords rated for less amperage than the appliance may overheat.
-
Always unplug appliance from electrical outlet before cleaning and servicing and when not in use. Grasp plug and pull to disconnect.
-
To reduce the risk of electric shock, do not immerse this appliance in water or other liquids.
-
To reduce the risk of electric shock, do not disassemble this appliance, but take it to a qualified technician when service or repair work is required. Incorrect reassembly can cause electric shock when the appliance is subsequently used.
-
The use of an accessory attachment not recommended by the manufacturer may cause a risk of fire, electric shock, or injury to persons.
-
Connect this appliance to a grounded outlet.
-
This unit is equipped with optical lenses and should not be exposed to direct sunlight.
-
Keep ventilation openings free of any obstructions.
-
Always remove the lens cap when the projection lamp is on.
SAVE THESE INSTRUCTIONS
The information contained in this manual will help you operate and maintain your 3M MP8650 Multimedia Projector.
THANK YOU FOR CHOOSING 3M
Thank you for choosing 3M multimedia projection equipment. This product has been produced in accordance with 3M's highest quality and safety standards to ensure smooth and troublefree use in the years to come.
For optimum performance, please follow the operating instructions carefully. We hope you will enjoy using this high performance product in your meetings, presentations and training sessions.
LIMITED WARRANTY
3M warrants this product against any defects in material and workmanship, under normal use and storage, for a period of one year from date of purchase. Proof of purchase date will be required with any warranty claim. In the event this product is found to be defective within the warranty period, 3M's only obligation and your exclusive remedy shall be replacement of any defective parts (labor included).
To obtain warranty service, immediately notify the dealer from which you purchased the product of any defects.
LIMITATION OF LIABILITY
THE FOREGOING WARRANTY IS MADE IN LIEU OF ALL OTHER WARRANTIES, EXPRESSED OR IMPLIED, AND 3M SPECIFICALLY DISCLAIMS ANY IMPLIED WARRANTY OF MERCHANTABILITY AND FITNESS. 3M SHALL NOT BE LIABLE FOR ANY DAMAGES, DIRECT, CONSEQUENTIAL, OR INCIDENTAL, ARISING OUT OF THE USE OR INABILITY TO USE THIS PRODUCT.
Important: The above warranty shall be void if the customer fails to operate product in accordance with 3M's written instructions. This warranty gives you specific legal rights and you may have other rights which vary from state to state.
FCC STATEMENT – CLASS A: This equipment generates, uses and can radiate radio frequency energy, and if not installed and used in accordance with the instruction manual may cause interference to radio communications. It has been tested and found to comply with the limits for a Class “A” computing device pursuant to Subpart B of Part 15 of the FCC Rules, which are designed to provide reasonable protection against such interference when operated in a commercial environment. Operation of this equipment in a residential area is likely to cause interference in which case the user at his/her own expense will be required to take whatever measures may be required to correct the interference.
EEC STATEMENT: This machine was tested against the 89/336/EEC (European Economic Community) for EMC (Electro Magnetic Compatibility) and fulfills these requirements.
Video signal cables: Double shielded coaxial cables (FCC shield cable) must be used and the outer shield must be connected to the ground. If normal coaxial cables are used, the cables must be enclosed in metal pipes or in a similar way to reduce the interference noise radiation.
Video inputs: The input signal amplitude must not exceed the specified level. See Section 9.
IBM is a registered trademark of International Business Machines Corporation. Apple Macintosh and Apple Powerbook are registered trademarks of Apple Computer, Inc. Microsoft and Windows 95 are registered trademarks, and Windows and Windows for Work Groups are trademarks of the Microsoft Corporation. All other products are trademarks or registered trademarks of their respective companies.
1-1. Contents of Shipping Box
The 3M Multimedia Projector MP8650 is shipped with the necessary cables required for standard VCR, PC, Apple Macintosh or laptop computer connections. Carefully unpack and verify that you have all of the items shown below in Figure 1-1.

Figure 1-1. Inventory of Shipping Box
1-2. Inventory List
The shipping carton contains the following items illustrated in Figure 1-1. If any of these items are missing, please contact your place of purchase.
DMP8650 Multimedia Projector
Remote control transmitter
(AAA batteries included)
DLens cap
dApple Macintosh adaptor (S-VGA, VGA)
dVGA cable (15-15 pin male to male)
To operate the Apple Macintosh mouse button functions via the MP8650 remote control transmitter requires the Apple Macintosh Mouse Receiver (accessory part). See Section 10 to order.
1-3. Keep Your Packing Materials
Save the shipping box and packing materials in the event the MP8650 should require shipping to a 3M Service Center for repair. The zoom lens should be completely retracted before shipping this product.
1-4. What's Next?
After you have unpacked the MP8650 system and identified all the parts, you are ready to set up the projector.
Take a few minutes to review Section 2 to familiarize yourself with the MP8650 machine characteristics and then turn to Section 3 to set up the projector.
2-1. Machine Characteristics
The 3M Multimedia Projector MP8650 integrates metal halide lamp and dichroic optics display technology into a single unit. It accepts input from two different computer sources and two video/audio sources and projects a bright super crisp image.
The MP8650 Multimedia Projector offers the following features:
dEasy to set up and use
dPortable (suitcase-style carrying handle)
dMetal halide projection lamp
D High brightness lamp output (see note)
d800 x 600 SVGA/VGA image (NTSC, PAL, SECAM)
D XGA compatible (60/70 Hz)
dRGBS compatible
Ability to display 16.7 million colors
dTwo computer input connections
dTwo video input connections
Power zoom
Power focus
dFull function remote control
dPC/Apple Macintosh mouse emulation
☐Dealer enabled RS232 control
dLighted, back-lit remote control keypad
D Built-in speaker (1 Watt)
D Horizontal and vertical image inverting function allows rear projection or ceiling mount
dHorizontal and vertical image position control
On-screen menu to adjust video image contrast, brightness, hue, saturation (color), sharpness, gamma, coring, horizontal position
On-screen menu to adjust computer video (RGB) contrast, brightness, synchronization and phase and vertical/horizontal position
dMenus display in English, French, or Spanish
dFixed keystone correction
Note
The MP8650 is one of the brightest projectors in the marketplace. The brightness of your machine will vary depending on the ambient room conditions and contrast/brightness settings.
2-2. Parts Identification List

natural_image
Line drawing of a remote control with labeled button (no text or symbols beyond label)

Figure 2-1. Identifying MP8650 Parts
- Remote Control Transmitter
- Lens
- Carry Handle
- Remote Control Sensor
- Indicator Lights (Temperature, Lamp, Power)
- Control Panel Keypad
a. Standby Power Switch
b. Input Selection
c. Horizontal Inversion
d. Vertical Inversion - Built-In Speaker
-
Height Adjustment Feet
-
Power Cord Connection
- Computer video (RGB) Input Terminals
a. RGB1/RGB2 (D sub 15-pin)
b. Audio-L/Audio-R (RCA Jack) - Video/Audio Input Terminals
a. S-Video1/S-Video2 (Mini DIN 4-pin)
b. Video1/Video2 (RCA Jack)
c. Audio-L/Audio-R (RCA Jack) - RGB/Audio L/R (monitor output)
- Remote (not used)
- Main Power Switch
- RS232C Serial Mouse Connection
3-1. Cable Connections
It only takes a few minutes to connect the 3M Multimedia Projector MP8650 to your computer, VCR or other video device (Figure 3-1).

flowchart
graph TD
    A["Sound System"] --> B["Laptop or Desktop"]
    A --> C["Laptop"]
    A --> D["Laptop or Laptop"]
    A --> E["Laserdisc or VCR (S-VHS output)"]
    A --> F["VCR (VHS output)"]
    G["Electric Outlet"] --> H["Power Supply"]
    H --> I["Switch"]
    I --> J["Control Unit"]
Figure 3-1. Typical Cable Configuration
Terminal Connection Panel
Take a moment to look over the input connection terminals (Figure 3-2) on the back of the projector. Connect your first RGB or Video input source to terminal #1 and your second input source to the terminal #2.
Terminal connectors for Computer1 (RGB1) and Computer2 (RGB2) are: RGB, Audio-L, Audio-R.
Terminal connectors for VIDEO/AUDIO 1/2 are: S-Video, Video, Audio-L, Audio-R.
Terminal connectors for MONITOR OUTPUT are: RGB, Audio-L, Audio-R.
Terminal connector for a PC serial mouse is the RS232C. Apple Macintosh computers require a mouse receiver (accessory part).

Figure 3-2. Input Connection Terminals
Power Connection
Caution
To prevent damage to equipment, all power to the MP8650 and input sources must be turned OFF during cable hook up.
The power cord (Figure 3-3) is detachable from the projector and has different connection plugs on each end. Plug the female end into the power cord terminal on the projector and the male end into a properly grounded electrical outlet.
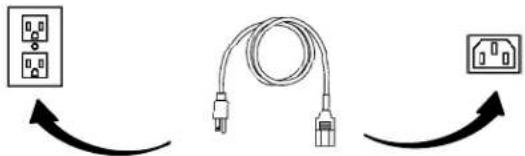
Figure 3-3. Connecting the Power Cord
Computer (RGB) Input Connection
There are two input jacks available for connecting either desktop or laptop computers. Find the cable that fits your computer type. The MP8650 comes with two computer input cables. The first cable (Figure 3-4) fits IBM PC and compatible VGA video systems, and the other cable (Figure 3-5) fits on the end of the first cable and adapts it to fit Apple Macintosh computers and Apple Powerbook laptop computers.

natural_image
Line drawing of a computer setup with an open projector and a monitor connected by cables (no text or symbols)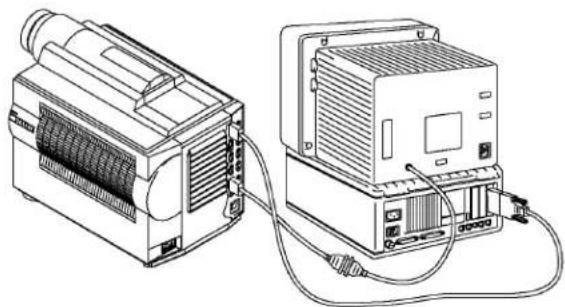
natural_image
Technical line drawing of two electronic devices connected by wires, no text or symbols presentFigure 3-4. IBM Compatible Computer Figure 3-5. Apple Macintosh Computer
Monitor Loop-Through (640 x 480 mode)
For IBM compatible computers:
a Power down the computer
b Connect the monitor cable to an RGB output port on the projector.
c Turn the power on.
d Select the appropriate RGB input mode on the projector.
For Apple Macintosh type computers (640 x 480 mode):
a Power down the computer
b Connect the 640 x 480 (grey color) adapter to the monitor output port on the computer or to the high density end of the laptop adapter.
c Connect the VGA cable from the adapter to the projector
d Turn the power on.
e Select the appropriate RGB input mode on the projector.
Monitor Pass-Through (832 x 624 mode): For Apple Macintosh computers, a gender changer (accessory part number 78-8118-3239-9) is required to complete the connection.
To complete the pass-through connections:
a Connect gender changer to 832 x 642 (black color) adaptor.
b Connect monitor cable to the gender changer.
c Connect other end of adapter to the projector monitor out port or connect VGA cable to adapter and the RGB out port on projector. d Turn power on.
S-Video Connection
Some video devices can generate S-VHS video, or S-Video (Y/C). The MP8650 will accept this signal through the S-VIDEO1 or S-VIDEO2 connectors. The S-VHS cable has identical round four-pin connectors on either end (Figure 3-6). Connect one end to the S-Video jack on the input source device, and the other end to the S-VIDEO1 or S-VIDEO2 terminal on the MP8650. Remember to connect the audio cables for sound output.
Four-Pin Connector S-VHS Cable

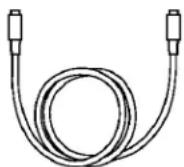
Figure 3-6. S-Video Input
Video/Audio Connection
Find the small, circular connector on your camcorder, laserdisc player, VCR, or other video source marked VIDEO OUT, TO MONITOR, or something similar.
Use the 3-conductor video/audio cable and insert the video (white) connector into the video output jack of your video source device. Connect the other end into the MP8650 VIDEO1 or VIDEO2 connector.
Next, find the AUDIO OUT terminals on your VCR or other audio source. Insert the left and right audio cable connectors (Figure 3-7) to the input source. Connect the other end to the AUDIO-L and AUDIO-R terminals on the MP8650.

n Note
The MP8650 projector is a stereo device. However, the projector's built-in speaker is monophonic. Stereo sound played through the speaker becomes monophonic due to an internal sound mixer that converts stereo to mono.
Figure 3-7. 3-Conductor Video/Audio Input Cable
If you are giving a multimedia presentation with stereo sound, you may want to consider connecting the MP8650 audio-out L/R jacks to a high-quality stereo system.
RS-232C Serial Cable/Mouse Receiver Connection
The MP8650 remote control transmitter can be used to control the mouse button functions on your personal computer (requires serial cable included) or Apple Macintosh type computer (requires Apple Macintosh mouse receiver which is an accessory).
n Note
Always power down your PC or Apple Macintosh computer before making any cable connections.
PC Computer: Install the serial cable (Figure 3-8) to connect the serial mouse port on your computer to the RS-232C terminal on the MP8650 projector. A serial mouse driver must be loaded on your PC computer for this function to operate properly. It is best to reference the operating instructions for your computer before connecting an external mouse device of any kind.
To load a serial mouse driver on a computer using Microsoft Windows or Windows for Workgroups, go into the Windows Setup function. From Program Manager click Main; then click Windows Setup; (note the current mouse driver that is loaded); click Options; click Change System Settings. Choose Mouse. You will need to have the Serial Mouse on Comm 1 driver loaded. It will most likely be listed as Serial or Bus Mouse. Click OK to apply the serial mouse driver. Restart Windows if prompted.
Hint: To load a serial mouse driver on a computer using Microsoft-Windows95, go into the Control Panel. Click Start; select Settings; select Control Panel. Click on Mouse; select the General tab; (note the current mouse driver that is loaded); select Change; select Show all compatible devices; (note the current Manufacturer and Model); select Standard Mouse Type for Manufacturer; select Standard Serial Mouse. Click OK to apply the serial mouse driver. Restart windows when prompted.
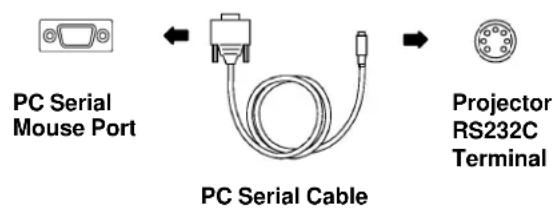
Figure 3-8. PC Serial Mouse Cable
n Note
Operating the mouse functions through the MP8650 remote control may disable the internal pointing device (IPD) on your computer. It is recommended that you review the operating instructions for your computer before connecting an external device of any kind.
See Technical-Appendix for RS32 Serial Command Codes.
Apple Macintosh: Power off the computer then disconnect the current mouse cable. Now connect the mouse receiver plug to the computer mouse port (Figure 3-9).
The Apple Macintosh computer mouse can be hooked into the loop allowing both the computer mouse and MP8650 remote control transmitter to operate the computer mouse button functions. After the mouse receiver is connected to the mouse port, connect the mouse cable to the mouse receiver plug.

Figure 3-9. Apple Macintosh Mouse Receiver
3-2. Projector Set Up
The meeting room is your operating environment and any stray light hitting the projection screen will become glare. It is best to use a meeting room without wide-open windows. If there are “light stripes” from venetian blinds, try to find a viewing area that’s away from them – and remember, the light stripes will move as the hour changes.
Ambient Light
Whenever you have a choice, light the room from the rear, away from the projection screen. The MP8650 has a brightness adjustment to achieve the best image possible.
Distance to Viewing Screen
The MP8650 can be used in a small or large meeting room to project a quality image from 51 cm (20 inches) to 762 cm (300 inches) in size. The distance between the projector and the viewing screen and the zoom lens setting (minimum to maximum) will determine the size of the projected image. Refer to the table in Section 9-3 to determine how far away from the viewing screen you need to place the projector to fill the screen with the projected image.
Remember that increasing the projector-to-screen distance also decreases the image's brightness dramatically. In other words, as the image grows larger, it also grows dimmer.
For best results, experiment to find the right combination of projector-to-screen distance and room lighting.
Carrying Handle
The MP8650 has a carrying handle that folds into the top of the projector housing. To raise the handle, push up on the back end of the handle (Figure 3-10) and then lift upward.

natural_image
Technical line drawings of two mechanical components with directional arrows indicating motion (no text or symbols)Figure 3-10. Unfolding Handle
Ceiling Mount Considerations
An optional ceiling mount bracket (Figure 3-11) is required to install the MP8650 from the ceiling. For this type of installation, the image must be inverted.
Refer to section 4-6 Inverting the Image for more details.
See section 10-1 to order the ceiling mount kit.

Figure 3-11. Optional Ceiling Bracket
Adjusting the Projector Elevation
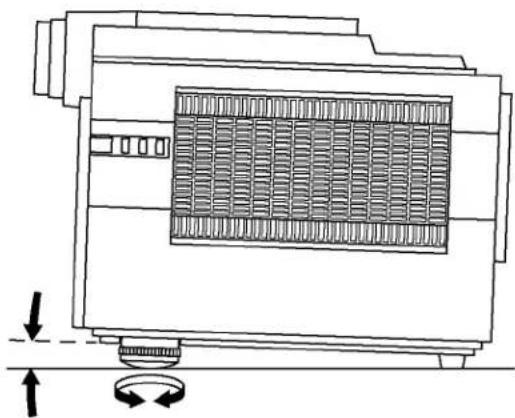
The elevation can be adjusted by turning the foot adjuster (Figure 3-12) to raise or lower the angle of the projector.
natural_image
Technical line drawing of a mechanical device with internal grid structure and directional arrows (no text or symbols)Figure 3-12. Foot Adjuster
n Note
Both adjusting feet must be raised or lowered the same amount to project a level image on the viewing screen. The elevation can be adjusted up to seven degrees.
Rear Projection
A semi-transparent screen (Figure 3-13) can be used to project an image and view it from the backside of the viewing screen. For this type of installation, the image must be inverted. Refer to section 4-6 Inverting the Image for more details.

Figure 3-13. Rear Projection Viewing
3-3. Now What?
Your MP8650 is now connected and ready to power on. Turn to Section 4 for details on operating the projector.
4-1. Turning On the Projector
Read the Important Safeguards before operating the MP8650 projector.
Refer to Section 3 to make all cable connections. When the input cables and power cords are connected, turn on the power, adjust the size and focus of the projected image and begin your presentation.
Power On: Turn on the projector power, then turn on the power to your input sources. The projector power switch is located on the backside of the projector in the lower right corner.
Press the power switch to ON to apply power to the projector. | = ON O = OFF

Caution
Allow a projector that has been stored in a cold place to warm up to operating temperature 0irc C to 35irc C ( 32irc F to 95irc F) before applying power.
The Standby/Power-On indicator (Figure 4-1) will turn amber, indicating the unit is in the standby mode.
Note
The lamp does not energize in the standby mode.
Remove Lens Cap: Remove the lens cap from the projection lens before energizing the lamp.
Projector Control Panel: The projector control panel is located on the side of the projector.
Energize Lamp: Press the POWER button ⚠️ on the projector control panel or the STANDBY button ⏻ on the remote control to energize the lamp. The Lamp indicator (Figure 4-2) will turn green to indicate that the metal halide lamp is warming up.
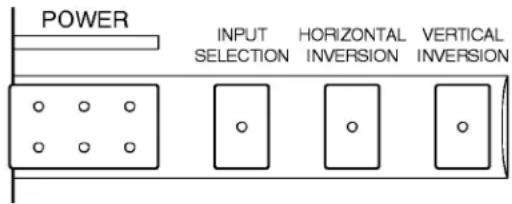
Figure 4-1. Projector Control Panel
The Standby/Power-On indicator (Figure 4-2) will turn from amber to green to indicate that the projector is in the operating mode. It takes a few moments for the projection lamp to reach its full light output.
Note
When a metal halide lamp is first turned on, it is normal for it to make noise as the gas inside the bulb heats to the proper operating temperature.
Select Input: Press the INPUT button on the control panel or RGB or VIDEO button on the remote control to select the desired video or computer source. The current input source (RGB1, RGB2, Video1 or Video2) will display in the upper right corner.
Press INPUT again or press the ⊙ or ←arrow (remote control) to select the next input source.

Figure 4-2. Indicator Lamps
4-2. Adjusting Image Size and Focus
Zoom: Press the ZOOM button, then press the ☐ or ☑ arrow to adjust the image size. If you cannot make the image fill the screen, locate the projector further back from the screen.
Caution
To avoid damaging the internal projector components, DO NOT rotate the projection lens with your hand. Always use the remote control to adjust the focus.
Focus: Press the FOCUS button to display the Focus pattern. Press the ✦ or ◀ arrow to increase or decrease the sharpness of the projected image.
4-3. Adjusting the Volume
Press and hold the VOL button to display the volume bar. Press the ✦ or ◯ arrow to increase or decrease the volume level.
Note
Press the MUTE button on the remote control to silence the volume. Press MUTE again to return the sound.
4-4. Adjusting the Picture
The projected image can be adjusted using the remote control transmitter.
For video signals (NTSC, PAL, SECAM) you can adjust:
| dContrast (low to high) |
| dBrightness (dark to light) |
| dHue (red to green) |
| dSaturation (low to high) |
| DSharpness (soft to sharp) |
| DGamma |
| DCoring (On/Off) |
| DHorizontal position |
For Computer (RGB) signals you can adjust:
| dContrast (low to high) |
| dBrightness (dark to light) |
| dP-Clock (synchronization) |
| DPhase |
| DHorizontal Position |
| DVertical Position |
Press the MENU MENU button to display Memory 1 or press MENU twice to display Memory 2 or press MENU three times to display Memory 3. (See Figure 4-3). If STANDARD displays instead of the Memory 1 screen, press the MENU button again.

Figure 4-3. Memory Screen

Figure 4-4. Picture Adjustments
Press the SELECT button (SELECT) to display the first picture adjustment setting for Memory 1, 2 or 3. (See Figure 4-4). Press + or to adjust this line or press SELECT again to display the next picture adjustment setting or press RESET (RESET) to use the STANDARD default settings.
Note
Using the standard default settings does not affect the Memory 1, Memory 2 or Memory 3 settings.
4-5. Memory Function
In addition to the standard factory default picture settings, the MP8650 will retain in memory, up to three different picture settings for RGB and Video input sources. If you use the MP8650 projector in meeting rooms that have different lighting considerations, you can adjust the picture for optimum performance and then save these settings under Memory 1 or Memory 2 or Memory 3 modes. Storing picture settings in memory will reduce the amount of setup time needed before a multimedia presentation.
To store picture settings in Memory menu:
- Setup the MP8650 to project an image from the first input source (RGB1 or RGB2 or Video1 or Video2).
- Press MENU to display STANDARD.
- Now press MENU once for Memory 1 or twice for Memory 2 or three times for Memory 3 mode.
-
Press SELECT (once, twice, etc.) to display each picture setting that can be adjusted for the Memory 1, 2 or 3 mode (see Step 3) or press RESET to use the factory defaults. Using the STANDARD factory defaults will not affect the Memory 1, 2, or 3 settings.
-
Press the + or - arrow to change each setting to produce the best picture.
- Continue to press SELECT, then + or - until all the picture settings for the Memory 1, 2 or 3 mode (selected in Step 3) are properly set.
- Press Menu to display the next Memory mode.
- Move the projector to the next presentation room and repeat Steps 1-7 to record different picture settings for the next Memory mode.
4-6. Inverting the Image
The image can be inverted for ceiling mounted applications. Press the HORIZONTAL or VERTICAL button on the projector control panel to invert the image left to right or top to bottom. Press again to invert the image back.
4-7. Image Position
The computer (RGB) image can be moved vertically or horizontally to center it on the projection screen. On the remote control, press the H/V button once, then press and hold the ☐ or arrow to set the horizontal (left/right) position or press the H/V button twice, then press and hold the ☐ or arrow to set the vertical (up/down) position.
Note
For video input, only the horizontal position can be adjusted.
4-8. Video System
The MP8650 has an automatic video detection function that will select the correct video system for NTSC, PAL or SECAM.
4-9. Setting Apple Macintosh Monitor Mode (Windowed or Compressed)
The MP8650 should be set to the desired Apple Macintosh monitor mode. Press the RGB button then RESET button on the remote control to switch between the ON compressed mode or OFF windowed mode. Press RESET again to switch the ON/OFF setting. ON OFF ON.
Note
In the compressed mode (ON), an 832 x 624 image is fully displayed by the 800 x 600 projector format. In the windowed mode (OFF), you will need to scroll the display to see the full 832 x 624 image.
4-10.Menu Languages
The MP8650 will display on-screen menus in the following languages:
dEnglish
dFrench
dSpanish
Press the VIDEO button then the RESET button on the remote control to switch the displayed language. Press RESET again to switch to the next language. English French Spanish English.
4-11. Turning Off the Projector
Press the STANDBY/ON button (remote control keypad or projector control panel) to switch the projector to the standby mode. The lamp will shut off and the green indicator on the projector panel will turn to orange. Wait until the cooling fan motor cycles off before you press the Power Off switch (Figure 3-2).
Note
Switching the power off before the fan has cycled off, will decrease the life of the projection lamp.
5-1. How to Operate the Remote Control
The remote control keypad (Figure 5-1) controls basic projector functions. To use the remote control, aim the remote toward the projection screen and press the desired button. The remote signal (Figure 5-3) will bounce off of the projection screen and back to the mouse receiver and sensor on the front of the projector.
n Note
Pressing some buttons will cause the remote control LED to flash. This is an indication that the current selection can be adjusted by pressing the + or <-buttons.
Remote Control Buttons
RGB
Press to switch between RGB1 or RGB2 input sources. Press RGB + RESET for ON-Compressed or OFF-Windowed display mode.
VIDEO
Press to switch between VIDEO1 or VIDEO2 input sources. Press VIDEO + RESET to switch displayed menu language. (Eng., Fr., Sp.)
VOL
Press to display the Volume bar. Press + or to adjust speaker volume or press RESET to return to default setting.
PHASE
Press PHASE and the LED lamp will flash. Press + or to adjust screen flicker or press RESET to return to the factory default setting.
RESET
After pressing Volume, Phase, H/V or MENU press RESET to return these buttons to the factory default setting.
BLANK
Press BLANK to display a black background with no image. Press again to return the image to the screen.
MUTE
Press to switch the audio (speaker) sound ON (volume bar turns green) or OFF (volume bar turns red).
MENU
Press once for Memory 1, twice for Memory 2 or three times for Memory 3. Press SELECT to display the picture adjustments (brightness, contrast, P-Clock). Press + or - to adjust or press RESET to go to the STANDARD default setting.
SELECT
Press to select the picture adjustment setting. See MENU button.
[Non-Text]
Press to switch projector between projection and standby mode. In projection mode the lamp is ON. In standby mode the lamp is OFF.
ZOOM
Press ZOOM and the LED will begin to flash. Press ➕ to increase or ◀ to decrease the size of the screen image.
FOCUS
Press to display the focus pattern. Press ✦ to increase or ⓣ to decrease the sharpness of the screen image.
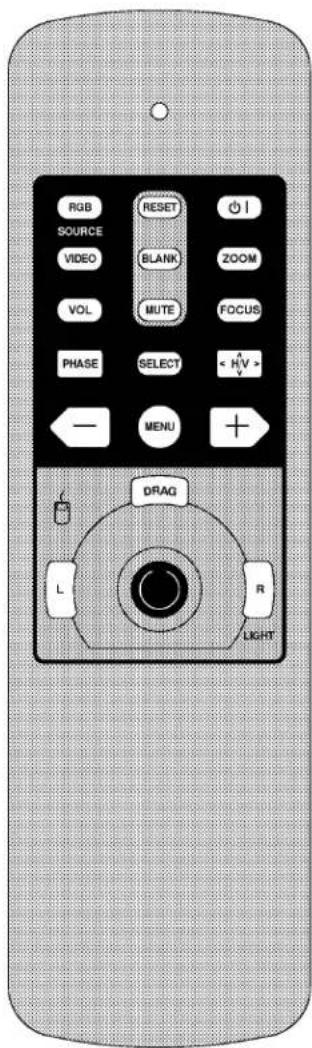
Figure 5-1. Remote Control

Press once for horizontal (left/right) or press twice for vertical (up/down) position adjustment. The LED on the remote control will flash. Press + or to adjust the setting or press the RESET button (RESET) to return it to the factory default setting.
Using the Mouse Buttons
The PC serial cable or Apple Macintosh mouse receiver must be connected before the remote control buttons will operate the mouse functions. See RS232C Serial Cable/Mouse Receiver Connection in Section 3.
There are three mouse buttons L-Left, R-Right and DRAG and a mouse STICK for controlling mouse functions. See Figure 5-2.
Mouse Stick: The mouse stick controls the position of the on-screen cursor or pointer.
L - Left Mouse Button: This button has the same function as a left mouse button.
R – Right Mouse Button: This button has the same function as a right mouse button. Press and hold the R button to backlight all the buttons on the remote control. After a few seconds, the backlighting will automatically turn off.
DRAG: Use this button to hold and drop an object so it can be moved to a new position on the screen.
a. Press and release the DRAG button to select a highlighted object (similar to pressing down and holding a normal mouse key button).
b. Use the mouse STICK to move the object to a new position.
c. Press the DRAG button again to release the object.
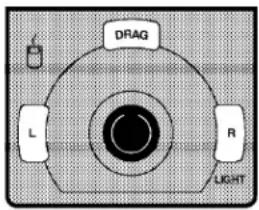
Figure 5-2. Mouse Buttons
Mouse Receiver - (Apple Macintosh computer only)
Set the mouse receiver on top of the MP8650 projector with the sensor facing the projection screen. Point the remote control at the projection screen to bounce the signal off of the screen and back to the mouse receiver.
n Note
The mouse receiver must be positioned so that the remote control signal can enter the sensor. You can either bounce the signal off of the projection screen or rotate the mouse receiver to aim the remote directly at it. Aiming the remote directly at the receiver will increase the effective signal distance.
For best results, always use fresh batteries in the remote control transmitter.
Replacing the Batteries
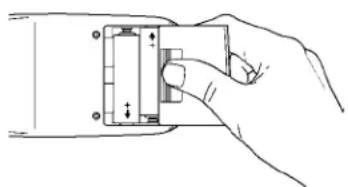
The remote control uses three AAA batteries. The battery cover is located on the back of the remote control (Figure 5-4). Slide the door open to access the batteries. Make sure the polarity (+/-) on each battery matches the decal in the battery compartment.

natural_image
Diagram of a projector with a screen and lens, showing light path from front to side (no text or symbols)Figure 5-3. Using the Remote Control
natural_image
Hand inserting a component into a device (no text or symbols visible)Figure 5-4. Replacing the Batteries
6-1. Metal Halide Projector Lamp
If the projected image appears dark, the lamp may be getting old and in need of replacement. Under normal operating conditions, the lamp should last approximately 1000 hours. However, after time, the lamp brightness will slowly grow dimmer.
Note
The TEMPERATURE indicator will come on if the lamp becomes too hot. If this happens, wait for the fan motor to stop running, turn the power off and let the projector cool. Check for airflow blockage, clean the air filter then turn the power on. If the TEMPERATURE indicator comes on again, call customer service or your dealer for assistance.
Display Lamp Operation Hours
You must turn both the projector lamp and main power OFF to reset the lamp hours.
a Press power button (Figure 4-1, side of projector) to turn projection lamp OFF.
b Switch projector power OFF (Figure 2-1, back of projector) to turn main power off.
c Press and hold the INPUT button (Figure 4-1, side of projector).
d While pressing the INPUT button, switch main power ON (Figure 2-1, back of projector). This will display the Lamp Timer Clock.
e Read the number of lamp usage hours.
f Check the RESET field to make sure it is set to NO. If RESET is set to YES, press the INPUT button to switch it back. (See note)
g Press power button (Figure 4-1, side of projector) to turn projection lamp OFF and exit the lamp timer clock display mode.
h Switch projector power OFF (Figure 2-1, back of projector) to turn main power off.
Note
Changing RESET to YES will zero the hour clock. This should only be done by a qualified technician when a new lamp is installed.
Change Lamp Message
After 1000 hours of lamp operation, the message “Change Lamp” will display for 30 seconds each time the machine is powered on. This message is an indication that it is time to install a fresh lamp.
For best results, the lamp should be replaced after 1000 hours of usage.
DFor 110V machines, the lamp can be replaced by the user (See Technical Appendix for instructions)
DFor 220V machines, the lamp must be replaced by a qualified service repair technician.
Contact your nearest Service Repair Center or the Technical Assistance Center at:
In U.S. or Canada: 1-800-328-1371
In other locations, contact your local 3M Sales office.
7-1. Cleaning
For best performance, keep your projector free of excess dust and surface dirt.
Daily Cleaning
Use a soft cloth to remove dust from the projector housing.
Cleaning the Projection Lens
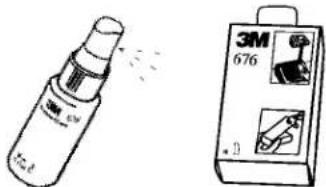
Use 3M Overhead Cleaner 676 to remove surface dirt and smudges from the projection lens (Figure 7-1).
Cleaning the Air Filter
natural_image
Illustration of a spray bottle and a 3M device (no text or symbols)Figure 7-1. Cleaning the Lens
For best performance, clean the air filter every 50 hours of operations.
Unplug the power cord and carefully remove the air filter. The air filter (Figure 7-2) is located underneath the projector and is easily removed by sliding it out like a center desk drawer.


Figure 7-3. Vacuum Air Cleaner Filter
Figure 7-2. Slide out to remove air filter Use a vacuum cleaner (Figure 7-3) to carefully remove dust and dirt from the bottom of the air cleaner screen.
Slide the air filter (top side up) back into place after it has been thoroughly cleaned.

Caution
To avoid damaging the internal projector components, do NOT vacuum the inside of the projector.
Section 8: Troubleshooting
The MP8650 has been designed to be as simple and trouble-free to use as possible. If you should run into problems operating the projector, please review the troubleshooting information below.
| Problem | Possible Solutions |
| Power does not come on | D Power cord must be plugged into an electric outlet.DPower switch must be turned on. |
| No picture and sound | D Set the projector to the correct input source.DCheck all cable connections from input source to projector.DMake sure the input source power is on. |
| Picture displays but no sound | D Check all cable connections from input source to projector.DPress VOLUME then + on the remote control.DPress the MUTE button on the remote control. |
| Sound but no picture | D Check all cable connections from input source to projector.DAdjust the picture brightness. Press MENU, then press SELECT. |
| Weak saturation, incorrect hue | D Adjust picture saturation and hue (video only). Press MENU, then press SELECT. |
| Picture is dark | D Adjust the picture brightness and contrast. Press MENU, then press SELECT.DLamp may need replacement. Call customer service for assistance. See Service Information below. |
| Picture is not sharp and clear | D Adjust focus and sharpness (video only). Press MENU, then press SELECT. |
| WARNING is flashing on the projection screen | DProjector is overheating. Turn the projector off and let it cool for 30 minutes.Clean the air filter and check all ventilation holes for blockage. |
| LAMP indicator solid red, Power-On indicator blinking red | DTurn the power off and let the projector cool. If the LAMP indicator comes on again there may be a problem with the lamp. Call customer service for assistance. See Service Information below. |
| “Change Lamp” message displays when projector is powered on | DThe Change Lamp message will display for 30 seconds after power on when the lamp clock reaches 1000 hours. This lamp is old and should be replaced by a qualified technician. |
| Power indicator is blinking red | D Check the air cleaner to make sure it is fully closed and latched. |
| TEMP indicator is red | D Turn the projector off and let it cool. Check the ventilation holes for blockage. |
| Remote control does not operate | D Replace old batteries with fresh AAA batteries.DThe polarity of the batteries (+/-) must match the decal on the remote control.DPoint the remote control toward the projection screen so the signal will bounce back to the projector. Also make sure the remote control sensor on the front of the projector is not blocked from receiving the signal. |
8-1. Service Information
For product information, product assistance, service information, or to order accessories, please call:
In U.S. or Canada: 1-800-328-1371
In other locations, contact your local 3M Sales office.
9-1. Specifications
Width 28.1 cm (10.95 inch)
Height 35.6 cm (13.88 inch)
Depth 48.6 cm (18.95 inch)
Weight 14 kg (30.94 lbs)
Panel size 8.1 cm (3.2 inches)
Number of pixels per panel 480,000 pixels (H800 X V600), 3 panels = 1.44 million total pixels
Dot defect < 0.011% of total pixel count
Zoom lens 1.6:1
Metal halide lamp 350W, rated at 1000 hours to half brightness
(110V-user can replace lamp, 220V-lamp must be replaced at service center)
Power supply AC90-132V, 50/60Hz
AC170-260V, 50/60Hz
Power consumption Maximum 470W (typical)
Storage temperature range -20ircC to 60ircC ( -4ircF to 140ircF )
Operating temperature range 0irc C to 35irc C ( 32irc F to 95irc F)
Input terminals S-Video: Mini DIN4-pin terminal
Video: RCA jack
Audio: RCA jack
Computer (RGB): D sub15-pin HD terminal
Input signals S-Video: Luminance 1.0V peak-to-peak, 75Ω termination
Chroma 0.286V peak-to-peak (burst signal) 75Ω term.
Video: 1.0V peak-to-peak, 75Ω termination
Audio: 260mvRMS, across 46kΩ
Computer (RGB1/RGB2): 0\~0.7V peak-to-peak, 75Ω
RGB (computer) input Audio: RCA jack
Output terminals Computer (RGB): D sub15-pin HD terminal
Audio: RCA jack
Output signals Monitor: 0\~0.7V peak-to-peak, 75Ω
Audio: 7V peak-to-peak or less, 680Ω termination
Batteries for remote control Three AAA, 1.5 Volt
9-2. S-Video Input Signal Terminal
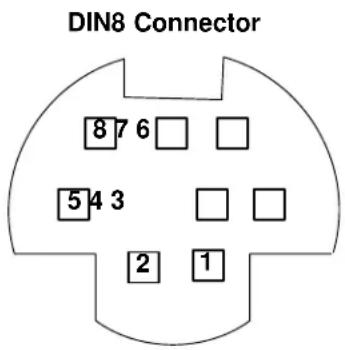
The following illustration (Figure 9-1) identifies the terminal connections for the Mini DIN4-pin.
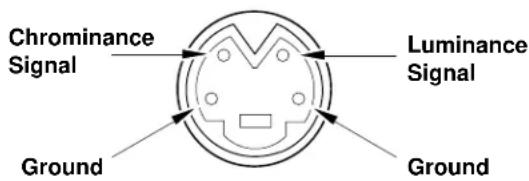
Figure 9-1. S-Video Input (Mini DIN4-pin)
Video input signal terminals are detected by the MP8650 in the following order of priority:
D S-video input terminal
D RCA jack input terminal
9-3. Projector-to-Screen Distances
| DISTANCE TO SCREEN | MINIMUM IMAGE MAXIMUM | M IMAGE | ||||
| Diagonal Width | Width Height | Diagonal Width | Height | |||
| 152 cm(5 ft) | 76 cm(30 in.) | 61 cm(24 in.) | 46 cm(18 in.) | 121 cm(47.5 in.) | 97 cm(38 in.) | 72 cm(28.5 in.) |
| 229 cm(7.5 ft) | 111 cm(43.8 in.) | 89 cm(35 in.) | 67 cm(26.3 in.) | 176 cm(69.4 in.) | 141 cm(55.5 in.) | 106 cm(41.6 in.) |
| 314 cm(10.3 ft) | 152 cm(60.0 in.) | 122 cm(48 in.) | 91 cm(36 in.) | 238 cm(93.8 in.) | 191 cm(75 in.) | 143 cm(56.3 in.) |
| 381 cm(12.5 ft) | 183 cm(71.9 in.) | 146 cm(57.5 in.) | 110 cm(43.1 in.) | 289 cm(113.8 in.) | 231 cm(91 in.) | 173 cm(68.3 in.) |
| 457 cm(15 ft) | 219 cm(86.3 in.) | 175 cm(69 in.) | 131 cm(51.8 in.) | 343 cm(135 in.) | 274 cm(108 in.) | 206 cm(81 in.) |
| 564 cm(18.5 ft) | 271 cm(106.9 in.) | 217 cm(85.5 in.) | 163 cm(64.1 in.) | 424 cm(166.9 in.) | 339 cm(133.5 in.) | 254 cm(100.1 in.) |
| 610 cm(20 ft) | 291 cm(114.4 in.) | 232 cm(91.5 in.) | 174 cm(68.6 in.) | 454 cm(178.8 in.) | 363 cm(143 in.) | 272 cm(107.3 in.) |
9-4. Physical Dimensions
The MP8650 projector has the following physical dimensions:

Figure 9-2. Physical Dimensions
9-5. Computer Video (RGB) Input Terminal
The following illustration (Figure 9-3) shows the terminal connections for the D-sub 15 pin HD connector. Refer to the table below for a description of the wire to pin connections.
| Pin # | Description Pin # | Description |
| 1 Image | Input (red) 9 Not connected | |
| 2 Image | Input (green) 10 Ground | |
| 3 Image | Input (blue) 11 Not connected | |
| 4 Not connected | 12 Not connected | |
| 5 Ground | (for sync.) 13 Composite/horizontal | |
| 6 Ground | (red) 14 Vertical sync signal | |
| 7 Ground | (green) 15 Not connected | |
| 8 Ground | (blue) | |
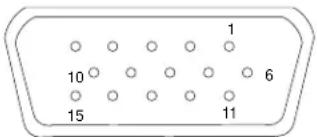
Figure 9-3. D-sub 15 pin Connector
9-6. Computer (RGB) Signal Connection Modes
The MP8650 projector automatically recognizes the following connection modes 1 to 18.
| Connect Mode | Pixel Number | Scan Frequency | Dot Clock Frequency (MHz) | Synchronization Signal* | Computer | |||
| Horizontal (kHz) | Vertical (Hz) | Horizontal width/polarity | Vertical width/polarity | |||||
| A | 1 | 800 x 600 | 35.16 | 56.25 | 36.000 | 72/± | 2/± | VESA 56Hz |
| B | 2 | 800 x 600 | 37.88 | 60.32 | 40.000 | 128/+ | 4/+ | VESA 60Hz |
| C | 3 | 800 x 600 | 48.08 | 72.19 | 50.000 | 120/+ | 6/+ | VESA 72Hz |
| D | 4 | 800 x 600 | 46.88 | 75.00 | 49.500 | 80/+ | 3/+ | VESA 75Hz |
| E | 5 | 832 x 624 | 49.73 | 74.55 | 57.283 | 64/- | 3/- | MAC 16 in. |
| F | 6 | 640 x 480 | 35.00 | 66.67 | 30.240 | 64/- | 3/- | MAC 13 in. |
| G | 7 | 640 x 480 | 34.98 | 66.62 | 31.334 | 64/- | 3/- | MAC LC |
| H | 8 | 640 x 480 | 37.50 | 75.00 | 31.500 | 64/- | 3/- | VESA 75Hz |
| I | 9 | 640 x 480 | 37.86 | 72.81 | 31.500 | 40/- | 3/- | VESA 72Hz |
| J | 10 | 640 x 480 | 31.47 | 59.94 | 25.175 | 96/- | 2/- | IBM-VGA |
| K | 11 | 640 x 400 | 37.86 | 85.08 | 31.500 | 32/- | 3/+ | VESA 400 |
| K | 12 | 640 x 350 | 37.86 | 85.08 | 31.500 | 32/+ | 3/- | VGA-350 |
| L | 13 | 640 x 400 | 31.47 | 70.09 | 25.175 | 96/- | 2/+ | VGA-400 |
| L | 14 | 640 x 350 | 31.47 | 70.09 | 25.175 | 96/+ | 2/- | VGA-350 |
| M | 15 | 640 x 400 | 24.83 | 56.42 | 21.053 | 64/- | 8/- | PC98-400 |
| N | 16 | 640 x 400 | 24.37 | 55.38 | 21.053 | 64/- | 8/- | FMR-400 |
| O** | 17 | 1024 x 768 | 48.363 | 60.004 | 65.000 | 136/- | 6/- | VESA 60Hz |
| P** | 18 | 1024 x 768 | 56.476 | 70.069 | 75.000 | 136/- | 6/- | VESA 70Hz |
* The synchronization signal widths represent the number of dots (horizontal) and the number of lines (vertical).
** Compressed mode only.
A-1. MP8650 Lamp Replacement (110V machines only)
To replace the lamp on the 3M MP8650 Multimedia Projector, you will need the following:
D2.5 mm hex wrench (shipped with lamp module)
DMetal halide lamp 78-6969-8306-9 or 78-6969-8422-4
WARNING
There are high voltage parts inside the cabinet that could cause an electric shock. Always unplug projector when changing the lamp.
Caution
Lamp and adjacent metal parts become extremely hot and can cause burns to your fingers. Allow the projector to cool for at least 1 hour before replacing the lamp.
Caution
Do not touch the inside of the lamp glass with your fingers. Oil from your fingers can contaminate the lamp glass and cause it to crack or burst.
Caution
Use care when inserting or removing the lamp module from the projector. Excessive force can cause damage to the lamp or projector.
- Power OFF: Press the Standby/ON button ☐ and wait for the fan motor to cycle off. Then, turn off the power switch and UNPLUG THE POWER CORD.
- Allow projector to cool: If the projector is at operating temperature, wait one hour to allow the metal parts to cool before continuing.
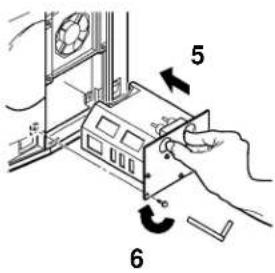
- Remove Lamp Access Door: Use a 2.5 mm hex wrench to unscrew the lamp cover retaining screws (1) and gently open the cover. Set aside (2).
- Remove Lamp Module: Slide the old lamp module (4) out of the projector body.
- Insert Lamp Module: Carefully insert the new lamp module (5) into the opening and slide it all the way back into place. Check the lamp module to be sure that it is fully inserted and flush against the back wall.
- Secure Lamp Module: Tighten the lamp module retaining screws (6) to secure the lamp in place.
- Close and Secure Door: Close lamp access door (7) and tighten the retaining screws (8) to secure the door. Turn on projector and test lamp. If lamp light blinks green but lamp does not illuminate, reseat lamp (step 6).



A-2. Serial Command Codes
All codes in this document are in ASCII Text. In order to get this to work you must send at the same communication setting as the projector.
This should be 9600 8N1.
For the rest of this document CR is a carriage return which is code 13.
There are two types of commands that can be sent to the projector. They are Write commands and Read commands.
Write Command Format
User:
| Code | CR |
Projector:
| O | K | CR |
if it worked or:
| N | G | CR |
if it did not work.
Read Command Format
User:
| Code | CR |
Projector:
| O | K Data CR |
if it worked or:
| N | G | CR |
| Function Code Meaning | ||
| Power On/Off Write Codes | D00W00D00W01Read CodesD00R | Power OnPower OffReturns:00 – Standby01 – Power on but no lamp02 – Power on and lamp03 – Power off but fan running |
A-2. Serial Command Codes, continued
| Function Code Meaning | ||
| Input Source Write Codes | D02W01D02W02D02W11D02W12D03W00Read CodesD02R | RGB 1RGB 2Video 1Video 2Shows what input is selected on-screenReturns:01 – RGB102 – RGB211 – Video112 – Video2 |
| Volume Control Write Codes | D04W00 toD04W14Read CodesD04R | Sets volume level to a value between 00 and 14 hex.This corresponds to 20 possible settings.Returns:00 to 14 hex |
| Focus Write Codes | D05W00D05W01D05W10D05W11D05W20 | 300ms Clockwise300ms CounterclockwiseContinuous ClockwiseContinuous CounterclockwiseTurn off motor |
| Zoom Write Codes | D06W00D06W01D06W10D06W11D06W20 | 300ms Clockwise300ms CounterclockwiseContinuous ClockwiseContinuous CounterclockwiseTurn off motor |
| Mute Write Codes | D07W00D07W01Read CodesD07R | Mute offMute onReturns:00 – mute is off01 – mute is on |
| Brightness Write Codes | D13W00 to D13W14Read CodesD13R | Sets brightness level to a value between 00 and 14 hex.This corresponds to 20 possible settings.Returns:00 to 14 hex |
| Blank Write Codes | D08W00D08W01Read CodesD08R | Blank is off – image is shownBlank is on – black screen is shownReturns:00 – off01 – on |
| Tint (Hue) Write Codes | D14W00 to D14W14Read CodesD14R | Sets tint (hue) level to a value between 00 and 14 hex.This corresponds to 20 possible settings.Returns:00 to 14 hex |
| Contrast Write Codes | D12W00 to D12W14Read CodesD12R | Set contrast level to a value between 00 and 14 hex. This corresponds to 20 possible settings.Returns:00 to 14 hex |
A-2. Serial Command Codes, continued
| Function Code Meaning | ||
| Attribute Memory Write Codes | D10W00D10W01D10W02D10W03D11W00Read CodesD10R | Set to DefaultSet to Memory 1Set to Memory 2Set to Memory 3Store current settings in current memoryReturns:00 – Default01 – Memory 102 – Memory 203 – Memory 3 |
| Color (Saturation) Write Codes | D15W00 to D15W14Read CodesD15R | Sets color (saturation) level to a value between 00 and 14 hex. This corresponds to 20 possible settings.Returns:00 to 14 hex |
| Sharpness Write Codes | D16W00 to D16W03Read CodesD16R | Sets sharpness level to a value between 00 and 03 hex.This corresponds to 4 possible settings.Returns:00 to 03 hex |
| Gamma Correction Write Codes | D17W00 to D17W14Read CodesD17R | Sets gamma level to a value between 00 and 14 hex. This corresponds to 20 possible settings.Returns:00 to 14 hex |
| Coring Write Codes | D18W00D18W01Read CodesD18R | Coring offCoring onReturns:00 – Coring is off01 – Coring is on |
| P–Clock Write Codes | D31WaaaaRead CodesD31R | The aaaa corresponds to the actual P–Clock number in hex.Returns:4 digit P–Clock number in hex |
| Phase Write Codes | D34W00 to D34W7FD35W00Read CodesD34R | Set phase to a value in the range of 00 to 7F hex.Reset phase to defaultReturns:00 to 7F |
| Timer Reset Write Codes | D60W00Read CodesD60R | Reset the accumulated operating time to 0Returns:0000 to 9999 decimal value of operating hours |
A-2. Serial Command Codes, continued
| Function Code Meaning | ||
| Display Position Write Codes | D36W00 to D36WFED37W00 to D37WFED38W00Read CodesD36RD37R | Change vertical display position (up/down) from reset position by 00 to FE.Change horizontal display position (left/right) from reset position by 00 to FE Presets display positionReturns:00 to FE vertical position00 to FE horizontal position |
| Language Selection (version 3 only) | Write CodesD52W00D52W01D52W02Read CodesD52R | EnglishFrenchSpanishReturns:00 – English01 – French02 – Spanish |
| On–Screen Displays (version 3 only) | Write CodesD51W00D51W01Read CodesD51R | Disable on–screen displayEnable on–screen displayReturns:00 – on–screen display is disabled01 – on–screen display is enabled |

(Blank Page)


- MP8650 Multimedia Projector Operator's Guide
- Safeguards 1
- Warranty 2 ....
- Section 1: Unpack .... 3
- Section 2: Product Description .... 4
- Section 3: Set Up 5
- Section 4: Operating the Projector ..... 11
- Section 5: Remote Control 15
- Section 6: Lamp Information ...... 17
- Section 7: Maintenance .... 18
- Section 8: Troubleshooting .... 19
- Section 9: Technical Specifications ..... 20
- Section 10: Accessories 23
- Appendix: Technical Information A-1
- INTENDED USE
- IMPORTANT SAFEGUARDS
- SAVE THESE INSTRUCTIONS
- THANK YOU FOR CHOOSING 3M
- LIMITED WARRANTY
- LIMITATION OF LIABILITY
- 1-1. Contents of Shipping Box
- 1-2. Inventory List
- 1-3. Keep Your Packing Materials
- 1-4. What's Next?
- 2-1. Machine Characteristics
- Note
- 2-2. Parts Identification List
- 3-1. Cable Connections
- Terminal Connection Panel
- Power Connection
- Caution
- Computer (RGB) Input Connection
- Monitor Loop-Through (640 x 480 mode)
- S-Video Connection
- Video/Audio Connection
- n Note
- RS-232C Serial Cable/Mouse Receiver Connection
- 3-2. Projector Set Up
- Ambient Light
- Distance to Viewing Screen
- Carrying Handle
- Ceiling Mount Considerations
- Adjusting the Projector Elevation
- Rear Projection
- 3-3. Now What?
- 4-1. Turning On the Projector
- 4-2. Adjusting Image Size and Focus
- 4-3. Adjusting the Volume
- 4-4. Adjusting the Picture
- 4-5. Memory Function
- 4-6. Inverting the Image
- 4-7. Image Position
- 4-8. Video System
- 4-9. Setting Apple Macintosh Monitor Mode (Windowed or Compressed)
- 4-10.Menu Languages
- 4-11. Turning Off the Projector
- 5-1. How to Operate the Remote Control
- Remote Control Buttons
- Using the Mouse Buttons
- Mouse Receiver - (Apple Macintosh computer only)
- Replacing the Batteries
- 6-1. Metal Halide Projector Lamp
- Display Lamp Operation Hours
- Change Lamp Message
- 7-1. Cleaning
- Daily Cleaning
- Cleaning the Projection Lens
- Cleaning the Air Filter
- Section 8: Troubleshooting
- 8-1. Service Information
- 9-1. Specifications
- 9-2. S-Video Input Signal Terminal
- 9-3. Projector-to-Screen Distances
- 9-4. Physical Dimensions
- 9-5. Computer Video (RGB) Input Terminal
- 9-6. Computer (RGB) Signal Connection Modes
- A-1. MP8650 Lamp Replacement (110V machines only)
- WARNING
- A-2. Serial Command Codes
- Write Command Format
- Read Command Format
- A-2. Serial Command Codes, continued
Brand : 3M
Model : MP8650
Category : Video projector