F609 - Exercise bike BodyCraft - Free user manual and instructions
Find the device manual for free F609 BodyCraft in PDF.


| Product Type | Exercise Bike |
| Brand | BodyCraft |
| Model | F609 |
| Dimensions (L x W x H) | 100 x 50 x 120 cm (approx.) |
| Weight (Net) | 30 kg (approx.) |
| Max User Weight | 136 kg (300 lbs) |
| Power Source | Self-powered (no external power required) |
| Display Type | LCD screen |
| Display Metrics | Time, distance, speed, calories, pulse |
| Resistance System | Magnetic, stepless adjustment |
| Resistance Levels | 20 levels (approx.) |
| Pedals | Adjustable with straps |
| Seat Adjustment | Horizontal and vertical |
| Handlebar Adjustment | Multi-position with pulse sensors |
| Transport Wheels | Yes, for easy mobility |
| Stabilizers | Adjustable leveling feet |
| Emergency Stop | Emergency brake lever |
| Maintenance | Wipe with damp cloth; lubricate belt as needed |
| Warranty Type | Frame: lifetime; Parts: 2 years; Labor: 1 year |
Frequently Asked Questions - F609 BodyCraft
User questions about F609 BodyCraft
0 question about this device. Answer the ones you know or ask your own.
Ask a new question about this device
Download the instructions for your Exercise bike in PDF format for free! Find your manual F609 - BodyCraft and take your electronic device back in hand. On this page are published all the documents necessary for the use of your device. F609 by BodyCraft.
USER MANUAL F609 BodyCraft
natural_image
Line drawing of a stationary exercise bench with vertical supports and adjustable arms (no text or symbols)QUESTION?
As a quality home gym supplier we are committed to your complete satisfaction. If you have questions, or find missing or damaged parts, we will guarantee your complete satisfaction through our authorized dealer service centers or our home office customer service department. Please call your local dealer for assistance or RSI at 800-990-5556 (9:00 AM - 5:00 PM). Our trained technicians will provide immediate assistance to you, free of charge.
We stand behind our products. Every piece, every part of this BODYCRAFT strength training system is guaranteed for as long as you own it. We will repair or replace anything that goes wrong.
Bodycraft is a division of Recreation Supply Inc.
P.O. BOX 181
Sunbury, OH 43074
BEFORE YOU BEGIN
Congratulations and thank you for selecting the Olympic Combination Bench strength training system. The Olympic Combination Bench offers an impressive array of strength training exercises to develop every major muscle group of the body. Whether your goal is cardiovascular fitness, a shapely, toned body or dramatic muscle size and strength, the Olympic Combination Bench will help you achieve the specific results you want.
For your safety and benefit, read this manual and the accompanying literature before using the Olympic Combination Bench. Keep this manual for future reference.
If you have additional questions, please call your local BODYCRAFT dealer or our customer service department at 800-990-5556 Monday through Friday, 9 a.m. until 5 p.m. Eastern Time.
IMPORTANT SAFETY NOTES
There is a risk assumed by individuals who use this type of equipment. Before beginning this or any other exercise program consult your physician. This is especially important for individuals over the age of 35 or persons with pre-existing health problems. Recreation Supply, Inc. assumes no responsibility for personal injury or property damage sustained by or through use of this product.
- This product must be assembled on a flat, level surface to assure its proper function.
- Clean pads and frame on a regular basis. We recommend warm, soapy water. Do not use harsh or abrasive chemicals.
- Inspect and tighten all parts before every use. Replace any worn parts immediately. Failure to do so may result in serious injury.
- Keep children away from the Olympic Combination Bench at all times.
- Keep your hands away from moving parts other than the designated handles.
- When adjusting the seat, make sure the spring pin is fully engaged. If not, the seat may slip and cause serious injury.
- Exercise with care to avoid injury.
- If unsure about the proper use of the Olympic Combination Bench strength training system call your local BODYCRAFT dealer or our customer service department at 800-990-5556.
EXPLODED VIEW

PARTS CHART
NO. DESCRIPTION
QTY.
1 FRONT STABILIZER
2 LEG EXTENSION/CURL SLEEVE
3 SEAT SUPPORT
4 UPRIGHT CONNECTOR
5 RIGHT UPRIGHT
6 LEFT UPRIGHT
7 SEAT SLIDER
8 SEAT HINGE
9 BACK SUPPORT
10 BACK SUPPORT PLATE
11 LEG EXTENSION HOLDER
12 LEG EXTENSION
13 SAFETY ARM
14 BAR CATCH
15 FOAM ROLLER HOLDER
16 BACKING PLATE
17 U PIN
18 LEG EXTENSION AXLE
19 45mm X 75mm CAP
20 75mm X 45mm CAP
21 45mm X 75mm PLUG
22 50mm SQUARE PLUG
23 1" ROUND PLUG
24 1"ID FOAM ROLLER PLUG
25 SPACER
26 45mm X 75mm SLIDER
27 STEEL BUSHING
28 110mm POP PIN
29 90mm POP PIN
30 KNOB
31 L PIN
32 SPRING CLIP
33 STOPPER
34 RUBBER DONUT
35 BUMPER FOR SAFETY ARM
36 BUMPER FOR BAR CATCH
37 SEAT PAD
38 BACK PAD
39 FOAM ROLLER
40 1/2" X 4-3/4" HEX HEAD BOLT
41 1/2" X 4" HEX HEAD BOLT
42 1/2" X 3" HEX HEAD BOLT
43 1/2" X 2-1/2" HEX HEAD BOLT
44 3/8" X 2-3/4" HEX HEAD BOLT
45 3/8" X 1" HEX HEAD BOLT
46 5/16" X 5/8" ROUND BOLT
47 5/16" X 12mm SET SCREW
48 4.5mm X 10mm SCREW
49 1/2" NYLON NUT
50 1/2" NYLON NUT (THINNER)
51 1/2" WASHER
52 3/8" WASHER
53 5/16" WASHER
54 METAL CAP
55 5/16" SPRING WASHER


natural_image
Technical line drawing of a rectangular object with labeled dimensions (38 and 39), no text or symbols present.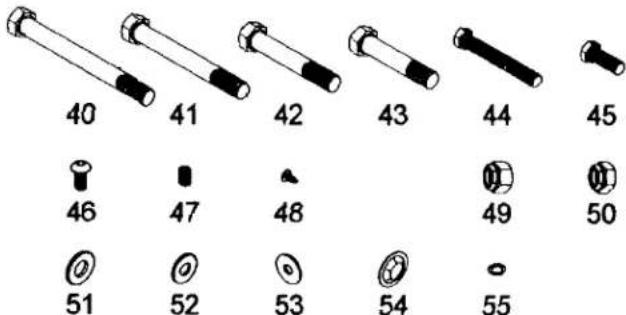
other
| Type | Value | |---|---| | Top 1 | 40 | | Top 2 | 41 | | Top 3 | 42 | | Top 4 | 43 | | Top 5 | 44 | | Top 6 | 45 | | Bottom 1 | 46 | | Bottom 2 | 47 | | Bottom 3 | 48 | | Bottom 4 | 49 | | Bottom 5 | 50 | | Bottom 6 | 51 | | Bottom 7 | 52 | | Bottom 8 | 53 | | Bottom 9 | 54 | | Bottom 10 | 55 |
STEP 1 Assembly Instructions
Do NOT tighten bolts until instructed.
- Attach Leg Extension Sleeve (2) to Front Stabilizer (1) using two 1/2" X 4" Hex Bolts (41), four 1/2" Washers(51) and, two 1/2" Nylon Nuts (49). Attach two 45mm X 75 mm Caps(19) to Front Stabilizer (1).
- Attach Upright Connector (4) to Right and Left Uprights (5, 6) (numbers sticker should face inside), using Backing Plate (16), two 1/2" X 3" Hex Bolts (42), four 1/2" Washers (51) and two 1/2" Nylon Nuts (49). Attach four 75mm X 45mm Caps (20) to Right and Left Upright bottoms, and two 45mm X 75 mm Plugs (21) to top of Uprights.
- Slide Seat Slider(7) onto Seat Support(3) with welded metal tabs facing toward rear of bench as shown. Attach Seat Support (3) to Upright Connector (4) using two 1/2" X 4" Hex Bolts (41) and two 1/2" Nylon Nuts (49).
- Attach Seat Support (3) to Leg Extension Sleeve (2), using two 1/2" X 2-1/2" Hex Bolts (43) and two 1/2" Washers (51). Attach a 45mm x 75 mm Plug (21) to Seat Support (3).

STEP 2 Assembly Instructions
- Attach Leg Extension (12) onto Leg Extension Sleeve (11) using Axle (18), two 5/16 Washers (53), two Spring Washers (55) and two 5/16" X 5/8" Round Bolts (46). Attach three 50mm square Plugs (22) to Leg Extension (12). Insert Leg Extension Holder (11) into Leg Extension Sleeve (2) by pulling pre-installed Pop Pin (28) out.
- Insert two Foam Roller Holders (15) into holes in Leg Extension (12). Slide Four Foam Rollers (39) onto each end of Foam Roller Holders (15). Insert 1" ID Foam Roller Plugs (24) onto each end of Foam Roller Holder (15). Slide Rubber Donut (34) onto weight holder on Leg Extension (12). Spring Clip (32) is provided to hold weight plates in place.
- Insert a Foam Roller Holder (15) into hole in Leg Extension Sleeve (11). Slide Foam Rollers (39) onto each end of Foam Roller Holders (15). Insert 1" ID Foam Roller Plugs (24) onto each end of Foam Roller Holder (15). Note: L Pin (31) is used to lock Leg Extension (12) into place when performing decline exercises. Remove it when performing leg extensions and leg curls.
- Slide Seat Hinges (8) onto axle on Seat Slider (7). Attach Seat Pad (37) to Seat Hinges (8) using two 3/8" X 1" Hex Bolts (45) and two 3/8" Washers (52).
- Attach Back Support (9) to welded tabs on Seat Slider (7) using one 1/2" x 4-3/4" Bolt (40), two Washers (51), and a 1/2" Nylon Nut (49). Attach two Back Support Plates (10) to Seat Support (3) using 1/2" X 4-3/4' Bolt (40) and one 1/2" Thin Nylon Nut (50). Attach Back Pad (38) to Back Support (9) using two 3/8" X 2 -3/4" Bolts (44) and two 3/8" Washers (52).
- Slide Safety Arms (13) and Bar Catches (14) over top of Uprights (tabs facing up) and secure at your desired height. For Squats, Safety Arm and Bar Catch can be reversed, facing toward rear.
Tighten all bolts. Bolts at pivot points can be loosened slightly (1/4 - 1/2 turn).

Assembly is complete! Please take the following steps before using the BODYCRAFT OLYMPIC COMBINATION BENCH:
- Make certain all bolts are tightened securely.
- Enjoy many years of a Fit Lifestyle.
Thank you for purchasing the Bodycraft Olympic combination bench Machine Training System. If You have any questions, please call your local BodyCraft dealer or call our customer service department at 800-990-5556
Brand : BodyCraft
Model : F609
Category : Exercise bike