
RCM-70 - Home Automation Rako - Free user manual and instructions
Find the device manual for free RCM-70 Rako in PDF.


| Product Type | Wireless 7-button wall mounted control panel |
| Brand | Rako |
| Model | RCM-70 |
| Number of Buttons | 7 (4 scenes + Off + Master Raise + Master Lower) |
| Scenes | 4 programmable scenes |
| Wireless Protocol | Rako proprietary radio |
| Power Source | 2 x CR2016 lithium batteries |
| Battery Life | Over 3 years (30 presses/day typical) |
| Battery Low Indication | LED blinks repeatedly after button press |
| LED Indicator | Red LED for transmission confirmation and battery warning |
| Installation Methods | Flush fixing to UK back-box, surface mounting with pattress, surface without back-box, Euro module |
| Operating Voltage | Safety extra low voltage (6V) |
| Programming | Integrated scene programming via button combinations |
| Programming Timeout | 3 minutes if no activity |
| House/Room Dip Switches | Yes, for addressing |
| Compatible Devices | Rako receivers (e.g., RAK-8, RAK-4) |
| Safety Warning | Lithium battery handling; mains wiring caution |
| Battery Cleaning | Keep contacts free of grease, moisture, contamination |
| Environmental | Dispose of batteries according to manufacturer |
| Manual Pages | 2 pages |
Frequently Asked Questions - RCM-70 Rako
User questions about RCM-70 Rako
0 question about this device. Answer the ones you know or ask your own.
Ask a new question about this device
Download the instructions for your Home Automation in PDF format for free! Find your manual RCM-70 - Rako and take your electronic device back in hand. On this page are published all the documents necessary for the use of your device. RCM-70 by Rako.
USER MANUAL RCM-70 Rako
Rako RCM070 Wall-Plates: Installation, Programming and Operating Instructions
General
RCM070 Wall-plate electronics module is a wireless 7 button wall mounted control panel providing 4 Scenes plus Off and Master Raise and Lower. The unit provides full scene programming.
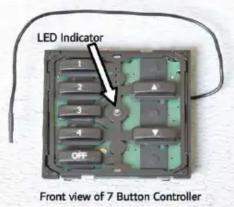
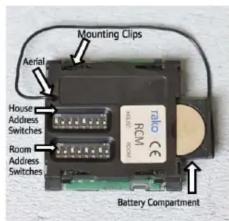
The Rako RCM series of wall-plates are designed to cope with a number of different installation situations. These are predominantly:
- Flush fixing into a UK back-box
- Surface mounting with a UK back-box (not screwless)
- Surface mounting with no back-box
- European DIN standard or French box (Euro module).

Fig. 1
Checking for correct operation
Rako control panels are supplied with a pullout tab to prevent inadvertent operation and battery deterioration during transit. Slide the tab out of the battery compartment. The Rako control panel should now be operational.
To check this press one of the buttons on the front of the Electronics Module and the indicating LED should illuminate briefly for a single flash. If the LED does not flash or it flashes repeatedly for a short burst (low battery warning) then you should contact Rako Controls.
Battery replacement
The Rako RCM series of wall-plates are designed to be powered by batteries. The designed battery life is better than 3 years (based on 30 button presses daily) but the batteries will eventually need replacing. In normal use the Led on the front panel illuminates momentarily when a button is pressed to indicate that a (radio) transmission has been made. When the batteries are approaching the end of their useful life the Led will continue to blink after a button has been pressed. When this starts to happen the batteries should be replaced as soon as possible. Always use two CR2016 batteries. To replace the batteries remove the Wall Plate from the wall and unclip the Electronics Module from it's mounting plate, taking care not to damage the aerial (note that when flush mounted the aerial may be located in a hole outside the back-box). Carefully Slide out the battery compartment drawer. Replace with new batteries ensuring that the positive (+) terminal makes contact with the battery clip and the negative (-) terminal with the pad on the circuit board.
To ensure reliable operation always ensure that battery contacts and battery surfaces are kept clean of any grease, moisture or other contamination.
Warning
Lithium batteries may explode if handled incorrectly. Always dispose of used batteries in accordance with manufacturer's recommendations.
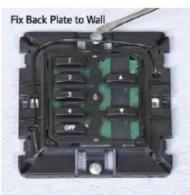
Flush Fixing a Wallplate to a Back Box


Warning
Rako wall-plates are designed to operate at safety extra low voltages (6V). When fixing the wall-plates to existing back-boxes there may be mains wiring present, if this is the case then the wiring should be made safe, properly insulated and any metal back-boxes earthed. Earthing of the back box is essential if a decorative metal front plate is being used. Should there be any doubt in how to do this contact a qualified electrician.
Rako Controls Ltd accepts no responsibility for any damage or injury caused by incorrect installation of a Rako product.
Surface Mounting a Wallplate using a Pattress (not screwless cover plates)



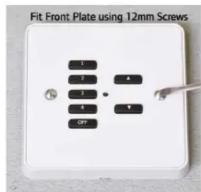
General
Rako thanks you for having purchased a Rako product and hopes that you are pleased with your system. Should for any reason you need to contact us please contact us via our website www.rakocontrols.com or by phoning our customer help line on 01634 226666.
Programming Scene Levels
The following procedure assumes that all the receivers have already been addressed, see receiver instruction manual for details.
Note:
If a panel is left in programming mode without pressing a button or a receiver does not receive a command within 3 minutes of the panel going into programming mode they will time out and return to normal mode
![graph TD A["Step 1: Put controller into programming mode by pressing and holding the scene button to be programmed and both raise and lower buttons together. After 5 seconds the red LED on the panel starts to flash. The panel is now in programming mode. Release the buttons"] --> B["Note: A Rako pane…](/content/2026/05/964472/images/6675fdf450c49789f284042b30df26a7c3480aa85a6ccdcdfa9c2f1c8d55777a.jpg)

Brand : Rako
Model : RCM-70
Category : Home Automation