
Octiv S - Hearing aid SIEMENS - Free user manual and instructions
Find the device manual for free Octiv S SIEMENS in PDF.


| Product Type | Hearing Aid |
| Brand | Siemens |
| Model | Octiv S |
| Category | Behind-the-Ear (BTE) |
| Controls | Push button and rocker switch |
| Volume Adjustment | Automatic with manual override via rocker switch or remote control |
| Hearing Programs | Up to 6 programs for different listening situations |
| Power Source | Zinc-air battery size 13 or 17 (non-rechargeable) or NiMH rechargeable |
| Battery Life | 5–14 days depending on usage and settings |
| Power-on Delay | Yes, for whistle-free insertion |
| Wireless Connectivity | e2e wireless for binaural control and remote control |
| Telecoil | Built-in for audio induction loops |
| Audio Input | Audio shoe compatible for FM systems (requires battery compartment exchange) |
| Accessories | Optional easyPocket remote control |
| Ear Pieces | Exchangeable LifeTips and LifeTubes |
| Maintenance | Daily cleaning with soft dry tissue; overnight drying; periodic tube and tip replacement |
| Storage | Open battery compartment, remove batteries if not used for extended periods |
| Safety | Not for use in explosive atmospheres; remove during MRI; keep away from children |
| Compliance | CE marking, FCC ID: SGI-WI002001 |
| Manufacturer | Sivantos Limited (under license of Siemens AG) |
Frequently Asked Questions - Octiv S SIEMENS
User questions about Octiv S SIEMENS
0 question about this device. Answer the ones you know or ask your own.
Ask a new question about this device
Download the instructions for your Hearing aid in PDF format for free! Find your manual Octiv S - SIEMENS and take your electronic device back in hand. On this page are published all the documents necessary for the use of your device. Octiv S by SIEMENS.
USER MANUAL Octiv S SIEMENS
Octiv instruments are easyPocket compatible. The easyPocket remote control is available as an optional accessory allowing for convenient and discreet

NOTICE
The easyPocket is an additional product to your hearing instrument which may be available to purchase. If you think it would assist you in your day-to-day life, talk to your NHS Provider about how you can obtain a easyPocket. Further information is available on our website www.bestsound-technology.co.uk or email info-hearingaids.uk@sivantos.com
Optional
hearing instrument adjustment It is extremely ergonomic, has an easy-to-read display and a modern, stylish look.


NOTICE
- To avoid environmental pollution, do not throw batteries into household waste. - Recycle or dispose of batteries according to national regulations or return them to your NHS Provider. - Recycle hearing instruments, accessories and packaging according to national regulations.
In case of instrument failure - Is the instrument switched on? - Is the battery inserted correctly? - Is the battery run down? - Is the battery compartment closed? - Is the sound opening in the ear mould clogged with wax? Troubleshooting Sound is weak - Increase the volume. - Replace the empty battery. - Clean or exchange the tube and the ear piece.
Hearing instrument emits whistling sounds. ▶ Reinsert the ear piece until it fits securely. ▶ Decrease the volume. ▶ Clean or exchange the ear piece. Sound is distorted. ▶ Decrease the volume. ▶ Replace the empty battery. ▶ Clean or exchange the tube and the ear piece. Hearing instrument emits signal tones. ▶ Replace the empty battery. Hearing instrument does not work. ▶ Turn the hearing instrument on. ▶ Gently close the battery door. ▶ Replace the empty battery. ▶ Make sure the battery is inserted correctly. ▶ Power-on delay is active. Wait several seconds and check again.
NOTICE Your hearing instruments are designed to comply with international standards on electromagnetic compatibility but interference with nearby electronic devices could occur. In this case, move away from the source of interference.
Conformance information With the CE marking, Sivantos confi rms compliance with the European guidelines, in particular directive 93/42 EEC of the European Council applying to medical products.
For the products with e2e wireless 2.0 Sivantos additionally confi rms compliance with the European Directive 99/5/EC (R&TTE) concerning radio and telecommunications terminal equipment.
Our quality management system, certified by an independent authority, assures consistently high product quality and reliability to the customer.
2011/65/EU RoHs concerning the restriction of hazardous substances.
UnitedKingdom
Sivantos Limited
Platinum House
Sussex Manor Business Park
Gatwick Road, Crawley
West Sussex RH10 9NH
Email: info-hearingaids.uk@sivantos.com
Technical information FCC ID: SGI-WL002BTE IC: 267AB-WL002
Disposal information Within the European Union, the marked equipment is covered by "Directive 2002/96/EC of the European Parliament and of the Council of 27 January 2003 on waste electrical and electronic equipment." Amended by "Directive 2003/108 EC" (WEEE).


LegalManufacturer Sivantos GmbH Henri-Dunant-Strasse 100 91058 Erlangen Germany Phone +49 9131 308 0
www.bestsound-technology.co.uk Manufactured by Sivantos GmbH under Trademark License of Siemens AG Based on Document No. A91SAT-02422-99T04-7600 EN-GBR | D00118952 JN7483 | Pt No: 10824114 | Issue 4 | © 05.2015 Siemens AG
Controls
With the controls you can, for example, adjust the volume or switch hearing programs. Your hearing instruments either have a push button and a rocker switch or a push button only. The NHS Provider has assigned your desired functions to the controls. i Ask your NHS Provider to mark your controls and their functions on the following pages.

You can also use a remote control.
| Pushbutton | ||||
| Function Left Right | ||||
| ^4 | ^24 | ^4 | ^24 | |
| Program change | ||||
| Volume up | ||||
| Volume down | ||||
| Standby/turn on | ||||
| ^4 press briefly 2 press 2 seconds | ||||
Important safety information
Personalsafety
WARNING
Risk of impairing the residual hearing of the user.
▶ Use only hearing instruments that have been fitted especially
for your needs.
Risk of injury!
Do not use obviously damaged devices and return them to point
of :
Risk of explosion!
Do not use your hearing instruments in explosive atmospheres
(e. g. in mining areas).
Risk of affecting electronic equipment!
In areas where the use of electronics or wireless devices are
restricted, verify if your device has to be turned off.
Risk of interference with active and non-active implants! If you
wear an active or a non-active implant, e.g. a brain implant:
Prior to use, have the electromagnetic compatibility verified.
Consult the physician that implanted the device before using
your hearing instruments.
Keep a safe distance of about 1.6 inches (4 cm) between the
implant and hearing instruments.
Your hearing instruments may reduce certain background sounds, potentially also traffic or warning signals.
Tinnitus noiser
Your hearing instrument may be equipped with a tinnitus noiser. The use of the tinnitus noiser should be only on the advice and in consultation with your NHS Provider.
WARNING
Risk of further impairment to the user's hearing health.
The volume of the tinnitus noiser can be set to a level which could
lead to permanent hearing damage when used for a prolonged
period of time.
The tinnitus noiser should never be used at uncomfortable levels.
For NHS Providers:
The target population is primarily the adult population over 21 years of age. The patient may have some control of the level or volume of the signal and the patient should discuss this adjustment as well as his or her comfort level and sound of the signal with their NHS Provider.
WARNING
Risk of further impairment to the user's hearing health.
The volume of the tinnitus noiser can be set to a level which could lead
to permanent hearing damage when used for a prolonged period of time.
should the tinnitus hoiser be set to such a level in the hearing instrument, advice the user of the maximum amount of time no
instrument, advise the user of the maximum day he or she should use the tinnitus noiser.
For example, occupational safety guidelines restrict continuous
For example, occupational safety guidelines test noise exposure of 80 dBA SPL to 8 hours per day.
The tinnitus noiser should never be used at uncomfortable levels.
Rockerswitch
| Function Left Right | ||||||
| Program up/down | ||||||
| Volume up/down | ||||||
| Tinnitus noiser level up/down | ||||||
| Sound balance | ||||||
| Standby/ turn on | ||||||
Push button and rocker switch
| Function Left Right | ||
| Lock / Unlock the controls | ||
| Read more in section "Locking the controls". | ||
Settings
| i | Ask your NHS Provider to mark your individual settings on the following pages. |
Hearing programs
| 1 | |
| 2 | |
| 3 | |
| 4 | |
| 5 | |
| 6 |
| Read more in section "Changing the hearing program". |
Feature
| Power-on delay enables whistle-free insertion of hearing instruments. Read more in section "Turning on and off". |
| e2e wireless enables simultaneous control of both hearing instruments. Read more in section "Using two hearing instruments". |
| A telecoil is built into the instrument, so it can connect with audio induction loops. Read more in section "Audio induction loops". |
| Accessories | |
| Remote control | |
| Batteries | |
| □ | Non-rechargeable (size 13) |
| □ | Non-rechargeable (size 312) |
| Exchangeable ear pieces(only with LifeTubes) | Size | |
Important information
Intendeduse Hearing instruments are intended to improve the hearing of hearing impaired persons. Diagnosis and prescription of a hearing instrument must be performed by hearing health specialists, e.g. acousticians, audiologists or ENT doctors.

Use the hearing instruments and accessories only as described in this user guide.
Transport and storage conditions During extended periods of transport and storage, please observe the following conditions:
| Storage | Transport | |
| Temperature | 10 to 40 °C | -20 to 60 °C |
| Relative humidity | 10 to 80 % | 5 to 90 % |
Air pressure 700 to 200 to 1050 hPa 1200 hPa
For other parts, such as batteries, other conditions may apply.

WARNING
Choking hazard!
Your hearing instruments contain small parts which can be swallowed. ▶ Keep hearing instruments, batteries and accessories out of reach of children and mentally disabled persons. ▶ If parts have been swallowed consult a physician or hospital immediately. ▶ Ensure adequate supervision if infants, small children or mentally disabled persons need to wear hearing instruments. ▶ Check the completeness of the hearing instruments regularly and ensure that the hearing instrument does not detach from the ear mould.

WARNING
Consult your NHS Provider if you experience any unusual side effects like skin irritation, excessive accumulation of ear wax, dizziness, change in your hearing, or if you think there may be a foreign object in your ear canal.

CAUTION
CAUTION Risk of injury
▶ Always wear the tube with an ear piece.
Make sure that the ear piece is completely attached.
Risk of injury!
Insert the ear piece carefully and not too deeply into the ear.
Risk of injury!
In very rare cases the ear piece could remain in your ear when removing the hearing instrument. If this happens, have the ear piece removed by a medical professional.
Productsafety

NOTICE
Leaking batteries damage the hearing instruments.
▶ Turn the hearing instruments off when not in use to preserve
the battery.
Remove batteries when the instruments are not in use for a prolonged period of time.

NOTICE
Protect your hearing instruments from extreme heat. Do not expose them to direct sunlight.

NOTICE
Do not dry your hearing instruments in the microwave oven.

Different types of strong radiation, e. g. during X-ray or MRI head examinations, may damage hearing instruments. ▶ Do not wear the hearing instruments during these or similar procedure. Weaker radiation, e. g. from radio equipment or airport security does not damage the hearing instruments.

NOTICE ▶ Protect your hearing instruments from high humidity. Do not wear them in the shower or when you apply make-up, perfume, aftershave, hairspray or suntan lotion.
Only for two instruments or the use of a remote control:

In some countries restrictions for the usage of wireless equipment exist. Refer to local authorities for further information.

WARNING
Risk of further impairment to the user's hearing health. An NHS Provider should advise a prospective hearing instrument or tinnitus noiser user to consult promptly with a licensed physician (preferably an ear specialist) before using the hearing instrument or hearing instrument with tinnitus noiser function if the NHS Provider determines through inquiry, actual observation, or review of any other available information concerning the prospective user that the prospective hearing was any of the following conditions: - Visible congenital or traumatic deformity of the ear. - History of active drainage from the ear within the previous 90 days. - History of sudden or rapidly progressive hearing loss within the previous 90 days. - Acute or chronic dizziness. - Unilateral hearing loss of sudden or recent onset within the previous 90 days. - Audiometric air-bone gap equal to or greater than 15 dB at 500Hz, 1,000Hz and 2,000Hz. - Visible evidence of significant cerumen accumulation or a foreign body in the ear canal. - Pain or discomfort
Explanation of symbols
Points out a situation that
could lead to serious, moderate, or minor injuries
Indicates possible property
.
1 Advice and tips on how to handle your device better
Information and warnings for children with hearing
for children instrument
Optional symbol for custom models with wireless function
Models with wireless functionality 66 CE compliance label.
CE 0125 confi rms complianc
with certain European Directives, refer to section
"Conformance information"
Indicates the legal manufacturer of th
Do not dispose of the device
with general domestic waste. Read more in section
"Disposal information"
[Non-Text]
Read and follow the instructions in the user guide
Getting to know your hearing instruments
hearing instruments It is recommended to familiarise
yourself with your new hearing instruments. With the instruments
in your hand try using the controls and note their location on the instrument.
Note their location on the instrument. This will make it easier for you to feel
and press the controls while wearing the hearing instruments.
A
Read this
thoroughly and completely and follow the safety
information in this document to avoid damage or injury.
-
i If you have problems pressing the controls of your hearing
instruments while wearing them, you can ask your NHS
them, you can ask your Provider about a remote
control option.
To benefit most from your hearing instrument, wear it daily and all day
instrument, wear it daily and all day long. Especially after long periods of
living with hearing loss, a dedicated hearing training is recommended -
ask your NHS Provider.
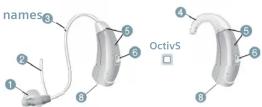
Your Octiv™ hearing instrument
Components and names


Batteries
Changing the batteries
Openthebattery compartment

Remove coloured sticker om new battery, place battery
in drawer with + symbol on
battery + side up. (You should only remove the protective sticker

③ Close battery door
Carefully close the
battery compartment. If you feel resistance, the
Battery is not inserted correctly.
Do not attempt to close the battery compartment by force.
It can be damaged
Low Battery indicator

Your hearing instrument may be programmed to inform you when
programmed to inform you when the battery should be replaced for
best system performance. You may hear an intermittent series of heeps
and/or experience low amplifi cation power or volume. Change the
power of volume. Change the battery when either of these occur.
Remove empty batteries immediately and disperse of according to local
and c regul

you at all times. ■ Only use zinc-air batteries
nickel-metal hydride (NiMH)
rechargeable batteries. ■ Do not use e.g. silver
or lithium-ion rechargeable batteries
Daily use
Turning on and off
You have several options to turn your hearing instruments on or off
your hearing instruments Via battery compartment
▶ Turning on: Close the battery compartment. The default
compartment. The default volume and hearing progra
are set. ▶ Turning off: Open the battery
- turning 2.0% open the battery compartment.
Via push button or rocker switch:
▶ Turning on or off: Press the push button. Refer to section
"Controls" for your personal settings.
After turning on, the previously
used volume and hearing program are set.
Via remote control:
Follow the instructions in the remote control's way guide
remote controls user guide. After turning on, the previously
After turning on, the previous used volume and hearing
program are set.

■ When wearing the hearing instruments
hearing instruments, an optional signal can
indicate when an instrument is turned
instrument is turned on or off.
■ Remove the batteries if the bearing instruments
the hearing instruments are not used for several
m = 311
When the power-on delay is
activated, the hearing instruments turn on after a delay of several
seconds. During this time you can insert the hearing instruments
insert the hearing instruments without experiencing unpleasant
whistling.
The "power-on delay" can be activated by your NHS Provider
Inserting
Your hearing instruments have been fine-tuned for your right and left.
in he-tuned for your right and near. Coloured markers indicate
the si
■ red marker = right ear
blue marker = left ear

To insert the hearing instrument:
Hold the tub
that is closer to the ear.
to the sq1 piece.
Carefully push the services
the ear piece in the ear canal
Twist it slightly
until it sits well.
▶ Open and close your mouth to avoid accumulation of air in the
avoid accumulation of all in the ear canal.
▶ Lift the hearing instrument
and slide it ove of your ear ②.
i
■
instrument with the right hand and the left hearing
hand and the left hearing instrument with the left
-
If you have problems inserting the ear piece
inserting the ear piece, use the other hand to
gently pull your earlobe
downwards. This opens the ear canal and eases
insertion of the ear piec
The optional concha lock helps to securely retain the ear piece in your
securities return the ear piece in your ear. To position the concha lock:
▶
lock and position
it carefully into the bowl of your car.
bowl of your ear (refer to the picture)
[Non-Text]
helps to ace in your
see in your na lock:
C
(
[Non-Text]
i
Note that manual volume adjustment may not be
adjustment may not be available for Octiv S instrum
Changing the hearing
program
Hearing programs change the characteristics of the sound coming
through the hearing instrument.
They help you to select the optimal setup for every listening situation.
An optional signal can indicate the
change of the hearing program. To change the hearing program
To change the hearing program, press the push button briefl y or
use a remote control.
Refer to section "Controls" and
to section "Settings" for your personal settings and for a list of
your hearing programs.
i
Your NHS Provider can
confi gure your hearing instruments so that they
switch automatically to the
audio shoe program if the audio shoe has been
audio shoe has been attached. Read more in
section "Audio input".
Furtheradjustments
(optional)
The controls of your hearing instruments can also be used
to change, for example, the
tinnitus noise Refer to proti
Refer to section "Controls" for your personal settings.
1
Locking the controls (optional)
(Optional) To prevent an
To prevent any accidental operation you can lock the controls. When the
controls are locked, both push button and rocker switch are disabled.
To lock th
the top of the rocker switc
and hold it. Simultaneously press the push button on the
press the push button on the same hearing instrument for
3 seconds
To unlock the controls, press the bottom of the rocker switch
bottom of the rocker switch and hold it. Simultaneously
press the push button on the same hearing instrument for
same hearing instrument for 3 seconds.
Whether this function is configured
for your hearing instruments is listed in section "Controls".
:
1
have to lock or unlock the
controls on each hearing instrument separately.
m = 311
optionally be indicated by
an acoustic signal. When you turn v
■ When you turn your hearing instruments
off and on again, the
key lock remains in the previously selected state
-
WARNING
Note that any unauthorized changes to the product may
changes to the product may cause damage to the product
m = 311
▶ Use only approved parts
and accessories. Ask your NHS Provider for support
NHS Provider for support.
Using two hearing
instruments
When controlling two instruments you have the following options to
you have the following options to, for example, change the hearing
program: ▶ You can control each hearing
In the case of the following instrument separately.
You can control both hearing instruments simultaneously.
Your NHS Provider has to activate
the "e2e wireless" function, enabling both bearing instruments to
both hearing instruments to exchange information. You can then
use either a remote control or the user controls on either of your
user controls on either of your instruments for the desired function
e.g. volume change.
The control elements of both instruments can even be set
differently – thus offering you the
degree of control you really need.
On the phone
When you are on the phone, hold the telephone receiver slightly above
your ear. The hearing instrument
and telephone receiver have to be aligned. Turn the
to be unghreat turn the receiver slightly so that
the ear is not completely covered
covered.
Telephone program
You may prefer a certain volume when using the phone. Ask your
when using the phone. Ask your NHS Provider to configure a
telephone program.
▶ Switch to the telephone program whenever you a
program whenever you are of the phone.
Whether a telephone program
is configured for your hearing instrument is listed in section.
Instrument is listed in Section "Settings".
Audio induction loops
Many telephones as well as public places like theatres offer the audio signal (music and speech) via an audio induction loop. With this system, your hearing instruments can directly receive the desired signal – without distracting noise in the environment.
You can usually
recognise audio induction loop
systems by certain

Telecoil program and
remote control
!
NOTICE
For instruments with wireless connectivity:
Connectivity. When the telecoil program
is active, the remote control
may cause a pulsing noise. Use the remote control
Use the remote control with a distance greater
than 10 cm (4 inches).
Audio input
With an audio shoe you can connect your hearing instrument to an FM system. An FM system gathers speech at the voice source (via a separate microphone) and transmits the sound directly to the hearing instrument. This can be useful for adults in diffi cult listening situations and for children in classrooms.
Nowadays, most FM systems allow for coupling with audio devices like a MP3 player.
Your NHS Provider can confi gure your hearing instruments so that they switch automatically to the audio shoe program if the audio shoe has been attached.
:
If you want to use an
audio shoe, a special battery
compartment is required.
▶ Ask your NHS Provider to exchange the battery
exchange the battery compartment.
A
WARNING
Risk of electric shock!
Connect audio input only
to a device conforming to IEC 60065, the IEC-Norm
for audio, video and other
electronic devices.
!
NOTICE
Use an approved audio shoe
only. Ask your NHS Pr or this accessory.
The audio shoe is only
available for Octiv M & HP
earing instruments.
Attaching and removing the audio shoe
The audio shoe is integrated into a battery compartment.
To attach or remove the audio shoe, the battery compartment has to be exchanged. A special tool is required.
▶ Ask your NHS Provider to attach or remove the audio shoe.
Maintenance and care
Your hearing instruments are so robust that they will function reliably for years. It is, however, important that you take care of your instruments and observe a few basic rules, which will soon become habit.
Cleaning
For hygiene reasons and to maintain functionality, clean your hearing instruments daily.
!
NOTICE
Donotput
the hearing instruments
in water.
Do not put LifeTubes or
_lifeTips in water.
Clean your hearing instruments with a soft, dry tissue.
If your hearing instruments are equipped with LifeTubes, regularly clean the tubes with special
cleaning wires. Refer to section "Cleaning the LifeTubes" for details.
•
▶ Ask your NHS Provider for recommended cleaning products, special care sets and further information on how to keep your hearing instruments in good condition.
For a more thorough professional cleaning, take your instruments to your NHS Provider.
Cleaning the LifeTubes
If your hearing instruments are equipped with LifeTubes, you can
equipped with LifeTubes, you can remove cerumen from the tubes using
a special cleaning wire. Ask your NHS
Provider for suitable cleaning wires.
So th
▶ Ca
th
in
- NOTICE
- Optional
- Controls
- Important safety information
- Personalsafety
- WARNING
- Tinnitus noiser
- For NHS Providers:
- Important information
- Choking hazard!
- CAUTION
- CAUTION Risk of injury
- Productsafety
- Explanation of symbols
- Your Octiv™ hearing instrument
- Batteries
- Daily use
- Inserting
- Audio induction loops
- Audio input
- Maintenance and care
Brand : SIEMENS
Model : Octiv S
Category : Hearing aid