
Nitro Custom - Hearing aid SIEMENS - Free user manual and instructions
Find the device manual for free Nitro Custom SIEMENS in PDF.


| Product Type | Custom In-the-Ear (ITE) Hearing Aid |
| Model | Nitro Custom |
| Brand | Siemens |
| Dimensions | Custom fit to ear canal; typical shell length 12-15 mm |
| Weight | Approximately 1.5 grams (varies with custom shell) |
| Power Source | Size 10 or 312 zinc-air battery, depending on variant |
| Battery Life | Up to 7 days (approx. 16 hours per day use) |
| Sound Amplification | Digital multi-channel compression |
| Noise Reduction | Adaptive directional microphones and noise suppression |
| Feedback Cancellation | Active feedback cancellation system |
| Programs | Multiple listening programs (e.g., quiet, noise, music) via push button |
| Connectivity | Optional Bluetooth streaming via auxiliary device |
| Telecoil | Built-in telecoil for phone and loop systems |
| Volume Control | Low-profile push button or remote control (optional) |
| Low Battery Warning | Beep indicator when battery is low |
| Maintenance | Daily cleaning with soft cloth; weekly drying using dehumidifier |
| Water Resistance | IP rating not specified; keep dry, avoid moisture |
| Safety | Do not use in explosive environments or during MRI scans |
| Spare Parts | Replacement domes (if applicable), filters, battery door |
| Reparability | User-replaceable battery; other repairs by authorized service center |
| Warranty | Usually 2-year manufacturer warranty (check documentation) |
Frequently Asked Questions - Nitro Custom SIEMENS
User questions about Nitro Custom SIEMENS
0 question about this device. Answer the ones you know or ask your own.
Ask a new question about this device
Download the instructions for your Hearing aid in PDF format for free! Find your manual Nitro Custom - SIEMENS and take your electronic device back in hand. On this page are published all the documents necessary for the use of your device. Nitro Custom by SIEMENS.
USER MANUAL Nitro Custom SIEMENS
natural_image
Four identical brown dental implants arranged in a grid, each with a central component and no visible text or symbols.NitroCustom
User Guide
SIEMENS
1
Dear customer,
Congratulations! You have selected a hearing instrument from Siemens. This hearing instrument was individually designed for your hearing impairment and is fitted specially to your personal hearing profile.
These instructions, together with guidance from your Hearing Care Professional, will help you understand how your new hearing instrument works.
If you have any further questions, please contact your Hearing Care Professional.
2
Contents
3 Your Nitro Custom hearing instrument 6
- Nitro IT 6
- Nitro CT 6
- Nitro CS 7
- Nitro CIC 7
4 Intended use 8
5 General notes on safety 9
6 Handling batteries 11
- Low battery indicator 11
- Inserting the battery 12
- Removing the battery 13
7 Applying and removing your hearing instrument 14
- Applying your hearing instrument 14
- Removing your hearing instrument 15
8 Turning your hearing instrument on and off 16
- Via battery compartment 16
- Via program button (optional) 16
- Power-on delay 16
9 Changing the hearing program (optional) 17
- How to select programs 17
Contents
2
10 Changing the volume 18
- Volume control (optional) 18
11 Functionalities 19
- Automatic telephone program 19
12 Maintenance and care 21
13 Troubleshooting tips 23
14 Disposal information 25
15 Your hearing instrument configuration 26
3
Your Nitro Custom hearing instrument

Nitro IT
(battery type: 13 or 312*)


Nitro CT
(battery type: 312)

Feature
① Microphone
② Battery compartment
③ Program button (optional)
④ Volume control (optional)
⑤ Vent
⑥ Removal cord (optional)
Your Nitro Custom hearing instrument
3

Nitro CS
(battery type: 10)
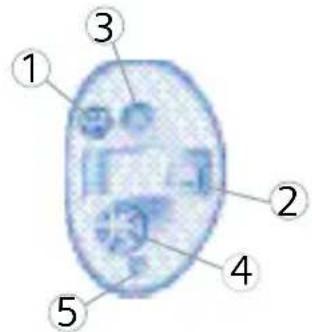

Nitro CIC
(battery type: 10)
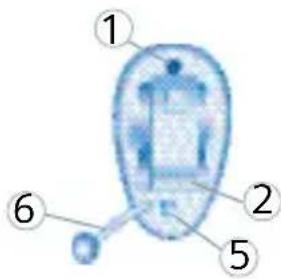
Your hearing system is individually manufactured according to the shape of your ear canals.
Each hearing instrument can be identified by the serial number located on the outside of the instrument.
If the number is written in red, the hearing instrument is for the right ear.
If the number is written in blue, the hearing instrument is for the left ear.
4
Intended use
Hearing instruments are intended to improve the hearing of hearing impaired persons. Diagnosis and prescription of a hearing instrument must be performed by hearing health specialists, e.g. ENT doctors, audiologists or acousticians.
Read and follow the instructions of this user guide to avoid injuries or damage on the hearing instrument.
| Symbols: | |
| Be aware to information marked with the warning symbol WARNING, CAUTION or NOTICE! | |
 | WARNING points out a situation that could lead to serious injuries,CAUTION indicates a situation that could lead to minor and moderate injuries. |
| NOTICE | NOTICE indicates a possible property damage. |
| [MDWA] | Advice and tips on how to handle your hearing instrument better. |
| Instruction. Indicates that something has to be done. | |
  | Indicates an option that not every hearing instrument has. Ask your Hearing Care Professional to check off the relevant information. |
NOTICE
Your hearing instrument is sensitive to extreme heat, high humidity, strong magnetic fields (>0.1T), X-rays and mechanical stress.
Do not expose your hearing instrument to extreme temperature or high humidity.
Do not leave it in direct sunlight.
Do not wear it in the shower or when you apply make-up, perfume, aftershave, hairspray or suntan lotion.
Do not wear your hearing instrument when you are exposed to short-waves, a strong magnetic field, a high frequency field or X-rays.
Do not place your hearing instruments in a microwave oven.

WARNING
Choking hazard posed by small parts.
Keep hearing instruments, batteries and accessories out of children's reach.
If swallowed consult a physician or hospital immediately.
If small children or mentally disabled persons need to wear hearing instruments ensure adequate supervision.
5
General notes on safety
NOTICE for batteries
Leaking batteries damage the instrument.
Remove batteries when the instrument is not in use for a prolonged period of time.
▶ Turn your hearing instrument off when not in use to preserve the battery.

WARNING
Risk in explosive environments, e.g. mining areas!
- Don't use your hearing instruments in areas where there is a danger of explosions.
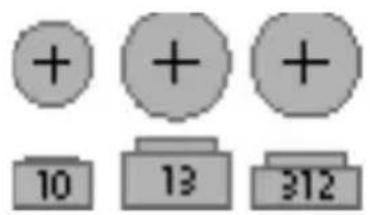
original size
▶ Always use the right size batteries.
i

natural_image
Diagram showing a blue arrow pointing to a white cross inside a blue cloud-like shape (no text or symbols)Remove the tab on your batteries only when you are ready to use them.
The positive (+) side of the batteries is always the smooth side.
Always keep spare batteries with you.
Low battery indicator
Your Hearing Care Professional can activate an acoustic signal to inform you when the battery is nearly empty. If you hear an acoustic signal or experience low amplification power, replace the battery.
6
Handling batteries

natural_image
Two-step illustration of a robotic arm holding a blue object, showing motion and assembly (no text or symbols)Inserting the battery
▶ Open the battery compartment completely using your fingernail as shown in the illustration.
Insert the proper size battery so that the "+" symbol on the battery aligns with the "+" marked on the battery compartment.
▶ Close the battery compartment by gently pressing the bottom of the door upward with your finger tip.
Do not force the door shut. If it does not close easily, check to see if the battery was inserted properly.
When the battery door is completely closed, your hearing instrument is ready for use.
Removing the battery
▶ Open the battery compartment completely.
▶ Lightly push the battery out with your finger or a pencil.
NOTICE
Batteries contain harmful substances that pollute the environment.
Do not throw used batteries into household trash.
▶ Return them to your Hearing Care Professional for environmentally correct disposal.
7
Applying and removing your hearing instrument
Applying your hearing instrument

natural_image
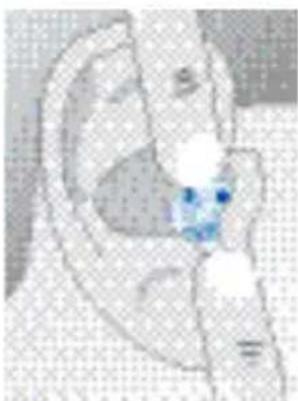
Illustration of a person holding an object, no visible text or symbols▶ Hold the hearing instrument with your thumb and index finger, carefully push the instrument in the ear canal.
▶ Gently work it into its proper position by slightly twisting until it is firmly seated.
Lightly press inward for a secure and comfortable fit.
▶ You may find it helpful to pull your ear slightly upward or to the back. Once inserted, you should be able to feel if the hearing instrument is correctly positioned.
natural_image
Close-up illustration of a human ear with visible teeth and facial features (no text or symbols)Applying and removing your hearing instrument
7
Removing your hearing instrument

natural_image
Illustration of a hand inserting a small blue object into an ear (no text or symbols visible)▶ Push lightly on the back of your ear to help loosen it or pull gently on your ear.
Then using your index finger, slowly pull the hearing instrument from your ear.
The completely-in-the-canal hearing instruments can be removed by pulling the small removal cord toward the back of your head.

WARNING
▶ Never pull on the battery compartment door or volume control wheel to remove the hearing instrument, as this could cause damage to your hearing instrument.
8
Turning your hearing instrument on and off
Via battery compartment
Insert the battery and fully close the battery compartment to turn the hearing instrument on.
▶ Open the compartment completely to turn the hearing instrument off.
Via program button (optional)
▶ Press and hold the program button for approximately 3 seconds to turn the hearing instrument on.
▶ Press and hold the program button for approximately 3 seconds.
If you turn your hearing instrument off this way you must wait approximately 10 seconds before your can turn it on again using the program button.
Power-on delay
Your hearing instruments are equipped with a "power-on-delay" feature which can be activated by your Hearing Care Professional. This allows you to turn the hearing instrument on with an automatic delay of 12 seconds, so that you may insert the hearing instrument into your ear without experiencing unpleasant feedback (whistling).
Changing the hearing program (optional)
9

natural_image
Illustration of a blue megaphone with a curved arrow pointing downward (no text or symbols)How to select programs
Your Nitro Custom hearing instrument offers up to 3 hearing programs for specific listening environments.
Select a program using the program button.
Each time you press the program button, your hearing instrument switches to the next program, confirming each change with a beep. The number of beeps your hear co incides with the selected program.
Example
You turn your hearing instrument on. It is automatically in program 1. You want to change to program 2.
▶ Press the program button once. Your hear 2 beeps. You are now in program 2.
Your Hearing Care Professional can write down the personal program configuration of your hearing instrument on page 26.
10
Changing the volume
The volume of your hearing instruments is controlled automatically and there is no need to manually adjust it.
Volume control (optional)

natural_image
Illustration of a human ear with a blue arrow indicating clockwise motion (no text or symbols)Should you prefer manual volume control, your Hearing Care Professional can program the hearing instrument for manual adjustment.
▶ Rotate the volume control with your index finger to select the desired listening volume.
Your hearing instrument will not exceed your maximum volume. Signal tones can be programmed to indicate when the volume control limit is reached. Adjusting the volume further in that direction will then have no effect.

Automatic telephone program
Hold a telephone near your hearing instrument (*).
The hearing instrument automatically switches to the telephone program.
▶ Move the telephone away from your hearing instrument.
The hearing instrument switches back to the previously used program.

You can also select the telephone program manually by using the program button.
(\*) AutoPhone magnet accessory
Not all telephones produce a magnetic field strong enough to activate the AutoPhone function. In this case, use the Siemens AutoPhone magnet, which is available as accessory, and attach it to the telephone receiver to activate the AutoPhone function.

See the AutoPhone magnet user guide for instructions on how to position the magnet.
▶ Use only the Siemens magnet. Ask your Hearing Care Professional for this accessory.
11
Functionalities
NOTICE
Magnets can disturb electrical devices and delete stored data.
Keep magnets away from computers, color monitors, television sets, floppy discs, video- and audio discs and other electronic equipment/devices.

WARNING
Magnets may interfere with the operation of life supporting systems (e.g. pacemakers, magnetic valves).
▶ Use a magnet only if not in doubt about the safe distance. The safe distance between pacemaker and magnet should be at least 10 cm (4 inches).

natural_image
Symbol of a faucet with a red diagonal line and a droplet below, representing water pollution (no text present)NOTICE
Do not put the hearing instruments in water.
Your hearing instrument is a highly sensitive system. Proper care and handling will ensure the best possible performance.
If soreness or skin irritation develops in the ear, discontinue wearing your hearing instrument, and bring it to your Hearing Care Professional. Minor fit adjustments and polishing can often correct this condition.
If soreness persists, discontinue wearing the hearing instrument and see your physician.
If excessive earwax accumulates when wearing your hearing instrument, consult your Hearing Care Professional.
12
Maintenance and care
Your hearing instrument may be equipped with a sieve, recess or guard on the sound outlet to prevent earwax from entering the hearing instrument.
Clean your hearing instrument regularly with a soft, dry tissue to prevent damage to the hearing instrument and to avoid health problems.
Place your hearing instrument in a "dry aid kit" with a special moisture-attracting capsule overnight.
Occasionally bring your hearing instrument to your Hearing Care Professional to change the wax guard, clean the venting channel, microphone and sound outlets, and for general system maintenance.
▶ Ask your Hearing Care Professional for special care sets and further information on how to keep your hearing instrument in good condition.
Your hearing instruments are extremely reliable devices. Should a problem occur, it can usually be corrected quickly. Use these troubleshooting tips to resolve simple issues.
| Problem Possible solution | |
| Sound is weak Replace empty battery.Check if the hearing instrument is turned on.Increase volume. | |
| Instrument emits whistling sound | Try reinserting the hearing instrument until it fits securely.Lower volume.Clean hearing instrument. |
| Sound is distorted | Lower volume.Replace empty battery.Clean hearing instrument. |
| Instrument emits signal tones | Gently close battery compartment completely.Replace empty battery. |
13
Troubleshooting tips
| Problem Possible solution | |
| Instrument does not work | Check if the hearing instrument is turned on.Gently close battery compartment completely.Replace empty battery.Make sure battery is inserted correctly.Wait 18 seconds and check again. |
If you still encounter problems after trying these suggestions, consult your Hearing Care Professional.
Within the European Union, the marked equipment is covered by "Directive 2002/96/EC of the European Parliament and of the Council of 27 January 2003 on waste electrical and electronic equipment."
Amended by "Directive 2003/108/EC" (WEEE).


▶ Recycle your hearing instruments and batteries according to national regulations.
For disposal within the EU please send devices to the following address:
United Kingdom Malta Ireland
Siemens Charles de Giorgio LTD Howth Junction
Hearing Instruments 39-40 South Street Business Center
Newton Road Valetta CMR 01 Kilbarrack
Crawley RH109TT P.O. Box 374 5 Dublin
www.siemens.com/hearing
With the CE marking Siemens confirms compliance with the European Directive 93/42/EEC concerning medical devices.
15
Your hearing instrument configuration
| Hearing instrument | ||
| LEFT RIGHT | ||
| Model | ||
| Serial number | ||
| Battery | ||
| yes no Power on delay yes no | ||
| yes no | Volume control yes no | |
| yes no | Push button yes no | |
| Signal tones | ||
| on off Low battery warning on off | ||
| on off Volume control limit on off | ||
| on off Volume control change on off | ||
| Hearing program | Description of the hearing program | |
| 1 | ||
| 2 | ||
| 3 | ||
Notes
© Siemens AG, 10.2010 · MR
Document No. A91SAT-00223-99T6-7600
Order/Item No. 101 48 955
Printed in Germany
www.siemens.com/hearing
- NitroCustom
- 1
- Dear customer,
- 2
- Contents
- Your Nitro Custom hearing instrument 6
- Intended use 8
- General notes on safety 9
- Handling batteries 11
- Applying and removing your hearing instrument 14
- Turning your hearing instrument on and off 16
- Changing the hearing program (optional) 17
- 3
- Your Nitro Custom hearing instrument
- Feature
- Nitro CS
- Nitro CIC
- 4
- Intended use
- NOTICE
- WARNING
- 5
- General notes on safety
- NOTICE for batteries
- i
- Low battery indicator
- 6
- Handling batteries
- Inserting the battery
- Removing the battery
- 7
- Applying and removing your hearing instrument
- Applying your hearing instrument
- Removing your hearing instrument
- 8
- Turning your hearing instrument on and off
- Via battery compartment
- Via program button (optional)
- Power-on delay
- Changing the hearing program (optional)
- 9
- How to select programs
- Example
- 10
- Changing the volume
- Volume control (optional)
- Automatic telephone program
- (\*) AutoPhone magnet accessory
- 11
- Functionalities
- 12
- Maintenance and care
- 13
- Troubleshooting tips
- United Kingdom Malta Ireland
- 15
- Your hearing instrument configuration
- Notes
Brand : SIEMENS
Model : Nitro Custom
Category : Hearing aid