T2 516 - Receiver TV Star - Free user manual and instructions
Find the device manual for free T2 516 TV Star in PDF.


| Product Type | High Definition Digital Terrestrial Receiver (DVB-T2) |
| Brand & Model | TV Star T2 516 |
| Signal Input | RF IN (aerial input) |
| Video Outputs | HDMI (720p/1080i), SCART |
| Audio Output | HDMI (embedded audio), SCART |
| USB Port | Yes (for recording, timeshift, media playback) |
| Remote Control Range | Up to 5-6 meters, 60 degree angle |
| Power Supply | AC mains (as per label), double insulation |
| Channel Search | Automatic with signal strength/quality meter (requires >70%) |
| Electronic Program Guide (EPG) | Yes |
| Recording & Timeshift | Via USB (optional, requires external storage) |
| Teletext | Yes (when available on channel) |
| Subtitles | Yes (when available on channel) |
| Audio Languages | Multi-language support (selectable via remote) |
| Aspect Ratio | 4:3 / 16:9 switchable |
| Favorite Channels | Yes (multiple lists) |
| Dimensions (Approx.) | Not specified in manual (typical receiver size) |
| Weight (Approx.) | Not specified (lightweight) |
| Warranty Period | 12 months |
| Cleaning Instructions | Use only a dry cloth |
| Operating Environment | Temperature +5°C to +40°C, humidity <60% |
| Safety Features | Double insulation, automatic shutdown on overheating (if applicable) |
| User Manual | Full manual available at www.tvstar.eu |
Frequently Asked Questions - T2 516 TV Star
User questions about T2 516 TV Star
0 question about this device. Answer the ones you know or ask your own.
Ask a new question about this device
Download the instructions for your Receiver in PDF format for free! Find your manual T2 516 - TV Star and take your electronic device back in hand. On this page are published all the documents necessary for the use of your device. T2 516 by TV Star.
USER MANUAL T2 516 TV Star
GB HIGH DEFINITION DIGITAL TERRESTRIAL RECEIVER
SHORT USER MANUAL
PLEASE CLICK THE WEB SITE WWW.TVSTAR.EU FOR THE FULL USER MANUAL
LT AUKŠTOS RAIŠKOS SKAITMENINIS TV PRIEDĖLIS
TRUMPAS VARTOTOJO VADOVAS
PILNĄ ŠIO TV PRIEDĚLIO VARTOTOJO VADOVĄ GALITE RASTI APSILANKĘ WWW.TVSTAR.EU
Important Safety Instructions
Read these instructions.
-
Keep these instructions.
-
Heed all warnings.
-
Follow all instructions.
-
Do not use this apparatus near water.
-
Clean only with dry cloth.
-
Do not install near any heat sources such as radiators, heat registers, stoves, or other apparatus (including amplifiers) that produce heat.
-
Operate this product only from the type of power source indicated on the label. If you are not sure of the type of power connected to your home, consult your local power company. Disconnect the unit from the mains before any maintenance or installation procedure.
-
Protect the mains cord from damage and stress.
-
Only use attachments/accessories specified by the manufacturer.
-
Unplug this apparatus during lightning storms or when unused for long periods of time.
-
Refer all servicing to qualified service personnel. Servicing is required when the apparatus has been damaged in any way, including damage to the mains cord or plug, if the unit has been exposed to liquid or moisture, has been dropped or is not operating correctly.
12.Do not impede the air flow into the unit by blocking the ventilation slots.
-
Attention should be drawn to the environmental aspects of battery disposal.
-
Use the apparatus in moderate climate.
15.WARNING: To reduce the risk of fire or electric shock, do not expose this apparatus to rain or moisture.
16.WARNING: The batteries shall not be exposed to excessive heat such as direct sun light, fire, etc.
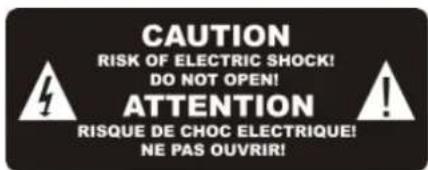

This symbol indicates that dangerous voltages constituting a risk of electric shock are present within this unit.

This symbol indicates that there are important operating and maintenance instructions in the literature accompanying this unit.

This symbol indicates that this product incorporates double insulation between hazardous mains voltage and user accessible parts. When servicing use only identical replacement parts.

This symbol on the product or in the instructions means that your electrical and electronic equipment should be disposed at the end of life separately from your household waste. There are separate collection systems for recycling. For more information, please contact the local authority or your retailer where you purchased the product.
Front and Rear Panel
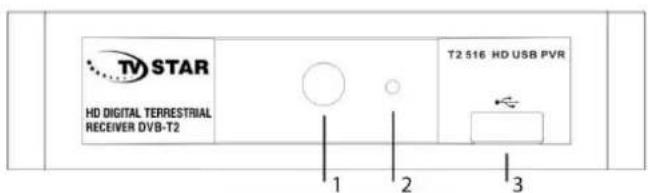
Front Panel
-
IR sensor
-
LED indicator
-
USB
Rear Panel
- RF IN: This socket connects to your external Aerial
- HDMI: High definition audio and video output used to connect to a HDMI device
- SCART: this socket connects to your TV set


-
MUTE: To navigate inside the menus.
-
FAV: Displays your favorite channels list. Press FAV again to access to the other favorite lists.
-
SUBTITLE: Display subtitle options (availability depends on the channel).
-
<0>-<9>: Numeric keys.
-
MENU: Display main menu on TV screen, and press again to disappear menu.
-
OK: To confirm current setting, or display all programs in no-menu mode.
-
EPG: Shows the Electronic Program Guide.
-
PAGE+/PAGE -: To navigate inside the menus.
-
VOL-/VOL+: To increase / decrease volume.
-
REV/FWD: Fastbackward/Fastforward.
-
PREV/NEXT: Skip backward/Fast forward.
-
PLAY
-
PAUSE
-
REC: Record button. (Optional)
-
TIMESHIFT: If the unit has attached an USB device goes to Timeshift mode. (Optional)
-
ZOOM: Increases the size of the image.
-
ASPECT:Switch 4:3/16:9.
-
POWER: Switch the receiver in and out of Standby mode.
-
TTX: Switch on Teletext, if current channel has this option, and use EXIT key to quit Teletext.
-
INFO: Display information about the current channel.
-
RECALL: Go back to the previous viewed channel.
-
LIST: List of channels.
-
EXIT: Use this key to quit current menu.
-
◀▶▲▼: Press to move the cursor
-
GOTO: Select time.
-
CH-/CH+: Program changing keys.
-
LANG: Change the Audio language and Left/Right channel (availability depends on the channel).
-
STOP
-
REPEAT: Repeat play.
-
TV/RADIO: Switch between Digital Radio and DVB-T modes.
-
TIMER: Access to the timer.
-
V-FORMAT: Switch the HDMI 720P and 1080i.
Installing the Batteries
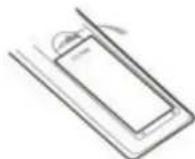
Remove the battery cover from the rear of the Remote Control and place 2xAAA size batteries inside the compartment.
Please make sure the battery polarities match the polarity markings inside the compartment.
-
Open the cover
-
Install batteries
3.Close the cover


Using the Remote Control
To use the Remote Control, point it towards the front of the Digital Set Top Box. The Remote Control has a range of up to 5-6 meters from the Set Top Box at an angle of up to 60 degrees.

Sunlight or very bright light decrease the sensitivity of the Remote Control
Connecting to a Television
For a basic connection from your Set Top Box to the television, use the SCART connection.
For the highest quality connection use a direct HDMI connection, see picture

First Time Installation
After all connections have been made properly, switch on TV and make sure the unit is connected to the Main Power. Press Power button to switch the unit on. If you are using the unit for the first time or have restored the unit to factory default, the installation guide menu will appear on your TV screen. Select Antenna Power 'On' if you're using Active Antenna.
(1) [OSD Language] press RIGHT/LEFT key to select a language.
(2) [Province/Area] press RIGHT/LEFT key to select your province/area of residence.
(3) [Antenna Power] press RIGHT/LEFT key to select antenna power on or off.
(4) [Channel No.] press RIGHT/LEFT key to select a channel. For selecting the channel, please find out on which channel the Digital TV signal is transmitted in your living Area.
(5) Make sure the signal 'quality bar' and the "signal strength bar" is more than 70% and up.
Press 'OK' to start to do channel searching.
(6) Once channel tuning is complete, you can start watching TV programs.

Troubleshooting
| Problem | Potential Reasons | What to do |
| No picture | Power isn't connected | Connect the power |
| The power switch is not on | Switch on the power | |
| Screen shows' No Signal' | Areal cable not connected | Plug in the Areal cable |
| Aerial cable is faulty | Check aerial cable and connections | |
| No sound from speaker | No or incorrect connection with SCART /HDMI cables | Connect the cables correctly |
| The program is a radio program | Presskey to shift into TV mode | |
| Remote Control is not responding | The battery is exhausted | Change battery |
| Remote Control is not facing or close enough to the STB | Adjust the position of the Remote Control and move closer to the unit | |
| Picture is breaking up | The signal is too weak | Check aerial, cable and connections, use signal quality /strength meter as described above |
The manufacturer reserves the right to change the configuration, technical or any other parameters without prior notice.
WARRANTY
CONDITIONS OF WARRANTY
Warranty period: 12 months.
During warranty period for the product the manufacturer assumes obligations stated in the warranty. Warranty period starts from the moment of retail sale of the product. The product is characterized by appropriate qualitative properties and will function without obstructions if you will follow the attached manual in operation. In case of obstructions in functioning the relevant authorized service-centre according to the request order of warranty owner during warranty period and on own account provide elimination of obstructions and malfunctions of the product.
Maximum term of repairing by the service-centre is 45 days. Warranty period is extended for the time of repairing. If repair will not be fulfilled by the time fixed the seller/manufacturer will replace the product with new one.
Exceptions are the cases of malfunctions due to improper or careless use of the product.
Warranty is valid if the date of sale is confirmed by the seller's stamp and signature and if there is a receipt confirmed this purchase on sheet of the warranty.
Warranty is valid in the presence of all original parts/components.
The device is intended not for professional, but exceptionally for in-home use!
Warranty is terminated in the following cases:
- when it is defined that unauthorized person broke the product integrity or installation of unoriginal parts/components took place;
- if malfunction occurred due to electric shock or inflammation;
- if product contacted with water or any other liquid;
- if malfunction occurred by any other reason beyond the control of the manufacturer;
- if malfunction occurred due to mechanical damage;
- if product was used or stored at the temperature below +5C and above +40C at humidity over 60%;
WARRANTY SERVICE COUPON
Serial number:
Warranty period: 12 months
Date of sale: ....
Stamp and signature of the seller
Full name of the buyer: ....
Street
City
Telephone
AUTHORIZED SERVICE-CENTRE:
Exertis Ireland Limited
M50 Business Park, Ballymount Road Upper, Dublin 12
Ireland Tel: +353-1-4087171
e-mail: ireland.webteam@exertis.com
GLAUSTA NAUDOTOJO INSTRUKCIJA
Gedimų nustatymas
UAB "IT Partner", PC "Parkas Outlet"
Como colocar as pilhas no controle remoto
Depanare
(6) amplitude of the function of the sum of the sum of the sum of the sum of the sum of the sum of the sum of the sum of the sum of the sum of the sum of the sum of the sum of the sum of the sum of the sum of the sum of the sum of the sum of the sum of the sum of the sum of the sum of the sum of the sum of the sum of the sum of the sum of the sum of the sum of the sum of the sum of the sum of the sum
guydsmomsmdgduu smdmgb36s

| 36m87n8s | 3m86205n6o 3076o | 6s 760s 8537n0m |
| gsdm5b9n8s | s6 s6o b6m7n0 338s | bs600s 338s |
| 338o b6m7n0 s6 s6o b6m7n0 | bs600s 338o b6m7n0 | |
| 33656g sb366d1 «s6 s6o b6b6n0» | sb6g b6 38n0o s6 s6o b6m7n0 | bs600s sb6g b6 38n0o |
| sb6g b6 38n0o y6g2n03n5 | dgsdm4g m sb6g b6 38n0o o5 dgsdm4g do | |
| s6 s6o b6s qo6sdo3gdoq6 | s6 s6o b6 s6sfo6n o dgg6n0s3s6gngdol SCART /HDMI | dgsgm0m 3s6gngdo l6m6o |
| g6 s6o b6pom 36m6n5s | qssj0n0m pocms3l <TV/Radio> 83 nggoddo | |
| qo6s5b9n6o dsnoz s6 dya5n8 | dsgsngs sb6d9b9n0ns | dgsmm0m bsgsngs |
| qo6y. dsmmzol 3gcm0o s6 s6o b6dsmn0m g6m7n0 dcdg6bg s6 s6 s6o b6dsmn0o sbembl dslo5b. | qss6g8n0m0n 3gcm0o s6oemddgmds6n0s o5 dmydm0nm8slo5b. | |
| gsdm5b9n8s «yqg8s» | b6b6n0 dgtobdghso l6y6n0s. | dgsdm4g m sb6g6s, 3s6g0o o5 y3g0s dgg6n0s, gsdm0g6g m b6b6n0 b6m0b0/dsm0l zsdbm0, gmzm6s s6f6n0n0s b6d0n. |

- Important Safety Instructions
- Front and Rear Panel
- Front Panel
- Rear Panel
- Installing the Batteries
- Using the Remote Control
- Connecting to a Television
- First Time Installation
- WARRANTY
- CONDITIONS OF WARRANTY
- WARRANTY SERVICE COUPON
- AUTHORIZED SERVICE-CENTRE:
- GLAUSTA NAUDOTOJO INSTRUKCIJA
- Como colocar as pilhas no controle remoto
- guydsmomsmdgduu smdmgb36s
Brand : TV Star
Model : T2 516
Category : Receiver