TM 551 - Tumble dryer Tricity Bendix - Free user manual and instructions
Find the device manual for free TM 551 Tricity Bendix in PDF.


| Product Type | Tumble Dryer |
| Brand | Tricity Bendix |
| Model | TM 551 |
| Loading Type | Front-Loading |
| Drying System | Vented |
| Capacity | 5.5 kg |
| Dimensions (H x W x D) | 85 cm x 60 cm x 60 cm |
| Weight | 35 kg |
| Power Supply | 220-240 V ~ 50 Hz |
| Power Consumption | 2500 W |
| Energy Class | C |
| Number of Programs | 5 |
| Programs | Cotton, Synthetics, Delicates, Iron Dry, Cupboard Dry |
| Drying Levels | Adjustable (Extra Dry, Normal, Iron Dry) |
| Timer | Up to 120 minutes |
| Cool Down Cycle | Yes |
| Lint Filter | Removable, clean after each use |
| Condenser | Not applicable (vented model) |
| Overheat Protection | Yes |
| Door Reversibility | Yes |
| Noise Level | 65 dB |
| Ventilation Hose Diameter | 100 mm |
| Spare Parts Availability | Filters, drum belt, heating element available from authorized dealers |
| Manual Languages | English, French, German, Dutch, Italian, Spanish |
Frequently Asked Questions - TM 551 Tricity Bendix
User questions about TM 551 Tricity Bendix
0 question about this device. Answer the ones you know or ask your own.
Ask a new question about this device
Download the instructions for your Tumble dryer in PDF format for free! Find your manual TM 551 - Tricity Bendix and take your electronic device back in hand. On this page are published all the documents necessary for the use of your device. TM 551 by Tricity Bendix.
USER MANUAL TM 551 Tricity Bendix
OPERATING & INSTALLATION INSTRUCTIONS

natural_image
Abstract black-and-white brushstroke design with no text or symbolsDELUXE TUMBLE DRYER
TM 551

IMPORTANT SAFETY INFORMATION
This information is provided in the interest of safety.
You must read it carefully before installing or using the appliance.
Installation
- Any electrical work required to install the appliance must be carried out by a competent qualified person.
- Do not use a two-way adaptor or extension lead. The dryer must be connected to its own socket.
- Ensure the appliance does not stand on the electrical supply cable.
- It is dangerous to alter the specifications or modify this product in any way.
Child Safety
- Check your drum before use. Pets and children have been known to climb into tumble dryers.
- This appliance should be operated by adults. Do not allow children to tamper with the controls or play with the product.
- Keep children away from the appliance when it is in operation.
During Use
- This tumble dryer is intended for normal domestic use only.
- Clean the lint filter after each drying cycle.
- The appliance should be unplugged after use.
- Do not block the air inlets at the front and back of your dryer.
- Do not allow fluff to accumulate around the tumble dryer.
-
Do not overload the appliance.
-
Do not exceed the recommended maximum load.
- Clothes which are dripping wet must not be placed in the dryer. Only load well spun clothes.
- Do not dry items containing foam rubber or rubber like materials.
- Under no circumstances should anything other than articles recommended for tumble drying be placed in the tumble dryer.
- Do not dry items that have been in contact with flammable chemicals such as dry cleaning fluid.
- Never switch the tumble dryer off and leave a hot load in the drum.
Service
- Do not attempt to repair the appliance yourself. Repairs carried out by inexperienced persons may cause injury or serious malfunction.
- Repairs should be carried out by Tricity Bendix Service Force.
Please read this instruction book before using the appliance, and retain for future reference
CONTENTS
FOR THE USER Page
Important Safety Information .....1
Installation
Child Safety
During Use
Service
Description of the Appliance ....3
Temperature Button
Time Selector Dial
Programme Chart
Programme Chart 4
Hints & Tips on Drying ....5
Operating Sequence......6
Loading the Laundry
Selecting the programme
When drying is complete
Maintenance and Cleaning .....7
External Cleaning
Cleaning the Lint Filter
Cleaning the Door
Something Not Working......8
Symptoms and Solutions
Service and Spare Parts....9
Customer Care 9
Tricity Bendix Service Centre
Addresses....10 - 11
Guarantee Conditions 12
FOR THE INSTALLER Page
Installation Instructions ....13
Technical Information
Positioning
Site Preparation
Electrical Connection ....14
Additional 15
Door reversal
DESCRIPTION OF THE APPLIANCE

Temperature Button
Depress the button for the high temperature. Press the button again to release it for the low temperature.
Use the high temperature for drying cottons and linens, and the low temperature for drying synthetics and delicates.
Time Selector Dial
The time selector dial is marked in minutes up to a maximum of 140 minutes.
To select a drying time, turn the dial clockwise until the time you require is in line with the marker.
To reduce the drying time turn the dial clockwise past the OFF position until the correct time is reached.
DO NOT ATTEMPT TO TURN THE DIAL ANTI-CLOCKWISE.
Programme Guide
This is a guide to help you select the correct temperature and drying time.
Filter
This must be removed and cleaned after every drying cycle.
Anti-crease Button
This function allows the clothes to be tumbled intermittently at the end of a programme to reduce creasing. If selected, this will continue until the appliance is switched off.
Dryer On Indicator
This illuminates when the appliance is operating. This will extinguish when the appliance is switched off.
Air Inlet
Do not cover or block the air inlet.
PROGRAMME GUIDE
Cotton and Polyester Cotton
| Degree of Spin Given | Quantity | Selector Dial Setting | |
| Store Dry | 500rpm800/1000rpm2800 rpm (spin dryer) | 6.0kg | 140 mins110 mins80 mins |
| 500rpm800/1000rpm2800 rpm (spin dryer) | 2.0kg | 100 mins80 mins60 mins | |
| Iron Dry | 500rpm800/1000rpm2800 rpm (spin dryer) | 6.0kg | 100 mins80 mins60 mins |
| 500rpm800/1000rpm2800 rpm (spin dryer) | 2.0kg | 80 mins60 mins40 mins |
Synthetics
| Degree of Spin Given | Quantity | Selector Dial Setting | |
| Store Dry | 500rpm800/1000rpm2800 rpm (spin dryer)500rpm800/1000rpm2800 rpm (spin dryer) | 2.0kg1.0kg | 60 mins50 mins40 mins40 mins30 mins20 mins |
If the laundry is spin-dried in a washing machine at less than 500 rpm, the residual dampness will be higher and consequently the drying time should be increased.
This applies particularly to laundry consisting primarily of towels.
If the laundry is spin-dried at more than 1200 rpm, the residual dampness will be lower and consequently the drying time should be decreased.
HINTS & TIPS ON DRYING
Before placing articles of laundry in your tumble dryer, check the care labels to ensure they are recommended for tumble drying
Care labels you may find on your laundry
| Suitable for tumble drying | |
| Tumble dry using full heat | |
| Tumble dry using half heat | |
| Do not tumble dry |
Do not overload the appliance
Here is a list of the approximate weight of some common laundry items:
Sheet 700 to 1000g
Pillowcase ....100 to 200g
Tablecloth 400 to 500g
Table Napkin ....50 to 100g
Kitchen Towel 70 to 120g
Linen Hand Towel....100 to 150g
Hand Towel 150 to 250g
Bath Towel 700 to 1000g
Bathrobe 1000 to 1500g
Shirt 200 to 300g
Apron....150 to 200g
- Always load well spun laundry. The higher the spin speed the lower the electricity consumption and the shorter the drying time.
- DO NOT load dripping wet laundry into the dryer. Roll the article in a towel or spin to remove excess water.
- Close poppers and zips and fasten any buttons.
- Sort the laundry. Separate synthetics from cottons/linens, and dry separately.
- Remove the laundry immediately after the programme has finished or select the Anti-crease option.
- Use a fabric conditioning sheet to reduce static. We recommend the sheet is pinned to an article of laundry (using a safety pin).
• Mix the load i.e. large and small articles. - When drying items such as sheets, we recommend you periodically stop the dryer to redistribute the load.
DO NOT use the tumble dryer to dry the following:
- Articles contaminated with inflammable substances e.g. petrol, cleaning solvents, cooking oil, fats or hair lacquer.
- Woollen and synthetic wool mixtures unless the item is labelled as suitable for tumble drying.
• Very delicate articles such as silk - Very large and bulky items such as duvets or sleeping bags.
OPERATING SEQUENCE
1. Loading the laundry
- Open the door by pulling it outwards
- Load the items one at a time, shaking them out loosely.
- Where possible mix the load, i.e. large and small items.
- Close the door.
- Dry your hands and plug in the appliance.

natural_image
Illustration of hands cleaning a car wheel rim (no text or symbols)2. Selecting the programme
- Select the temperature
- Select the required drying time
i Use the programme guide to help you select the correct drying time and temperature.
i The machine will now start working. It will rotate in a clockwise direction, and will periodically rotate anti-clockwise for approximately 20 seconds, which helps to prevent tangling.
- To shorten a timed programme, turn the time selector dial clockwise past the off position until the correct time is reached, bearing in mind that during the last 12 minutes the dryer carries out the cooling phase.

natural_image
Hand holding a circular dial with measurement markings (no text or symbols visible)3. When drying is complete
• The machine stops automatically
- Remove the laundry
- Switch off the machine

There is an automatic 12 minute cool down period at the end of every cycle, during which the heater is switched off. This helps to minimise creasing.

Never switch the dryer off and leave a ad in the drum.
The filter must be cleaned after every drying programme.
We recommend the machine is disconnected from the electricity supply when not in use.
MAINTENANCE AND CLEANING

Disconnect the appliance from the electricity supply before carrying out any maintenance or cleaning.
Never use abrasive cleaning products or cleaning agents which contain bleach, acetone, alcohol or methylated spirits.
External Cleaning
Periodically wipe the outside of the appliance, using only water and a soft cloth. Dry thoroughly.
Cleaning the Lint Filter
Your dryer will only function well if the filter is clean.
The filter collects fluff which accumulates during drying and it must therefore be removed and cleaned at the end of each programme.
To remove the filter:
- Pull the filter upwards and away from the appliance.
- Remove any threads of fluff by hand or with a soft brush
- Slide the filter back into position.

Wash the filter occasionally in detergent solution using a soft brush to remove any small particles.

natural_image
Diagram of a solar panel mounted on a circular base with a curved arrow indicating rotation (no text or symbols)
The lint filter must be cleaned after every drying cycle.

Keep the air inlets at the front and back of the appliance clear.

natural_image
Hand holding a toothbrush applying product to a rectangular block (no text or symbols visible)Cleaning the Door
Wipe the interior part of the door to remove any fluff.
The condenser and ducting should be cleaned 3 or 4 times a year or more frequently if the dryer is in constant use.

The condenser will discolour through use. This will not affect the performance of the appliance.
For maximum efficiency, the plates are made from very thin aluminium and are easily damaged. Do not try to poke anything between the plates or use a hard object or toll for cleaning. At all times, handle the condenser carefully and avoid crushing the plates.
SOMETHING NOT WORKING
Before contacting your local Tricity Bendix Service Force please carry out the following checks.
| SYMPTOM | SOLUTION |
| ◆ The machine does not work | ◆ Check that there is a supply of electricity◆ Check the plug fuse◆ Check the door is closed◆ Check the machine is switched on◆ Check the time selector dial is set correctly |
| ◆ The clothes are not dry after normal drying time | ◆ Check you have used the correct temperature setting)◆ Check the timer has not been set within a cool down period◆ The heater cut-out has operated. See below |
Heater Cut-Out
This cut-out operates if the airflow is severely restricted. Before resetting it check:
◆ The filter is clean.
◆ The air inlets at the back are not blocked.
◆ There are no other restrictions.
Reset the cut-out on the rear of the dryer by pushing the red button.
If the cut-out continues to operate after checking the above points you should contact Tricity Bendix Service Force.

natural_image
Diagram of a front-loading washing machine with visible blades and control panel (no text or labels)In the event of your appliance requiring service, or if you wish to purchase spare parts please contact your local Tricity Bendix Service Force Centre by telephoning:
0870 5 929929 (UK) 0752 01 409 0770 (EIRE)
Your telephone call will be automatically transferred to your local Service Centre. The addresses can be found on the pages headed Tricity Bendix Service Force Centres.
When you contact Service Force, they will need to know:
- Your name, address and post code
- Your telephone number
- Clear and concise details of the fault
- The model and serial number
- The date of purchase
Before calling out an engineer, please ensure you have read the details under the heading 'Something Not Working'.
In-guarantee customers should ensure that the checks under the heading 'Something Not Working' have been made as the engineer will make a charge if the fault is not a mechanical or electrical breakdown. Please note that it will be necessary to provide proof of purchase for any in-guarantee service calls.
All enquiries concerning service should be addressed to your local Service Centre.
CUSTOMER CARE
For general enquiries concerning your Tricity Bendix appliance or for further information on Tricity Bendix products please contact our Customer Care Department by letter or telephone:
(UK) Customer Care Department Tricity Bendix 55-77 High Street Slough Berkshire SL1 1DZ Tel: 08705 950 950*
(EIRE) Customer Care Department Tricity Bendix Electrolux Group Longmile Road Junction Naas Road Dublin 12 Tel: 0752 01 409 0752
* calls to this number may be recorded for training purposes.
To contact your local Tricity Bendix Service Centre telephone 08705 929 929
| MIDLANDS | LONDON & EAST ANGLIA | NORWICH (M52) | 2b Trafalgar Street Norwich NR1 3HN | ||
| BIRMINGHAM (M18) | 66 Birch Road East Wyrley Road Industrial Estate Witton Birmingham B6 7DB | BECKENHAM (M79) | 11a Gardener Ind. Estate Kent House Lane Beckenham Kent BR3 1QZ | SUNBURY (M63) | Unit 1a The Summit Hanworth Road Hanworth Ind Estate Sunbury on Thames TW16 5D |
| CHELMSFORD (M47) | Hanbury Road Widford Ind. Estate Chelmsford Essex CM12 3AE | ||||
| BOURNE (M44) | Manning Road Ind Estate Pinfold Road Bourne PE10 9HT | COLINDALE (M53) | Unit 14 Capitol Park Capitol Way Colindale London NW9 0EQ | SOUTH EAST ASHFORD (M58) | Unit 2 Bridge Road Business Est. Bridge Road Ashford Kent TN2 1BB |
| BRIDGNORTH (M72) | 68 St. Mary's Street Bridgnorth Shropshire WV16 4DR | ||||
| GLOUCESTER (M23) | 101 Rycroft Street Gloucester GL1 4NB | ELTHAM (M78) | 194 Court Road Mottingham Eltham London SE9 4EW | FLEET (M59) | Unit 1 Redfield Industrial Estate Church Crookham Fleet Hampshire GU13 0RD |
| HEREFORD (M31) | Unit 3 Bank Buildings Cattle Market Hereford HE4 9HX | ENFIELD (M49) | 284 Alma Road Enfield London EN3 7BB | ||
| HIGHAM FERRERS (M51) | 30 High Street Higham Ferrers Northants NN10 8BB | GRAVESEND (M57) | Unit B4, Imperial Business Estate Gravesend Kent DA11 0DL | HAYWARDS HEATH (M55) | 21-25 Bridge Road Haywards Heath Sussex RH16 1UA |
| ILKESTON (M43) | Unit 2 Furnace Road Ilkeston DE7 5EP | HARPENDEN (M46) | Unit 4 Riverside Estate Coldharbour Lane Harpenden AL5 4UN | SOUTH WEST BARNSTAPLE (M30) | Main Road Fremington Barnstaple North Devon EX31 2NT |
| LEICESTER (M22) | Unit 7 Oaks Industrial Estate Coventry Road Narborough Leicestershire LE0 5GF | LETCHWORTH (M50) | 16-17 Woodside Ind. Est. Works Road Letchworth Herts SG6 1LA | BOURNEMOUTH (M26) | 63-65 Curzon Road Bournemouth Dorset BH1 4PW |
| LINCOLN (M40) | Unit 8 Stonefield Park Clifton Street Lincoln LN5 8AA | LONDON (M76) | 2/4 Royal Lane Yiewsley West Drayton Middlesex UB7 8DL | BRIDGEWATER (M35) | 6 Hamp Industrial Estate Bridgewater Somerset TA6 3NT |
| NEWCASTLE UNDER LYME (M12) | 18-21 Croft Road Brampton Ind. Estate Newcastle under Lyme Staffordshire ST5 0TW | MAIDENHEAD (M60) | Reform Road Maidenhead Berkshire SL5 8BY | BRISTOL (M25) | 11 Eldon Way Eldonwall Trading Bristol Avon BS4 3QQ |
| REDDITCH (M20) | 13 Thornhill Road North Moons Moat Redditch Worcestershire B98 9ND | MOLESEY (M61) | 10 Island Farm Avenue West Molesey Surrey KT8 2UZ | EMSWORTH (M33) | 266 Main Road Southbourne Emsworth PO10 8JL |
| TAMWORTH (M19) | Unit 3 Sterling Park Claymore Tamworth B77 5DO | NEWBURY (M24) | 9 Pipers Court Berkshire Drive Thatcham Berkshire RG19 4ER | ISLE OF WIGHT (M34) | Unit 8 Enterprise Court Ryde Business Park Ryde Isle of Wight PO33 1DB |
| WORCESTER (M73) | Units 1 & 2 Northbrook Close Gregorys Mill Ind Estate Worcester WR3 8BP | IPSWICH (M48) | Unit 6C Elton Park Business Centre Hadleigh Road Ipswich IP2 0DD | NEWTON ABBOT (M29) | Unit 2 Zealley Ind. Estate Kingsteignton Newton Abbot S. Devon TQ12 3TD |
To contact your local Tricity Bendix Service Centre telephone 08705 929 929
| CHANNEL ISLANDS | ORKNEY(M65) | Corsie Domestics7 King StreetKirkwallOrkney KW15 | NORTH EAST | ||
| GUERNSEY | Guernsey ElectricityPO Box 4Vale, GuernseyChannel Islands | GATESHEAD(M39) | Unit 356aDukesway CourtDukeswayTeam ValleyGateshead NE11 0BH | ||
| JERSEY | Jersey ElectricityCompanyPO Box 45Queens RoadSt HelierJerseyChannel Islands JE4 8NY | PERTH | Hydro ElectricalInveralmond HouseRuthervenfield RoadPerth PH1 3AQ | GRIMSBY(M42) | 15 Hainton AvenueGrimsbySouth HumbersideDN32 9AS |
| PERTH(OWN SALES) | Graham BeggUnit 4Airport Ind. EstateWick KW1 4QS | HULL(M41) | Unit 1Boulevard IndustrialEstateHull HU3 4AY | ||
| SCOTLAND | SHETLAND(OWN SALES) | Tait Electronic Systems LtdHolmsgarth RoadLerwickShetland ZE1 0PW | LEEDS(M37) | 64-66 Cross Gates RoadLeedsLS15 7NN | |
| ABERDEEN(M05) | 54 Claremont StreetAberdeen AB10 6RA | ||||
| AUCHTERMUCHY(M03) | 33a BurnsideAuchtermuchyFife KY14 7AJ | SHETLAND(OWN SALES) | Bolts Shetland Ltd26 North RoadLerwickShetland ZE1 0PE | NEWTON AYCLIFFE(M45) | Unit 16Gurney WayAycliffe Ind EstateNewton AycliffeDL5 6UJ |
| BLANTYRE(M07) | Unit 5Block 2Auchenraith Ind. EstateRosendale WayBlantyre G72 0NJ | WHALSAY(OWN SALES) | Leask ElectricalHarisdaleSymbister, WhalsayShetland ZE2 9AA | SHEFFIELD(M38) | Pennine HouseRoman Ridge Ind.Roman Ridge RoadSheffieldS9 1GB |
| DUMFRIES(M01) | 93 Irish StreetDumfriesScotland DG1 2PQ | NORTHERN IRELAND | NORTH WEST | ||
| DUNOON(M67) | Brair Hill7 Hill Street,DunoonArgyll PA23 7AL | BELFAST(M27) | Owenmore HouseKilwee Business ParkUpper Dunmury LaneBelfastBT17 0HD | BIRKENHEAD(M11) | 1 Kelvin ParkDock RoadBirkenheadL41 1LT |
| GLASGOW(M04) | 20 Cunningham RoadClyde EstateRutherglen,Glasgow G73 1PP | WALESCARDIFF(M28) | Guardian Industrial EstateClydesmuir RoadTremorfa, CardiffCF2 2QS | CARLISLE(M10) | Unit 7James Street WorkshopsJames StreetCarlisle Cumbria CA25AH |
| INVERNESS(M06) | Unit 3BSmithton Indust. Est.SmithtonInverness IV1 AJ | CLYWD(M14) | Unit 6-7 Coed - ParcAbergele RoadRhuddianCiwydWalesLL18 5UG | ISLE OF MAN(M64) | South Quay Ind. EstateDouglasIsle of Man IM1 5AT |
| ISLE OF ARRAN(OWN SALES) | Arran DomesticsUnit 4 The DouglasCentreBrodickIsle of Arran KA27 8AJ | DYFED(M77) | Maes Y CoedHigh MeadLlanybydderCarmarthenshireSA40 9UL | LIVERPOOL(M15) | Unit 1Honeys Green PrecinctHoneys Green LaneLiverpoolL12 9JH |
| ISLE OF BARRA(OWN SALES) | J Zerfah244 BruernishIsle of BarraWestern Islands HS9 5QY | HAVERFORDWEST(M75) | Cromlech LodgeAmblestonHaverfordwestPembrokeshireSA62 5DS | MANCHESTER(M09) | Unit BCentral Industrial EstateSt Marks StreetBolton BL3 6NR |
| ISLE OF BUTE | Walker EngineeringGlenmhorUpper Serpentine RoadRothesayIsle of Bute PA20 9EH | PRESTON(M13) | Unit 250Dawson PlaceWalton SummitBamber BridgePrestonLancashire PR5 8AL | ||
| ISLE OF LEWIS | ND Macleod16 James StreetStornowayIsle of Lewis PA87 2QW | OSWESTRY(M17) | Plas FlynnonWarehouseMiddleton RoadOswestrySY11 2PP | STOCKPORT(M16) | Unit 20 Haigh ParkHaigh AvenueStockportSK4 1QR |
| KELSO(M08) | 2-8 Wood MarketKelsoBorders TD5 7AX | ||||
GUARANTEE CONDITIONS
Standard guarantee conditions
We, Tricity Bendix, undertake that if within 12 months of the date of the purchase this Tricity Bendix appliance or any part thereof is proved to be defective by reason only of faulty workmanship or materials, we will, at our option repair or replace the same FREE OF CHARGE for labour, materials or carriage on condition that:
• The appliance has been correctly installed and used only on the electricity supply stated on the rating plate.
- The appliance has been used for normal domestic purposes only, and in accordance with the manufacturer's instructions.
• The appliance has not been serviced, maintained repaired, taken apart or tampered with by any person not authorised by us.
• All service work under this guarantee must be undertaken by a Tricity Bendix Service Force Centre.
- Any appliance or defective part replaced shall become the Company's property.
• This guarantee is in addition to your statutory and other legal rights.
Home visits are made between 8.30am and 5.30pm Monday to Friday. Visits may be available outside these hours in which case a premium will be charged.
Exclusions
This guarantee does not cover:
• Damage or calls resulting from transportation, improper use or neglect, the replacement of any light bulbs or removable parts of glass or plastic
• Costs incurred for calls to put right an appliance which is improperly installed or calls to appliances outside the European Community (EC) or European Free Trade Area
• Appliances found to be in use within a commercial environment, plus those which are subject to rental agreements
• Products of Tricity Bendix manufacture which are not marketed by Tricity Bendix
European Guarantee
If you should move to another country within Europe then your guarantee moves with you to your new home subject to the following qualifications:
• The guarantee starts from the date you first purchased your product
• The guarantee is for the same period and to the same extent for labour and parts as exists in the new country of use for this brand or range of products
• This guarantee relates to you and cannot be transferred to another user
- Your new home is within the European Community (EC) or European Free Trade Area
• The product is installed and used in accordance with our instructions and is only used domestically, i.e. a normal household
• The product is installed taking into account regulations in your new country.
Before you move please contact your nearest Customer Care centre, listed below, to give them details of your new home. They will then ensure that the local Service Organisation is aware of your move and able to look after you and your appliances.
| France | Senlis | +33 | (0)3 44 62 28 28 |
| Germany | Nurenberg | +49 | (0)911 323 2600 |
| Italy | Pordenone | +39 | (0)1678 47053 |
| Sweden | Stockholm | +46 | (0)20 78 77 50 |
| UK | Slough | +44 | (0)1753 219898 |
| Eire | Dublin | +353 | (0) 14090770 |
INSTALLATION INSTRUCTIONS
Technical Information
Dimensions:
| Height | 85 cm |
| Width | 59.5 cm |
| Depth | 58 cm |
Maximum Dry Weight Loads:
| Cotton | 6 kg |
| 'Easycare' polyester/cotton(for minimum creasing) | 6 kg2 kg |
| Delicates | 2 kg |
Electrical Ratings
| Voltage | 220-240v |
| Frequency | 50Hz |
| Power rating | 2700w |
POSITIONING
Site Preparation
• The installation surface must be clean and dry.
• Do not install on a deep pile carpet.
- Do not install the appliance where the temperature may fall below freezing or rise above 35°C.
• Do not use a two way electrical adaptor or extension lead. The dryer must be connected to its own socket.
• Please ensure that when the appliance is installed it is easily accessible for the engineer in the event of a breakdown.
• Hot air emitted by the tumble dryer can reach temperatures of up to 60^ C. The flooring on which the tumble dryer is installed must therefore be heat resistant to a minimum of 60^ C.

The plug must be accessible after installation.
Venting - This appliance contains a retractable vent hose which must be extended to an open door or window during use.
ELECTRICAL CONNECTION

Any electrical work required to install this appliance should be carried out by a qualified electrician or competent person.
WARNING - THIS APPLIANCE MUST BE EARTHED
Before switching on make sure the electricity supply voltage is the same as that indicated on the appliance rating plate. The rating plate is located on the back panel of your tumble dryer.
CHANGING A FUSE
'Your tumble dryer will be fitted with one of two plugs. When replacing the fuse, always use ASTA approved 13A fuses to British Standard 1362.
Type 1: Prise out the fuse cover (A) with fuse (B). Change the fuse and refit both to the plug.

Important - The fuse cover must be refitted when changing a fuse. If the fuse cover is lost, the plug should not be used until a correct replacement is fitted. Replacements are identified by the colour insert or the colour embossed in words on the base of the plug. They are available from most electrical retail shops.
Type 2: Prise up the hinged fuse cover (A) as shown.
Replace the fuse and press the cover back into place.

FITTING A REPLACEMENT PLUG
Should the plug need to be replaced for any reason the wires in the mains lead are coloured in accordance with the following code:
Blue - Neutral 'N'
Brown - Live 'L'
Green and Yellow - Earth 'E'
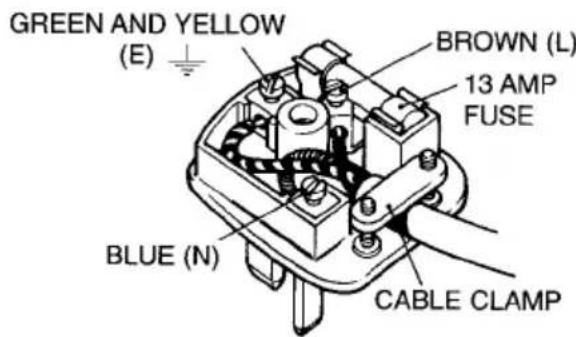
The GREEN & YELLOW wire must be connected to the terminal in the plug which is marked with the letter 'E' or by the earth symbol or coloured green or green and yellow.
The BLUE wire must be connected to the terminal marked with the letter 'N' or coloured black.
The BROWN wire must be connected to the terminal that is marked with the letter 'L' or coloured red.

A cut off plug inserted into a 13 amp socket is a serious safety (shock) hazard. Ensure that the cut off plug is disposed of safely.
ADDITIONAL
Door Reversal
Your dryer has a reversible door. To change the direction of the opening. Proceed as follows:
(Fig 1) - Open the door
- Undo screw (A)
- Remove switch strike (B) and replace screw
- Remove hinge block screws (E)
- Remove door from hinge blocks
(Fig 2) - Remove hinge screws (F) and hinge (G)
- Refit to the opposite side as shown
(Fig 3) - Refit latch plate (D) and screws (C)
- Remove screw (H) at top of door and refit switch strike (B) as shown
- Fit door to hinge blocks and secure with screws (E)
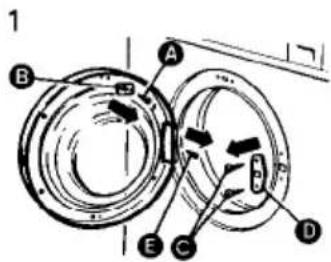
Fig. 1
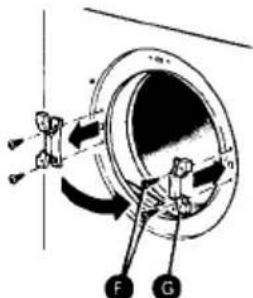
Fig. 2

Fig. 3
TRICITY BENDIX
Tricity Bendix, 55-77 High Street, Slough, Berkshire SL1 1DZ
Consumer care telephone number... 08705 950 950 (UK) 0752 01 409 0770 (EIRE)
- OPERATING & INSTALLATION INSTRUCTIONS
- IMPORTANT SAFETY INFORMATION
- Installation
- Child Safety
- During Use
- Service
- CONTENTS
- FOR THE USER Page
- Important Safety Information .....1
- Description of the Appliance ....3
- Programme Chart 4
- Hints & Tips on Drying ....5
- Operating Sequence......6
- Maintenance and Cleaning .....7
- Something Not Working......8
- Service and Spare Parts....9
- Customer Care 9
- Tricity Bendix Service Centre
- Addresses....10 - 11
- Guarantee Conditions 12
- FOR THE INSTALLER Page
- Installation Instructions ....13
- Electrical Connection ....14
- Additional 15
- DESCRIPTION OF THE APPLIANCE
- Temperature Button
- Time Selector Dial
- Programme Guide
- Filter
- Anti-crease Button
- Dryer On Indicator
- Air Inlet
- HINTS & TIPS ON DRYING
- Do not overload the appliance
- DO NOT use the tumble dryer to dry the following:
- OPERATING SEQUENCE
- Loading the laundry
- Selecting the programme
- When drying is complete
- MAINTENANCE AND CLEANING
- External Cleaning
- Cleaning the Lint Filter
- Cleaning the Door
- SOMETHING NOT WORKING
- Heater Cut-Out
- 5 929929 (UK) 0752 01 409 0770 (EIRE)
- CUSTOMER CARE
- GUARANTEE CONDITIONS
- Standard guarantee conditions
- Exclusions
- This guarantee does not cover:
- European Guarantee
- INSTALLATION INSTRUCTIONS
- Technical Information
- POSITIONING
- Site Preparation
- ELECTRICAL CONNECTION
- WARNING - THIS APPLIANCE MUST BE EARTHED
- CHANGING A FUSE
- FITTING A REPLACEMENT PLUG
- ADDITIONAL
- Door Reversal
- TRICITY BENDIX
Brand : Tricity Bendix
Model : TM 551
Category : Tumble dryer