TM 471 - Tumble dryer Tricity Bendix - Free user manual and instructions
Find the device manual for free TM 471 Tricity Bendix in PDF.


| Product Type | Tumble Dryer |
| Brand | Tricity Bendix |
| Model | TM 471 |
| Energy Class | C (est.) |
| Drum Capacity | 4.5 kg (est.) |
| Drying Programs | Cotton, Synthetics, Delicates, Timed Drying, Cool Air |
| Installation Type | Freestanding |
| Dimensions (H x W x D) | 85 x 60 x 58 cm (est.) |
| Weight | 35 kg (est.) |
| Power Supply | 220-240 V, 50 Hz |
| Power Consumption | 2500 W (est.) |
| Noise Level | 68 dB(A) (est.) |
| Drying System | Vented |
| Lint Filter | Removable, clean after each use |
| Safety Features | Thermal cut-off, door safety switch |
| Maintenance | Clean condenser (if applicable), check exhaust hose |
| Spare Parts Availability | Limited, mainly belts and filters |
Frequently Asked Questions - TM 471 Tricity Bendix
User questions about TM 471 Tricity Bendix
0 question about this device. Answer the ones you know or ask your own.
Ask a new question about this device
Download the instructions for your Tumble dryer in PDF format for free! Find your manual TM 471 - Tricity Bendix and take your electronic device back in hand. On this page are published all the documents necessary for the use of your device. TM 471 by Tricity Bendix.
USER MANUAL TM 471 Tricity Bendix
Better Products. Better Value.

natural_image
Illustration of various household appliances including refrigerator, washing machine, microwave, and kitchen appliance (no text or symbols)Operating and Installation Instructions
Model No.
TM 471
CONTENTS
| Warnings | Page | 3 |
| Installation | Page | 4-5 |
| Electrical Connections | Page | 6 |
| Use | Page | 7 |
| Control Panel | Page | 7 |
| Use Of Controls | Page | 7 |
| Drying Times | Page | 8 |
| Drying 4,5 kg (10 lb) of cotton | Page | 9 |
| Drying 2 kg (4.5 lb) of synthetics | Page | 9 |
| Hints On Drying | Page | 10 |
| Maintenance | Page | 11 |
| External Cleaning | Page | 11 |
| Cleaning The Door | Page | 11 |
| Cleaning The Filter | Page | 11 |
| Servicing | Page | 11 |
| Guarantee Conditions | Page | 12 |
| Service Centres | Page | 13-16 |
TECHNICAL SPECIFICATIONS
| DIMENSIONS: | Height: | 85 cm (33.5") |
| Width: | 60 cm (23.6") | |
| Depth: | 57 cm (22.4") | |
| Weight: | 29.5 kg | |
| ELECTRICAL CONNECTION: | Voltage: | 220-240 V/50 Hz |
| Max. Power Absorbed: | 2400 W (13 A) | |
| DRYING CAPACITY: | Cotton, Linen: | 4.5 kg (10 lb) |
| Synthetics, delicate fabrics: | 2 kg (4.5 lb) |
Important note
A special stacking kit is available through your dealer, to enable the mounting of the dryer on top of your washing machine.
The child safety catch
This tumble dryer incorporates a special child safety feature.
At the top, on the inside of the porthole door, you will notice a red catch, if this is removed it will prevent the machine from working. To remove, press the catch downwards (see picture). You MUST replace the catch to enable the appliance to work.
We advise that when the appliance is not in use it should be unplugged from the electricity supply.

natural_image
Technical diagram showing a hand holding a mechanical component, with no visible text or symbols.IT IS MOST IMPORTANT THAT THIS INSTRUCTION BOOK SHOULD BE RETAINED WITH THE APPLIANCE FOR FUTURE REFERENCE. SHOULD THE APPLIANCE BE SOLD OR TRANSFERRED TO ANOTHER OWNER, OR SHOULD YOU MOVE HOUSE AND LEAVE THE APPLIANCE, ALWAYS ENSURE THAT THE BOOK IS LEFT WITH THE APPLIANCE IN ORDER THAT THE NEW OWNER CAN GET TO KNOW THE FUNCTIONING OF THE APPLIANCE AND THE RELEVANT WARNINGS.
THESE WARNINGS ARE PROVIDED IN THE INTEREST OF SAFETY. YOU MUST READ THEM CAREFULLY BEFORE INSTALLING OR USING THE APPLIANCE.
■ Always switch off and unplug the appliance after use.
■ Any electrical work required to install this appliance should be carried out by a qualified electrician or competent person.
■ This appliance is designed to be operated by adults. Children should not be allowed to tamper with the controls or play with the product.
■ This product should be serviced by an authorised Service Centre, and only genuine Zanussi spare parts should be used.
■ It is dangerous to alter the specifications or modify this product in any way.
■ Care must be taken to ensure that the appliance does not stand on the electrical supply cable.
- You may notice that the drum in the tumble dryer is slightly off-centre. This is correct and is designed to eliminate the possibility of coins etc., being caught in the fluff filter.
■ Do not overload the appliance.
■ Never tumble dry items that have had contact with chemicals such as dry cleaning fluid. These are of a volatile nature and could cause an explosion.
■ Clothes which are dripping wet should not be placed in the dryer.
Always load well spun laundry.
The higher the spin speed the lower the electricity consumption and the shorter the drying times.
■ Leave the porthole door slightly ajar when not in use to preserve the door seal.
■ Fluff filter must be cleaned after every use.
■ Do not operate the appliance with a damaged filter or with no filter at all, as this may cause a fire.
■ Zanussi tumble dryers are designed to be vented through to the open air. The appliance should have its own ventilation system which should not be joined with any other ventilation system connected to any other appliance.
- In order to prevent the appliance from overheating, it is important that the condensation vents are not obstructed.
■ Pets or children have been known to climb into tumble dryers. Check your drum before use.
■ The users should always check that they have not left their gas lighters (disposable or otherwise) in their clothing.
■ The materials used on this appliance marked with the symbol ⬆ are recyclable.
Check with your local Council or Environmental Health Office to see if there are facilities in your area for re-cycling this appliance.
■ Under no circumstances should you attempt to repair the machine yourself. Repairs carried out by inexperienced persons may cause injury or serious malfunctioning. Refer to your local Zanussi Service Centre. Always insist on genuine Zanussi spare parts.
Positioning
The appliance may be placed in any room, provided the following precautions are taken.
The appliance expels hot, very moist air. The rest of the house must be able to easily absorb this moisture. Normally, absorption is only possible in houses where there is very little humidity. Otherwise, the room must have ventilation towards the outside; generally, an open door or window is enough.
The capacity of the venting circuit must be at least 150 m³/hour. Check that the air inlet and outlet vents are unobstructed.
The best way of evacuating the moisture is through a vent hose to the outside of the building. Use a special 100 mm diametre flexible hose (supplied with the appliance) connected to one of the air outlet vents with the collar supplied.
The unused outlet vent(s) must be covered. Never connect the air vent hose into an existing discharge pipe or duct, as this could be dangerous, might disturb neighbours and could cause the dryer to malfunction.
The maximum length of the vent hose may be:
4 metres with 2 bends, or
2 metres with 3 bends.
Advice: If the hose is long and the room temperature low, the moisture might condense to water inside the hose. This is an unavoidable natural phenomenon. To prevent this water from lying in the hose or flowing back into the tumble dryer, it is advisable to drill a small hole (dia. 3 mm) in the lowest point of the hose and to place a small container below it.
Connect the other end of the hose to an opening in a door or window. Fit a suitable shield or point the hose downwards to prevent any rain water and wind from getting in.
Rain and wind shields for placing over openings usually consist of valves or movable flaps. Periodically check the shield since strong winds and other factors (rust, dirt) can sometimes prevent it from opening, so causing problems with air venting.
If you use a rain shield, check that the openings in it are large enough to allow air to escape. Openings which are too small restrict the flow of air.
Problems can be encountered in rooms fitted with a very powerful central extractor fan. If you find that drying times are too long, switch off the extractor or close its grille whilst the tumble dryer is in use.
A highly effective solution is to simply poke the vent hose through a window or skylight. This might however cause problems in winter because the dryer will draw in very cold (and often also very damp) air through the open window, so increasing drying times and leading to very high energy consumption.
If the dryer is fitted next to kitchen units, make sure that the vent hose is not squashed. It the hose is partially squashed, drying efficiency will be reduced, resulting in longer drying times and higher energy consumption.
If the hose is completely squashed, the safety cut-outs with which the machine is fitted may operate.
Condensation discharge through a window

natural_image
Simple line drawing of a cabinet with a vertical support and dashed line indicating motion or force (no text or symbols)Condensation discharge through a vent hose
Condensation may be discharged either through a vent outlet provided at the back or through the front or right side outlet.
The vent hose collar is placed in the rear vent outlet.
natural_image
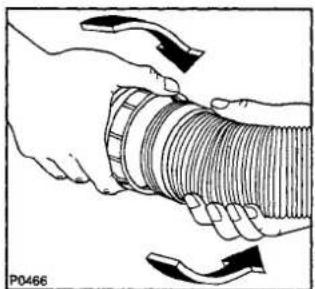
Illustration of hands holding a coiled hose with directional arrows indicating movement (no text or symbols)Remove the collar by pulling it out of the vent outlet. Attach the collar to the vent hose until tight.
Fit the collar into the required vent outlet by proceeding as follows:
Condensation discharge at the back

natural_image
Hand holding a hose with a directional arrow, no visible text or symbolsPush the vent hose with the collar firmly into the vent outlet.
Condensation discharge at the front

natural_image
Hand holding a square object with an arrow indicating rotation (no text or symbols)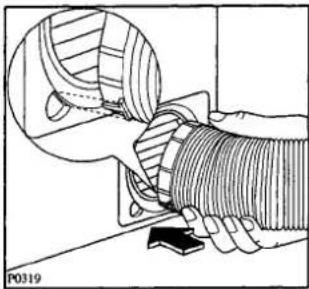
natural_image
Technical illustration of a hand holding a coiled spring or hose component, with no visible text or symbols.Remove the small cover and introduce the vent hose with the collar into the vent outlet. The tongue on the collar should correspond with the slot on the vent hole. Then push firmly to ensure secure fit.

If you use the front or side vent outlet, the cover you have removed should be placed at the back.
Note
The cover on the front vent outlet will only fit the rear vent outlet. The side vent outlet cover will ONLY fit the rear vent outlet, it will NOT fit the front vent outlet.

natural_image
Line drawing of a washing machine with attached tubing and paper clips (no text or symbols)The length of the vent hose must not be more than 4 m and it must not contain more than two bends when it is placed in position for operation.

natural_image
Diagram of a washing machine with a door and fan, crossed by diagonal lines (no text or symbols)You should NOT connect the flexible vent hose to, for example, a chimney or flue pipe designed to carry the exhaust from a fuel burning heating appliance.
The tumble dryer must be installed in a clean place, where dirt does not build up.

natural_image
Diagram of a mechanical device with internal components and directional arrows, no readable text or symbolsMake sure there are no obstructing items or materials near the air-intake louvres provided at the back (e.g. paper; rags etc.).
Important
When operating the tumble dryer, the room temperature must not exceed 35^ C, as it may affect the performance of the appliance.
To save energy, the room temperature should not be lower than +15°C.
natural_image
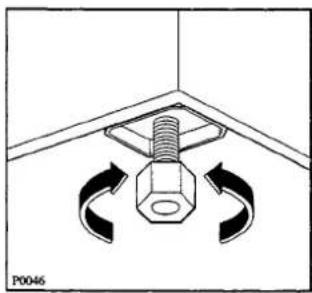
Technical diagram of a bolt and nut assembly with rotational arrows indicating motion (no text or symbols)Level the tumble dryer into place by screwing or unscrewing the front feet as required.
Accurate levelling will keep vibration and noise to a minimum when the dryer is in use.
Electrical Connections
WARNING:
THIS APPLIANCE MUST BE EARTHED.
The manufacturer declines any liability should this safety measure not be observed.
If the plug that is fitted to your appliance is not suitable for your socket outlet, it must be cut off, and the appropriate plug fitted.
Remove the fuse from the cut off plug. The cut off plug should then be disposed of to prevent the hazard of electric shocks in case it should be plugged into a 13 Amp socket in another part of your home.
IMPORTANT
The wires in the mains lead are coloured in accordance with the following code:
Green and Yellow - Earth
Blue - Neutral
Brown - Live
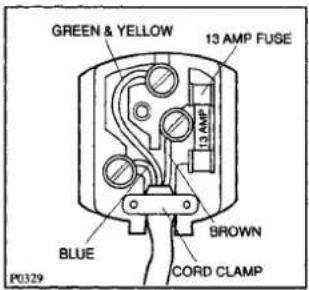
If you fit your own plug, the colours of the wires in the mains lead of your appliance may not correspond with the markings identifying the terminals in your plug.
To fit the plug, proceed as follows:
Connect the green and yellow (earth) wire to the terminal in the plug which is marked with the letter "E" or the earth symbol ± , or coloured green and yellow.
Connect the blue (neutral) wire to the terminal in the plug which is marked with the letter "N" or coloured black.
Connect the brown (live) wire to the terminal in the plug which is marked with the letter "L" or coloured red.
The plug moulded on to the lead incorporates a fuse. For replacement, use a 13 Amp BS1362 fuse. Only ASTA or BSI approved fuses should be used.
The plug must not be used if the fuse cover/carrier is lost. The cover/carrier is indicated by the coloured insert at the base of the plug.
A replacement cover/carrier must be obtained from your local Tricity Bendix Service Centre whose address is at the back of this book.
Avoid connecting the tumble dryer to the same socket as your washing machine (or any other appliance) by means of an adaptor. Have an extra socket installed if necessary, by a qualified electrician.
This appliance complies with E.E.C. Directive no. 87/308 of 2.6.87 relative to radio interference suppression.
Note
Installation, and, in particular, connection to the electric mains and to the discharge vent must be carried out by a competent person or qualified electricians.
Please ensure that when the appliance is installed it is easily accessible for the engineer, in the event of a breakdown.
Control Panel

1 CHECK FILTER LIGHT
This light comes on when you open the door at the end of the cycle or during drying to check the clothes to remind you that the filter should be cleaned at the end of the programme.
When you close the door the light goes off.
If you wish to leave the door ajar at the end of the programme to eliminate the steam, turn the selector knob one notch forward (to the right) from position «1» or «0» to switch off the light.
2 MAINS ON LIGHT
This light comes on when the machine starts.
3 HALF HEAT BUTTON
Press this button to reduce the temperature when you are drying particularly delicate cottons or linens.
This allows you to use the 120 minute sector of the timer (normally at full heat) as these items will take longer to dry at lower temperatures.
4 NO HEAT BUTTON
Press this button to operate the dryer without heat.
This is an ideal way of freshening already dry laundry.
5 DRYING TIME SELECTOR
The selector dial is marked with times in minutes corresponding with those on the chart (page 8).
To set the machine to the selected time, turn the dial clockwise until the time you want coincides exactly with the pointer.
The selector incorporates two drying cycles, one of up to 120 minutes at a high temperature for natural fabrics, and one of up to 80 minutes at a low temperature for synthetic fabrics.
Never attempt to turn the dial in an anticlockwise direction.
The selected time can be extended when the original programme is completed, by resetting the knob for a further period of drying.
It is better to select a time which is too short and then set the dial for a further period if necessary.
Select the drying time with the help of the programme guide.
Remember that during the last 8 minutes of the operation the heat is cut off in order to carry out a fabric cooling phase, which prevents any creasing or crumpling of the fabrics.
Cotton and Linen
Selector dial: up to 120 minutes (FULL HEAT section)
| Degree of drying required and labels on articles | Degree of spin given | Quantity | Selector dial setting |
| Store dry ☐ | 800 rpm | 10 lb (4.5 kg) | 80-95 mins |
| 5.5 lb (2.5 kg) | 55-65 mins | ||
| 1000-1200 rpm | 10 lb (4.5 kg) | 70-80 mins | |
| 5.5 lb (2.5 kg) | 45-55 mins | ||
| Iron dry ☐ | 800 rpm | 10 lb (4.5 kg) | 60-75 mins |
| 5.5 lb (2.5 kg) | 45-55 mins | ||
| 1000-1200 rpm | 10 lb (4.5 kg) | 55-65 mins | |
| 5.5 lb (2.5 kg) | 35-45 mins |
high temperature
Synthetics
Selector dial: up to 80 minutes (HALF HEAT section)
| Degree of drying required and labels on articles | Degree of spin given | Quantity | Selector dial setting |
| Store dry [IMAGE] | Short spin | 4.5 lb (2 kg) | 40-50 mins |
| 2.2 lb (1 kg) | 30-40 mins | ||
| 1.1 lb (0.5 kg) | 20-25 mins |
reduced temperature
If the laundry is spun in a washing machine at less than 800 rpm the residual dampness will be higher and consequently the drying time should be increased.
This applies particularly to laundry consisting primarily of towels.
If the laundry is spun at more than 1200 rpm, the residual dampness will be lower and consequently the drying time should be decreased.
Note: If you dry mixed loads (cotton and resistant synthetics, for example), select the drying time suitable for the most delicate fabric and increase the drying time by 10 mins.
DRYING 4.5 KG (10 LB) OF COTTON
You have for example just machine-washed and spun at 1200 rpm 4.5 kg (10 lb) of laundry.
They are cotton fabrics of medium weight which you want to iron as soon as they are dried.
1. Load the laundry

natural_image
Line drawing of a hand washing a garment with a cloth, no text or symbols presentOpen the door by pulling it outward.
Load the items one at a time, shaking them out loosely and close the door.
Please check the laundry does not get caught between the door and filter.
2. Depress the required button(s).
3. Select time and start the machine
natural_image
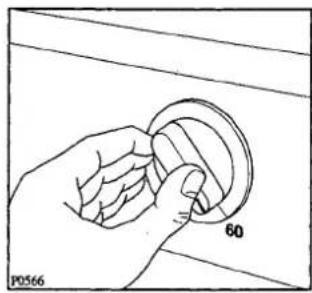
Hand holding a circular component with a 60-degree angle marker (no text or symbols on the object itself)Following the indications given in the drying times chart, turn the selector dial clockwise on the 60 minutes setting (in the "up to 120 minutes" section – high temperature).
The mains-on light will ill- luminate and the dryer starts to work.
4. When drying is completed
The machine stops automatically and the mains-on light goes out.
If the laundry is still too damp, select a further brief drying time, bearing in mind that during the last 8 minutes the dryer carries out the cooling and anti-crease treatment phase.
Clean the filter after every drying programme. A clean filter ensures correct functioning of the appliance.
To switch off the check filter light if the door is left ajar proceed as explained on page 7.
DRYING 2 KG (4.5 LB) OF SYNTHETICS
You have for example just machine-washed and briefly spun 2 kg (4.5 lb) of synthetics which do not need ironing.
1. Load the laundry

natural_image
Line drawing of hands washing a washing machine with a cloth (no text or symbols)Open the door by pulling it outward.
Load the items one at a time, shaking them out loosely and close the door.
Please check the laundry does not get caught between the door and filter.
2. Select time and start the machine

Following the indications given in the drying times chart, turn the selector dial clockwise on the 40 minutes setting (in the "up to 80 minutes" section – low temperature).
The mains-on light will ill- luminate and the dryer starts to work.
3. When drying is completed
The machine stops automatically and the mains-on light goes out.
If the laundry is still too damp, select a further brief drying time, bearing in mind that during the last 8 minutes the dryer carries out the cooling and anti-crease treatment phase.
Clean the filter after every drying programme. A clean filter ensures correct functioning of the appliance.
To switch off the check filter light if the door is left ajar proceed as explained on page 7.
■ Do not overload the appliance.
Here is a list of the average of the more common laundry items according to an approximate basis.
| Sheet | 700 to 1000 g |
| Pillowcase | 100 to 200 g |
| Tablecloth | 400 to 500 g |
| Table napkin | 50 to 100 g |
| Kitchen towel | 70 to 120 g |
| Linen hand towel | 100 to 150 g |
| Hand towel | 150 to 250 g |
| Bath towel | 700 to 1000 g |
| Bathrobe | 1000 to 1500 g |
| Shirt | 200 to 300 g |
| Apron | 150 to 200 g |
However, the best and most economical load is the maximum indicated for the different types of fabric.
■ Always load well spun laundry. The higher the spin speed the lower the electricity consumption and the shorter the drying times.
■ Do not leave the damp laundry load in a heap too long before drying.
■ Sort the laundry out: Separate synthetics from cotton and linen and dry them separately.
- Close poppers and zips and fasten any buttons found loose.
■ Do not use the tumble dryer to dry the following:
- Dry-cleaned fabrics or fabrics cleaned with chemical solvents.
- Woollen garments and those manufactured from synthetic/wool mixtures of the heat-shrinkable type.
- Very delicate articles such as silk and curtains made of synthetic material.
- Foam-rubber articles.
- Fibre-glass articles.
■ In some cases labels on articles may also be of help.
Vigorous drying (high temperature)
Delicate drying (reduced temperature)
Do not tumble dry
■ Avoid drying dark clothes with light coloured fluffy items such as towels as they could attract the fluff.
- If you overdry the laundry, besides wasting energy, any subsequent ironing may become more difficult because fabric could be heavily crumpled.
■ Remove the laundry when the dryer has finished drying.
■ To avoid a static charge when drying is completed, use either a fabric softener when you are washing the laundry or a fabric conditioner specifically for tumble dryers.
■ When you have finished tumble drying do not forget to clean the filter.
If the filter is dirty, drying times are increased considerably and consequently energy consumption is also increased.
Important
You must disconnect the appliance from the electricity supply, before you can carry out any cleaning or maintenance work.
External Cleaning
Use only soap and water and then dry thoroughly.
From time to time, apply a little wax furniture cream with a soft cloth.
Important: do not use methylated spirit, diluents or similar products.
Cleaning The Door
natural_image
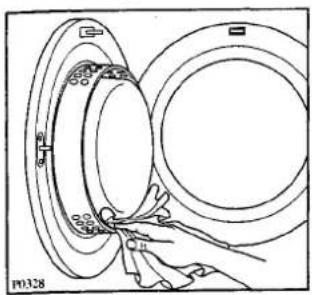
Line drawing of a hand placing circular components into a ring (no text or symbols)Clean periodically the interior part of the door to remove any fluff. Accurate cleaning ensures correct drying.
Cleaning The Filter
natural_image
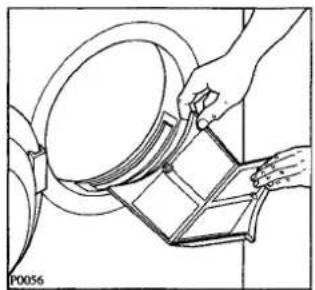
Technical line drawing of a mechanical assembly with hands and components (no text or symbols)Your dryer will only function well if the filter is clean.
The filter collects all the "fluff" which accumulates during drying and it must therefore be removed and cleaned at the end of each programme.
The filter is composed of
two parts to facilitate cleaning.
To remove the filter it is sufficient to lift it up.
It is perfectly normal for fluff to accumulate in the filter during drying. In fact, even fabrics dried in the open air lose their fibres, but we do not notice it.
SERVICING
Before contacting your local Service Centre, please make the following checks:
The dryer does not start up
■ The door is open
■ The plug is not fitted into the wall socket
■ There is no electricity supply from the wall socket
■ The time selector dial is not set correctly
■ The child safety catch is not in position
The dryer does not dry properly
■ The filter is clogged
■ Insufficient drying time
■ Excessive laundry load
■ The dryer is not correctly installed
■ The NO HEAT or HALF HEAT button has been depressed
If, after these checks, there is still a fault, call your local Service Centre, whose address can be found on page 13. Please make sure you give the model and serial number of the appliance.

This information can be found on the rating plate (see picture) or on the guarantee card.
Original spare parts can be purchased from Service Centres.
In-guarantee customers should ensure that the above checks have been made as the engineer will make a charge if the fault is not a mechanical or electrical breakdown.
Please note that proof of purchase is required for any in-guarantee service calls.
TRICITY BENDIX
GUARANTEE CONDITIONS
We, Tricity Bendix, undertake that if within 12 months of the date of the purchase this Tricity Bendix appliance or any part thereof is proved to be defective by reason only of faulty workmanship or materials, we will, at our option repair or replace the same FREE OF ANY CHARGE for labour, materials or carriage on condition that:
■ The appliance has been installed correctly and used only on the electricity supply stated on the rating plate.
The appliance has been used for normal domestic purposes only, and in accordance with the manufacturer's operating and maintenance instructions.
■ The appliance has not been serviced, maintained, repaired, taken apart or tampered with, by any person not authorised by us.
All service work under this guarantee must be undertaken by a Tricity Bendix service representative or authorised agent.
Any appliance or defective part replaced shall become the property of Tricity Bendix.
This guarantee is in addition to your statutory and other legal rights.
Home visits are made between 8.30 am and 5.30 pm Monday to Friday. Visits may be available outside these hours in which case a charge will be made.
EXCLUSIONS
This guarantee does not cover:
■ Damage or calls resulting from transportation, improper use or neglect, the replacement of any light bulbs or removable parts of glass or plastic, or vacuum cleaner drive belts, brushes or dust bags.
■ Costs incurred for calls to put right an appliance which is improperly installed or calls to appliances outside the United Kingdom.
■ Appliances found to be in use within a commercial environment, plus those which are subject to rental agreements.
■ Products of Tricity Bendix manufacture which are not marketed by Tricity Bendix.
■ EEC Countries. The standard guarantee is applicable but subject to the owners responsibility and cost to ensure the appliance meets the standards set by the country to which the product is taken. Proof of purchase may be required. Electrolux Aftersales Service in the country concerned, with whom Tricity Bendix have an arrangement, will be pleased to advise further.
Tricity Bendix After Sales Service Service Centre Addresses 13/01/94
| CENTRE | POSTAL DISTRICTS | SERVICE APPOINTMENTS | ADDRESS |
| ABERDEEN | AB | 0224-696569 | Electrolux After Sales ServiceNortheast Appliance Service8 Comhill ArcadeComhill DriveAberdeenAB2 5UT |
| ARGYLLE | PA24-61 | 0505-321316 | Electrolux After Sales ServiceT.D.C. Refrigeration40 Arran PlaceLinwoodRenfrewshirePA3 3QU |
| BARNSTAPLE | EX18-23, 31-39 | 0271-328826 | Electrolux After Sales ServiceMc Bain RefrigerationUnit 4 Upcott AvenuePottington Industrial EstateBarnstapleN. DevonEX31 1HN |
| BORDERS | TD | 0573-224411 | Electrolux After Sales ServiceJames Stewart & Son2-8 Wood MarketKelso,BordersTD5 7AX |
| BOURNE | PE1-15PE34,38NG31-34 | 0778-394424 | Electrolux After Sales ServiceBourne ElectricalPinfold RoadManning Road Industrial EstateBourneLinconshirePE10 9HT |
| CANVEY | E EC EN N NW W WCAL CB HA LU MK SGUB WDIP NR CM CO IG RM SSPE16-19,30-33, 35-37 | 081-443-3464081-965-9699081-965-96990268-6941440268-694144 | Electrolux After Sales Service2-4 SandhurstKings RoadCanvey IslandSS8 0QY |
| CARDIFF | CF NP1-4,6,9-44 SA1-18SA21-32 | 0222-460131 | Electrolux After Sales ServiceGuardian Industrial EstateClydesmuir RoadTremorfaCardiffCF2 2QS |
| CUMBRIA | CA | 0228-594747 | Electrolux After Sales ServiceETB ServicesCarlisle Enterprise CentreJames StreetCarlisleCA2 5AP |
| DUMFRIES &GALLOWAY | DG1-14 | 0387-65166 | Electrolux After Sales ServiceAllan Crossan (service)93 Irish StreetDumfriesScotland |
Tricity Bendix After Sales Service Service Centre Addresses 13/01/94
| CENTRE | POSTAL DISTRICTS | SERVICE APPOINTMENTS | ADDRESS |
| DUNDEE | DD1-14PH8-18 | 0250-876285 | Electrolux After Sales ServiceI Brogan Domestic1 Lochinblair GardensDunkeld RoadBlairgowriePerthshirePH10 6GA |
| FIFE | KY1-16PH1-7 | 0592-610590 | Electrolux After Sales ServiceM & H Appliances8 Eddison HouseFullerton RoadQueensway Industrial EstateGlenrothesFifeKY7 5QR |
| GLASGOW | G KA ML PA1-23EH FK ZE | 041-647-4381 | Electrolux After Sales Service20 Cunningham RoadClyde EstateRutherglenGlasgowG73 1PP |
| GUERNSEY | All Codes | 0481- 46931 | Guernsey ElectricityPO Box 4.Vale GuernseyChannel Island |
| HAVERFORDWEST | SA33-39SA41-44SA61-73 | 0437-710914 | Electrolux After Sales ServiceC Butherway1 Church RoadRochHavefordwestDyfedSA62 6AG |
| HEREFORD | HR1-9LD1-8SY7,18NP5NP7-8 | 0432-340334 | Electrolux After Sales ServiceDomestic Repair CentreUnit 3 Bank BuildingsCattle MarketHerefordHR4 9HX |
| HULL | YO4YO11-18YO25HU1-19DN14 | 0482-585678 | Electrolux After Sales ServiceJohn SizerUnit 1 Boulevard UnitFactory EstateHullHU3 4 AY |
| INVERNESS | IV1-28, 30-36, 40-49, 51-56PH19-26, 30-44KW1-14 | 0463-792952 | Electrolux After Sales ServiceHighland AppliancesUnit 3B3 Smithton Industrial EstateSmithtonInverness |
| ISLE OF WIGHT | PO30-41 | 0983-872552 | Electrolux After Sales ServiceWyatts Electrical Service4 Forelands RoadBembridgeI O WP035 5XW |
Tricity Bendix After Sales Service Service Centre Addresses 13/01/94
| CENTRE | POSTAL DISTRICTS | SERVICE APPOINTMENTS | ADDRESS |
| JERSEY | ALL CODES | 0534-505050 | Jersey Electricity CompanyPO Box 45 Queens RoadSt Helier JE4 8NYJerseyChannel Islands |
| LAMPETER | SA19,20SA40SA45-48SY23-25 | 0570-423020 | Electrolux After Sales ServiceLampeter Domestic Appliance ServiceUnit 16 Lampeter Industrial EstateLampeterSA48 7DY |
| LANCASTER | LA1-23 | 0772-316175 | Electrolux After Sales ServiceNL ServicesUnit 333 Ranglet RoadWalton SummitBamber BridgePrestonLancsPR5 8AR |
| LEEDS | BD DN1-7.10-12 HD HG HXLS S WF YO1-3.5-8 DENG1-22 & 25 | 0532-608511 | Electrolux After Sales Service64-66 Cross Gates RoadLeedsLS15 7NN |
| LINCOLN | DN21sub codes 1,2 & 5 onlyLN1,2,4-6LN3 sub codes 4,5 onlyLN8-10NG23,24PE20-25 | 0522-514603 | Electrolux After Sales ServiceBrian HudsonUnit 8 Stonefield ParkClifton StreetLincolnLN5 8AA |
| NEWTON ABBOTT | EX1-17TQPL1-9,16,19-21 | 0626-65909 | Electrolux After Sales ServiceSouth West Domestic ServiceUnit 2 Zealley Industrial EstateKingsteigntonNewton AbbottSouth DevonTQ12 3SJ |
| NORTH WALES | LL | 0745-591616 | Electrolux After Sales ServiceGMS (Cymru)Unit 2 Coed - ParcAbergele RoadRhuddianClwydLL18 5UG |
| NORTHERN | DL TS DH YO21,22DH NE SRFY PR WN BBBL M OL SKCH CW L WA | 0325-301400091-493-20250282-7746210282-774621051-2541724 | Electrolux After Sales ServicePO Box 40 Preston RoadAycliffe Industrial EstateNewton AycliffeCo. DurhamDL5 6 XA |
| NORTHERNIRELAND EAST | BT1-30, 36-57, 63-67 | 0232-746591 | Electrolux After Sales ServiceUnit C3Edenderry Industrial Estate326, Crumlin RoadBelfastBT14 7EE |
Tricity Bendix After Sales Service Service Centre Addresses 13/01/94
| CENTRE | POSTAL DISTRICTS | SERVICE APPOINTMENTS | ADDRESS |
| NORTHERN IRELAND WEST | BT31-35, 60-62, 68-82, 92-94 | 0861-510400 | Electrolux After Sales ServiceG & O (Armagh) ServiceOwenmore HouseKilwee Business ParkUpper Dunmurray LaneBelfastBT17 OHD |
| NUNEATON | B DY ST TFWR WS WVGL HP NN OX RG SL SNCV LE | 021-358-7076021-358-50510993-7044110203-354424 | Electrolux After Sales ServiceUnit 23-24 Alliance Business ParkTownsend DriveNuneatonWarwickshireCV11 6RX |
| REDRUTH | TR1-20,26,27PL10-15,17,18, 22-35 | 0209-314407 | Electrolux After Sales ServiceCornwall Domestic ServiceUnit 7D Pool Industrial EstateWilson WayRedruthCornwallTR15 3QW |
| SHREWSBURY | SY1-6SY8-17SY19-22 | 0743-450279 | Electrolux After Sales ServiceBLI Service6 Harlescott BarnHarlescott LaneShrewsburySY1 3SY |
| SOUTH HUMBERSIDE | DN8,9DN15-20DN21 Sub codes 3,4 onlyDN31-40LN(3 sub code 6 only),7LN11-13 | 0472-267978 | Electrolux After Sales ServiceJohn Robinson ( Electrical)Unit 74 New Enterprise CentreKing Edward StreetGt. GrimsbyDN31 3JP |
| SOUTHERN | BN16-18. BH DT SO SPBA BS PO1-22. TA TR21-25 | 0705-6674110272-211876 | Electrolux After Sales ServiceLimberline RoadHilseaPortsmouthHampshirePO3 5JJ |
| TONBRIDGE | CT DA ME GU1-26. TNBN1-15 RHTW BR CR SE SW SM KT | 0732-3577220273-694341081-658-9069 | Electrolux After Sales Service61-63 High StreetTonbridgeKentTN9 1SD |
D930701A
TRICITY BENDIX

Better Products. Better Value.
Tricity Bendix, 99 Oakley Road, Luton, Beds LU 4 9QQ
Model No.
TM 471
A DIVISION OF EMACO LIMITED. REGISTERED IN ENGLAND NO. 176547
TW
11 12 / 94
Part No. 125998803
- CONTENTS
- Important note
- The child safety catch
- Positioning
- Condensation discharge through a vent hose
- Condensation discharge at the front
- Note
- Important
- Electrical Connections
- WARNING:
- THIS APPLIANCE MUST BE EARTHED.
- Control Panel
- CHECK FILTER LIGHT
- MAINS ON LIGHT
- HALF HEAT BUTTON
- NO HEAT BUTTON
- DRYING TIME SELECTOR
- DRYING 4.5 KG (10 LB) OF COTTON
- Load the laundry
- Depress the required button(s).
- Select time and start the machine
- When drying is completed
- DRYING 2 KG (4.5 LB) OF SYNTHETICS
- Select time and start the machine
- When drying is completed
- External Cleaning
- SERVICING
- Before contacting your local Service Centre, please make the following checks:
- The dryer does not start up
- The dryer does not dry properly
- TRICITY BENDIX
- GUARANTEE CONDITIONS
- EXCLUSIONS
Brand : Tricity Bendix
Model : TM 471
Category : Tumble dryer