DX-26L100A13 - Television Dynex - Free user manual and instructions
Find the device manual for free DX-26L100A13 Dynex in PDF.


| Product Type | LCD TV |
| Brand | Dynex |
| Model | DX-26L100A13 |
| Screen Size (Diagonal) | 26 inches |
| Display Resolution | 720p (1366 x 768) |
| Aspect Ratio | 16:9 |
| Refresh Rate | 60 Hz |
| Contrast Ratio (Typical) | 800:1 |
| Dynamic Contrast Ratio | 1300:1 |
| Brightness (Typical) | 250 cd/m² |
| Response Time | 5 ms |
| Viewing Angle (Horizontal/Vertical) | 140° / 140° |
| Dimensions with Stand (W x H x D) | 26.2 x 18.4 x 7.9 inches |
| Dimensions without Stand | 26.2 x 16.9 x 4.1 inches |
| Weight with Stand | 15.4 lbs (7.0 kg) |
| Weight without Stand | 14.52 lbs (6.6 kg) |
| Power Consumption (On) | 75 W |
| Power Consumption (Standby) | Less than 1 W |
| Power Input | 120 V, 60 Hz |
| HDMI Inputs | 3 (side panel) |
| Component Video Inputs | 1 (side panel) |
| Composite Video Input | 1 (side panel) |
| PC/VGA Input | 1 (side panel) |
| USB Port | 1 (side panel, supports JPEG and firmware upgrade) |
| Digital Audio Output | 1 coaxial (side panel) |
| Analog Audio Output | 1 (side panel) |
| Headphone Jack | 1 (side panel) |
| VESA Mount Pattern | 200 x 100 mm |
| Audio Power (Speakers) | 6 W per channel (2 speakers) |
| TV Tuner | Analog NTSC, Digital ATSC/Clear-QAM |
| Parental Control (V-Chip) | Yes (version 2.0) |
| Sleep Timer | Yes (up to 240 minutes) |
| Closed Captioning | Yes (analog and digital) |
| OSD Languages | English, French, Spanish |
| Warranty | 1 year (parts and labor) |
Frequently Asked Questions - DX-26L100A13 Dynex
User questions about DX-26L100A13 Dynex
0 question about this device. Answer the ones you know or ask your own.
Ask a new question about this device
Download the instructions for your Television in PDF format for free! Find your manual DX-26L100A13 - Dynex and take your electronic device back in hand. On this page are published all the documents necessary for the use of your device. DX-26L100A13 by Dynex.
USER MANUAL DX-26L100A13 Dynex
Important Safety Instructions 2
Warning 2
Caution 3
Installing the stand or wall-mount bracket 4
Installing the stand 4
Installing a wall-mount bracket....4
TV components 4
Package contents 4
Front 5
Back and Side 5
Remote control 1 ....6
Remote control 2 ....7
Making connections 8
What connection should I use? 8
Connecting power 9
Connecting a cable or satellite box 9
Connecting an antenna or cable TV (no box) 11
Connecting a DVD or Blu-ray player 12
Connecting a VCR....14
Connecting a camcorder or game console 14
Connecting a computer 15
Connecting a USB flash drive 16
Connecting headphones....16
Connecting a basic home theater system 17
Connecting a home theater system with multiple devices ..... 17
Using the remote control 17
Installing remote control batteries 17
Aiming the remote control 18
Turning on your TV for the first time 18
Understanding the basics 19
Turning your TV on or off 19
Selecting the video input source 19
Using the on-screen menus 19
Navigating the menus 20
Selecting a channel 20
Adjusting the volume 21
Viewing program information 21
Adjusting the picture ....21
Adjusting the TV picture 21
Adjusting the computer image 22
Adjusting the sound 22
Adjusting sound settings 22
Playing TV audio only 23
Changing channel settings 24
Automatically scanning for channels 24
Hiding channels 24
Setting up a favorite channel list 25
Viewing a favorite channel 25
Adding or changing a channel label 25
Checking the digital signal strength 26
Setting parental controls 26
Setting or changing the password 26
Locking control buttons 27
Setting parental control levels 27
Downloading rating information 28
Using closed captioning 29
Turning closed captioning on or off 29
Selecting the analog closed captioning mode 30
Customizing digital closed captioning styles 30
Adjusting time settings ....31
Setting the clock 31
Setting the sleep timer 31
Adjusting menu settings ....32
Selecting the menu language 32
Labeling an input source 32
Restoring settings to default 33
Using a USB flash drive ....33
Switching to USB mode 33
Browsing photos 33
Viewing your favorite photos 34
Viewing photos in a slideshow 34
Customizing slideshow settings 35
Maintaining 35
Cleaning 35
Servicing 36
Troubleshooting ....36
Video and audio 36
Remote control 37
General 37
Specifications 38
Programming universal remote controls 39
Programming a different universal remote control 39
For additional help and information....39
Common universal remote control codes 39
Legal notices ....40
One-year limited warranty - Dynex Televisions .....41
Definitions: 41
How long does the coverage last? 41
What does this warranty cover? 41
How to obtain warranty service? 41
Where is the warranty valid? 41
What does the warranty not cover? 41
CHILD SAFETY
It makes a difference how and where you use your flat panel display
As you enjoy your new product, keep these safety tips in mind
The issue
The home theater entertainment experience is a growing trend, and larger TVs are popular purchases. However, TVs are not always supported on the proper stands or installed according to the manufacturer's recommendations. We and the consumer electronics industry are committed to making home entertainment enjoyable and safe.
TVs that are inappropriately placed on dressers, bookcases, shelves, desks, speakers, chests, or carts may fall over and cause injury.
Tune into safety
- One size of TV stand does not fit all. Use only a TV stand rated for the weight of your TV.
- Carefully read and understand all enclosed instructions for proper use of this product.
- Don't let children climb on or play with entertainment system furniture and TVs.
- Don't place TVs on furniture that can easily be used as steps, such as a crate or chest of drawers.
- Remember that children can become excited while watching a program, especially on a “larger-than-life” TV. Make sure that you place or install the TV where it cannot be pushed, pulled over, or knocked down.
• Make sure that you route all cords and cables so that they cannot be pulled or grabbed by curious children.

Wall mounting
If you decide to wall mount your TV, always remember:
- One size of wall mount does not fit all. Use only a wall mount rated for the weight of your TV and that has been recommended by this TV manufacturer, listed in this manual, or otherwise listed by an independent laboratory as suitable for your TV.
- Follow all instructions supplied by the TV and wall mount manufacturers.
- If you have any doubts about your ability to safely wall mount your TV, get help from a professional installer.
- Make sure that the wall where you are mounting the TV is appropriate. Some wall mounts are not designed to be mounted to walls backed with steel studs or cinder blocks. If you are unsure, ask a professional installer.

CEA
Consumer Electronics Association
• TVs can be heavy. At least two people are required for safe wall mount installation.
Important Safety Instructions


This symbol indicates that dangerous voltage constituting a risk of electric shock is present within your TV. This label is located on the back of your TV.

This symbol indicates that there are important operating and maintenance instructions in the literature accompanying your TV.
1 Read these instructions.
2 Keep these instructions.
3 He e ed a ll w a r n i n g s .
4 Follow all instructions.
5 Do not use this apparatus near water.
6 Clean only with dry cloth.
7 Do not block any ventilation openings. Install in accordance with the manufacturer's instructions.
8 Do not install near any heat sources such as radiators, heat registers, stoves, or other apparatus (including amplifiers) that produce heat.
9 Do not defeat the safety purpose of the polarized or grounding-type plug. A polarized plug has two blades with one wider than the other. A grounding type plug has two blades and a third grounding prong. The wide blade or the third prong are provided for your safety. If the provided plug does not fit into your outlet, consult an electrician for replacement of the obsolete outlet.
10 Protect the power cord from being walked on or pinched particularly at plugs, convenience receptacles, and the point where they exit from the apparatus.
11 Only use attachments/accessories specified by the manufacturer.
12 Use only with the cart, stand, tripod, bracket, or table specified by the manufacturer, or sold with the apparatus. When a cart is used, use caution when moving the cart/apparatus combination to avoid injury from tip-over.

S3125A
13 Unplug this apparatus during lightning storms or when unused for long periods of time.
14 Refer all servicing to qualified service personnel. Servicing is required when the apparatus has been damaged in any way, such as power-supply cord or plug is damaged, liquid has been spilled or objects have fallen into the apparatus, the apparatus has been exposed to rain or moisture, does not operate normally, or has been dropped.
15 The wall plug is the disconnecting device. The plug must remain readily operable.
16 An apparatus with three-prong, grounding-type plug is a Class I apparatus which needs to be grounded to prevent possible electric shock. Make sure that you connect the Class I apparatus to a grounding-type, three-prong outlet.
17 Remote control batteries should not be exposed to excessive heat such as sunshine, fire, or the like.
18 The apparatus should not be exposed to dripping or splashing and no objects filled with liquids, such as vases, should be placed on the apparatus.
Warning
Electric shock hazard
To reduce the risk of fire or electric shock, do not remove any cover or expose the device to rain or moisture. No user-serviceable parts are inside. Refer servicing to qualified service technicians.
Lightning
For added protection for your device receiver during a lightning storm, or when it is left unattended and unused for long periods of time, unplug it from the power outlet and disconnect any antenna or cable system. This helps prevent property damage and personal injury from lightning and power line surges.
Power lines
An outside antenna system should not be located in the vicinity of overhead power lines or other electric light or power circuits, or where it can fall into such power lines or circuits. When installing an outside antenna system, extreme care should be taken to keep from touching such power lines or circuits as contact with them might be fatal.
Handling the LCD panel
- Your TV's screen is made of glass. Do not drop your TV or hit, jolt, or press hard against the LCD panel. If the screen breaks, be careful of broken glass.
- If the LCD panel is broken, make absolutely sure that you do not touch the liquid in the panel. This may cause skin inflammation.
- If the liquid gets in your mouth, immediately gargle, rinse, and consult with your doctor. Also, if the liquid gets in your eyes or touches your skin, consult with your doctor after rinsing for at least 15 minutes or longer in clean water.
Replacement parts
When replacement parts are required, make sure that the service technician uses replacement parts specified by the manufacturer that have the same characteristics as the original part. Unauthorized substitutions may result in fire, electric shock, personal injury, or other hazards.
Safety check
After completing any service or repair to this device, ask the service technician to perform routine safety checks to determine that your TV is in correct operating condition.
Power source
Operate your TV only from the type of power source indicated on the marking label. If you are not sure of the type of power supplied to your home, consult an electrician or your local power company.
Servicing
These servicing instructions are for use by qualified service personnel only. To reduce the risk of electric shock, do not perform any servicing other than that contained in the operating instructions unless you are qualified to do so.
Caution
Damage requiring service
Unplug this TV from the power outlet and refer servicing to qualified service personnel under the following conditions:
- When the power supply cord or plug is damaged or frayed.
- If liquid has been spilled or objects have fallen into your TV.
- If your TV has been exposed to rain or water.
- If your TV does not operate normally by following the operating instructions. Adjust only those controls that are covered by the operating instructions because incorrect adjustment of other controls may result in damage and will often require extensive work by a qualified technician to restore your TV to its normal operation.
- If your TV has been dropped or damaged in any way.
- When your TV exhibits a distinct change in performance.
Outdoor antenna grounding
If an outside antenna or cable system is connected to your TV, make sure that the antenna or cable system is grounded to provide some protection against voltage surges and built-up static charges. Article 810 of the National Electrical Code, ANSI/NFPA No. 70, provides information with respect to correct grounding of the mast and supporting structure, grounding of the lead-in wire to an antenna discharge unit, size of grounding conductors, location of the antenna-discharge unit, connection to grounding electrodes, and requirements for the grounding electrode.
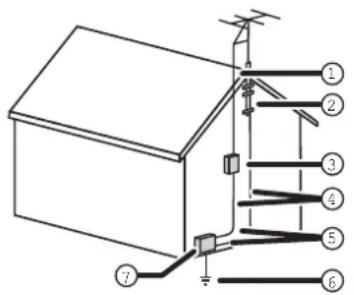
① Antenna lead-in wire
② Grounding clamp
③ Antenna discharge unit
④ Grounding conductors
⑤ Ground clamps
⑥ Power service grounding electrode system
⑦ Electric service equipment
Note to CATV system installer
Article 820 of the National Electrical Code, ANSI/NFPA No. 40 provides guidance for correct grounding. Specifically, it states that the cable ground must be connected to the grounding system of the building as close to the point of cable entry as practical.
Condensation
Moisture will form on the TV if the TV is brought from cool surroundings into a warm room or if the temperature of the room rises suddenly. When this happens, the TV's performance may be impaired. To prevent this, let the TV stand in its new surroundings for about an hour before switching it on, or make sure that the room temperature rises gradually.
Condensation may also form during the summer if the TV is exposed to the breeze from an air conditioner. In such cases, change the location of the TV.
Mobile telephone warning
To avoid interference with your TV picture and sound, operating problems, or even damage, keep your cordless and cellular telephones away from the TV.
End of life directives
Your TV contains tin-lead solder and a fluorescent lamp containing a small amount of mercury. Disposal of these materials may be regulated for environmental reasons. Your TV also contains material that can be recycled and reused. For disposal or recycling information, contact your local authorities to find a recycler in your area.
Non-active pixels
The LCD panel contains almost 3 million thin film transistors, which provide exceptionally sharp video quality. Occasionally, a few non-active pixels may appear on the screen as a fixed blue, green, or red point. These non-active pixels do not adversely affect the performance of your TV, and are not considered defects.
Installing the stand or wall-mount bracket
Notes
- If you plan to wall-mount your TV, do not install the stand.
- Store the stand and stand screws in case you decide to use the stand in the future.
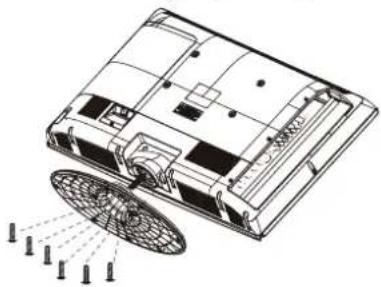
Installing the stand
1 Carefully place your TV screen face-down on a cushioned, clean surface to protect the screen from damages and scratches.
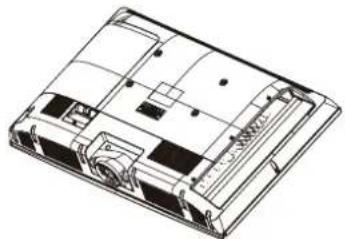
2 Secure the stand to the stand column on the TV with the six screws M4 type (16 mm) provided.
Installing a wall-mount bracket
Warning
This apparatus is intended to be supported by a UL Listed wall mount bracket.
To attach your TV to a wall-mount bracket:
1 Carefully place your TV screen face-down on a cushioned, clean surface to protect the screen from damages and scratches. If the base is not connected, skip to Step 3.
2 Remove the six screws that secure the base to the stand, then remove the base.
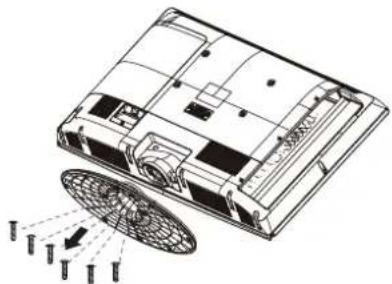
3 Attach the wall-mount bracket to your TV using the mounting holes on the back of your TV. See the instructions that came with the wall-mount bracket for information about how to correctly hang your TV.
Note
The length of the M4 wall-mount screws vary depending on the wall-mount bracket you purchased. See the instructions that came with the wall-mount bracket for screw lengths.

TV components
Package contents
• Remote control and batteries (2 AAA)
- Stand with screws
• Quick Setup Guide
• Important Information
Front Back and Side
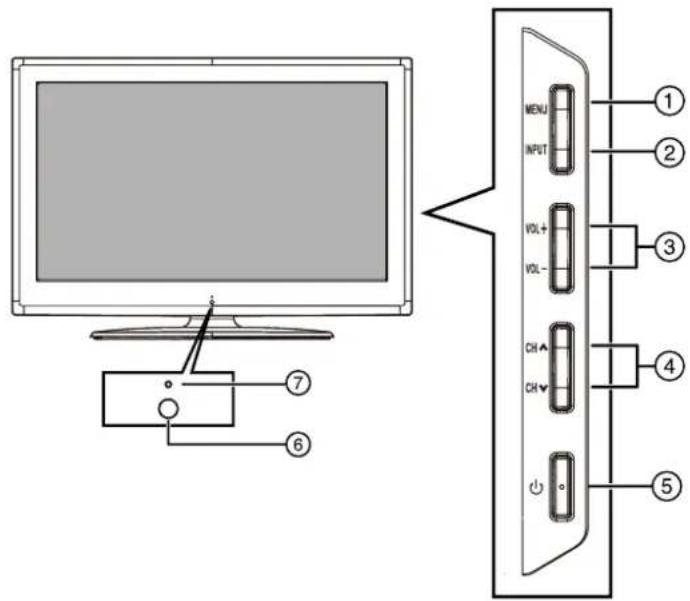
| # Item Description | ||
| 1 | MENU | Press to open the on-screen menu. For more information, see “Navigating the menus” on page 20. |
| 2 | INPUT | Press to open the INPUT SOURCE list, then press CH or CH to select a video input source. For more information, see “Selecting the video input source” on page 19. |
| 3 | VOL+/VOL- Press to increase or decrease the volume. | |
| 4 | CH /SH √ | Press to go to the next or previous channel in the channel list. |
| 5 | ○ (Power) | Press to turn your TV on or off (standby mode). When your TV is in standby mode, power still flows through it. To completely disconnect power, unplug the power cord. |
| 6 | Remote sensor | Receives the signals from the remote control. Do not block. |
| 7 | Power indicator | Turns off when your TV is turned on. Lights red when your TV is in standby mode. For more information, see “Turning your TV on or off” on page 19. |

| # Item Description | ||
| 1 | ○ (headphone) | Connect headphones to this jack. For more information, see “Connecting headphones” on page 16. |
| 2 | ANT CABLE IN | Connect an antenna or cable TV to this jack. For more information, see “Connecting an antenna or cable TV (no box)” on page 11. |
| 3 | DIGITAL OUTPUT | Connect a digital sound system to this jack. For more information, see “Connecting a basic home theater system” on page 17. |
| 4 | ANALOG AUDIO OUT | Connect an audio amplifier to these jacks. For more information, see “Connecting a basic home theater system” on page 17. |
| 5 | COMPONENT IN Y, P B, PR | Connect the video for a component video device to these jacks. For more information, see “Using component video (better)” on page 10. |
| 6 | AV IN | Connect the audio (L and R) and video for a composite video device, such as a VCR, to these jacks. For more information, see “Using composite video (good)” on page 11. |
| 7 | PC/DVI AUDIO IN | Connect the audio for a computer or a DVI device to this jack. For more information, see “Connecting a computer” on page 15, or “Using DVI (same as HDMI but requires an audio connection)” on page 10. |
| 8 | VGA/PC INPUT | Connect the video for a computer to this jack. For more information, see “Connecting a computer” on page 15. |
| 9 | HDMI1/HDMI2/HDMI3 | Connect HDMI devices to these jacks. An HDMI cable carries both video and sound. You do not need to make an audio connection for an HDMI device. For more information, see “Connecting a DVD or Blu-ray player” on page 12, or “Using HDMI” on page 12. |
| 10 | USB | Connect a USB flash drive to this port. For more information, see “Connecting a USB flash drive” on page 16. |
Remote control 1
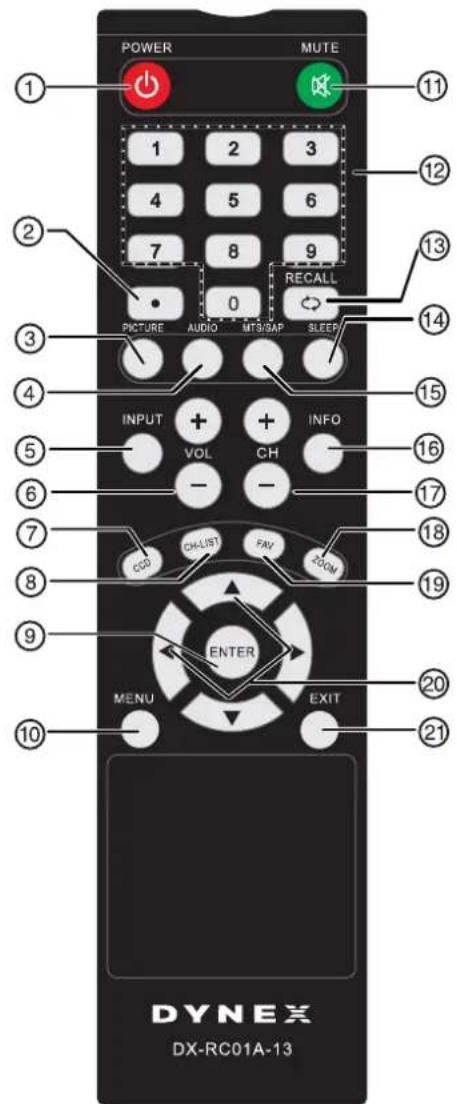
| # Button Description | ||
| 1 | (Power) | Press to turn your TV on or off (Standby mode). When your TV is off, power still flows into it. To disconnect power, unplug the power cord. |
| 2 | (Dot) | Press to enter a digital sub-channel number. For more information, see “Selecting a channel” on page 20. |
| # Button Description | ||
| 3 | PICTURE | Press to select the picture mode. You can select Vivid, Standard, Energy Savings, or Custom. For more information, see "Adjusting the TV picture" on page 21. |
| 4 | AUDIO | Press to select an audio mode. For more information, see "Adjusting sound settings" on page 22. |
| 5 | INPUT | Press to open the INPUT SOURCE list, then press ▲ or ▼ to select a video input source. For more information, see "Selecting the video input source" on page 19. |
| 6 | VOL+/VOL- Press to increase or decrease the volume. | |
| 7 | CCD | Press to turn closed captioning on or off. You can select On, Off, or CC On When Mute. For more information, see "Turning closed captioning on or off" on page 29. |
| 8 | CH-LIST Press to open the channel list. | |
| 9 | ENTER Press to confirm selections or changes. | |
| 10 | MENU Press to open the on-screen menu. | |
| 11 | × MUTE | Press to mute the sound. Press again to restore the sound. |
| 12 | Numbers | Press to enter channel numbers and the parental control password. |
| 13 | RECALL Press to go to the last viewed channel. | |
| 14 | SLEEP | Press to set the sleep timer. For more information, see "Setting the sleep timer" on page 31. |
| 15 | MTS/SAP | In analog TV mode, press to select Stereo, Mono, or SAP. For more information, see "Adjusting sound settings" on page 22. |
| 16 | INFO | Press to display TV status information, such as the channel number, channel name (if available), or signal source. For more information, see "Viewing program information" on page 21. |
| 17 | CH+ / CH- | Press to go to the next or previous channel in the channel list. For more information, see "Selecting a channel" on page 20. |
| 18 | ZOOM | Press to select the aspect ratio. For more information, see "Adjusting the TV picture" on page 21. |
| 19 | FAV | Press to open the Favorites channel list. For more information, see "Setting up a favorite channel list" on page 25 and "Viewing a favorite channel" on page 25. |
| 20 | ▲ ▼ ◀ ▶ | Press to navigate through the on-screen menus and adjust settings. |
| 21 | EXIT Press to close the on-screen menu. | |
Remote control 2
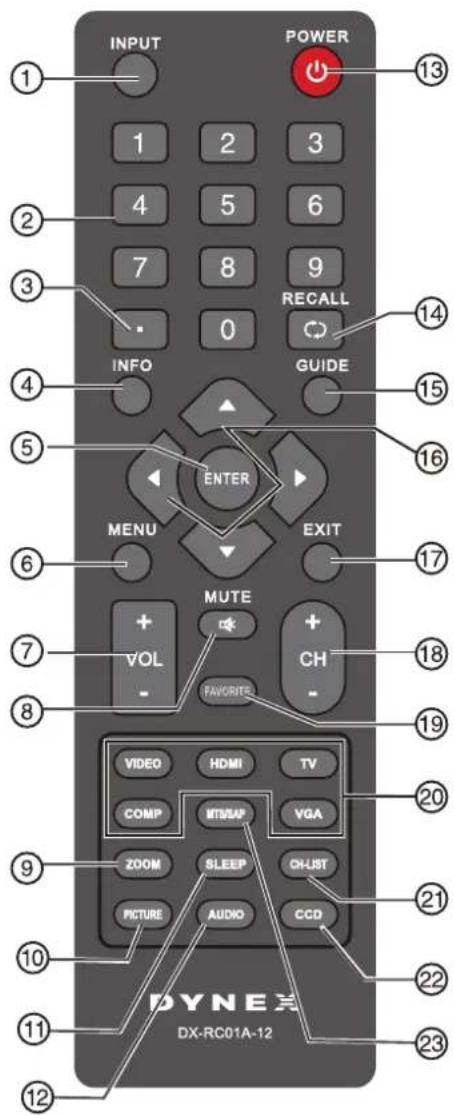
| # Button Description | ||
| 1 | INPUT | Press to open the INPUT SOURCE list, then press ▲ or ▼ to select a video input source. For more information, see "Selecting the video input source" on page 19. |
| 2 | Numbers | Press to enter channel numbers and the parental control password. |
| 3 | • (Dot) | Press to enter a digital sub-channel number. For more information, see "Selecting a channel" on page 20. |
| 4 | INFO | Press to display TV status information, such as the channel number, channel name (if available), or signal source. For more information, see "Viewing program information" on page 21. |
| 5 | ENTER Press to confirm selections or changes. | |
| 6 | MENU Press to open the on-screen menu. | |
| 7 | VOL+/VOL- Press to increase or decrease the volume. | |
| 8 | × MUTE | Press to mute the sound. Press again to restore the sound. |
| # Button Description | ||
| 9 | ZOOM | Press to select the aspect ratio. For more information, see “Adjusting the TV picture” on page 21. |
| 10 | PICTURE | Press to select the picture mode. You can select Vivid, Standard, Energy Savings, or Custom. For more information, see “Adjusting the TV picture” on page 21. |
| 11 | SLEEP | Press to set the sleep timer. For more information, see “Setting the sleep timer” on page 31. |
| 12 | AUDIO | Press to select an audio mode. For more information, see “Adjusting sound settings” on page 22. |
| 13 | (Power) | Press to turn your TV on or off (Standby mode). When your TV is off, power still flows into it. To disconnect power, unplug the power cord. |
| 14 | RECALL Press to go to the last viewed channel. | |
| 15 | GUIDE This function is not available on this model. | |
| 16 | ▲▼◀▶ | Press to navigate through the on-screen menus and adjust settings. |
| 17 | EXIT Press to close the on-screen menu. | |
| 18 | CH+ / CH- | Press to go to the next or previous channel in the channel list. For more information, see “Selecting a channel” on page 20. |
| 19 | FAVORITE | Press to open the Favorites channel list. For more information, see “Setting up a favorite channel list” on page 25 and “Viewing a favorite channel” on page 25. |
| 20 | Video Input | Press to select the input source.Press TV to select TV.P r e s s COMP to select the device connected to the COMPONENT IN video jacks.Press VIDEO to select the device connected to the AV IN jacks.Press VGA to select the device connected to the PC IN VGA jack.Press HDMI once to select HDMI1, twice to select HDMI2, and three times to select a device connected to the HDMI3 jack. |
| 21 | CH-LIST Press to open the channel list. | |
| 22 | CCD | Press to turn closed captioning on or off. You can select On, Off, or CC On When Mute. For more information, see “Turning closed captioning on or off” on page 29. |
| 23 | MTS/SAP | In analog TV mode, press to select Stereo, Mono, or SAP. For more information, see “Adjusting sound settings” on page 22. |
Making connections
What connection should I use?
Your TV has several connection types for connecting devices to your TV.
For the best video quality, you should connect a device to the best available connection.
Use the following tables to identify cables:
| Connection type and jack | Video quality | Cable connector |
| HDMI video/audio | Best (use this if your devices have HDMI) | |
| Component video (requires an audio connection) | Better than composite, or coaxial | |
| Composite video (requires an audio connection) | Better than coaxial | |
| Coaxial video/audio | Good |

You can use the HDMI1 jack to connect a DVI device to your TV. You need to attach an HDMI-to-DVI adapter to the end of the HDMI cable that connects to the DVI device.
Cautions
- Check the jacks for position and type before making any connections.
- Loose connections can result in image or color problems. Make sure that all connections are tight and secure.
• The external audio/video equipment shown may be different from your equipment. If you have questions, refer to the documentation that came with your equipment.
• Always unplug the power cord when connecting external equipment.
Connecting power
To connect the power:
- Plug the AC power cord into an AC power outlet.
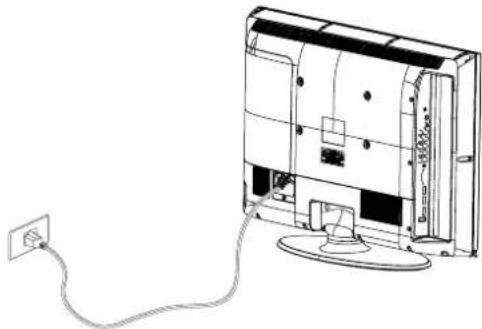
Notes
- Your TV should only be operated from the power source indicated on the label.
• Always unplug the AC power cord from the power outlet when you will not be using your TV for an extended period of time.
• The AC power cord is permanently attached to the back of your TV. Do not try to pull it out.
Connecting a cable or satellite box
Many cable or satellite TV boxes have more than one connection type. To get the best video, you should use the best connection type available. For more information, see "What connection should I use?" on page 8.
Notes
- If the signal level for a channel is weak, the picture may be distorted. Adjust the antenna or use a highly directional outdoor or set-top antenna with a built-in amplifier.
- If the picture quality is good on some channels and poor on others, the problem may be caused by a poor or weak signal from the broadcaster or cable TV provider.
- If you connect to cable or satellite TV without a set-top box and experience poor picture quality, you may need to install a set-top box to improve signal reception and picture quality. Contact your cable or satellite TV provider about upgrading to a set-top box.
- Many high-definition (HD) channels upscale standard-definition (SD) content. The picture displayed on your TV is still displayed as SD, thus the picture quality will not be as clear or crisp as it would be if the content was originally recorded in HD.
Using HDMI (best)
To connect a cable or satellite box using HDMI:
1 Turn off your TV and all connected equipment.
2 Connect the incoming cable from the cable wall jack to the cable-in jack on the cable or satellite box.
3 Connect an HDMI cable (not provided) to one of the HDMI jacks on the side of your TV and to the HDMI OUT jack on the cable or satellite box.

4 Turn on your TV, then turn on the cable or satellite box.
Note
An HDMI cable carries both audio and video. You do not need to use any audio cables.
Using DVI (same as HDMI but requires an audio connection)
Note
A DVI device must be connected to the HDMI1 jack. If you connect a DVI device to another HDMI jack, you will not hear any audio.
To connect a cable or satellite box using DVI:
1 Turn off your TV and all connected equipment.
2 Connect the incoming cable from the cable wall jack to the cable-in jack on the cable or satellite box.
3 Connect an HDMI-DVI adapter (not provided) to one end of an HDMI cable (not provided), then connect it to the DVI OUT jack on the cable or satellite box.
4 Connect the other end of the HDMI cable to the HDMI1 jack on the side of your TV.
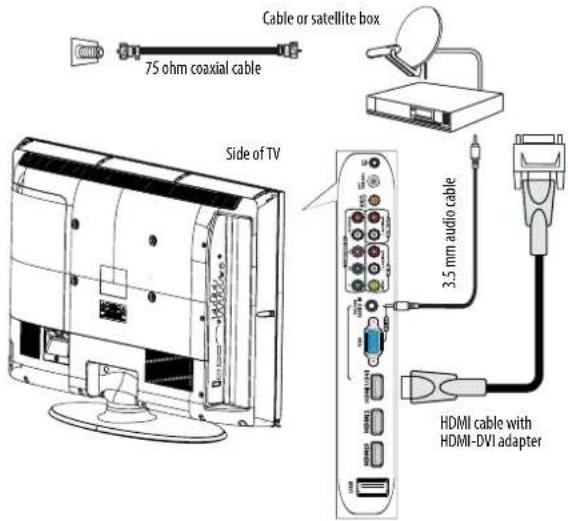
5 Connect a 3.5 mm audio cable (not provided) to the PC/DVI AUDIO IN jack on the back of your TV and to the AUDIO OUT jack on the cable or satellite box.
6 Turn on your TV, then turn on the cable or satellite box.
Using component video (better)
To connect a cable or satellite box using component video:
1 Turn off your TV and all connected equipment.
2 Connect the incoming cable from the cable wall jack to the cable-in jack on the cable or satellite box.
3 Connect a component video cable (not provided) to the COMPONENT IN/Y, PB, PR jacks on the side of your TV and to the component video out jacks on the cable or satellite box.
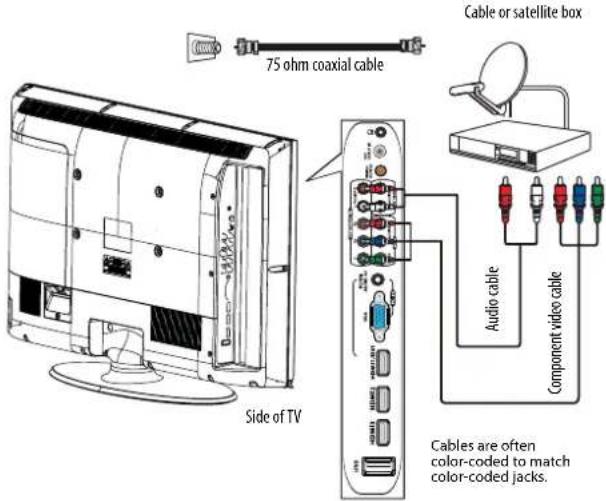
4 Connect an audio cable (provided) to the L and R audio jacks on the side of your TV and to the audio out jack on the cable or satellite TV box.
Note
When you connect the audio using the L and R audio jacks, the audio output is analog. Your TV also has a digital coaxial audio jack, so you can connect the video to the component video jacks, then connect a digital coaxial audio cable to receive digital audio.
5 Turn on your TV, then turn on the cable or satellite box.
Using composite video (good)
To connect a cable or satellite box using composite video:
1 Turn off your TV and all connected equipment.
2 Connect the incoming cable from the cable wall jack to the cable-in jack on the cable or satellite box.
3 Connect a composite (A/V) cable (not provided) to the VIDEO IN jack and L/R AUDIO jacks on the side of your TV and to the composite video and audio out jacks on the cable or satellite box.

4 Turn on your TV, then turn on the cable or satellite box.
Connecting an antenna or cable TV (no box)
To connect an antenna or cable TV (no box):
1 Turn off your TV and all connected equipment.
2 Connect a coaxial cable (not provided) to the ANT/CABLE IN jack on the side of your TV and to the antenna or cable TV wall jack.

3 Turn on your TV.
Notes
- Use a coaxial cable to eliminate interference and noise from radio waves.
- Do not bundle the coaxial cable with the power cord or other cables.
- If the antenna is not installed correctly, contact qualified service personnel to correct the problem.
Connecting a DVD or Blu-ray player
Using HDMI
To connect a DVD or Blu-ray player using HDMI:
1 Make sure that your TV's power cord is unplugged and the DVD or Blu-ray player is turned off.
2 Connect an HDMI cable (not provided) to one of the HDMI jacks on the side of your TV and to the HDMI OUT jack on the DVD or Blu-ray player.

To play from a DVD or Blu-ray player:
1 Turn on your TV, then press INPUT to open the INPUT SOURCE list.
2 Press ▲ or ▼ to select HDMI1, HDMI2, or HDMI3, then press ENTER.
| Note |
| You can also press HDMI one or more times to select HDMI1, HDMI2, or HDMI3. |
3 Turn on the DVD or Blu-ray player.
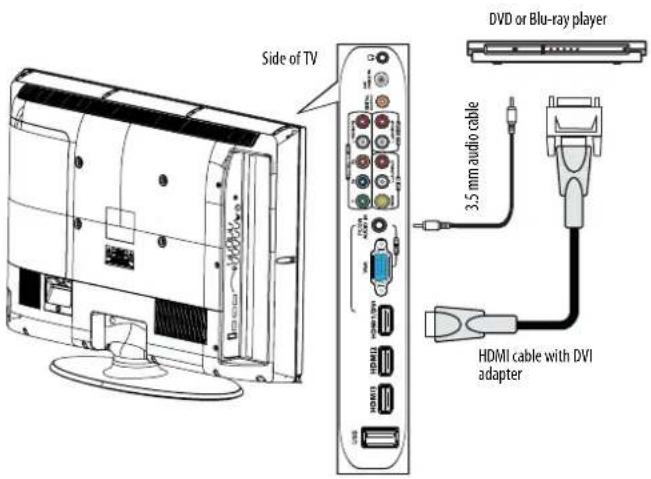
Using DVI
To connect a DVD or Blu-ray player using DVI:
1 Make sure that your TV's power cord is unplugged and the DVD or Blu-ray player is turned off.
2 Connect an HDMI cable with DVI adapter (not provided) to the HDMI3/DVI jack on the side of your TV and to the DVI OUT jack on the DVD or Blu-ray player.
3 Connect an audio cable with stereo mini plug (not provided) to the PC/DVI AUDIO IN jack on the side of your TV and to the AUDIO OUT jack on the DVI device.
Note
When you connect the audio using the PC AUDIO IN jack, the audio output is analog.
To play from a DVD or Blu-ray player:
1 Turn on your TV, then press INPUT to open the INPUT SOURCE list.
2 Press ▲ or ▼ to select HDMI3, then press ENTER.
Note
You can also press HDMI one or more times to select HDMI3.
3 Turn on the DVD or Blu-ray player.
Using component video (better)
To connect a DVD or Blu-ray player using component video:
1 Make sure that your TV's power cord is unplugged and the component video device is turned off.
2 Connect a component video cable (not provided) to the COMPONENT IN/Y, PB, PR jacks on the side of your TV and to the COMPONENT OUT jacks on the DVD or Blu-ray player.

3 Connect an audio cable (not provided) to the L and R (audio in) jacks on the side of your TV and to the L/R AUDIO OUT jacks on the DVD or Blu-ray player.
Note
When you connect the audio using the L and R audio jacks, the audio output is analog. Your TV also has a digital coaxial audio jack, so you can connect the video to the component video jacks, then connect a digital coaxial audio cable to receive digital audio.
To play from the DVD or Blu-ray player:
1 Turn on your TV, then press INPUT to open the INPUT SOURCE list.
2 Press ▲ or ▼ to select Component, then press ENTER.
Note
You can also press COMP to select the component video device.
3 Turn on the DVD or Blu-ray player.
Using composite video (good)
To connect a DVD or Blu-ray player using composite video:
1 Make sure that your TV's power cord is unplugged and the composite video device is turned off.
2 Connect a composite cable (not provided) to the VIDEO and L and R (audio in) jacks on the side of your TV and to the AV OUT jacks on the DVD or Blu-ray player.
Note
When you connect the audio using the L and R audio jacks, the audio output is analog.
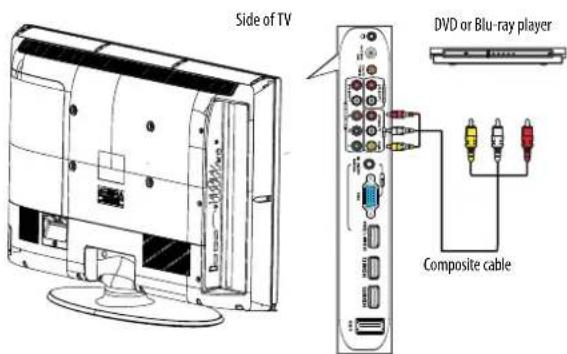
Cables are often color-coded to match color-coded jacks. Connect yellow to yellow, red to red, and white to white.
To play from the DVD or Blu-ray player:
1 Turn on your TV, then press INPUT to open the INPUT SOURCE list.
2 Press ▲ or ▼ to select AV, then press ENTER.
Note
You can also press VIDEO to select the composite device.
3 Turn on the DVD or Blu-ray player.
Connecting a VCR
To connect a VCR:
1 Make sure that your TV's power cord is unplugged and the VCR is turned off.
2 Connect a composite cable (not provided) to the VIDEO and L and R (audio in) jacks on the side of your TV and to the AV OUT jacks on the VCR.
Note
When you connect the audio using the L and R audio jacks, the audio output is analog.

Cables are often color-coded to match color-coded jacks. Connect yellow to yellow, red to red, and white to white.
To play from the VCR:
1 Turn on your TV and the VCR, then press INPUT to open the INPUT SOURCE list.
2 Press ▲ or ▼ to select AV, then press ENTER.
Note
You can also press VIDEO to select the VCR.
Connecting a camcorder or game console
To connect a camcorder or game console:
1 Make sure that your TV's power cord is unplugged and the camcorder or game console is turned off.
2 Connect a composite cable (not provided) to the VIDEO and L and R (audio in) jacks on the side of your TV and to the AV OUT jacks on the camcorder or game console.
Note
When you connect the audio using the L and R audio jacks, the audio output is analog.

Cables are often color-coded to match color-coded jacks. Connect yellow to yellow, red to red, and white to white.
To play from the camcorder or game console:
1 Turn on your TV and the camcorder or game console, then press INPUT to open the INPUT SOURCE list.
2 Press ▲ or ▼ to select AV, then press ENTER.
Note
You can also press VIDEO to select the device.
Connecting a computer
Tip
Some computers have an HDMI jack. You can use an HDMI cable to connect the computer for a better picture.
Using VGA
To connect a computer using VGA:
1 Make sure that your TV's power cord is unplugged and the computer is turned off.
2 Connect a VGA cable (not provided) to the VGA IN jack on the back of your TV and to the VGA jack on the computer.
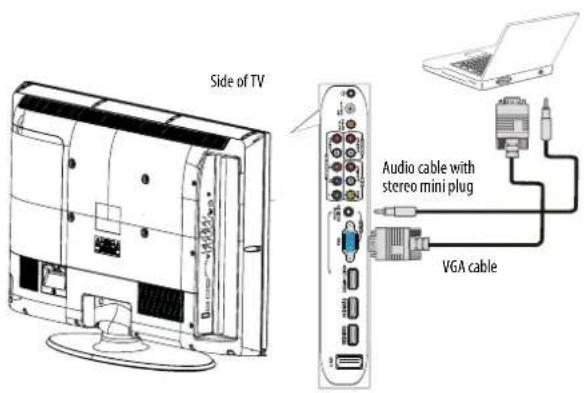
3 Connect an audio cable with stereo mini plug (not provided) to the PC IN AUDIO jack on the back of your TV and to the LINE OUT or AUDIO OUT jack on the computer.
To play video from the computer:
1 Turn on your TV, then press INPUT to open the INPUT SOURCE list.
2 Press ▲ or ▼ to select VGA, then press ENTER.
3 Turn on the computer and adjust the display properties if necessary.
Note
You can also press VGA to select the computer.
Using HDMI
To connect a computer using HDMI:
1 Make sure that your TV's power cord is unplugged and the computer is turned off.
2 Connect an HDMI cable (not provided) to one of the HDMI jacks on the side of your TV and to the HDMI OUT jack on the computer.

To play video from the computer:
1 Turn on your TV and the computer, then press INPUT to open the INPUT SOURCE list.
2 Press ▲ or ▼ to select HDMI1, HDMI2, or HDMI3, then press ENTER.
Note
You can also press HDMI repeatedly to select HDMI1, HDMI2, or HDMI3.
Connecting a USB flash drive
To connect a USB flash drive:
1 Plug a USB flash drive into the USB port on the side of your TV.

Caution
Removing the USB flash drive or turning off the TV while using the USB flash drive may result in loss of data or damage to the USB flash drive.
To play from a USB flash drive:
1 Turn on your TV, then press INPUT to open the INPUT SOURCE list.
2 Press ▲ or ▼ to select USB, then press ENTER.
Notes
- Never remove the USB flash drive or turn off your TV while viewing JPEG pictures.
- The JPEG picture viewer only supports JPEG format images (with ".jpg" file extensions)
- Not all JPEG files are compatible with your TV.
- For more information, see "Using a USB flash drive" on page 33.
Connecting headphones
The TV speakers are muted when headphones are attached.
Warning
Loud noise can damage your hearing. When using headphones, use the lowest volume setting on your headphones that still lets you hear the sound.
To connect headphones:
- Connect headphones to the (headphone) jack on the side of your TV.

Connecting a basic home theater system
To connect a basic home theater system using analog audio:
1 Make sure that your TV's power cord is unplugged and the home theater system is turned off.
2 Connect an analog audio cable (not provided) to the L/R (audio out) jacks on the side of your TV and to the AUDIO IN jacks on the home theater system.

To connect a basic home theater system using digital audio:
1 Make sure that your TV's power cord is unplugged and the home system is turned off.
2 Connect a digital coaxial audio cable (not provided) to the DIGITAL OUTPUT jack on the side of your TV and to the DIGITAL AUDIO IN jack on the home theater system.

Connecting a home theater system with multiple devices
Notes
We recommend that you connect the AV receiver's HDMI OUT jack to one of your TV's HDMI IN jacks. Then, connect the AV receiver's DIGITAL AUDIO INPUT jack to your TV's DIGITAL OUTPUT jack to route Dolby Digital audio.
![graph TD A["Blu-ray player/DVD player/VCR"] --> B["AV receiver"] C["Cable or satellite TV box"] --> B D["Computer"] --> E["Game console or camera"] E --> B F["Antenna or cable TV connected directly to the wall jack"] --> E](/content/2026/05/963404/images/01865707f0e5fa8eef583cacc2eec023c725189051ebf4307f9b2c698f1a6005.jpg)
The connections you make depend on the video and audio jacks available on your devices. Refer to the documentation that came with your devices for connection information.
Remember to use the best connection types available for the best picture and sound. For information about connection types, see "What connection should I use?" on page 8.
Using the remote control
Installing remote control batteries
To install the remote control batteries:
1 While pressing the cover release latch on the back of the remote control, lift the cover off the remote control. Remote Control 1

Remote Control 2
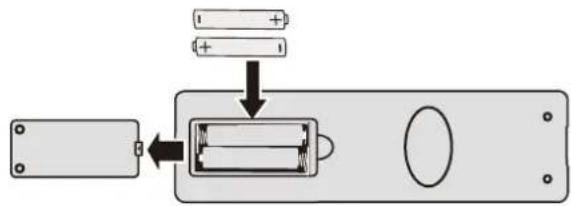
2 Insert two AAA batteries into the battery compartment. Make sure that you match the + and - symbols on the batteries with the + and - symbols in the battery compartment.
3 Replace the battery cover. Remote Control 1

Remote Control 2

Cautions
- Batteries should not be exposed to excessive heat, such as sunshine, heat registers, or fire.
- Battery chemicals can cause a rash. If the batteries leak, clean the battery compartment with a cloth. If chemicals touch your skin, wash immediately.
- Make sure that batteries are disposed of correctly. Do not burn or incinerate.
Notes
- Do not mix batteries of different types.
- Do not mix old and new batteries.
- Remove batteries when the charge is depleted.
- If the remote control is not going to be used for an extended period of time, remove the batteries.
Aiming the remote control
To aim the remote control:
- Point the remote control towards the remote sensor on the front of your TV.
Turning on your TV for the first time
The first time you turn on your TV, the Setup Wizard opens. The Setup Wizard guides you through setting up basic settings including the menu language, date and time, picture mode, and TV signal source.
To set up your TV:
1 Make sure that you have:
- Installed the remote control batteries. (See page 17 for details).
- Connected an antenna, cable TV, or satellite TV. (See page 9 to page 11 for details.)
- Connected the power cord. (See page 9 for details.)
2 Press (Power), then wait several seconds. The Choose Your Menu Language screen opens.

3 Press ▲ or ▼ to highlight a language, then press ENTER. The Choose Your Time Setting screen opens.
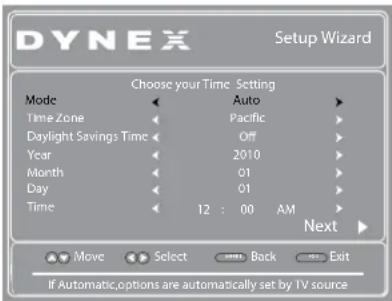
4 Press ▲ or ▼ to highlight Mode, then press ◀ or ▶ to select Custom (to set the date and time manually), or Auto (to set the date and time automatically from a TV signal source, based on the time zone you select).
5 If you selected Auto for mode, press ▲ or ▼ to highlight Time Zone, then press ◀ or ▶ to select your time zone. Choices include Eastern, Central, Mountain, Pacific, Alaska, Hawaii, Atlantic, or Newfoundland.
6 If you selected Auto for mode, press ▲ or ▼ to highlight Daylight Savings Time, then press ◀ or ▶ to select On (if your viewing area observes Daylight Savings Time), or Off (if your viewing area does not observe Daylight Savings Time).
7 If you selected Custom for Mode, set the date by pressing ▲ or ▼ to highlight Year, Month, or Day, then press ◀ or ▶ to change the setting.
8 If you selected Custom for Mode, set the time by pressing ▲ or ▼ to highlight Time, then press ◀ or ▶ to highlight the hour, minute, or AM/PM.
9 Press ▲ or ▼ to adjust the setting.
10 Press ENTER. The Choose Your Picture Mode screen opens.

11 Press ▲ or ▼ to highlight Home Mode or Retail Mode, then press ENTER.
If you selected Retail Mode, a message appears "If you select Retail Mode, then Energy saving is not realized." Select Yes to continue, or select No to change your selection. The Choose Your TV Source screen opens.
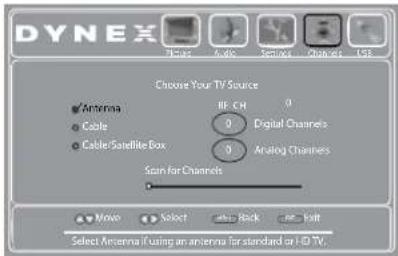
12 Press ▲ or ▼ to highlight Antenna, Cable, or Cable/Satellite Box (if your cable TV uses a box, select Cable/Satellite Box), then press ENTER.
- If you chose Antenna or Cable, your TV automatically starts scanning for channels available in your viewing area. If you chose Cable/Satellite box, your TV does not need to scan for channels.
- During the auto channel scan your TV searches for digital channels first. When the digital channel search is complete, a message appears asking if you want to search for analog channels. If you choose Antenna, press MENU or EXIT if you don't need the analog channel scan, or don't press any button to continue searching.
Note
The channel scan can take up to 20+ minutes. You can press EXIT at any time to stop the auto scan, but you will need to run the auto scan again to create a channel list.
13 To watch TV, press INPUT, press ▲ or ▼ to highlight the video input source for your TV in the INPUT SOURCE list, then press ENTER.
- If your TV is connected to an antenna, cable TV (no box), or cable or satellite TV box using a coaxial cable, select TV.
- If your TV is connected to a cable or satellite box using an HDMI cable or HDMI cable with a DVI adapter, select HDMI.
- If your TV is connected to a cable or satellite box using a component video cable, select Component.
- If your TV is connected to a cable or satellite box using a composite video cable, select AV.
Understanding the basics
Turning your TV on or off
To turn your TV on or off:
1 Make sure that the power cord is connected to a power outlet.
2 Press (Power) to turn on your TV. The power indicator LED turns off.
3 Press (Power) again to turn off your TV. Your TV enters Standby mode and the power indicator turns red.
Selecting the video input source
To select the video input source:
1 Turn on your TV, then press INPUT. The INPUT SOURCE list opens.
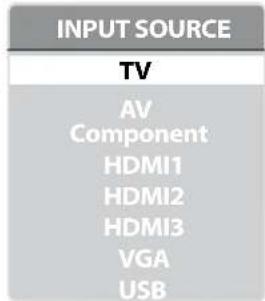
2 Press ▲ or ▼ to highlight the video input source, then press ENTER. You can also press a direct input button on the remote control to select the video input source.
- Press TV to select TV (if your TV is connected to an antenna, cable TV (no box), or cable or satellite TV using a coaxial cable).
- Press COMP to select the device connected to the COMPONENT IN video jacks.
- Press VIDEO to select the device connected to the AV IN jacks.
- Press VGA to select the device connected to the PC IN VGA jack.
- Press HDMI once to select HDMI1, twice to select HDMI2, and three times to select a device connected to the HDMI3 jack.
Using the on-screen menus
Notes
- Depending on the signal source selected, you may see different options on your screen. The following menus are shown in TV mode.
- Menu items that are not selectable are grayed out.
- Menus in this manual are described in TV mode, unless otherwise indicated.
• The screens shown in this manual are for explanation purposes and may vary from the actual screens on your TV.
Picture menu (TV mode)

Audio menu (TV mode)

Settings menu (TV mode)
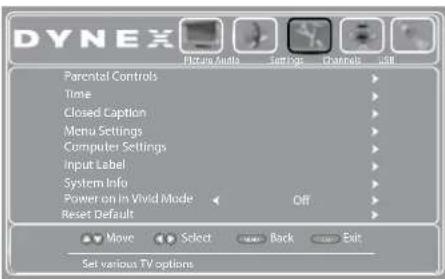
Channels menu (TV mode)
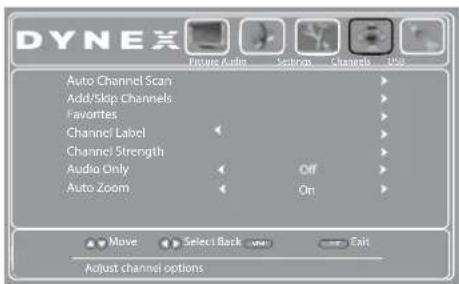
USB menu (USB mode)

Navigating the menus
Remote Control 1

Press MENU to open the on-screen menu.
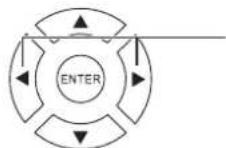
Press ◀ or ▶ to move the cursor on the screen or to adjust a selected item.

Press ▲ or ▼ to select menu options.

Press ENTER to confirm a selection or enter a sub-menu.

Press MENU to return to the previous menu.

Press EXIT to close the menu.
Remote Control 2

Press MENU to open the on-screen menu.

Press ◀ or ▶ to move the cursor on the screen or to adjust a selected item.
Press ▲ or ▼ to select menu options.
Press ENTER to confirm a selection or enter a sub-menu.

Press MENU to return to the previous menu.

Press EXIT to close the menu.
Selecting a channel
To select a channel:
- Press CH+ or CH- to go to the next or previous channel on the memorized channel list.
- Press the number buttons to enter the channel number you want, then wait for the channel to change or press ENTER to immediately change the channel.
- To select a digital sub-channel, press the number buttons to select the main digital channel, press (dot), then press the number button for the sub-channel. Wait for the channel to change, or press ENTER to immediately change the channel.
- Press RECALL to go to the last viewed channel. Press RECALL again to return to the channel you were watching.
- Press CH-LIST to open the channel list, press ▲ or ▼ to highlight a channel, then press ENTER. Hidden channels are grayed out on the Channel list.
- Press FAV or FAVORITE to open the favorite channel list, press ▲ or ▼ to highlight a channel, then press ENTER.
Note
If a list has more than one page, press ◀ or ▶ to scroll through the pages.
Adjusting the volume
To adjust the volume:
- Press VOL+ or VOL− to increase or decrease the volume.
- Press ✗ MUTE to turn off the sound. Press ✗ MUTE again to turn the sound back on.
Viewing program information
To view channel information:
- Press INFO to view an information banner. The information banner shows the current program information such as channel number, video input source, and resolution.
- Digital channel information—Displays the channel number, station name, channel label, broadcast program name, TV rating, signal type, audio information, resolution, CC mode, current time, and current program start and end times.
- Analog channel information—Displays channel number, channel label (if preset), signal type, and audio information.
Adjusting the picture
Adjusting the TV picture
To adjust the TV picture:
1 Press MENU. The on-screen menu opens with the Picture menu displayed.
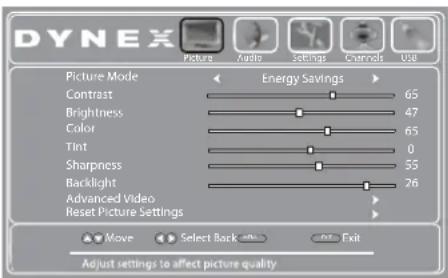
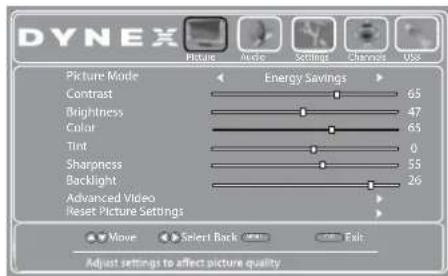
2 Press ▲ or ▼ to highlight an option, press ◀ or ▶ to adjust the setting, or press ▶ or ENTER to go to the sub-menu. You can select:
- Picture Mode—Selects the picture mode. You can select:
- Vivid—(a bright and vivid picture) Significantly increases the contrast, brightness, and sharpness. This selection is good for video games, animation, and in bright light environments.
- Standard—(a standard picture) Moderately increases the contrast, brightness, and sharpness. This selection is good for standard TV broadcasts.
- Energy Savings—(the backlight brightness is decreased) Your TV has a backlight that provides light for displaying the picture. Your TV uses less energy when you reduce this backlight.
- Custom—(customized picture) Lets you manually customize the picture settings such as brightness, contrast, and sharpness.
Note
You can also press PICTURE on your remote control to select the picture mode.
- Contrast—Adjusts the brightness of the light areas of the picture.
- Brightness—Adjusts the brightness of the dark areas of the picture.
- Color—Adjusts the color intensity of the picture. A low setting may make the color look faded. A high setting may make the color look artificial.
- Tint—Adjusts the color balance of the picture. Use this control to make skin tones look more natural.
- Sharpness—Adjusts the color detail of images. If you set this control too high, dark images may appear with light or white edges.
- Backlight— Increasing the backlight setting will increase the brightness and display performance of the screen. The higher the setting is, the higher the power consumption.
- Advanced Video—Opens the Advanced Video sub-menu where you can adjust additional video options.
- Aspect Ratio—Selects the aspect ratio of the picture.
Aspect ratio option Example
| Normal:Displays the original 4:3 aspect ratio with vertical black bars on the left and right of the image. If the original aspect ratio is 16:9, the image displays in 16:9. |  |
| Zoom:Expands the image to fill the screen. The top and bottom of the image may be cropped. |  |
| Wide:Use this option to view content recorded in a 16:9 (wide-screen) aspect ratio. |  |
| Cinema:Stretches the image at the edges, but keeps a clear image in the center. |  |
| Auto:The picture display is adjusted to the correct aspect ratio automatically (TV mode only). This setting is only active whenAutoZoomin the Channels menu is set toOn. |  |
Note
You can also press ZOOM to select the aspect ratio.
- Color Temperature—Selects the color temperature. You can select Cool (to enhance the blues), Normal, or Warm (to enhance the reds).
- Noise Reduction—Selects the noise reduction mode to reduce picture noise (snow). You can select Low, Middle, Strong, or Off.
- Aspect Ratio—Cinema, Auto, Normal, Wide, or Zoom.
- Overscan —This feature extends part of the display past the visible area of the screen. The resulting picture will "zoom in" on the image center. You can select On or Off.
- Adaptive Contrast—Automatically adjusts picture detail and brightness. You can select On or Off.
- Dynamic Contrast Ratio—Enhances the contrast ratio between light and dark areas of the picture. You can select On or Off. If this is set to On, Backlight cannot be adjusted.
- Reset Picture Settings—Reset all picture settings to factory mode.
3 Press MENU to return to the previous menu, or press EXIT to close the menu.
Adjusting the computer image
To adjust the computer image:
1 Make sure that your TV is in VGA mode. For more information, see "Selecting the video input source" on page 19.
2 Press MENU. The on-screen menu opens with the Picture menu displayed.
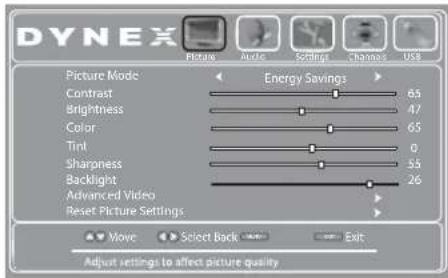
3 Press ◀ or ▶ to highlight Settings, then press ▼. The Settings menu opens.
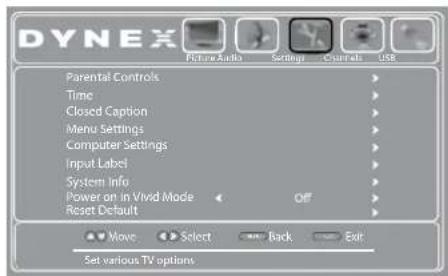
4 Press ▲ or ▼ to highlight Computer Settings, then press ENTER. The Settings-Computer settings menu opens.
5 Press ▲ or ▼ to highlight an option, then press ◀ or ▶ to adjust the option. You can select:
• Auto Adjust—Automatically adjusts the image settings such as position and phase.
• H. Position—Moves the image right or left.
• V. Position—Moves the image up or down.
- Clock—Adjusts the sample frequency.
- Phase—Adjusts the focus of stable images.
6 Press MENU to return to the previous menu, or press EXIT to close the menu.
Adjusting the sound
Adjusting sound settings
To adjust the sound settings:
1 Press MENU. The on-screen menu opens with the Picture menu displayed.
2 Press ◀ or ▶ to highlight Audio, then press ▼. The Audio menu opens.
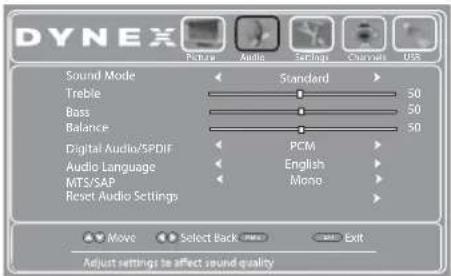
3 Press ▲ or ▼ to highlight an option, then press ◀ or ▶ to adjust the setting. You can select:
- Sound Mode—Selects the EQ sound mode. You can select Standard, News, Music, Movie, or Custom.
Note
You can also press AUDIO on the remote control to select the audio mode.
- Treble—Adjusts the high sounds.
• Bass—Adjusts the low sounds.
• Balance—Adjusts the balance between the left and right audio channels. - Digital Audio/SPDIF—Selects the preferred audio format for digital audio signals. Options include PCM (to output the audio in 2-channel stereo), or RAW (to pass through the original digital audio sound).
- Audio Language—Selects the default language track when watching digital TV programs. Options include English, Français (French), and Español (Spanish).
-
MTS/SAP—(Analog channels only) Selects the audio mode. You can select:
-
Mono-if there is noise or static on weak stereo broadcasts.
- Stereo-for programs broadcast in stereo.
- SAP-to listen to a secondary audio program (if available).
Note
You can also press MTS/SAP on the remote control one or more times to select the audio mode.
- Reset Audio Settings— Resets all audio settings to factory defaults.
4 Press MENU to return to the previous menu, or press EXIT to close the menu.
Playing TV audio only
You can turn off the picture on your TV and listen to the program audio only.
To play TV audio only:
1 Press MENU. The on-screen menu opens with the Picture menu displayed.
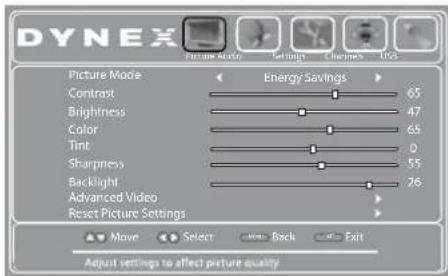
2 Press ◀ or ▶ to highlight Channels, then press ▼. The Channels menu opens.

3 Press ▲ or ▼ to highlight Audio Only, then press ENTER.
4 Press ◀ or ▶ to select On.
5 Press MENU to return to the previous menu, or press EXIT to close the menu. The picture turns off in approximately 3 to 5 seconds.
Notes
• Audio only works only when the input source is TV and your TV is receiving a broadcast signal.
- To exit audio only mode, press any button except the power button. When you exit audio only mode, the Audio Only option is automatically reset to Off.
Changing channel settings
Automatically scanning for channels
When you scan for channels, your TV searches for channels available in your viewing area and stores the channel information in the channel list. When you press
CH+ or CH−, your TV goes to the next or previous channel in the channel list.
If the TV signal source changes, for example you change from an outdoor antenna to cable TV (no box), you need to scan for channels again.
To automatically scan for channels:
1 Press MENU. The on-screen menu opens with the Picture menu displayed.
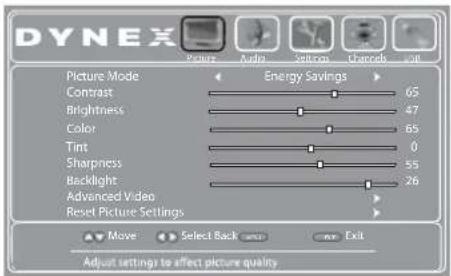
2 Press ◀ or ▶ to highlight Channels, then press ▼. The Channels menu opens.
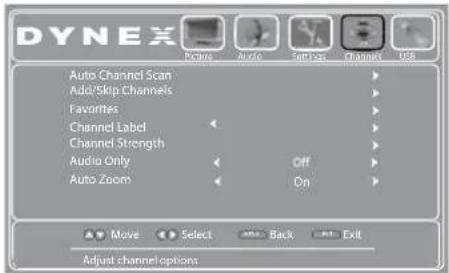
3 Press ▲ or ▼ to highlight Auto Channel Scan, then press ENTER. The CHANNELS-Auto Channel Scan screen opens.

4 Press ▲ or ▼ to highlight Antenna, Cable, or Cable/Satellite Box, then press ENTER.
- If you are using an antenna for a standard or HD TV signal, select Antenna.
- If your cable is connected directly to the TV (using no tuner box), select Cable.
- If your cable is connected to your TV through a tuner box, select Cable/Satellite Box.
If you selected Antenna or Cable, your TV searches automatically for available channels in your area and stores the channel information in the channel list. This may take several minutes. While scanning, the TV displays a progress report.
- Or-
If you selected Cable/Satellite Box, the channel search is not necessary.
Note
You can press EXIT at any time to stop scanning, but you must run the scan later to complete the process.
Hiding channels
You can hide channels in the channel list. When you press CH or CH, your TV skips the hidden channels. You can still tune to a hidden channel by pressing the number buttons for the channel.
To hide channels:
1 Press MENU. The on-screen menu opens with the Picture menu displayed.
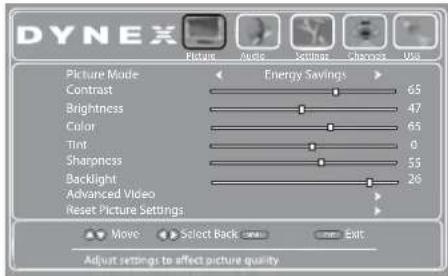
2 Press ◀ or ▶ to highlight Channels, then press ▼. The Channels menu opens.
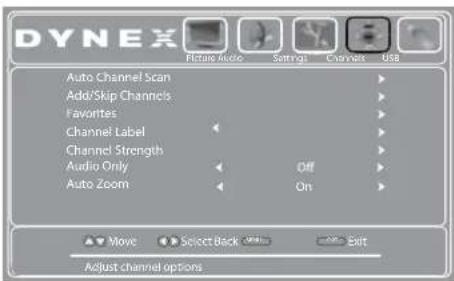
3 Press ▲ or ▼ to highlight Add/Skip Channels, then press ENTER. The channel list opens.

4 Press ▲ or ▼ to highlight the channel you want to hide, then press ENTER. The check mark disappears.
Notes
- A channel with a check mark is not hidden. A channel with no check mark is hidden.
- If the list has more than one page, press ▲ or ▼ to scroll through the pages.
5 Press MENU to return to the previous menu, or press EXIT to close the menu.
Setting up a favorite channel list
You can create a favorite channel list to make it easier to tune to your favorite channels.
To set up a favorite channel list:
1 Press MENU. The on-screen menu opens with the Picture menu displayed.

2 Press ◀ or ▶ to highlight Channels, then press ▼. The Channels menu opens.

3 Press ▲ or ▼ to highlight Favorites, then press ENTER. The Channels-favorites list opens.

4 Press ▲ or ▼ to highlight the channel you want to add to the favorites list, then press ENTER. A check mark appears.
| Notes | |
| ·To remove a channel from the favorites list, highlight the channel, then press ENTER. The check mark disappears and the channel is removed from the list. ·If the list has more than one page, press ▲ or ▼ to scroll through the pages. | |
5 Press MENU to return to the previous menu, or press EXIT to close the menu.
Viewing a favorite channel
To view a favorite channel:
1 Press FAV or FAVORITE on your remote control. The Favorites channel list opens.
2 Press ▲ or ▼ to highlight a channel, then press ENTER to tune to the channel.
Adding or changing a channel label
If a channel is not already labeled, you can label the channel to make it easier to identify. You can also relabel a channel that is already labeled.
To add or change a channel label:
1 Press MENU. The on-screen menu opens with the Picture menu displayed.
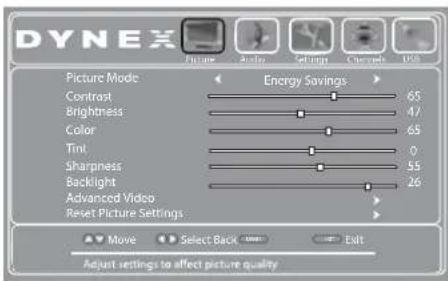
2 Press ◀ or ▶ to highlight Channels, then press ▼. The Channels menu opens.
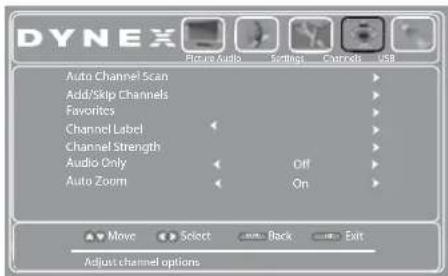
3 Press ▲ or ▼ to highlight Channel Label, then press ENTER. The Channel Label screen opens with the channel number field highlighted.
4 Press ▲ or ▼ to select the channel you want to label, then press ▶ to go to the channel label editing field.

5 Press ▲ or ▼ to select a character, then press ◀ or ▶ to move to the previous or next position. Repeat this step to add more characters. You can enter as many as 11 characters. If you need to delete a character, enter a blank space, then press ENTER.
6 When you have completed the label, press ENTER.
7 Press MENU to return to the previous menu, or press EXIT to close the menu.
Checking the digital signal strength
You can check the digital signal strength to determine if you need to adjust your antenna or digital cable input. The higher the signal strength, the less likely you are to experience picture degradation.
To check the digital signal strength:
1 Press MENU. The on-screen menu opens with the Picture menu displayed.
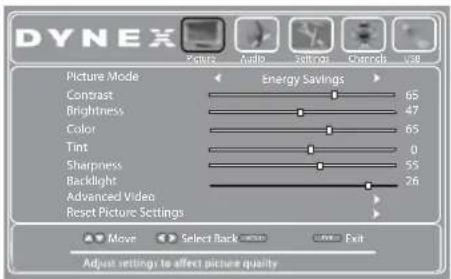
2 Press ◀ or ▶ to highlight Channels, then press ▼. The Channels menu opens.
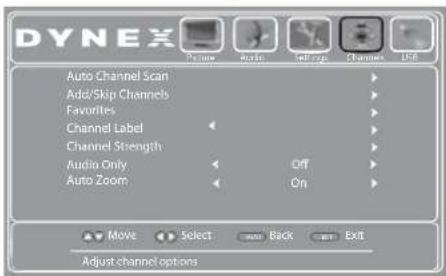
3 Press ▲ or ▼ to highlight Channel Strength, then press ENTER. The DTV signal strength is indicated by the color bar.
4 Press MENU to return to the previous menu, or press EXIT to close the menu.
Setting parental controls
Parental controls let you prevent your children from watching inappropriate material on TV. When set, parental controls read the rating of the program (with some exceptions, such as news and sports) and deny access to programs that exceed the ratings level you select. To watch programs that exceed the selected rating, you must enter the password.
Setting or changing the password
To set or change the password:
1 Press MENU. The on-screen menu opens with the Picture menu displayed.

2 Press ◀ or ▶ to highlight Settings, then press ▼. The Settings menu opens with Parental Controls highlighted.
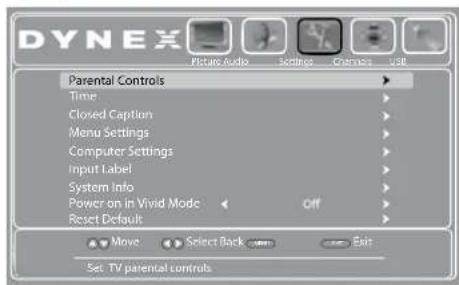
3 Press ENTER. The Enter Password screen opens.
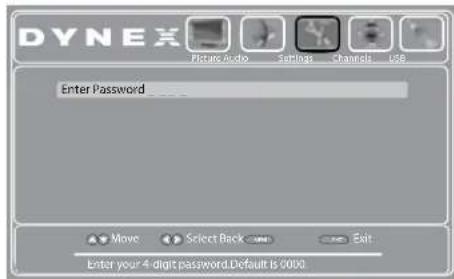
4 Press the number buttons to enter the four-digit password. The default password is 0000. You should change the password to something you can remember. The Parental Controls menu opens.

5 Press ▲ or ▼ to highlight Change Password, then press ENTER. The Password Entry screen opens.

6 Press the number buttons to enter the old password, enter a new password, then enter the new password again. The password has been successfully changed.

7 Press EXIT to close the menu.
Locking control buttons
You can lock the TV control buttons on the side of your TV. When the control buttons on your TV are locked, you can only operate the TV with the remote control.
To lock control buttons:
1 Press MENU. The on-screen menu opens with the Picture menu displayed.

2 Press ◀ or ▶ to highlight Settings, then press ▼. The Settings menu opens with Parental Controls highlighted.
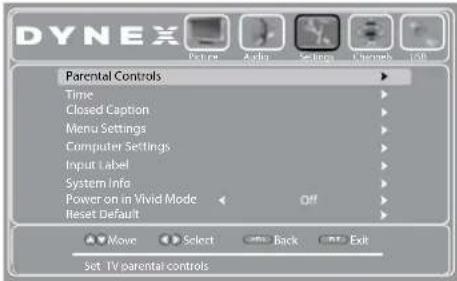
3 Press ENTER. The Enter Password screen opens.
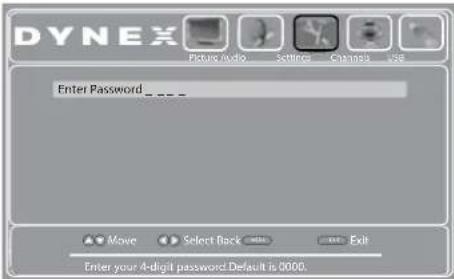
4 Press the number buttons to enter the four-digit password. The Parental Controls menu opens with Button Lock highlighted.

5 Press ◀ or ▶ to select Yes (to lock the buttons), or No (to unlock the buttons).
6 Press EXIT to close the menu.
Setting parental control levels
You can set parental control levels for the U.S. and Canada. Parental control settings are only applicable to programs that have a rating signal.
To set parental control levels:
1 Press MENU. The on-screen menu opens with the Picture menu displayed.
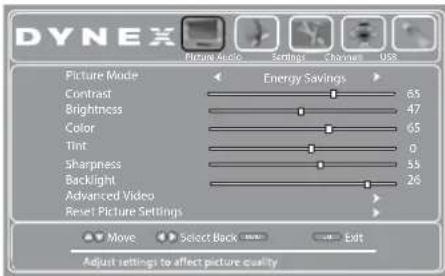
2 Press ◀ or ▶ to highlight Settings, then press ▼. The Settings menu opens with Parental Controls highlighted.
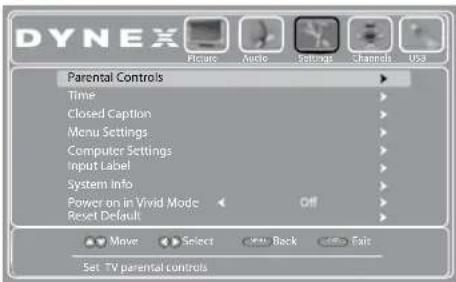
3 Press ENTER. The Enter Password screen opens.
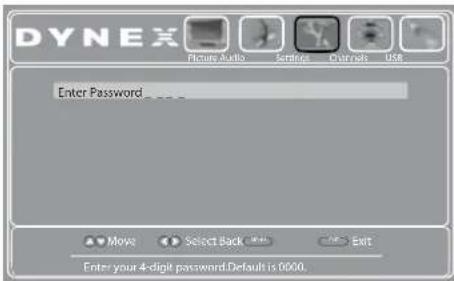
4 Press the number buttons to enter the four-digit password. The Parental Controls menu opens.
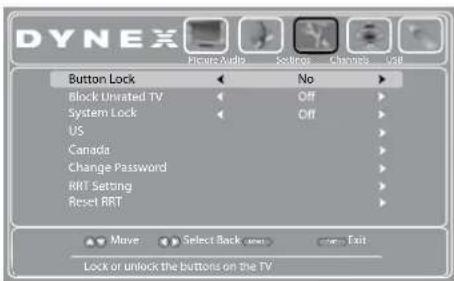
5 Press ▲ or ▼ to highlight US (or Canada to set controls for Canada), then press ENTER. The Ratings screen opens.
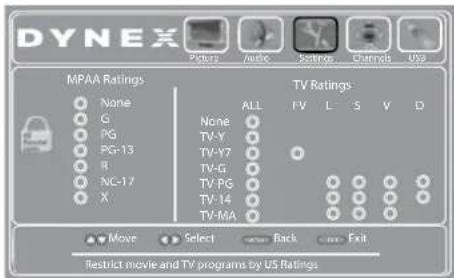
6 Press ▲ or ▼, ◀ or ▶ to highlight the rating you want to block, then press ENTER. A lock icons appear next to a rating is blocked.
| Note | |
| When you block a rating, that rating and all higher ratings are blocked. | |
7 Press EXIT to close the menu.
Ratings
U.S. TV ratings (age-based)
| None Not rated | |
| TV-Y All children | |
| TV-Y7 Children over seven years of age | |
| TV-G General audiences | |
| TV-PG Parental guidance suggested | |
| TV-14 Parents strongly cautioned | |
| TV-MA Mature audiences only | |
U.S. TV ratings (content-based)
| All All ratings are blocked | |
| FV Fantasy violence | |
| L Adult language | |
| S Sexual situations | |
| V | V i o |
| D | Sexually suggestive dialog |
U.S. movie (MPAA) ratings
| None | Movie not rated |
| G | General audiences |
| PG | Parental guidance suggested |
| PG-13 | Suitable for children 13 and older |
| R Parental guidance suggested for children under 17 | |
| NC-17 Not suitable for children under 17 | |
| X | Adults only |
Canadian English ratings
| E | Exempt programming |
| C | C h |
| C8+ | Children over 8 years old |
| G | General audiences |
| PG | Parental guidance |
| 14+ | Over 14 years old |
| 18+ | Adult programming |
Canadian French ratings
| E | Exempt programming |
| G | General audiences |
| 8 ans+ | Over 8 years old |
| 13 ans+ | Over 13 years old |
| 16 ans+ | Over 16 years old |
| 18 ans+ | Adult programming |
Downloading rating information
To download rating information:
1 Press MENU. The on-screen menu opens with the Picture menu displayed.
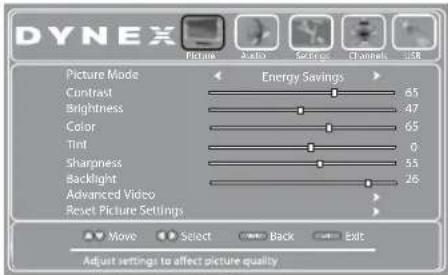
2 Press ◀ or ▶ to highlight Settings, then press ▼. The Settings menu opens with Parental Controls highlighted.

3 Press ENTER. The Enter Password screen opens.
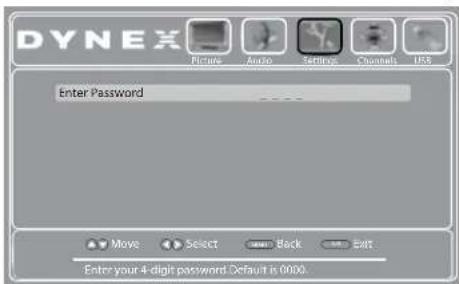
4 Press the number buttons to enter the four-digit password. The Parental Controls menu opens.
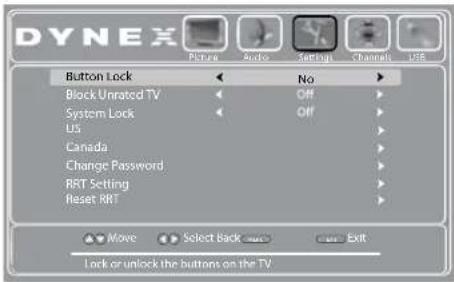
5 Press ▲ or ▼ to highlight RRT Setting, then press ENTER. If the program is broadcast with RRT rating information, the information is downloaded automatically and can be used for parental controls.
6 Press EXIT to close the menu.
To reset the RRT setting to factory defaults:
1 Press MENU. The on-screen menu opens with the Picture menu displayed.

2 Press ◀ or ▶ to highlight Settings, then press ▼. The Settings menu opens with Parental Controls highlighted.
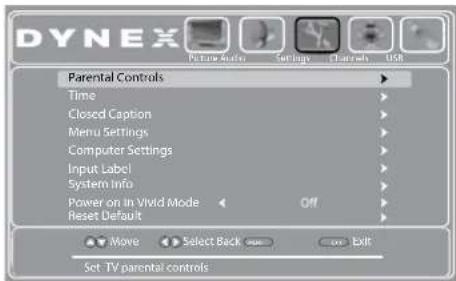
3 Press ENTER. The Enter Password screen opens.
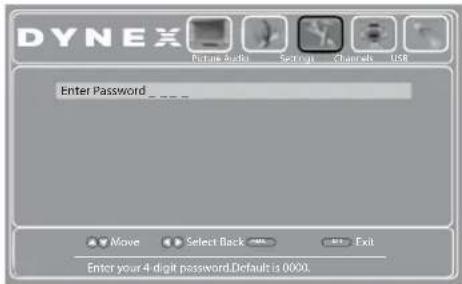
4 Press the number buttons to enter the four-digit password. The Parental Controls menu opens.

5 Press ▲ or ▼ to highlight Reset RRT, then press ENTER. The RRT settings are reset to factory defaults.
6 Press EXIT to close the menu.
Using closed captioning
Closed captioning availability and content depends on the broadcaster and may vary across programs in a channel.
Turning closed captioning on or off
To turn closed captioning on or off:
1 Press MENU. The on-screen menu opens with the Picture menu displayed.
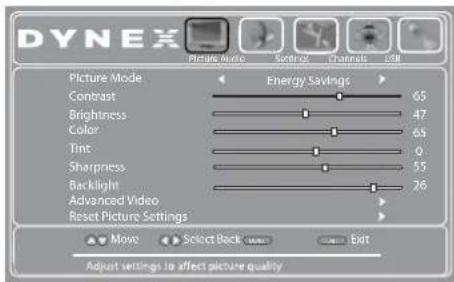
2 Press ◀ or ▶ to highlight Settings, then press ▼. The Settings menu opens.

3 Press ▲ or ▼ to highlight Closed Caption, then press ENTER. The Settings-Closed Caption menu opens.

4 Press ▲ or ▼ to highlight CC Mode, then press ENTER.
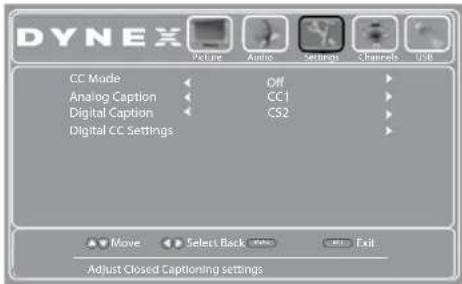
5 Press ◀ or ▶ to select On (turns closed captioning on), CC On When Mute (turns closed captioning on when the sound is muted), or Off (turns closed captioning off).
6 Press MENU to return to the previous menu, or press EXIT to close the menu.

Selecting the analog closed captioning mode
To select the closed captioning mode:
1 Press MENU. The on-screen menu opens with the Picture menu displayed.
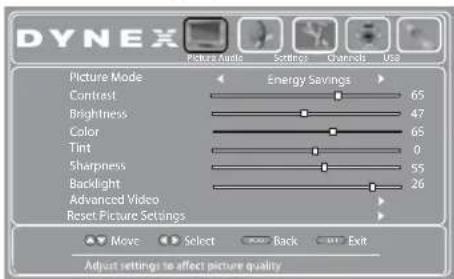
2 Press ◀ or ▶ to highlight Settings, then press ▼. The Settings menu opens.
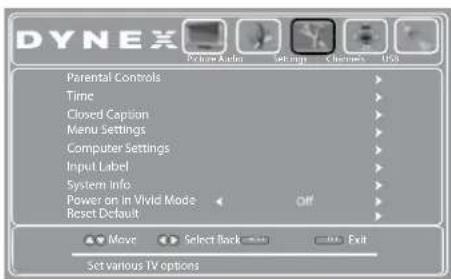
3 Press ▲ or ▼ to highlight Closed Caption, then press ENTER. The Settings-Closed Caption menu opens.
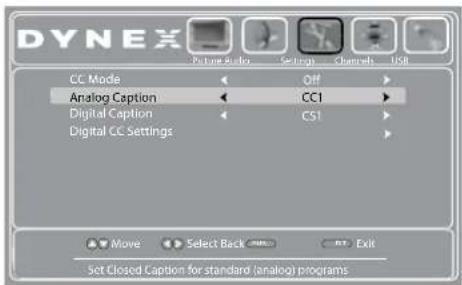
4 Press ▲ or ▼ to highlight Analog Caption, then press ◀ or ▶ to select an analog caption setting. You can select:
- CC1 through CC4—Closed captioning appears in a small banner across the bottom of the screen. CC1 is usually the "printed" version of the audio. CC2 through CC4 display content provided by the broadcaster. - Text1 through Text4—Closed captioning that covers half or all of the screen. Text1 through Text4 display content provided by the broadcaster.
5 Press EXIT to close the menu.
Customizing digital closed captioning styles
To customize digital closed captioning styles:
1 Press MENU. The on-screen menu opens with the Picture menu displayed.
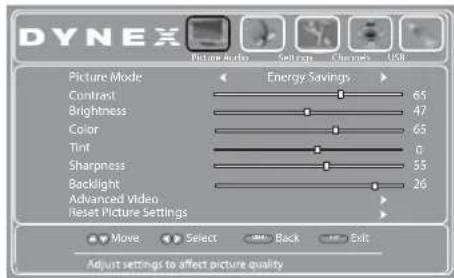
2 Press ◀ or ▶ to highlight Settings, then press ▼. The Settings menu opens.

3 Press ▲ or ▼ to highlight Closed Caption, then press ENTER. The Settings-Closed Caption menu opens.

4 Press ▲ or ▼ to highlight Digital Caption (only available for digital stations), then press ◀ or ▶ to select a digital caption setting. You can select CC1 through CC4 and CS1 through CS6.
5 Press ▲ or ▼ to highlight Digital CC Settings, then press ENTER. The Digital CC Settings menu opens.

6 Press ▲ or ▼ to highlight Mode, then press ◀ or ▶ to select Custom.
| Note | |
| To reset the closed caption styles to their defaults, set Mode to Default. |
7 Press ▲ or ▼ to highlight a style, then press ◀ or ▶ to adjust the style. You can select:
- Font-Selects the font style.
- Size—Selects the font size.
- Edge Effect—Selects the edge style for the words.
- Edge Color—Selects the color for the edges.
- Text Color—Selects the color for the text.
- Background Color—Selects the color for the background.
- Text Opacity—Selects the opacity for the text.
- Background Opacity–Selects the opacity for the background.
8 Press EXIT to close the menu.
Adjusting time settings
Setting the clock
To set the clock:
1 Press MENU. The on-screen menu opens with the Picture menu displayed.

2 Press ◀ or ▶ to highlight Settings, then press ▼. The Settings menu opens.
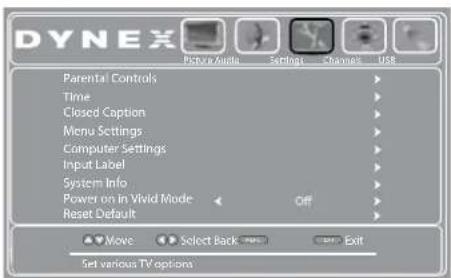
3 Press ▲ or ▼ to highlight Time, then press ENTER. The Settings-Time menu opens.

4 Press ▲ or ▼ to highlight Mode, then press ◀ or ▶ to select Custom (to set the date and time manually, or Auto (to have the date and time set automatically from a TV signal source, based on your time zone).
5 If you selected Auto for Mode, press ▲ or ▼ to highlight Time Zone, then press ◀ or ▶ to select your time zone. You can select Eastern, Central, Mountain, Pacific, Alaska, Hawaii, Atlantic, or Newfoundland.
6 If your viewing area observes daylight savings time, press ▲ or ▼ to highlight Daylight Savings Time, then press ◀ or ▶ to select On or Off.
7 If you selected Custom for Mode:
- Pre▲ or ▼ to highlight Year, Month, or Day, then press ◀ or ▶ to adjust the setting.
- P r e ▲ or ▼ to highlight Time, press ◀ or ▶ to highlight the hour, minute, or AM/PM field, then press ▲ or ▼ to adjust the setting.
8 Press EXIT to close the menu.
Setting the sleep timer
You can set the amount of time before your TV automatically turns off.
To set the sleep timer:
1 Press MENU. The on-screen menu opens with the Picture menu displayed.

2 Press ◀ or ▶ to highlight Settings, then press ▼. The Settings menu opens.
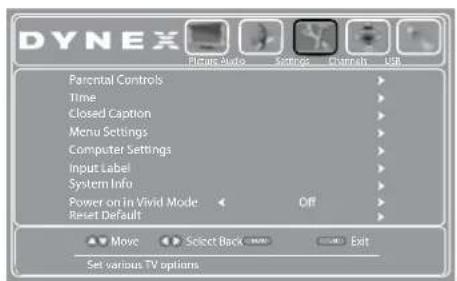
3 Press ▲ or ▼ to highlight Time, then press ▶ or ENTER. The Settings-Time menu opens.
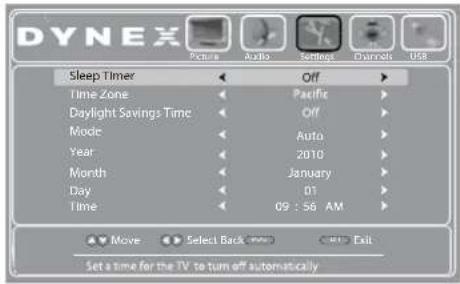
4 Press ▲ or ▼ to highlight Sleep Timer, then press ◀ or ▶ to select the amount of time (Off, 5 minutes, 10 minutes, 15 minutes, 30 minutes, 60 minutes, 90 minutes, 120 minutes, 180 minutes, 240 minutes) before your TV turns off automatically. To turn the sleep timer off, select Off.
5 Press EXIT to close the menu.

Adjusting menu settings
Selecting the menu language
To select the on-screen menu language:
1 Press MENU. The on-screen menu opens with the Picture menu displayed.
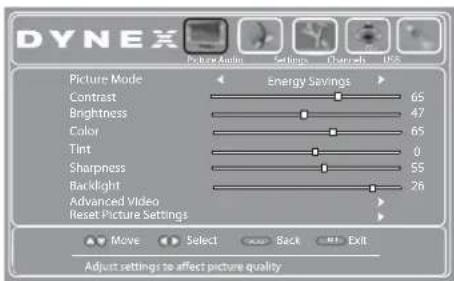
2 Press ◀ or ▶ to highlight Settings, then press ▼. The Settings menu opens.

3 Press ▲ or ▼ to highlight Menu Settings, then press ▶ or ENTER. The Settings-Menu Settings menu opens with Menu Language highlighted.
4 Press ◀ or ▶ to select the menu language. You can select English, French, or Spanish.
5 Press EXIT to close the menu.
Labeling an input source
You can add a label to a video input source to make it easier to identify. These labels are displayed on the INPUT SOURCE list and on the banner that appears when you press INFO.
To label an input source:
1 Press MENU. The on-screen menu opens with the Picture menu displayed.

2 Press ◀ or ▶ to highlight Settings, then press ▼. The Settings menu opens.

3 Press ▲ or ▼ to highlight Input Labels, then press ENTER. The Settings-Input Label screen opens with Present Label highlighted.
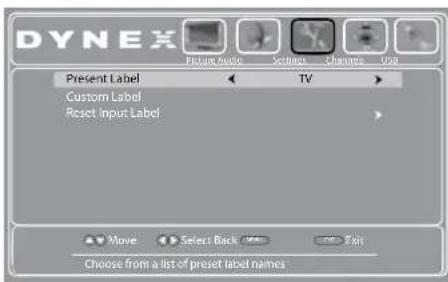
4 Press ◀ or ▶ to select a preset label from several options, or select Custom to enter your own label.
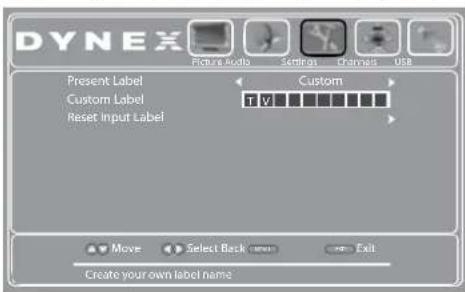
5 If you select Custom, press ▲ or ▼ to highlight Custom Label, then press ▶.
6 Press ▲ or ▼ to select a character.
7 Press ▶ to move to the next position. Repeat this step to enter additional characters. You can enter as many as 10 characters. If you need to delete a character, enter a blank space, then press ENTER.
8 When you complete the label, press MENU. The next time you press INPUT, the new label appears in the INPUT SOURCE list.
9 Press EXIT to close the menu.
Restoring settings to default
Caution
When you restore default settings, all the settings (except the password and parental rating) you have customized are reset.
To restore settings to default:
1 Press MENU. The on-screen menu opens with the Picture menu displayed.

2 Press ◀ or ▶ to highlight Settings, then press ▼. The Settings menu opens.

3 Press ▲ or ▼ to highlight Reset Default, then press ENTER. A confirmation box opens.
4 Press ◀ or ▶ to select Yes (to reset all settings to factory default), or No (to not reset).
5 Press EXIT to close the menu.
Using a USB flash drive
You can connect a USB flash drive to your TV to view compatible JPEG pictures.
Notes
The JPEG picture viewer only supports JPEG format images (with ".jpg" file extensions).
Not all JPEG files are compatible with your TV.
Switching to USB mode
To switch to USB mode:
1 Make sure that you have connected the USB flash drive to the USB port on the side of your TV.
2 Press INPUT. The INPUT SOURCE list opens.
3 Press ▲ or ▼ to highlight USB, then press ENTER.
Note
To exit USB mode, press INPUT to open the INPUT SOURCE list, then select another input source.
Browsing photos
To browse photos on a USB flash drive:
1 Switch to USB mode (see "Switching to USB mode" on page 33).
2 Press MENU. The USB menu opens.

3 Press ▼ to access the menu. Photos is highlighted.

4 Press ENTER to access the menu. The USB Photos menu opens with Browse Photos highlighted.

5 Press ENTER. The screen displays folder names and photo files stored on the USB flash drive in a thumbnail index with the first photo or folder highlighted. A control bar appears at the bottom of the screen.
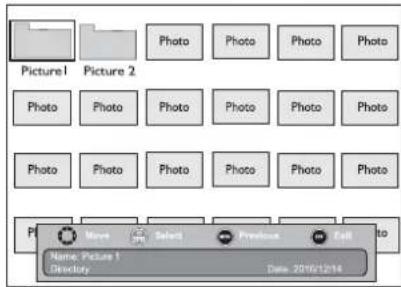
6 To navigate the thumbnail index screen, press:
- ▲▼◀ or ▶ to browse through the files and folders.
- ENTER to view a highlighted photo full screen, or open a highlighted folder.
- MENU to open the USB menu.
- FAV or FAVORITE to add or remove a photo from the favorite photo list. A heart appears on a photo that has been added to the list.
- EXIT to return to the USB menu.
When a photo is displayed full screen, a control bar appears at the bottom of the photo. The file name, picture resolution, size, and date are displayed on the bottom of the control bar. If you do not press a button within 10 seconds, the control bar closes. Press any button to open the control bar again.
7 To navigate the photo screen, press:
• ◀ to go to the previous photo.
• ▶ to go to the next photo.
- ENTER to rotate the photo clockwise.
- ZOOM one or more times to enlarge the image by x2 or x4, or to select Fill (to display the photo at its actual size). You can press ▲▼◀ or ▶ to pan the photo.
- EXIT to return to the thumbnail index.
- MENU to return to the USB menu.
Viewing your favorite photos
After you have created your favorite photo list, you can browse your favorite photos quickly.
To view your favorite photos:
1 Switch to USB mode (see "Switching to USB mode" on page 33).
2 Press MENU. The USB menu opens.

3 Press ▼ to access the Photos menu. Photos is highlighted.
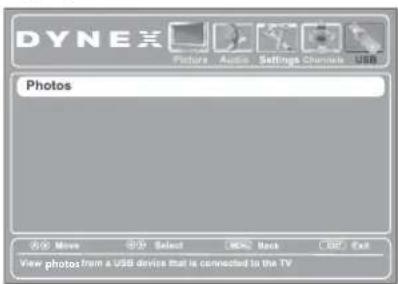
4 Press ENTER to access the USB Photos menu. The USB Photos menu opens.
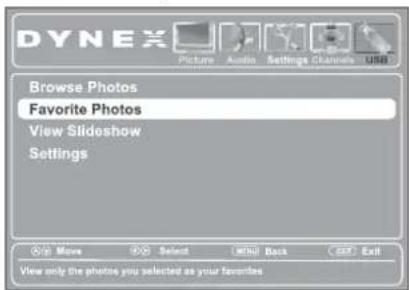
5 Press ▲ or ▼ to highlight Favorite Photos, then press ENTER. A thumbnail index of your favorite photos opens with a control bar at the bottom of the screen.

6 You can select photos and navigate on the photo screen the same way you browse photos. For information, see "Browsing photos" on page 33.
Viewing photos in a slideshow
To view photos in a slideshow:
1 Switch to USB mode (see "Switching to USB mode" on page 33).
2 Press MENU. The USB menu opens.

3 Press ▼ to access the Photos menu. Photos is highlighted.
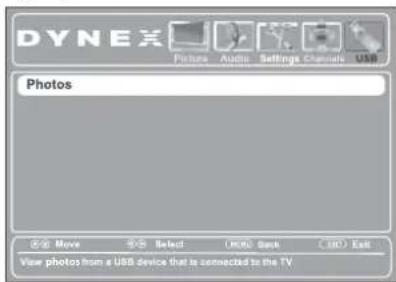
4 Press ENTER to access the USB Photos menu. The USB Photos menu opens.

5 Press ▲ or ▼ to highlight View Slideshow, then press ENTER. A slideshow begins with the first photo in the current folder.
When a photo is displayed full screen, a control bar appears at the bottom of the photo. The file name, picture resolution, size, and date are displayed on the bottom of the control bar. If you do not press a button within 10 seconds, the control bar closes. Press any button to open the control bar again.

6 To control the slideshow, press:
- ENTER to pause or start the slideshow.
- EXIT to exit the slideshow and return to the thumbnail index.
- MENU to return to the USB menu.
Customizing slideshow settings
You can customize the slideshow settings by selecting Repeat, Shuffle, Speed, and Transition settings.
To customize slideshow settings:
1 Switch to USB mode (see "Switching to USB mode" on page 33).
2 Press MENU. The USB menu opens.
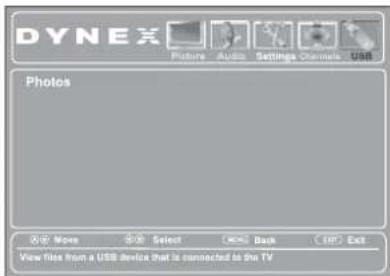
3 Press ▼ to access the Photos menu. Photos is highlighted.
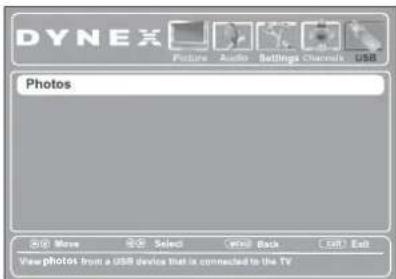
4 Press ENTER to access the USB Photos menu. The USB Photos menu opens.

5 Press ▲ or ▼ to highlight Settings, then press ENTER. The USB Photos Settings menu opens.
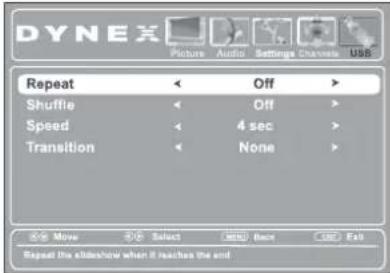
6 Press ▲ or ▼ to highlight an option, then press ENTER. You can select:
- Repeat—To repeat the slideshow when it reaches the end. You can select On or Off.
- Shuffle—To display the photos in random order. You can select On or Off.
- Speed—To set the amount of time a photo is displayed before the next photo is shown. You can select 4 sec, 6 sec, or 8 sec.
• Transition—To select the way photos transition when moving to the next file in the slideshow. You can select:
• None—for no transition effect. - Fade to Black—to fade the screen to black between photos.
• Vertical Wipe—to wipe the screen from top to bottom between photos.
• Horizontal Wipe—to wipe the screen from left to right between photos. - Random—To randomly select a transition effect.
7 Press EXIT to close the menu.
Maintaining
- Do not use your TV in areas that are too hot or too cold, because the cabinet may warp or the screen may malfunction. Your TV works best in temperatures that are comfortable to you.
- Storage temperatures are 32° to 122°F (0° to 50°C).
- Working temperatures are 41° to 104°F (5° to 40°C).
- Do not place your TV in direct sunlight or near a heat source.
Cleaning
Before cleaning the screen, unplug your TV from the power outlet.
Clean your TV with a soft, lint-free cloth. If surfaces are extremely dirty, use a soft cloth dampened with a weak detergent solution.
Use an eyeglass cleaner to clean the screen. Never use alcohol, paint thinner, or benzine.
Before using a chemically treated cloth, read the instructions that came with the cloth.
Do not spray insecticide liquid near your TV. Such chemicals may cause damage and discoloration to the exposed surfaces.
Servicing
Do not try to repair your TV yourself. There are no user-serviceable parts inside. Turn off your TV, unplug the power cord, then contact an authorized service center.
Troubleshooting
Warning
Do not try to repair your TV yourself. Contact authorized service personnel.
Video and audio
| Problem Solution | |
| Picture does not fill the screen. There are black bars around the picture. | · Change the aspect ratio. An increasing amount of digital TV and movies are presented in wide screen (16:9). See “Adjusting the TV picture” on page 21. |
| No picture (screen is not lit) and no sound. | · Press on the TV or the remote control. · Make sure that the video cables are connected securely to the back of your TV. · Adjust the contrast and brightness. See “Adjusting the TV picture” on page 21. · Make sure that the power cord is plugged in. · Make sure that the correct video input source is selected. See “Selecting the video input source” on page 19. · Try another channel. The station may be experiencing problems. · Make sure that the incoming signal is compatible. · Make sure that the antenna or cable TV is connected correctly and securely. See “Connecting a cable or satellite box” on page 9 or “Connecting an antenna or cable TV (no box)” on page 11. · Check the closed caption settings. Some TEXT modes can block the screen. |
| Picture quality is good on some channels and poor on others. Sound is good. | · The problem may be caused by a poor or weak signal from the broadcaster or cable TV provider. · If you connect to cable or satellite TV without a set-top box and experience poor picture quality, you may need to install a set-top box to improve signal reception and picture quality. Contact your cable or satellite TV provider about upgrading to a set-top box. |
| Problem Solution | |
| Dark, poor, or no picture (screen is lit), but sound is good. | Try another channel. The station may be experiencing problems.Make sure that the antenna or cable TV is connected correctly and securely. See “Connecting a cable or satellite box” on page 9 or “Connecting an antenna or cable TV (no box)” on page 11.Make sure thatAudio Onlyoption is set to Off. See “Playing TV audio only” on page 23.Adjust the brightness. See “Adjusting the TV picture” on page 21.Make sure that the correct picture mode is selected. See “Adjusting the TV picture” on page 21.If you are using an antenna, the digital channel signal may be low. To check the digital channel signal strength, see “Checking the digital signal strength” on page 26.If you are using an antenna and the signal strength is low, adjust the antenna or use a highly directional outdoor antenna or set-top antenna with a built-in amplifier.Make sure that the video cables are connected securely to the back of your TV.The video cable(s) you are using may be bad. Try a new set. |
| No color, dark picture, or color is not correct. | Try another channel. The station may be experiencing problems.Adjust the color saturation. See “Adjusting the TV picture” on page 21.Make sure that the video cables are connected correctly and securely to the back of your TV.Make sure that the antenna or cable TV is connected correctly and securely. See “Connecting a cable or satellite box” on page 9 or “Connecting an antenna or cable TV (no box)” on page 11.If you are using an antenna, the digital channel signal may be low. To check the digital channel signal strength, see “Checking the digital signal strength” on page 26.If you are using an antenna and the signal strength is low, adjust the antenna or use a highly directional outdoor antenna or set-top antenna with a built-in amplifier. |
| Only snow (noise) appears on the screen. | Try another channel. The station may be experiencing problems.Make sure that the antenna or cable TV is connected correctly and securely. See “Connecting a cable or satellite box” on page 9 or “Connecting an antenna or cable TV (no box)” on page 11.If you are using an antenna, the digital channel signal may be low. To check the digital channel signal strength, see “Checking the digital signal strength” on page 26.If you are using an antenna and the signal strength is low, adjust the antenna or use a highly directional outdoor antenna or set-top antenna with a built-in amplifier. |
| Dotted lines or stripes appear on the screen. | Make sure that the antenna or cable TV is connected correctly and securely. See "Connecting a cable or satellite box" on page 9 or "Connecting an antenna or cable TV (no box)" on page 11.If you are using an antenna, the digital channel signal may be low. To check the digital channel signal strength, see "Checking the digital signal strength" on page 26.If you are using an antenna and the signal strength is low, adjust the antenna or use a highly directional outdoor antenna or set-top antenna with a built-in amplifier.Make sure that the video cables are connected securely to the back of your TV.The video cable(s) you are using may be bad. Try a new set.Other devices (for example, surround sound receiver, external speakers, fans, or hair dryers) may be interfering with your TV. Try turning off one device at a time to determine which device is causing interference. After you have determined which device is causing interference, move it further from the TV to eliminate the interference. |
| Double images. Use a highly directional outdoor antenna, cable TV, or satellite TV. | |
| The picture has a few bright or dark spots. | A few bright or dark spots on an LCD screen is normal. It does not affect the operation of this TV. |
| Good picture, but no sound. | Increase the volume.Unplug the headphones.Make sure that the sound is not muted.Make sure that the correct audio mode is selected.Make sure that the audio cables are connected correctly and securely to the back of your TV.Make sure that the antenna or cable TV is connected correctly and securely. See "Connecting a cable or satellite box" on page 9 or "Connecting an antenna or cable TV (no box)" on page 11.If you are using an antenna, the digital channel signal may be low. To check the digital channel signal strength, see "Checking the digital signal strength" on page 26.The audio cable(s) you are using may be bad. Try a new set. |
| Poor picture. Make sure that the room is not too bright.Light reflecting off the screen can make the picture difficult to see.If an S-VHS camera or a camcorder is connected while another connected device is turned on, the picture may be poor. Turn off one or more devices. | |
| Good sound but poor color. | Adjust the contrast, color, and brightness settings. |
| Audio noise. Other devices (for example, surround sound receiver, external speakers, fans, or hair dryers) may be interfering with your TV. Try turning off one device at a time to determine which device is causing interference. After you have determined which device is causing interference, move it further from the TV to eliminate the interference. | |
| Problem Solution | |
| No output from one of the speakers. | Adjust the audio balance. See “Adjusting sound settings” on page 22.Make sure that the audio cables are connected correctly and securely to the back of your TV. |
| After images appear. | Do not display a still image, such as a logo, game, or computer image, for an extended period of time. This can cause a permanent after-image to be burned into the screen. This type of damage is not covered by your warranty. |
Remote control
| Problem Solution | |
| Remote control does not work. | Make sure that the power cord is correctly connected to your TV and a power outlet.Make sure that there are no obstructions between the remote control and the remote control sensor on the front of the TV.Point the remote control directly at the remote control sensor on your TV. For the location of the remote control sensor, see "Front" on page 5.Make sure that the batteries are installed correctly. See "Installing remote control batteries" on page 17.Replace dead batteries with new batteries.See "Installing remote control batteries" on page 17. |
| Trouble programming your existing universal remote control. | See instructions and a table of common codes in "Programming a different universal remote control" on page 39.Codes are subject to change. For up-to-date codes, go to www.dynexproducts.com/remotecodes.Replace dead batteries with new batteries.See "Installing remote control batteries" on page 17.Refer to the User Guide that accompanied your universal remote control and contact the manufacturer if problems persist. |
General
| Problem Solution | |
| No power. • Make sure that the power cord is correctly connected to your TV and a power outlet. • Unplug the power cord, wait 60 seconds, then plug the cord back in and turn on your TV. • Other devices (for example, surround sound receiver, external speakers, fans, or hair dryers) may be interfering with your TV. Try turning off one device at a time to determine which device is causing interference. After you have determined which device is causing interference, move it further from the TV to eliminate the interference. | |
| “No signal” error message is displayed. | • Press INPUT and make sure that you have selected the correct input for the device or service you are trying to use. • If you are using a cable or satellite box, use the remote that came with that box to change channels. |
| After Auto Channel Search, there are no channels. | • Reception can vary by channel depending on the broadcast power level of a given station. Contact your cable or satellite TV provider.• Make sure that the antenna or cable/satellite box is connected securely to your TV.• Try replacing the cable between the antenna/cable or cable/satellite box and your TV. |
| One or more channels do not display. | • Make sure that the channels are not blocked. See “Setting parental control levels” on page 27.• Make sure that the channels are not hidden. The channel may have been deleted from the channel list. You can tune to the channel by pressing the number buttons or you can add the channel back to the channel list. See “Hiding channels” on page 24.• If you are using a cable or satellite box, use the remote that came with that box to change channels.• Make sure that you have the correct input selected to view channels from the cable or satellite box.• If you are using an antenna, the digital channel signal may be low. To check the digital channel signal strength, see “Checking the digital signal strength” on page 26. |
| Password is lost. | • Enter 9999 to access parental controls, then set a new password. See “Setting or changing the password” on page 26. |
| Some settings cannot be accessed. | • If a setting is grayed, the setting is not available in the current video input mode. |
| TV cabinet creaks. | • When the TV is in use, the temperature rises naturally and may cause the cabinet to expand or contract which can cause a creaking noise. This is not a malfunction. |
| Control buttons do not work. | • Make sure that the Button Lock option is set to No. See “Locking control buttons” on page 27.• Unplug the power cord, wait a few seconds, then plug the cord back in and turn on your TV. |
| TV keeps turning off. | • Make sure that the sleep timer is not turned on. See “Setting the sleep timer” on page 31. |
If the problem is not solved by using these troubleshooting instructions, turn off your TV, then turn it on again.
Note
Specifications
Specifications are subject to change without notice.
Warranty
| DX-26L100A13 |
| Parts: 1 yearLabor: 1 year |
Dimensions and weight
| DX-26L100A13 |
| Without stand:4.1 x 26.2 x16.9 in.(10.36 x 66.44 x 42.84 cm)14.52 lbs (6.6 kg) |
| With stand:7.9 x 26.2 x 18.4 in. (19.98 x 66.44 x 46.72 cm)15.4 lbs (7.0 kg) |
Screen
| DX-26L100A13 | |
| Screen size measured diagonally 26" | |
| Display type LCD | |
| Panel 60 Hz vs.120 Hz 60Hz | |
| Display resolution 720p | |
| Panel resolution 1366 (H) × 768 (V) | |
| Aspect ratio 16:9 | |
| Contrast ratio (typical)-panel 800:1 | |
| Dynamic contrast ratio-list value 1300:1 | |
| Brightness (center typical) cd/m2 | 250 nits |
| Comb filter | 3d y/c digital |
| Response time | 5 ms |
| Horizontal viewing angle | 140 |
| Vertical viewing angle | 140 |
Display resolutions/VGA scan rates
| DX-26L100A13 | |
| HDMI 1.3 | Suggested Resolutions: 1080p, 1080i, 720p, 480p, 480i |
| Component video | Suggested Resolutions: 1080i, 720p, 480p, 480i |
| PC/VGA | Suggested scan rates: 640 × 480/60Hz, 800 × 600/60Hz, 1024 × 768/60Hz, 1360 × 768/60Hz |
Tuner
| DX-26L100A13 | |
| Analog | NTSC |
| Digital | ATSC, 8-VSB, Clear-QAM |
Inputs
| DX-26L100A13 | |
| HDMI/DVI | 3 (side)E-EDID compliantHDCP compliantDVI to HDMI1 only |
| Component video | 1 (side) |
| Composite video 1 (side) | |
| Shared audio (component and composite) | No |
| S-Video No | |
| PC/VGA 1 (side) | |
| 3.5mm PC audio input 1 (side) | |
| USB 1 (side) | Supports JPEG and firmware upgrade |
Outputs
| DX-26L100A13 | |
| Video No | |
| Analog audio 1 (side) | |
| Digital audio 1 Coaxial (side) | |
| WiFi No | |
| Ethernet No | |
| Headphone 1 (side) | |
Audio
| DX-26L100A13 | |
| Watts/Channel 6W | |
| Number of Speakers | 2 |
Power
| DX-26L100A13 | |
| Power consumption | On: 75 WStandby: <1 W |
| Power input | 120V/60Hz |
Miscellaneous
| DX-26L100A13 | |
| OSD languages | English, French, Spanish |
| INlink No | |
| Game Mode | No |
| ENERGY STAR qualified | No |
| Internet connectable | No |
| TV base screws | M4 type (16 mm length)(6 pcs) |
| V-Chip (version 2.0) | Yes |
| Sleep timer | Yes |
| Channel labeling | No |
| VESA mount (mm)(horizontal × vertical) | 200 × 100 |
Note
The length of the wall-mount screws vary depending on the wall-mount bracket you purchased. See the instructions that came with the wall-mount bracket for screw lengths.
Programming universal remote controls
Programming a different universal remote control
You can operate your Dynex TV with a new or existing universal remote control.
To program a different universal remote control:
1 See the table below for common codes. If you have problems programming your remote or need a different remote control code, visit www.dynexproducts.com/remotecodes for the latest remote control code information.
2 Follow your universal remote control's instructions to enter the TV code you found in Step 1.
Tips
- If your universal remote control has a code search feature, run a code search to identify a code that matches your TV. See your universal remote control's instructions for details.
- If your universal remote control has a "Learn" feature, you can manually program it using the Dynex TV remote to "teach" the commands one at a time. See your universal remote control's instructions for details.
For additional help and information...
- Visit http://www.dynexproducts.com/remotecodes
- Call technical support for the universal remote control or cable/satellite company of the remote/set-top box you are trying to program.
- Call the Dynex Customer Care Center 1-800-305-2204
Common universal remote control codes
Notes
• This note only goes with TV/Blu-ray or TVs.
- The following codes may not provide full functionality. You may need to use the remote control that came with your TV, especially to control the Blu-ray or DVD functions.
The following is a list of the most common remote control codes. Codes for other remote controls are available online at: www.dynexproducts.com/remotecodes, or check with your cable or satellite TV provide for the remote control code.
Dynex TV codes for universal remote controls (for all Dynex TVs manufactured after Jan. 1, 2007)
| Universal remote control makes and models | |
| One for All | 0054 |
| Phillips | 0198, 0490 |
| RCA | 135 |
| Sony | 068, 069, 078, 096, 100, 164, 168, 229, 026 |
Set-top box makes and models
| Cablevision | 068, 069, 078, 096, 100, 164, 168, 229, 026 |
| Charter | 2002, 1204, 1423, 1517, 0171, 1963, 0463, 1463, 0842, 1326, 167, 415, 424, 450, 456, 461, 507, 523, 567, 577, 586 |
| Comcast | 10171, 11204, 11326, 11463, 11517, 11641, 11780, 11785, 11892, 11963, 12002 |
| Cox 1326, 1463 | |
| DirectTV | 10171, 11204, 11326, 11517, 11564, 11641, 11963, 12002 |
| Dish Network 720 | |
| Time Warner | 400, 450, 461, 456, 11463, 1463, 0463 |
| TiVo 0091 | |
| Verizon 0198, 0490 | |
Tips
- The brand name is often visible on the front of the universal remote control, and the model number is often visible on the back.
- If your universal remote control isn't listed on the chart, refer to your universal remote control's instructions and try codes for the brands Orion, Emerson, Memorex, Sansui, Sylvania, or Zenith. You may need to try several codes before finding a match.
Legal notices
FCC Part 15
This device complies with Part 15 of the FCC Rules. Operation of this product is subject to the following two conditions: (1) this device may not cause harmful interference, and (2) this device must accept any interference received, including interference that may cause undesired operation. This equipment has been tested and found to comply within the limits for a class B digital device, pursuant to Part 15 of the FCC Rules. These limits are designed to provide reasonable protection against harmful interference in a residential installation. This equipment generates, uses, and can radiate radio frequency energy and, if not installed and used in accordance with the instructions, may cause harmful interference to radio communications. However, there is no guarantee that interference will not occur in a particular installation. If this equipment does cause harmful interference to radio or television reception, which can be determined by turning the equipment off and on, the user is encouraged to try to correct the interference by one or more of the following measures:
- Reorient or relocate the receiving antenna.
-
Increase the separation between the equipment and receiver.
-
Connect the equipment into an outlet on a circuit different from that to which the receiver is connected.
- Consult the dealer or an experienced technician for help.
FCC warning
Changes or modifications not expressly approved by the party responsible for compliance with the FCC Rules could void the user's authority to operate this equipment.
Canada ICES-003 statement
Connections to this device must be made with shielded cables with metallic RF/EMI connector hoods to maintain compliance with FCC Rules and Regulations.
HDMI

The terms HDMI and HDMI High-Definition Multimedia Interface, and the HDMI Logo are trademarks or registered trademarks of HDMI Licensing LLC in the United States and other countries.
Dolby Laboratories

Dolby, Pro Logic, and the double-D symbol are trademarks of Dolby Laboratories.
One-year limited warranty - Dynex Televisions
Definitions:
Dynex Products ("Dynex") warrants to you, the original purchaser of this new Dynex-branded television ("Product"), that the Product shall be free of defects in the original manufacturer of the material or workmanship for a period of one (1) year from the date of your purchase of the Product ("Warranty Period"). For this warranty to apply, your Product must be purchased in the United States or Canada from a Best Buy or Future Shop authorized dealer of Dynex brand products only that are packaged with this warranty statement.
How long does the coverage last?
The Warranty Period lasts for 1 year (365 days) from the date you purchased the Product. Your purchase date is printed on the receipt you received with the Product.
What does this warranty cover?
During the Warranty Period, if the original manufacture of the material or workmanship of the Product is determined to be defective by an authorized Dynex repair center or store personnel, Dynex will (at its sole option): (1) repair the Product with new or rebuilt parts; or (2) replace the Product at no charge with new or rebuilt comparable products or parts. Products and parts replaced under this warranty become the property of Dynex and are not returned to you. If service of Products or parts are required after the Warranty Period expires, you must pay all labor and parts charges. This warranty lasts as long as you own your Dynex Product during the Warranty Period. Warranty coverage terminates if you sell or otherwise transfer the Product.
How to obtain warranty service?
If you purchased the Product at a Best Buy or Future Shop retail store location and your television Product has a screen size of less than 42 inches, please take your original receipt and the Product to any Best Buy or Future Shop store. Make sure that you place the Product in its original packaging or packaging that provides the same amount of protection as the original packaging. If you purchased the Product from a Best Buy or Future Shop online web site, mail your original receipt and the Product to the address listed on the web site. Make sure that you put the Product in its original packaging or packaging that provides the same amount of protection as the original packaging. To obtain in-home warranty service for a television with a screen 42 inches or larger, in the United States call 1-888-BESTBUY, Canada call 1-866-BESTBUY for Future Shop call 1-800-663-2275. Call agents will diagnose and correct the issue over the phone or will have an Dynex-approved repair technician dispatched to your home.
Where is the warranty valid?
This warranty is valid only in the United States and Canada at Best Buy or Future Shop branded retail stores or websites to the original purchaser of the product in the county where the original purchase was made.
What does the warranty not cover?
This warranty does not cover:
- Customer instruction/education
- Installation
- Set up adjustments
- Cosmetic damage
- Damage due to acts of God, such as power surges
• Accident (s) - Misuse
• A b u s e - Negligence
- Commercial purposes/use, including but not limited to use in a place of business or in communal areas of a multiple dwelling condominium or apartment complex, or otherwise used in a place of other than a private home.
- Modification of any part of the Product, including the antenna
- Plasma display panel damaged by static (non-moving) images applied for lengthy periods (burn-in).
• Damage due to incorrect operation or maintenance - Connection to an incorrect voltage or power supply
- Attempted repair by any person not authorized by Dynex to service the Product
- Products sold "as is" or "with all faults"
-
Consumables, including but not limited to batteries (i.e. AA, AAA, C etc.)
-
Products where the factory applied serial number has been altered or removed
- Loss or Theft of this product or any part of the product
- Up to three (3) pixel failures (dots that are dark or incorrectly illuminated) grouped in an area smaller than one tenth (1/10) of the display size or up to five (5) pixel failures throughout the display. (Pixel based displays may contain a limited number of pixels that may not function normally.)
- Failures or Damage caused by any contact including but not limited to liquids, gels or pastes.
REPAIR REPLACEMENT AS PROVIDED UNDER THIS WARRANTY IS YOUR EXCLUSIVE REMEDY FOR BREACH OF WARRANTY. DYNEX SHALL NOT BE LIABLE FOR ANY INCIDENTAL OR CONSEQUENTIAL DAMAGES FOR THE BREACH OF ANY EXPRESS OR IMPLIED WARRANTY ON THIS PRODUCT, INCLUDING, BUT NOT LIMITED TO, LOST DATA, LOSS OF USE OF YOUR PRODUCT, LOST BUSINESS OR LOST PROFITS. DYNEX PRODUCTS MAKES NO OTHER EXPRESS WARRANTIES WITH RESPECT TO THE PRODUCT, ALL EXPRESS AND IMPLIED WARRANTIES FOR THE PRODUCT, INCLUDING, BUT NOT LIMITED TO, ANY IMPLIED WARRANTIES OF AND CONDITIONS OF MERCHANTABILITY AND FITNESS FOR A PARTICULAR PURPOSE, ARE LIMITED IN DURATION TO THE WARRANTY PERIOD SET FORTH ABOVE AND NO WARRANTIES, WHETHER EXPRESS OR IMPLIED, WILL APPLY AFTER THE WARRANTY PERIOD. SOME STATES, PROVINCES AND JURISDICTIONS DO NOT ALLOW LIMITATIONS ON HOW LONG AN IMPLIED WARRANTY LASTS, SO THE ABOVE LIMITATION MAY NOT APPLY TO YOU. THIS WARRANTY GIVES YOU SPECIFIC LEGAL RIGHTS, AND YOU MAY ALSO HAVE OTHER RIGHTS, WHICH VARY FROM STATE TO STATE OR PROVINCE TO PROVINCE.
Contact Dynex:
For customer service please call 1-800-305-2204
www.dynexproducts.com
Distributed by Best Buy Purchasing, LLC
7601 Penn Avenue South, Richfield, Minnesota, U.S.A. 55423-3645
© 2012 BBY Solutions, Inc.
All rights reserved. DYNEX is a trademark of BBY Solutions, Inc. Registered in some countries. All other products and brand names are trademarks of their respective owners.
DYNEX™
www.dynexproducts.com
US and Canada Market - (800) 305-2204
Distributed by Best Buy Purchasing, LLC
7601 Penn Ave. South, Richfield, MN 55423 U.S.A.
2012 BBY Solutions, Inc. All rights reserved.
DYNEX is a trademark of BBY Solutions, Inc. Registered in some countries. All other products and
brand names are trademarks of their respective owners.
- CHILD SAFETY
- IT MAKES A DIFFERENCE HOW AND WHERE YOU USE YOUR FLAT PANEL DISPLAY
- AS YOU ENJOY YOUR NEW PRODUCT, KEEP THESE SAFETY TIPS IN MIND
- THE ISSUE
- TUNE INTO SAFETY
- WALL MOUNTING
- IMPORTANT SAFETY INSTRUCTIONS
- WARNING
- ELECTRIC SHOCK HAZARD
- LIGHTNING
- POWER LINES
- HANDLING THE LCD PANEL
- REPLACEMENT PARTS
- SAFETY CHECK
- POWER SOURCE
- SERVICING
- CAUTION
- DAMAGE REQUIRING SERVICE
- OUTDOOR ANTENNA GROUNDING
- NOTE TO CATV SYSTEM INSTALLER
- CONDENSATION
- MOBILE TELEPHONE WARNING
- END OF LIFE DIRECTIVES
- NON-ACTIVE PIXELS
- INSTALLING THE STAND OR WALL-MOUNT BRACKET
- NOTES
- INSTALLING THE STAND
- INSTALLING A WALL-MOUNT BRACKET
- TO ATTACH YOUR TV TO A WALL-MOUNT BRACKET
- NOTE
- TV COMPONENTS
- PACKAGE CONTENTS
- MAKING CONNECTIONS
- WHAT CONNECTION SHOULD I USE
- CAUTIONS
- CONNECTING POWER
- TO CONNECT THE POWER
- CONNECTING A CABLE OR SATELLITE BOX
- USING HDMI (BEST)
- TO CONNECT A CABLE OR SATELLITE BOX USING HDMI
- USING DVI (SAME AS HDMI BUT REQUIRES AN AUDIO CONNECTION)
- TO CONNECT A CABLE OR SATELLITE BOX USING DVI
- USING COMPONENT VIDEO (BETTER)
- TO CONNECT A CABLE OR SATELLITE BOX USING COMPONENT VIDEO
- USING COMPOSITE VIDEO (GOOD)
- TO CONNECT A CABLE OR SATELLITE BOX USING COMPOSITE VIDEO
- CONNECTING AN ANTENNA OR CABLE TV (NO BOX)
- TO CONNECT AN ANTENNA OR CABLE TV (NO BOX)
- CONNECTING A DVD OR BLU-RAY PLAYER
- USING HDMI
- TO CONNECT A DVD OR BLU-RAY PLAYER USING HDMI
- TO PLAY FROM A DVD OR BLU-RAY PLAYER
- USING DVI
- TO CONNECT A DVD OR BLU-RAY PLAYER USING DVI
- TO CONNECT A DVD OR BLU-RAY PLAYER USING COMPONENT VIDEO
- TO PLAY FROM THE DVD OR BLU-RAY PLAYER
- TO CONNECT A DVD OR BLU-RAY PLAYER USING COMPOSITE VIDEO
- CONNECTING A VCR
- TO CONNECT A VCR
- TO PLAY FROM THE VCR
- CONNECTING A CAMCORDER OR GAME CONSOLE
- TO CONNECT A CAMCORDER OR GAME CONSOLE
- TO PLAY FROM THE CAMCORDER OR GAME CONSOLE
- CONNECTING A COMPUTER
- TIP
- USING VGA
- TO CONNECT A COMPUTER USING VGA
- TO PLAY VIDEO FROM THE COMPUTER
- TO CONNECT A COMPUTER USING HDMI
- CONNECTING A USB FLASH DRIVE
- TO CONNECT A USB FLASH DRIVE
- TO PLAY FROM A USB FLASH DRIVE
- CONNECTING HEADPHONES
- TO CONNECT HEADPHONES
- CONNECTING A BASIC HOME THEATER SYSTEM
- TO CONNECT A BASIC HOME THEATER SYSTEM USING ANALOG AUDIO
- TO CONNECT A BASIC HOME THEATER SYSTEM USING DIGITAL AUDIO
- CONNECTING A HOME THEATER SYSTEM WITH MULTIPLE DEVICES
- USING THE REMOTE CONTROL
- INSTALLING REMOTE CONTROL BATTERIES
- TO INSTALL THE REMOTE CONTROL BATTERIES
- AIMING THE REMOTE CONTROL
- TO AIM THE REMOTE CONTROL
- TURNING ON YOUR TV FOR THE FIRST TIME
- TO SET UP YOUR TV
- UNDERSTANDING THE BASICS
- TURNING YOUR TV ON OR OFF
- TO TURN YOUR TV ON OR OFF
- SELECTING THE VIDEO INPUT SOURCE
- TO SELECT THE VIDEO INPUT SOURCE
- USING THE ON-SCREEN MENUS
- NAVIGATING THE MENUS
- SELECTING A CHANNEL
- TO SELECT A CHANNEL
- ADJUSTING THE VOLUME
- TO ADJUST THE VOLUME
- VIEWING PROGRAM INFORMATION
- TO VIEW CHANNEL INFORMATION
- ADJUSTING THE PICTURE
- ADJUSTING THE TV PICTURE
- TO ADJUST THE TV PICTURE
- ADJUSTING THE COMPUTER IMAGE
- TO ADJUST THE COMPUTER IMAGE
- ADJUSTING THE SOUND
- ADJUSTING SOUND SETTINGS
- TO ADJUST THE SOUND SETTINGS
- PLAYING TV AUDIO ONLY
- TO PLAY TV AUDIO ONLY
- CHANGING CHANNEL SETTINGS
- AUTOMATICALLY SCANNING FOR CHANNELS
- TO AUTOMATICALLY SCAN FOR CHANNELS
- HIDING CHANNELS
- TO HIDE CHANNELS
- SETTING UP A FAVORITE CHANNEL LIST
- TO SET UP A FAVORITE CHANNEL LIST
- VIEWING A FAVORITE CHANNEL
- TO VIEW A FAVORITE CHANNEL
- ADDING OR CHANGING A CHANNEL LABEL
- TO ADD OR CHANGE A CHANNEL LABEL
- CHECKING THE DIGITAL SIGNAL STRENGTH
- TO CHECK THE DIGITAL SIGNAL STRENGTH
- SETTING PARENTAL CONTROLS
- SETTING OR CHANGING THE PASSWORD
- TO SET OR CHANGE THE PASSWORD
- LOCKING CONTROL BUTTONS
- TO LOCK CONTROL BUTTONS
- SETTING PARENTAL CONTROL LEVELS
- TO SET PARENTAL CONTROL LEVELS
- RATINGS
- DOWNLOADING RATING INFORMATION
- TO DOWNLOAD RATING INFORMATION
- TO RESET THE RRT SETTING TO FACTORY DEFAULTS
- USING CLOSED CAPTIONING
- TURNING CLOSED CAPTIONING ON OR OFF
- TO TURN CLOSED CAPTIONING ON OR OFF
- SELECTING THE ANALOG CLOSED CAPTIONING MODE
- TO SELECT THE CLOSED CAPTIONING MODE
- CUSTOMIZING DIGITAL CLOSED CAPTIONING STYLES
- TO CUSTOMIZE DIGITAL CLOSED CAPTIONING STYLES
- ADJUSTING TIME SETTINGS
- SETTING THE CLOCK
- TO SET THE CLOCK
- SETTING THE SLEEP TIMER
- TO SET THE SLEEP TIMER
- ADJUSTING MENU SETTINGS
- SELECTING THE MENU LANGUAGE
- TO SELECT THE ON-SCREEN MENU LANGUAGE
- LABELING AN INPUT SOURCE
- TO LABEL AN INPUT SOURCE
- RESTORING SETTINGS TO DEFAULT
- TO RESTORE SETTINGS TO DEFAULT
- USING A USB FLASH DRIVE
- SWITCHING TO USB MODE
- TO SWITCH TO USB MODE
- BROWSING PHOTOS
- TO BROWSE PHOTOS ON A USB FLASH DRIVE
- VIEWING YOUR FAVORITE PHOTOS
- TO VIEW YOUR FAVORITE PHOTOS
- VIEWING PHOTOS IN A SLIDESHOW
- TO VIEW PHOTOS IN A SLIDESHOW
- CUSTOMIZING SLIDESHOW SETTINGS
- TO CUSTOMIZE SLIDESHOW SETTINGS
- MAINTAINING
- CLEANING
- TROUBLESHOOTING
- SPECIFICATIONS
- PROGRAMMING UNIVERSAL REMOTE CONTROLS
- PROGRAMMING A DIFFERENT UNIVERSAL REMOTE CONTROL
- TO PROGRAM A DIFFERENT UNIVERSAL REMOTE CONTROL
- TIPS
- FOR ADDITIONAL HELP AND INFORMATION
- COMMON UNIVERSAL REMOTE CONTROL CODES
- LEGAL NOTICES
- FCC PART 15
- FCC WARNING
- CANADA ICES-003 STATEMENT
- HDMI
- DOLBY LABORATORIES
- ONE-YEAR LIMITED WARRANTY - DYNEX TELEVISIONS
- DEFINITIONS
- HOW LONG DOES THE COVERAGE LAST
- WHAT DOES THIS WARRANTY COVER
- HOW TO OBTAIN WARRANTY SERVICE
- WHERE IS THE WARRANTY VALID
- WHAT DOES THE WARRANTY NOT COVER
Brand : Dynex
Model : DX-26L100A13
Category : Television