MPCD-X1 - CD Player Citronic - Free user manual and instructions
Find the device manual for free MPCD-X1 Citronic in PDF.


| Product Type | CD Player |
| Brand | Citronic |
| Model | MPCD-X1 |
| Dimensions (W x H x D) | 19" x 1.75" (1U) x 10" |
| Weight | 3.2 kg |
| Power Supply | AC 230V, 50Hz |
| Power Consumption | 15W |
| Disc Compatibility | CD, CD-R, CD-RW |
| Playback Functions | Program, Repeat, Random, A-B Repeat, Intro Scan |
| Audio Outputs | Analog RCA, Digital Coaxial, Headphone |
| Anti-Shock Protection | Yes (120 seconds for CD, 12 seconds for MP3) |
| Rack Mountable | Yes, 19" standard rack (brackets included) |
| Cleaning Instructions | Wipe with a soft, dry cloth. Do not use liquids or aerosols. |
| Safety Warnings | Do not open the unit. Use only with a grounded AC outlet. Keep away from moisture. |
| Spare Parts Availability | Laser pickup lens and drive belts available from authorized service centers. |
| Repair Policy | Repairs should be carried out by qualified personnel only. |
| Warranty | 2 years limited warranty |
Frequently Asked Questions - MPCD-X1 Citronic
User questions about MPCD-X1 Citronic
0 question about this device. Answer the ones you know or ask your own.
Ask a new question about this device
Download the instructions for your CD Player in PDF format for free! Find your manual MPCD-X1 - Citronic and take your electronic device back in hand. On this page are published all the documents necessary for the use of your device. MPCD-X1 by Citronic.
USER MANUAL MPCD-X1 Citronic
-
Read these instructions.
-
Keep these instructions.
-
Heed all warnings.
-
Follow all instructions.
-
Do not use this item near water.
-
Clean only with dry cloth.
-
Do not block any of the ventilation openings. Install in accordance with the manufacture's instructions.
-
Do not install near any heat sources such as radiators, heat registers, stoves or other items (including amplifiers) that produce heat.
-
Do not defeat the safety purpose of the polarized plug. The wide blade is provided for your safety. If the provided plug does not fit into the item or the mains socket, consult an electrician for replacement.
-
Protect the power cord from being walked on or pinched particularly at plug, convenience receptacles, and point where they exit from the item.
-
Only use attachments/accessories specified by the manufacturer.
-
Use only with a cart, stand, tripod, bracket or table specified by the manufacturer, or sold with the item. When a cart is used, use caution when moving the cart/item combination to avoid injury.
-
Unplug this item during lighting storms or when unused for long periods of time.
-
Refer all servicing to qualified service personnel. Serving is required when the item has been damaged in any way, such as power supply cord or plug is damaged, liquid has been spilled or objects have fallen into the item, the item has been exposed to rain or moisture, does not operate normally, or has been dropped (note: accidental or cosmetic damage is not covered by the items 12 month warranty)
-
Please keep the unit in a safe environment.
-
Do not store anything on top of the item

CAUTION: To reduce the risk of electric shock, do not remove any cover. No user-serviceable parts inside. Refer servicing to qualified service personnel only.
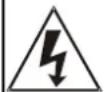
The lightning flash with arrowhead symbol within the equilateral triangle is intended to alert the use to the presence of un-insulated "dangerous voltage" within the product's enclosure that may be of sufficient magnitude to constitute a risk of electric shock.

The exclamation point within the equilateral triangle is intended to alert the user to the presence of important operation and maintenance (servicing) instructions in the literature accompanying this appliance.
Main Features:
- Auto CUE
- Instant Start
- Switching power supply
• Digital Anti-Shock (10 seconds)
• Real time scratch play - Pitch bend +/- 100% for CD
• 2048 programmable CUE points (512 discs x 4 cue points on each) - 8 different speed scan (4 forward / 4 reverse)
- Adjustable pitch percentages (+/-4%, +/-8%, +/-16% or +/-100%)
- 5 digital effects: SCRATCH, ECHO, FLANGER, FILTER, BRAKE
- Pitch control
- Seamless loop
• Fader start playback
• Full function MP3 Playback - RELAY playback
• Music master tempo
• AUTO/MANUAL BPM
• Digital RCA coaxial output
Accessories
• 1 x Fig. 8 power cable
- 1 x RCA cable
- 1 x Fader start cable
General Checks and Advice
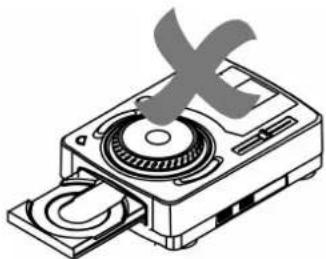
1) Before switching off the power ensure there is no CD in the draw, the disc tray is fully closed and the LCD display reads "NO DISC".
natural_image
Illustration of a CD-ROM with a gray X mark indicating the disc (no text or symbols present)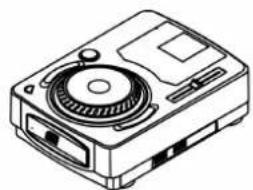
natural_image
Line drawing of a CD or DVD drive with no visible text or symbols2) Installation
- Place the unit on a flat surface or mount in a secure case.
- Be sure the player is mounted in a well ventilated area and is not exposed to direct sunlight, high temperatures or high humidity.
- Keep the unit as far away as possible from TVs and tuners as the unit may cause undesirable interference to these devices.
3) Compact Discs
• DO NOT allow fingerprints, oil or dust to get on to the surface of the disc.
- If the disc is dirty, wipe it clean with a soft dry cloth.
• DO NOT use benzene, white spirit, electrostatic-proof chemical or silicone-treated cloths to clean discs.
• Always handle discs carefully to prevent damaging the surface; in particular when removing a disc from its case or returning it.
• DO NOT bend the disc.
- DO NOT enlarge the hole in the centre of the disc.
- DO NOT write on the printed side of the disc with hard tipped implements such as a pencil or ball point pen as it could effect playback.
• Condensation will form if a disc is brought in to a warm area from a colder one.
- DO NOT attempt to dry the disc with a hair dryer etc.
General Functions and Controls
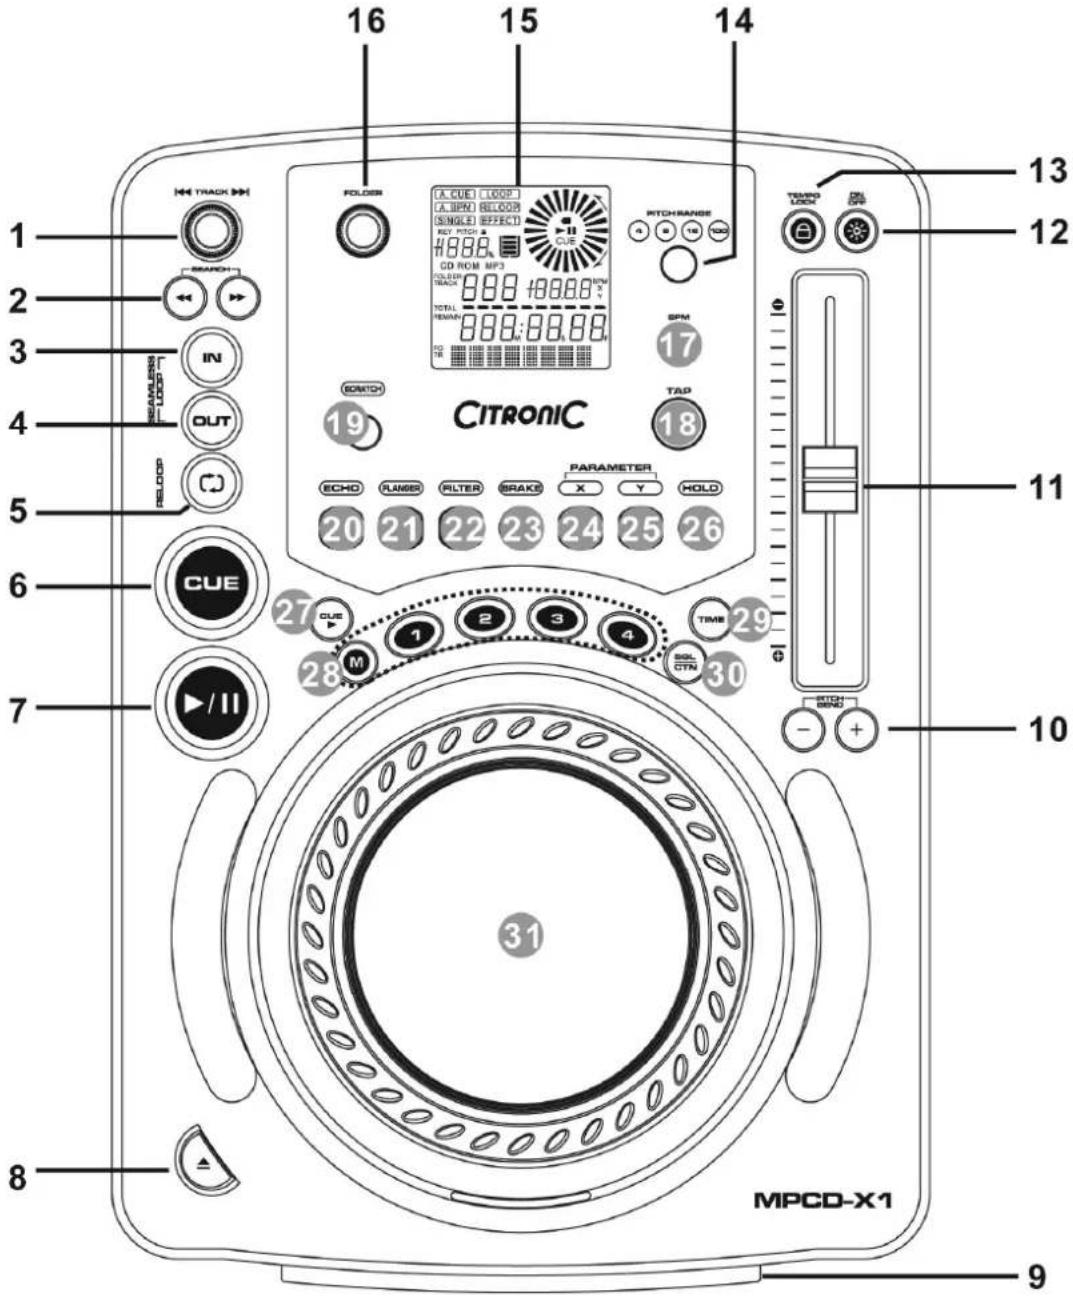
- TRACK KNOB - This knob has three functions:
a. You can use it to select the next or previous track by turning the knob forwards or backwards.
b. Holding down and turning the knob forwards or backwards will rapidly skip through the tracks on your CD by 10 tracks per click.
c. Press track knob to read the ID3 tags on the file name. Switch between: File name / Title name / Artist / Bit rate on the LCD display.
- SEARCH BUTTONS – Allows you to quickly scan through the track to find the point you want.
-
IN BUTTON - Pressing the IN button sets a CUE POINT without music interruption. This button is also used to set the starting point of a SEAMLESS LOOP.
-
OUT BUTTON - This button is used to set the ending point of a LOOP. A LOOP is started by pressing the IN button to select the starting point and the OUT button to set the LOOP ending point. The LOOP will continue to play until the OUT button is pressed once again.
- RELOOP BUTTON - If a SEAMLESS LOOP has been made, but the CD player is not actively in SEAMLESS LOOP mode.
a. Pressing the RELOOP button will instantly reactivate the seamless loop mode. To exit loop, press the OUT BUTTON. LOOP will appear in the LCD display when the RELOOP function is available.
b. You can fine tune the SEAMLESS LOOP by holding the RELOOP button and using the jog wheel to set the exact OUT point.
- CUE BUTTON - Can be used in a number of ways:
a. Pressing the CUE button during playback immediately stops the current track and returns the music to the last set cue point.
b. In pause mode pressing and holding the CUE button plays the track from the last set CUE point. Releasing CUE button will return the track to the last set CUE point.
c. Pressing and holding the Cue will start the track. If PLAY/PAUSE button is pressed during this time the track will continue to play when CUE button is released.
- PLAY/PAUSE BUTTON – Pressing the PLAY/PAUSE button once will instantly start the track. Pressing this button again will PAUSE the current track.
- EJECT BUTTON – This button will EJECT the current CD (Note: The EJECT function will only work when the unit is in CUE or PAUSE mode to prevent accidentally ejecting the disc when in PLAY mode).
- DISC TRAY – Use the EJECT BUTTON to open the disc tray. Load the CD into the tray and press the EJECT BUTTON to load the draw. If the tray is not closed after 60 seconds it will close automatically to prevent damage.
- PITCH BEND BUTTONS - The desired pitch of the music increases when button "+" is held and decreases when button "-" is held. The music returns to the original pitch when either button is released.
- PITCH SLIDER - This slider is used to adjust the playback pitch percentage. Move the slider down to speed up the music and move the slider up to slow the music down.
- PITCH ON/OFF BUTTON - This button turns the PITCH SLIDER function on and off.
- TEMPO LOCK BUTTON - This button turns on or turns off the TEMPO LOCK function. This function allows you to use the PITCH SLIDER to speed up or slow down playback speed without altering the tonal pitch of the track.
- PITCH RANGE BUTTON - Press the button to choose pitch percentage adjustment. ±4%, ±8%, ±16%, and ±100%. (Note: 100% does not work with MP3 music)
- LCD DISPLAY - The high quality LCD display gives a clear indication of all the functions as they occur (see LCD display section for more details).
- FOLDER KNOB - Turn the FOLDER knob to search for the desired folder.
- BPM BUTTON – To change between auto and manual BPM count.
-
TAP BUTTON - This button is used for manual BPM. When in manual BPM mode, tap this button to the beat of the current track.
-
SCRATCH BUTTON - This button is used to activate the scratch effect by touching the surface of the JOG WHEEL
- ECHO BUTTON – This button is used to add an ECHO effect to your output signal.
- FLANGER BUTTON - The FLANGER effect distorts the output signal and creates an effect similar to the frequency, phasing in and out of each other.
- FILTER BUTTON - The FILTER effect tweaks the original sound to add different tonal definition.
- BRAKE BUTTON - This button is used to adjust the START/STOP speed. When BRAKE is activated you can press the X BUTTON and use the JOG WHEEL to adjust the start speed of playback. If you press the Y BUTTON and use the JOG WHEEL you can adjust the stop speed. This effect is then active when you press the PLAY / PAUSE BUTTON.
- X PARAMETER BUTTON - (Time parameter) You can set the X parameter by rotating the JOG WHEEL clockwise to increase the length of the effect or anticlockwise to decrease the length of the effect.
- Y PARAMETER BUTTON - (Ratio parameter) You can set the Y parameter by rotating the JOG WHEEL clockwise to increase the level of the effect or anticlockwise to decrease the level of the effect.
Note: When you stop using the JOG WHEEL to control the X & Y parameter effects. The Parameter setting will return to the pre-set value.
- HOLD BUTTON - Activating the HOLD button in combination with one of the above X or Y buttons allows you to lock the level of either parameter. When the desired level is set, deactivate the hold button for continued normal use.
- CUE PLAY BUTTON – Pressing the CUE PLAY button will return the track to the previous set cue point and continue playing.
- MEMORY BUTTON - This "M" button can be used in a number of ways:
a. Press this button to activate memory mode (LED will glow) press your desired memory bank (1-4) button to store your CUE points.
b. To store your cue points that are saved in the BANKS to the system memory for next time, press and hold the "M" button for 2 seconds until it flashes
c. RECALL MEMORY: The MPCD-X1 can store 2048 cue points. That's 4 cue points for every 512 CDs. These settings may be easily recalled. Press EJECT so the draw is open. Load your CD into the draw. Press the "M" button so it is illuminated. Then close the CD draw. The unit will then display RECALL as the cue points are found in the system memory (Note: this may take around 20 seconds).
- TIME BUTTON - The button will switch the time value described in the TIME METER between ELAPSED playing time, TRACK remaining time and TOTAL remaining time.
- SGL/CTN BUTTON - This function allows you to choose between single track play or continuous track play (all tracks in order with no pause between). This function also operates in RELAY mode. With this button you can switch auto cue on and off, by holding the button down for 2 seconds.
- JOG WHEEL – The JOG WHEEL controls a number of different functions:
a. The JOG WHEEL will act as a frame search control when the track is in the pause or cue mode, allowing you to set a point. If SCRATCH mode is activated then only the outer part of the JOG WHEEL will act as a frame search.
b. The JOG WHEEL also works as a pitch bend during playback. Turning the wheel clockwise will increase the pitch percentage up to 100%, and turning the wheel
counterclockwise will decrease the pitch percentage down to -100%. The pitch bend will be determined on how long you turn the JOG WHEEL continuously.
c. The JOG WHEEL can be used to control the output values of both the X & Y parameters for the digital effects.
Rear Connections
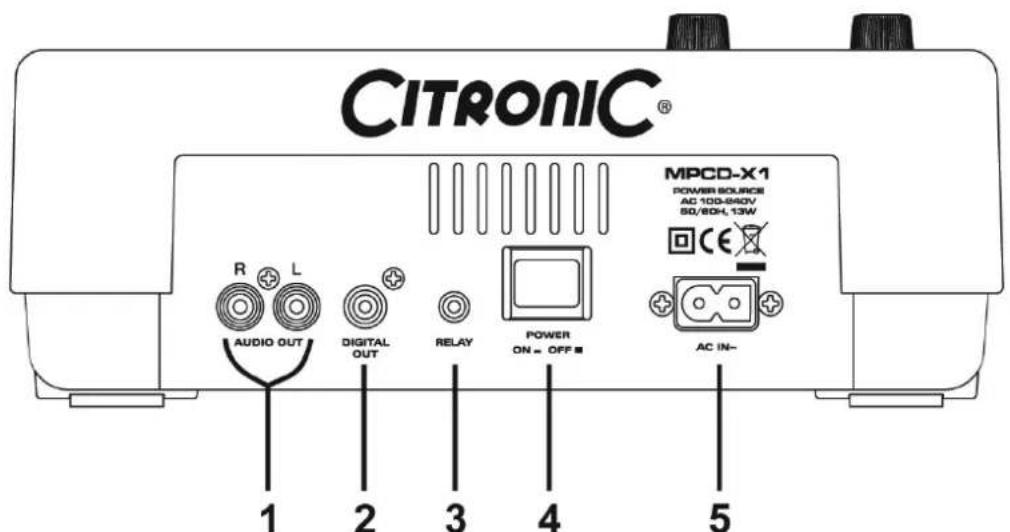
- AUDIO OUT R & L - Audio out signals. Connect stereo RCA cable from audio out to a mixers line input.
- DIGITAL OUT – A digital audio output (S/Pdif) connector for connecting the device to digital recording devices or digital amplifiers.
- RELAY SOCKET – Used to connect a CD player to a mixer with a "Fader start" function. It allows you to start the track by moving the crossfader rather than pressing the PLAY/PAUSE button.
- POWER BUTTON - This button is used to turn your unit power ON and OFF.
- POWER CONNECTOR - Used to connect the unit to the main power using the power cable provided.
LCD Display
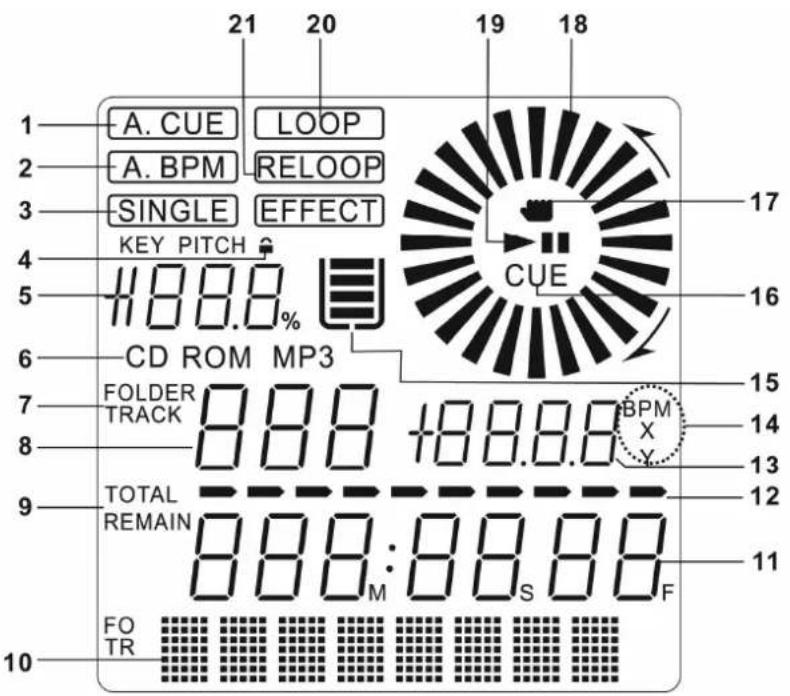
- A.CUE - This will indicate if the AUTO CUE is on or off. AUTO CUE will find the first beat on the track automatically. Press and hold the SGL/CTN for 2 second to turn the AUTO CUE function on and off.
- A.BPM - This will indicate if AUTO BPM is active. If you use the TAP button then this will turn the AUTO BPM counter off.
- SINGLE - This will indicate if the player is in single track or continuous play mode.
- LOCK - This will indicate if the players TEMPO LOCK mode is active.
- PITCH VALUE - This meter will display the pitch percentage applied by the PITCH SLIDER.
- CD/MP3 - This will identify whether the tracks on the CD are standard audio files or MP3.
- FOLDER/TRACK - This will indicate that you are searching the TRACK NUMBER or FOLDER NUMBER on the FOLDER/TRACK METER.
- FOLDER/TRACK METER - This will let you know what number track or folder is currently playing or being cued.
- ELAPSED/TOTAL/REMAIN – This indicates whether the time mode shown on the display refers to either total remaining time or track remaining time. If neither of these are illuminated this indicates the elapsed track time.
-
CHARACTER DISPLAY – This part of the display is mainly used to display MP3 file names, CD text information, system messages such as effects parameters, settings and so on.
-
TIME DISPLAY – This indicates in detail the current Minutes, Seconds and Frames. The meter will display the elapsed time, remaining time or total remaining time of the entire disc depending on which option you choose.
- TIME BAR - Gives a visual representation of the time remaining or time elapsed and will flash shortly before the track ends.
- PARAMETER COUNT - Shows the current BPM or values for the X and Y Parameters when in use.
- X/Y/BPM - Indicates whether the PARAMETER COUNT number being displayed is either the X or Y value or the current BPM.
- ANTI-SHOCK AND BUFFER – Shows the current status of the buffer memory which is represented on the display by the bucket being full or empty. Each bar represents 2 seconds of anti shock. If the buffer is full then the full 10 seconds of anti shock is in operation.
- CUE - Indicates the unit is at a cue point and ready to play
- HAND – Indicates that you are touching the TOUCH SENSITIVE JOG WHEEL.
- WHEEL - CD direction indicator will display the direction the CD is rotating. Clockwise rotation means the CD is playing forward. It also indicates the speed of the forward and reverse search operations.
- PLAY/PAUSE – Indicates the music is either in PLAY mode or in PAUSE/CUE mode.
- LOOP - Indicates that a loop has been programmed.
- RELOOP - Indicates that the programmed loop is playing.
Specification:
MODEL: MPCD-X1, MP3/CD player
POWER: AC100-240V, 50/60Hz, 13W
DIMENSION: 246 (W) X 348 (D) X 103.5 (H) mm
WEIGHT 2.46 kg
Note: Specifications and design are subject to change without notice for purpose of improvement.
AUDIO CHARACTERISTICS: (CD Test disc: TCD-782; load=100k ohm)
| ITEM TYPICAL LIMIT CONDITION | |||
| OUTPUT LEVEL 2V +/-0.5dB 2V +/-1dB 1kHz, 0dB | |||
| CHANNEL BALANCE WITHIN 0.2dB WITHIN 1dB | 1kHz, 0dB | ||
| FREQUENCY RESPONSE | 17-20kHz +/-0.4dB | 17-20kHz +/-1dB | 0dB OUTPUT |
| DE-EMPHASIS | -20dB +/-0.2dB | -20dB +/-1dB | 16kHz,-20dB |
| CHANNEL SEPARATION(*2) | 93dB | 85dB | 1kHz, 0dB |
| THD+N (*1) | 0.006% | 0.01% 1kHz, 0dB | |
| S/N RATIO (*2) | 130dB | 90dB | 1kHz, 0dB |
| DIGITAL OUTPUT LEVEL | 0.5 +/-0.03V P-P | 0.5 +/-0.1V P-P | 75 ohm load |
| Note: *1: With 20kHz low pass filter | |||
| *2: With 20KHz low pass filter, "IHF-A" weighted | |||
MP3 FORMAT
| Disc Format | Applicable file extensions | mp3 . MP3 . mP3 . Mp3 |
| ISO9660 | max. 63 characters | |
| Joliet | max. 63 characters | |
| CD-ROM sector format | mode-1 only | |
| Max. number of Folders | 255 | |
| Max. number of files | max. 999 files (* note #1) | |
| MP3 Format | MPEG 1 Layer 3 standard (ISO/IEC 11172-3), which provides for single channel ('mono') and two-channel ('stereo') coding at sampling rates of 32, 44.1 and 48kHz. | 32/40/48/56/80/96/112/128/160/192/224/256/320 kbps |
| Xing/VBRI VBR | ||
| MPEG 2 Layer 3 standard (ISO/IEC 13818-3), which provides for similar coding at sampling rates of 16, 22.05 and 24 kHz. | 32/40/48/56/64/80/96/112/144/160 Kbps | |
| Xing/VBRI VBR | ||
| MPEG 2.5 Layer 3 standard, which provides for similar coding at sampling rates of 8, 11.025 and 12 kHz. | 32/40/48/56/64/80/96/112/144/160 Kbps | |
| Xing/VBRI VBR | ||
| Disc Writing Method | Disc at Once and Track at Once | |
| Multi Session | If the 1^st session is CDDA, you can playback only CDDA track, if the 1^st session is MP3, you can playback only MP3 file. |
Note #1: max. 255 files each folder
FOR MORE INFORMATION ON CITRONIC PRODUCTS VISIT
WWW.CITRONIC.COM
Brand : Citronic
Model : MPCD-X1
Category : CD Player