CD-1.4 - CD Player Citronic - Free user manual and instructions
Find the device manual for free CD-1.4 Citronic in PDF.


| Product Type | CD Player |
| Brand | Citronic |
| Model | CD-1.4 |
| Dimensions (W x H x D) | 430 x 100 x 250 mm |
| Weight | 3.0 kg |
| Power Supply | AC 230V~ 50Hz |
| Power Consumption | 15 W |
| Playback Formats | Audio CD, CD-R, CD-RW |
| Main Functions | Play, Pause, Stop, Skip, Repeat, Random, Program |
| Outputs | Analog Audio (RCA), Headphone (3.5 mm) |
| Remote Control | Included |
| Maintenance | Clean lens with soft cloth; avoid dust and moisture |
| Safety Instructions | Keep away from water; do not open casing; use in well-ventilated area |
| Spare Parts & Reparability | Replacement remote, power cord; service by qualified technician |
| General Information | Designed for home audio systems; 12-page manual available for download |
Frequently Asked Questions - CD-1.4 Citronic
User questions about CD-1.4 Citronic
0 question about this device. Answer the ones you know or ask your own.
Ask a new question about this device
Download the instructions for your CD Player in PDF format for free! Find your manual CD-1.4 - Citronic and take your electronic device back in hand. On this page are published all the documents necessary for the use of your device. CD-1.4 by Citronic.
USER MANUAL CD-1.4 Citronic
- Read these instructions.
- Keep these instructions.
- Heed all warnings.
- Follow all instructions.
- Do not use this item near water.
- Clean only with dry cloth.
- Do not block any of the ventilation openings. Install in accordance with the manufacture's instructions.
- Do not install near any heat sources such as radiators, heat registers, stoves or other items (including amplifiers) that produce heat.
- Do not defeat the safety purpose of the polarized plug. The wide blade is provided for your safety. If the provided plug does not fit into the item or the mains socket, consult an electrician for replacement.
- Protect the power cord from being walked on or pinched particularly at plug, convenience receptacles, and point where they exit from the item.
- Only use attachments/accessories specified by the manufacturer.
- Use only with a cart, stand, tripod, bracket or table specified by the manufacturer, or sold with the item. When a cart is used, use caution when moving the cart/item combination to avoid injury.
- Unplug this item during lighting storms or when unused for long periods of time.
- Refer all servicing to qualified service personnel. Serving is required when the item has been damaged in any way, such as power supply cord or plug is damaged, liquid has been spilled or objects have fallen into the item, the item has been exposed to rain or moisture, does not operate normally, or has been dropped (note: accidental or cosmetic damage is not covered by the items 12 month warranty)
- Please keep the unit in a safe environment.
- Do not store anything on top of the item.

CAUTION
DO NOT OPEN RISK OF ELECTRIC SHOCK

CAUTION: To reduce the risk of electric shock, do not remove any cover. No user-serviceable parts inside. Refer servicing to qualified service personnel only.
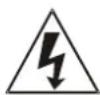
The lightning flash with arrowhead symbol within the equilateral triangle is intended to alert the use to the presence of un-insulated “dangerous voltage” within the product’s enclosure that may be of sufficient magnitude to constitute a risk of electric shock.

The exclamation point within the equilateral triangle is intended to alert the user to the presence of important operation and maintenance (servicing) instructions in the literature accompanying this appliance.
MAIN FEATURES
- Auto Cue
- Digital output
- Pitch Display
- Frame Search
- Single/Continuous
• +10 Track skip search - Pitch range: + / - 4% , + / - 8% , + / - 16%
• 8 times over sampling 1 bit D/A converter - Relay play allow consecutive playback during two decks
GENERAL FUNCTIONS
CONTROL
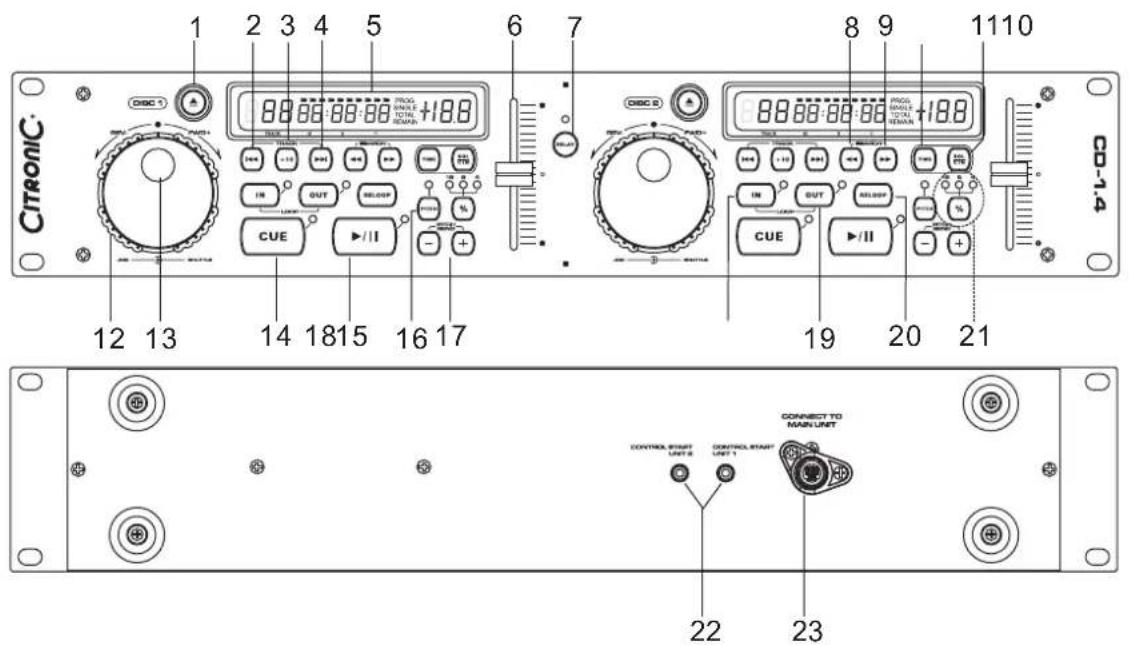
- OPEN/ CLOSE button (Disc Tray Open/ Close) – This button is used to open and close the disc tray door.
NOTE: When a disc is loaded, the tray will not open unless the unit is in pause or cue mode. - TRACK button - This button is used to select your desired track. Tapping the button will skip backward to the previous track; holding down this button will rapidly skip backward through the tracks on your CD.
- +10 TRACK SKIP button – This button allows you to skip ahead by 10 tracks. Example: if you are at Track #1, pressing this button will skip you to Track #11, press the button again, it will skip to Track #21. If there are not that many tracks, it will go back to Track #1.
- ▶▶▶I TRACK button – This button is used to select your desired track. Tapping the button will skip forward to the next track, holding down this button will rapidly skip forward through the tracks on your CD.
-
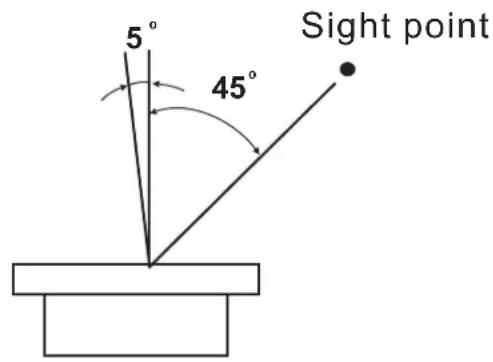
LI QUID CRYSTAL DISPLAY (LCD) – This high quality LCD Indicates all the functions (play, pause, cue, etc..), as they occur. This display is viewable at several comfortable angles as described on. The LCD icons will be described in the next section.
-
PITCH SLIDER – This slider is used to adjust the playback pitch percentage when the PITCH function is activated. The slider is a set adjustment and will remain set until the pitch slider is moved or the PITCH function has been turned off. The maximum pitch range of the slider is +/-16%. This adjustment can be made with or without a CD in the drive.
The pitch adjustment will remain even if a disc has been removed, and will reflect on any other disc loaded into the unit. That is to say, if you set a +2% pitch on one disc, remove that disc and insert another, that disc will also have a +2% pitch. The amount of pitch being applied will be displayed in the LCD. Use this slider to match the BPM's of this unit to that of another music source. By changing the pitch of one disc with respect to the other in this way, the beats can be matched.
-
RELAY button – Use a standard Mini plug (stereo) to plug in Side1 to Side 2. Set both sides of the CD player to single mode on the control. When Disc 1 ends the CD player will automatically change to Disc 2 and when Disc 2 ends it will return to Disc 1, etc.
-
◀◀SEARCH button – This search button allows you to quickly scan backward through a track.
-
▶▶SEARCH button – This search button allows you to quickly scan forward through a track.
-
TIME button - The TIME button is used to change the displayed time values. Time can be displayed as elapsed track time, remaining track time, and total disc remaining time.
-
SGL/ CTN button – This button allows the unit's play mode to change between Single and Continuous. In single mode the unit will play a single track and return to cue mode. In continuous mode the unit continues to play track by track.
12. SHUTTLE WHEEL
Playback-mode:
Via the Shuttle-wheel, you can quickly scan forwards and backwards. Turn the Shuttle-wheel to the right in order to scan forwards and turn it to the left in order to scan backwards. The further you turn the Shuttle wheel the higher the scanning-speed.
Pause-mode:
In the pause-mode, the current frame is repeated as soon as you turn the Shuttle-wheel.
13. JOG WHEEL
13-1. Playback-mode: You can temporarily adjust the playback-speed by +/- 16 %.
13-2. Pause-mode: In the pause-mode, the current frame is repeated as soon as you turn the Jog-wheel. Via the Jog-wheel, you can slowly search within a title forwards and backwards. In this way, you can easily find a Cue-point for example. Turn the Jog-wheel to the right in order to search forwards and turn it to the left in order to search backwards. The faster you turn the Jog-wheel the higher the searching-speed.
-
CUE button - Pressing the CUE button during playback immediately pauses playback and returns the track to the last set cue point. The red CUE BUTTON LED will glow when the unit is in cue mode. The LED will also flash every time a new CUE POINT is set. The CUE button can also be held down to momentarily play the CD. When you release the CUE button it instantly returns to the last set CUE POINT.
-
PLAY/ PAUSE button – Each press of the PLAY/PAUSE BUTTON causes the operation to change from play to pause or from pause to play. While in play mode the play LED will glow, and while in pause mode the play LED will flash.
-
PITCH button – This button is used to turn the pitch function on and off. The pitch functions of the PITCH SLIDER, PITCH BEND BUTTONS and JOG WHEEL will not function without this function being activated. The pitch slider and pitch bend buttons have a maximum range of +/-16%. The "+" and "-" pitch bend buttons have a maximum range of 16%.
17. PITCH BEND BUTTONS
(-) PITCH BEND button – The (-) pitch bend function creates a momentary “Slow Down” in the CD's pitch speed (Beats per minute - BPM) when the PITCH function is activated. This function allows the beats between two CD's or any other music source to match.
This is a momentary function. When the button is depressed the pitch speed will automatically return to PITCH SLIDER'S selected pitch. Holding down this button will give a maximum of -16% pitch. Be sure to remember that this function is a momentary pitch adjustment, for a more precise adjustment use the PITCH SLIDER to match the BPM's with another playing music source.
(+) PITCH BEND button – The (+) pitch bend function creates a momentary “BUMP” in the CD’s pitch speed (Beats per minute - BPM) when the PITCH function is activated. This function allows the beats between two CDs or any other music source to match. This is a momentary function. When the button is depressed the pitch speed will automatically return to PITCH SLIDER’S selected pitch. Holding down this button will give a maximum of +16% pitch. Be sure to remember that this function is a momentary pitch adjustment, for a more precise adjustment use the PITCH SLIDER to match the BPM’s with another playing music source.
- LOOPIN button - This function allows you to set the starting point of a loop.
- LOOP OUT button – This button is used to set the ending point of a loop. A loop is started by pressing the IN BUTTON, pressing the OUT BUTTON sets the loop ending point. The loop will continue to play until the OUT BUTTON is pressed once again.
- RELOOP button – If a LOOP has been made, but the CD Player is not actively in LOOP mode (a loop is not playing), pressing the RELOOP BUTTON will instantly reactivate the LOOP mode. To exit the loop, press the LOOP OUT BUTTON.
- PITCH PERCENTAGE SELECTOR – Choose from pitch percentages of 4%, 8%, and 16%.
- CONTROL START socket – These sockets are to connect to a mixer using a 3.5mm jack plug to give remote start capability. When the switch contacts are shorted the respective unit will play, and similarly when the switch contacts are open the player will be in pause mode.
- CONTROL connector - Connect this connector to the REMOTE connector on the main unit using the included control cord.
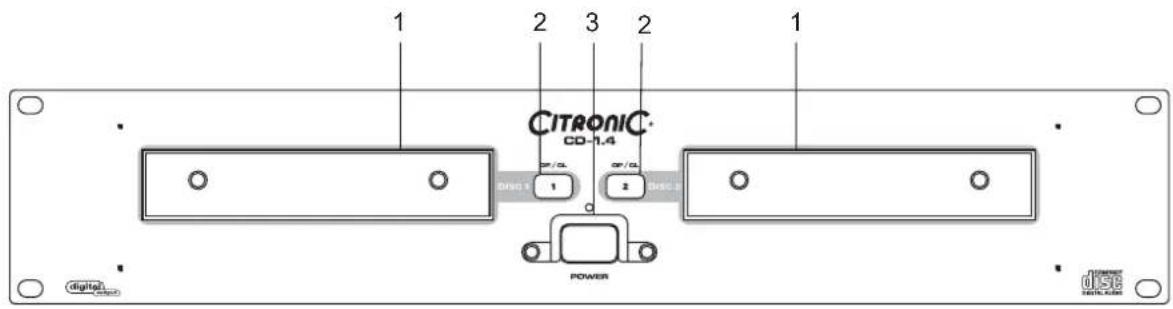
- CD TRAY – This tray is used to load and unload a compact disc into the mechanism. The tray is opened and closed by pressing the OPEN/CLOSE BUTTON. Never attempt to force the transport tray open or closed when the power is turned off.
- OPEN/ CLOSE button (CD Tray Open/ Close) – This button is used to open and close the transport tray. NOTE: When a disc is already loaded in the transport tray, the tray will not open unless the unit is in pause or cue mode.
- POWER SWITCH button – This switch is used to control the unit's main power. A blue LED directly above the power switch will glow to indicate main power is active.
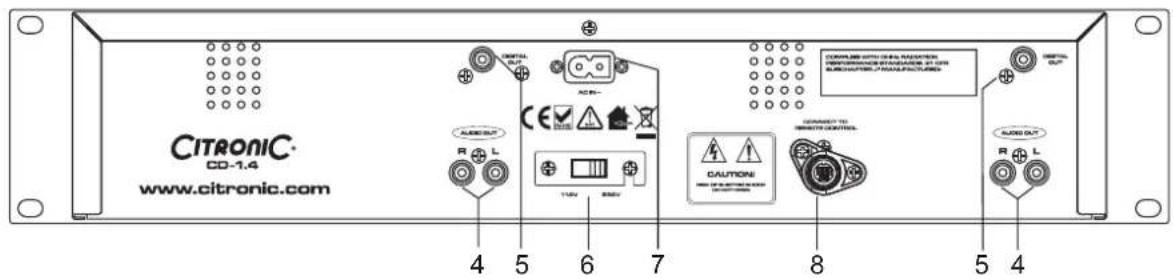
- AUDIO OUT R & L sockets – These jacks send a left and right analog mono output signal. Use these jacks to send standard audio to a mixer or receiver. The red colored jack represents the right channel output and white jack represents the left channels output.
- DIGITAL OUT socket – This jack sends a digital stereo out signal. Use this connection to create near perfect copies of your disc to a Mini disc, CD-R, or any other recording device with a digital input.
- VOLTAGE selector - 115V AC and 230V AC switch.
- POWER connector – This is the main power connection. Only use the supplied polarized power cord. Use of any other power may result in sever damage to the unit. Be sure the local power matches the unit's required power.
- REMOTE jack - Connect the supplied 8 pin cable from this jack to the remote control's connector. This will allow you to control the player functions with the remote unit.
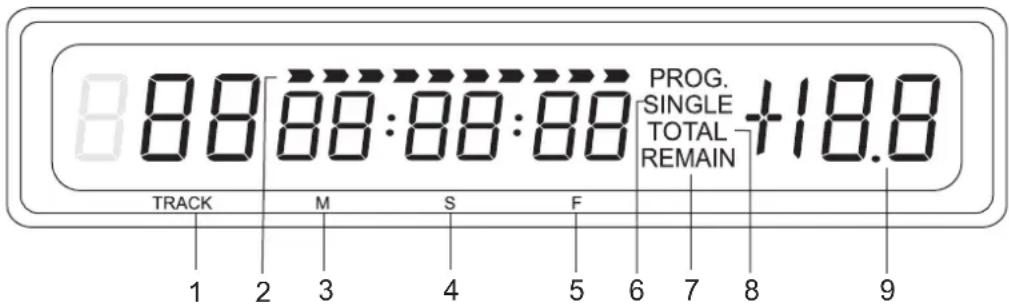
- TRACK INDICATOR – This 3-digit indicator details a current track. The number displayed in the track indicator is a direct reference to a track being selected a track in play, pause, or cue mode.
- TIME BAR INDICATOR - This bar visually details the time defined in the TIME METER (M, S, &F) as with the TIME METER, this bar is also dependent on the selected time function TOTAL REMAIN, REMAIN or ELAPSED. This bar will begin to flash when 15 seconds of a track remain and will begin to rapidly flash when three seconds of a track remain. The flashing bar is a great visual reminder a track is about to end. The flashing bar will function regardless of which time mode the unit is in.
- MINUTES METER - This meter will display the elapse, total, or remaining time in minutes. The display time will be indirect reference to the current time mode.
- SECONDS METER – This meter will display the elapse, total, or remaining time in seconds. The display time will be indirect reference to the current time mode.
- FRAME METER – This meter will display the elapse, total, or remaining time in frames. The displayed frames will be indirect reference to the current time mode.
- SINGLE INDICATOR – This indicates the unit is in single play mode, the unit will play a single and return to CUE mode. If the single indicator is not displayed, the unit is in continuous mode. In continuous mode the drive will play through all the tracks on the disc.
- REMAIN INDICATOR – This indicator is in direct reference to the TIME METER. When the REMAIN indicator is displayed in the LCD, the time defined will refer to a single track's remaining time. The time mode is changed by tapping on TIME button.
- TOTAL REMAIN INDICATOR – This indicator is in direct reference to the TIME METER. When the TOTAL REMAIN indicator is displayed in the LCD, the time defined will refer to a disc's total remaining time. The time mode is changed by tapping on TIME button.
The unit will indicate the ELAPSED time when neither the TOTAL REMAIN OR REMAIN indicators are showing. - PITCH METER – This meter displays the pitch percentage being applied to playback by the PITCH SLIDER. If the meter read zero regardless of the PITCH SLIDER'S position, the PITCH function is not activated.
PREPARATIONS
1. Checking the Contents
Check that the carton contains the following items:
(1) Main Unit
(2) Controller Unit
(3) Operating Instructions (This Booklet)
(4) ONE (1) 8P cable right angle
(5) Two (2)2P RCA path cord (L/R)
(6) Two (2) Auto-start cable
(7) ONE (1) AC power cord
2. Installing the Units
(1) Place your unit on a flat surface or mount it in a secure rack mount case.
(2) Be sure the player is mounted in a well-ventilated area where it will not be exposed to direct sunlight, high temperatures, or high humidity.
(3) Try to place the unit as far as possible from TVs and tuners, as the unit may cause undesirable interference.
CAUTION:
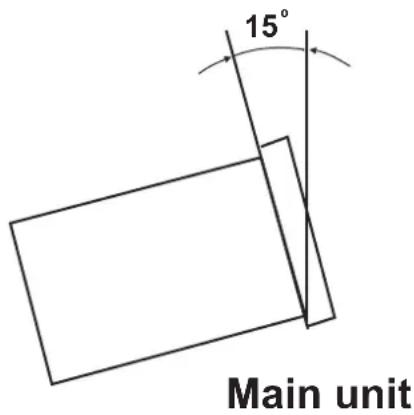
The player will work normally when the main unit is mounted with the front panel within 15 degrees of the vertical plane. If the unit is tilted excessively, discs may not be loaded or unloaded properly.
The control panel's LCDs are designed to be clearly visible within the angles. Mount the control unit so that the visual angle is within this range.
3. Connections
(1) Turn off the POWER switch
(2) Connect the RCA pin cord to the input on your mixer..
(3) Connect the control cords to the REMOTE connector on the main unit.
CAUTION:
- Be sure to use the supplied control cords. Using another type of cable may result in damage.
- Be sure the power is off when connecting the control cords. Otherwise the units may not work properly.
BEFORE SWITCHING OFF THE POWER
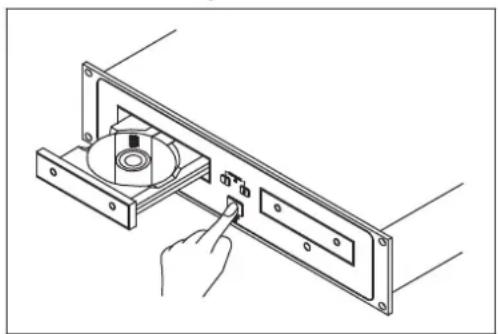
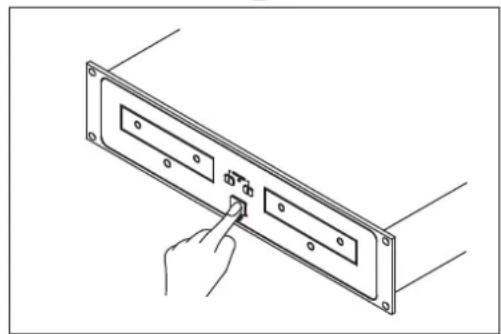
When you have finished using the CD player, before switching off the power, be sure that the disc holder had been closed with the OPEN/CLOSE button.
CAUTION:
Do not forcibly close the disc holder when the power is off.

natural_image
Technical line drawing of a mechanical assembly with a hand inserting a component into a housing (no text or symbols)Do not switch off the power when the disc holder is open.

natural_image
Line drawing of a hand inserting a small component into a panel with two buttons (no text or symbols)To avoid damage, please don't switch off the power until "no disc" or "time code" is showed on the LCD after the disc holder has been closed with the Open/Close button.
POWER OFF POWER OFF
COMPACT DISCS
-
Precautions on handling compact discs
-
Do not allow fingerprints, oil or dust to get on the surface of the disc.
- If the disc is dirty, wipe it off with a soft dry cloth.
- Do not use benzene, thinner, water, record spray, electrostatic-proof chemicals, or silicone-treated cloths to clean discs.
- Always handle discs carefully to prevent damaging the surface; in particular when removing a disc from its case or returning it.
- Do not bend the disc.
- Do not apply heat.
- Do not enlarge the hole in the center of the disc.
- Do not write on the label (printed side) with a hard-tipped implement such as a pencil or ball point pen.
- Condensation will form if a disc is brought into a warm area from a colder one, such as outdoors in winter.
-
Do not attempt to dry the disc with a hair dryer, etc..
-
Precaution on storage
• After playing a disc, always unload it from the player.
• Always store the disc in the jewel case to protect from dirt or damage.
- Do not place discs in the following areas:
(1) Areas exposed to directs sunlight for a considerable time.
(2) Areas subject to accumulation of dust or high humidity.
(3) Areas are affected by heat from indoor heaters, etc..
SPECIFICATIONS
GENERAL
| Dimensions: | Main | Unit | 482(W)× 88.8(H)× 262.5(D)mm |
| Control Unit | 482(W)× 88.8(H)× 97(D)mm | ||
| Weight: | Main | Unit | 5.1 Kg |
| Control Unit | 1.7Kg | ||
Power supply: AC 115/230V, 60/50Hz
Power consumption: 16.5W
Pitch control range: within+/-4%, +/-8%, +/-16%
Pitch bend: + / - 16%
Pitch accuracy: + / - 0.15%
Digital out level 0.5V+/-0.1 p-p @ LOAD = 75 ohm (option)
AUDIO CHARACTERISTICS (TEST DISC: TCD-782, LOAD=47Kohm)
| ITEM | TYPICAL | LIMIT | CONDITION |
| Output level | 2Vrms+/-0.5dB | 2Vrms+/-1 dB | 1KHz,0 dB |
| Channel balance | WITHIN 0.1 dB | WITHIN 1 dB | 1KHz,0 dB |
| Frequency response | 20-20KHz+/-0.4 dB | 20-20KHz+/-1 dB | 0dB OUTPUT |
| De-emphasis response | -19.6~-20dB | -19~-21dB | 16KHz, -20 dB |
| Channel separation (* 2) | 89 dB | 80dB | 1KHz,0 dB |
| T.H.D. + NOISE (* 1) | 0.01% | 0.03% | 1KHz,0 dB |
| S/N (* 2) | 92dB | 85 dB | 1KHz.0 dB |
NOTE: *1: WITH 20KHz LOW PASS FILTER.
* 2: WITH 20KHz LOW PASS FILTER AND "IHF-A" WEIGHTED.
SEARCHING TIME (TEST DISC: TCD-792)
| ITEM | TYPICAL | LIMITS | CONDITION |
| Short access time | 2 sec | 4 sec | Play next track |
| Long access time | 4 sec | 6 sec | TRACK 1 TO 20,20 TO 1 |
PLAYABILITY
| ITEM | TYPICAL | LIMIT | CONDITION |
| Interruption | 1mm | 0.7mm | TCD-725 |
| Black dot | 1mm | 0.6mm | TCD-725 |
| Finger prints | 75um | 65um | TCD-725 |
| Eccentricity | 140um | 140um | TCD-712 W/O TRACK JUMP |
| Vertical deviation | 1mm | 0.5mm | TCD-731R |
PICK-UP
| System | Object lens drive system optical pick-up |
| Object lens drive system | 2 dimensional parallel drive |
| Tracking detection | 3 spot beam detection |
| Optical source Semiconductor laser | |
| Wave length | 780nm |
NOTES:
(1) The specifications are subject to change to any improvement by negotiations in advance.
(2) The parts are subject to change to any improvement within the range of the specifications.
FOR MORE INFORMATION ON CITRONIC PRODUCTS VISIT
WWW.CITRONIC.COM
Brand : Citronic
Model : CD-1.4
Category : CD Player