MPCD-X3 - CD Player Citronic - Free user manual and instructions
Find the device manual for free MPCD-X3 Citronic in PDF.


| Product Type | Digital Media Player (CD, USB, MIDI) |
| Brand / Model | Citronic MPCD-X3 |
| Dimensions | 296 (D) x 218 (W) x 103.5 (H) mm |
| Weight | 2.5 kg |
| Power Supply | AC100-240V, 50/60Hz, 19 Watts |
| Supported Media | CD, CD-R/RW, USB mass storage (FAT12/16/32, up to 32GB) |
| Audio Formats | MP3 (32-320 kbps), WAV (1411 kbps PCM) |
| Playback Modes | Single, Continuous, Relay; Reverse play; Seamless loop; Sampler (forward/reverse) |
| Pitch Control | ±6%, ±10%, ±16%, ±100% with Key Lock (Master Tempo) |
| Jog Wheel | Touch-sensitive with scratch, pitch bend, and frame search; 8 LED modes |
| Cue & Loop | Auto Cue, Manual Cue, 4 programmable cue points per bank, seamless loop with auto/beat sync |
| Effects | Echo, Flanger, Filter with adjustable TIME and RATIO parameters |
| BPM Functions | Auto BPM (tap tempo), BPM display, BPM-based effects sync |
| Display | Large bright VFD showing time, track info, BPM, pitch, and metadata (ID3 tags) |
| Connectivity | RCA audio out (L/R), digital coaxial out, headphone jack (6.3mm) with volume, USB MIDI port, fader start relay, USB 2.0 host port |
| Sampler | Forward/reverse sampling, assignable to 4 bank buttons |
| Memory Backup | Saves last settings; 2000 programmable cue points (500 tracks x 4) for CD |
| Database Builder | Software to organize USB library by Title, Artist, Album, Genre (Windows XP/Vista/7) |
| MIDI Functionality | MIDI over USB, assignable CC/NOTE codes, player A/B switching, linkable between two units |
| Safety & Maintenance | Do not use near water; clean with dry cloth; unplug during storms; no user-serviceable parts inside; refer servicing to qualified personnel |
| Accessories Included | Fig. 8 power cable, USB cable, RCA cable, fader start cable |
Frequently Asked Questions - MPCD-X3 Citronic
User questions about MPCD-X3 Citronic
0 question about this device. Answer the ones you know or ask your own.
Ask a new question about this device
Download the instructions for your CD Player in PDF format for free! Find your manual MPCD-X3 - Citronic and take your electronic device back in hand. On this page are published all the documents necessary for the use of your device. MPCD-X3 by Citronic.
USER MANUAL MPCD-X3 Citronic
-
Read these instructions.
-
Keep these instructions.
-
Heed all warnings.
-
Follow all instructions.
-
Do not use this item near water.
-
Clean only with dry cloth.
-
Do not block any of the ventilation openings. Install in accordance with the manufacture's instructions.
-
Do not install near any heat sources such as radiators, heat registers, stoves or other items (including amplifiers) that produce heat.
-
Do not defeat the safety purpose of the polarized plug. The wide blade is provided for your safety. If the provided plug does not fit into the item or the mains socket, consult an electrician for replacement.
-
Protect the power cord from being walked on or pinched particularly at plug, convenience receptacles, and point where they exit from the item.
-
Only use attachments/accessories specified by the manufacturer.
-
Use only with a cart, stand, tripod, bracket or table specified by the manufacturer, or sold with the item. When a cart is used, use caution when moving the cart/item combination to avoid injury.
-
Unplug this item during lighting storms or when unused for long periods of time.
-
Refer all servicing to qualified service personnel. Serving is required when the item has been damaged in any way, such as power supply cord or plug is damaged, liquid has been spilled or objects have fallen into the item, the item has been exposed to rain or moisture, does not operate normally, or has been dropped (note: accidental or cosmetic damage is not covered by the items 12 month warranty)
-
Please keep the unit in a safe environment.
-
Do not store anything on top of the item.


CAUTION: To reduce the risk of electric shock, do not remove any cover. No user-serviceable parts inside. Refer servicing to qualified service personnel only.
The lightning flash with arrowhead symbol within the equilateral triangle is intended to alert the use to the presence of un-insulated "dangerous voltage" within the product's enclosure that may be of sufficient magnitude to constitute a risk of electric shock.

The exclamation point within the equilateral triangle is intended to alert the user to the presence of important operation and maintenance (servicing) instructions in the literature accompanying this appliance.
Main Features
- Plays MP3/WAV files from USB or CDs
- MP3 track listings
- Headphone jack w/trim control
- Fine tune BPM
- Next track search
- Auto cue
• Real time scratch play
• 1/75th second frame search - Reverse play
• Real time cue ("Cue on the Fly") - 8 different speed scan (4 forward/4 reverse)
- Pitch display
- RCA coaxial output
• Large bright VFD display - Fader start control
- Seamless loop (uninterrupted loop playback)
- Sampler (forward & reverse sampling)
• Music master tempo
• 10 second digital anti-shock
• 2000 (500 track x 4) programmable cue points for CD
- Relay playback
• Memory backup, defaults to last setting
• Jog wheel pitch bend +/-100%
- Selectable single or continuous play
• Jog wheel sensitivity adjustment
- Folder search for MP3's
• 4 programmable cue (bank) buttons
- Adjustable pitch percentages: +/-6%, +/-10%, +/-16% or +/-100%
- Instant start within 10ms (sound is produced immediately when the PLAY button is pressed)
• WAV Files: 1411kbps PCM
Accessories
- 1 x Fig. 8 cable
- 1 x USB cable
- 1 x RCA cable
- 1 x Fader start cable
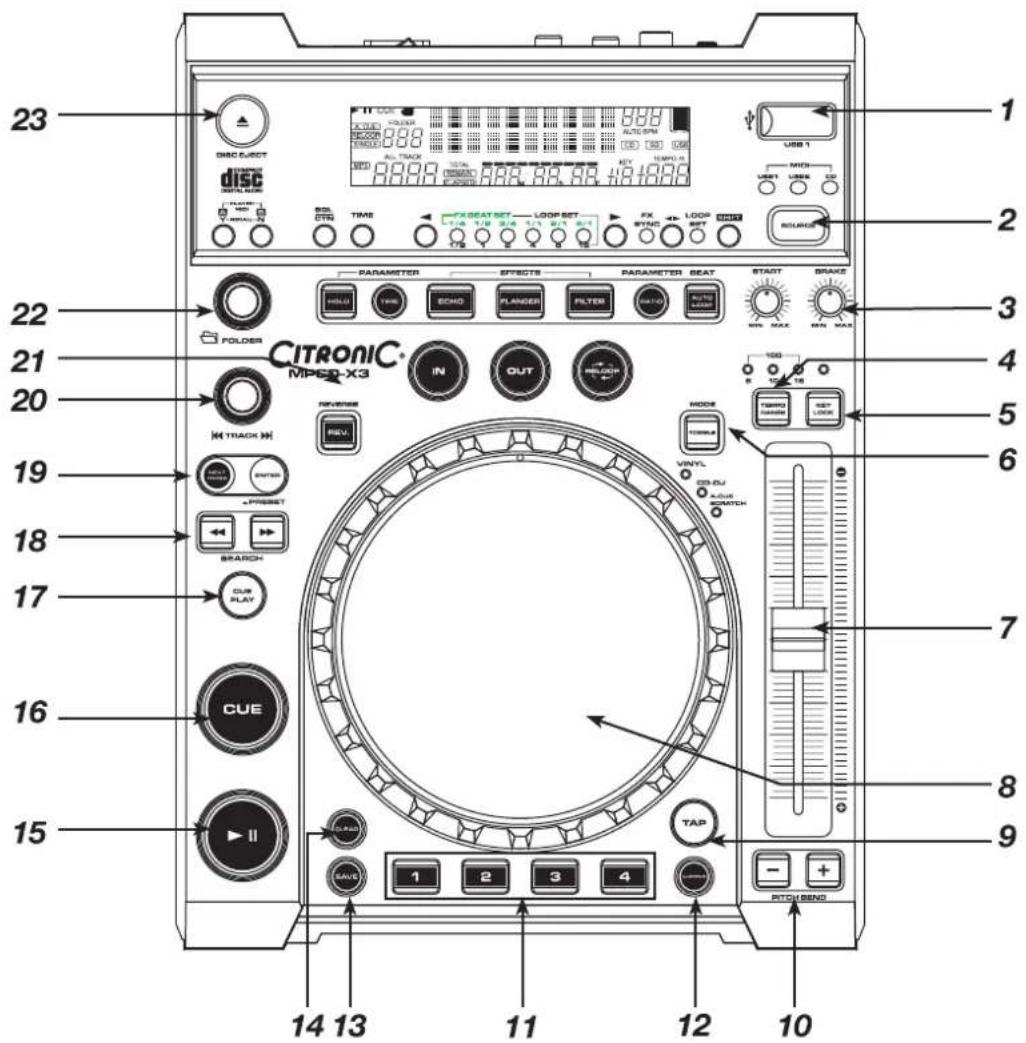
General Functions and Controls
- USB PORT 1 - This is the USB port where you insert your USB mass storage device (up to 32gb)
- SOURCE SELECT - Use this button to select CD/USB1/USB2/MIDI music. Hold the SOURCE SELECT button for 2 seconds to enter MIDI mode.
- BRAKE, START DIAL
a. BRAKE DIAL – When the BRAKE dial is rotated to MIN, play stops instantly; when the dial is rotated from MIN up to MAX, play slows down before coming to a complete stop.
i. When in VINYL mode, the BRAKE dial determines the deceleration speed until play stops, when the top of the jog wheel is held down (Note: It is advised to hold the side of the jog wheel with one hand while doing this as any movement from the jog wheel at this point will cause the unit to go in to scratch mode)
ii. When in CD DJ mode, this BRAKE dial determines the deceleration speed until play stops when the PLAY/PAUSE button is pressed.
b. START DIAL - When the START dial is rotated to MIN, play will start instantly. When the dial is rotated between MIN up to MAX, play starts slowly before reaching full playback speed.
i. When in the VINYL mode, this START dial determines the acceleration speed until full playback speed is reached when using the jog wheel to scratch, backspin or stop the track.
ii. When in the CD DJ mode, this START dial determines the acceleration speed until full playback speed is reached when the PLAY/PAUSE button is pressed.
- TEMPO RANGE BUTTON - Press the button to choose pitch percentage adjustment percentage. ±6%, ±10%, ±16%, and ±100%. With this button you can also switch the PITCH SLIDER on or off by pressing and holding it for 2 seconds.
- KEY LOCK - This button turns on or turns off the KEY LOCK function. This function allows you to use the PITCH SLIDER to speed up or slow down playback speed but without altering the tonal pitch of the track.
- TOGGLE BUTTON (WHEEL MODE) - Press the TOGGLE button to select the operation mode: VINYL/CD DJ/A.CUE SCRATCH.
a. VINYL - When wheel mode is set to VINYL, use the JOG WHEEL to activate the scratch effect by touching the surface of JOG WHEEL and moving it clockwise and anti clockwise.
b. CD DJ - When wheel mode is set to CD DJ use the JOG WHEEL to pitch bend and frame search.
c. A.CUE SCRATCH
i. IN PLAYBACK MODE - While music is playing, the JOG WHEEL can be used to return the unit to last set CUE point (using the IN button). Simply touch the JOG WHEEL and unit will immediately return to the last set CUE point.
ii. IN CUE MODE - While the music is not playing (CUE mode), tapping the JOG WHEEL will start the playback. Hold your finger on the jog wheel to continue playback. When your finger is released the music will stop and go back to the last CUE point.
- PITCH SLIDER - This slider is used to adjust the playback pitch percentage. Move the slider down to speed up the music and move the slider up to slow down the music.
8. JOG WHEEL
a. The JOG WHEEL will act as a frame search control when the track is in the pause or cue mode, allowing you to set a point. Pressing play with create an IN point.
b. The wheel also works as a pitch bend during playback. Turning the wheel clockwise will increase the pitch percentage up to 100%, and turning the wheel counterclockwise will decrease the pitch percentage down to -100%. The pitch bend will be determined on how long you turn the jog wheel continuously.
c. The JOG WHEEL can be used with the hold of the TIME and RATIO knob to set effects and samples parameter adjustment.
There are several varied modes which can be adjusted for Jog Wheel light ring.
- To select light ring you desired; press PRESET button to enter internal menu, and turn FOLDER knob to search "JOG MODE" menu.
- Turn the TRACK knob to select the different MODES you want to adjust.
- Press SHIFT button and turn TRACK knob to adjust the setting value.
a. MODE 1 - Will show the playing point indicator around the ring. You can adjust the setting value range 1 of smallest indicator to 23 of full circle indicator.
b. MODE 2 - Will indicate the playing point opposite (on->off / off→on) when the Jog Wheel is touched. You can adjust the setting value range 1 of smallest indicator off to 23 of full circle off.
c. MODE 3 - Will show the playing point indicator around the ring and flash to the playing level in both sides. You can adjust the setting value range 1 of smallest playing point indicator to 23 of full circle indicator.
d. MODE 4 - Will flash to the playing level around the ring.
e. MODE 5 - Will always be on. You can adjust the setting brightness range 1 to 100.
f. MODE 6 - Will flash related to the setting speed. You can adjust the setting speed range 1 of fast flash to 100 of slow flash.
g. MODE 7 - Will show the playing point similar to trail effect.
h. MODE 8 - Will light when the JOG WHEEL is touched.
-
T AP BUTTON - This button is used for manual BPM. When in manual BPM mode, tap this button to the beat of the current track. Hold the TAP button for 1 second to activate Auto BPM.
-
PITCH BEND BUTTONS - The desired pitch of CD increase when button "+" is held and decreases when button "-" is held. The music returns to the original pitch when either button is released.
-
BANK BUTTONS 1\~4 - These buttons are used to store either four cue points or four samples. (For more information go to SAVE BUTTON) The stored CUE points will become samples when you change to another CD or USB device to play.
-
SAMPLE BUTTON - Press this button, then press the desired BANK button to set the sample loop mode (LED on). When sample mode is set, then sampler will mix the music together. Press the SAMPLE button again to set the sample single mode (LED flashing), press the SAMPLE button again to cancel sample function..
-
SAVE BUTTON - This button can be used in a number of ways:
a. Press the button to activate memory mode (LED will glow) press your desired bank button to store your CUE point or playing loop. b. To store your loops and cue points that are saved in the BANKS to the system memory for next time, press and hold the SAVE button for 2 seconds c. RECALL MEMORY: The MPCD-X3 can store 2000 programmed cue points in 500 tracks for CD and 4 programmed cue points per track in the USB device. These setting may be recalled at any time, even when an audio source has been removed and loaded at a later time. To recall the bank memory with CD/USB device:
i. Turn the TRACK knob to select the track with the BANKS and "Load Cues?" will be indicated on the VFD screen. Press MIDI PLAYER A (Y) to load or press MIDI PLAYER B (N) not to load.
ii. Press the SAVE button (LED on) and turn the TRACK knob to select the TRACK with BANKS that you would like to recall.
- CLEAR BUTTON - Press CLEAR button (LED on) or hold the CLEAR button to select the BANK buttons you would like to clear.
- PLAY/PAUSE BUTTON - Pressing PLAY/PAUSE button will start the track instantly. Pressing this button again will pause the current track.
- CUE BUTTON - Can be used in a number of ways:
a. Pressing the CUE button during playback immediately stops the current track and returns the music to the last set cue point.
b. In pause mode pressing and holding the CUE button plays the track from the last set CUE point. Releasing CUE button will return the track to the last set CUE point.
c. Pressing and hold Cue will start the track. If PLAY/PAUSE button is pressed during this time the track will continue to play when CUE button is released.
- CUE PLAY BUTTON - Press CUE PLAY button to return to the last cue point and continue playing immediately. You can also tap the button to create a BOP effect.
- SEARCH BUTTONS - Press the ◀ button to quickly scan backwards through the track or press the ▶ button to quickly scan forward through the track.
- NEXT TRACK BUTTON - While either playing a track or in pause mode, press this button to search for the next track you want to play on that unit. NEXT TRACK indicators will flash and you can turn the FOLDER and TRACK knob to search for the next track you want. Press the PRESET button to confirm your next track.
- TRACK KNOB - This knob has three functions:
a. You can use it to select the next or previous track by turning the knob forwards or backwards.
b. Holding down and turning the knob forwards or backwards will rapidly skip through the tracks on your CD or USB memory by 10 tracks per click.
c. Press track knob to read the ID3 tags on the file name. Switch between: Track name / Title / Artist / Album / Genre on the VFD.
- REV BUTTON - Activate reverse function to play the track or sampler in reverse. Pressing this button again will deactivate this effect.
- FOLDER KNOB - Turn FOLDER knob to search the desired folder.
- EJECT BUTTON - Pressing the EJECT button will eject the current CD (Note: The EJECT function will only work when the unit is in cue or pause mode (this is to prevent accidentally ejecting the disc when in play mode).
flowchart
graph TD
    A["Player Y-CALL N"] --> B["SQL CTN"]
    B --> C["TIME"]
    C --> D["FX BEAT SET 1/4 1/2 3/4 1/1 2/1 4/1"]
    D --> E["LOOP SET"]
    E --> F["FX SYNC LOOP SET"]
    F --> G["SHIFT"]
    H["PARAMETER"] --> I["HOLD"]
    H --> J["TIME"]
    H --> K["ECHO"]
    H --> L["FLANGER"]
    H --> M["FILTER"]
    H --> N["RATIO"]
    H --> O["AUTO LOOP"]
    P["IN"] --> Q["OUT"]
    R["RSLOOP"] --> S["26"]
-
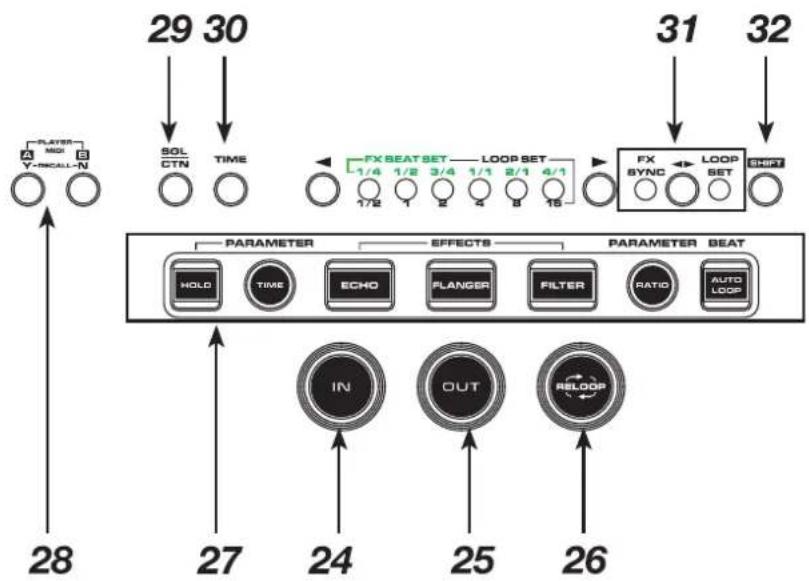
IN BUTTON - Pressing the IN button sets a CUE POINT without music interruption. This button also used to set the starting point of a seamless loop.
-
OUT BUTTON - This button is used to set the ending point of a loop. A loop is started by pressing the IN button to select the starting point and the OUT button to set the loop ending point. The loop will continue to play until the OUT button is pressed once again.
-
RELOOP BUTTON - If a SEAMLESS LOOP has been made, but the CD player is not actively in seamless loop mode, pressing the RELOOP button will instantly reactivate the seamless loop mode. To exit loop, press the out button. RELOOP will appear in the VFD display when the RELOOP function is available. When in loop mode, hold RELOOP button (LED: IN/OUT/RELOOP will flash and "OUT EDIT" will be indicated on the VFD. You can now use the JOG wheel to edit the out point, then press RELOOP button again to exit editing.
27. EFFECTS AND PARAMETER BUTTONS
a. EFFECTS - The below buttons add effects to the music. The volume and length of the effects can be controlled by a combination of the PARAMETER BUTTONS and JOG WHEEL.
i. ECHO BUTTON - This button is used to add an ECHO effect your output signal.
ii. FLANGER BUTTON - The FLANGER effect distorts the output signal and creates an effect similar to the frequency phasing in and out of each other.
iii. FILTER BUTTON - The FILTER effect tweaks the original sound to add different tonal definition.
b. PARAMETERS:
i. TIME BUTTON - (X parameter) You can set the time parameter in one of two ways. The first is to press the FX SYNC button and select the FX beat value (see FX SYNC section later on) or by pressing the TIME button and rotating the JOG WHEEL clockwise to increase the length of the effect or anti clockwise to decrease the level of the effect.
ii. RATIO BUTTON - (Y parameter) You can set the ratio parameter by selecting this button and rotating the JOG WHEEL clockwise to increase the level of the effect or anti-clockwise to decrease the level of the effect Note: For the above when the JOG WHEEL has stopped moving the ratio will return to the default setting.
iii. HOLD BUTTON – Activating the HOLD button in combination with one of the above TIME or RATIO buttons allows you to lock the default level of either parameter. When the desired level is set, deactivate the hold button for continued normal use.
iv. AUTO LOOP BUTTON - Press this button to activate AUTO LOOP function. Press the IN button to select the start of the loop and OUT point will be found automatically according to the BPM value. (Note: The length of the loop is determined by the LOOP SET values (See LOOP SET section later on))
-
MIDI A/B - When the unit is in MIDI mode press this button to switch between player A/B
-
SGL/CTN BUTTON - This function allows you to choose between single track play or continuous track play (all tracks in order with no delay between tracks). This function also operates in RELAY mode. With this button you can also switch auto cue on and off, by holding the button down for 1 second.
-
TIME BUTTON - The button will switch the time value described in the TIME METER between ELAPSED playing time, TRACK remaining time and TOTAL remaining time.
-
FX SYNC / LOOP SET ◀▶ - Use this button to select FX SYNC (Green LED) or LOOP SET (Red LED) mode.
a. FX SYNC - This is used to select the delay time of an effect to the beat of music. The beat delay ratios are 1/4, 1/2, 3/4, 1/1, 2/1, and 4/1. To turn off auto beat sync press and hold button for 1 second.
b. LOOP SET - When the loop set function is activated, select the beat bar of 1/2, 1, 2, 4, 8, 16 (1 bar = 4 beat) at which you would like to end your desired loop.
- SHIFT BUTTON - Hold the SHIFT button enables to call up a second function.
-
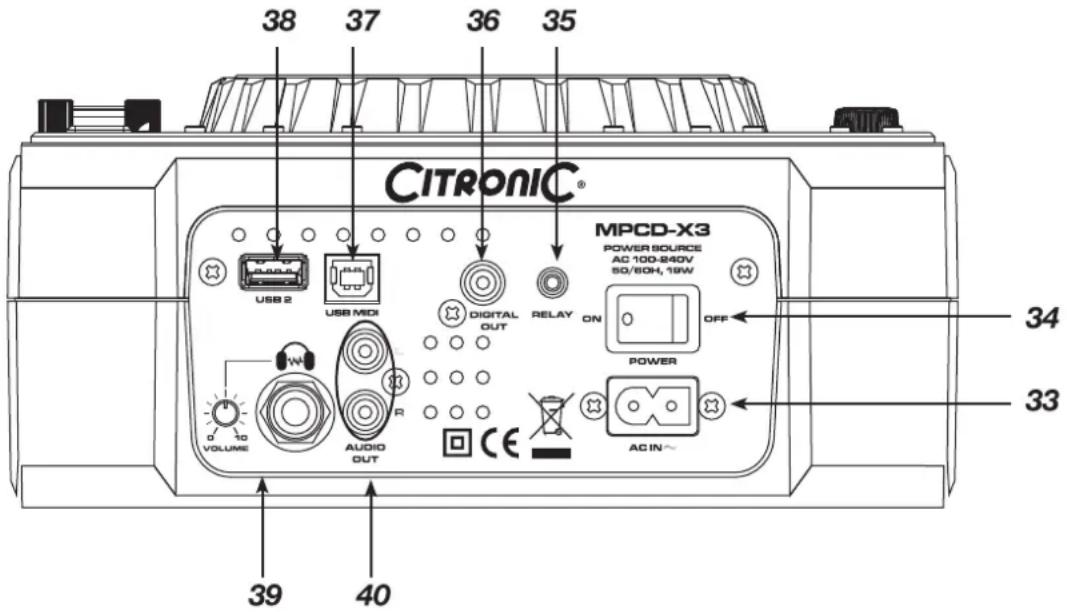
POWER CONNECTOR - This connection is used to connect your main power (use Fig.8 cable provided)
-
POWER BUTTON - This button is used to turn your unit power on and off.
-
RELAY SOCKET – Used to connect a CD player to a mixer with "Fader start" function. It allows you to start the track by moving the crossfader rather than pressing the PLAY/PAUSE button.
-
DIGITAL OUT - A digital output connector for connecting the device to digital recording devices or digital amplifiers.
- USB MIDI PORT - Use this jack to connect to a computer or another MPCD-X3 player.
- USB 2 PORT - This is the USB port where you insert your USB mass storage device.
- HEADPHONE JACK & VOLUME CONTROL - This 6.3mm jack socket is used to connect your headphones. The volume control is located next to it.
- AUDIO OUT R & L - Audio out signals. Connect stereo RCA cable from audio out to a mixer's line input.
-
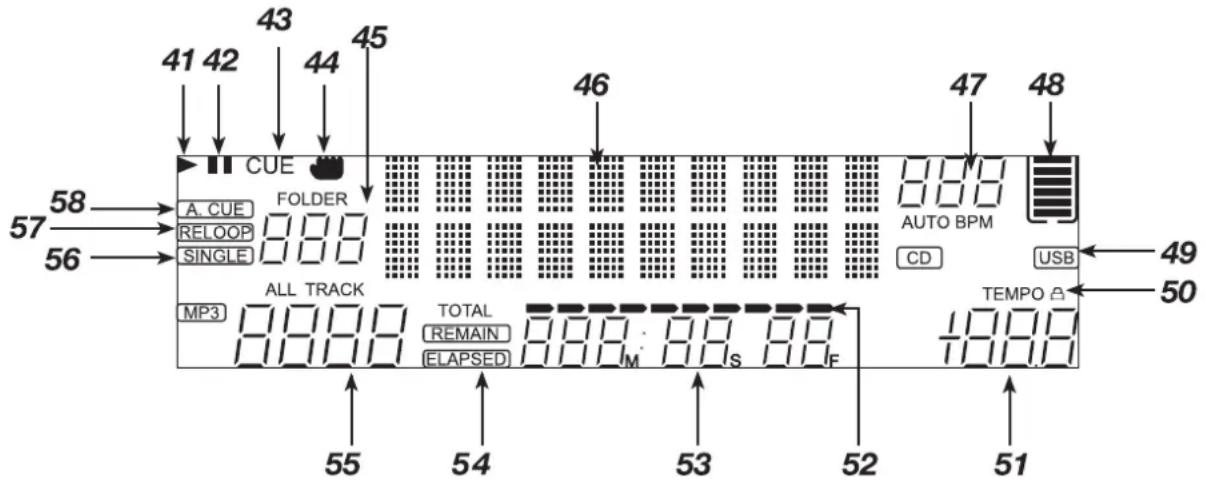
PLAY INDICATOR - The play indicator will glow when the unit is in play mode.
-
PAUSE INDICATOR - The pause indicator will glow when the unit is in pause mode.
-
CUE INDICATOR - This indicator will glow when the unit is in CUE mode and will flash every time a new CUE POINT is set.
-
TOUCH INDICATOR - This appears when anything touches the JOG WHEEL.
-
FOLDER DISPLAY - This indicates which folder you are in.
-
CHARACTER DISPLAY - This will display the name of the track and album when an MP3 track is loaded.
-
BPM METER - This meter will display the BPM (beats per minute) of the current track. AUTO BPM - This will indicate that the AUTO BPM counter is active.
-
MEMORY BUCKET - This indicator serves two functions. The bucket symbol details the cue memory status, a full bucket outline indicates the cue memory is full. The five bars in the memory bucket detail the digital buffer. Each bar indicates 2 seconds. The search functions will not operate until all the bars are full.
-
CD/USB INDICATOR - This indicates which port is active. Use the SOURCE button to select your desired port.
-
TEMPO LOCK - This will indicate the TEMPO LOCK function is active.
-
PITCH INDICATOR - This meter will display the pitch percentage applied by the pitch slider.
-
TIME BAR INDICATOR - This bar gives a visual approximation of a track or discs time. This bar will begin to flash when a track is ending.
- TIME METER - These indicators will detail the current minutes, seconds, and frames. The meter will display either the elapse, total, or remaining time of a track or the entire disc. The display time will depend on the selected time function. The selected time function will be displayed above the TIME METER as total remaining, remaining track time or elapsed track name.
- REMAIN / ELAPSED INDICATOR - When REMAIN is indicated in the VFD display the TIME METER will show the current track's remaining time. When ELAPSED is indicated in the VFD display the TIME METER will show the current track's elapsed time.
- TRACK DISPLAY - This indicator describes which track is currently cued or is playing.
- SINGLE INDICATOR - This indicates that the track is in single play mode, the track will play once and return to CUE mode. If the single indicator is not on, the unit is in continuous mode.
- RELOOP INDICATOR - Appears when LOOP is engaged or ready to be engaged.
- AUTO CUE - This will indicate if the AUTO CUE is on or off. Press and hold the SGL/CTN for 1 second to turn the AUTO CUE function on and off.
Internal Menu
Press PRESET BUTTON to enter the internal menu, and turn FOLDER KNOB to search through the different menu.
Turn the TRACK KNOB or JOG WHEEL to change the submenus; press PRESET BUTTON to save your settings and exit the menu.
- JOG MODE - Select JOG LED mode (mode range is 1\~8)
- PLAYLIST - Normal / Title/ Artist / Album/ Genre (for USB)
- Sensitivity -Touch wheel sensitivity adjustment (Adjustment range is -20\~+20)
- Pitch Bend - Pitch range +/-1%\~100%
- Line Setup - L1 mode = 1\~3 (Line 1 mode)
a. L2 mode = 1\~3 (Line 2 mode)
b. Dis = 0.5\~12.0 sec. (LINE NAME start/stop time adjustment)
c. Run = 50\~2000 msec. (LINE NAME move time adjustment)
-
INTENSITY - VFD Brightness (Brightness range is 1\~4)
-
A.CUE LEVEL - Change the AUTO CUE Level (Level range is -36\~-78db)
- MIDI CC TYPE - Change the send of REL.(RELATIVE), ABS.(ABSOLUTE), Note: For FOLDER /TRACK/ WHEEL under MIDI mode.
a. MIDI SETUP - USB = MIDI/LINK (USB MIDI JACK function)
i. MIDI CH = Player MIDI CH 1\~16 selection
ii. JOG OUTPUT (0\~30 ms) (Control JOG MIDI max. send time)
iii. Pulse = (1024 or 512) (Select sensor to send Pulse)
iv. I/O DISPLAY/Hide (display/hide MIDI I/O value)
v. EDIT = ON/OFF (Set MIDI NOTE and MIDI LED code on/off; ON→default value)
vi. NAME = MIDI (B\~H) (2 more devices connection)
b. MIDI NOTE EDIT - Edit the send MIDI NOTE code (Please refer MIDI MAP)
c. MIDI LED EDIT -Edit the received MIDI LED code (Please refer MIDI MAP)
d. Repeat Mode - Play FOLDER repeat
e. Bit Rate - Display ON - Display OFF
f. Version - CON: VerXX(Control version) - BUF: VerXX(Buffer version) - SER: VerXX(Servo version) - DSP: VerXX(DSP version)
g. Load Default - Press TRACK Knob to enter load defaults.
h. EXIT & SAVE - Exit & Save setting to next power on (Press the TRACK KNOB to fast exit & save in any operating mode)
Note:
Save: PITCH ON/OFF, PITCH RANGE, SGL/CTN, AUTO CUE, TIME MODE, HOLD, KEY LOCK, EFFECTS ON/OFF, SENITIVITY, DISPLAY/SCROLL TIME/JOG MODE/ INTENSITY/ A.CUE LEVEL/MIDI CC TYPE/ MIDI CH/ MIDI SETUP
Defaults: PITCH (ON), PITCH RANGE (10%), (CTN), AUTO CUE(ON), TIME MODE (REMAIN), HOLD(OFF), KEY LOCK(OFF), EFFECTS(OFF), SENITIVITY(0), PITCH BEND(PITCH RANGE), BIT RATE(Disp. ON), JOG MODE(MODE1,1), INTENSITY(4), A. CUE LEVEL(-48db), MIDI CC TYPE (REL.), MIDI CH(CH 1,2), MIDI SETUP(JOGOUT 0 ms) (PULSE 1024) (I/O HIDE), REPEAT MODE (OFF), LINE SETUP (LINE 1 DISPLAY=2/LINE 2 DISPLAY=1), (DISPLAY (1 sec)/RUN (150msec) TIME), PLAYLIST (NORMAL)
Data Backup
DATABASE BUILDER:
Database management software for the MPCD-X3 enables you to search for your files by Title, Artist, Album and Genre.
Installation: Refer to the following figures for installing database management software on your computer.
Download available at www.citronic.com
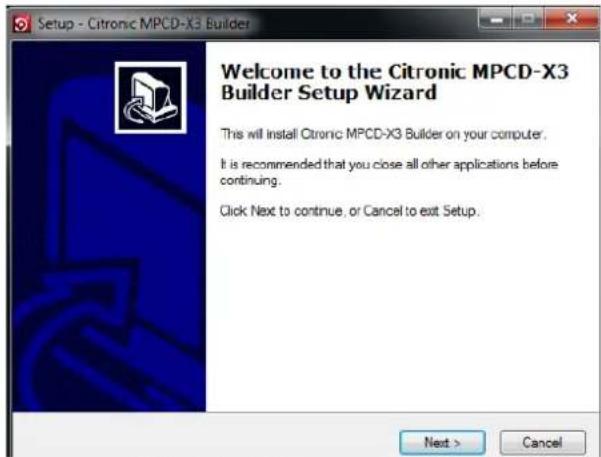
STEP 1: Click next >
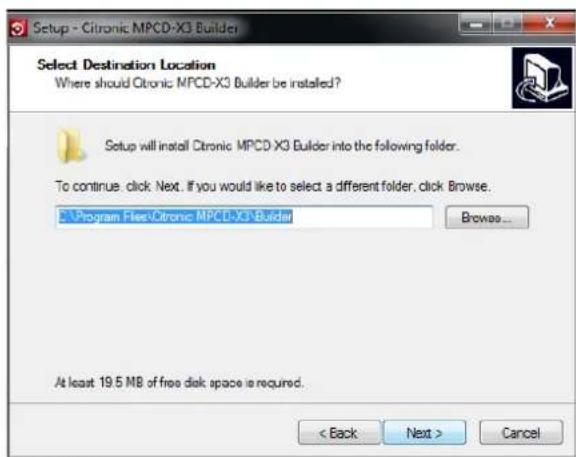
STEP 2: Click next >
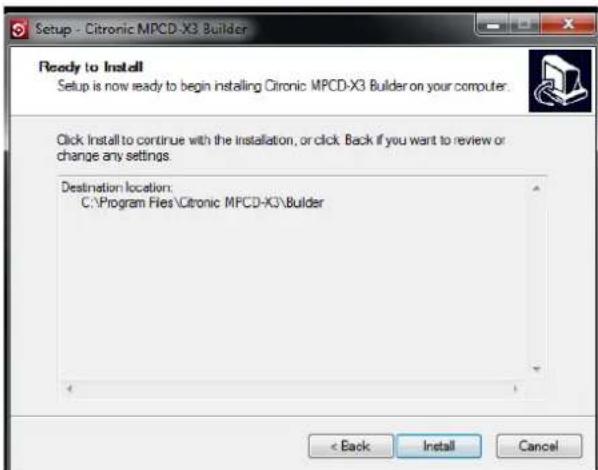
STEP 3: Click install
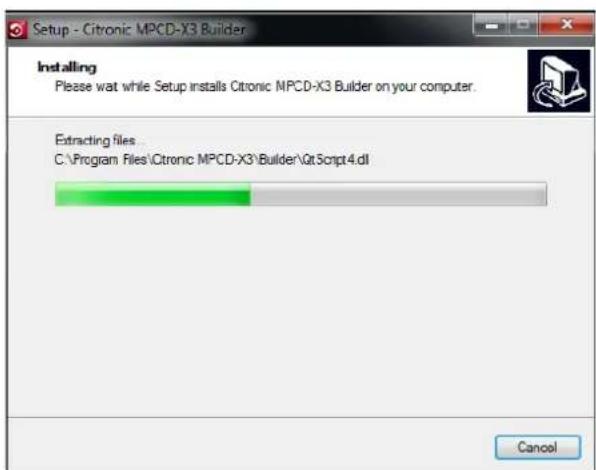
STEP 4: Processing
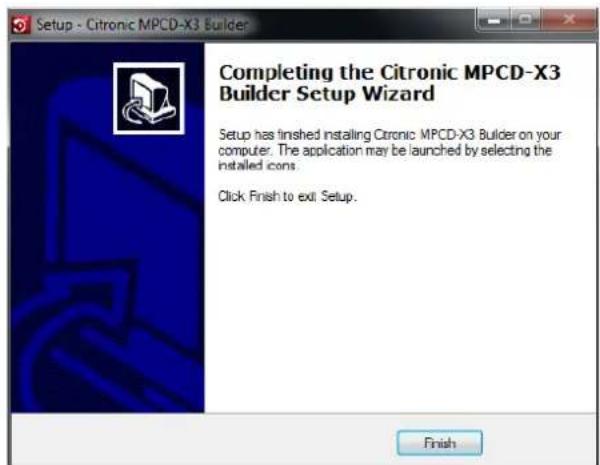
STEP 5: Click finish
The database builder will scan your USB hard drive and create database files to locate the files in your music library in your favor.
Scan and create: Refer to the following figures to process scanning and creating database. NOTE for Vista users please right click the icon and select "RUN AS ADMINISTRATOR"
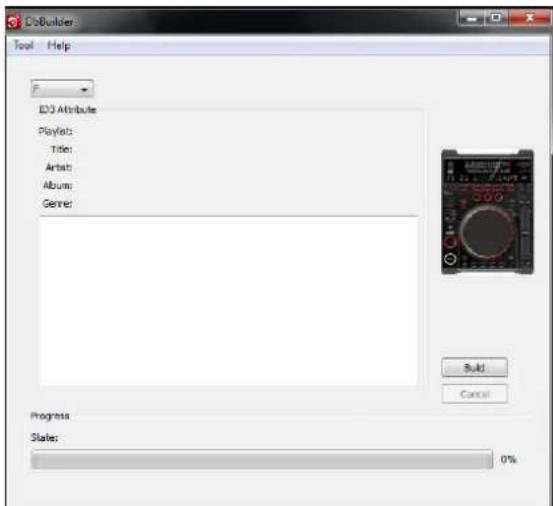
STEP 1: Select the desired USB hard drive and click build
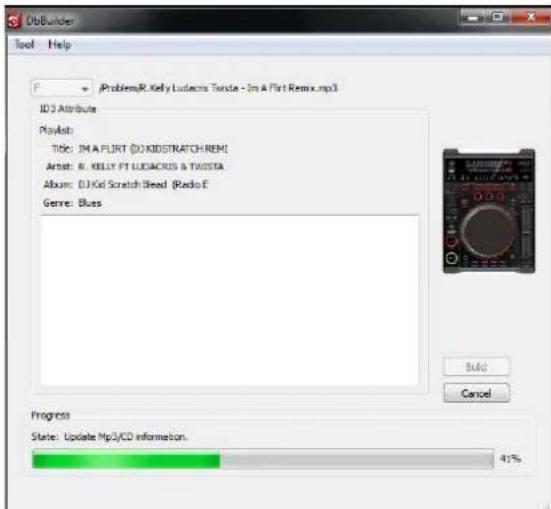
STEP 2: Processing
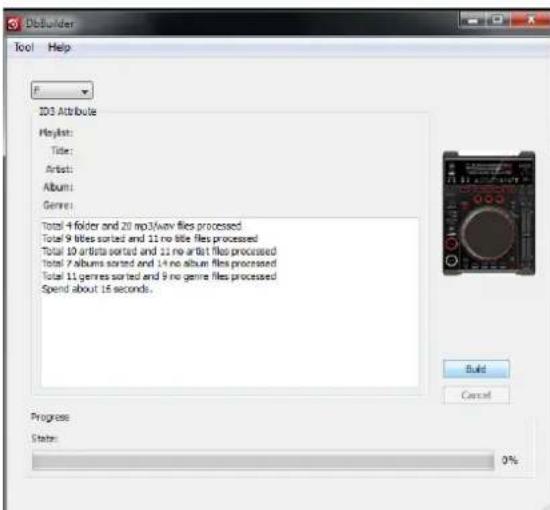
STEP 3: complete
NOTE: Please re-create the database builder whenever you change the contents of your USB device.
PLAYLIST:
- Press and hold the PRESET button to enter the internal menu, and turn FOLDER knob to search PLAYLIST menus.
- Turn the TRACK knob to select "Normal/ Title/ Artist/ Album/ Genre" (for USB only). And press the PRESET button again to save your setting and exit the menu. ex: to select "Artist"
a. Hold and turn the FOLDER knob you can select the folder you like by first letter of Album and the Albums are arranged in alphabet order.
b. Turn the FOLDER knob; or hold the FOLDER knob and turn JOG WHEEL to select next "Artist".
c. Each press TRACK knob you can select the ID3 of track you like to indicate.
d. Turn the TRACK knob; or hold the TRACK knob and turn JOG WHEEL to select the track you like.
System Requirements
• CPU: Intel Pentium 4, 1 x GHz processor, Intel Centrino Mobile Technology 1.6GHz or above
- RAM: 512MB
• DISK SPACE: 100MB of free disk space needed
• OS: Microsoft Windows XP SP3, Vista SP2, Windows 7
Link Up
With this function a USB device can be loaded into one MPCD-X3, the connected to another MPCD-X3 as a connected host USB player. Follow the directions below to setup the link function.
MAIN PLAYER:
- Press the PRESET button to enter the internal menu.
- Once you are in the internal menu, turn the FOLDER knob until MIDI SETUP is displayed.
-
Press the SHIFT button and turn TRACK knob until the USB = LINK is displayed, and press the PRESET button to save the setting and exit.
-
Now load your USB1 device into the MAIN PLAYER.
-
Connect the MAIN PLAYER using the rear USB MIDI port to the second player top USB 1 port.
-
You should now be able to access the main player loaded USB device using the second player controls.
(NOTE: The USB1 port must be used for storage device and read first before connecting the second player)
MAIN PLAYER (with loaded USB Device)
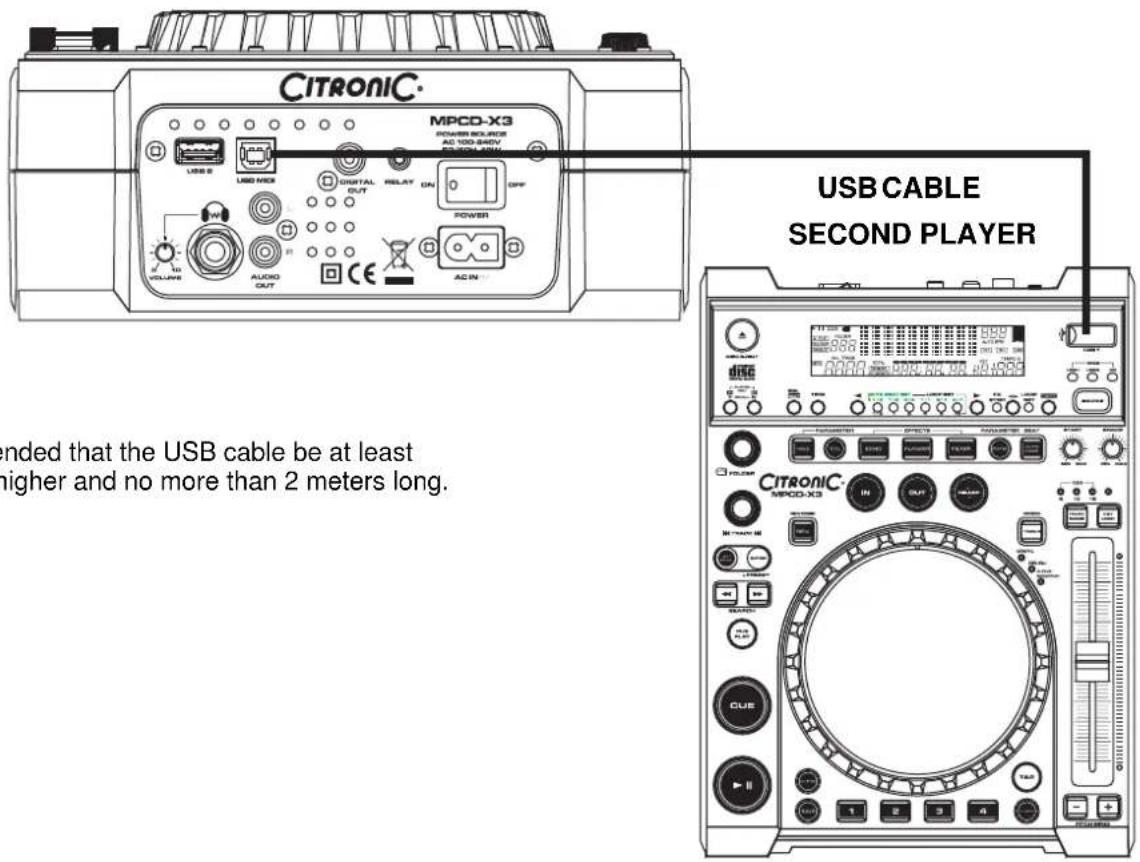
WARNING:
It is recommended that the USB cable be at least 28 gauge or higher and no more than 2 meters long.
MIDI MAP (Hexadecimal)
| SW name Type | MIDI 1 MIDI 2(Hold SHIFT) | Remarks | |
| FOLDER SW/ENC | 2B/31 6A/70 CC TYPE = RELATIVE | ||
| TRACK SW/ENC | 25/33 64/72 CC TYPE = RELATIVE | ||
| JOG SW/ENC | 13/35 52/74 CC TYPE = RELATIVE |
| FOLDER | CW/CCW | 31/32 | 70/71 | CC TYPE = NOTE |
| TRACK | CW/CCW | 33/34 | 72/73 | CC TYPE = NOTE |
| JOG | CW/CCW | 35/36 | 74/75 | CC TYPE = NOTE |
| FOLDER | ENC/CENTER | 31/0F | 70/4E | CC TYPE = ABSOLUTE |
| TRACK | ENC/CENTER | 33/15 | 72/54 | CC TYPE = ABSOLUTE |
| PITCH SLIDER | VR/CENTER | PITCHBEND/18 | 76/57 |
| START | VR | 27 | 66 |
| BRAKE | VR | 2D | 6C |
| PLAY/PAUSE | SW/LED 02/02 | 41/02 | |
| CUE | SW/LED 2E/2E | 5D/2E | |
| NEXT TRACK | SW/LED | 10/10 | 4F/10 |
| HOLD | SW/LED 11/11 | 50/11 | |
| FX TIME | SW/LED 0B/0B | 4A/0B | |
| FX RATIO | SW/LED | 2F/2F | 6E/2F |
| ECHO | SW/LED 05/05 | 44/05 | |
| FLANG. | SW/LED 29/29 | 68/29 | |
| FILTER SW/LED 23/23 62/23 | |||
| LOOP | SW/LED 30/30 | 5F/30 | |
| IN | SW/LED 04/04 | 43/04 | |
| OUT SW/LED | 17/17 | 56/17 | |
| RELOOP | SW/LED | 1D/1D | 5C/1D |
| REV | SW/LED 0A/0A | 49/0A | |
| CLEAR | SW/LED 08/08 | 47/08 | |
| SAVE | SW/LED | 0E/0E | 4D/0E |
| SAMPLE | SW/LED | 2C/2C | 6B/2C |
| KEY LOCK | SW/LED | 1E/1E | 5D/1E |
| < > | SW/LED (Fx SYNC) | 0C/0C | 4B/0C |
| < SW/LED (1/4) | 19/19 | 58/19 | |
| > SW/LED (4/1) | 12/12 | 51/12 | |
| WHEEL MODE | SW/LED (VINYL) | 24/24 | 63/24 |
| TEMP RANGE | SW/LED (10) | 2A/2A | 69/2A |
| 1 | SW/LED/LED2 | 14/14/31 | 53/14/31 |
| 2 | SW/LED/LED2 | 1/A/1A/32 | 59/1A/32 |
| 3 | SW/LED/LED2 | 20/20/33 | 5F/20/33 |
| 4 | SW/LED/LED2 | 26/26/34 | 65/26/34 |
| 1/2 (RED) | LED | 35 | 35 |
| 1 (LED) | LED | 36 | 36 |
| 2 (LED) | LED | 37 | 37 |
| 4 (LED) | LED | 38 | 38 |
| 8 (LED) | LED | 39 | 39 |
| 16 (LED) | LED | 3A | 3A |
| 1/2 (GREEN) | LED | 3B | 3B |
| 3/4 (GREEN) | LED | 3C | 3C |
| 1/1 (GREEN) | LED | 3D | 3D |
| 2/1 (GREEN) | LED | 3E | 3E |
| TEMP RANGE 6 | LED | 3F | 3F |
| TEMP RANGE 16 | LED | 40 | 40 |
| LOOP SET | LED | 41 | 41 |
| A. CUE SCRATCH | LED | 42 | 42 |
| CDJ | LED | 43 | 43 |
| DISC EJECT | SW | 0D | 4C |
| SGL/CTN | SW | 1 | 40 |
| TIME | SW | 1F | 5E |
| SHIFT | SW | 45 | -- |
| ENTER SW | 16 | 55 | |
| << | SW | 1C | 5B |
| >> | SW | 22 | 61 |
| CUE PLAY | SW | 28 | 67 |
| TAP | SW | 7 | 46 |
| PITCH BEND - | SW | 3 | 42 |
| PITCH BEND + | SW | 9 | 48 |
1. CC-ABSOLUTE (VR)
Control Change messages are sent with status 0xBn, where n is the channel, for the specified CC controller. Thus the controller MIDI ID is indicated with the channel along with the CC number. The value from 0x00 to 0x7F, directly related to the location of the controller.
2. CC-RELATIVE (ENC)
Control Change messages are status 0xBn, where n is the channel, for the specified CC controller. Thus the controller MIDI ID is indicated with the channel along with the CC number. The value from 0x40 to indicate the change in the controller. This is an offset to 0x40 "one's complement" notation.
A message with data 0x43 indicates a positive change of 3.
A messages with data 0x31 indicates a negative change of 15.
3. SWITCH ON/OFF (SW,CENTER,CW,CCW)
These messages are used for switches.
Control Change messages are sent with status 0x9n, SWITCH On and Off value are 0x7F and 0x00, where n is the channel.
4. LED ON/OFF (LED)
These messages are used for LED.
Control Change messages are sent with status 0x9n, LED On and Off value are 0x7F and 0x00, where n is the channel.
Specification:
Model: MPCD-X3, Digital media player
POWER: AC100-240V, 50/60Hz, 19Watts
DIMENSION: 296 (D) X 218 (W) X 103.5 (H) mm
WEIGHT 2.5 kg
Note: Specifications and design are subject to change without notice for purpose of improvement.
AUDIO CHARACTERISTICS: (CD Test disc: TCD-782; USB Test format: MP3, 128kbps; load=100K ohm)
| ITEM | TYPICAL | LIMIT | CONDITION | |
| (1) OUTPUT LEVEL | CD | 2V +/-0.5dB 2V +/-1dB | 1KHz, 0dB | |
| USB1,2 | 1.85V +/-0.5dB 1.85V +/-1dB | |||
| (2) CHANNEL BALANCE | WITHIN 0.2dB WITHIN 1dB 1KHz, 0dB | |||
| (3) FREQUENCY RESPONSE | CD | 17-20KHz +/-0.4dB | 17-20KHz +/-1dB | 0dB OUTPUT |
| USB1,2 | 17-16KHz +/-0.2dB | 17-16KHz +/-1dB | ||
| (4) DE-EMPHASIS CD | -20dB +/-0.2dB -20dB +/-1dB 16KHz,-20dB | |||
| (5) CHANNEL SEPARATION(*2) | CD, USB1,2 91dB | 85dB | 1KHz, 0dB | |
| (6) THD+N (*1) | CD 0.006% | 0.01% 1KHz, 0dB | ||
| USB1,2 0.007% | 0.01% 1KHz, 0dB | |||
| (7) S/N RATIO (*2) | 126dB 90dB 1KHz, 0dB | |||
| (8) PHONES OUTPUT LEVEL | CD | 0.35V +/-0.5dB 0.35V +/-1dB | 1KHz, -20dB | |
| (9) DIGITAL OUTPUT LEVEL | 0.5 +/-0.03V P-P | 0.5 +/-0.1V P-P | 75 ohm load | |
| Note: *1: With 20KHz low pass filter | ||||
| *2: With 20KHz low pass filter, "IHF-A" weighted | ||||
MP3 FORMAT
| Disc Format | Applicable file extensions | mp3 . MP3 . mP3 . Mp3 |
| ISO9660 | max. 63 characters | |
| Joliet | max. 63 characters | |
| CD-ROM sector format | mode-1 only | |
| Max. number of Folders | 255 | |
| Max. number of files | max. 999 files (* note #1) | |
| USB Format | File System | FAT 12/16/32 |
| Applicable file extensions | mp3. MP3. mP3. Mp3 | |
| Max. number of Folders | 999 | |
| Max. number of files | max. 999 files | |
| MP3 Format | MPEG 1 Layer 3 standard (ISO/IEC 11172-3), which provides for single channel ('mono') and two-channel ('stereo') coding at sampling rates of 32, 44.1 and 48kHz. | 32/40/48/56/80/96/112/128/160/192/224/256/320 kbps |
| Xing/VBRI VBR | ||
| MPEG 2 Layer 3 standard (ISO/IEC 13818-3), which provides for similar coding at sampling rates of 16, 22.05 and 24 kHz. | 32/40/48/56/64/80/96/112/144/160 Kbps | |
| Xing/VBRI VBR | ||
| MPEG 2.5 Layer 3 standard, which provides for similar coding at sampling rates of 8, 11.025 and 12 kHz. | 32/40/48/56/64/80/96/112/144/160 Kbps | |
| Xing/VBRI VBR | ||
| Disc Writing Method | Disc at Once and Track at Once | |
| Multi Session | If the 1^st session is CDDA, you can playback Only CDDA track, If the 1^st session is MP3, you can playback only MP3 file. |
Note #1: max.255 files each folder
FOR MORE INFORMATION ON CITRONIC PRODUCTS VISIT
WWW.CITRONIC.COM
- Main Features
- Accessories
- General Functions and Controls
- JOG WHEEL
- EFFECTS AND PARAMETER BUTTONS
- b. PARAMETERS:
- Internal Menu
- Note:
- Data Backup
- DATABASE BUILDER:
- PLAYLIST:
- System Requirements
- Link Up
- MAIN PLAYER:
- MAIN PLAYER (with loaded USB Device)
- WARNING:
- CC-ABSOLUTE (VR)
- CC-RELATIVE (ENC)
- SWITCH ON/OFF (SW,CENTER,CW,CCW)
- LED ON/OFF (LED)
- Specification:
Brand : Citronic
Model : MPCD-X3
Category : CD Player