PD-1S MK2 - DJ Equipment Citronic - Free user manual and instructions
Find the device manual for free PD-1S MK2 Citronic in PDF.


| Product Type | DJ Mixer |
| Model | PD-1S MK2 |
| Brand | Citronic |
| Channels | 2 |
| Frequency Response | 20Hz - 20kHz |
| Input Impedance (Line) | 10 kΩ |
| Output Impedance (Master) | 100 Ω |
| Maximum Output Level | +10 dBu |
| Signal-to-Noise Ratio | >90 dB |
| Power Supply | 12V DC, 500 mA (center positive) |
| Dimensions (W x D x H) | 19 x 6 x 1.75 in (483 x 152 x 44 mm) |
| Weight | 2.5 kg (5.5 lbs) |
| Input Connectors | 2 x RCA (Line), 1 x 3.5mm (AUX) |
| Output Connectors | 2 x RCA (Master), 1 x 3.5mm (Headphones) |
| USB Port | USB-B (for PC connection) |
| Built-in Effects | Equalizer (Bass, Mid, Treble) |
| Microphone Input | 1/4" TS (unbalanced) |
| Headphone Output | 1/4" TRS (stereo) |
| Rack Mountable | Yes (19" rack ears included) |
| Operating Temperature | 0°C to 40°C |
| Cleaning Instructions | Use dry cloth, no solvents |
| Safety Certifications | CE, RoHS |
Frequently Asked Questions - PD-1S MK2 Citronic
User questions about PD-1S MK2 Citronic
0 question about this device. Answer the ones you know or ask your own.
Ask a new question about this device
Download the instructions for your DJ Equipment in PDF format for free! Find your manual PD-1S MK2 - Citronic and take your electronic device back in hand. On this page are published all the documents necessary for the use of your device. PD-1S MK2 by Citronic.
USER MANUAL PD-1S MK2 Citronic
Pro-Drive Direct Drive Turntable
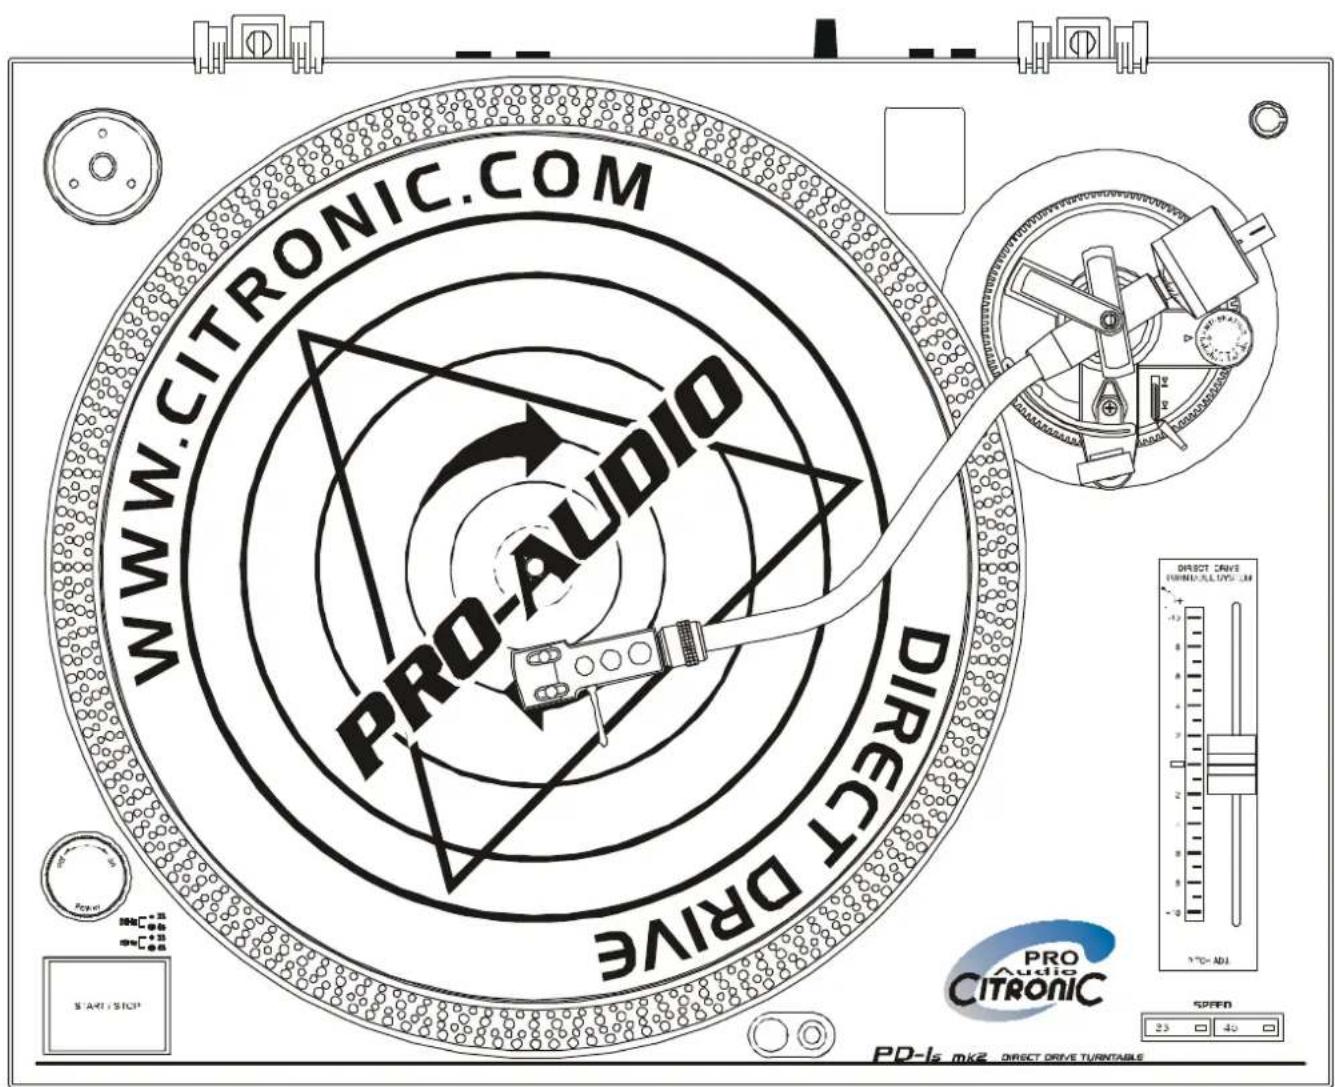
OWNERS MANUAL
Table of Contents
About Citronic....3
Important Safety information....3
Your Serial Number......3
Illustration and Main Features ....4
Check List....5
Assembly Instructions......5
Placement....5
Connections 5
Scratch Mixing Tip......6
Operation......6
Remote Start....6
Changing the Speed 6
Maintenance 6
Cartridge Replacement......7
Technical Specification ....7
Guarantee of Satisfaction......8
CE Markings......8
Notes: 9
About Citronic
Thank you for choosing Citronic and the PD-1s mk2 Professional Direct Drive Turntable. You have joined a discerning group of DJ's and operators who value design integrity, quality and state of the art facilities. Established in Melksham, Wiltshire in 1972, Citronic occupies prestigious purpose built factory headquarters. The award winning product range covers professional audio mixers, amplifiers and signal processing.
Each unit is manufactured to the highest possible standards and all have an enviable reputation for reliability and value for money – the noted hallmark of Citronic products.
Substantial investment has been made in high technology CAD systems, manufacturing control and testing techniques. This sophisticated computerisation coupled with an extensive research and development program, enables the company to offer an exceptional degree of manufacturing excellence and quality assurance.
Citronic has always listened carefully to the customer and places tremendous emphasis on market research. This ensures that the exacting requirements of the DJ are complimented without compromise, throughout the entire product range. This unique approach, coupled with a strong input from a highly qualified engineering team, ensures that Citronic maintains its position as a respected leader, in the industry's development.
Citronic has a distribution network throughout Europe, Asia and the Americas. Enjoy your new purchase.
Important Safety information
Safety Warnings:
All the safety and operating instructions should be read before the appliance is operated.
To prevent fire or shock hazard, do not expose this appliance to rain or moisture.
To reduce the risk of electric shock, do not remove the cover (or back). There are no serviceable parts inside. Always refer servicing to qualified service personnel.
Cautionary Notes:
Care must be taken not to damage the power supply cord housing, which could expose line parts and cause electric shock. When removing from wall outlet, be sure to remove by holding the plug and not by pulling the cord.
In order to prevent electric shock; do not open the top cover. If a problem occurs, contact your dealer.
Do not place metal objects or spill liquid inside the mixer. Electric shock or malfunction may result.
Any use of the controls, or any adjustment, or the performance of any procedure other than those specified herein may result in serious damage to your health.
The unit should not be opened or repaired by anyone except properly qualified service personnel.
Double insulated - when servicing, use only identical replacement parts.
Your Serial Number
Please, record and retain serial number of your PD-1s mk2 Professional Direct DriveTurntable shown on the rating label.
My Serial Number Is:
WARNING
In order to obtain the best service from the unit we STRONGLY recommend that you read this manual before you apply any power
Illustration and Main Features
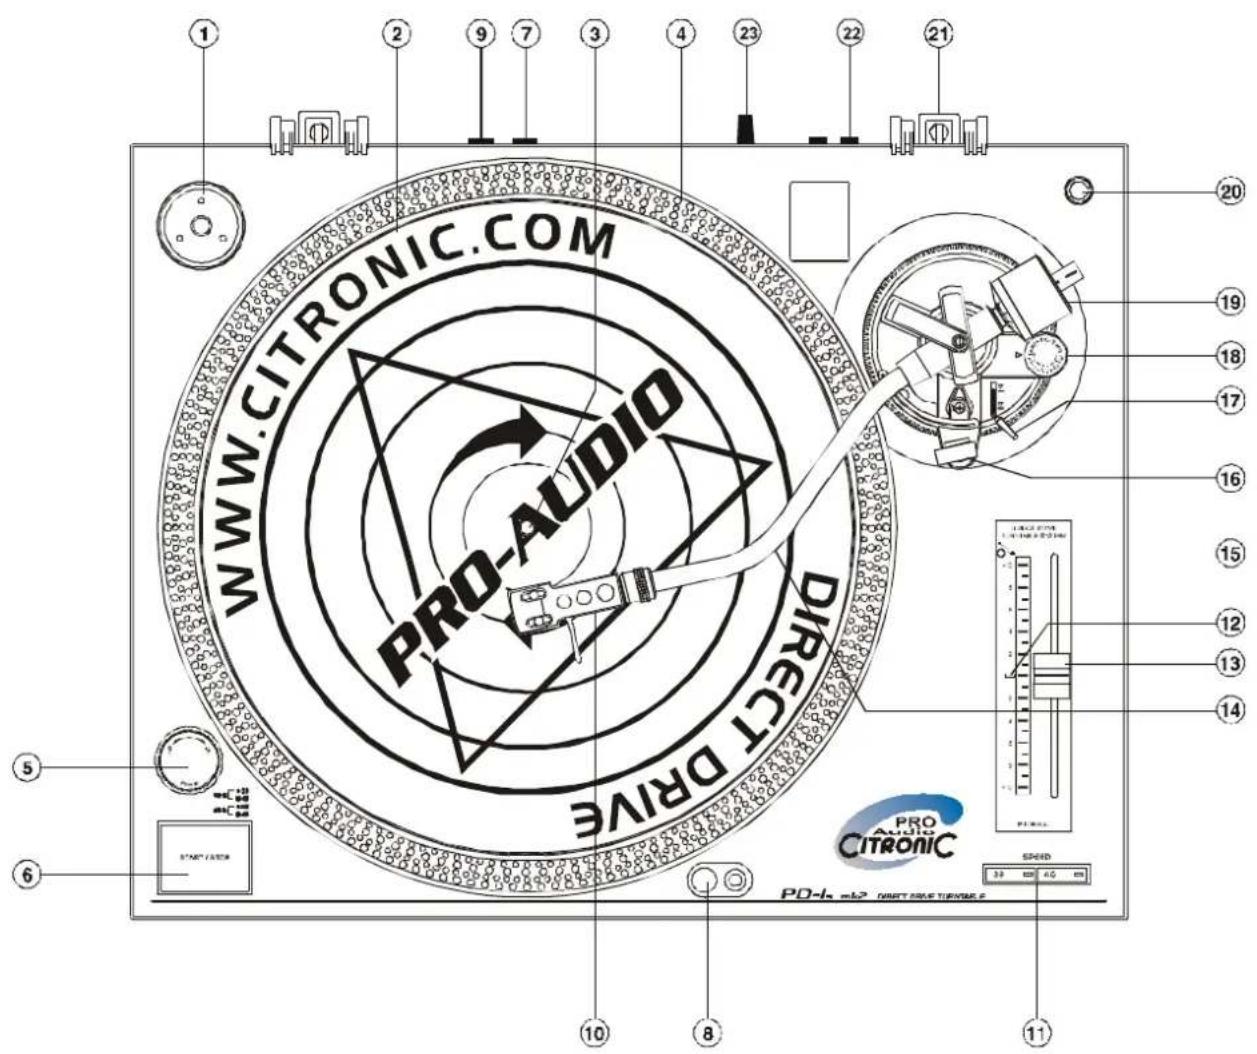
1) 45-rpm Adapter
2) Slip Mat
3) Center Spindle
4) Strobe Dots
5) Power Switch/Strobe
6) Start/Stop Button
7) Pitch Out: Frequency output of pitch out is
675Hz square wave 2Vp-p, while pitch is in middle position 0%
8) Target Light
9) Remote Start Socket: This jack can be connected with an external switch to perform the Start/Stop operation.
10) Headshell
11) Speed Select Buttons
12) Quartz lock LED
13) Pitch Control Slider
14) Static Balanced Tonearm
15) Trim control
16) Arm Rest
17) Cueing Lever
18) Anti-skating Knob
19) Counterweight
20) Spare Cartridge Holder
21) Hinge For Dust Cover
22) Phono Sockets L+R
23) Phono Sockets Earth (GND)
Check List
- Check that the following parts are included in the package with the main unit:
1) Turntable platter
2) Slip mat
3) Dust cover
4) 45-rpm adapter
5) Counterweight
6) Operating instructions
7) Phono lead
Assembly Instructions
- Remove the main unit with the packing from the box and take off the packing.
- Insert the 45-rpm adaptor in the slot on the turntable.
- Place the turntable platter onto the center spindle.
- Place the slip mat on the platter.
- Installation of cartridge: When installing a cartridge, refer to the operating instructions of that cartridge. During installation, attach the stylus protector to guard the stylus tip from damage.
- Insert the headshell into the front end of the tonearm, then turn the lock nut clockwise with the headshell firmly held horizontally.
- Slide counterweight onto tonearm. Twist it lightly and it will screw onto the rear shaft of the tonearm.
-
Adjustment of horizontal zero (0) balance and stylus pressure:
(a) Remove the stylus protector, do not touch the stylus tip during the adjustment.
(b) Set the cueing lever to the lower position.
(c) Release the arm clamp and lift the tonearm from the arm rest to free it.
(d) While holding the Headshell lever rotate the counterweight until the tonearm is approximately balanced horizontally (floats freely).
(e) Refasten the tonearm with the arm clamp.
(f) Hold the counterweight stationary with one hand and rotate only the stylus-pressure ring to bring the number "0" of the ring into alignment with the center line on the tonearm rear shaft.
(g) Rotate the counterweight clockwise until the scale shows the value corresponding to the pressure of the used stylus, typically 4 grams. -
Set the anti-skating control knob to the same value as the stylus pressure.
-
Install the dust cover to the main unit.
Placement
- Do not place the unit in a location where it will be exposed to direct sunlight or near a heating appliance.
- Do not place the unit in a location where there is high humidity or a lot of dust.
- Cartridge may pick up sound pressures or vibrations from the speakers coming along the floor or through the air resulting in howling. Find a location, which is very stable, and vibration free.
●The legs have functions for adjusting the height of the unit itself. Adjust the legs to stabilize the main body horizontally.
Connections
- Connect the power cord to the household AC outlet.
- Connect the unit output terminals to the PHONO inputs of your mixer.
Output terminals Mixer input
L White) >> L Channel
R (Red) >> R Channel
GND (Spade) >> GND
NOTE: Be sure to connect the separate ground terminal firmly to the Mixer. If this connection is not made or is loose, a power source "HUM" will result.
Scratch Mixing Tip
If you are using the deck for scratching the cartridge can be adjusted to give better traction as follows: Align the cartridge in a direct line to the back of the tone arm.
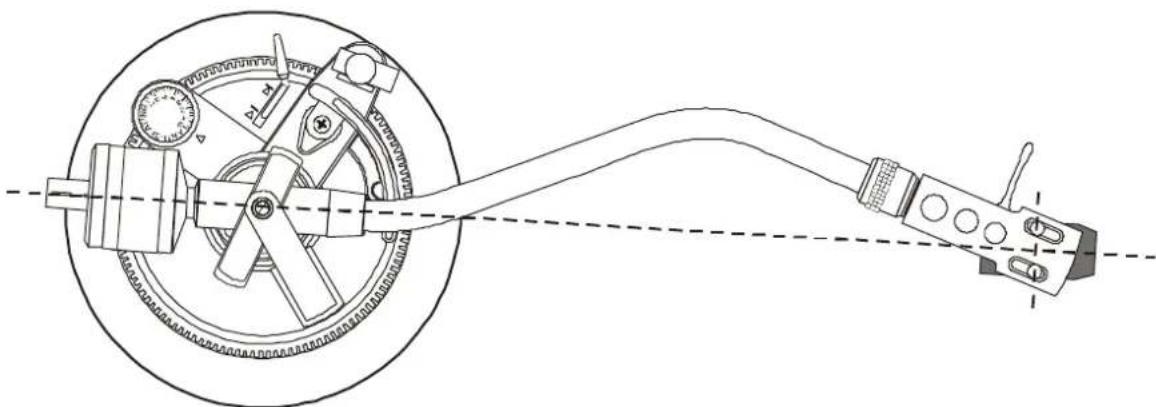
natural_image
Technical line drawing of a mechanical assembly with gears and a connecting rod (no text or symbols)NOTE this is not advisable to use during normal play.
Operation
The following instructions assume that the counter balance weight has been set.
-
Rotate the power switch to turn on the power, the speed indicator and the strobe-illuminator will light up.
-
Place a record on the slip mat, when playing a 45rpm record with a large center hole; place the 45-rpm adaptor on the center spindle.
-
Set the speed to match the record.
-
Remove the stylus protector, release the arm clamp.
-
Set the cueing lever to the up position.
-
Press the Start/Stop button, the turntable platter will start to rotate.
-
Move the tonearm over the desired groove.
-
Set the cueing lever to the down position, the tonearm will descend slowly onto the record and play begins.
-
When play is finished, raise the cueing lever, move the tonearm to the arm rest, secure the tonearm with the arm clamp.
-
Press the Start/Stop button to stop the platter rotating, push the power button to turn off the power.
Suspend play
Set the cueing lever to "UP" position during play, the stylus tip of the cartridge will be lifted from the record.
Target light
This unit is provided with a target light for illuminating the stylus tip during play. Push the target light button, the target light will be raised into position for illuminating the stylus tip.
Remote Start
The remote start jack socket is located at the rear of the deck. When a jack plug is inserted and connected to a compatible mixer e.g. Station 9, CDM8:4. The deck will be able to be started automatically from the mixer remote start control.
Changing the Speed
As long as the pitch control (13) is in center click position, the turntable is operated with quartz-controlled speed.
The Blue LED (12) will then be lit.
The speed can be increased or decreased by 10% via the pitch control (13). The Blue LED (12) will then be off.
The Trim control (15) can be used to provide an increased range of pitch control adjustment in order to have the turntable rotate extremely slow or fast.
For DJ Mixer operation, the start/stop function can be remotely controlled by a separate switch. Use the jack remote socket (9) to connect this to the mixer option.
Maintenance
● Clean the stylus periodically with a soft brush to prevent the accumulation of dust.
- When the sound becomes distorted or noisy, check the stylus. If worn out, replace it with a new one.
●From time to time, the dust cover and turntable cabinet should be wiped with a soft, dry cloth.
Cartridge Replacement
To replace the cartridge in the headshell, follow the instructions below:
When installing a cartridge, refer to the operating instructions of that cartridge.
During installation, attach the stylus protector to guard the stylus tip from damage.
To aid assembly use the slot provided at the rear of the turntable (feature 20)
a) Using a pair of fine electronic pliers, carefully remove each of the four wires in turn from the back of the cartridge.
b) Unscrew the two cartridge mounting screws and withdraw the old cartridge.
c) Install the new cartridge and tighten with the screws provided so that they are central in the headshell slot.
d) Connect the lead wires to the cartridge terminals. The terminals of most cartridges are color-coded.
Connect each lead wire to the terminal of the same color.
White (L+) Left channel+
Blue (L-) Left channel-
Red (R+) Right channel+
Green (R-) Right channel-
Technical Specification
Motor
8 pole 2 phase brushless DC
Drive Direct Drive
Pitch +/- 10%
Starting Torque More than 1kgf.cm
Braking system Electronic brake
Braking Time Less than 1 sec.
Starting Time Less than 1 sec.
Braking Time Less than 1 sec.
Tracking force adjustment range 0 - 4g
Effective arm length 230.5mm
Power supply
AC 115 - 230V, 50/60Hz
Power consumption
12 Watts
Dimension (WxDxH)
450 x 350 x 146 mm
Weight
9.6 Kgs
Output as per cartridge fitted
1.5 - 3.6 mV
Guarantee of Satisfaction
This product is guaranteed to the original purchaser against defects in material and workmanship for one year from the date of initial purchase. Activate this guarantee at the time of purchase by returning the Guarantee Card to the address on the front page. Keep a copy of your sales receipt for proof of guarantee status, should it be necessary.
If a malfunction occurs, the dealer who supplied the unit will be happy to handle the repair. When returning a unit, use the original factory carton – do not chance inadequate packing materials. Simply tape a note to the unit describing the malfunction.
If your unit is out of guarantee, we recommend that you return it to an authorised Citronic dealer for repair or service. Experienced personnel, supported by specialist testing equipment, will be able to find and correct the fault in the most efficient and cost effective way
If you have need to contact us about the operation or servicing of your PD-1s mk2 Professional Direct Drive Turntable please write, telephone or e-mail to the address on the back page: -
CE Markings
EMC Conformity
The PD-1s Professional Direct Drive Turntable, have been tested to demonstrate compliance with the EMC 89/336/EEC directive, under which the following harmonised standards apply:
I) EN55020 Electromagnetic Immunity
iv) EN55013 Electromagnetic Compatibility
Electrical Equipment Safety Regulations (1994)
The PD-1s Professional Direct Drive Turntable, have been designed and tested to demonstrate compliance the LVD 73/23/Eec directive, using the following standard.
I) EN60065 Safety requirements for mains operated electronic equipment for household and similar general use.
Notes:
Web: www.citronic.com
9151-1
- Table of Contents
- About Citronic
- Important Safety information
- Safety Warnings:
- Your Serial Number
- WARNING
- Check List
- Assembly Instructions
- Placement
- Connections
- Scratch Mixing Tip
- Operation
- Remote Start
- Changing the Speed
- Maintenance
- Cartridge Replacement
- Technical Specification
- Guarantee of Satisfaction
- CE Markings
- EMC Conformity
- Electrical Equipment Safety Regulations (1994)
- Notes:
Brand : Citronic
Model : PD-1S MK2
Category : DJ Equipment