
DRAGON EVO B01 - Motorcycle helmet Premier - Free user manual and instructions
Find the device manual for free DRAGON EVO B01 Premier in PDF.


| Brand | Premier |
| Model | DRAGON EVO B01 |
| Product Type | Motorcycle helmet (full-face) |
| Shell Material | Thermoplastic polycarbonate alloy |
| Weight | Approx. 1550 g (size M) |
| Safety Certifications | ECE R22-05, DOT FMVSS 218 |
| Fastening System | Micrometric buckle (quick-release) |
| Visor Type | Clear polycarbonate, anti-scratch, UV protection |
| Sun Visor | Integrated drop-down sun visor |
| Ventilation | Adjustable chin and top vents, rear exhaust |
| Inner Liner | Removable and washable, moisture-wicking fabric |
| Liner Features | Antimicrobial, hypoallergenic, breathable |
| Noise Reduction | Wind tunnel tested, reduces wind noise |
| Helmet Sizes | XS, S, M, L, XL, XXL |
| Available Colors | Matte black, gloss white, red, blue |
| Warranty | 5 years from date of purchase |
| Usage | Street, touring, sport riding |
| Cleaning Instructions | Hand wash liner with mild soap, air dry; wipe shell with damp cloth |
| Replacement Parts Available | Visor, inner liner, cheek pads, chin curtain |
| Included Accessories | Helmet bag, breath guard, chin curtain |
Frequently Asked Questions - DRAGON EVO B01 Premier
User questions about DRAGON EVO B01 Premier
0 question about this device. Answer the ones you know or ask your own.
Ask a new question about this device
Download the instructions for your Motorcycle helmet in PDF format for free! Find your manual DRAGON EVO B01 - Premier and take your electronic device back in hand. On this page are published all the documents necessary for the use of your device. DRAGON EVO B01 by Premier.
USER MANUAL DRAGON EVO B01 Premier


natural_image
Diagram of a biological structure with a red circular component and curved boundary, labeled 'c' (no text or symbols beyond label)Montaggio
Smontaggio Visiera
natural_image
Two line drawings of a person riding a motorcycle with motion arrows, accompanied by the Italian flag (no text or symbols on the figures themselves)| 49 a 50 | xxxs |
| 51 a 52 | xxs |
| 53 a 54 | xs |
| 55 a 56 | s |
| 57 a 58 | m |
| 59 a 60 | l |
| 61 | xl |
| 62 a 63 | xxl |
Manutenzione
La Calotta
A Put the visor in the close position and rotate the little side "comma" downwards so to allow it to pass through the eyelet on the visor.
B Lift the small flap with the Premier logo outward.
natural_image
Diagram of a biological structure with a red circular component and curved boundary, labeled 'c' (no text or symbols beyond label)Visor Assembly
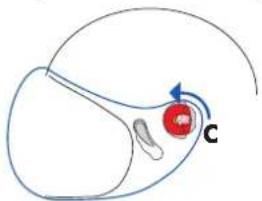
C Rotate the visor plate counter clockwise for 90° and remove it. For the opposite side the rotation is clockwise.
To reassemble the visor just follow the steps from C to A. Take care that the correct plate is used for the correct side. Once the visor is mounted and the plate turned into its locking position, the plate must adhere perfectly to the helmet shell.
For further information view the video on our web site www.premierhelmet.com

How to replace your DRAGON EVO 2.0 Visor

Rubber Cover
Visor Disassembly
Take off the premier black rubber cover.
Unscrew the screw located in the visor mechanism.
Loosen and turn the "corn" downwards, due to let it pass by the specific area of the visor.
Repeat the same on the other side.

Visor Assembly
To put the visor back on, repeat backwards the same actions done to disassembly, paying attention to the position of the Premier logo on the black rubber cover. Repeat the same on the other side.
For further information view the video on our web site www.premierhelmet.com

How to replace your MONZA - EOS Visor

Visor Disassembly
To REMOVE the visor, open and align the lower clasp to the spring cursor, lower the cursor, grab the visor and pull it downwards.
Repeat the same operation on the other side.
Visor Assembly
To REMOUNT the visor, insert the upper clasp in its cavity and align the lower clasp with the spring cursor.
Lower the spring cursor and lightly press the visor so that the lower clasp anchors to the guide on the side plate, release the spring cursor and ensure that the visor has properly anchored to place.
Repeat the same operation also on the other side.
Warning:
While opening the visor do not force upwards too much in order to prevent the breaking of the visor locks.
For further information view the video on our web site www.premierhelmet.com

How to replace your JET TOURING 3 Visor
Visor Disassembly
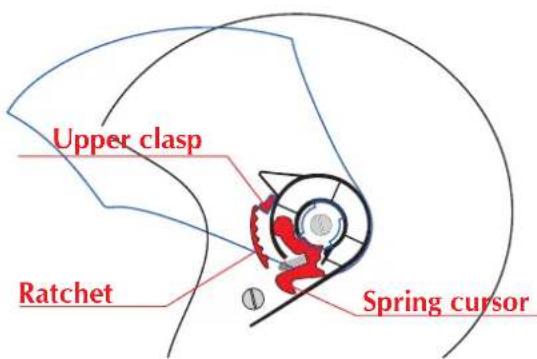
To REMOVE the visor, align the upper clasp to the end of the ratchet, grab the visor and, at the same time, pull the spring cursor downwards. Pull and remove the visor. Repeat the same operation also on the other side.
Visor Assembly
To REMOUNT the visor, insert the upper clasp to the end of the ratchet and contemporarily pull the spring cursor downwards. Push the visor and release the cursor and verify that the visor is well anchored to the helmet. Do the same on the other side.
For further information view the video on our web site www.premierhelmet.com

How to replace your Visor VANGARDE - LE PETIT VISOR - BABY VISOR

Visor Disassembly
Use a cutting key to remove the rubber cover. Remove the srew that hold the alluminium plate. Then hold and push to remove the visor. Repeat the same on the other side.
Visor Assembly
Insert the alluminium plate that holds the visor, tighten with the cutting screw. Repeat the same operation on the other side.
For further information view the video on our web site www.premierhelmet.com

Instruction disassembly and assembly Visor TROPHY
Visor Disassembly
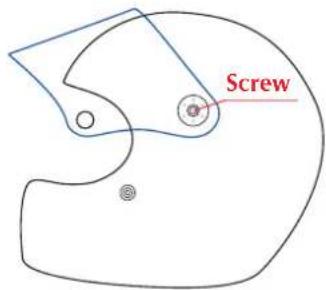
With the help of a allen key of 4 disassembly the metallic plates.
Take off the visor
Repeat the same mechanism on the other side.
Visor Assembly
Place the visor on the shell making sure that the bullet hole is well centered with the brass dice placed on the shell. Insert the aluminum plate and tight the allen screw. Repeat the same operation on the other side.
For more information visit www.premier.com and view the video with the instruction.

Instruction disassembly and assembly Visor PEPE - SCOOBY
Visor Disassembly
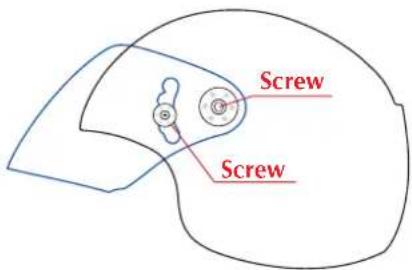
With the help of a allen key of 4 and a star screw remove the metallic plates.
Take off the visor.
Repeat the same mechanism on the other side.
Visor Assembly
Lay the visor on the mechanism.
Insert the metallic plat, screw the allen and the self-threading screw.
Repeat the same mechanism on the other side.
For more information visit www.premier.com and view the video with the instruction.

How to replace your VINTAGE - FREE EVO Visor

Removal
Remove the cheek pads by gently pushing them down out of the shell. Then pull the visor down gently until you pass the border of the visor, one side at a time until the visor is released from the mechanism.
Fitting
Insert the visor in one side of the mechanism, push and click it in. Repeat the same operation on the other side. After push up the visor until you pass the visor border and make sure that the visor works correctly. At the end apply the cheek pads pushing them in the appropriate section on the polystyrene shell.
Repeat the same operation on the other side.
For further information view the video on our web site www.premierhelmet.com

How to remove and reassemble the washable inner lining
1 Remove the cheek pads (normally just press it in or fixed by means of press buttons)
2 Remove the neck roll by gently pulling it out
3 Remove the front plastic ventilation grid as per type A or type B chin
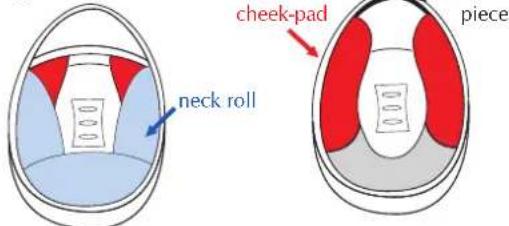
TYPE A Pull the lining upwards in correspondence of the three studs (see drawing), unbutton the lining at the back and remove it.
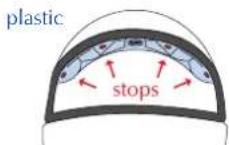
front plastic ventilation grid
TYPE B Remove the front plastic ventilation grid (simply pressed in) and unbutton the lining at the back.

To remount the lining, just repeat all the steps backwards taking care that the cheek pads are reassembled following this sequence: 1) pass the chin strap through the eyelet; 2) lay the forepart of the cheek pad in the shell so that it touches the mouthpiece; 3) press the back part of the cheek pad and block it back to perfectly adhere to the shell.

Helmet retention system
A Chinstrap with DD ring fastener
B Chinstrap with quick release fastener
C Chinstrap with micrometric fastener
A Chinstrap with DD ring fastener
The DD ring fastening system allows you to obtain an easy and precise regulation of the length of the chinstrap.
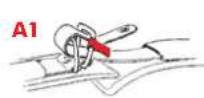

A1 Insert the free end of the chin strap in the DD rings.
A2 Tighten the free end of the chinstrap by pulling it.
A3 Bend the end of the chinstrap which hangs loose and fix it to the other strap by means of the press button.
If you want to loosen the chin strap just pull the red tongue on the DD ring.
B Chinstrap with quick release fastener


B) This system allows you to fasten your helmet easily and safely.
B1 The length of the chinstrap can be regulated through the metallic buckle and the strap must be tight.
To fasten the chinstrap, you must insert the metallic part in the buckle until it clicks into place.
To release the buckle just pull the red button.

C Chinstrap with micrometric fastener.
With this system you will always be able to easily fasten and regulate your chinstrap.

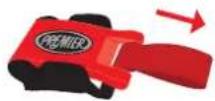
C1 Insert the plastic tongue in the buckle until the strap is tight. To unfasten the buckle, just pull on the red flag till the strap is loose.
*To guarantee the perfect functioning of the micrometric retention system, the chinstrap must always be passed through the slide.
Aerodynamics and Acoustics
The Premier helmet has been designed and developed with particular attention to aerodynamics and acoustics. The type of motorcycle and the physical characteristics of the driver may create turbulences that affect the acoustics of the helmet especially when airflows hit the lower part of the helmet creating vortexes that reduce the helmet's noise reduction features.

natural_image
Two line drawings of a person riding a motorcycle, one with motion arrows and the other with a flag (no text or symbols)Homologation Label
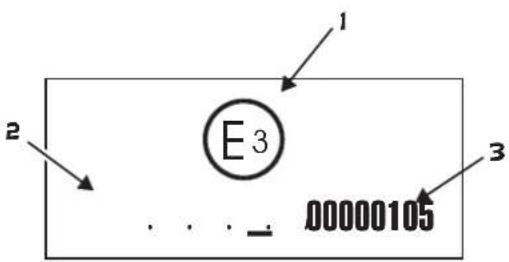
The international homologation label is composed of:
1) a circle containing the letter E identifying the country where the helmet model has been approved; in the case of Italy the number is 3, Spain 9, Luxembourg 13 etc.
2) the homologation number is followed by a dash (/) and a letter:
"J" if the helmet is an open face and does not protect your face
"P" if the helmet is a full face and protects your face "NP" if the helmet is a full face but does not offer facial protection.
3) a hyphen (-) followed by the production serial number for the helmet model homologated in a determined country. The country's authority will keep trace of the correspondence between the helmet type and the serial numbers.

How to determinate the correct size of your helmet
Warning:
To ensure adequate protection the helmet must fit snugly on your head.
| 49 a 50 | xxxs |
| 51 a 52 | xxs |
| 53 a 54 | xs |
| 55 a 56 | s |
| 57 a 58 | m |
| 59 a 60 | l |
| 61 | xl |
| 62 a 63 | xxl |
Maintenance
The outer shell
The outer shell can be cleaned with water and mild soap. The use of other detergents may cause damages to the paint and to the shell.
The visor
To clean the external surface of the visor, wipe with a soft cloth, water and mild soap. The internal surface of the visor may be cleaned exclusively with a soft micro fibre cloth, lightly damp if necessary.
Warning:
The antifog treatment present on the internal surface of the shell is subject to deteriorate with use and climatic conditions. We suggest to replace the visor once the treatment starts to wear off reducing the antifog action.




www.premierhelmet.com



- Montaggio
- Smontaggio Visiera
- Manutenzione
- La Calotta
- Visor Assembly
- How to replace your DRAGON EVO 2.0 Visor
- Visor Disassembly
- How to replace your MONZA - EOS Visor
- Warning:
- How to replace your JET TOURING 3 Visor
- How to replace your Visor VANGARDE - LE PETIT VISOR - BABY VISOR
- Instruction disassembly and assembly Visor TROPHY
- Instruction disassembly and assembly Visor PEPE - SCOOBY
- How to replace your VINTAGE - FREE EVO Visor
- Removal
- Fitting
- How to remove and reassemble the washable inner lining
- Helmet retention system
- Aerodynamics and Acoustics
- Homologation Label
- How to determinate the correct size of your helmet
- Maintenance
- The outer shell
- The visor
Brand : Premier
Model : DRAGON EVO B01
Category : Motorcycle helmet