
MT202-EXE - Telephone Phoenix Audio - Free user manual and instructions
Find the device manual for free MT202-EXE Phoenix Audio in PDF.


| Product Type | Desktop Speakerphone / Conference Phone |
| Dimensions | 250 x 200 x 70 mm (9.84 x 7.87 x 2.76 in) |
| Weight | 850 g (1.87 lbs) |
| Power Supply | Power over Ethernet (PoE) IEEE 802.3af or AC adapter 5V DC, 2A |
| Network Interface | 1x RJ-45 10/100 Mbps Ethernet |
| Handset | Not included (handset-free speakerphone) |
| Speaker Type | Full-range driver with echo cancellation |
| Microphone Type | Omnidirectional MEMS microphone array |
| Key Features | HD voice, mute, volume control, call hold, redial, speed dial |
| Compatibility | SIP-based VoIP systems, PBX, Zoom, Microsoft Teams (certified) |
| Display | 2.8-inch color LCD (320x240 pixels) with backlight |
| Buttons | 12-key dial pad, 4 context-sensitive soft keys, navigation pad |
| LED Indicators | Call status, mute, message waiting |
| Mounting | Desk stand included, wall-mountable (optional bracket) |
| Operating Temperature | 0°C to 40°C (32°F to 104°F) |
| Cleaning Instructions | Wipe with a soft dry cloth; do not use liquid cleaners or abrasives |
| Safety | Use only supplied power adapter; keep away from water and heat sources |
| Spare Parts | AC adapter, Ethernet cable, desk stand (order from Phoenix Audio support) |
| Repairability | Score 6/10 – user-replaceable power adapter and cable; internal repairs by technician |
| Warranty | 2 years limited |
Frequently Asked Questions - MT202-EXE Phoenix Audio
User questions about MT202-EXE Phoenix Audio
0 question about this device. Answer the ones you know or ask your own.
Ask a new question about this device
Download the instructions for your Telephone in PDF format for free! Find your manual MT202-EXE - Phoenix Audio and take your electronic device back in hand. On this page are published all the documents necessary for the use of your device. MT202-EXE by Phoenix Audio.
USER MANUAL MT202-EXE Phoenix Audio
natural_image
White and gray portable electronic device with mesh grille and blue control panel (no visible text or symbols)DUET EXE OVERVIEW

The Duet is a high performance speakerphone for desktop use that can cover anywhere from small to medium room settings. It has a commanding pickup and broadcasting range and is remarkably portable.
The Duet utilizes a high quality microphone and loudspeaker backed by a powerful DSP that runs advanced echo cancellation and noise suppression technologies. The Duet is made out of an aluminum body which makes it exceptionally durable and great for travel. Its plug-and-play design makes it extremely user friendly and eliminates the need for additional driver installations in order to use.
The Duet Executive, which is the dual USB and phone model of the Duet family, is a desktop solution that is compatible with almost any telephone / smartphone / tablet as well as Voice over IP (VoIP) conferencing.
This guide will help you learn how to use your speakerphone and will reveal all the features that come with it.
CONNECTING YOUR DUET
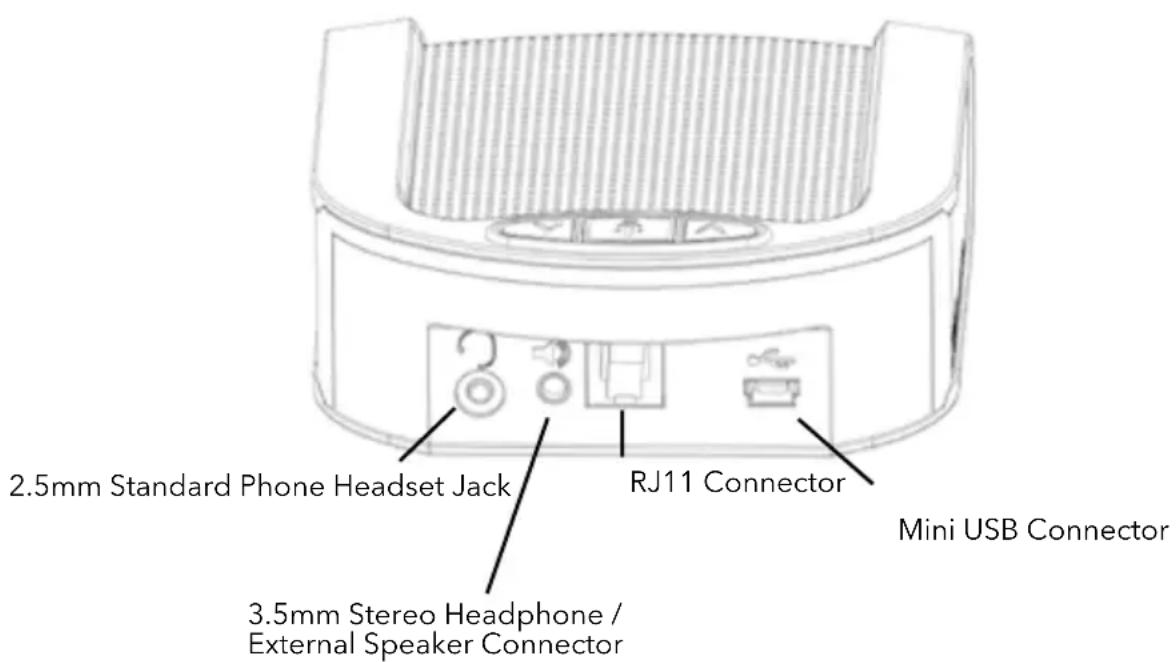
CONNECT TO A COMPUTER:
This connection is for any session using your computer, such as Voice over IP applications (Skype, Vidyo, etc.).
1 Using the USB cable provided, plug the mini USB side of the cable into the Duet (located on the connector panel below the unit)
2 Plug the USB end of the cable into any USB port on your computer
CONNECTING YOUR DUET
CONNECT TO A PHONE / SMARTPHONE / TABLET / VIDEO CODEC SYSTEM
This connection is for any session using a phone device with either an RJ11, 3.5mm headset, or RCA jack (telephone, IP phone, smartphone, tablet / Video Codec system).
Take a look at the kind of connector your device has for a headset jack and continue to the appropriate section below:
RJ11 connector (square phone jack):
If your device has an RJ11 connector as its headset jack you will need to use one of two RJ11 to RJ11 cables that were supplied with your Duet. The two cables (one gray an one black) have the same connector at both ends, but have different internal wiring. If you have a Cisco phone, start with the black cable. If it doesn't work, repeat the process with the gray cable. If you have an Avaya phone, start with the gray cable. If it doesn't work repeat the process with the black cable
Plug the RJ11 cable into the Duet and plug the other end of the RJ11 into the RJ11 jack on your phone
2.5mm Connector (telephone / cellular phone):
If your device has a 2.5mm jack you will need to use the RJ11 to 2.5mm cable Plug the RJ11 end into the Duet and the 2.5mm end into the device
3.5mm Connector (4 pin for smartphone / tablet):
Using the RJ11 to 2.5mm cable plug the RJ11 end into the Duet Using the provided 2.5mm to 3.5mm adapter, connect the female end of the 2.5mm adapter to the male end of the 2.5mm to RJ11 Plug the 3.5mm connector into your device
RCA Connector (Video Codec systems):
Using the RJ11 to RCA cable connect the RJ11 to the Duet Connect the black RCA to your VC's speaker output Connect the red RCA to your VC's speaker input
Your Duet is ready to use. No additional drivers or steps are needed; however we do recommend downloading and using our “Phoenix Audio Setup Utility” for optimal audio controls and performance. This utility can be found on our website:
USING THE DUET
The Duet's control panel has 3 buttons:
- Mute (in the middle)
• Volume Up (to the right)
• Volume Down (to the left)

natural_image
Diagram of a stylized telephone handset with three buttons and dotted pattern base (no text or symbols)LIGHT INDICATIONS:
- Button panel light off - unit is off (not connected)
- Button panel light on – unit is on (connected)
- Button panel light blinking – unit is on and the microphone is muted
BASIC UNIT OPERATIONS:
Turn unit ON: unit is always on when connected to a power source or USB device.
Turn unit OFF: disconnect unit from power source or USB device.
Mute microphone: push the Mute button once. The button panel light will start blinking.
Unmute microphone: push the Mute button once. The button panel light will stop blinking and will stay on.
NOTE: The MUTE button will mute the microphone not the speaker. To mute the speaker just use the volume buttons to decrease the volume till no sound is audible. The volume buttons will control the level of audio heard from the speaker and not the sensitivity of the Duet's microphone. To adjust the microphone volume level use the Phoenix Audio Setup Utility which can be found on our website.
SETTING UP TELEPHONE OUTPUT GAIN
Output gain controls the level (sensitivity) of the Duet's output audio signal going into your telephone. If the gain is set too high, the telephone input will clip the signal and the Duet will fail to cancel the "line echo". As a result you may hear an echo returning when you speak. If the gain is set too low, the other side may have trouble hearing you or won't be able to hear you at all. You can customize your output gain by downloading the Phoenix Audio Setup Utility:
www.phnxaudio.com
HEADSET CONNECTION
The Duet is equipped with a 2.5mm standard telephone / cellular phone headset connector. Connecting a headset to the Duet will automatically disable the Duet's internal built-in speaker and microphone. Your PC's sound (music, VoIP communication, etc...) will be converted into mono and sent to the headset's earphone together with the audio signal received by the telephone. The headset connection is useful when you want to conduct a high quality private conversation using a standard telephone / cellular phone headset.
CONNECTING EXTERNAL SPEAKERS / HEADPHONES
The 3.5mm "External Speaker" jack located on the Duet's connector panel can be used to connect any type of amplified speakers or stereo headphones. The external speakers / headphones will be used by the Duet to play sound and the Duet's internal speaker will be muted.
NOTE: When connecting the Duet Executive to external speakers, the Executive will also send your telephone's audio to the external speaker (or headphones). While the internal Executive's speaker is disabled when using this connection, the Executive's internal microphone is still functional. This feature is useful if, for example, you listen to music stored on your computer while wearing headphones and the telephone rings. You can pick up the call without taking the headphones off. It can also be useful if you want to have a private conversation using standard headphones without the need to purchase a telephone headset.
DAISY CHAINING
The Duet Executive is the only Duet model that can be Daisy Chained. Any number of units can be connected in a Daisy Chain as long as all the units are Executive models. This feature allows the Duet to cover medium to large conference rooms. Every unit in the chain will utilize both its microphone and speaker.
DAISY CHAINING EXECUTIVES REQUIRES Two ELEMENTS:
1 RJ11 to 2.5mm cable, like the one supplied with each Duet and used for a cellular phone connection
2 3.5mm plug (we call it a Dummy Plug). The 3.5mm stereo plug is the standard plug used by most powered speakers and headphones. Feel free to use your household headphones
HOW TO DAISY CHAIN MULTIPLE UNITS:
1 Connect Duet #1 to your communication link (PC, telephone, or both)
2 Take the RJ11 to 2.5mm cable and plug the 2.5mm end of the cable into Duet #1 and the RJ11 into Duet #2
3 Plug the Dummy Plug into Duet #1's 3.5mm jack
4 Setup output gain through the Phoenix Audio Technologies Setup Utility (0dB gain)
5 Power Duet #2 using the supplied power adapter (you can also power it from a USB port)
NOTE: Plugging in the Dummy Plug signals to the Duet that it is in a Daisy Chain mode and activates all the required algorithms. Failing to do so will disable the echo cancelling algorithm and other critical functions.
NOTE: Phoenix offers a Daisy Chain Kit (MT221). This kit consists of an 11 foot RJ11 to 2.5mm cable and a Dummy Plug that can assist you with Daisy Chaining.
HOW TO BRIDGE CALLS
When the Duet Executive is connected to both your computer and your telephone, you can bridge the two connections which will allow you and both parties to communicate freely with each other.
This feature is very convenient if you are on a VoIP call and want to patch-in a person that has no access to a computer. Simply call him / her using your telephone while keeping the VoIP call active.
SPECIFICATIONS
Compatibility
Windows 95 and up, MAC OS, and Linux
Connectivity
USB connector – PC or Laptop connectivity and power
2.5mm – headset connection
3.5mm connection – for external loudspeakers or headphones
RJ11 connector – (accompanied cables provided)
Size
3.75 in x 1.25 in x 4.5 in (W x H x D)
Weight
0.55 lbs (with USB cable)
Power
USB power for PC and Laptop (LED will illuminate)
External power supply included for phone only configurations (when Duet is not plugged into the PC)
Performance
Speech processing and echo suppression at 32KHz sampling rate
HD speaker audio (16KHz bandwidth)
Maintains audio performance of the PC for HiFi audio applications when external speakers are connected
Plugging in external speakers will automatically turn off the internal loudspeaker
Audio
100% Full duplex performance – No attenuation (either way) during full duplex
Acoustic echo cancellation >40 dB
High-end performance: conforms to ITU-T G.167 standard
Noise cancellation >10dB
Residual echo is suppressed to the environment noise level to prevent artificial ducking of signal
Voice level equalization
Convergence speed 40 dB/sec
Tail length (200ms)
Convergence during full duplex (no recovery time after full duplex)
Low delay (10 msec)
Bandwidth 20 - 7500 kHz for speech processing maintains the soundcard bandwidth
Integrated loudspeaker
Mute button and loudspeaker volume control buttons (LED will blink in mute mode)
Four position gain setting for optimum adjustment of signal level into the telephone
WARRANTY
The following warranty statement is effective for all Phoenix Audio Technologies' products as of October 1st, 2007: Phoenix Audio Technologies warrants that this product is free of defects in both materials and workmanship. Should any part of this product be defective, the Manufacturer agrees, at its option, to repair or replace with a like new replacement any defective part(s) free of charge (except transportation charges) for a period of two years for all products. This warranty period begins on the date the end user is invoiced for the product, provided the end user provides proof of purchase that the product is still within the warranty period and returns the product within the warranty period to Phoenix Audio Technologies or an authorized Phoenix Audio Technologies dealer according to the Product Return and Repair Policy listed below. All inbound shipping costs are the responsibility of the end user, Phoenix Audio Technologies will be responsible for all outbound shipping costs.
Product Return and Repair Policy
- Return to seller if purchased through an authorized dealer
a. Proof of purchase date from reseller within warranty period must be provided by the end user
b. Seller may, at its discretion, provide an immediate exchange or repair or may return the unit to the Manufacturer for repair
- Return to Manufacturer
a. An RMA (return merchandise authorization) number must be obtained by the end user from Phoenix Audio Technologies
b. The end user must return the product to Phoenix Audio Technologies with proof of purchase (showing purchase date) for a warranty claim, and display the RMA number on the outside of the shipping package
THIS WARRANTY IS VOID IF:
The product has been damaged by negligence, accident, act of God, or mishandling, or has not been operated in accordance with the procedures described in the operating and technical instructions; or; The product has been altered or repaired by other than the Manufacturer or an authorized service representative of the Manufacturer; or; Adaptations or accessories other than those manufactured or provided by the Manufacturer have been made or attached to the product which, in the determination of the Manufacturer, shall have affected the performance, safety or reliability of the product; or; The product's original serial number has been modified or removed.
NO OTHER WARRANTY, EXPRESS OR IMPLIED, INCLUDING WARRANTIES OF MERCHANTABILITY OR FITNESS FOR ANY PARTICULAR USE, APPLIES TO THE PRODUCT. MANUFACTURER'S MAXIMUM LIABILITY HEREUNDER SHALL BE THE AMOUNT PAID BY THE END USER FOR THE PRODUCT.
Manufacturer shall not be liable for punitive, consequential, or incidental damages, expenses, or loss of revenue or property, inconvenience, or interruption in operation experienced by the end user due to a malfunction in the purchased product. No warranty service performed on any product shall extend the applicable warranty period.
This warranty extends only to the original end user and is not assignable or transferable. This warranty is governed by the laws of the State of California.
For more information or technical support please refer to our website www.phnxaudio.com, email us at support@phnxaudio.com, or call (818) 937-4779
Phoenix Audio Technologies, 2934 N. Naomi Street, Burbank, CA 91504
Telephone: (818) 937-4774, Fax: (818) 230-9116, info@phnxaudio.com



- DUET EXE OVERVIEW
- CONNECTING YOUR DUET
- CONNECT TO A COMPUTER:
- CONNECT TO A PHONE / SMARTPHONE / TABLET / VIDEO CODEC SYSTEM
- Take a look at the kind of connector your device has for a headset jack and continue to the appropriate section below:
- USING THE DUET
- LIGHT INDICATIONS:
- BASIC UNIT OPERATIONS:
- SETTING UP TELEPHONE OUTPUT GAIN
- HEADSET CONNECTION
- CONNECTING EXTERNAL SPEAKERS / HEADPHONES
- DAISY CHAINING
- DAISY CHAINING EXECUTIVES REQUIRES Two ELEMENTS:
- HOW TO DAISY CHAIN MULTIPLE UNITS:
- HOW TO BRIDGE CALLS
- SPECIFICATIONS
- Compatibility
- Connectivity
- Size
- Weight
- Power
- Performance
- Audio
- WARRANTY
- Product Return and Repair Policy
- THIS WARRANTY IS VOID IF:
Brand : Phoenix Audio
Model : MT202-EXE
Category : Telephone