
SX-15 - Doorbell BYRON - Free user manual and instructions
Find the device manual for free SX-15 BYRON in PDF.


| Product Type | Wireless Door Chime |
| Model | SX-15 |
| Brand | Byron |
| Power Source | 2 x AA batteries (not included) |
| Battery Life | Approximately 12-18 months under normal use |
| Number of Melodies | 36 selectable tunes |
| Volume Control | Adjustable (including mute option) |
| Wireless Range | Up to 150 meters (open field) |
| Frequency | 433 MHz |
| LED Indicator | Flashes when doorbell pressed |
| Dimensions (Receiver) | 120 x 80 x 30 mm |
| Weight (Receiver) | 100 g |
| Number of Push Buttons Supported | Up to 4 (extra buttons sold separately) |
| Mounting | Wall-mounted or tabletop (screws and adhesive tape included) |
| Weather Resistance (Push Button) | Splash-proof (IP44) |
| Maintenance | Wipe with a dry cloth; do not use abrasive cleaners |
| Safety | Low voltage device; keep away from water sources |
| Compliance | CE, RoHS |
Frequently Asked Questions - SX-15 BYRON
User questions about SX-15 BYRON
0 question about this device. Answer the ones you know or ask your own.
Ask a new question about this device
Download the instructions for your Doorbell in PDF format for free! Find your manual SX-15 - BYRON and take your electronic device back in hand. On this page are published all the documents necessary for the use of your device. SX-15 by BYRON.
USER MANUAL SX-15 BYRON
Wire Free Battery Bell Kit
The wirefree battery bell kit consists of two separate units:
- Push button unit (Transmitter)
- Door chime unit (Receiver)
These units are completely self-contained and no wiring between them is necessary.
No wiring is required for this wirfree door bell kit. When the push button is pressed, it sends a wirefree signal to activate the door bell. As the operating range is up to 100 metres
(320 ft. approx.), you can mount the door bell virtually anywhere in the home, workshop, or office. However, the operating range of the wirefree signal will be reduced if the signal is transmitted through a number of walls or ceilings. Metal, and UPVC doorframes will also reduce the operating range.


Installation
Push button unit
- The push button unit is operated by 2 x 3 volt Lithium batteries (CR2032 - included).
- Remove the back of the case by pushing in the tab on the bottom with a small, flat screwdriver.
- 2 x 3 volt Lithium batteries (CR2032) have been installed. Simply pull off the isolating strip to allow the batteries to make electrical contact.
- Snap the front cover of push button back on and it is ready to use.
Replacing the batteries. Remove the locking screw from the battery fastener in the battery compartment. Insert 2 x 3 volt Lithium batteries (We recommend Byron model SX-100 - not included), ensure the battery's polarity matches the internal markings. Tighten the screw on the battery fastener to hold the batteries firm in their compartment. Test to see if the L.E.D. light comes on.


CR2032 x 2

Battery Bell unit
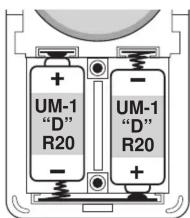
- Remove the front cover, insert 2 x 1.5 volt alkaline batteries ("D", UM1, R20 size not supplied) into the battery compartment, ensuring the battery polarity match the internal markings.
- Snap the front cover back on, the chime unit is ready to use. NOT TO BE USED WITH A TRANSFORMER.
Installation Guide
a) Bell Push Unit: Using the two holes on the back of push button as a template, mark the fixing position for the unit. Drill holes, fit wall plugs (if fixing to masonry) and secure the Bell Push Unit with screws (self-tapping N3 x 16mm screws - included) in position, alternatively use the double-sided self-adhesive pad (included), by placing onto your front doorframe or a position nearby. Please note, the latter is not the most theft resistant option.
Important: Mounting the push button unit onto UPVC doorframes or metal surfaces will reduce the operating range.
b) Door Chime Unit: This has a slotted hang hole on the rear, this hole will enable the chime unit to be hooked onto a screw and be easily removed or relocated to another room. Drill a hole and fit wall plug (if fixing to masonry) and screw (self-tapping N3 x 16mm screw included) to fixing position. Leave a gap of 3mm between the screw head and the wall. Locate the keyhole slot on the back of the unit over the screw.
Channel Selection
The unit comes from the factory on a pre-set radio frequency channel. However, should your door chime activate intermittently for no reason at all, it is possible that a similar unit is operating nearby on the same frequency. The encoded frequency of the push button (transmitter) and Door Chime (receiver) can be changed to avoid this problem.
- Bell Push: Remove the back of the case by pushing in the tab on the bottom with a small, flat screwdriver.
Door Chime Unit: Slide open the battery compartment.
- There is 4 position dip switch marked 1,2,3,4. Use a small screwdriver to alter the dip switch levers to the "On" or "Off" position, which can be altered to achieve total sixteen (16) possible channels.


- Select any combination ensuring it is set to the same code on both push button and door chime units. E.g. If the 1st & 2nd dipswitches are down in your push button, then the 1th & 2nd dipswitches must be down in your chime unit.
- Test to ensure correct operation before final installation.
Door Bell Operation
Press the button on the push button unit once, the LED indicator will light up during signal transmission for 1 second and the door chime unit will sound. The sound will stop as soon as the melody ends. For repeat sound, press the button again. Holding the button in will NOT repeat the sound.
Sound Adjustment
To slightly adjust the sound of the bell, loosen the screw that holds the dome in place. Turn the dome and then tighten the screw.

Important
- Do not mount the Push Button unit onto any metal or UPVC doorframe as this will reduce the operating range.
- Do not immerse either unit in water.
- Do not expose either unit to high temperatures or close to fireplace.
- Do not use different type of batteries, or mix up old and new batteries.
- Do not leave exhausted batteries in either unit. If leaving the doorbell for a long period of time, remove the batteries from all compartments to prevent leakage.
- The chime unit is designed for internal use only.
- Please dispose of old, defective batteries in an environmentally friendly manner in accordance with the relevant legislation.
- The unit should not be exposed to or placed near sources of water or direct heat.
- Replace batteries only with the same or equivalent type recommended by the manufacturer.
- Do not place near a P.I.R. which may interfere with your chime.
Trouble Shooting & User Hints
| ProblemChime does not sound but LED lights on Push Button | Possible Causes1. Units is out of range (max. range 100m)2. Push button and chime not on same channel | Suggested RemedyOperate the Chime unit within the operation range (100m)Re-set the channel (see Channel Set Up) |
| Chime does not sound plus no lights on Push Button LED | 1. Flat push button battery2. Wrong polarity of battery in push button3. Remove the protective Strip. | Change the batteryRe-insert battery as internal marking in right polarity |
| Chime sounds without push button being pressed | A similar wirfree door chime product is operating nearby on the same transmitter frequency | Change transmission channel (see Channel Set Up) |
NOTE: There are no serviceable parts in the unit, do not attempt to repair it.
Specification
A. Push Button unit
Power : 2 x 3volt Lithium batteries (CR2032 - included, replace with Byron model SX-100)
Consumption : 3.0mA - ON 0.003mA - OFF
B. Door Chime unit
Power : 2 x 1.5volt batteries ("D", R20 or UM1 - not included)
Alternatively powered by A/C-D/C 9volt 300mA adaptor (Byron model SX-36 - not included)
Consumption : 100mA - ON 0.3mA - Stand-by
Operating Temperature: -10°C to +40°C
Operating Distance : 100 metres (320 feet approx.) in open field Selectable Channel : Total sixteen (16) possible channels


Brand : BYRON
Model : SX-15
Category : Doorbell