
BV14A - Freezer BAUMATIC - Free user manual and instructions
Find the device manual for free BV14A BAUMATIC in PDF.


| Product Type | Freezer |
| Brand | Baumatic |
| Model | BV14A |
| Net Capacity | Approximately 140 liters |
| Dimensions (W x D x H) | 550 x 600 x 850 mm |
| Net Weight | 35 kg |
| Power Supply | 220-240 V, 50 Hz |
| Annual Energy Consumption | 200 kWh |
| Climate Class | SN-T |
| Refrigerant | R600a |
| Noise Level | 40 dB |
| Defrost Type | Manual |
| Energy Class | A+ |
| Door Hinge | Reversible |
| Shelves | 3 wire shelves |
| Drawers | 1 large drawer |
| Temperature Control | Thermostat dial |
| Interior Light | LED interior light |
| Warranty | 2 years |
| Repairability | Spare parts available |
Frequently Asked Questions - BV14A BAUMATIC
User questions about BV14A BAUMATIC
0 question about this device. Answer the ones you know or ask your own.
Ask a new question about this device
Download the instructions for your Freezer in PDF format for free! Find your manual BV14A - BAUMATIC and take your electronic device back in hand. On this page are published all the documents necessary for the use of your device. BV14A by BAUMATIC.
USER MANUAL BV14A BAUMATIC
natural_image
Line drawing of a fish head and tail, no text or symbols presentUser Manual for your
BV14A
BUILT-UNDER FREEZER
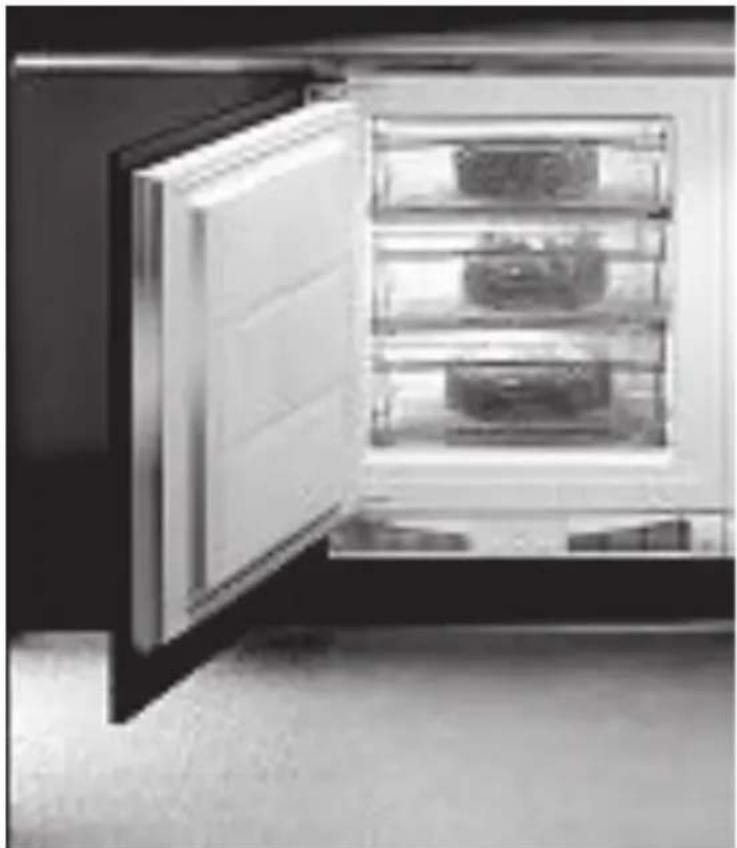
natural_image
Interior view of a refrigerator with open door and shelves (no visible text or symbols)Baumatic®

NOTE: This User Instruction Manual contains important information, including safety & installation points, which will enable you to get the most out of your appliance. Please keep it in a safe place so that it is easily available for future reference.
Specifications of your BV14A Built-under Freezer .. 3
Important Safety Information .... 3
Using your Baumatic BV14A FREEZER 6
Note: Before Using your BV14A Freezer 7
Using your Baumatic BV14A Freezer 7
Temperature Selection 9
Proper Freezing Procedure 9
Arranging Food in your Fridge 11
Cleaning/Maintenance.... 13
Never Use Solvents To Clean Your Freezer 14
Installing your BV14A Freezer 17
Reversing the swing of the Door 20
Troubleshooting 21
Baumatic Ltd. - Conditions of guarantee 22
Specifications of your BV14A Built-under Freezer
Congratulations on purchasing a Baumatic BV14A Built-under Freezer!
Your Freezer has:
• Gross capacity: 96 litres
• Net capacity: 86 litres
• Energy efficiency class: A
- Star rating: ****
- Fast freeze switch
- Adjustable Thermostat
- On/Off indicator light
- Fast Freeze indicator light
• Temperature rise warning light
- 3 Freezer drawers
- Reversible door
- Adjustable feet
Dimensions mm (H x W x D): 818-898 x 596 x 560
To fully enjoy using your appliance long into the future, please firstly familiarise yourself with the specifications, safety advice and operational instructions included in this manual.

When you install your Fridge, it is important to bear in mind its climatic rating.

In order to find out the climatic rating of your appliance, check the data rating tag inside your refrigerator. It indicates the ambient temperature range within which your appliance will function.
Important Safety Information
Please read this before installing & using.
- NOTE - This appliance must be grounded. In the event of a malfunction or breakdown, grounding will reduce the risk of electric shock by providing a path of least resistance of electrical current. You will be able to tell if it is because a non-grounded appliance will give off an electrical discharge. Manufacturer declines all responsibility for any damage due to non-grounding of appliance.
• DURING THE GUARANTEE PERIOD ONLY BAUMATIC SERVICE ENGINEERS OR AN AUTHORISED AGENT OF BAUMATIC SHOULD CARRY OUT REPAIRS ON THIS UNIT. - DO NOT USE IF THE SUPPLY CORD IS DAMAGED. NEVER TAKE RISKS WITH FIRE!
Electrical safety

This appliance complies with Directives 89/336/EEC, 73/23/EEC and following changes.
⚠️ ENSURE YOU CONNECT THIS APPLIANCE TO A SUPPLY RATED AT 220-240V (or 200-230V) and 50HZ.
NOTE: the supporting structure is constructed in panels of treated sheet steel, electrostatically enamelled to resist ill-treatment and to give long-lasting beauty and shine.
Do not attempt to alter the specifications of this appliance. Doing so could damage the machine, cause injury & invalidate your warranty. DO NOT USE ADAPTERS/SHUNTS.
Do not allow children to play with, near or inside this appliance.
Do not pull on the power supply cable to free the plug from the wall!
Do not attempt to use your appliance outdoors or any place where it is likely to come into contact with the elements.
Do not pull out or insert the plug with wet hands.
Before any cleaning or maintenance work, ensure that the appliance has been disconnected from the power supply.
Never allow the back coils of the Appliance to come into contact with any wall surface. ALWAYS ENSURE THAT THE SPACE INTO WHICH YOU ARE PLACING YOUR APPLIANCE IS FREE OF STORED ITEMS SUCH AS PAPERS OR OTHER FLAMMABLE MATERIALS.
NEVER block the VENTILATION OPENINGS OF THE APPLIANCE EITHER INSIDE OR ON ITS EXTERIOR. IT IS VITAL TO KEEP YOUR APPLIANCE WELL VENTILATED SO THAT THERE IS PROPER AIR FLOW BETWEEN THE BOTTOM OF THE UNIT AND THE PLINTH / KICK PLATE ON WHICH IT IS SITTING.
WARNING - DO NOT DAMAGE THE REFRIGERANT CIRCUIT. AT THE END OF THE FUNCTIONAL LIFE OF THE EQUIPMENT (WHICH USES COOLING GAS R600o (ISOBUTANE) AND INFLAMMABLE GAS INSIDE THE INSULATING FOAM, IT MUST BE PLACED IN SAFETY BEFORE SENDING IT FOR PROPER WASTE DISPOSAL.
PLEASE OBSERVE ALL INSTALLATION ADVICE IN THIS MANUAL FOR SAFE USAGE OF YOUR APPLIANCE.
Note: Before discarding an old refrigerator/freezer, switch off and disconnect it from the power supply. Cut off and render any plug useless. Ensure that the door cannot jam (removing it is best), regardless of whether or not it can be pushed open from inside. AN OLD FRIDGE/FREEZER CAN BE A DEADLY PLAYTHING FOR CHILDREN!
Conformity to W.E.E.E. Directive
This appliance is marked according to the European directive 2002/96/EC on Waste electrical and Electronic Equipment (WEEE). By ensuring this product is disposed of correctly, you will help prevent potential negative consequences for the environment and human health, which could otherwise be caused by inappropriate waste handling of this product.
The symbol on the product, or on the documents accompanying the product, indicates that this appliance may not be treated as household waste. Instead it shall be handed over to the applicable collection point for the recycling of electrical and electronic equipment.
Disposal must be carried out in accordance with local environmental regulations for waste disposal.
For more detailed information about treatment, recovery and recycling of this product, please contact your local city office, your household waste disposal service or the shop where you purchased the product.
Using your Baumatic BV14A FREEZER
Your BV14A Built-under Freezer

FREEZING COMPARTMENT (1)
is used for freezing fresh foods.
STORING BASKET (2)
is used for storing packages of frozen foods.
CONTROL PANEL (3)
See Operation Controls
Note: Before Using your BV14A Freezer
Upon delivery
When your Freezer has been delivered, you will need to wait approximately 2 hours before turning it on. The fluid of the compressor installed in the appliance will need time to settle. PLEASE DO NOT PLUG IN ANY EARLIER THAN THIS!
NOTE:
THERE CAN BE AN ODOUR WHEN YOU FIRST SWITCH ON THE APPLIANCE. IT WILL VANISH WHEN THE UNIT STARTS COOLING.
We recommend that you have the Fridge delivered near to where you plan to install it so that this fluid can settle.
Situating your freezer
CAUTION: DO NOT PLACE THE APPLIANCE NEAR HEAT SOURCES AND FOLLOW THE INSTALLATION ADVICE SHOWN ON PAGE 14.
FOR FULL INSTALLATION ADVICE, PLEASE SEE PAGE 14.
MAKE A NOTE OF THE LOCATION FOR YOUR NEW FRIDGE-FREEZER. MAKE SURE THAT IT WILL FIT PROPERLY SO THAT:
1) The doors can open freely and completely.
2) You can access your food conveniently.
3) There is sufficient space at the back for the cooling coils to give off heat safely & that they do not touch the plug (see SAFETY SECTION).
NOTE: You can reverse the swing of the door to customise the unit to your location. Please see pages 16 for details.
Using your Baumatic BV14A Freezer
You switch on your appliance
by PLUGGING IT IN & SETTING THE THERMOSTAT. This can be found on the control panel at the bottom of the front of the appliance.

THE CONTROL PANEL
The freezer is controlled with switches and the thermostat button.
It is shown below:
1 ON/OFF switch (green signal lamp)
2 Continuous operation button (yellow signal lamp)
3 Alarm off button (red signal lamp)
KEY:
1) ON/OFF SWITCH -
When the appliance is switched on, the green light comes on.
When it is off, the light goes off.
2) CONTINUOUS OPERATION BUTTON -
This switch is used to select one of the two automatic operation modes: continuous and automatic.
i) CONTINUOUS OPERATION –
the yellow light is on. In continuous operation, the cooling system will work constantly to chill your appliance. Select this mode when you want to freeze large amounts of fresh foods and in case you want to deep freeze foods that are already frozen.
the yellow light is off. The interior temperature is controlled by the thermostat which turns the cooling system on and off.
How often the appliance switches its cooling system on and off depends on:
• The thermostat knob position (thermostat position)
• How often you open the door.
- Ambient temperature.
3) Alarm off Button and the red signal lamp
- You turn the alarm off by pressing the Alarm off' button. It looks like this:
The alarm goes on because the temperature inside the freezer has risen errantly beyond the scope of the setting you had selected (red signal lamp will be on). It will also go off when the there is excessive dust collected at the back of the condenser (red signal lamp will be off).
Temperature Selection

Using Your Freezer Starting Your Freezer For The First Time (* After It Has Been Installed)
You control the freezer's interior temperature automatically by setting the thermostat. This can be found on the control panel at the bottom of the freezer.
- The most suitable position is in the middle between max. (7) & min. (1).
- We recommend setting the thermostat on a position approaching maximum (7) only to accelerate cooling (e.g., before loading smaller amounts of fresh foods or when the operation mode has risen to the ambient temperature).
- Thermostat settings towards min. (1) help you save energy, provided that the freezer is loaded with a smaller amount of frozen foods.
- Changes in the ambient temperature will affect the temperature in the interior of the appliance.
- Choose the correct setting using the thermostat knob (pictured below).
- Switch the freezer on.
- The sound alarm will come on because the temperature will be too high. It is designed to activate when exposed to this. THIS IS NORMAL. You switch the alarm off by pressing the alarm button:
- On the control panel, switch to the continuous operation position. All three signal lamps will light up. Place fresh food into the freezer several hours after the red signal lamp has gone off.
Proper Freezing Procedure
- 24 hours before you place fresh food in the freezer, switch the continuous operation button ('2' in Figure on page 7) on (i.e., so that the yellow lamp comes on). At the end of this period, load fresh food into the freezing compartment (the topmost compartment of the freezer).
- After 24 hours, move the frozen food to the storage compartment of the freezer and repeat the freezing procedure with a new load, if required.
- REMINDER - fresh food should not touch those packages that are already frozen.
USING YOUR FREEZER
- Approximately 24 hours after the last loading of fresh food into your freezer, press the continued operation button again ('2' in Figure on page 7) so that the freezer switches to its automatic operation (yellow light turns off).
Points To Bear In Mind When Using Your Freezer
- If you want to freeze small quantities of fresh food (1-2kg), you DON'T have to switch the appliance to the continuous operation mode.
- The storage time and recommended temperature for storing commercially frozen foods is indicated on the packaging. For storing and use, consider the manufacturer's instructions.
- When shopping, be careful to choose only packages of foods which are adequately packed and provided with complete data. They should be stored in freezers where the temperature is not higher than -18°C.
- Do not buy packages of food encased in frost or ice. This indicates that the package has thawed at least once previously.
- Take care that packages don't start to thaw. Temperature rise shortens the storage time of commercially frozen foods.
- Do NOT touch the cooled surfaces while your freezer is operating, especially not with wet hands or mouth. Skin might stick to the cold surfaces and become damaged.
- Do not freeze bottled drinks, especially not fi zzy ones such as mineral water, sparkling wine, beer, cola, etc., because liquid expands during freezing and may make the container it is in explode.
- With the exception of ice cream, never try to eat frozen food. You may get frostbite or damage your teeth and mouth.
- Carefully check the food for colour or smell. If you are in doubt about the quality of the food stored, throw it away because it may be spoiled and therefore dangerous to eat.
- Disconnect the appliance from the mains before repairing (only a qualified technician should repair it) and before cleaning / maintenance.
- Only use the tools enclosed with your appliance or those tools that have been recommended for use in this manual.
- The rating plate is in the interior or on the rear wall of the appliance.
- Storing time During Power Supply Interruption. Avoid opening the freezer in case of a blackout that lasts longer than 15 hours.
Arranging Food in your Freezer
The chart below shows the range within which you will be able to store food in your freezer.
| Food Storage time (in month) | ||||||||||||
| 1 | 2 | 3 | 4 | 5 | 6 | 7 | 8 | 9 | 1 | 0 | 1 | |
| Vegetable + + + | ||||||||||||
| Fruit + + + | ||||||||||||
| Bread, pastries + | ||||||||||||
| Milk + | ||||||||||||
| Ready-made meals + | ||||||||||||
| Meat: Beef + + + | ||||||||||||
| Veal + + + | ||||||||||||
| Pork | + + + | |||||||||||
| Poultry | + + + | |||||||||||
| Game | + + + | |||||||||||
| Minced meat | + | |||||||||||
| Smoked sausages | + | |||||||||||
| Fish: lean fat | + | |||||||||||
| + | ||||||||||||
| Offal | + | |||||||||||
- To reduce humidity and possible frost, NEVER place liquids in unsealed containers in the freezer.
• Make sure that you arrange food in such a way that the door can close completely. - NOTE - Sometimes your freezer door may seem 'stuck' if you try to open it again right after closing it. This normal phenomenon is due to pressure shifts within the appliance and should clear in a few minutes. Please give it this time before re-opening.
- NEVER place warm food inside the freezer. Warm food must be allowed to cool to room temperature fi rst.
- Unpleasant odours within may mean your freezer needs to be cleaned or that food has spoiled and needs to be discarded.
-
Pack food in freezer storage bags, noting the type of food, quantity, date prepared and inserted into the freezer. Write this information on the bags.
-
Always be mindful of the storage life of foods you are going to be freezing for a long time. Although the temperature of the freezer can dip to a very low level, this does not mean that food can be stored indefinitely. Pay particular attention to the information printed on the packaging of the foods you are going to be placing in your freezer.
- Always store food with a view to how often it will be used. Food consumed daily should be placed in a more accessible place than food stored long-term so that you don't end up leaving the door open for extended periods while searching for food.
- Do not store excessive quantities or weights of food. Always try to leave gaps between your packages for better storage results.
- Do NOT place food too closely to the interior walls. Items placed too closely to walls may freeze to them!
- Do not load tepid packages alongside frozen ones in your freezer. The freshly introduced food may cause a slight and potentially detrimental thaw in the frozen article/s.
- Use correct packaging and wrap items correctly.
- The packaging should be airtight and shouldn't leak since this could cause substantial vitamin loss and dehydration from your food.
- Foil and bags should be applied carefully to articles of food so that they can be stored systematically & comfortably within the freezer.
- It is very important that the food is frozen as soon as possible. We recommended that the size of the package not be too large. It should also have been sufficiently cooled (at least to room temperature) before being loaded in your freezer.
- The amount of fresh foods that can be loaded within 24 hours is indicated on the rating plate (freezing capacity).
- Food cut into small portions will be easier to defrost and cook. The recommended weight for each portion is 2.5kg.
- The outside of a food packaging should be dry before being placed in the freezer. All packages should be odour-free and non-toxic.
A NOTE ON DEFROSTING
- Partially thawed or defrosted foods should be consumed as soon as possible. Cold air preserves the food but it does not destroy micro-organisms which rapidly activate themselves after defrosting to make foods perishable. Partial defrosting reduces the nutritional value of foods, especially of fruits, vegetables and ready-made meals.
- Generally, you should NOT refreeze defrosted items.
Cleaning/Maintenance
LONG ABSENCES: In the case of long absences (extended holidays, sabbaticals, etc.), the appliance must be switched off, emptied out completely, dried and the doors left slightly open to prevent the formation of mould and unpleasant odours.
NOTE: Before attempting to clean your appliance, UNPLUG IT and make sure you do the following:
WE RECOMMEND THAT YOU CLEAN AND MAINTAIN YOUR REFRIGERATOR ONCE A MONTH.
- Pay particular attention to the sealing rubber bars of the doors. These need to be kept clean for hygienic reasons as well as to allow the door to close properly.
- Leave the door open during cleaning.
- In order to collect the defrosted water, take out the bottom drawer and soak up the water using a sponge as shown in the figure pictured below.

natural_image
Illustration of a server rack with heat sinks and a hand cleaning the rack (no text or symbols)To accelerate the defrosting process, you can scrape off any frost that may have formed on the back coils using a plastic spatula. DO NOT USE A METAL ONE!!!!
- Clean the inside of your Freezer after using a solution of soda bicarbonate in warm water (1 tablespoon Bicarbonate to 2 litres of water).
- Clean the condenser (back of unit) with a broom once a year.
Never Use Solvents To Clean Your Freezer

MAINTENANCE FROM TIME TO TIME, YOU WILL NEED TO REPLACE THE INTERNAL BULB. REMEMBER TO UNPLUG YOU APPLIANCE FIRST
Find the lamp housing in the top right of the refrigerator's interior.
Gently move the transparent lamp cover plate from the lamp cradle.
Unscrew the bulb and replace with a new one, maximum 10W.
HOW TO CLEAN THE CONDENSER – the condenser consists of a coil structure at the back of your freezer.
To clean it, carefully follow the following instructions:
To optimize the operation of the appliance and to save energy you should periodically clean the dust from the condenser at the back of the appliance.
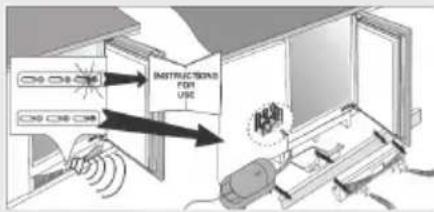
NOTE: You will be alerted to the presence of excessive amounts of dust on the condenser by a sound alarm.
natural_image
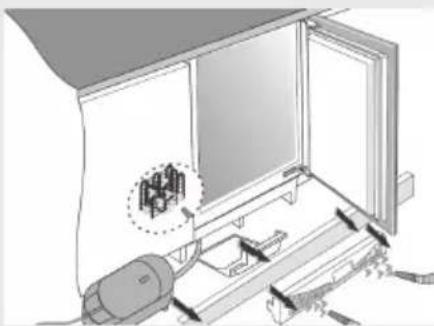
Diagram of a device with an open panel and mechanical components, no visible text or symbolsUpon hearing this alarm, you should:
- Check the air circulation through the bottom rail openings.
- If necessary, clean or vacuum the dust from the condenser. See the instructions below & on the next page.
To check if there is dust and clear dust away
- If the air opening in the bottom rail of the fridge is dirty or dusty, you should clean or vacuum it (see the figure below).
- Remove the bottom board of the unit cabinet.
- Push a finger through the opening in the bottom rail and release the fastener.
- Pull the rail towards you and remove it.
- Pull the condenser dish out.
- Use the vacuum cleaner to clean the dust from the condenser.
- Replace the condenser dish & the bottom rail in the opposite order to taking them out.
Disconnect the freezer from the mains before you clean the condenser!
Defrosting
Tips for Energy Savings
PERIODIC CLEANING OF THE CONDENSER
- Firstly, disconnect it from the mains.
- Empty the contents of your freezer. You should take the necessary precautions to maintain any food items you wish to keep. Remember that it is a health hazard to allow frozen articles of food to thaw and then refreeze them. Wrap them in newspaper or some other insulation-giving wrapper and/or store them in another freezer.
- Remove the appliance from the unit in which it is held.
- Pull the appliance out so that you have access to the condenser at the rear of the freezer. NOTE - you must take care not to overbalance the appliance whilst moving it out - WARNING: - Tipping hazard.
- Unscrew the screws that secure the bonnet at the back of the appliance. Remove the bonnet.
- Clean the dust from and dirt from the condenser.
- After replacing the bonnet, move the freezer back into the cabinet space.
When the frost and ice layer on the inside of the appliance has grown to 3-5 mm, you should defrost your freezer.
24 hours prior to defrosting, press the continuous operation mode button ('2' in diagram on page 7). This will provide an extra low temperature of food inside the freezer. After this period, take the food out & protect it from melting (eg. Moving it to another freezer &/or wrapping it in newspaper).
Disconnect the freezer from the mains power supply.
CAUTION!
- Avoid using defrosting sprays - these may damage the plastic parts in the fridge and could be hazardous to health.
- Water collected at the bottom of the interior of the freezer should be mopped with a sponge or a highly absorbent cloth.

Ensure that your freezer has adequate ventilation. See the cleaning and installation sections for the recommended openings you should observe.

Turn the thermostat from higher down to lower as soon as possible, depending on how full the freezer is and the ambient temperature.

Never use the continuous operation feature unnecessarily. Press the operation mode selection switch to the setting for automatic operation.

Try not to open the door too often, especially when the weather is wet and hot. Once you open the door, be sure to close it as soon as possible.
⚠️ Use higher thermostat settings only if essential and not for constant, long-term use.
Do not leave the appliance on Fast freeze indefinitely or for periods in excess of that recommended in this manual.
Before loading the appliance with packages of fresh foods, ensure they are first cooled to the ambient temperature.
If the door seal (gasket) is damaged, the energy consumption will be much higher. To keep the sealing in good condition, be sure not to spill oils or fats on it. A damaged seal will need to be replaced. A crushed seal can be 'fl uffed' out using hot air from a hair dryer held at a safe distance.
The condenser at the bottom of the appliance must always be clean and free of dust.
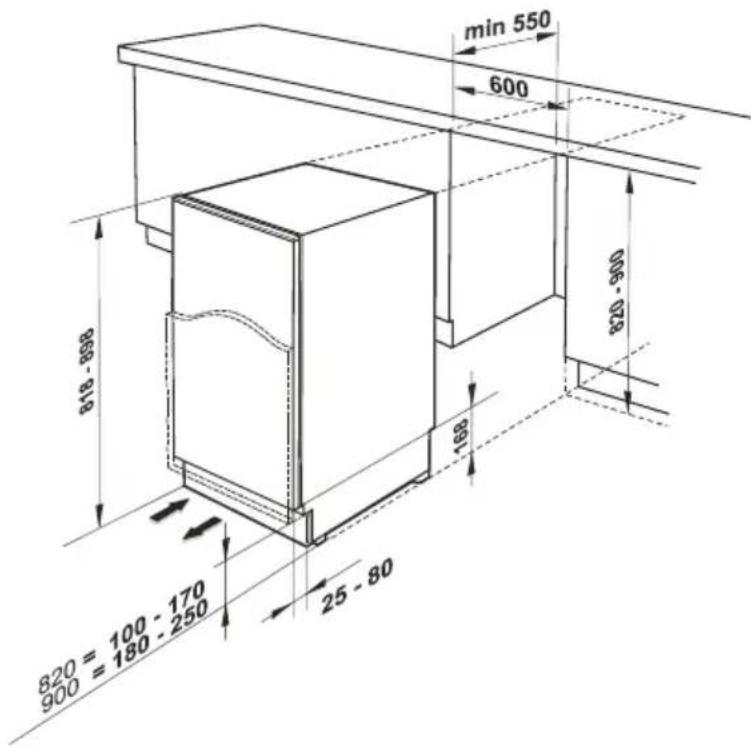

NOTE - YOU NEED THE SPACES SHOWN AT LEFT TO INSTALL YOUR APPLIANCE.
Ensure there is sufficient space behind the cooling coils at the back of your Fridge
1) Ensure that you are going to be placing your fridge away from heat sources and in a well-ventilated position. This should be at least 3 cm away from electric stoves and 30 cm from oil or coal stoves. Do not place the appliance in the path of direct sunlight.
2) After removing the rear wall of the cabinet, push the appliance into the kitchen unit's space and allow at least 4mm free space on both sides between the appliance and the side walls of the kitchen unit (Fig.1, at right). Allow 38mm space between back of the fridge and the wall.
Installing your Appliance- continued

natural_image
Interior view of a refrigerator with overhead ceiling and visible doorboard (no text or symbols)Install the Fitting Bar (shown in the picture below) so that it attaches to the top of the appliance and underneath the top of the cabinetry, indicated by the arrow:

Please be aware that the Fitting Bar is not attached to the appliance and needs to be secured during installation.

1) Using a 2.8 mm diameter bit, make holes sufficient to attach the rail as shown on the left. NOTE - door area below the rail must reach to just below appliance.
2) Fix the hanging rail onto the inside of the décor door using two 10mm screws, centering it so that 262mm of its width is on either side of the imaginary vertical middle line of the décor door.
3) Clasp the eyelet holes in the rail on the inside of the décor door over the bolts protruding from the top edge of the refrigerator door. Secure these using the nut caps provided, as shown in the above illustration. Make sure that you have the décor door attached levelly before proceeding to the lower fastenings as shown on right.
Fastening your Freezer to under the Worktop

natural_image
Diagram of a door with a screwdriver and a magnified inset showing internal components (no text or symbols)
natural_image
Line drawing of a kitchen appliance with a tray and base, showing a close-up inset of the door mechanism (no text or symbols)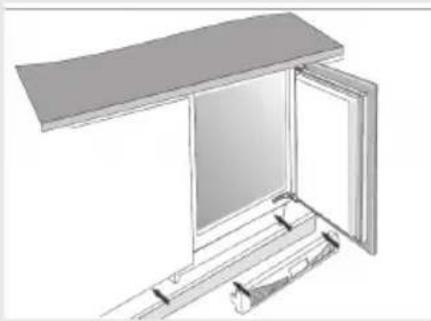
natural_image
3D diagram of a cabinet with open door and internal components, no text or symbols presentDrill two holes and attach your fridge to the underside of your worktop as shown in figure at left.
Adjust the feet to level your Appliance
Adjust the feet (see picture below) until your Fridge sits levelly on your floor. You can level your unit using these adjustable feet to compensate for dips and rises in your floor surface.
NOTE: You can adjust the height from 82 to 90 cm. The height MUST be adjusted before the appliance is built into the unit space designated for it.
DO NOT MOVE THE FRIDGE WHEN THE FEET ARE EXTENDED HIGH!
Adjusting the base
Place the plinth fascia over the area indicated with arrows and push into place.
Reversing the swing of the Door

natural_image
Diagram of two identical rectangular panels with arrows indicating force or movement, no text or symbols present
natural_image
Diagram of an open refrigerator showing internal components and airflow paths (no text or symbols)NOTE: All numbered references apply to both pictures for your convenience.
1) On the hinge-less side of the fridge's door, remove the caps (1) that cover the hinge bracket holes. Keep these in a safe place nearby.
2) Remove the upper hinge (2) using a star-head screwdriver to remove the screws.
3) Detach and remove the lower hinge (3) by doing the same as you had to the top hinge.
4) Flip the top hinge and bring it over and down to the bottom corner that is diagonally opposed to it (4). Screw it in.
5) Flip the bottom hinge and bring it over and up to the top corner that is diagonally opposed to it (5). Screw it in.
6) Attach the door to the doorway, ensuring that all the holes where the hinges had formerly been screwed into are now covered with the caps you had previously removed.
Troubleshooting
Trace a problem using the table below instead of having to call for help.
| Problem What to do | |
| YOUR FREEZER DOES NOT APPEAR TO BE WORKING / NO APPARENT POWER | Check that the plug is well-inserted into the power socket. Plug in if necessary. |
| Check that there is power from the mains-there may be a blackout or your fuses may have blown. | |
| Check That The Electronic Thermostat (Regulator Found On The Inside Wall Of The Fridge-freezer Near The Top) Is In The Recommended Functioning Position And Not ‘0’ (Off). | |
| Check that the socket is suffi cient and no adapter or extension leads have been used. | |
| Check that the power supply voltage corresponds to the appliance. | |
| YOUR FREEZER APPEARS TO BE PERFORMING POORLY | You have overloaded the appliance or food has Been packed too tightly. Take out And consume food; look for out-of-date food That can be disposed of. |
| The thermostat setting is set too low. Set it Higher. | |
| Ensure that the door has been closed properly. For instance, there may be a problem inside the Unit, keeping the door open or another Fault, such as a broken or missing Door seal. | |
| Ensure that there is no dust on the condenser. | |
| Ensure that there is enough room at the rear and Sides of the unit. | |
| THERE IS A NOISE The Cooling | A Slight Noise (Bubbling Sound) Even When The Compressor Is Not Running. This Is Normal. If These Sounds Change, Ensure: Your Unit Is Well Levelled / Nothing Is Touching The Rear Of The Unit / No Material On The Appliance Is Vibrating. Note: A Sound Like Flowing Water Is Perfectly Natural As It Indicates That The Refrigerant Is Flowing. This Is Not A Malfunction. |
Baumatic Ltd. - Conditions of guarantee
Dear Customer,
Your new Baumatic appliance comes complete with a free 12 month guarantee covering both parts and labour costs resulting from defective materials or workmanship.
Baumatic also gives you the opportunity to automatically extend the guarantee period for a further 12 months at no extra cost, giving an initial guarantee period of 24 months. The extended guarantee period applies to England, Scotland, Wales and Northern Ireland only.
To qualify for your full 24 months guarantee you must register your appliance within 28 days of purchase to be covered under this guarantee. This can be done online via: www.baumatic.co.uk or through returning the guarantee card which can be found in each new Baumatic appliance.
* In addition, your appliance is covered by a 5 year parts warranty. Baumatic Ltd will provide free of charge the parts required to repair the appliance, only if they are fitted by a Baumatic engineer, for any defect that arises due to faulty materials or workmanship within a period of 5 years from the original purchase date.
* An additional 1 to 3 year insurance scheme for labour is available should you wish to extend the warranty period.
Should any person other than an authorised representative of Baumatic Ltd interfere with the appliance, the policy is negated and Baumatic Ltd will be under no further liability.
The guarantee covers the appliance for normal domestic use only, unless otherwise stated.
Any claims made under the terms of the guarantee must be supported by the original invoice/bill of sale issued at the time of purchase.
This guarantee is transferable only with the written consent of Baumatic Ltd.
If the appliance fails and is considered either not repairable or uneconomical to repair between 12 months (2 years if registered) and five years, a free of charge replacement will not be offered.
The guarantee for any replacement will only be for the remainder of the guarantee on the original product purchased.
This guarantee does not cover:
x Sinks and taps
X Failure to comply with the manufacturer's instructions for use.
X The replacement of cosmetic components or accessories.
X Accidental damage or wilful abuse.
X Subsequent loss or damage owing to the failure of the appliance or electrical supply.
X Incorrect installation.
X Losses caused by Acts of God, civil war, failure to obtain spare parts, strikes or lockouts. X Filters, fuses, light bulbs, external hoses, damage to bodywork, paintwork, plastic items, covers, baskets, trays, shelves, burner bases, burner caps, decals, corrosion, rubber seals..
In the course of the work carried out it may be necessary to remove the appliance from its operating position. Whilst all reasonable care will be taken, Baumatic Ltd cannot accept responsibility for damage sustained to any property whatsoever in this process. This guarantee is in addition to and does not diminish your statutory or legal rights.
Contacting Baumatic Ltd.
| SALES | SERVICE | SPARES | TECHNICAL |
| TEL: 0118 933 6900 | TEL: 0118 933 6911 TEL: 0118 933 6922 TEL: 0118 9336933 | ||
| FAX: 0118 931 0035 | FAX: 0118 986 9124 FAX: 0118 933 6942 FAX: 0118 9336942 |
Thank you for buying Baumatic.
*Applies to UK, Scotland, Wales & Northern Ireland only. (Republic of Ireland has 1 year labour and 1 year parts warranty only).
Baumatic Ltd
Make-up for your kitchen
Headquarters
Baumatic Ltd.
Baumatic Buildings,
6 Bennet Road,
Reading,
Berkshire
RG2 0QX, United Kingdom
Sales Telephone
+44 118 933 6900
Sales Fax
+44 118 931 0035
Service Telephone
+44 118 933 6911
Service Fax
+44 118 986 9124
Spares Telephone
+44 118 933 6922
Technical / Advice Telephone
+44 118 933 6933
E-mail:
sales@baumatic.co.uk
technical@baumatic.co.uk
Http (Internet site):
www.baumatic.com

www.baumatic.com

- User Manual for your
- Baumatic®
- Specifications of your BV14A Built-under Freezer
- Congratulations on purchasing a Baumatic BV14A Built-under Freezer!
- Your Freezer has:
- Important Safety Information
- Please read this before installing & using.
- Electrical safety
- Using your Baumatic BV14A FREEZER
- FREEZING COMPARTMENT (1)
- STORING BASKET (2)
- CONTROL PANEL (3)
- Note: Before Using your BV14A Freezer
- Upon delivery
- NOTE:
- Situating your freezer
- THE CONTROL PANEL
- KEY:
- 1) ON/OFF SWITCH -
- 2) CONTINUOUS OPERATION BUTTON -
- i) CONTINUOUS OPERATION –
- How often the appliance switches its cooling system on and off depends on:
- 3) Alarm off Button and the red signal lamp
- Temperature Selection
- Proper Freezing Procedure
- USING YOUR FREEZER
- Points To Bear In Mind When Using Your Freezer
- Arranging Food in your Freezer
- A NOTE ON DEFROSTING
- Cleaning/Maintenance
- Never Use Solvents To Clean Your Freezer
- Upon hearing this alarm, you should:
- To check if there is dust and clear dust away
- Defrosting
- Tips for Energy Savings
- PERIODIC CLEANING OF THE CONDENSER
- CAUTION!
- Installing your Appliance- continued
- Fastening your Freezer to under the Worktop
- Adjust the feet to level your Appliance
- Adjusting the base
- Reversing the swing of the Door
- NOTE: All numbered references apply to both pictures for your convenience.
- Troubleshooting
- Baumatic Ltd. - Conditions of guarantee
- Dear Customer,
- Baumatic Ltd
- Headquarters
- E-mail:
Brand : BAUMATIC
Model : BV14A
Category : Freezer