
SC-PM533 - Hi-Fi System PANASONIC - Free user manual and instructions
Find the device manual for free SC-PM533 PANASONIC in PDF.


| Product Type | Mini Hi-Fi System |
| Model | SC-PM533 |
| Disc Playback | CD, CD-R/RW |
| Cassette Deck | Yes, auto-reverse |
| Radio Tuner | FM/AM with presets |
| Output Power | 40 W RMS total (2 x 20 W) |
| Speaker Impedance | 6 ohms |
| Audio Inputs | AUX (RCA), USB port |
| Headphone Output | Yes, 3.5mm jack |
| Equalizer | Preset EQ modes (Rock, Pop, Jazz, etc.) |
| Remote Control | Included |
| Dimensions (Main Unit) | Approx. 200 x 250 x 300 mm |
| Weight (Main Unit) | Approx. 4.5 kg |
| Power Supply | AC 220-240 V, 50/60 Hz |
| Power Consumption | 80 W (standby: < 1 W) |
| Safety Features | Auto power off, ventilation slots |
| Cleaning Instructions | Wipe with dry cloth; avoid liquids |
| Spare Parts Availability | Contact Panasonic service center |
| Repairability Index | High (modular design) |
Frequently Asked Questions - SC-PM533 PANASONIC
User questions about SC-PM533 PANASONIC
0 question about this device. Answer the ones you know or ask your own.
Ask a new question about this device
Download the instructions for your Hi-Fi System in PDF format for free! Find your manual SC-PM533 - PANASONIC and take your electronic device back in hand. On this page are published all the documents necessary for the use of your device. SC-PM533 by PANASONIC.
USER MANUAL SC-PM533 PANASONIC
natural_image
Illustration of a set of audio equipment including a remote control, two speakers, and a vinyl record (no text or symbols visible)The illustrations show SC-PM53.
Panasonic®
Operating Instructions
CD Stereo System

ENERGY STAR
As an ENERGY STAR® Partner*, Panasonic has determined that this product meets the ENERGY STAR® guidelines for energy efficiency.
*For Canada only: The word "Participant" is used in place of the word "Partner".
SC-PM533 is available in the U.S.A. only.
Model No. SC-PM53 SC-PM533

Table of contents
IMPORTANT SAFETY
INSTRUCTIONS 3
Disc information 3
Getting started 4
Placement of speakers 5
Overview of controls 6
Discs....7
Cassette tape 9
Radio 10
Timer....11
Sound adjustment 12
External unit 13
Troubleshooting guide 14
Specifications 15
Maintenance....15
When moving the unit 15
Limited Warranty
(ONLY FOR U.S.A.) 16
Limited Warranty
(ONLY FOR CANADA) 17
Product Service 17
Español
SUPPLIED ACCESSORIES
Please check and identify the supplied accessories.
Use numbers indicated in parentheses when asking for replacement parts. (As of December 2005)
In the U.S.A. to order accessories, refer to "Accessory Purchases" on page 16.
1 x Remote control
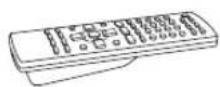
(N2QAYB000008)
1 x AM loop antenna
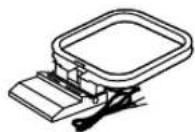
(N1DAAAA00001)
1 x AC power supply cord
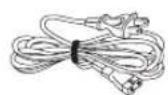
(K2CB2CB00018)
1 x FM indoor antenna
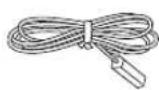
(RSA0007-L)
2 x Remote control batteries
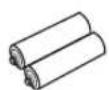
Before connecting, operating or adjusting this product, please read the instructions completely.
Please keep this manual for future reference.
Operations in these instructions are described using remote control, but you can do the operations with the main unit if the controls are the same.
Unless otherwise indicated, illustrations in these operating instructions are of SC-PM53 for the U.S.A. and Canada.
Your unit may not look exactly as illustrated.
Thank you for purchasing this product.
For optimum performance and safety, please read these instructions carefully.
These operating instructions are applicable to the following system.
| System SC-PM53 SC-PM53 | |
| Main unit SA-PM53 SA-PM533 | |
| Speakers SB-PM53 SB-PM53 | |
The model number and serial number of this product can be found on either the back or the bottom of the unit. Please note them in the space provided below and keep for future reference.
MODEL NUMBER ____ SERIAL NUMBER ____
User memo:
DATE OF PURCHASE ____
DEALER NAME
DEALER ADDRESS
TELEPHONE NUMBER ____
WARNING:
TO REDUCE THE RISK OF FIRE, ELECTRIC SHOCK OR PRODUCT DAMAGE, DO NOT EXPOSE THIS APPARATUS TO RAIN, MOISTURE, DRIPPING OR SPLASHING AND THAT NO OBJECTS FILLED WITH LIQUIDS, SUCH AS VASES, SHALL BE PLACED ON THE APPARATUS.
CAUTION!
THIS PRODUCT UTILIZES A LASER.
USE OF CONTROLS OR ADJUSTMENTS OR PERFORMANCE OF PROCEDURES OTHER THAN THOSE SPECIFIED HEREIN MAY RESULT IN HAZARDOUS RADIATION EXPOSURE.
DO NOT OPEN COVERS AND DO NOT REPAIR YOURSELF. REFER SERVICING TO QUALIFIED PERSONNEL.
CAUTION!
DO NOT INSTALL OR PLACE THIS UNIT IN A BOOKCASE, BUILT-IN CABINET OR IN ANOTHER CONFINED SPACE. ENSURE THE UNIT IS WELL VENTILATED. TO PREVENT RISK OF ELECTRIC SHOCK OR FIRE HAZARD DUE TO OVERHEATING, ENSURE THAT CURTAINS AND ANY OTHER MATERIALS DO NOT OBSTRUCT THE VENTILATION VENTS.
The socket outlet shall be installed near the equipment and easily accessible or the mains plug or an appliance coupler shall remain readily operable.
CAUTION
RISK OF ELECTRIC SHOCK DO NOT OPEN

CAUTION: TOREDUCETHERISKOFELECTRIC SHOCK, DONOTREMOVESCREWS. NOUSER-SERVICEABLEPARTS INSIDE. REFERSERVICINGTOQUALIFIED SERVICEPERSONNEL.

Thelightningflashwitharrowheadsymbol, withinanequilateraltriangle,isintendedto alerttheusertothepresenceofuninsulated "dangerousvoltagewlthintheproducts enclosurethatmaybeofsufficient magnitudetoconstituteariskofelectric shocktopersons.

The exclamationpoint within an equilateral triangle is intended to alert the user to the presence of important operating and maintenance (servicing) instructions in the literature accompanying the appliance.
-If you see this symbol-
Information on Disposal in other Countries outside the European Union
This symbol is only valid in the European Union. If you wish to discard this product, please contact your local authorities or dealer and ask for the correct method of disposal.
Except for U.S.A.
| CAUTION | - CLASS IM INVISIBLE LASER RADCTION WHEN OPEN,DO NOT VIEW INTEST WITH OPTICAL INSTRUMENTS. ECKES-1-40 Class 1M |
| VARNING | - KIAS IS OSHNIK LASERSTÄRNING NÄR DENNA DEL AB ÖPPNAD,BETRACTAJI STRALEKT DREKT GENOM OPTIKT INSTRUMENT. |
| FORSIGTIG | - USYNLIK LASERSTÄRING KLASSE IM, NÄR LÄGET ER ABENT,UNDĞAT ET LÜGE PÄM OPTIKE INSTRUMENTEN. |
| VARO! | - AWATTASSA ELET ALTIMALLUCKAN IM NÄKYMÄKÖNTÄ LASERSÄTEKI YÄ,ÄLAKTSO ÖSPOLLA LATTEFFLA SLORAWÄTÄFTERSEN. |
| VORSICHT | - UNSICH-TBAPE LASERSTÄRHLUNG KLASSE IM, WENN ARDBECKING GEÖFFNET,NÖCHD DIREKT IM OPTISHEIN INSTRUMENTEN BETRACKEN. |
| ATTENTION | - RAYONNEMENT LASER INVISIBLE, CLASSE IM, EN CAS D'OUVERTURE,NE PAS RESGARDER DIRECTEMENT A-LÄMBE D'INSTRUMENTS D'OPTIQUE. |
| 注意 | - ここを聞くと不可視レーザ光が出来ます。ピームを見たり,触れたりしないでください。 |
| 注意 | - 打开时有不可見激光辐射・避免光束照射。SB2011.20X108 类 RQLIS971 |
Inside of product
IMPORTANT SAFETY INSTRUCTIONS
Read these operating instructions carefully before using the unit. Follow the safety instructions on the unit and the applicable safety instructions listed below. Keep these operating instructions handy for future reference.
1) Read these instructions.
2) Keep these instructions.
3) Heed all warnings.
4) Follow all instructions.
5) Do not use this apparatus near water.
6) Clean only with dry cloth.
7) Do not block any ventilation openings. Install in accordance with the manufacturer's instructions.
8) Do not install near any heat sources such as radiators, heat registers, stoves, or other apparatus (including amplifiers) that produce heat.
9) Do not defeat the safety purpose of the polarized or grounding-type plug. A polarized plug has two blades with one wider than the other. A grounding-type plug has two blades and a third grounding prong. The wide blade or the third prong are provided for your safety. If the provided plug does not fit into your outlet, consult an electrician for replacement of the obsolete outlet.
10) Protect the power cord from being walked on or pinched particularly at plugs, convenience receptacles, and the point where they exit from the apparatus.
11) Only use attachments/accessories specified by the manufacturer.
12) Use only with the cart, stand, tripod, bracket, or table specified by the manufacturer, or sold with the apparatus. When a cart is used, use caution when moving the cart/apparatus combination to avoid injury from tip-over.
13) Unplug this apparatus during lightning storms or when unused for long periods of time.
14) Refer all servicing to qualified service personnel. Servicing is required when the apparatus has been damaged in any way, such as power-supply cord or plug is damaged, liquid has been spilled or objects have fallen into the apparatus, the apparatus has been exposed to rain or moisture, does not operate normally, or has been dropped.

Disc information
- This unit can play MP3 or WMA files and CD-DA format audio CD-R/RWs that have been finalized.
- It may not be able to play some CD-R/RWs depending on the condition of the recording.
- Do not use irregularly shaped discs.
- Do not use discs with labels and stickers that are coming off or with adhesive exuding from under labels and stickers.
- Do not attach extra labels or stickers on the disc.
- Do not write anything on the disc.
CD
• This unit can access up to 99 tracks.
- Choose a disc with this mark:

Using DualDiscs
The "CD" sides of DualDiscs do not meet the CD-DA standard so it may not be possible to play them on this unit.
MP3 WMA
- Files are treated as tracks and folders are treated as albums.
• This unit can access up to 999 tracks, 255 albums and 20 sessions. - Disc must conform to ISO9660 level 1 or 2 (except for extended formats).
- To play in a certain order, prefix the folder and file names with the 3-digit numbers in the order you want to play them.
MPEG Layer-3 audio decoding technology licensed from Fraunhofer IIS and Thomson multimedia.
Windows Media, and the Windows logo are trademarks, or registered trademarks of Microsoft Corporation in the United States and/or other countries.
WMA is a compression format developed by Microsoft Corporation. It achieves the same sound quality as MP3 with a file size that is smaller than that of MP3.

Not doing the following will cause damage to the unit.
Removing the power plug
- "GOODBYE" is displayed when the unit turns off. Remove the power plug after this display disappears.
Tray caution
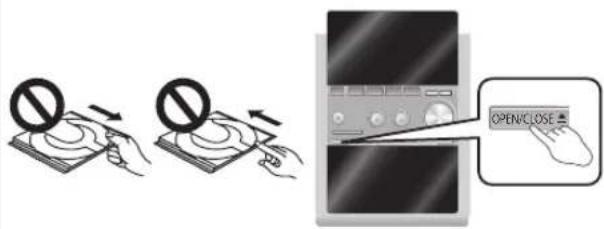
• Always press [OPEN/CLOSE ▲] to insert or remove a disc.
- Do not push or pull out the tray by hand as this may cause an accident.
Inserting a disc
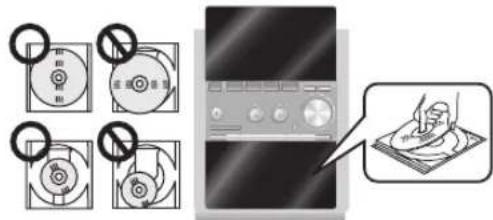
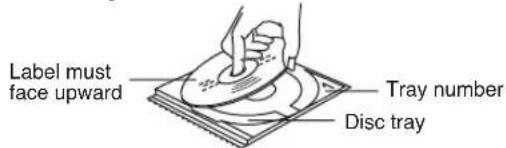
- Place the disc label-up in the center or tray.
- Insert only one disc into each tray.
Getting started
Step Step 1 - Making the connections - Making the connections
Connect the AC power supply cord only after all other connections have been made.
1 Connect the AM loop antenna.
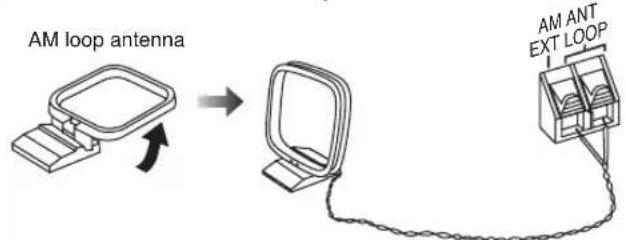
flowchart
graph LR
    A["AM loop antenna"] --> B["Computer"]
    B --> C["AM ANT EXT LOOP"]
Stand the antenna up on its base. Keep the loose antenna cord away from other wires and cords.
2 Connect the FM indoor antenna.
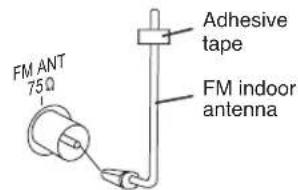
Tape the antenna to a wall or column, in a position with least amount of interference.
3 Connect the speaker cords.
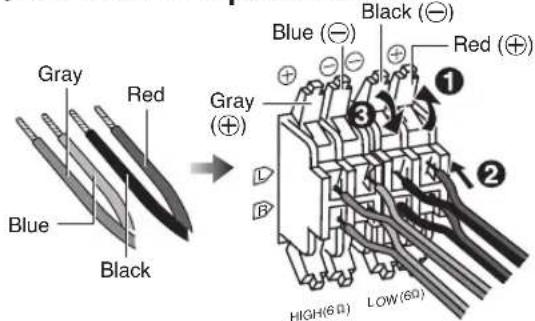
Incorrect connection can damage the unit.
4 Connect the AC power supply cord.
The included AC power supply cord is for use with this unit only. Do not use it with other equipment.
Optional antenna connections
FM outdoor antenna AM outdoor antenna
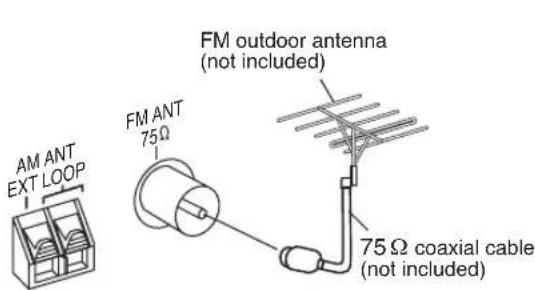
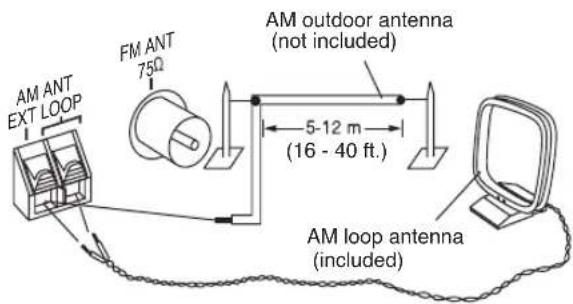
- Never use an outdoor antenna during a lightning storm.
- You can connect the FM outdoor antenna for better reception. Please consult your dealer for installation.
- Disconnect the FM indoor antenna if an FM outdoor antenna is installed.
- Connect the AM outdoor antenna without removing the AM loop antenna. Run 5 to 12 m (16 - 40 feet) of vinyl-covered wire horizontally along a window or other convenient location.
Step 2 - Inserting batteries into the remote control
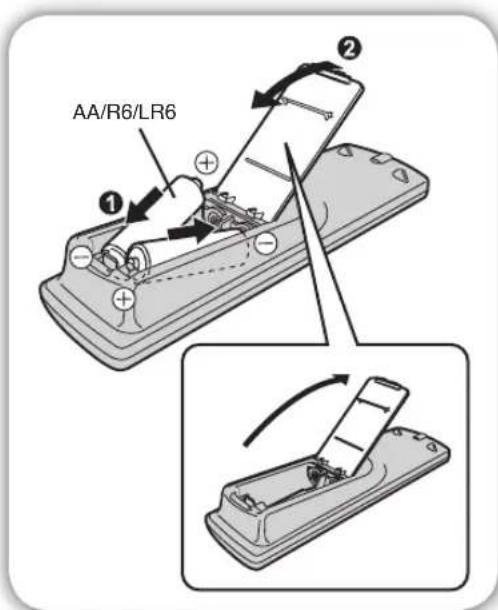
Batteries
- Insert so the poles (+ and -) match those in the remote control.
- Remove if the remote control is not going to be used for a long period of time. Store in a cool, dark place.
- Do not use rechargeable type batteries.
- Mishandling of batteries in the remote control can cause electrolyte leakage, which may cause a fire.
Do not:
- mix old and new batteries.
- use different types of batteries at the same time.
- heat or expose to flame.
• take apart or short circuit. - attempt to recharge alkaline or manganese batteries.
• use batteries if their covering has been peeled off.
Use
- Aim at the remote control sensor, avoiding obstacles, at a maximum range of 7 m (23 feet) directly in front of the unit.
Refer to page 6 for remote control signal sensor position.
Step 3 DEMO function - DEMO function
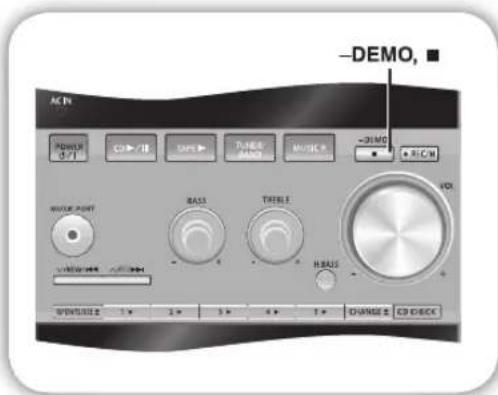
When the unit is first plugged in, a demonstration of its functions may be shown on the display.
If the demo setting is off, you can show a demonstration by selecting "DEMO ON".
Press and hold [-DEMO, ■].
The display changes each time the button is held down.
![PANASONIC SC-PM533 - Press and hold [-DEMO, ■]. - 1](/content/2026/05/962351/images/defece92c87bd94c4b967ffacb2f4e655eb1c2631e89d9f7bdb63c852728abc3.jpg)
While in standby mode, select "DEMO OFF" to reduce power consumption.
Placement of speakers
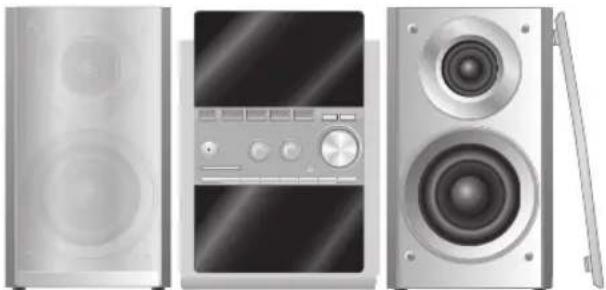
natural_image
Three-panel illustration of a compact audio speaker system with visible sound waves, control panel, and speaker tower (no text or symbols)Speakers are designed identically so that no left or right channel orientation is necessary.
Use only the supplied speakers.
The combination of the main unit and speakers provide the best sound. Using other speakers can damage the unit and sound quality will be negatively affected.
Note
- Keep your speakers at least 10mm ( ^13/_32 ) away from the system for proper ventilation.
• These speakers do not have magnetic shielding. Do not place them near televisions, personal computers or other devices easily influenced by magnetism.
• To avoid damage to the speakers, do not touch the speaker cones if you have taken the nets off.

Caution
- Use the speakers only with the recommended system. Failure to do so can damage the amplifier and speakers, and can cause fi re. Consult a qualifi ed service person if damage occurs or if a sudden change in performance is apparent.
- Do not attach these speakers to walls or ceilings.
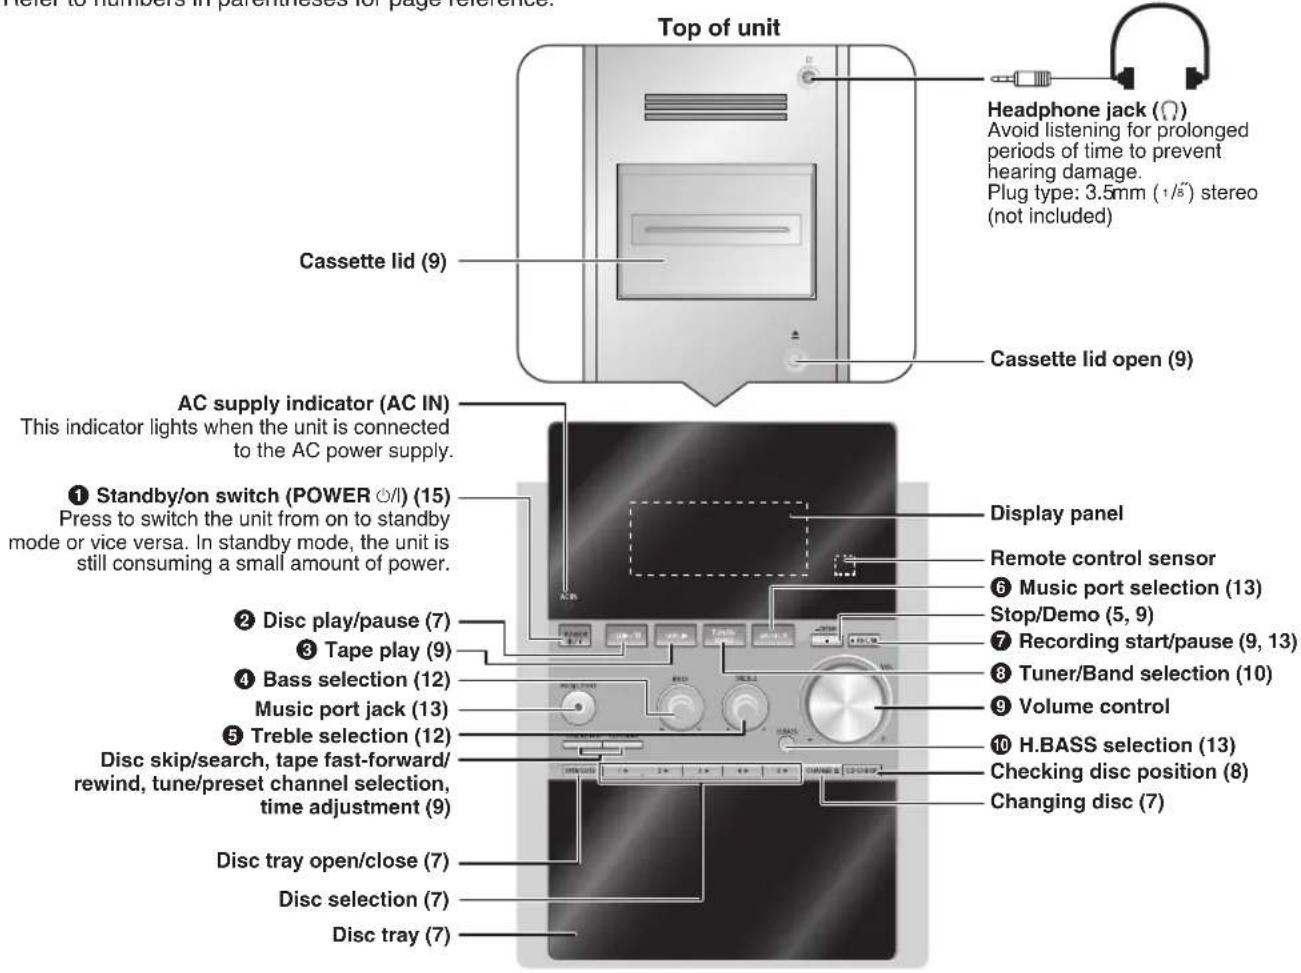
Overview of controls
Main unit Main unit
Refer to numbers in parentheses for page reference.
Remote control Remote control
Buttons such as ① function the same as the controls on the main unit.
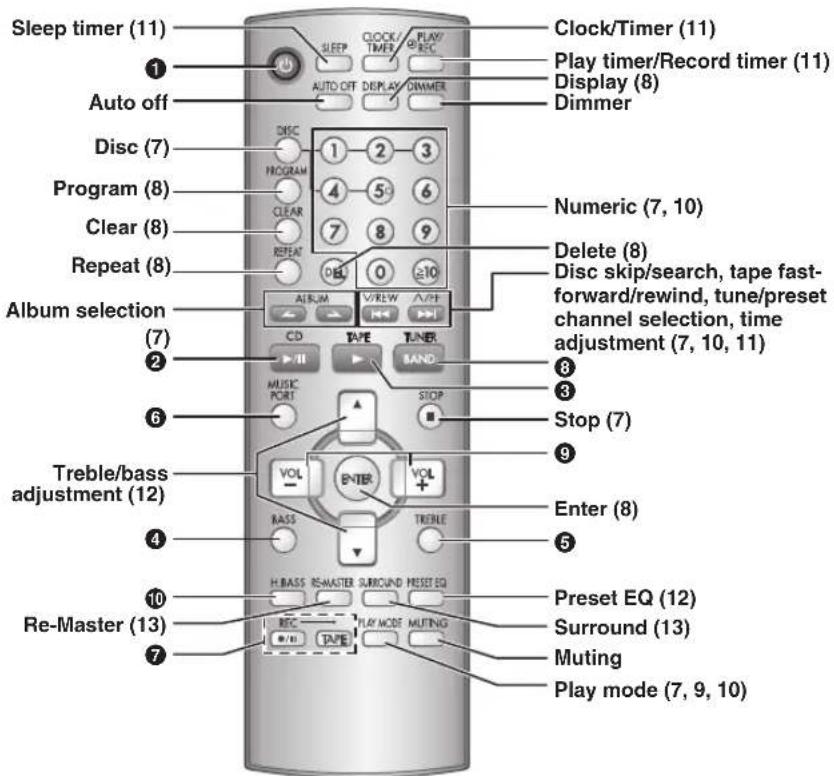
This function allows you to turn off the unit in disc or tape mode only after left unused for 10 minutes.
The setting is maintained even if the unit is turned off.
Dims the display panel.
Mutes the sound.
- Press the button to activate.
- Press again to cancel.
Discs
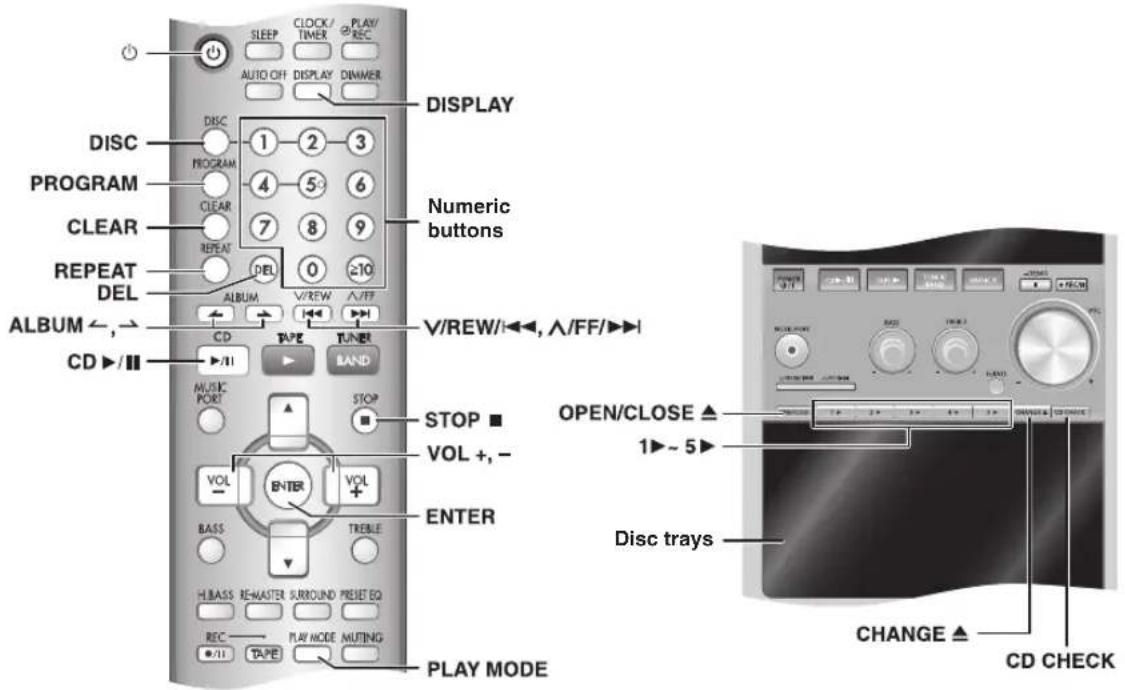
Basic play Basic play
CD MP3 WMA
1 Press [⏻] to turn the unit on.
2 Press [1 ▶\~ 5 ▶] to select your desired tray.
3 Press [OPEN/CLOSE ▲] to open the disc tray and then load the disc. Press [OPEN/CLOSE ▲] again to close the tray.
4 Press [CD ▶/Ⅲ] to start play.
5 Adjust the volume.
To Action
| stop the disc Press [STOP ■]. | |
| pause play Press [CD ▶/■]. Press again to resume play. | |
| skip tracks Press | [√/REW/◀◀] or [^/FF/▶▶] during play or pause. |
| search through tracks CD | Press and hold [√/REW/◀◀] or [^/FF/▶▶▶] during play or pause. |
| direct play If the unit is on standby mode and a disc is loaded, press [CD ▶/■] or [1 ▶ ~ 5 ▶] to start play. | |
| skip album MP3 WMA | Press [ALBUM ← or ] in the play mode. Press [ALBUM ← or +once and then the numeric buttons in the stop mode. |
Changing disc (CD CH
CD MP3 WMA
While one disc is playing, you can change the discs in other trays (except in All-Disc random play or program play).
1 Press [CHANGE ▲].
2 Press [1 ▶\~ 5 ▶] to select the tray.
3 Change the disc.
4 Press [CHANGE ▲] again to close the tray.
Play Mode function
CD MP3 WMA
1 Press [CD ▶/II] and then [STOP ■].
2 Press [DISC] and (within 10 seconds) press [1 \~ 5] to select the disc.
3 Press [PLAY MODE] to select the desired mode.
| Mode To play | |
| 1-DISCIDISC | one selected disc. |
| ALL-DISCALL DISC | all discs in trays, e.g., 4→5→1→2→3. |
| 1-TRACK1TR | one selected track on the selected disc.Press the numeric buttons to select the track. |
| 1-ALBUM1ALBUMMP3WMA | one selected album on the selected disc.Press [ALBUM←or→]to select the album. |
| 1-DISC RANDOM1DISC RND | one selected disc randomly. |
| 1-ALBUM RANDOM1ALBUM RNDMP3WMA | all tracks in one selected album randomly.Press [ALBUM←or→]to select the album. |
| ALL-DISC RANDOMALL DISC RND | all loaded discs randomly. |
Note
- During any random play, you cannot skip to tracks that have been played.
During 1-DISC RANDOM or ALL-DISC RANDOM play, you can search forward or backward only within the current track.
Discs (continued)
Checking which discs are in the trays (CD CHECK)
CD MP3 WMA
1 Press [CD CHECK].
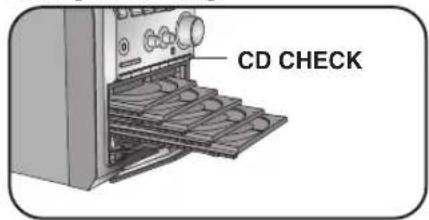
2 Press the button again to close the trays.
Note
• The tray with a disc being played will not open.
- If the player is stopped, all trays will open.
- Do not remove or insert discs during disc check.
- Do not pull out the trays during disc check.
- 8 cm discs cannot be checked.
Display function
This function allows you to display the information of the current track.
Press [DISPLAY] repeatedly during play or pause mode.
CD
→ Elapsed time → Remaining time
MP3 WMA
![PANASONIC SC-PM533 - Press [DISPLAY] repeatedly during play or pause mode. - 1](/content/2026/05/962351/images/fa85dcb5a823c116e0d882551104d17975cdd9d26b5b97ffa984f6d1448765e5.jpg)
flowchart
graph LR
    A["Elapsed time"] --> B["Remaining time"]
    B --> C["Album name"]
    C --> D["Track name"]
    D --> E["Tag (Artist)"]
    E --> F["Tag (Track)"]
    F --> G["Tag (Album)"]
Note
• Maximum number of displayable characters: approximately 30
- This unit supports ver. 1.0 & 1.1 ID3 tags. Text data that is not supported will not be displayed.
- ID3 is a tag embedded in MP3 tracks to provide information about the track.
Advanced play Advanced play
Direct access play
This function allows you to start play from a specific track.
CD
Press the numeric buttons to select and play your desired track.
MP3 WMA
1 Press [ALBUM or ] to select the album.
2 Press [√FF/▶▶] once and then the numeric buttons to select and play your desired track.
For two-digit track, press [≥10] once, and then the two digits.
For three-digit track, press [≥10] twice, and then the three digits.
Note
This function does not work during any random/program mode.
Repeat play
You can repeat program play or other selected play mode.
CD MP3 WMA
Press [REPEAT] before or during play.
"REPEAT ON" and "☐ are displayed.
To cancel
Press [REPEAT] again.
"REPEAT OFF" is displayed and "☐" is cleared.
Program play
This function allows you to program up to 24 tracks.
CD
1 Press [CD ▶/II] and then [STOP ■].
2 Press [PROGRAM].
3 Press [DISC].
4 (Within 10 seconds or so)
Press [1\~5] to select your desired disc.
5 Press the numeric buttons to select your desired track.
6 Repeat steps 3 to 5 to program other tracks.
7 Press [CD ▶/II] to start play.
MP3 WMA
1 Press [CD ▶/II] and then [STOP ■].
2 Press [DISC].
3 (Within 10 seconds or so)
Press [1\~5] to select your desired disc.
4 Press [STOP ■].
5 Press [PROGRAM].
6 Press [ALBUM ← or ] to select your desired album.
7 Press [^/FF/▶▶] once and then the numeric buttons to select your desired track.
8 Press [ENTER]. Repeat steps 6 to 8 to program other tracks.
9 Press [CD ▶/II] to start play.
To Action
| cancel program mode | Press [PROGRAM] in the stop mode. |
| replay the program | Press [PROGRAM] then [CD ▶/■]. |
| check program contents | Press [V/REW/◄◄] or [^/FF/►►I] when “PGM” is displayed in the stop mode.To check while programming, press [PROGRAM] twice after “PGM” appears, then press [V/REW/◄◄] or [^/FF/►►I]. |
| add to the program | CDRepeat step 3 to 5 in the stop mode.MP3 WMARepeat steps 6 to 8 in the stop mode. |
| clear the last track | Press [DEL] in the stop mode. |
| clear all programmed tracks | Press [CLEAR] in the stop mode. “CLR ALL” is displayed. |
Note
- When you try to program more than 24 tracks "PGM FULL" appears.
- During program play, skipping is always in the programmed order, whether forward or backward.
- You cannot program CD-DA together with MP3 and WMA tracks.
- You cannot change or open other trays during program play mode.
CD
During program play, you can search backward or forward only within the current track.
MP3 WMA
The program memory is cleared when you change a disc or open a disc tray.
Cassette tape
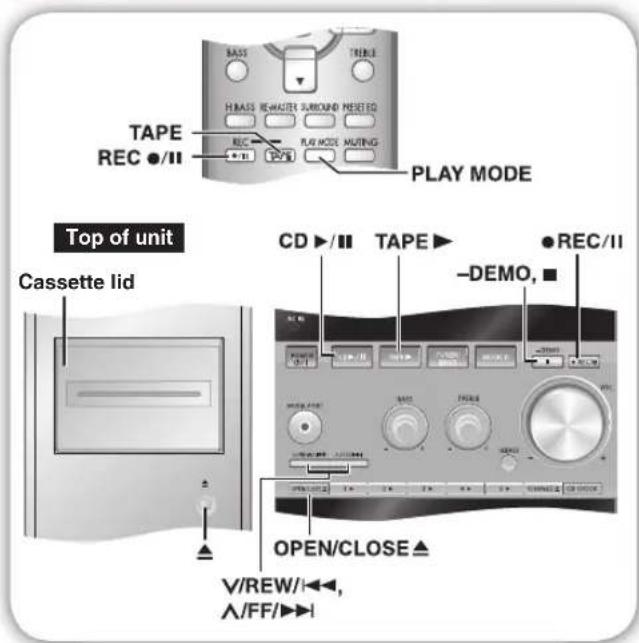
The buttons described for "Cassette tape" are mainly for the main unit unless indicated otherwise.
Basic play Basic play
1 Press [▲] and insert the cassette.
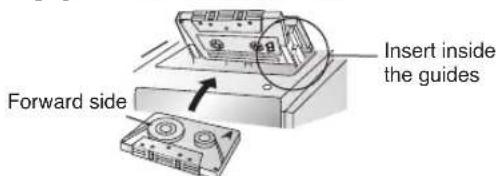
2 Close the lid by hand.
3 Press [TAPE ▶] to start play.
To play the other side of the cassette, turn the cassette over.
| To Action | |
| stop tape playback Press [−DEMO, ■]. | |
| start one-touch play Press [TAPE ▶] when the unit is OFF with the cassette loaded. | |
| fast-forward and rewind | Press [√/REW/◄◄] or [^/FF/►►l] in the stop mode. |
Note
- Tapes exceeding 100 minutes are thin and can break or get caught in the mechanism.
- Endless tapes can get caught up in the deck's moving parts if used incorrectly.
TPS (Tape Program Sensor)
TPS (Tape Program Sensor) Erasure pro
This function enables you to search the beginning of a track, up to a maximum of 9.
Press [√/REW/◄◄] or [√/FF/►►] during play.
Play resumes from the track found.
Note
TPS may not function properly:
• with short silent parts
- when noise occurs between tunes
• if silent parts found within tunes
Recording Recording
Use normal position tapes.
High position and metal position tapes can be used, but this unit will not be able to record or erase them correctly.
Preparation
Wind the leader tape so that recording can begin immediately.
Recording the radio
1 Insert the cassette to be recorded.
2 Tune to the required station (refer to page 10).
3 Press [● REC/II] to start recording.
Recording discs
1 Insert the cassette to be recorded.
2 Press [CD ▶/Ⅱ] and then [-DEMO, ■].
3 Press [OPEN/CLOSE ▲] to insert the disc. Press again to close.
4 Press [PLAY MODE] on the remote control to select your desired mode (refer to page 7).
5 Press [● REC/II] to start recording.
Recording programmed tracks
1 Insert the cassette to be recorded.
2 Program the tracks you want (refer to page 8).
3 Press [● REC/II] to start recording.
Other basic operations
| To Action | |
| erase a recorded sound | 1) Insert the cassette to be recorded.2) Press [TAPE ▶] and then [-DEMO, ■].3) Press [● REC/■]. |
| stop recording | Press [-DEMO, ■]. |
| stop recording temporarily | 1) Press [● REC/■].2) Press again to resume recording. |
| record on the other side of the tape | Turn the cassette over and press [● REC/■]. |
You can perform the same operation of [● REC/III] on the main unit by pressing [REC ●/III] and [TAPE] simultaneously on the remote control.
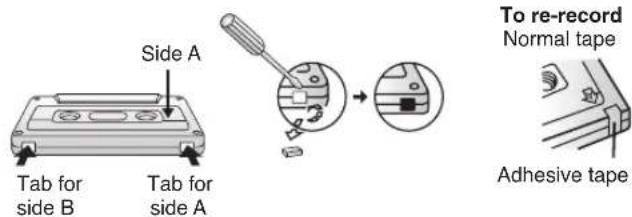
Erasure prevention (in Sensor)
The illustration shows how to remove the tabs to prevent recording. To record on the tape again, cover as shown.
Radio
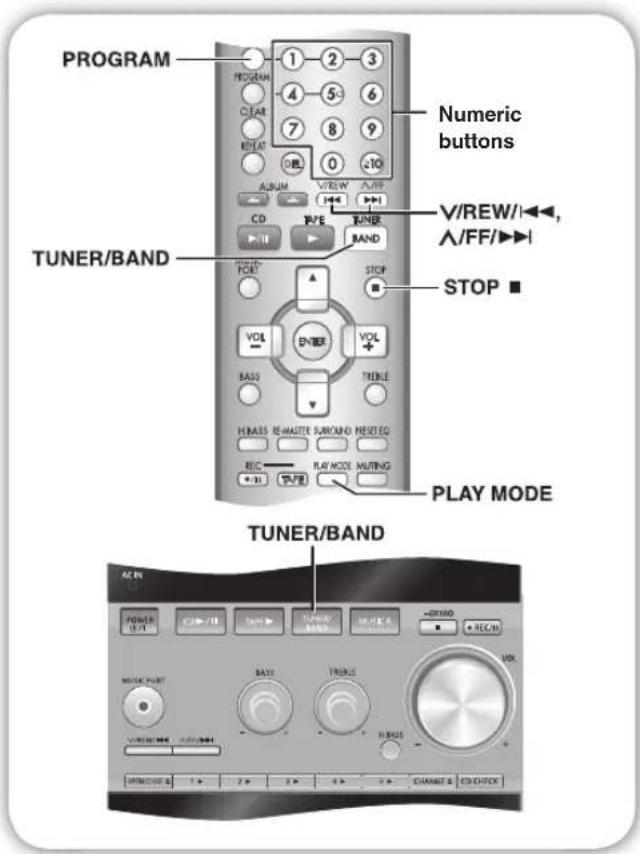
Manual tuning Manual tuning
1 Press [TUNER/BAND] to select "FM" or "AM".
2 Press [PLAY MODE] to select "MANUAL".
3 Press [√/REW/◄◄] or [√FF/►►] to select the frequency of the required station.
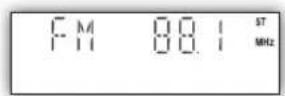
"ST" is displayed when a stereo FM broadcast is being received.
To tune automatically
Press [V/REW/I◄◄] or [\/FF/►►I] for a moment until the frequency starts changing rapidly. The unit begins auto tuning, stopping when it finds a station.
- Auto tuning may not function when there is excessive interference.
- To cancel auto tuning, press [V/REW/I◄◄], [\/FF/►►] or [STOP ■].
To improve FM sound quality
Press and hold [PLAY MODE] to display "MONO".
To cancel
Press and hold [PLAY MODE] again until "MONO" disappears.
• MONO is also canceled if the frequency is changed.
- Turn off "MONO" for normal listening.
Memory preset Memory preset
Up to 15 stations can be set in both the FM and AM bands.
Preparation
Press [TUNER/BAND] to select "FM" or "AM".
Automatic presetting
Press and hold [PROGRAM] to start presetting.
Manual presetting
1 Press [PLAY MODE] to select "MANUAL".
2 Press [V/REW/I◄◄] or [V/FF/►►] to tune to the required station.
3 Press [PROGRAM].
4 Press numeric buttons to select a channel.
The station occupying a channel is erased if another station is preset in that channel.
5 Repeat steps 2 to 4 to preset more stations.
Selecting a preset station
Press numeric buttons to select the channel.
For channels 10 to 15 press [≥10], then the two digits.
OR
1 Press [PLAY MODE] to select "PRESET".
2 Press [V/REW/i◄◄] or [\/FF/►►] to select the channel.
FM allocation setting FM allocation setting
By main unit only
This system can also receive FM broadcasts allocated in 0.1 MHz steps.
To change the step to 0.1 MHz
1 Press and hold [TUNER/BAND]. After a few seconds the display changes to a flashing display of the current minimum frequency.
2 Continue to hold down [TUNER/BAND].
- When the minimum frequency changes, release the button. To return to the original step, repeat the above steps.
• After the setting is changed, any previously preset frequency will be cleared.
Timer
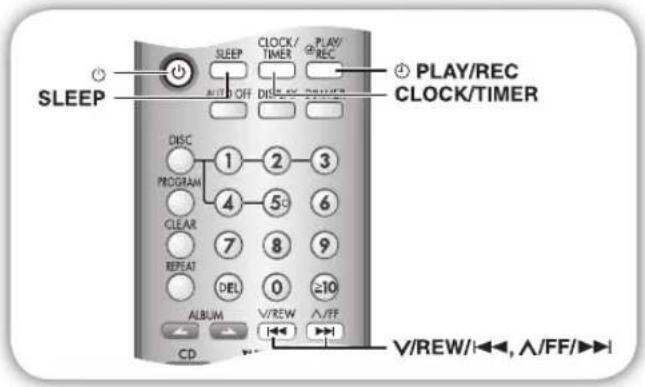
Setting the clock Setting the clock
This is a 12-hour clock.
1 Press [CLOCK/TIMER] to select "CLOCK". Each time you press the button:
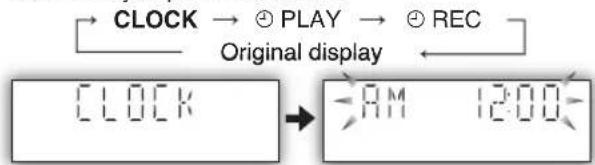
2 Within 5 seconds, press [√/REW/◄◄] or [^/FF/►►] to set the time.
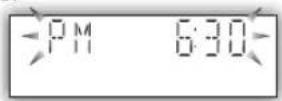
3 Press [CLOCK/TIMER] again to confi rm.
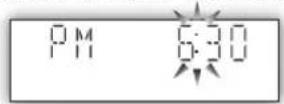
Displaying the clock
Press [CLOCK/TIMER] to display the clock for a few seconds.
Note
The clock may lose or gain minutes over a period of time. Readjust as necessary.
Using the sleep timer Using the sleep timer
This function enables you to turn off the unit automatically after the set time.
Press [SLEEP] repeatedly to select your desired time.
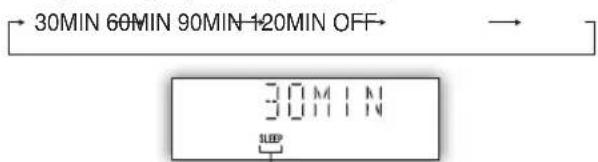
Sleep timer indicator
To cancel
Press [SLEEP] to select "OFF".
Changing the remaining time
Press [SLEEP] to show the remaining time, and press [SLEEP] again to select your desired time.
Note
- The play and sleep timer or the record and sleep timer can be used together.
- The sleep timer always has priority. Be sure not to overlap timer settings.
Using the play or record timer Using the play or record
You can set the timer to come on at a certain time to wake you up (play timer) or to record from the radio or a music port source (record timer).
Preparation
Turn the unit on and set the clock.
Timer Action
| Play timer Prepare the music source you want to listen to; cassette, disc number (1-5), radio or music port source, and set the volume. |
| Record timer Check the cassette's erasure prevention tabs (refer to page 9), insert the cassette and tune to the radio station (refer to page 10) or select music port source (refer to page 13). |
1 Press [CLOCK/TIMER] repeatedly to select your desired timer.

2 Within 5 seconds, press [√/REW/◄◄] or [√/FF/►►] to set the starting time.
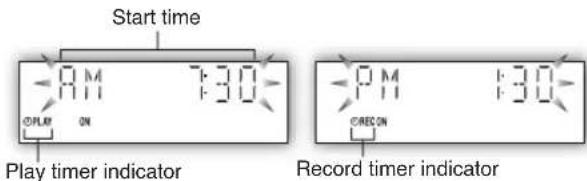
3 Press [CLOCK/TIMER] to confirm.
4 Repeat steps 2 and 3 to set the finishing time.
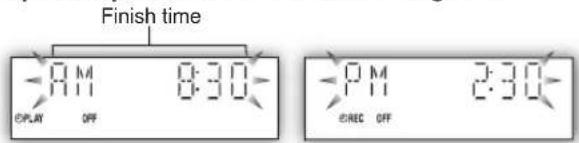
To activate the timer
5 Press [∅PLAY/REC] to turn on your desired timer.
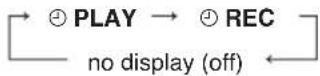
6 Press [◎] to turn off the unit.
The unit must be off for the timers to operate.
To enjoy the desired source after the timer setting is completed.
The volume level (for play timer) and music source are stored in the timer memory and the timer will start in these preset conditions. However, the disc numbers do not get stored in the timer memory.
- After step 5, start playing the desired source.
- Reset the disc numbers if you have changed any of them, confirm that a disc or cassette is inserted, then press [☐] to put the unit on standby.
Timer (Continued)
Other basic operations
| To Action | |
| change the settings Repeat steps 1 to 4 and 6 on page 11. | |
| change the source or volume | 1) Press [PLAY/REC] to clear the timer indicator from the display.2) Make changes to the source or volume.3) Perform steps 5 and 6 on page 11. |
| check the settings (when the unit is on or in standby mode) | Press [CLOCK/TIMER] repeatedly to select PLAY or REC. |
| cancel | Press [PLAY/REC] to clear indicators from the display. |
Note
• The play timer and record timer cannot be used together.
- The play timer will start at the preset time, with the volume increasing gradually to the preset level.
- The record timer will start 30 seconds before the set time with the volume muted.
- The timer comes on at the set time every day if the timer is on.
- The unit must be in the standby mode for the timer to function.
- If you turn the unit off and on again while a timer is functioning, the finish time setting will not be activated.
- If MUSIC PORT is selected as the source when the timer comes on, the system turns on and engages MUSIC PORT as the source. If you wish to playback or record from the portable audio equipment, activate the equipment's play mode and increase the volume. (See the portable audio equipment's instruction manual.)
Sound adjustment
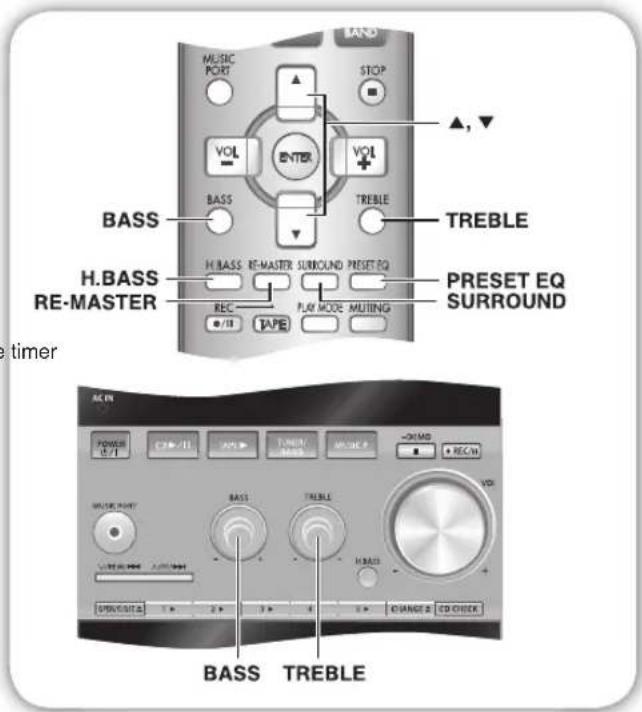
Selecting sound effects Selecting sound effects
You can change the sound effect by selecting Preset EQ or adjusting the bass or treble effect.
Preset EQ
Press [PRESET EQ] repeatedly to select your desired setting.
$$ \begin{array}{c}\text {HEAVY} \rightarrow \text {CLEAR} \rightarrow \text {SOFT} \rightarrow \text {VOCAL} \rightarrow \text {EQ - OFF}\\uparrow\end{array} $$
| Setting Effect |
| HEAVY Adds punch to rock |
| CLEAR Clarifi es higher frequencies |
| SOFT For background music |
| VOCAL Adds gloss to vocal |
| EQ-OFF No effect |
Bass or treble
Enable you to enjoy the lower or higher pitch sound.
1 Press [BASS] or [TREBLE] to select your desired setting.
| Setting | Effect |
| BASS | For lower pitch sound |
| TREBLE | For higher pitch sound |
2 Press [▲] or [▼] to adjust the level.
OR
To adjust bass or treble using the main unit.
Turn [BASS] or [TREBLE] clockwise to increase the level.
Turn [BASS] or [TREBLE] counter-clockwise to decrease the level.
Note
The tone level can be varied within -3 to +3.
External unit
Enjoying surround sound Enjoying surround
The buttons described for "External unit" are mainly for sound main unit unless indicated otherwise.
Enable you to add natural width and depth to the stereo sound.
To activate
Press [SURROUND] to display “■■” indicator.
To cancel
Press [SURROUND] again to clear “■■” indicator.
Note
- Surround sound is less discernible when listening through headphones.
- If interference in FM stereo reception increases, cancel the surround sound effect.
Enhancing the bass Enhancing the bass
Enable you to enjoy the powerful bass effect.
Press [H.BASS] repeatedly to select your desired setting.
$$ \begin{array}{c} \text {LEVEL 1\to LEVEL 2\to OFF} \ \uparrow \end{array} $$
Note
The actual effect depends on the disc.
Re-master – Enjoying more natural sound
Discs recorded at:
MP3
32 kHz, 44.1 kHz or 48 kHz
WMA
22 kHz, 32 kHz, 44 kHz or 48 kHz
This feature reproduces the frequencies lost during recording to give you a sound closer to the original.
Press [RE-MASTER] during play to select "RE-MASTER ON".
Each time you press the button:
RE-MASTER ON ↔ RE-MASTER OFF
Note
You cannot change RE-MASTER during recording.
Connecting to a portable audio equipment
This feature enables you to enjoy music from portable audio equipment.
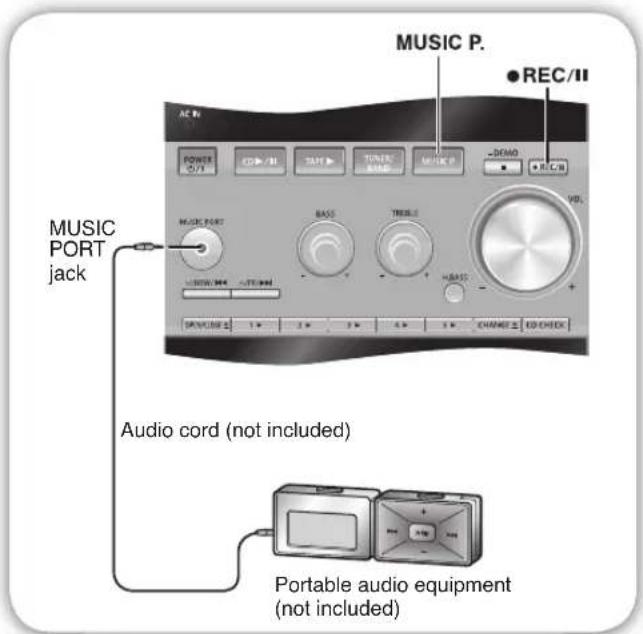
Playing from portable audio equipment Playing from po
Switch off the equalizer function (if there is any) of the portable audio equipment before you plug into the MUSIC PORT jack. Otherwise, sound from the speaker may be distorted.
1 Plug the audio cord into the MUSIC PORT jack and press [MUSIC P.].
2 Play the portable audio equipment. (See the portable audio equipment's instruction manual.)
Recording from portable audio equipment
1 Insert the cassette to be recorded.
2 Press [MUSIC P.].
3 Play the portable audio equipment.
4 Press [● REC/II] to start recording.
Note
- All peripheral components and cables are sold separately.
- For other recording operations, refer page 9, "Other basic operations".
Troubleshooting guide
Before requesting service, make the following checks. If you are in doubt about some of the check points, or if the remedies indicated in the chart do not solve the problem, refer to the “Customer Services Directory” on page 16 if you reside in the U.S.A., or refer to the “Product information” on page 17 if you reside in Canada.
Common problems
| No sound. | Turn the volume up.The speaker cords may not be connected properly. Turn the unit off, check and correct the connections and turn the unit on (refer to page 4). |
| Sound is unfixed, reversed or comes from one speaker only. | Check the speaker connections (refer to page 4). |
| Humming heard during play. | An AC power supply cord or fluorescent light is near the cables. Keep other appliances and cords away from this unit's cables. |
| “ERROR” is displayed. | Incorrect operation performed. Read the instructions and try again. |
| “--:---” appears on the display. | You plugged the AC power supply cord in for the first time or there was a power failure recently.Set the time (refer to page 11). |
| “F61” is displayed. | Check and correct the speaker cord connections (refer to page 4). Unplug and plug in the AC power supply cord, then turn on the unit.If this does not fix the problem, there is a power supply problem. Consult the dealer. |
Listening to the radio
| Noise is heard.The stereo indicator fl ickers or doesn’t light.Sound is distorted. | Use an outdoor antenna (refer to page 4). |
| A beat sound is heard. | Turn the TV off or separate it from the unit. |
| A low hum is heard during AM broadcast. | Separate the antenna from other cables and cords. |
When there is a television set nearby
| The picture on the TV disappears or stripes appear on the screen. | The location and direction of the antenna are incorrect. If you are using an indoor antenna, change to an outdoor antenna (refer to page 4). The TV antenna wire is too close to the unit. Separate the antenna wire of the TV set from the unit. |
Using the cassette deck
| Recording is not possible. | If the erasure prevention tabs have been removed, cover the holes with adhesive tape (refer to page 9). |
Playing discs
| The display is wrong or play won’t start. | The disc may be upside down (refer to page 3). Wipe the disc. Replace the disc if it is scratched, warped, or non-standard. Condensation may have formed inside the unit due to a sudden change in temperature. Wait about an hour for it to clear and try again. |
| The total number of tracks displayed differs each time the same disc is inserted. Unusual sound is heard. | The disc may be scratched, or its data may be defective. Replace the disc. |
| CD-RW cannot be read. | The disc was incompletely formatted. Use the recording equipment to fully format the disc before recording. |
| “VBR-” is displayed instead of the remaining play time. | The unit cannot display the remaining play time for variable bit rate (VBR) tracks. |
| “TAKE OUT/DISC” appears on the display. | There is a problem with the disc mechanism. (A power failure may have occurred.) The tray will open automatically. Remove the disc from the tray, and after ensuring there is no disc in the tray, close it. The unit will make the disc changing noises for a few moments and then it should operate normally. |
The remote control
| Remote control doesn’t work. | Check that the batteries are inserted correctly (refer to page 5).Replace the batteries if they are worn. |
Specifications
AMPLIFIER SECTION
FTC OUTPUT POWER both channel driven
simultaneously
10% Total harmonic distortion
60 Hz to 3 kHz
(Low channel)
SC-PM53
W per channel (6 Ω)
SC-PM533
N per channel (6 Ω)
3 kHz to 16 kHz
(High channel)
SC-PM53
39
W per channel (6 Ω)
SC-PM533
N per channel (6 Ω)
Total Bi-Amp power
SC-PM53
79
W per channel
SC-PM533 74
W per channel
RMS OUTPUT POWER both channel driven
simultaneously
10% total harmonic distortion
1 kHz
(Low channel)
SC-PM53
45
W per channel (6 Ω)
SC-PM533
N per channel (6 Ω)
8 kHz
(High channel)
SC-PM53
45
V per channel (6 Ω)
SC-PM533
42
V per channel (6Ω)
Total Bi-Amp power
SC-PM53
90
W per channel
SC-PM533
85
W per channel
Input Impedance
Music port 250 mV 12 kΩ
Output Impedance
Headphone
16 Ω to 32Ω
Phone jack
Terminal Stereo, 3.5 mm (
^1/_8
Music port input jack
Terminal Stereo, 3.5 mm (
^1/_8
FM TUNER SECTION
Frequency range
87.9
MHz to 107.9 MHz (200 kHz steps)
87.5
MHz to 108.0 MHz (100 kHz steps)
Sensitivity
S/N 26B
0.2μV
Antenna terminals
75 Ω (unbalanced)
Preset station FM 15 stations
AM 15 stations
AM TUNER SECTION
Frequency range
520 kHz to 1710 kHz (10 kHz steps)
Sensitivity
S/N 20B (at 1000 kHz)
900 μV/m
CASSETTE DECK SECTION
Track system
4-track, 2-channel
Heads
Record/playback
Solid permalloy head
Erasure
Double gap ferrite head
Motor
Recording system
DC servo motor
Erase system
AC bias 100 kHz
Tape speed
AC erase 100 kHz
Overall frequency response (+3, -6 dB at DECK OUT)
NORMAL
35 Hz to 14 kHz
S/N RATIO
54 dB (A weighted)
Wow and flutter
0.08% (WRMS)
Fast-forward and rewind time
Approx. 120 seconds with C-60 cassette tape
Maintenance
If the surfaces are dirty
To clean this unit, wipe with a soft, dry cloth.
- Never use alcohol, paint thinner or benzine to clean this unit.
- Before using chemically treated cloth, read the instructions that came with the cloth carefully.
For a cleaner, crisper sound
Clean the heads regularly to assure good quality playback and recording.
Use a cleaning tape (not included).
CD SECTION
Disc played [8 cm (3") or 12 cm (5")]
(1) CD-Audio (CD-DA)
(2) CD-R/RW (CD-DA, MP3, WMA formatted disc)
(3) MP3/WMA
Sampling frequency
CD-DA
44.1 kHz
MP3/WMA
32 kHz, 44.1 kHz, 48 kHz
Bit rate
MP3/WMA
32kbps to 384 kbps
Decoding
16/20/24 bit linear
Pick up
Wavelength
785 nm
Beam source
Semiconductor laser
Laser power
CLASS 1
Audio output (Disc)
Number of channels
2-Channel
Frequency response 20Hz to 20kHz (+1dB, -2dB)
Wow and flutter
Below measurable limit
Digital filter
8fs
D/A converter
MASH (1 bit DAC)
SPEAKER SECTION
Type 2 way, 2 speaker system
Speaker(s)
Woofer
10cm (4") cone type (6Ω)
Tweeter
6 cm (2 ^3 / _8 ) cone type (6 Ω)
Impedance
6Ω
Input power (IEC)
HIGH
90 W (Max)
LOW
90 W (Max)
Output sound pressure
80dB/W (1.0 m)
Crossover over frequency
2.2 kHz
Frequency range
45 Hz to 35 kHz (-16dB)
50Hz to 31 kHz (-10dB)
Dimensions (W x H x D)
144mm×249mm×200mm
(5^1/16'' × 9^13/16'' × 7^7/_8'')
Mass
1.9 kg (4.2 lb.)
GENERAL
Power supply
AC 120V, 60Hz
Power consumption
140W
Dimensions (W x H x D)
175mm × 249mm × 355mm
(6^7/8'' × 9^13/16'' × 13^63/64'')
Mass
5.4kg (11.9 lb.)
Operating temperature range
+5°C to +35°C (+41°F to +95°F)
Operating humidity range
5% to 90% RH (no condensation)
Power consumption in standby mode 0.4W
Note
- Specifications are subject to change without notice. Mass and dimensions are approximate.
- Total harmonic distortion is measured by the digital spectrum analyzer.
- The labels "HIGH" and "LOW" on the rear or the speakers refer to High frequency and Low frequency.
When moving the unit
1 Remove all discs.
2 Press [POWER ⏻/l] to turn the unit off.
3 Disconnect the AC power supply cord.
Limited Warranty (ONLY FOR U.S.A.)
Panasonic Consumer Electronics Company, Division of Panasonic Corporation of North America One Panasonic Way Secaucus, New Jersey 07094
Panasonic Puerto Rico, Inc. Ave. 65 de Infantería, Km. 9.5 San Gabriel Industrial Park, Carolina, Puerto Rico 00985
Panasonic Audio Products Limited Warranty
Limited Warranty Coverage
If your product does not work properly because of a defect in materials or workmanship, Panasonic Consumer Electronics Company or Panasonic Puerto Rico, Inc. (collectively referred to as "the warrantor") will, for the length of the period indicated on the chart below, which starts with the date of original purchase ("warranty period"), at its option either (a) repair your product with new or refurbished parts, or (b) replace it with a new or a refurbished product. The decision to repair or replace will be made by the warrantor.
| Product or Part Name Parts Labor | ||
| Audio Products (except items listed below) | One (1) year One (1) year | |
| USB Reader-Writer, Personal Computer Card Adapters (in exchange for defective item) | One (1) year Not Applicable | |
| Accessories: Headphones, Cartridges, Microphones, Adapters | Ninety (90) days | Ninety (90) days |
| Rechargeable Batteries, DVD-R/-RAM Discs (in exchange for defective item) | Ten (10) days Not Applicable | |
| SD Memory Cards, Rechargeable Battery Packs (in exchange for defective item) | Ninety (90) days | Not Applicable |
During the "Labor" warranty period there will be no charge for labor. During the "Parts" warranty period, there will be no charge for parts. You must carry-in or mail-in your product during the warranty period. If non-rechargeable batteries are included, they are not warranted. This warranty only applies to products purchased and serviced in the United States or Puerto Rico. This warranty is extended only to the original purchaser of a new product which was not sold "as is". A purchase receipt or other proof of the original purchase date is required for warranty service.
Carry-In or Mail-In Service
For Carry-In or Mail-In Service in the United States call 1-800-211-PANA (1-800-211-7262) or visit Panasonic web site: http://www.panasonic.com For assistance in Puerto Rico call Panasonic Puerto Rico, Inc. (787)-750-4300 or fax (787)-768-2910.
Limited Warranty Limits And Exclusions
This warranty ONLY COVERS failures due to defects in materials or workmanship, and DOES NOT COVER normal wear and tear or cosmetic damage. The warranty ALSO DOES NOT COVER damages which occurred in shipment, or failures which are caused by products not supplied by the warrantor, or failures which result from accidents, misuse, abuse, neglect, mishandling, misapplication, alteration, faulty installation, set-up adjustments, misadjustment of consumer controls, improper maintenance, power line surge, lightning damage, modification, or commercial use (such as in a hotel, office, restaurant, or other business), rental use of the product, service by anyone other than a Factory Servicenter or other Authorized Servicer, or damage that is attributable to acts of God.
THERE ARE NO EXPRESS WARRANTIES EXCEPT AS LISTED UNDER "LIMITED WARRANTY COVERAGE". THE WARRANTOR IS NOT LIABLE FOR INCIDENTAL OR CONSEQUENTIAL DAMAGES RESULTING FROM THE USE OF THIS PRODUCT, OR ARISING OUT OF ANY BREACH OF THIS WARRANTY. (As examples, this excludes damages for lost time, travel to and from the servicer, loss of media or images, data or other memory content. The items listed are not exclusive, but are for illustration only.) ALL EXPRESS AND IMPLIED WARRANTIES, INCLUDING THE WARRANTY OF MERCHANTABILITY, ARE LIMITED TO THE PERIOD OF THE LIMITED WARRANTY.
Some states do not allow the exclusion or limitation of incidental or consequential damages, or limitations on how long an implied warranty lasts, so the exclusions may not apply to you.
This warranty gives you specific legal rights and you may also have other rights which vary from state to state. If a problem with this product develops during or after the warranty period, you may contact your dealer or Servicenter. If the problem is not handled to your satisfaction, then write to the warrantor's Consumer Affairs Department at the addresses listed for the warrantor.
PARTS AND SERVICE WHICH ARE NOT COVERED BY THIS LIMITED WARRANTY ARE YOUR RESPONSIBILITY.
Customer Services Directory
Obtain Product Information and Operating Assistance; locate your nearest Dealer or Servicenter; purchase Parts and Accessories; or make Customer Service and Literature requests by visiting our Web Site at:
http://www.panasonic.com/comsumersupport or, contact us via the web at:
http://www.panasonic.com/contactinfo
You may also contact us directly at: 1-800-211-PANA (7262), Monday-Friday 9 am-9 pm; Saturday-Sunday 10 am-7 pm, EST.
For hearing or speech impaired TTY users, TTY: 1-877-833-8855
Accessory Purchases
Purchase Parts, Accessories and Instruction Books online for all Panasonic Products by visiting our Web Site at:
http://www.pasc.panasonic.com or, send your request by E-mail to:
npcparts@us.panasonic.com
You may also contact us directly at: 1-800-332-5368 (Phone) 1-800-237-9080 (Fax Only) (Monday-Friday 9 am to 8 pm, EST.) Panasonic Services Company 20421 84th Avenue South, Kent, WA 98032 (We Accept Visa, MasterCard, Discover Card, American Express, and Personal Checks)
For hearing or speech impaired TTY users, TTY: 1-866-605-1277
Service in Puerto Rico
Panasonic Puerto Rico, Inc. Ave. 65 de Infantería, Km. 9.5, San Gabriel Industrial Park, Carolina, Puerto Rico 00985 Phone (787)750-4300, Fax (787)768-2910
Panasonic Canada Inc.
PANASONIC/TECHNICS PRODUCT – LIMITED WARRANTY
Panasonic Canada Inc. warrants this product to be free from defects in material and workmanship and agrees to remedy any such defect for a period as stated below from the date of original purchase.
Technics Audio Product One (1) year, parts and labour
Panasonic Audio & DVD Product One (1) year, parts and labour
Accessories including rechargeable batteries Ninety (90) days
In-home Service will be carried out only to locations accessible by roads and within 50 km of an authorized Panasonic service facility.
LIMITATIONS AND EXCLUSIONS
This warranty does not apply to products purchased outside Canada or to any product which has been improperly installed, subjected to usage for which the product was not designed, misused or abused, damaged during shipping, or which has been altered or repaired in any way that affects the reliability or detracts from the performance, nor does it cover any product which is used commercially. Dry cell batteries are also excluded from coverage under this warranty.
This warranty is extended to the original end user purchaser only. A purchase receipt or other proof of date of original purchase is required before warranty service is performed.
THIS EXPRESS, LIMITED WARRANTY IS IN LIEU OF ALL OTHER WARRANTIES, EXPRESS OR IMPLIED, INCLUDING ANY IMPLIED WARRANTIES OF MERCHANTABILITY AND FITNESS FOR A PARTICULAR PURPOSE. IN NO EVENT WILL PANASONIC CANADA INC. BE LIABLE FOR ANY SPECIAL, INDIRECT OR CONSEQUENTIAL DAMAGES.
In certain instances, some jurisdictions do not allow the exclusion or limitation of incidental or consequential damages, or the exclusion of implied warranties, so the above limitations and exclusions may not be applicable.
WARRANTY SERVICE
FOR PRODUCT OPERATION ASSISTANCE, please contact:
Our Customer Care Centre:
Telephone #: (905) 624-5505
1-800 #: 1-800-561-5505
Fax #: (905) 238-2360
Email link: "Contact Us" on www.panasonic.ca
FOR PRODUCT REPAIRS, please locate your nearest Authorized Servicente at www.panasonic.ca:
Link: "Servicentres™ locator" under "Customer support"
Panasonic Factory Service:
Richmond British Columbia Mississauga, Ontario
Panasonic Canada Inc.
Panasonic Canada Inc.
12111 Riverside Way
5770 Ambler Drive
Richmond BC V6W 1K8
Mississauga ON L4W 2T3
Tel: (604) 278-4211
Tel: (905) 624-8447
Fax: (604) 278-5627
Fax: (905) 238-2418
IF YOU SHIP THE PRODUCT TO A SERVICENTRE
Carefully pack and send prepaid, adequately insured and preferably in the original carton.
Include details of the defect claimed, and proof of date of original purchase.
Product Service
- Damage requiring service — The unit should be serviced by qualified service personnel if:
(a) The AC power supply cord or the plug has been damaged; or
(b) Objects or liquids have gotten into the unit; or
(c) The unit has been exposed to rain; or
(d) The unit does not operate normally or exhibits a marked change in performance; or
(e) The unit has been dropped or the cabinet damaged.
-
Servicing— Do not attempt to service the unit beyond that described in these operating instructions. Refer all other servicing to authorized servicing personnel.
-
Replacement parts— When parts need replacing ensure the servicer uses parts specified by the manufacturer or parts that have the same characteristics as the original parts. Unauthorized substitutes may result in fire, electric shock, or other hazards.
-
Safety check— After repairs or service, ask the servicer to perform safety checks to confirm that the unit is in proper working condition.
The servicer will require all components to service your system.
Therefore, should service ever be necessary, be sure to bring the entire system.
Product information
For product information or assistance with product operation:
In the U.S.A., refer to "Customer Services Directory" on page 16.
In Canada, contact the Panasonic Canada Inc. Customer Care Centre at 905-624-5505, or visit the website (www.panasonic.ca), or an authorized Servicentre closest to you.
natural_image
Pure electrical circuit lines without any symbolsAparato principal Aparato principal
Other basic operations
Para Acción
Selecting fine audio equipment such as the unit you've just purchased is only the start of your musical enjoyment. Now it's time to consider how you can maximize the fun and excitement your equipment offers. This manufacturer and the Electronic Industries Association's Consumer Electronics Group want you to get the most out of your equipment by playing it at a safe level. One that lets the sound come through loud and clear without annoying blaring or distortion—and, most importantly, without affecting your sensitive hearing.
We recommend that you avoid prolonged exposure to excessive noise.
Sound can be deceiving. Over time your hearing "comfort level" adapts to higher volumes of sound. So what sounds "normal" can actually be loud and harmful to your hearing.
Guard against this by setting your equipment at a safe level BEFORE your hearing adapts.
To establish a safe level:
- Start your volume control at a low setting.
- Slowly increase the sound until you can hear it comfortably and clearly, and without distortion.
Once you have established a comfortable sound level:
- Set the dial and leave it there.
Taking a minute to do this now will help to prevent hearing damage or loss in the future. After all, we want you listening for a lifetime.
THE FOLLOWING APPLIES ONLY IN THE U.S.A.
FCC Note:
This equipment has been tested and found to comply with the limits for a Class B digital device, pursuant to Part 15 of the FCC Rules.
These limits are designed to provide reasonable protection against harmful interference in a residential installation. This equipment generates, uses and can radiate radio frequency energy and, if not installed and used in accordance with the instructions, may cause harmful interference to radio communications. However, there is no guarantee that interference will not occur in a particular installation. If this equipment does cause harmful interference to radio or television reception, which can be determined by turning the equipment off and on, the user is encouraged to try to correct the interference by one or more of the following measures:
- Reorient or relocate the receiving antenna.
- Increase the separation between the equipment and receiver.
- Connect the equipment into an outlet on a circuit different from that to which the receiver is connected.
- Consult the dealer or an experienced radio/TV technician for help.
Any unauthorized changes or modifications to this equipment would void the user's authority to operate this device.
This device complies with Part 15 of the FCC Rules. Operation is subject to the following two conditions: (1) This device may not cause harmful interference, and (2) this device must accept any interference received, including interference that may cause undesired operation.
Responsible Party:
Panasonic Corporation of North America
One Panasonic Way
Secaucus, NJ 07094
Telephone No.: 1-800-211-7262
- Panasonic®
- Table of contents
- IMPORTANT SAFETY
- Español
- SUPPLIED ACCESSORIES
- User memo:
- WARNING:
- CAUTION!
- CAUTION
- -If you see this symbol-
- IMPORTANT SAFETY INSTRUCTIONS
- Disc information
- CD
- Using DualDiscs
- MP3 WMA
- Removing the power plug
- Getting started
- Step Step 1 - Making the connections - Making the connections
- Connect the AC power supply cord.
- Optional antenna connections
- Step 2 - Inserting batteries into the remote control
- Batteries
- Do not:
- Use
- Step 3 DEMO function - DEMO function
- Press and hold [-DEMO, ■].
- Placement of speakers
- Use only the supplied speakers.
- Note
- Overview of controls
- Main unit Main unit
- Remote control Remote control
- Discs
- Basic play Basic play
- CD MP3 WMA
- Changing disc (CD CH
- Play Mode function
- Discs (continued)
- Checking which discs are in the trays (CD CHECK)
- Display function
- Press [DISPLAY] repeatedly during play or pause mode.
- Advanced play Advanced play
- Direct access play
- Press the numeric buttons to select and play your desired track.
- Repeat play
- Press [REPEAT] before or during play.
- To cancel
- Press [REPEAT] again.
- Program play
- Cassette tape
- Press [▲] and insert the cassette.
- Close the lid by hand.
- Press [TAPE ▶] to start play.
- TPS (Tape Program Sensor)
- TPS (Tape Program Sensor) Erasure pro
- Press [√/REW/◄◄] or [√/FF/►►] during play.
- Recording Recording
- Preparation
- Recording the radio
- Recording discs
- Recording programmed tracks
- Other basic operations
- Erasure prevention (in Sensor)
- Radio
- Manual tuning Manual tuning
- To tune automatically
- To improve FM sound quality
- Memory preset Memory preset
- Automatic presetting
- Manual presetting
- Selecting a preset station
- OR
- FM allocation setting FM allocation setting
- By main unit only
- To change the step to 0.1 MHz
- Timer
- Setting the clock Setting the clock
- Using the sleep timer Using the sleep timer
- Changing the remaining time
- Using the play or record timer Using the play or record
- To activate the timer
- Timer (Continued)
- Sound adjustment
- Selecting sound effects Selecting sound effects
- Preset EQ
- Bass or treble
- External unit
- Enjoying surround sound Enjoying surround
- To activate
- Enhancing the bass Enhancing the bass
- Re-master – Enjoying more natural sound
- Discs recorded at:
- MP3
- WMA
- Press [RE-MASTER] during play to select "RE-MASTER ON".
- Connecting to a portable audio equipment
- Playing from portable audio equipment Playing from po
- Recording from portable audio equipment
- Troubleshooting guide
- Specifications
- AMPLIFIER SECTION
- FTC OUTPUT POWER both channel driven
- RMS OUTPUT POWER both channel driven
- FM TUNER SECTION
- AM TUNER SECTION
- CASSETTE DECK SECTION
- Maintenance
- If the surfaces are dirty
- For a cleaner, crisper sound
- CD SECTION
- SPEAKER SECTION
- Power consumption in standby mode 0.4W
- When moving the unit
- Limited Warranty (ONLY FOR U.S.A.)
- Panasonic Audio Products Limited Warranty
- Limited Warranty Coverage
- Carry-In or Mail-In Service
- Limited Warranty Limits And Exclusions
- Customer Services Directory
- Accessory Purchases
- Service in Puerto Rico
- Panasonic Canada Inc.
- PANASONIC/TECHNICS PRODUCT – LIMITED WARRANTY
- LIMITATIONS AND EXCLUSIONS
- WARRANTY SERVICE
- IF YOU SHIP THE PRODUCT TO A SERVICENTRE
- Product Service
- Product information
- Aparato principal Aparato principal
- THE FOLLOWING APPLIES ONLY IN THE U.S.A.
- FCC Note:
Brand : PANASONIC
Model : SC-PM533
Category : Hi-Fi System