
7510 - Mobile Phone NOKIA - Free user manual and instructions
Find the device manual for free 7510 NOKIA in PDF.


| Product Type | Mobile Phone (GSM 850/900/1800/1900) |
| Model Number | 7510a-b (RM-399) |
| Battery | BL-5BT rechargeable Li-Ion |
| Charger | AC-3 (output: 5V, 600mA) |
| Display | Internal color display, 128x160 pixels (est.) |
| Camera | 2 MP (1600x1200 pixels) |
| Video Recording | 176x144 pixels, QCIF |
| Memory Card | microSD up to 8 GB |
| Connectivity | Bluetooth 2.1+EDR, Wi-Fi (WLAN 802.11b/g), USB 2.0 |
| Radio | FM radio with RDS |
| Messaging | SMS, MMS, Email, Instant Messaging |
| Key Features | Voice dialing, T9 predictive text, organizer, games, t-zones browser |
| Antenna | Internal and external (GPS not specified) |
| Operating System | Proprietary Nokia OS (Series 40, 5th Edition, feature pack 1, estimated) |
| Compliance | FCC, IC, SAR: 0.84 W/kg (head), 0.25 W/kg (body) |
| Included Accessories | Battery, charger, headset, user guide |
| Care | Keep dry, avoid dust, clean with soft cloth |
| Safety | Use only approved accessories, switch off in restricted areas |
| Spare Parts | Battery BL-5BT, charger AC-3, covers, headset (contact dealer) |
| General Info | Manufacturer: Nokia, released 2008, intended for US market |
Frequently Asked Questions - 7510 NOKIA
User questions about 7510 NOKIA
0 question about this device. Answer the ones you know or ask your own.
Ask a new question about this device
Download the instructions for your Mobile Phone in PDF format for free! Find your manual 7510 - NOKIA and take your electronic device back in hand. On this page are published all the documents necessary for the use of your device. 7510 by NOKIA.
USER MANUAL 7510 NOKIA
Nokia 7510 User Guide
9210193
Issue 1
This device model is intended for sale only in the United States and has not been certified for use in the European Union and EFTA countries.
© 2008 Nokia. All rights reserved.
Nokia, Nokia Connecting People and Navi are trademarks or registered trademarks of Nokia Corporation. Nokia tune is a sound mark of Nokia Corporation. Other product and company names mentioned herein may be trademarks or tradenames of their respective owners.
Reproduction, transfer, distribution, or storage of part or all of the contents in this document in any form without the prior written permission of Nokia is prohibited.
US Patent No 5818437 and other pending patents. T9 text input software Copyright © 1997-2008. Tegic Communications, Inc. All rights reserved.

Includes RSA BSAFE cryptographic or security protocol software from RSA Security.

POWERED Java and all Java-based marks are trademarks or registered trademarks of Sun Microsystems, Inc.
This product is licensed under the MPEG-4 Visual Patent Portfolio License (i) for personal and noncommercial use in connection with information which has been encoded in compliance with the MPEG-4 Visual Standard by a consumer engaged in a personal and noncommercial activity and (ii) for use in connection with MPEG-4 video provided by a licensed video provider. No license is granted or shall be implied for any other use. Additional information, including that related to promotional, internal, and commercial uses, may be obtained from MPEG LA, LLC. See http://www.mpegla.com.
Nokia operates a policy of ongoing development. Nokia reserves the right to make changes and improvements to any of the products described in this document without prior notice.
TO THE MAXIMUM EXTENT PERMITTED BY APPLICABLE LAW, UNDER NO CIRCUMSTANCES SHALL NOKIA OR ANY OF ITS LICENSORS BE RESPONSIBLE FOR ANY LOSS OF DATA OR INCOME OR ANY SPECIAL, INCIDENTAL, CONSEQUENTIAL OR INDIRECT DAMAGES HOWSOEVER CAUSED.
THE CONTENTS OF THIS DOCUMENT ARE PROVIDED "AS IS". EXCEPT AS REQUIRED BY APPLICABLE LAW, NO WARRANTIES OF ANY KIND, EITHER EXPRESS OR IMPLIED, INCLUDING, BUT NOT LIMITED TO, THE IMPLIED WARRANTIES OF MERCHANTABILITY AND FITNESS FOR A PARTICULAR PURPOSE, ARE MADE IN RELATION TO THE ACCURACY, RELIABILITY OR CONTENTS OF THIS DOCUMENT. NOKIA RESERVES THE RIGHT TO REVISE THIS DOCUMENT OR WITHDRAW IT AT ANY TIME WITHOUT PRIOR NOTICE.
The availability of particular products and applications and services for these products may vary by region. Please check with your Nokia dealer for details, and availability of language options.
Export controls
This device may contain commodities, technology or software subject to export laws and regulations from the US and other countries. Diversion contrary to law is prohibited.
FCC/INDUSTRY CANADA NOTICE
Your device may cause TV or radio interference (for example, when using a telephone in close proximity to receiving equipment). The FCC or Industry Canada can require you to stop using your telephone if such interference cannot be eliminated. If you require assistance, contact your local service facility. This device complies with part 15 of the FCC rules. Operation is subject to the following two conditions: (1) This device may not cause harmful interference, and (2) this device must accept any interference received, including interference that may cause undesired operation. Any changes or modifications not expressly approved by Nokia could void the user's authority to operate this equipment.
Model number: 7510a-b
9210193/Issue 1 EN-US
Contents
Safety......7
1. General information......8
About your device....8
Network services....8
Access codes....9
Configuration setting service......10
My Nokia....10
Download content......10
Helpful hints....11
Software updates......11
Nokia support....12
Digital rights management......12
2. Get started......13
Install SIM card and battery......13
Insert a microSD card....14
Remove the memory card.....15
Change the covers....15
Charge the battery....16
Antenna....17
Connect a USB cable....17
Headset....17
Strap....18
Keys and parts....19
Switch the phone on and off......20
Navigate the menus....20
Standby mode....21
Display....21
Home screen....21
Shortcuts in the standby
mode....22
Indicators......22
Flight mode......23
Keypad lock....23
Functions without a SIM card......24
3. Calls......24
Make a call....24
Answer and end a call ......25
Dialing shortcuts....25
Voice dialing....25
Options during a call....26
4. Write text.....26
Text modes....26
Traditional text input......27
Predictive text input......27
5. Messaging......27
Text and picture messages ......28
Text messages....28
Picture messages ......28
Create a text or picture message ....29
Read a message and reply......29
Send messages....29
E-mail application....30
Start E-mail....30
View the Inbox and other folders....31
Write and send an e-mail......31
Read an e-mail and reply......31
Delete an e-mail....31
E-mail settings....32
Voice notes ......32
Instant Messaging ....32
Register with an IM service......33
Log in....33
Begin an IM session....33
Receive and reply to messages....33
Return to chat session....34
Contacts....34
Conversation options......34
Set your availability......35
Exit the IM application....35
Log out of IM......35
Info messages, SIM messages, and service commands....36
Voice mail 36
Message settings......36
- People ......37
Manage contacts....37
Business cards....39
Assign dialing shortcuts......39
-
Call History ......39
-
Connectivity......39
Bluetooth wireless technology......40
Packet data....41
USB data cable....41
Nokia PC Suite....42
- Settings......42
Wi-Fi/WLAN connection....42
About Wi-Fi/WLAN......42
Quick connection......43
Find, save, and connect to networks....43
Saved networks......44
Profiles......44
Themes......45
Tones....45
Display....45
Lights....46
Date and time....46
My shortcuts....46
Left selection key 46
Other shortcuts ....46
Synchronization and backup......47
Call....47
Phone....48
Voice commands....48
Accessories....49
Configuration......49
Software updates over the air......50
Security....51
Restore factory settings....52
- Gallery....52
Folders and files....52
Print images....53
Memory card....53
- Media......54
Camera and video....54
Take a picture....54
Record a video clip....54
Camera and video options......55
Media player....55
Music menu....55
Play songs....56
Change the media player look......56
Radio....57
Tune in to radio stations......57
Radio settings....58
Voice recorder....58
Equalizer....58
Stereo widening....59
12. Organizer......59
Alarm clock....59
Calendar....60
To-do list....60
Notes......60
Calculator....60
Countdown timer....61
Stopwatch....61
13. Games ......62
Launch an application....62
Download an application....62
14. t-zones ......63
Connect to a service....63
Appearance settings......64
Cache memory....64
Browser security......64
15. SIM services......65
Accessories......66
Battery......66
Battery and charger
information......66
Nokia battery authentication
guidelines....67
Authenticate hologram......68
What if your battery is not authentic?......68
Care and maintenance......69
Disposal....70
Additional safety
information......70
Small children....70
Operating environment....70
Medical devices....71
Implanted medical devices....71
Hearing aids....72
Vehicles....72
Potentially explosive
environments....72
Emergency calls....73
Certification information (SAR)......74
Index....75
Safety
Read these simple guidelines. Not following them may be dangerous or illegal. Read the complete user guide for further information.

SWITCH ON SAFELY
Do not switch the device on when wireless phone use is prohibited or when it may cause interference or danger.

ROAD SAFETY COMES FIRST
Obey all local laws. Always keep your hands free to operate the vehicle while driving. Your first consideration while driving should be road safety.

INTERFERENCE
All wireless devices may be susceptible to interference, which could affect performance.

SWITCH OFF IN RESTRICTED AREAS
Follow any restrictions. Switch the device off in aircraft, near medical equipment, fuel, chemicals, or blasting areas.

QUALIFIED SERVICE
Only qualified personnel may install or repair this product.

ACCESSORIES AND BATTERIES
Use only approved accessories and batteries. Do not connect incompatible products.

WATER-RESISTANCE
Your device is not water-resistant. Keep it dry.
1. General information
About your device
The wireless device described in this guide is approved for use on the GSM 850, 900, 1800, and 1900 MHz networks (RM-399). Contact your service provider for more information about networks.
When using the features in this device, obey all laws and respect local customs, privacy and legitimate rights of others, including copyrights.
Copyright protection may prevent some images, music, and other content from being copied, modified, or transferred.
Your device may have preinstalled bookmarks and links for third-party internet sites. You may also access other third-party sites through your device. Third-party sites are not affiliated with Nokia, and Nokia does not endorse or assume liability for them. If you choose to access such sites, you should take precautions for security or content.

Warning: To use any features in this device, other than the alarm clock, the must be switched on. Do not switch the device on when wireless device use ause interference or danger.
Remember to make back-up copies or keep a written record of all important information stored in your device.
When connecting to any other device, read its user guide for detailed safety instructions. Do not connect incompatible products.
The images in this guide may differ from your device display.
Network services
To use the device you must have service from a wireless service provider. Many of the features require special network features. These features are not available on all networks; other networks may require that you make specific arrangements with your service provider before you can use the network services. Using network services involves transmission of data. Check with your service provider for details
about fees in your home network and when roaming on other networks. Your service provider can give you instructions and explain what charges will apply. Some networks may have limitations that affect how you can use network services. For instance, some networks may not support all language-dependent characters and services.
Your service provider may have requested that certain features be disabled or not activated in your device. If so, these features will not appear on your device menu. Your device may also have a special configuration such as changes in menu names, menu order, and icons. Contact your service provider for more information.
Access codes
To set how your phone uses the access codes and security settings, select Menu > Settings > Security > Access codes.
- The PIN (UPIN) code, supplied with the SIM (USIM) card, helps to protect the card against unauthorized use.
- The PIN2 (UPIN2) code, supplied with some SIM (USIM) cards, is required to access certain services.
- PUK (UPUK) and PUK2 (UPUK2) codes may be supplied with the SIM (USIM) card. If you enter the PIN code incorrectly three times in succession, you are asked for the PUK code. If the codes are not supplied, contact your service provider.
- The security code helps to protect your phone against unauthorized use. You can create and change the code, and set the phone to request the code. Keep the code secret and in a safe place separate from your phone. If you forget the code and your phone is locked, your phone will require service and additional charges may apply. For more information, contact a Nokia Care point or your phone dealer.
- The restriction password is required when using the call restriction service to restrict calls to and from your phone (network service).
- To view or change the security module settings for the web browser, select Menu > Settings > Security > Security module sett..
Configuration setting service
To use some of the network services, such as mobile internet services, the multimedia messaging service (MMS), Nokia Xpress audio messaging, or remote internet server synchronization, your phone needs the correct configuration settings. For more information on availability, contact your service provider or the nearest authorized Nokia dealer, or visit the support area on the Nokia website. See "Nokia support," p. 12.
When you have received the settings as a configuration message and the settings are not automatically saved and activated, Configuration settings received is displayed.
To save the settings, select Show > Save. If required, enter the PIN code supplied by the service provider.
My Nokia
Receive free tips, tricks, and support for your Nokia phone, plus free trial content, interactive demonstrations, a personalized web page, and news about the latest Nokia products and services.
Get the most out of your Nokia phone and register to My Nokia today! For more information and availability in your region, see www.nokia.com/mynokia.
Download content
You may be able to download new content (for example, themes) to your phone (network service).

Important: Use only services that you trust and that offer adequate security protection against harmful software.
For the availability of different services and pricing, contact your service provider.
Helpful hints
If you have queries with your phone, or you are unsure how your phone should function, refer to the user guide. If this does not help, try the following:
- Reset the phone: switch off the phone, and remove the battery. After a few seconds, insert the battery, and switch on the phone.
- Restore the factory settings.See "Restore factory settings," p. 52.
- Update your phone software with the Nokia Software Updater application, if available. See "Software updates," p. 11.
- Visit a Nokia website, or contact Nokia Care. See "Nokia support," p. 12.
If a query remains unresolved, contact your local Nokia Care point for repair options. Before sending your phone for repair, always back up or make a record of data in your phone.
Software updates
Nokia may produce software updates that may offer new features, enhanced functions, or improved performance. You may be able to request these updates through the Nokia Software Updater PC application. To update the device software, you need the Nokia Software Updater application and a compatible PC with Microsoft Windows 2000, XP or Vista operating system, broadband internet access, and a compatible data cable to connect your device to the PC.
To get more information and to download the Nokia Software Updater application, visit www.nokia.com/softwareupdate or your local Nokia website.
If software updates over the air are supported by your network, you may also be able to request updates through the phone. See "Software updates over the air," p. 50.

Important: Use only services that you trust and that offer adequate security protection against harmful software.
Nokia support
Check www.nokia.com/support or your local Nokia website for the latest version of this guide, additional information, downloads, and services related to your Nokia product.
Configuration settings service
Download free configuration settings such as MMS, GPRS, e-mail, and other services for your phone model at www.nokia.com/support.
Nokia PC Suite
You may find PC Suite and related information on the Nokia website at www.nokia.com/support.
Nokia Care services
If you need to contact Nokia Care services, check the list of local Nokia Care contact centers at www.nokia.com/customerservice.
NOKIA Care
Maintenance
For maintenance services, check your nearest Nokia Care point at www.nokia.com/repair.
Digital rights management
Content owners may use different types of digital rights management (DRM) technologies to protect their intellectual property, including copyrights. This device uses various types of DRM software to access DRM-protected content. With this device you can access content protected with WMDRM 10, OMA DRM 1.0, OMA DRM 1.0 forward lock, and OMA DRM 2.0. If certain DRM software fails to protect the content, content owners may ask that such DRM software's ability to access new DRM-protected content be revoked. Revocation may also prevent renewal of such DRM-protected content already in your device. Revocation of such DRM software does not affect the use of content protected with other types of DRM or the use of non-DRM-protected content.
Digital rights management (DRM) protected content comes with an associated activation key that defines your rights to use the content.
If your device has OMA DRM-protected content, to back up both the activation keys and the content, use the backup feature of Nokia PC Suite. Other transfer methods may not transfer the activation keys which need to be restored with the content for you to be able to continue the use of OMA DRM-protected content after the device memory is formatted. You may also need to restore the activation keys in case the files on your device get corrupted.
If your device has WMDRM-protected content, both the activation keys and the content will be lost if the device memory is formatted. You may also lose the activation keys and the content if the files on your device get corrupted. Losing the activation keys or the content may limit your ability to use the same content on your device again. For more information, contact your service provider.
2. Get started
Install SIM card and battery
Always switch the device off and disconnect the charger before removing the battery.
This phone is intended for use with a BL-5BT battery. Always use original Nokia batteries. See "Nokia battery authentication guidelines," p. 67.
The SIM card and its contacts can be easily damaged by scratches or bending, so be careful when handling, inserting, or removing the card.
- Slide the cover (1), and remove it. Remove the battery (2).
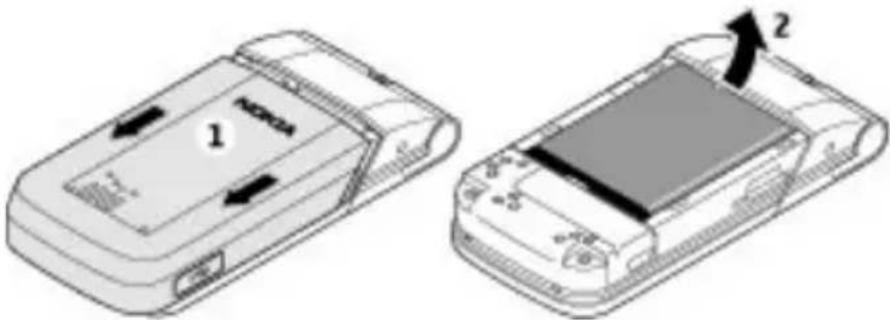
natural_image
Illustration of two electronic devices with labeled parts and directional arrows (no text or symbols present)-
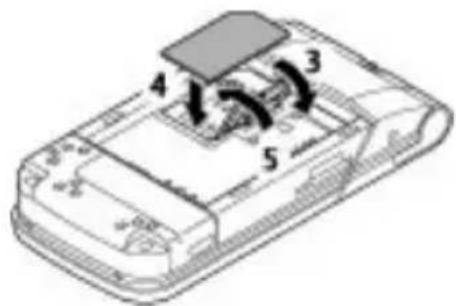
Open the SIM card holder (3). Insert the SIM card with the contact surface facing down into the holder (4). Close the SIM card holder (5).
-
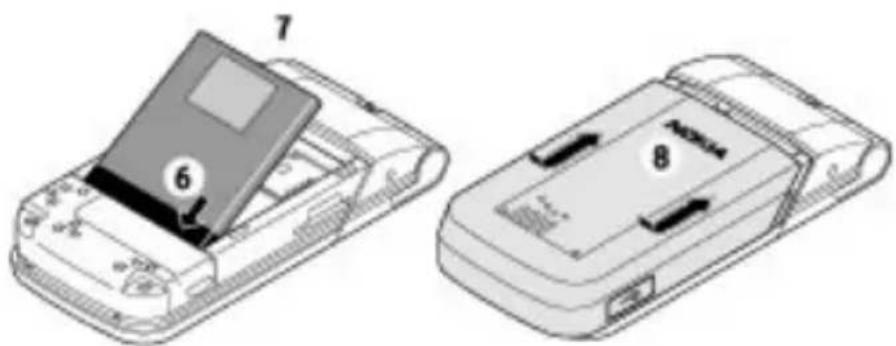
Observe the battery contacts (6), and insert the battery (7). Replace the back cover (8).
Insert a microSD card
Use only compatible microSD cards approved by Nokia for use with this device. Nokia uses approved industry standards for memory cards, but some brands may not be fully compatible with this device. Incompatible cards may damage the card and the device and corrupt data stored on the card.
Your phone supports microSD cards of up to 8 GB.
-
Remove the back cover.
-
Insert the card into the memory card slot with the contact surface facing down, and press until it locks into place.
-
Replace the back cover.
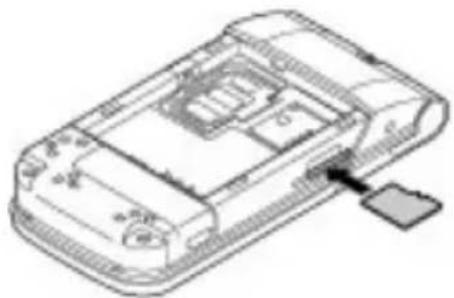
natural_image
Technical line drawing of a mobile phone casing with internal components and a USB cable (no text or symbols)Remove the memory card

Important: Do not remove the memory card in the middle of an operation when the card is being accessed. Removing the card in the middle of an operation may damage the memory card as well as the device, and data stored on the card may be corrupted.
You can remove or replace the memory card during phone operation without switching the device off.
- Ensure that no application is currently accessing the memory card.
- Remove the back cover.
- Press the memory card slightly in to release the lock, and remove it.
- Replace the back cover.
Change the covers

Note: Always switch off the power and disconnect the charger and any other device before removing the covers. Avoid touching electronic components while changing the covers. Always store and use the device with the covers attached.
Remove covers
Slide the cover until it unlocks, and remove it.
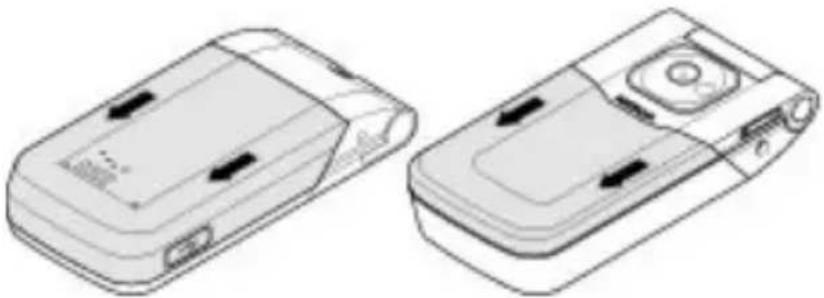
natural_image
Technical line drawing of two views of a mobile phone casing (no text or symbols)Replace covers
Place the cover on the device, and slide it until it locks.
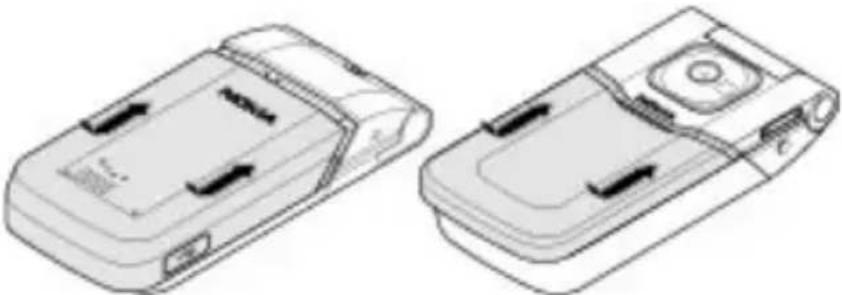
natural_image
Technical line drawing of two views of a mobile phone casing (no text or symbols)Charge the battery
Your battery has been precharged, but the charging levels may vary.
- Connect the charger to a wall outlet.
- Connect the charger to the device. During charging, the reminder light flashes up about every 30 seconds.
- When the battery is fully charged, disconnect the charger from the device, then from the wall outlet.
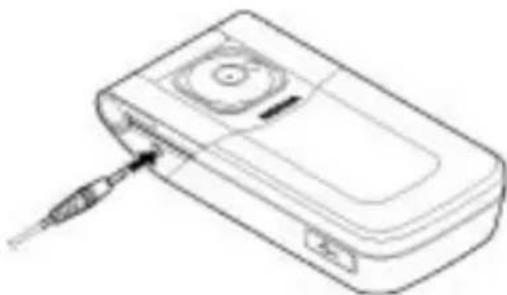
natural_image
Line drawing of a handheld electronic device with a cable inserted (no text or symbols)If the battery is completely discharged, it may take
a few minutes before the charging indicator appears on the display or before any calls can be made.
The charging time depends on the charger used. Charging a BL-5BT battery with the AC-3 charger takes approximately 2 hours 40 minutes while the phone is in the standby mode.
Antenna
Your device may have internal and external antennas. As with any radio transmitting device, avoid touching the antenna area unnecessarily while the antenna is transmitting or receiving. Contact with such an antenna affects the communication quality and may cause the device to operate at a higher power level than otherwise needed and may reduce the battery life.
The figure shows the antenna area marked in grey.
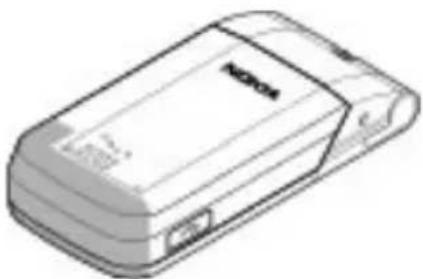
natural_image
Line drawing of a mobile phone with visible brand logo and ports (no text or symbols beyond branding)Connect a USB cable
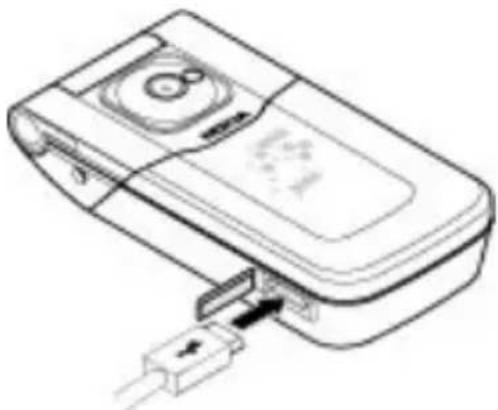
Open the cover of the USB connector, and connect the USB cable to the device.
natural_image
Line drawing of a mobile phone with cable and connector (no text or symbols)Headset

Warning: Listen to music at a moderate level. Continuous exposure to high the may damage your hearing. Do not hold the device near your ear when the speaker is in use, because the volume may be extremely loud.

Warning: When you use the headset, your ability to hear outside sounds it is affected. Do not use the headset where it can endanger your safety.
When connecting any external device or any headset, other than those approved by Nokia for use with this device, to the Nokia AV Connector, pay special attention to volume levels.
Do not connect products that create an output signal as this may cause damage to the device. Do not connect any voltage source to the Nokia AV Connector.
Strap
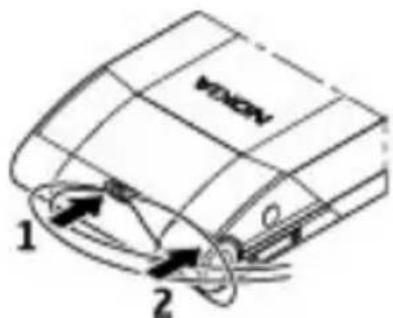
Thread a strap as shown in the picture and tighten it.
Keys and parts
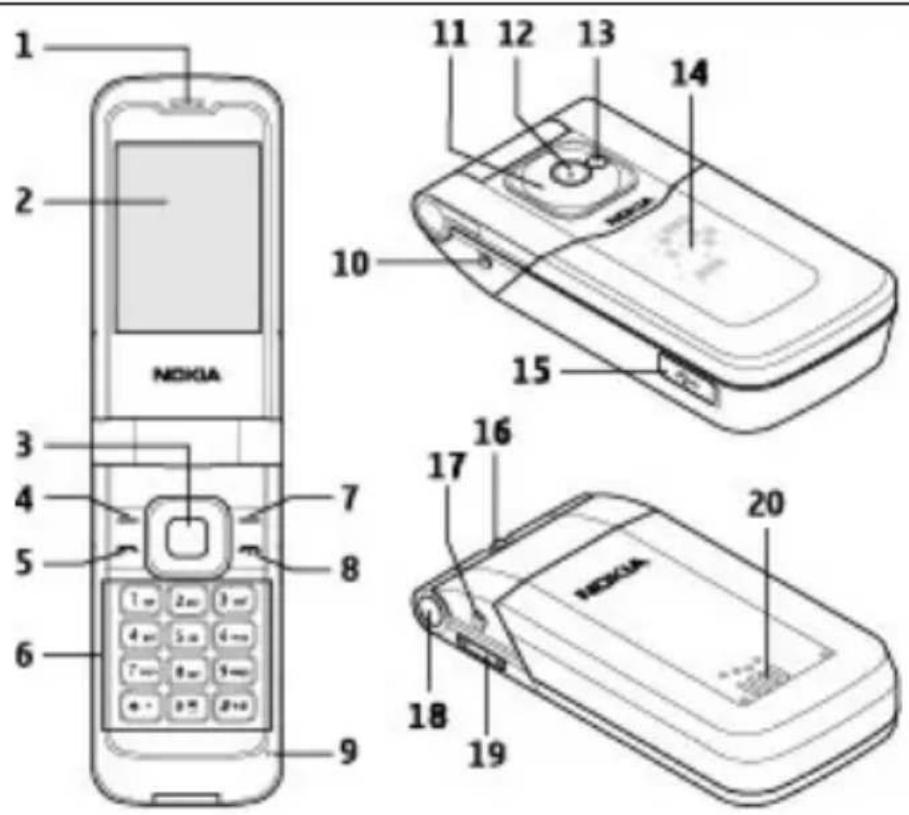
| 1 Earpiece 2 Display | ||
| 3 NaviTM key; hereafter referred to as scroll key | 4 Left | selection key |
| 5 Call key 6 Keypad | ||
| 7 Right selection key 8 Power/End key | ||
| 9 Microphone 10 Charger connector | ||
| 11 Reminder light 12 Camera lens | ||
| 13 Camera flash 14 Hidden cover display | ||
| 15 Mini USB cable connector | 16 | Wrist strap eyelet |
| 17 | Nokia AV Connector (2.5 mm) | 18 | Fold release button |
| 19 Volume keys 20 Loudspeaker | |||
Switch the phone on and off
To switch the phone on or off, press and hold the power key.
If the phone prompts for a PIN code, enter the code (displayed as ****).
If the phone prompts you for the time and date, enter the local time, select the time zone of your location in terms of the time difference with respect to Greenwich Mean Time (GMT), and enter the date. See "Date and time," p. 46.
When you switch on your phone for the first time, you may be prompted to get the configuration settings from your service provider (network service). For more information, refer to Connect to support. See "Configuration", p. 49, and "Configuration setting service", p. 10.
Navigate the menus
The phone offers you an extensive range of functions that are grouped into menus.
- To access the menu, select Menu.
- Scroll through the menu, and select an option (for example, Settings).
- If the selected menu contains further submenus, select one (for example, Call).
- If the selected menu contains further submenus, repeat step 3.
- Select the setting of your choice.
- To return to the previous menu level, select Back.
To exit the menu, select Exit.
To change the menu view, select Options > Main menu view. Scroll right, and select from the available options.
To rearrange the menu, select Options > Organize. Scroll to the menu item to be moved, and select Move. Scroll to where you want to move the menu item, and select OK. To save the change, select Done > Yes.
Standby mode
When the phone is ready for use, and you have not entered any characters, the phone is in the standby mode.
Display
| 1 | Signal strength of the cellular network ,or the UMA network。 | 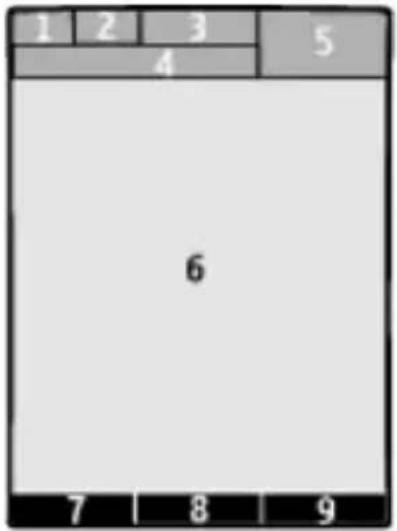 |
| 2 | Battery charge status | |
| 3 Indicators | ||
| 4 Name of the network or the operator logo | ||
| 5 Clock | ||
| 6 Display | ||
| 7 Function of the left selection key | ||
| 8 Function of the Navi key | ||
| 9 Function of the right selection key | ||
You may change the function of the left and right selection key. See "Left selection key," p. 46.
Home screen
The home screen mode displays a list of selected phone features and information that you can directly access.
To activate or deactivate the home screen mode, select Menu > Settings > Display > Home screen > Home screen mode.
To organize and change the home screen mode, select Menu > Settings > Display > Home screen > Personalize view and from the available options.
To select the key that is used to activate the home screen mode, select Menu > Settings > Display > Home screen > Home screen key and from the available options.
Depending on the setting, in the home screen mode, scroll up or down to navigate in the list, and select Select, View, or Edit. The arrows indicate that further information is available. To stop navigation, select Exit.
Shortcuts in the standby mode
To access a list of numbers you have dialed, press the call key once. To call a number from the list, scroll to the number or name, and press the call key.
To open the web browser, press and hold 0.
To call your voice mailbox, press and hold 1.
You can use keys as shortcuts. See "Dialing shortcuts," p. 25.
Indicators
You have unread messages.
You have unsent, canceled, or failed messages.
You have missed calls.
The keypad is locked.
The phone does not ring for incoming calls or text messages.
An alarm is set.
G/E The phone is registered to the GPRS or EGPRS network.
G/E The phone has an open GPRS or EGPRS connection.
The GPRS or EGPRS connection is suspended (on hold).
* Bluetooth connectivity is turned on.
Wireless LAN connectivity is turned on.
/ A wireless connection or a UMA connection is active.
2 If you have two phone lines, the second phone line is selected.
All incoming calls are forwarded to another number.
Calls are limited to a closed user group.
The currently active profile is timed.
Vibrating alert is on.
Flight mode
Use the flight mode in radio sensitive environments—on board aircraft or in hospitals—to deactivate all radio frequency functions. You still have access to offline games, the calendar, and phone numbers. When the flight mode is active,→ is displayed.
To activate or set up the flight mode, select Menu > Settings > Profiles > Flight > Activate or Customize.
To deactivate the flight mode, select any other profile.
Make an emergency call in flight mode
Enter the emergency number, press the call key, and when Exit flight profile? is displayed, select Yes.

Warning: With the flight profile you cannot make or receive any calls,
including emergency calls, or use other features that require network coverage. To make calls, you must first activate the phone function by changing profiles. If the device has been locked, enter the lock code. If you need to make an emergency call while the device is locked and in the flight profile, you may be also able to enter an official emergency number programmed in your device in the lock code field and select 'Call'. The device will confirm that you are about to exit flight profile to start an emergency call.
Keypad lock
To lock the keypad to prevent accidental keypresses, select Menu, and press * within 3.5 seconds.
To unlock the keypad, select Unlock, and press * within 1.5 seconds. If requested, enter the lock code.
To answer a call when the keypad is locked, press the call key. When you end or decline the call, the keypad locks automatically.
Further features are Automatic keyguard and Security keyguard. See "Phone," p. 48.
When the device or keypad is locked, calls may be possible to the official emergency number programmed into your device.
Functions without a SIM card
Some functions of your phone may be used without inserting a SIM card, such as Organizer functions and games. Some functions appear dimmed in the menus and cannot be used.
3. Calls
You can make and receive phone calls using a mobile network or a wireless fidelity (Wi-Fi) wireless local area network (WLAN). Wi-Fi is used for voice calls over the internet. See "Wi-Fi/WLAN connection," p. 42.
Make a call
You can make a call in several ways:
- Enter the phone number, including the area code, and press the call key.
For international calls, press * twice for the international prefix (the + character replaces the international access code), enter the country code, the area code without the leading 0, if necessary, and the phone number. - To access the list of dialed numbers, press the call key once in the standby mode. Select a number or name, and press the call key.
- Search for a name or phone number that you saved in Contacts. See "Manage contacts," p. 37.
To adjust the volume in a call, press the volume key up or down.
Answer and end a call
To answer an incoming call, open the fold and press the call key. To end the call, press the end key, or close the fold.
To decline an incoming call, press the end key. To mute the ringing tone, select Silence.
To answer a call just by opening the fold, select Menu > Settings > Call > Answ. if fold opened > On.
Dialing shortcuts
First assign a phone number to one of the number keys, 2 to 9. See "Assign dialing shortcuts," p. 39.
Use a dialing shortcut to make a call in one of the following ways:
- Press a number key, then the call key.
- If Menu > Settings > Call > 1-touch dialing > On is selected, press and hold a number key.
Voice dialing
Make a phone call by saying the name that is saved in People.
As voice commands are language-dependent, before voice dialing you must select Menu > Settings > Phone > Language settings > Phone language and your language.

Note: Using voice tags may be difficult in a noisy environment or during an ency, so you should not rely solely upon voice dialing in all circumstances.
- In the home screen mode, press and hold the right selection key. A short tone sounds, and Speak now is displayed.
- Say the name of the contact you want to dial. If the voice recognition is successful, a list of proposed matches is displayed. The phone plays the voice command of the first match on the list. If it is not the correct command, scroll to another entry.
Options during a call
Many of the options that you can use during a call are network services. For availability, contact your service provider.
During a call, select Options. The available options may include the following:
Call options are Mute or Unmute, Phonebook, Menu, Lock keypad, Record, Voice clarity, Loudspeaker or Handset.
Network options are Answer or Decline, Hold or Resume, New call, Add to conference, End call, End all calls, and the following:
- Touch tones — to send tone strings
- Swap — to switch between the active call and the call on hold
- Transfer calls — to connect a call on hold to an active call and disconnect yourself
• Conference — to make a conference call - Private call — to have a private discussion in a conference call

Warning: Do not hold the device near your ear when the loudspeaker is in because the volume may be extremely loud.
4. Write text
Text modes
To enter text (for example, when writing messages) you can use traditional or predictive text input.
When you write text, press and hold Options to switch between traditional text input, indicated by , and predictive text input, indicated by . Not all languages are supported by predictive text input.
The character cases are indicated by Abc, and. ABC
To change the character case, press #. To change from the letter to number mode, indicated by 123, press and hold #, and select Number mode. To change from the number to the letter mode, press and hold #.
To set the writing language, select Options > Writing language.
Traditional text input
Press a number key, 2-9, repeatedly until the desired character appears. The available characters depend on the selected writing language.
If the next letter you want is located on the same key as the present one, wait until the cursor appears, and enter the letter.
To access the most common punctuation marks and special characters, press 1 repeatedly. To access the list of special characters, press *.
Predictive text input
Predictive text input is based on a built-in dictionary to which you can also add new words.
- Start writing a word, using the keys 2 to 9. Press each key only once for one letter.
-
To confirm a word, scroll right or add a space.
-
If the word is not correct, press * repeatedly, and select the word from the list.
- If the ? character is displayed after the word, the word you intended to write is not in the dictionary. To add the word to the dictionary, select Spell. Enter the word using traditional text input, and select Save.
-
To write compound words, enter the first part of the word, and scroll right to confirm it. Write the last part of the word, and confirm the word.
-
Start writing the next word.
5. Messaging
Create and receive text and pictures messages and voice notes with your device. The messaging services can only be used if your network or service provider supports them.
Text and picture messages
You can create a message and optionally attach, for example, a picture. Your phone automatically changes a text message to a picture message when a file is attached.
Text messages
Your device supports text messages beyond the limit for a single message. Longer messages are sent as two or more messages. Your service provider may charge accordingly. Characters with accents or other marks, and characters from some language options, take up more space, and limit the number of characters that can be sent in a single message.
An indicator at the top of the display shows the total number of characters left and the number of messages needed for sending.
Before you can send any text or SMS e-mail messages, you must save your message center number. Select Menu > Messaging > Message settings > Text messages > Message centers > Add center, enter a name, and the number from the service provider.
Picture messages
A picture message can contain text, pictures, and sound or video clips.
Only devices that have compatible features can receive and display multimedia messages. The appearance of a message may vary depending on the receiving device.
The wireless network may limit the size of MMS messages. If the inserted picture exceeds this limit the device may make it smaller so that it can be sent by MMS.

Important: Exercise caution when opening messages. Messages may contain malicious software or otherwise be harmful to your device or PC.
For availability and subscription to the multimedia messaging service (MMS), contact your service provider. You may also download the configuration settings. See "Nokia support," p. 12.
Create a text or picture message
- Select Menu > Messaging > Create message > Message.
- To add recipients, scroll to the To: field, and enter the recipient's number or e-mail address, or select Add to select recipients from the available options. Select Options to add recipients and subjects and to set sending options.
- Scroll to the Text: field, and enter the message text.
- To attach content to the message, scroll to the attachment bar at the bottom of the display, and select the desired type of content.
- To send the message, select Send.
The message type is indicated at the top of the display and changes automatically depending on the content of the message.
Service providers may charge differently depending on the message type. For details, contact your service provider.
Read a message and reply

Important: Exercise caution when opening messages. Messages may in malicious software or otherwise be harmful to your device or PC.
Your phone issues a notification when you receive a message. Select View to display the message. If more than one message was received, to display a message, select the message from the Inbox and Open. Use the scroll key to view all parts of the message.
To create an answer message, select Reply.
Send messages Message sending
To send the message, select Send. The phone saves the message in the Outbox folder, and the sending starts.

Note: The message sent icon or text on your device screen does not indicate the message is received at the intended destination.
If message sending is interrupted, the phone tries to resend the message a few times. If these attempts fail, the message remains in the Outbox folder. To cancel the sending of the messages in the Outbox folder, select Options > Cancel sending.
To save the sent messages in the Sent items folder, select Menu > Messaging > Message settings > General settings > Save sent messages.
Organize your messages
The phone saves received messages in the Inbox folder. Organize your messages in the saved items folder.
To add, rename, or delete a folder, select Menu > Messaging > Saved items > Options.
E-mail application
If you have an e-mail account with one of the e-mail service providers supported by your wireless network operator, you can use the E-mail application to access it. You can view your Inbox folder, receive notification of new e-mail, and compose, send, receive, and delete e-mail. The E-mail application is different from the SMS and MMS e-mail function.
If you do not already have an e-mail account, you can register for one on the website of one of the supported e-mail service providers. For the costs of sending and receiving e-mail messages, contact your wireless network operator.
Start E-mail
-
Select Menu > Messaging > E-mail. Select the provider with which you have an e-mail account.
-
Read and accept the terms of use, if applicable. Enter your user name and password. The password is case sensitive.
-
If you wish to stay signed in or receive notification of new e-mail, scroll to the desired option, and select Mark. The setting only applies to the current e-mail account in the E-mail application.
View the Inbox and other folders
The Inbox view shows the first page of the Inbox folder. To go to the next page of the Inbox folder, select Next page.
To navigate from the Inbox folder to another folder, scroll right or left to the desired folder. The first page of that folder loads automatically. To update the content again, select Options > Refresh.
To view additional details of an e-mail, select the e-mail.
Write and send an e-mail
- To write an e-mail, in the Inbox folder, select Options > Create.
- Enter the recipient's e-mail address, a subject, and the e-mail message. To select from a list of recent e-mail addresses, select Insert.
- To send the e-mail, select Send.
Read an e-mail and reply

Important: Exercise caution when opening messages. Messages may
contain malicious software or otherwise be harmful to your device or PC.
- When viewing an e-mail, select Options > Reply, Reply to all, or Forward. The e-mail view opens with the appropriate fields completed.
- Enter the necessary remaining information.
- To send the e-mail, select Send.
Delete an e-mail
To delete an e-mail message from the Inbox folder, scroll to the message, and select Options > Delete.
To delete an e-mail message you are viewing, select Options > Delete.
© 2008 Nokia. All rights reserved. 31
To mark multiple e-mail messages for deletion, scroll to each message, and select Options > Delete Multiple. When you have marked the relevant messages, select Options > Delete marked.
E-mail settings
In the Inbox folder, select Options > Email Settings and from the following:
- Folder display — to sort e-mail messages in the Inbox folder by the sender's address or the subject
- Delete Confirmation — to be asked to confirm message deletion
- Message AutoExpand — to automatically expand e-mail messages when highlighted
To apply the changes, select Save. These settings are applied to all of your e-mail accounts.
Voice notes
Create and send a voice note using MMS in a convenient way.
- Select Menu > Messaging > Create message > Voice notes. The voice recorder opens.
- Record your message. See "Voice recorder," p. 58.
- Enter one or more phone numbers in the To: field, or select Add to retrieve a number.
- To send the message, select Send.
Instant Messaging
With instant messaging (IM) (network service) you can send short, simple text messages to other online users, as long as you all use the same IM service.

Note: Depending on your IM service provider, you may not have access to the features described in this guide and your menus may be different.
Before you can start using IM, you must first register with the IM service you want to use. While you are logged in and connected to the IM service, you can exit the IM application and use the other functions of the phone, and the IM session and conversations remain active in the background.
Register with an IM service
Register over the internet with the IM service provider you selected. During the registration process, you can create the unique ID and password of your choice. For more information about signing up for IM services, contact your wireless service provider or an IM service provider.
Log in
Select Menu > Messaging > Instant Messagi... and the IM service. Enter your unique ID and password, and select Sign on. The menus may vary depending on your IM service provider.
Begin an IM session
You can send instant messages to anyone if you have the person's unique ID and you use the same IM service.
To begin an IM session:
- Select a contact who is online from your contacts list. Some IM service providers also allow sending instant messages to contacts who are not online.
To send a message to a person who is not in your contacts list, select Options, the option to send a message, and enter the unique ID of the person.
A conversation menu is displayed, with the contact's name displayed at the top. - Enter a message and select Send.
Receive and reply to messages
When you receive an instant message during an active IM conversation, the new message notification sound plays, and the message appears in the conversation. As the conversation progresses, the most recent message appears at the bottom of the
display, causing the previous messages to move up if the display is full. To reply, enter your message and select Send.
If you receive an instant message when you have the IM application open, but do not have an active conversation open, the new message notification sound plays, and a new IM icon is displayed next to the name of the message sender under the conversations section of the contacts list.
If you receive an instant message when you are logged in to the IM service but do not have the IM application open, a message is displayed to tell you, that a new IM message was received. Select Start to open the IM application and view the new message.
Return to chat session
From the IM contacts list, select Conversations. This list displays all IM conversations and group chats in which you are currently participating. To view a conversation or continue chatting, select a group name or contact name.
Contacts
You can add the names of contacts with whom you interact frequently by IM to the contacts list.
To add a contact to the contacts list, select Options > Add a contact, depending on your IM service provider. Enter the contact's unique ID for the IM service, and select OK.
To remove a contact from the contacts list, select the contact you want to remove and Options > Delete contact, depending on your IM service provider, and select OK.
Conversation options
You can save an open conversation to be available for viewing, even after you end the conversation.
To save a conversation, while you have it open, select Options > Save, edit the name, if you want, and select Save. To manage saved conversations from the contacts list, select Options > Saved conversations, and scroll to the desired
conversation name. To view the conversation, select Open. To rename the conversation, select Options > Rename. To delete a conversation, select Options > Delete > OK.
Set your availability
You can determine if other users can tell whether you are available or not.
From the contacts list, highlight your name at the top of the menu, and select Options > My status > Available, Away, or Invisible, depending on your IM service provider.
Exit the IM application
From the contacts list, you can exit the IM application but still be connected to the IM service.
Select Exit, confirm the selection, and select Exit again. If you open IM again, you do not need to log in again.
You can receive instant messages from your contacts when using your phone for other purposes.
If you are connected to your IM service, but you have not used your IM application for some time, you may be automatically disconnected from the IM service. The next time you open the IM application, you must log in again.
Log out of IM
To disconnect from the IM service, you must log out.
From the contacts list, select Options > Sign off, depending on your IM service provider, and select OK.
You are taken to the login screen of the IM service provider, where you can return to the IM service provider selection list, exit the IM application, or select an IM service and log in again.
Info messages, SIM messages, and service commands
Info messages
You can receive messages on various topics from your service provider (network service). For more information, contact your service provider.
Select Menu > Messaging > Info messages and from the available options.
Service commands
Service commands allow you to write and send service requests (USSD commands) to your service provider, such as activation commands for network services.
To write and send the service request, select Menu > Messaging > Serv. commands. For details, contact your service provider.
SIM messages
SIM messages are specific text messages that are saved to your SIM card. You can copy or move those messages from the SIM to the phone memory, but not vice versa.
To read SIM messages, select Menu > Messaging > Options > SIM messages.
Voice mail
The voice mailbox is a network service to which you may need to subscribe. For more information, contact your service provider.
To call your voice mailbox, press and hold 1.
To edit your voice mailbox number, select Menu > Messaging > Voice mail > Voice mailbox no..
Message settings
Select Menu > Messaging > Message settings and from the following:
- General settings — to save copies of sent messages in your phone, to overwrite old messages if the message memory becomes full, and to set up other preferences related to messages
- Text messages — to allow delivery reports, to set up message centers for SMS and SMS e-mail, to select the type of character support, and to set up other preferences related to text messages
- Picture messages — to allow delivery reports, to set up the appearance of picture messages, to allow the reception of picture messages and advertisements, and to set up other preferences related to picture messages
- Service messages — to activate service messages and to set up preferences related to service messages
6. People
You can save names, phone numbers as contacts in the phone memory and on the SIM card memory and search and recall them to make a phone call or to send a message.
Manage contacts
Select the memory for contacts
The phone memory can save contacts with additional details, such as various phone numbers and text items. You can also save an image, a tone, or a video clip for a limited number of contacts.
The SIM card memory can save names with one phone number attached to them. The contacts saved in the SIM card memory are indicated by ☐.
Select Menu > People > Settings > Memory in use. When you select Phone and SIM, contacts will be saved in the phone memory.
Save names and numbers
To save a name and phone number, select Menu > People > Add new.
The first number you save is automatically set as the default number and is indicated with a frame around the number type indicator (for example, 📷). When you select a name from contacts (for example, to make a call), the default number is used unless you select another number.
Search for a contact
Select Menu > People > Phonebook, and scroll through the list of contacts, or enter the first characters of the contact's name.
Add and edit details
To add or change a detail to a contact, select the contact and Details > Options > Add detail and from the available options.
Copy or move contacts
- Select the first contact to copy or move and Options > Mark.
- Mark the other contacts, and select Options > Copy marked or Move marked.
Copy or move all contacts
Select Menu > People > Copy contacts or Move contacts.
Delete contacts
Select the contact and Options > Delete contact.
To delete all the contacts, select Menu > People > Del. all contacts > From phone memory or From SIM card.
To delete a number, text item, or an image attached to the contact, search for the contact, and select Details. Scroll to the desired detail, select Options > Delete and from the available options.
Create a contact group
Arrange contacts into caller groups with different ringing tones and group images.
- Select Menu > People > Groups.
- To create a new group, select Add or Options > Add new group.
- Enter the group name, select an image and a ringing tone if you want to add them to the group, and select Save.
- Select the group and View > Add to add contacts to the group.
Business cards
You can send and receive a person's contact information from a compatible device that supports the vCard standard.
To send a business card, search for the contact, and select Details > Options > Send business card.
When you receive a business card, select Show > Save to save the business card in the phone memory.
Assign dialing shortcuts
Create shortcuts by assigning phone numbers to the number keys 2-9.
- Select Menu > People > 1-touch dialing, and scroll to a number key.
- Select Assign, or, if a number has already been assigned to the key, select Options > Change.
- Enter a number or search for a contact.
7. Call History
To view the information on your calls, messages, data, and synchronization, select Menu > Call History and the desired item.

Note: The actual invoice for calls and services from your service provider ary, depending on network features, rounding off for billing, taxes, and so
8. Connectivity
Your phone provides several features to connect to other devices to transmit and receive data.
Bluetooth wireless technology
Bluetooth technology allows you to connect your phone, using radio waves, to a compatible Bluetooth device within 10 meters (32 feet).
This device is compliant with Bluetooth Specification 2.1 + EDR supporting the following profiles: SIM access, object push, file transfer, dial-up networking, headset, handsfree, generic access, serial port, generic object exchange, advanced audio distribution, audio video remote control, and generic audio/video distribution. To ensure interoperability between other devices supporting Bluetooth technology, use Nokia approved accessories for this model. Check with the manufacturers of other devices to determine their compatibility with this device.
Features using Bluetooth technology increase the demand on battery power and reduce the battery life.
Set up a Bluetooth connection
Select Menu > Settings > Connectivity > Bluetooth and take the following steps:
- Select My phone's name and enter a name for your phone.
- To activate Bluetooth connectivity, select Bluetooth > On. ✝ indicates that Bluetooth connectivity is active.
- To connect your phone to an audio accessory, select Conn. to audio acc. and the device to which you want to connect.
- To pair your phone with any Bluetooth device in range, select Paired devices > Add new device.
Scroll to a found device, and select Add.
Enter a passcode (up to 16 characters) on your phone and allow the connection on the other Bluetooth device.
If you are concerned about security, turn off the Bluetooth function, or set My phone's visibility to Hidden. Accept Bluetooth communication only from those you trust.
PC connection to the internet
Use Bluetooth technology to connect your compatible PC to the internet without PC Suite software. Your phone must have activated a service provider that supports internet access, and your PC must support Bluetooth technology. After connecting to the network access point (NAP) service of the phone, and pairing with your PC, your phone automatically opens a packet data connection to the internet.
Packet data
General packet radio service (GPRS) is a network service that allows mobile phones to send and receive data over an internet protocol (IP)-based network.
To define how to use the service, select Menu > Settings > Connectivity > Packet data > Packet data conn. and from the following options:
- When needed — to set the packet data connection to established when required by an application. The connection will be cut when the application is closed.
- Always online — to automatically connect to a packet data network when you switch the phone on
You can use your phone as a modem by connecting it to a compatible PC using Bluetooth technology or a USB data cable. For details, see Nokia PC Suite documentation. See "Nokia support," p. 12.
USB data cable
You can use the USB data cable to transfer data between the phone and a compatible PC.
To activate the phone for data transfer, connect the data cable, and select the mode:
- Ask on conn. — to set your phone to ask whether the connection should be established
• PC Suite — to use the cable for PC Suite - Music sync — to synchronize your phone with the music files on your compatible PC
- Data storage — to connect to a PC that does not have Nokia software and use the phone as data storage
To change the USB mode, select Menu > Settings > Connectivity > USB data cable and the desired USB mode.
Nokia PC Suite
With Nokia PC Suite, you can manage your music, synchronize contacts, calendar, notes, and to-do notes between your phone and a compatible PC or a remote internet server (network service). You may find more information and PC Suite on the Nokia website. See "Nokia support," p. 12.
9. Settings
Wi-Fi/WLAN connection
Your phone can detect and connect to a wireless LAN (WLAN or Wi-Fi) to connect to the internet and to enable voice calls over the internet.
About Wi-Fi/WLAN
To use this service, you must obtain an unlicensed mobile access (UMA) subscription from your service provider. The correct settings may already be configured in your phone. For more information, contact your service provider.
The Wi-Fi/WLAN function allows a seamless hand-off of mobile voice and data from the mobile phone network to a WLAN according to the Wi-Fi specification. When your phone is connected to a WLAN access point and you move out of range of this access point, the roaming function tries to automatically connect your phone to another access point belonging to the same network. If the WLAN connection is lost, your phone connects automatically to the mobile phone network.
Turn the Wi-Fi/WLAN function on or off
Select Menu > Settings > Wi-Fi > Wi-Fi > On or Off.
Quick connection
Connect in a convenient way to any available non-key requiring WLAN with the best signal strength. Connections are attempted in the order of signal strength only to networks that have not been saved.
Select Menu > Settings > Wi-Fi > Quick Connect and follow the instructions on the display.
Find, save, and connect to networks
Display a list of locally available networks, connect to or save a network, or search for a hidden network.
Display available networks
Select Menu > Settings > Wi-Fi > Available networks.

indicates the network is connected

indicates the signal strength

indicates a secured network. To connect, you need the corresponding access

indicates a saved network
To update the list, select Options > Refresh.
To see the encryption type and other details of a network, scroll to a network and select Options > View details.
Locate a hidden network
A hidden network can only be found by searching for its service set identifier (SSID).
Select Options > Hidden networks, enter the SSID of the network, and select OK. When you save the hidden network, it will appear in the list of available networks without searching again.
Connect to a network
Scroll to an available network, and select Connect. A successful connection to an UMA network is indicated by ○ (green).
If you attempt to connect without a valid UMA subscription, the message Contact your service provider is displayed.
Save a network
When you connect to a network, you are asked to save it.
To save a network, scroll to the network in the list of available networks, and select Options > Save.
Saved networks
Display, manage, connect to, and prioritize your saved networks.
Select Menu > Settings > Wi-Fi > Saved networks.
The networks are listed in order of priority. The network with the highest priority is the first one to which an automatic connection attempt is made.
To connect manually, scroll to a network, and select Connect.
Manage saved networks
Scroll to a network, select Options and from the following:
- Conn. setting — to set automatic or manual connection to the network when it becomes available
- Rename — to rename the network
- Forward settings — to forward the settings of the saved network. Enter a security code (preset code 12345), and the phone number, and select Send.
- Edit settings — to set the access data of a network
- Delete — to delete the selected network
- Add new network — to add a new network and set its access data manually
- Organize priority — to move a saved network in the order of priority
Profiles
Your phone has various setting groups called profiles, which you can customize with ringing tones for different events and environments.
Select Menu > Settings > Profiles, the desired profile, and from the following options:
- Activate — to activate the selected profile
- Customize — to change the profile settings
- Timed — to set the profile to be active for a certain time. When the time set for the profile expires, the previous profile that was not timed becomes active.
Themes
A theme contains elements for customizing your phone.
Select Menu > Settings > Themes and from the following options:
- Select theme — Open the Themes folder, and select a theme.
- Theme downloads — Open a list of links to download more themes.
Tones
You can change the tone settings of the selected active profile.
Select Menu > Settings > Tones. You can find the same settings in the Profiles menu.
If you select the highest ringing tone level, the ringing tone reaches its highest level after a few seconds.
Display
Select Menu > Settings > Display and from the following:
- Wallpaper — to add a background image for the home screen mode
• Home screen — to activate, organize, and personalize the home screen mode - Home screen font col. — to select the font color for the home screen mode
- Navigation key icons — to display the scroll key icons in the home screen mode
- Notification details — to display details in missed call and message notifications
- Fold animation — to display an animation when you open or close the fold
- Font size — to set the font size for messaging, contacts, and web pages
• Operator logo — to display the operator logo
Lights
To activate or deactivate light effects associated with different phone functions, select Menu > Settings > Lights.
Date and time
To change the clock type, time, time zone, or date, select Menu > Settings > Date and time.
When traveling to a different time zone, select Menu > Settings > Date and time > Date & time settings > Time zone:, and scroll left or right to select the time zone of your location. The time and date are set according to the time zone and enable your phone to display the correct sending time of received text or picture messages.
For example, GMT -5 denotes the time zone for New York (USA), 5 hours west of Greenwich, London (UK).
My shortcuts
With personal shortcuts you get quick access to frequently used phone functions.
Left selection key
To change the function assigned to the left selection key, select Menu > Settings > My shortcuts > Left selection key and the desired function.
In the home screen mode, if the left selection key is Go to, to activate a function, select Go to > Options and from the following:
- Select options — to add or remove a function
- Organize — to rearrange the functions
Other shortcuts
Select Menu > Settings > My shortcuts and from the following:
- Navigation key — to assign other functions from a predefined list to the navigation key (scroll key)
- Home screen key — to select the movement of the navigation key to activate the home screen mode
Synchronization and backup
Select Menu > Settings > Sync and backup and from the following:
- Phone switch — Synchronize or copy selected data between your phone and another phone using Bluetooth technology.
- Create backup — Create a backup of selected data.
- Restore backup — Select a stored backup file, and restore it to the phone. Select Options > Details for information about the selected backup file.
- Synchronization — Synchronize or copy selected data between your phone and another device, PC, or network server (network service).
Call
Select Menu > Settings > Call and from the following:
- Call forwarding — to forward your incoming calls (network service). You may not be able to forward your calls if some call restriction functions are active. See "Security," p. 51.
- Anykey answer — to answer an incoming call by briefly pressing any key, except the power key, the left and right selection keys, or the end key
- Automatic redial — to automatically redial the number if a call fails. The phone tries to call the number 10 times.
- Voice clarity — to enhance speech intelligibility, especially in noisy environments
- 1-touch dialing — to dial the names and phone numbers assigned to the number keys (2-9) by pressing and holding the corresponding number key
- Call waiting — to have the network notify you of an incoming call while you have a call in progress (network service)
- Call duration display — to display the duration of the call in progress
-
Summary after call — to briefly display the approximate duration after each call
-
Send my caller ID — to show your phone number to the person you are calling (network service). To use the setting agreed upon with your service provider, select Set by network.
- Outgoing call line — to select the phone line for making calls, if your SIM card supports multiple phone lines (network service)
- Answ. if fold opened — to answer or end a call by opening or closing the fold
Phone
Select Menu > Settings > Phone and from the following:
- Language settings — to set the language of your phone, select Phone language and a language. To set the language of your phone according to the information on the SIM card, select Phone language > Automatic.
• Memory status — to check the memory consumption - Automatic keyguard — to lock the keypad automatically after a preset time delay when the phone is in the home screen mode and no function has been used
• Security keyguard — to ask for the security code when you unlock the keyguard
• Voice recognition — See "Voice commands," p. 48. - Flight query — to be asked whether to use the flight mode when you switch the phone on. With the flight mode, all radio connections are switched off.
- Phone updates — to receive software updates from your service provider (network service). This option may not be available, depending on your phone. See "Software updates over the air," p. 50.
- Operator selection — to set a cellular network available in your area
- Help text activation — to select whether the phone shows help texts
- Start-up tone — to play a tone when you switch the phone on
- Switch off tone — to play a tone when you switch the phone off
- Fold close handling — to select the behavior of the phone when the fold is closed
- Confirm SIM actions — (network service) See "SIM services," p. 65.
Voice commands
Call contacts and use your phone by speaking a voice command.
Voice commands are language-dependent. To set the language, select Menu > Settings > Phone > Language settings > Phone language and your language.
To train the voice recognition of your phone to your voice, select Menu > Settings > Phone > Voice recognition > Voice recog. training.
To activate a voice command for a function, select Menu > Settings > Phone > Voice recognition > Voice commands, a feature, and the function. 📍 indicates that the voice command is activated.
To activate the voice command, select Add. To play the activated voice command, select Play.
To use voice commands, see "Voice dialing", p. 25.
To manage the voice commands, scroll to a function, and select Options and from the following:
- Edit or Remove — to rename or deactivate the voice command
- Add all or Remove all — to activate or deactivate voice commands for all functions in the voice commands list
Accessories
This menu and its various options are shown only if the phone is or has been connected to a compatible mobile accessory.
Select Menu > Settings > Accessories. Select an accessory, and an option depending on the accessory.
Hearing aid
If your phone is provided with a hearing aid coil, select Hearing aid > T-coil hrng. aid mode > On to optimize the sound quality when using a T-coil hearing aid. is shown when T-coil hrng. aid mode is active.
Configuration
You can configure your phone with settings that are required for certain services. Your service provider may also send you these settings. See "Configuration setting service," p. 10.
Select Menu > Settings > Configuration and from the following options:
- Default config. sett. — to view the service providers saved in the phone and set a default service provider
- Act. def. in all apps. — to activate the default configuration settings for supported applications
• Preferred access pt. — to view the saved access points - Connect to support — to download the configuration settings from your service provider
- Device manager sett. — to allow or prevent the phone from receiving software updates. This option may not be available, depending on your phone. See "Software updates over the air," p. 50.
- Personal config. sett. — to manually add new personal accounts for various services and to activate or delete them. To add a new personal account, select Add new, or Options > Add new. Select the service type, and enter the required parameters. To activate a personal account, scroll to it, and select Options > Activate.
Software updates over the air
Your service provider may send phone software updates over the air directly to your phone (network service). This option may not be available, depending on your phone.
Downloading software updates may involve the transmission of large amounts of data through your service provider's network. Contact your service provider for information about data transmission charges.
Make sure that the device battery has enough power, or connect the charger before starting the update.

Warning: If you install a software update, you cannot use the device, even to make emergency calls, until the installation is completed and the device is restarted. Be sure to back up data before accepting installation of an update.
Software update settings
This option may not be available, depending on your phone.
To allow or disallow software and configuration updates, select Menu > Settings > Configuration > Device manager sett. > Serv. softw. updates.
Request a software update
- Select Menu > Settings > Phone > Phone updates to request available software updates from your service provider.
- Select Current softw. details to display the current software version and check whether an update is needed.
- Select Install softw. update to download and install a phone software update (if an update is available).
The software update may take several minutes. If there are problems with the installation, contact your service provider.
Security
When security features that restrict calls are in use (such as call restriction, closed user group, and fixed dialing), calls may be possible to the official emergency number programmed into your device.
Select Menu > Settings > Security and from the following:
- PIN code request or UPIN code request — to request for your PIN or UPIN code every time the phone is switched on. Some SIM cards do not allow the code request to be turned off.
- Call restrictions — to restrict incoming calls to and outgoing calls from your phone (network service). A restriction password is required.
- Fixed dialing — to restrict your outgoing calls to selected phone numbers if supported by your SIM card. When the fixed dialing is on, GPRS connections are not possible except while sending text messages over a GPRS connection. In this case, the recipient's phone number and the message center number must be included in the fixed dialing list.
- Closed user group — to specify a group of people whom you can call and who can call you (network service)
- Security level — to request the security code whenever a new SIM card is inserted into the phone, select Phone. To request the security code when the
SIM card memory is selected, and you want to change the memory in use, select Memory.
- Access codes — to change the security code, PIN code, UPIN code, PIN2 code, or restriction password
- PIN2 code request — to select whether the PIN2 code is required when using a specific phone feature which is protected by the PIN2 code. Some SIM cards do not allow the code request to be turned off.
• Code in use — to select the type of PIN code - Authority certificates or User certificates — to view the list of the authority or user certificates downloaded into your phone. See "Browser security," p. 64.
- Security module sett. — to view Secur. module details, activate Module PIN request, or change the module PIN and signing PIN. See "Access codes," p. 9.
Restore factory settings
To restore the phone back to factory conditions, select Menu > Settings > Rest. factory sett. and from the following options:
- Restore settings only — to reset all preference settings without deleting any personal data
- Restore all — to reset all preference settings and delete all personal data, such as contacts, messages, media files, and activation keys
10. Gallery
Manage images, video clips, music files, themes, graphics, tones, recordings, and received files. These files are stored in the phone memory or on a memory card and may be arranged in folders.
Folders and files
- To view the list of folders, select Menu > Media > Gallery.
-
To view the list of files in a folder, select a folder and Open.
-
To view the folders of the memory card when moving a file, scroll to the memory card, and press the scroll key right.
Print images
Your phone supports Nokia XpressPrint to print images that are in the jpeg format.
-
To connect your phone to a compatible printer, use a data cable or send the image by Bluetooth to a printer supporting Bluetooth technology. See "Bluetooth wireless technology," p. 40.
-
Select the image you want to print and Options > Print.
Memory card
Use a memory card to store your multimedia files, such as video clips, music tracks, sound files, images, and messaging data.
Some of the folders in Gallery with content that the phone uses (for example, Themes) may be stored on the memory card.
Format the memory card
Some supplied memory cards are preformatted; others require formatting. When you format a memory card, all data on the card is permanently lost.
-
To format a memory card, select Menu > Media > Gallery or Games, the memory card folder □, and Options > Format memory card > Yes.
-
When formatting is complete, enter a name for the memory card.
Lock the memory card
To set a password (maximum 8 characters) to lock your memory card against unauthorized use, select the memory card folder and Options > Set password.
The password is stored in your phone, and you do not have to enter it again while you are using the memory card on the same phone. If you want to use the memory card on another device, you are asked for the password.
To remove the password, select Options > Delete password.
Check memory consumption
To check the memory consumption of different data groups and the available memory to install new software on your memory card, select the memory card and Options > Details.

11. Media
Camera and video
Take pictures or record video clips with the built-in camera.
Take a picture
To use the still picture function, select Menu > Media > Camera; or, if the video function is on, scroll left or right.
To zoom in and out in camera mode, scroll up and down, or press the volume keys.
To take a picture, select Capture. The phone saves the pictures on the memory card, if available, or in the phone memory.
Keep a safe distance when using the flash. Do not use the flash on people or animals at close range. Do not cover the flash while taking a picture.
To take all pictures with the camera flash, select Options > Flash > Flash on; or to activate the flash automatically when the light conditions are dim, select Automatic.
To display a picture immediately after you take it, select Options > Settings > Image preview time and the preview time. During the preview time, to take another picture, select Back. To send the picture to another device or to an available service, select Options > Send and from the available options.
Your device supports an image capture resolution of up to 1600x1200 pixels.
Record a video clip
To activate the video function, select Menu > Media > Video; or, if the camera function is on, scroll left or right.
To start the video recording, select Record; to pause the recording, select Pause; to resume the recording, select Continue; to stop the recording, select Stop.
Your device supports a video resolution of 176x144 pixels and saves the video clips on the memory card, if available, or in the phone memory.
Camera and video options
To use a filter, select Options > Effects.
To adapt the camera to the light conditions, select Options > White balance.
To change other camera and video settings and to select the image and video storage, select Options > Settings.
Media player
Your phone includes a media player for listening to songs and viewing video clips. Music and video files stored in the music folder in the phone memory or on the memory card are automatically detected and added to the music library.
To open the media player, select Menu > Media > Media player.
Music menu
Access your music and video files stored in the phone memory or on the memory card, download music or video clips from the web, or view compatible video streams from a network server (network service).
To listen to music or play a video clip, select a file from the available folders and Play.
To download files from the web, select Options > Downloads and a download site.
To update the music library after you have added files, select Options > Update library.
Create a playlist
To create a playlist with your music selection:
-
Select Playlists > Create playlist, and enter the name of the playlist.
-
Add music or video clips from the displayed lists.
- Select Done to store the playlist.
Play songs

Warning: Listen to music at a moderate level. Continuous exposure to high volume may damage your hearing. Do not hold the device near your ear when the loudspeaker is in use, because the volume may be extremely loud.
To adjust the volume level, press the volume keys.
Operate the player with the virtual keys on the display.
To start playing, select ▶.
To pause playing, select ||.
To skip to the next song, select ▶▶. To skip to the beginning of the previous song, select ◀◀ twice.
To fast-forward the current song, select and hold ▶▶. To rewind the current song, select and hold ◀◀. Release the key at the position you want to continue the music playback.
To switch to the music menu, select ≡ on the display.
To switch to the current playlist, select (…) on the display.
To close the media player menu, and to continue music playback in the background, press the end key.
To stop the media player, press and hold the end key.
Change the media player look
Your phone provides several themes to change the look of the media player.
Select Menu > Media > Media player > Go to Media player > Options > Settings > Media player theme and one of the listed themes. The virtual keys may change depending on the theme.
Radio
The FM radio depends on an antenna other than the wireless device antenna. A compatible headset or enhancement needs to be attached to the device for the FM radio to function properly.

Warning: Listen to music at a moderate level. Continuous exposure to high volume may damage your hearing. Do not hold the device near your ear when the loudspeaker is in use, because the volume may be extremely loud.
Select Menu > Media > Radio.
To adjust the volume level, press the volume keys of the phone.
To use the graphical keys on the display, scroll up, down, left, or right.
To close the radio menu, and to continue playing the radio in the background, press the end key.
To switch the radio off, press and hold the end key.
Tune in to radio stations
Search and save stations
- To start the search, select and hold or. To change the radio frequency in 0.05 MHz steps, briefly press or.
- To save a station to a memory location, select Options > Save station.
- To enter the name of the radio station, select Options > Stations > Options > Rename.
Select Options and from the following:
- Search all stations — to automatically search for the available stations at your location
- Set frequency — to enter the frequency of the desired radio station
• Stations — to list, organize, rename, or delete saved stations
Change stations
Select △ or ▽, or press the number key corresponding to the number of the station in the station list.
Radio settings
Select Options > Settings and from the following:
- RDS — to select whether to display information from the radio data system
- Auto-frequency — to enable the automatic switch to a frequency with the best reception of the tuned in station (available with activated RDS)
- Play via — to select the headset or the loudspeaker
• Output — to switch between stereo and mono output
• Radio theme — to select a radio theme
Voice recorder
Record speech, sound, or an active call, and save them in Gallery.
Select Menu > Media > Voice recorder. To use the graphical keys ♏, , or □ on the display, scroll left or right.
Record sound
- Select ●, or, during a call, select Options > Record. While recording a call, all parties to the call hear a faint beeping. To pause the recording, select □□.
- To end the recording, select ■. The recording is saved in the Recordings folder in Gallery.
Select Options to play or send the last recording, to access the list of recordings, or to select the memory and the folder to store the recordings.
Equalizer
Adjust the sound when using the music player.
Select Menu > Media > Audio Settings > Equalizer.
To activate a predefined equalizer set, scroll to one of the sets, and select Activate.
Create a new equalizer set
- Select one of the last two sets in the list and Options > Edit.
- Scroll left or right to access the virtual sliders and up or down to adjust the slider.
- To save the settings and create a name for the set, select Save and Options >Rename.
Stereo widening
Stereo widening creates a wider stereo sound effect when you are using a stereo headset.
To activate, select Menu > Media > Audio Settings > Stereo widening.
12. Organizer
Alarm clock
To sound an alarm at a desired time.
Set the alarm
- Select Menu > Organizer > Alarm clock.
- Set the alarm on, and enter the alarm time.
- To issue an alarm on selected days of the week, select Repeat: > On and the days.
- Select the alarm tone. If you select the radio as the alarm tone, connect the headset to the phone.
- Set the snooze time-out, and select Save.
Stop the alarm
To stop the sounding alarm, select Stop. If you let the alarm sound for a minute or select Snooze, the alarm stops for the snooze time-out, then resumes.
Calendar
Select Menu > Organizer > Calendar.
The current day is framed. If there are any notes set for the day, the day is in bold type. To view the day notes, select View. To view a week, select Options > Week view. To delete all notes in the calendar, select Options > Delete notes > Delete all notes.
To edit settings related to date and time, select Options > Settings and from the available options. To delete old notes automatically after a specified time, select Options > Settings > Auto-delete notes and from the available options.
Make a calendar note
Scroll to the date, and select Options > Make a note. Select the note type, and fill in the fields.
To-do list
To save a note for a task that you must do, select Menu > Organizer > To-do list.
To make a note if no note is added, select Add; otherwise, select Options > Add. Fill in the fields, and select Save.
To view a note, scroll to it, and select View.
Notes
To write and send notes, select Menu > Organizer > Notes.
To make a note if no note is added, select Add; otherwise, select Options > Make a note. Write the note, and select Save.
Calculator
Your phone provides a standard, a scientific, and a loan calculator.
Select Menu > Organizer > Calculator and, from the available options, the calculator type and the operating instructions.
This calculator has limited accuracy and is designed for simple calculations.
Countdown timer
Normal timer
- To activate the timer, select Menu > Organizer > Countd. timer > Normal timer, enter a time, and write a note that is displayed when the time expires. To change the time, select Change time.
- To start the timer, select Start.
- To stop the timer, select Stop timer.
Interval timer
- To have an interval timer with up to 10 intervals started, first enter the intervals.
- Select Menu > Organizer > Countd. timer > Interval timer.
- To start the timer, select Start timer > Start.
To select how the interval timer should start the next period, select Menu > Organizer > Countd. timer > Settings > Contin. to next period and from the available options.
Stopwatch
You can measure time, take intermediate times, or take lap times using the stopwatch.
Select Menu > Organizer > Stopwatch and from the following options:
- Split timing — to take intermediate times. To reset the time without saving it, select Options > Reset.
- Lap timing — to take lap times
- Continue — to view the timing that you have set in the background
- Show last time — to view the most recently measured time if the stopwatch is not reset
• View times or Delete times — to view or delete the saved times
To set the stopwatch timing in the background, press the end key.
13. Games
Your phone may have some games or applications installed. These files are stored in the phone memory or on a memory card and may be arranged in folders. See "Memory card," p. 53.
Launch an application
Select Menu > Media > Games > Games or Memory card. Scroll to a game or an application, and select Open.
To set sounds, lights, and shakes for a game, select Menu > Media > Games > Options > Application settings.
To view application options, select Menu > Media > Games > Options.
Select from the following:
- Update version — to verify that a new version of the application is available for download from the web (network service)
- Web page — to provide further information or additional data for the application from an internet page (network service), if available
- Application access — to restrict the application from accessing the network. The available options may vary.
Download an application
Your phone supports J2ME™ Java applications. Ensure that the application is compatible with your phone before downloading it.

Important: Only install and use applications and other software from trusted sources, such as applications that are Symbian Signed or have passed the Java Verified™ testing.
You can download new applications and games in different ways.
- Select Menu > Media > Games > Options > Downloads > App. downloads or Game downloads; the list of available bookmarks is shown.
- Use the Nokia Application Installer from PC Suite to download the applications to your phone.
For the availability of different services and pricing, contact your service provider.
14. t-zones
You can access various internet services with your phone browser. The appearance of the internet pages may vary due to screen size. You may not be able to see all the details on the internet pages.

Important: Use only services that you trust and that offer adequate security and protection against harmful software.
For the availability of these services, pricing, and instructions, contact your service provider.
You may receive the configuration settings required for browsing as a configuration message from your service provider.
To set up the service, select Menu > t-zones > Web settings > Configuration sett., a configuration, and an account.
Connect to a service
To make a connection to the service, select Menu > t-zones > Home; or in the standby mode, press and hold 0.
To select a bookmark, select Menu > t-zones > Bookmarks.
To select the last visited URL, select Menu > t-zones > Last web addr..
To enter the address of a service, select Menu > t-zones > Go to address. Enter the address, and select OK.
After you make a connection to the service, you can start browsing its pages. The function of the phone keys may vary in different services. Follow the text guides on the phone display. For more information, contact your service provider.
Appearance settings
While browsing the web, select Options > Settings and from the following:
- Display — Select the font size, whether images are shown, and how the text is displayed.
- General — Select whether web addresses are sent as Unicode (UTF-8), the encoding type for the contents, and whether JavaScript™ is enabled.
The available options may vary.
Cache memory
A cache is a memory location that is used to store data temporarily. If you have tried to access or have accessed confidential information requiring passwords, empty the cache after each use. The information or services you have accessed are stored in the cache.
A cookie is data that a site saves in the cache memory of your phone. Cookies are saved until you clear the cache memory.
To clear the cache while browsing, select Options > Tools > Clear the cache. To allow or prevent the phone from receiving cookies, select Menu > t-zones > Web settings > Security > Cookies; or, while browsing, select Options > Settings > Security > Cookies.
Browser security
Security features may be required for some services, such as banking services or online shopping. For such connections you need security certificates and possibly a security module, which may be available on your SIM card. For more information, contact your service provider.
To view or change the security module settings, or to view a list of authority or user certificates downloaded to your phone, select Menu > Settings > Security > Security module sett., Authority certificates, or User certificates.

Important: Even if the use of certificates makes the risks involved in remote connections and software installation considerably smaller, they must be used
correctly in order to benefit from increased security. The existence of a certificate does not offer any protection by itself; the certificate manager must contain correct, authentic, or trusted certificates for increased security to be available. Certificates have a restricted lifetime. If "Expired certificate" or "Certificate not valid yet" is shown, even if the certificate should be valid, check that the current date and time in your device are correct.
15. SIM services
Your SIM card may provide additional services. You can access this menu only if it is supported by your SIM card. The name and contents of the menu depend on the available services.
To show the confirmation messages sent between your phone and the network when you are using the SIM services, select Menu > Settings > Phone > Confirm SIM actions.
Accessing these services may involve sending messages or making a phone call for which you may be charged.
Accessories

Warning: Use only batteries, chargers, and accessories approved by Nokia for use with this particular model. The use of any other types may invalidate any approval or warranty, and may be dangerous.
For availability of approved accessories, please check with your dealer. When you disconnect the power cord of any accessory, grasp and pull the plug, not the cord.
Battery
Battery and charger information
Your device is powered by a rechargeable battery. The battery intended for use with this device is BL-5BT. This device is intended for use when supplied with power from the following chargers: AC-3. The battery can be charged and discharged hundreds of times, but it will eventually wear out. When the talk and standby times are noticeably shorter than normal, replace the battery. Use only Nokia approved batteries, and recharge your battery only with Nokia approved chargers designated for this device. Use of an unapproved battery or charger may present a risk of fire, explosion, leakage, or other hazard.
The exact charger model number may vary depending on the type of plug. The plug variant is identified by one of the following: E, EB, X, AR, U, A, C, or UB.
If a battery is being used for the first time or if the battery has not been used for a prolonged period, it may be necessary to connect the charger, then disconnect and reconnect it to begin charging the battery. If the battery is completely discharged, it may take several minutes before the charging indicator appears on the display or before any calls can be made.
Always switch the device off and disconnect the charger before removing the battery.
Unplug the charger from the electrical plug and the device when not in use. Do not leave a fully charged battery connected to a charger, since overcharging may shorten its lifetime. If left unused, a fully charged battery will lose its charge over time.
Always try to keep the battery between 15^ C and 25^ C ( 59^ F and 77^ F). Extreme temperatures reduce the capacity and lifetime of the battery. A device with a hot or cold battery may not work temporarily. Battery performance is particularly limited in temperatures well below freezing.
Do not short-circuit the battery. Accidental short-circuiting can occur when a metallic object such as a coin, clip, or pen causes direct connection of the positive (+) and negative (-) terminals of the battery. (These look like metal strips on the battery.) This might happen, for example, when you carry a spare battery in your pocket or purse. Short-circuiting the terminals may damage the battery or the connecting object.
Do not dispose of batteries in a fire as they may explode. Batteries may also explode if damaged. Dispose of batteries according to local regulations. Please recycle when possible. Do not dispose as household waste.
Do not dismantle, cut, open, crush, bend, deform, puncture, or shred cells or batteries. In the event of a battery leak, do not allow the liquid to come in contact with the skin or eyes. In the event of such a leak, flush your skin or eyes immediately with water, or seek medical help.
Do not modify, remanufacture, attempt to insert foreign objects into the battery, or immerse or expose it to water or other liquids.
Improper battery use may result in a fire, explosion, or other hazard. If the device or battery is dropped, especially on a hard surface, and you believe the battery has been damaged, take it to a service center for inspection before continuing to use it.
Use the battery only for its intended purpose. Never use any charger or battery that is damaged. Keep your battery out of the reach of small children.
Nokia battery authentication guidelines
Always use original Nokia batteries for your safety. To check that you are getting an original Nokia battery, purchase it from an authorized Nokia dealer, and inspect the hologram label using the following steps:
Successful completion of the steps is not a total assurance of the authenticity of the battery. If you have any reason to believe that your battery is not an authentic,
original Nokia battery, you should refrain from using it, and take it to the nearest authorized Nokia service point or dealer for assistance. Your authorized Nokia service point or dealer will inspect the battery for authenticity. If authenticity cannot be verified, return the battery to the place of purchase.
Authenticate hologram
-
When you look at the hologram on the label, you should see the Nokia connecting hands symbol from one angle and the Nokia Original Enhancements logo when looking from another angle.
-
When you angle the hologram left, right, down and up, you should see 1, 2, 3 and 4 dots on each side respectively.
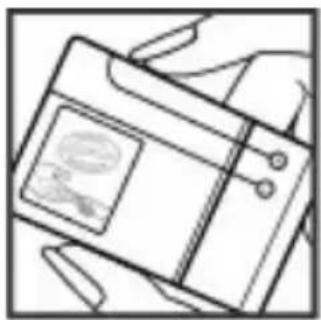
natural_image
Line drawing of a hand holding a device with a screen (no text or symbols visible)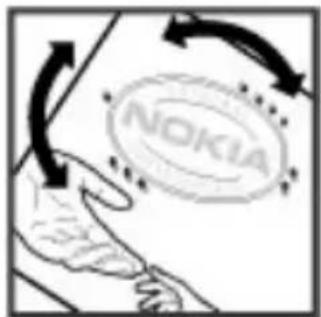
What if your battery is not authentic?
If you cannot confirm that your Nokia battery with the hologram on the label is an authentic Nokia battery, please do not use the battery. Take it to the nearest authorized Nokia service point or dealer for assistance. The use of a battery that is not approved by the manufacturer may be dangerous and may result in poor performance and damage to your device and its enhancements. It may also invalidate any approval or warranty applying to the device.
For additional information, refer to the warranty and reference leaflet included with your Nokia device.
Care and maintenance
Your device is a product of superior design and craftsmanship and should be treated with care. The following suggestions will help you protect your warranty coverage.
- Keep the device dry. Precipitation, humidity, and all types of liquids or moisture can contain minerals that will corrode electronic circuits. If your device does get wet, remove the battery, and allow the device to dry completely before replacing it.
- Do not use or store the device in dusty, dirty areas. Its moving parts and electronic components can be damaged.
- Do not store the device in hot areas. High temperatures can shorten the life of electronic devices, damage batteries, and warp or melt certain plastics.
- Do not store the device in cold areas. When the device returns to its normal temperature, moisture can form inside the device and damage electronic circuit boards.
- Do not attempt to open the device other than as instructed in this guide.
- Do not drop, knock, or shake the device. Rough handling can break internal circuit boards and fine mechanics.
- Do not use harsh chemicals, cleaning solvents, or strong detergents to clean the device.
- Do not paint the device. Paint can clog the moving parts and prevent proper operation.
- Use a soft, clean, dry cloth to clean any lenses, such as camera, proximity sensor, and light sensor lenses.
- Use only the supplied or an approved replacement antenna. Unauthorized antennas, modifications, or attachments could damage the device and may violate regulations governing radio devices.
• Use chargers indoors. - Always create a backup of data you want to keep, such as contacts and calendar notes.
- To reset the device from time to time for optimum performance, power off the device and remove the battery.
These suggestions apply equally to your device, battery, charger, or any enhancement. If any device is not working properly, take it to the nearest authorized service facility for service.
Disposal
The crossed-out wheeled-bin symbol on your product, literature, or packaging reminds you that all electrical and electronic products, batteries, and accumulators must be taken to separate collection at the end of their working life. This requirement applies to the European Union and other locations where separate collection systems are available. Do not dispose of these products as unsorted municipal waste.
By returning the products to collection you help prevent uncontrolled waste disposal and promote the reuse of material resources. More detailed information is available from the product retailer, local waste authorities, national producer responsibility organizations, or your local Nokia representative. For the product Eco-Declaration or instructions for returning your obsolete product, go to country-specific information at www.nokia.com.
Additional safety information
Small children
Your device and its enhancements may contain small parts. Keep them out of the reach of small children.
Operating environment
This device meets RF exposure guidelines when used either in the normal use position against the ear or when positioned at least 2.2 centimeters (7/8 inch) away from the body. When a carry case, belt clip, or holder is used for body-worn operation, it should not contain metal and should position the device the above-stated distance from your body.
To transmit data files or messages, this device requires a quality connection to the network. In some cases, transmission of data files or messages may be delayed until such a connection is available. Ensure the above separation distance instructions are followed until the transmission is completed.
Medical devices
Operation of any radio transmitting equipment, including wireless phones, may interfere with the functionality of inadequately protected medical devices. Consult a physician or the manufacturer of the medical device to determine if they are adequately shielded from external RF energy or if you have any questions. Switch off your device in health care facilities when any regulations posted in these areas instruct you to do so. Hospitals or health care facilities may be using equipment that could be sensitive to external RF energy.
Implanted medical devices
Manufacturers of medical devices recommend that a minimum separation of 15.3 centimeters (6 inches) should be maintained between a wireless device and an implanted medical device, such as a pacemaker or implanted cardioverter defibrillator, to avoid potential interference with the medical device. Persons who have such devices should:
- Always keep the wireless device more than 15.3 centimeters (6 inches) from the medical device when the wireless device is turned on.
- Not carry the wireless device in a breast pocket.
- Hold the wireless device to the ear opposite the medical device to minimize the potential for interference.
- Turn the wireless device off immediately if there is any reason to suspect that interference is taking place.
- Read and follow the directions from the manufacturer of their implanted medical device.
If you have any questions about using your wireless device with an implanted medical device, consult your health care provider.
Hearing aids
Some digital wireless devices may interfere with some hearing aids. If interference occurs, consult your service provider.
Vehicles
RF signals may affect improperly installed or inadequately shielded electronic systems in motor vehicles such as electronic fuel injection systems, electronic antiskid (antilock) braking systems, electronic speed control systems, and air bag systems. For more information, check with the manufacturer, or its representative, of your vehicle or any equipment that has been added.
Only qualified personnel should service the device or install the device in a vehicle. Faulty installation or service may be dangerous and may invalidate any warranty that may apply to the device. Check regularly that all wireless device equipment in your vehicle is mounted and operating properly. Do not store or carry flammable liquids, gases, or explosive materials in the same compartment as the device, its parts, or enhancements. For vehicles equipped with an air bag, remember that air bags inflate with great force. Do not place objects, including installed or portable wireless equipment in the area over the air bag or in the air bag deployment area. If in-vehicle wireless equipment is improperly installed and the air bag inflates, serious injury could result.
Using your device while flying in aircraft is prohibited. Switch off your device before boarding an aircraft. The use of wireless teledevices in an aircraft may be dangerous to the operation of the aircraft, disrupt the wireless telephone network, and may be illegal.
Potentially explosive environments
Switch off your device when in any area with a potentially explosive atmosphere, and obey all signs and instructions. Potentially explosive atmospheres include areas where you would normally be advised to turn off your vehicle engine. Sparks in such areas could cause an explosion or fire resulting in bodily injury or even death. Switch off the device at refueling points such as near gas pumps at service stations. Observe restrictions on the use of radio equipment in fuel depots, storage, and distribution areas; chemical plants; or where blasting operations are in progress. Areas with a
potentially explosive atmosphere are often, but not always, clearly marked. They include below deck on boats, chemical transfer or storage facilities and areas where the air contains chemicals or particles such as grain, dust, or metal powders. You should check with the manufacturers of vehicles using liquefied petroleum gas (such as propane or butane) to determine if this device can be safely used in their vicinity.
Emergency calls

Important: This device operates using radio signals, wireless networks, landline networks, and user-programmed functions. If your device supports voice calls over the internet (internet calls), activate both the internet calls and the cellular phone. The device will attempt to make emergency calls over both the cellular networks and through your internet call provider if both are activated. Connections in all conditions cannot be guaranteed. You should never rely solely on any wireless device for essential communications like medical emergencies.
To make an emergency call:
- If the device is not on, switch it on. Check for adequate signal strength.
Depending on your device, you may also need to complete the following:
- Insert a SIM card if your device uses one
- Remove certain call restrictions you have activated in your device.
-
Change your profile from offline or flight profile mode to an active profile.
-
Press the end key as many times as needed to clear the display and ready the device for calls.
-
Enter the official emergency number for your present location. Emergency numbers vary by location.
-
Press the call key.
When making an emergency call, give all the necessary information as accurately as possible. Your wireless device may be the only means of communication at the scene of an accident. Do not end the call until given permission to do so.
Certification information (SAR)
This mobile device meets guidelines for exposure to radio waves.
Your mobile device is a radio transmitter and receiver. It is designed not to exceed the limits for exposure to radio waves recommended by international guidelines. These guidelines were developed by the independent scientific organization ICNIRP and include safety margins designed to assure the protection of all persons, regardless of age and health.
The exposure guidelines for mobile devices employ a unit of measurement known as the Specific Absorption Rate or SAR. The SAR limit stated in the ICNIRP guidelines is 2.0 watts/kilogram (W/kg) averaged over 10 grams of tissue. Tests for SAR are conducted using standard operating positions with the device transmitting at its highest certified power level in all tested frequency bands. The actual SAR level of an operating device can be below the maximum value because the device is designed to use only the power required to reach the network. That amount changes depending on a number of factors such as how close you are to a network base station. The highest SAR value under the ICNIRP guidelines for use of the device at the ear is 0.52 W/kg.
Use of device accessories may result in different SAR values. SAR values may vary depending on national reporting and testing requirements and the network band. Additional SAR information may be provided under product information at www.nokia.com.
Your mobile device is also designed to meet the requirements for exposure to radio waves established by the Federal Communications Commission (USA) and Industry Canada. These requirements set a SAR limit of 1.6 W/kg averaged over one gram of tissue. The highest SAR value reported under this standard during product certification for use at the ear is 0.84 W/kg and when properly worn on the body is 0.25 W/kg.
Index
Symbols/Numerics
1-touch dialing 25, 39, 47
A
access codes 9
accessories 49
anykey answer 47
applications 62
B
battery 16
battery charge status 21
browser 63
business cards 39
C
cache memory 64
calculator 60
call forwarding 47
call history 39
call waiting 47
caller id 48
camera 54, 55
configuration 49
configuration setting service 10
cookies 64
cover 15
D
data cable 41
dialing shortcuts 25, 39
display 21, 45
downloads 10
E
e-mail 30
settings 32
writing 31
equalizer 58
F
factory settings 52
flight mode 23
flight query 48
font size 45
G
games 62
general packet radio service 41
GPRS 41
H
handsfree 26
headset 17
hearing aid 49
help text 48
helpful hints 11
hidden network 43
home screen 21, 45
I
IM
See instant messaging
in-call timer 47
indicators 22
info messages 36
instant messaging 32
internet 63
K
keyguard 48
keypad lock 23
keys 19
L
language 48
lights 46
loudspeaker 26
M
media player 55
memory card 14, 53
message center number 28
message sending 29
microSD card 14
My Nokia 10
N
navigation 20
net call 42
Nokia Care 12
notes 60
number mode 26
0
offline mode 24
P
packet data 41
parts 19
PC Suite 42
phone software updates 48
picture 54
PIN 9
predictive text input 27
print images 53
profiles 44
PUK 9
R
radio 57
recorder 58
redial 47
restriction password 9
S
scrolling 20
security code 9
security module 9
service commands 36
service set identifier 43
settings 42
shortcuts 22, 46
signal strength 21
SIM
services 65
SIM card 13, 24
SIM messages 36
software update 11, 50
SSID 43
start up tone 48
status indicators 21
stereo widening 59
stopwatch 61
strap 18
switch off tone 48
T
t-zones 63
take a picture 54
text modes 26
themes 45
tones 45
traditional text input 27
U
UPIN 9
USB data cable 41
V
video clips 54
voice clarity 47
voice commands 48
voice dialing 25
voice recognition 48
voice recorder 58
VoIP 42
W
wallpaper 45
web 63
Wi-Fi 42
WLAN 42
write text 26
This product is licensed under the MPEG-4 Visual Patent Portfolio License (i) for personal and noncommercial use in connection with information which has been encoded in compliance with the MPEG-4 Visual Standard by a consumer engaged in a personal and noncommercial activity and (ii) for use in connection with MPEG-4 video provided by a licensed video provider. No license is granted or shall be implied for any other use. Additional information, including that related to promotional, internal, and commercial uses, may be obtained from MPEG LA, LLC. See http://www.mpegla.com.
natural_image
Isometric line drawing of a mobile phone casing with internal components and a cable (no text or symbols)natural_image
Four technical line drawings of a mobile phone casing, showing front, side, top, and side views (no text or symbols)Cargar la batería
natural_image
Line drawing of a handheld electronic device with a cable inserted (no text or symbols)Antena
natural_image
Line drawing of a mobile phone with a brand logo and ports (no text or symbols)natural_image
Line drawing of a mobile phone with cable connector (no text or symbols)Auricular

natural_image
Line drawing of a hand holding a device with a small screen (no text or symbols visible)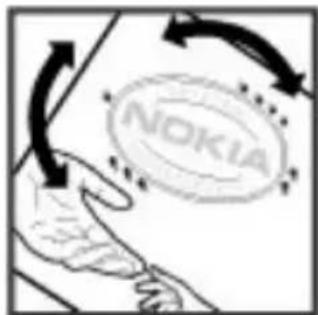
- Nokia 7510 User Guide
- Export controls
- FCC/INDUSTRY CANADA NOTICE
- Contents
- Safety......7
- General information......8
- Get started......13
- Calls......24
- Write text.....26
- Messaging......27
- Organizer......59
- Games ......62
- t-zones ......63
- SIM services......65
- Accessories......66
- Battery......66
- Care and maintenance......69
- Additional safety
- information......70
- Index....75
- Safety
- SWITCH ON SAFELY
- ROAD SAFETY COMES FIRST
- INTERFERENCE
- SWITCH OFF IN RESTRICTED AREAS
- QUALIFIED SERVICE
- ACCESSORIES AND BATTERIES
- WATER-RESISTANCE
- General information
- About your device
- Network services
- Access codes
- Configuration setting service
- My Nokia
- Download content
- Helpful hints
- Software updates
- Nokia support
- Configuration settings service
- Nokia PC Suite
- Nokia Care services
- Maintenance
- Digital rights management
- Get started
- Install SIM card and battery
- Insert a microSD card
- Remove the memory card
- Change the covers
- Remove covers
- Replace covers
- Charge the battery
- Antenna
- Connect a USB cable
- Headset
- Strap
- Keys and parts
- Switch the phone on and off
- Navigate the menus
- Standby mode
- Home screen
- Shortcuts in the standby mode
- Indicators
- Flight mode
- Make an emergency call in flight mode
- Keypad lock
- Functions without a SIM card
- Calls
- Make a call
- Answer and end a call
- Dialing shortcuts
- Voice dialing
- Options during a call
- Write text
- Text modes
- Traditional text input
- Predictive text input
- Messaging
- Text and picture messages
- Text messages
- Picture messages
- Create a text or picture message
- Read a message and reply
- Send messages Message sending
- Organize your messages
- E-mail application
- Start E-mail
- View the Inbox and other folders
- Write and send an e-mail
- Read an e-mail and reply
- Delete an e-mail
- E-mail settings
- Voice notes
- Instant Messaging
- Register with an IM service
- Log in
- Begin an IM session
- Receive and reply to messages
- Return to chat session
- Contacts
- Conversation options
- Set your availability
- Exit the IM application
- Log out of IM
- Info messages, SIM messages, and service commands
- Info messages
- Service commands
- SIM messages
- Voice mail
- Message settings
- People
- Manage contacts
- Select the memory for contacts
- Save names and numbers
- Search for a contact
- Add and edit details
- Copy or move contacts
- Copy or move all contacts
- Delete contacts
- Create a contact group
- Business cards
- Assign dialing shortcuts
- Call History
- Connectivity
- Bluetooth wireless technology
- Set up a Bluetooth connection
- PC connection to the internet
- Packet data
- USB data cable
- Settings
- Wi-Fi/WLAN connection
- About Wi-Fi/WLAN
- Turn the Wi-Fi/WLAN function on or off
- Quick connection
- Find, save, and connect to networks
- Display available networks
- Locate a hidden network
- Connect to a network
- Save a network
- Saved networks
- Manage saved networks
- Profiles
- Themes
- Tones
- Display
- Lights
- Date and time
- My shortcuts
- Left selection key
- Other shortcuts
- Synchronization and backup
- Call
- Phone
- Voice commands
- Accessories
- Hearing aid
- Configuration
- Software updates over the air
- Software update settings
- Request a software update
- Security
- Restore factory settings
- Gallery
- Folders and files
- Print images
- Memory card
- Format the memory card
- Lock the memory card
- Check memory consumption
- Media
- Camera and video
- Take a picture
- Record a video clip
- Camera and video options
- Media player
- Music menu
- Create a playlist
- Play songs
- Change the media player look
- Radio
- Tune in to radio stations
- Search and save stations
- Change stations
- Radio settings
- Voice recorder
- Record sound
- Equalizer
- Create a new equalizer set
- Stereo widening
- Organizer
- Alarm clock
- Set the alarm
- Stop the alarm
- Calendar
- Make a calendar note
- To-do list
- Notes
- Calculator
- Countdown timer
- Normal timer
- Interval timer
- Stopwatch
- Games
- Launch an application
- Download an application
- t-zones
- Connect to a service
- Appearance settings
- Cache memory
- Browser security
- SIM services
- Battery
- Battery and charger information
- Nokia battery authentication guidelines
- Authenticate hologram
- What if your battery is not authentic?
- Care and maintenance
- Disposal
- Additional safety information
- Small children
- Operating environment
- Medical devices
- Implanted medical devices
- Hearing aids
- Vehicles
- Potentially explosive environments
- Emergency calls
- Certification information (SAR)
- Index
- Symbols/Numerics
- A
- B
- C
- D
- E
- F
- G
- H
- I
- K
- L
- M
- N
- 0
- P
- R
- S
- T
- U
- V
- W
- Cargar la batería
- Antena
- Auricular
Brand : NOKIA
Model : 7510
Category : Mobile Phone