
TEW-730APO - Access Point TRENDNET - Free user manual and instructions
Find the device manual for free TEW-730APO TRENDNET in PDF.


| Product Type | Outdoor Wireless N300 PoE Access Point |
| Model | TEW-730APO |
| Brand | TRENDnet |
| Wireless Standard | IEEE 802.11n/g/b (2.4 GHz) |
| Maximum Data Rate | Up to 300 Mbps |
| Antenna | Built-in 9 dBi directional antenna |
| Interface | 1 x 10/100 Mbps Auto-MDIX Ethernet port |
| Power Supply | Proprietary PoE injector (24V, 1A power adapter included) |
| Power over Ethernet | Yes (non-802.3af compliant) |
| Operating Modes | Fat AP, Thin AP, Virtual AC, Virtual AC + Thin AP, Router |
| Indoor/Outdoor | Outdoor (IP55 rated) |
| Dimensions (Approx.) | 200 x 100 x 50 mm (without mount) |
| Weight (Approx.) | 0.5 kg (device only) |
| Mounting | Pole mounting kit included (up to 63 mm diameter) |
| Enclosure Rating | IP55 (weather and dust resistant) |
| Wireless Security | WEP, WPA, WPA2 (TKIP/AES), WPA-PSK, WPA2-PSK, RADIUS |
| Management | Web-based GUI, SNMP, Telnet, SSH, HTTPS, WISE tool |
| LED Indicators | Power, LAN, Wireless Signal (Green/Yellow/Red) |
| Operating Temperature | -20°C to 60°C (estimated based on outdoor rating) |
| Humidity | Up to 95% (non-condensing) |
| Package Contents | Access point, CD-ROM, Quick Installation Guide, Pole mounting hardware, PoE injector, Power adapter, Grounding wire |
| Warranty | 3 years (product), 1 year (power adapter/fan) |
| Compliance | FCC Part 15, CE, RoHS, IC |
| Grounding | Included grounding wire for lightning protection |
Frequently Asked Questions - TEW-730APO TRENDNET
User questions about TEW-730APO TRENDNET
0 question about this device. Answer the ones you know or ask your own.
Ask a new question about this device
Download the instructions for your Access Point in PDF format for free! Find your manual TEW-730APO - TRENDNET and take your electronic device back in hand. On this page are published all the documents necessary for the use of your device. TEW-730APO by TRENDNET.
USER MANUAL TEW-730APO TRENDNET
natural_image
White Treadonet industrial device with control panel and buttons (no visible text or symbols on body)9 dBi Outdoor PoE Access Point
TEW-730APO
TRENDnet User's Guide
Table of Contents
Contents
Product Overview ....3
Package Contents .... 3
Features 3
Product Hardware Features....4
Application Diagram 6
Creating a Network....6
Wireless Performance Considerations 7
Getting Started ....7
Connect wireless devices to your access point....9
Steps to improve wireless connectivity 9
Configuration....10
Access the management page 10
Device Modes ....10
FAT AP 11
AP Mode 12
Wireless Client Mode....14
Bridge Mode 15
AP Repeater Mode....17
Router Mode....18
Wireless Networking and Security....19
How to choose the type of security for your wireless network .... 19
Secure your wireless network 20
Wireless access control.... 22
Advance Settings....23
Change your IP address 23
Configure your Internet connection.... 24
Setting time 24
Advance wireless settings.... 24
Change your login password 25
Access Control 25
IP Filtering....25
Port Filtering....26
MAC Filtering 26
Port Forwarding....26
Open a device on your network to the Internet.... 27
DMZ....27
Configure your log 27
View your log....28
Ping Watchdog 28
Remote Management....28
Upgrade Firmware 29
Backup and restore your router configuration settings 30
Reset to factory defaults 30
Certificate configuration settings 31
Device Information 31
Associated Information 32
Statistics.... 33
ARP Table....33
Bridge Table....33
DHCP Clients 33
Thin AP 34
TRENDnet User's Guide
Table of Contents
Basic Setting.... 34
Information....35
Virtual AC 35
System Setting 36
AP Management 37
Advance Settings....37
Setting time 37
Upgrade Firmware 38
Backup and restore your router configuration settings 38
Reset to factory defaults 39
Change your login password....39
Configure your log 39
View your log 40
Ping Tool 41
Device Information 41
Wireless Users 42
DHCP Client 42
Configure Wireless Profile 42
Secure your wireless network 43
Wireless access control.... 45
Virtual AC + Thin AP 46
AP Management 46
System Setting 46
Advance Settings......47
Setting time 47
Upgrade Firmware 48
Backup and restore your router configuration settings 48
Reset to factory defaults 49
Change your login password 49
Configure your log 50
View your log....51
Ping Tool 51
Device Information 51
Wireless Users 52
DHCP Client 52
Configure Wireless Profile 53
Secure your wireless network 53
Wireless access control 55
Additional hardware installation....56
Ground wire....56
Pole mounting 56
Troubleshooting 57
Appendix 58
Product Overview
natural_image
White industrial device labeled 'TRENDUST' with control panel and indicator lights (no readable text beyond label)Package Contents
In addition to the access point, the package includes:
- TEW-730APO
• CD-ROM (User's Guide) - Quick Installation Guide
- Poll mounting hardware
• Proprietary PoE injector
• Power adapter (24V, 1A) - Grounding wire
If any package contents are missing or damaged, please contact the retail store, online retailer, or reseller/distributor from which the product was purchased.
Features
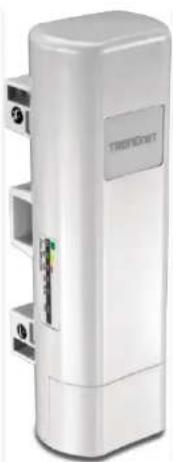
TRENDnet's 9 dBi Outdoor PoE Access Point, model TEW-730APO, provides wireless N300 (2.4 GHz) building-to-building connectivity. It supports Fat AP, Thin AP, Virtual Access Control (controls compatible Thin AP devices), and Virtual AC + Thin AP modes. Fat AP mode supports a variety of installation scenarios with Access Point (AP), WDS Bridge, WDS Repeater, Client, and CPE + AP modes. The rugged IP55 rated TEW-730APO comes with a proprietary PoE injector and a pole mounting kit.
Multi-Mode Support
Supports Fat AP, Thin AP, Virtual Access Control (controls compatible Thin AP devices), and Virtual AC + Thin AP modes
Fat AP Mode
Fat AP mode supports a variety of installation scenarios with Access Point (AP), WDS Bridge, WDS Repeater, Client, and CPE + AP modes
Thin AP Mode
Thin AP mode supports management of the TEW-730APO by another device (such as another TEW-730APO set to Virtual Access Control) and Thin AP supports Access Point (AP) mode
Virtual Access Control (AC) Mode
Virtual Access Control mode manages other compatible access points set to Thin AP
Wireless N300 (2.4 GHz)
Compliant with 802.11n/g/b technology (2.4 GHz spectrum) with data rates up to 300 Mbps
Directional Antenna
Built in 9 dBi directional antenna
Outdoor Rated
Durable enclosure with an IP55 outdoor weather rating
Power over Ethernet (PoE)
Comes with a PoE injector (non-802.3af compliant)
Logs
Real time logs and statistics help trouble shooting
TRENDnet User's Guide
TEW-730APO
Encrypted Wireless
Support for wireless encryption of up to WPA2
Compatibility
Compatible with 2.4 GHz legacy wireless devices
Mounting Hardware
Pole mounting hardware included
*Maximum wireless signal rates are referenced from IEEE 802.11 theoretical specifications. Actual data throughput and coverage will vary depending on interference, network traffic, building materials and other conditions.
Product Hardware Features

• Diagnostic LEDs: Provides device status.
○ Wireless Signal: Blinks green during wireless network activity.
■ Green (Good), Yellow (Moderate), Red (Poor)
○ LAN: Blinks green during network activity
- Power: Solid green when the device has power
- Ethernet port: 1x 10/100Mbps Auto-MDIX port. Connect the side marked "PoE" of PoE adapter to this port. Depending on the mode settings applied, the Ethernet port can function as the network WAN port or LAN port. Note: To access the Ethernet port, remove the bottom cap.
- Reset button: Press and hold the reset button for 15 seconds to reset the unit back the factory default settings. Note: To access the reset button, remove the bottom cap
TRENDnet User's Guide
TEW-730APO
Access Point Front View with Bottom Cap Removed

- Ethernet port: 1x 10/100Mbps Auto-MDIX port. Connect the side marked "PoE" of PoE adapter to this port. Depending on the mode settings applied, the Ethernet port can function as the network WAN port or LAN port
- Reset button: Press and hold the reset button for 15 seconds to reset the unit back the factory default settings.
PoE Adapter View
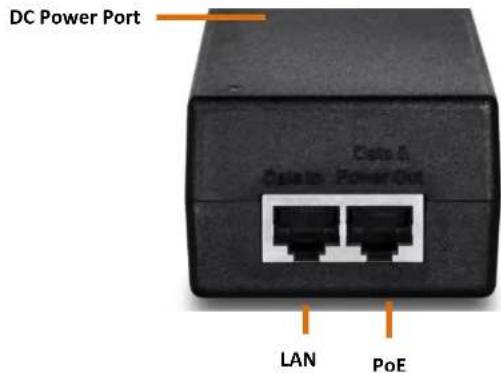
• DC Power port: Powers up the PoE adapter.
- PoE: Provides power to the access point. Connect this side to the access point Ethernet port.
• LAN: Provides network connectivity to the access point and your network. Connect this side to your router or network.
Application Diagram

natural_image
Modern residential building with two white air purifiers emitting green signal waves, no text or symbols visibleThe access point is mounted a pole which is connected to the provided PoE adapter and then connected to your network switch or router. Wireless signals from the access point are broadcasted to each creating a Bridge/WDS connection, thereby providing network connection between both networks.
Creating a Network
What is a network?
A network is a group of computers or devices that can communicate with each other. A home network of more than one computer or device also typically includes Internet access, which requires a router.
A typical home network may include multiple computers, a media player/server, a printer, a modem, and a router. A large home network may also have a switch, additional routers, access points, and many Internet-capable media devices such as TVs, game consoles, and Internet cameras.
- Modem – Connects a computer or router to the Internet or ISP (Internet Service Provider).
- Router – Connects multiple devices to the Internet.
- Switch –Connect several wired network devices to your home network. Your router has a built-in network switch (the LAN port 1-4). If you have more wired network devices than available Ethernet ports on your router, you will need an additional switch to add more wired connections.
How to set up a home network
-
For a network that includes Internet access, you'll need:
-
Computers/devices with an Ethernet port (also called network port) or wireless networking capabilities.
- A modem and Internet service to your home, provided by your ISP (modem typically supplied by your ISP).
-
A router to connect multiple devices to the Internet.
-
Make sure that your modem is working properly. Your modem is often provided by your Internet Service Provider (ISP) when you sign up for Internet service. If your modem is not working contact your ISP to verify functionality.
-
Set up your router. See "How to setup your router" below.
- To connect additional wired computers or wired network devices to your network, see "Connect additional wired devices to your network" on page 11.
- To set up wireless networking on your router, see "Wireless Networking and Security" on page 12.
Wireless Performance Considerations
There are a number of factors that can impact the range of wireless devices.
- Adjust your wireless devices so that the signal is traveling in a straight path, rather than at an angle. The more material the signal has to pass through the more signal you will lose.
- Keep the number of obstructions to a minimum. Each obstruction can reduce the range of a wireless device. Position the wireless devices in a manner that will minimize the amount of obstructions between them.
- Building materials can have a large impact on your wireless signal. In an indoor environment, try to position the wireless devices so that the signal passes through less dense material such as dry wall. Dense materials like metal, solid wood, glass or even furniture may block or degrade the signal.
- Antenna orientation can also have a large impact on your wireless signal. Use the wireless adapter's site survey tool to determine the best antenna orientation for your wireless devices.
- Interference from devices that produce RF (radio frequency) noise can also impact your signal. Position your wireless devices away from anything that generates RF noise, such as microwaves, radios and baby monitors.
- Any device operating on the 2.4GHz frequency will cause interference. Devices such as 2.4GHz cordless phones or other wireless remotes operating on the 2.4GHz frequency can potentially drop the wireless signal. Although the phone may not be in use, the base can still transmit wireless signal. Move the phone's base station as far away as possible from your wireless devices.
If you are still experiencing low or no signal consider repositioning the wireless devices or installing additional access points. The use of higher gain antennas may also provide the necessary coverage depending on the environment.
Getting Started
For a typical wireless setup at home or office when using the access point in AP mode, please do the following:
Hardware Installation
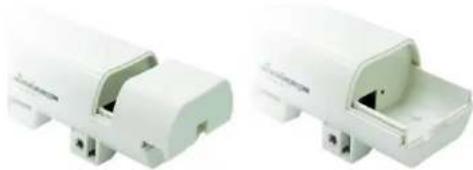
- Remove the bottom cap.
natural_image
Two white plastic electrical connectors with internal cutouts, shown from different angles (no text or symbols visible)- Plug a Network cable to the Ethernet port.
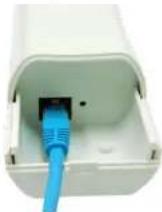
- Slide the bottom cover back to the unit.
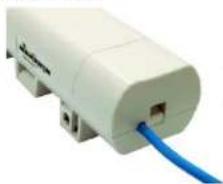
natural_image
White electronic device with blue cable inserted into a port (no visible text or symbols)TRENDnet User's Guide
TEW-730APO
- Plug an Ethernet cable to the access point and plug the other end of the cable to the side of the PoE adapter marked PoE.
- Take another Ethernet cable and plug it on the side of the PoE adapter marked LAN, plug the other end of the cable to your network.

natural_image
Close-up of a black Ethernet device labeled 'Data 6' with two Ethernet ports (no additional text or symbols visible)- Verify that the following LED indicators on the access point: Power (Solid Green), LAN (Solid/Blinking Green) and WLAN (Blinking Green).

- Open your web browser (e.g. Internet Explorer, Firefox, Safari, Chrome, or Opera) and go to http://192.168.10.100. The access point will prompt you for a password.

- Enter the default user name and password and then click Login. Default System Password: admin
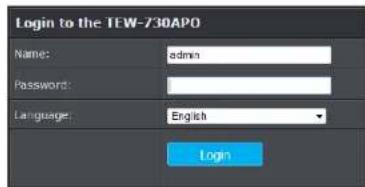
- Click the System button on the left side and then System Settings.

- Select Fat AP in the Mode drop down menu and select the proper Country/Region.
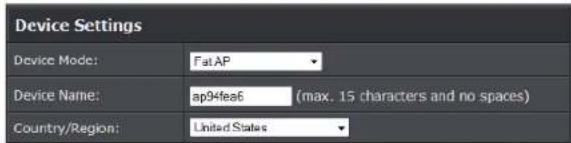
- Click Apply button to save your setting.
- Once the configuration is saved. Click the Wireless button on the left side and then Basic Settings.
TRENDnet User's Guide
TEW-730APO

-
Select AP in the Operation Mode pull down menu.
-
Enter your desired network name (SSID) of your wireless network in the Wireless Network Name and click Apply to save settings.

Connect wireless devices to your access point
A variety of wireless network devices can connect to your wireless network such as:
- Wireless Laptop computers
• Network media players - Wireless IP cameras
- Smart Phones
• Gaming Consoles - Internet enabled TVs
Each device may have its own software utility for searching and connecting to available wireless networks, therefore, you must refer to the User's Manual/Guide of your wireless client device to determine how to search and connect to this router's wireless network.
See the "Appendix" on page 53 for general information on connecting to a wireless network.
Steps to improve wireless connectivity
There are a number of factors that can impact the range of wireless devices. Follow these tips to help improve your wireless connectivity:
- Keep the number of obstructions to a minimum. Each obstruction can reduce the range of a wireless device. Position the wireless devices in a manner that will minimize the amount of obstructions between them.
a. For the widest coverage area, install your router near the center of your home, and near the ceiling, if possible.
b. Avoid placing the router on or near metal objects (such as file cabinets and metal furniture), reflective surfaces (such as glass or mirrors), and masonry walls.
c. Any obstruction can weaken the wireless signal (even non-metallic objects), so the fewer obstructions between the router and the wireless device, the better.
d. Place the router in a location away from other electronics, motors, and fluorescent lighting.
e. Many environmental variables can affect the router's performance, so if your wireless signal is weak, place the router in several locations and test the signal strength to determine the ideal position.
- Building materials can have a large impact on your wireless signal. In an indoor environment, try to position the wireless devices so that the signal passes through less dense material such as dry wall. Dense materials like metal, solid wood, glass or even furniture may block or degrade the signal.
- Antenna orientation can also have a large impact on your wireless signal. Use the wireless adapter's site survey tool to determine the best antenna orientation for your wireless devices.
- Interference from devices that produce RF (radio frequency) noise can also impact your signal. Position your wireless devices away from anything that generates RF noise, such as microwaves, radios and baby monitors.
If possible, upgrade wireless network interfaces (such as wireless cards in computers) from older wireless standards to 802.11n. If a wirelessly networked device uses an older standard, the performance of the entire wireless network may be slower. If you are still experiencing low or no signal consider repositioning the wireless devices or installing additional access points.
Configuration
Access the management page
Note: The access point's default management page http://192.168.10.100 is accessed through the use of your Internet web browser (e.g. Internet Explorer, Firefox, Chrome, Safari, and Opera) and will be referenced frequently in this User's Guide.
- Open your web browser (e.g. Internet Explorer, Firefox, Safari, Chrome, or Opera) and go to http://192.168.10.100. The access point will prompt you for a password.

- Enter the default user name and password and then click Login. Default Username and Password: admin
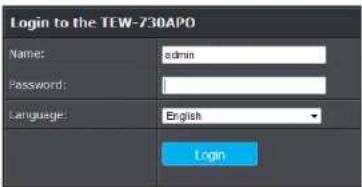
Device Modes
The TEW-730APO access point supports different types of system modes and sub modes within the selected device mode. Please verify carefully on which mode you would like the device to operate in to proper installation.
- FAT AP: In this mode the devices operates as your typical standalone access point. Below list the supported wireless modes when FAT AP is selected as the device system mode.
○ AP Mode: Creates a wireless network to your existing network. Device Ethernet port serves as a LAN (Local Area Network) port of the device
- Wireless Client: Connects to any existing wireless network (similar to a wireless adapter). Device Ethernet port serves as a LAN (Local Area Network) port of the device
Bridge: Creates a wireless bridge connection with another access point. Ethernet port serves as a LAN (Local Area Network) port of the device
o AP Repeater: Is similar to WDS repeater mode and repeats and existing WDS connection. Device Ethernet port serves as a LAN (Local Area Network) port of the device
- Thin AP: In this mode the device operates only in access point mode. However a thin access point must be controller with a controller system. Please see Virtual AC mode.
- Virtual AC: Virtual Access Controller, in this mode the device operates only as the controller system for Thin AP mode devices connected in the same network.
- Virtual AC + Thin AP: In this mode the device simultaneously operates in Thin AP mode and the controller system for Thin AP mode devices connected in the same network and a Thin AP client.
TRENDnet User's Guide
TEW-730APO
FAT AP
Below describes the configuration settings when the TEW-730APO System Mode is set to FAT AP mode. The features and configuration settings in FAT AP is similar to most wireless access points in the market. It creates a wireless network in your environment, the device also be configured as a bridge, repeater or wireless client in FAT AP mode.
Configuration
- Log into the management page (see "Access the management page" on page 9).
- Your access point will prompt you for a user name and password.

- Enter the default user name and password and then click Login.
Default User Name: admin
Default Password: admin
- Click the System button on the left side and then System Settings.

- Select Fat AP in the Device Mode drop down menu and Select your Country/Region.

- Click Apply button to save your setting.
- Click the Wireless button on the left side and then Basic Settings.
- Select the mode you would like to apply Operation Mode pull down menu.

- AP: Creates a wireless network to your existing network. Device Ethernet port serves as a LAN (Local Area Network) port of the device
- Wireless Client: Connects to any existing wireless network (similar to a wireless adapter). Device Ethernet port serves as a LAN (Local Area Network) port of the device
- Bridge: Creates a wireless bridge connection with another access point. Ethernet port serves as a LAN (Local Area Network) port of the device
- AP Repeater: Repeats the wireless signal of an existing wireless network. Device Ethernet port serves as a LAN (Local Area Network) port of the device
AP Mode
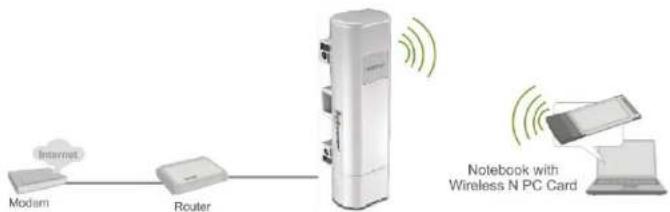
flowchart
graph LR
    A["Modam"] --> B["Router"]
    B --> C["Notebook with Wireless N PC Card"]
    C --> D["Internet"]
This section outlines available management options when the device System Setting is set to Bridge and the wireless Operation Mode is set to AP. Click Apply to save any changes.
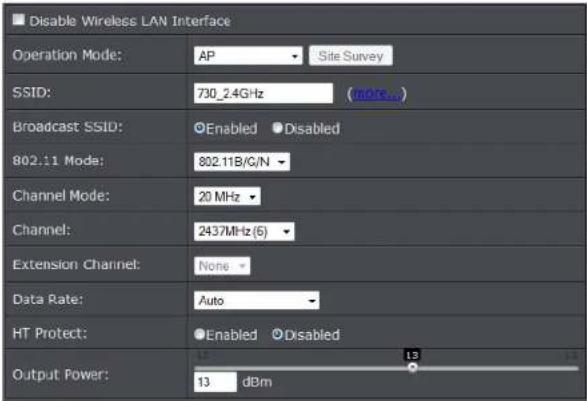
- Disable Wireless LAN Interface:
- Check/Off: turns off wireless networking on your router.
- Unchecked/On: turns on the wireless networking on your router (by default it is enabled).
Note: It is recommended to leave the wireless setting to On unless you do not plan on connecting any wireless computers or devices to your network.
- Operation Mode: Select the mode you want the access point to operate in.
- AP: refer to page11 for additional information.
○ Wireless Client: refer to page13 for additional information - Bridge: refer to page 16 for additional information
-
AP Repeater: refer to page18 for additional information to operate the device as an access point.
-
Wireless Network Name (SSID): This acronym stands for Service Set Identifier and is the name of your wireless network. It differentiates your wireless network from others around you. By default, the access point broadcast TRENDnet730 as the wireless network name. If you choose to change the SSID, change it to a name that you can easily remember. You can click more to configure additional SSID.
-
Broadcast SSID:
-
Enable: Access point will broadcast your wireless network name (SSID), making it easier for wireless clients to find the wireless network.
○ Disable: Access point will not broadcast the wireless network name (SSID) and wireless clients will have to manually enter the wireless network to connect.
- 802.11 Mode: If all of the wireless devices you want to connect with this Access Point can connect in the same transmission mode, you can improve performance slightly by choosing the appropriate mode. If you have some devices that use a different transmission mode, choose the appropriate mode.
- 802.11b/g mixed mode (2.4GHz) - This wireless mode works in the 2.4GHz frequency range and will allow both wireless b and wireless g client to connect and access point, at 54Mbps for wireless g and share access at the same time. Although the wireless b/g operates in the 2.4GHz frequency, it will allow the use of other 2.4GHz client devices (Wireless n/g @ 54Mbps) to connect and access at the same time.
802.11b/g/n mixed mode (2.4GHz) - This wireless mode works in the 2.4GHz frequency range and will only allow the use of wireless g client devices to connect and access point, 54Mbps for wireless g and up to 300Mbps* for wireless n and share access at the same time. Although the wireless b/g/n operates in the same 2.4GHz frequency, it will allow the use of other 2.4GHz client devices (Wireless b/g/n) to connect and access at the same time.
TRENDnet User's Guide
TEW-730APO
- HT protect: Enable HT (High Throughput) protect to ensure HT transmission with MAC mechanism. Under 802.11n mode, wireless client can be divided into HT STA and Non-HT STA, among which the one with HT protect enabled gets higher throughput.
- Channel Mode: Four levels are available: 5MHz, 10MHz, 20MHz and 40MHz. The last one can enhance data throughput, but it takes more bandwidth, thus it might cause potential interference.
- Channel: To manually set the channel on which the router will broadcast, uncheck Auto Channel, then click the drop-down list and select the desired Channel for wireless communication. The goal is to select the Channel that is least used by neighboring wireless networks.
- Extension channel: When 20/40 channel bandwidth has been chosen, you should select extension channel to get higher throughput.
- Data Rate: Usually "Auto" is preferred. Under this rate, the IEEE 802.11b/g/n Wireless CPE will automatically select the highest available rate to transmit. In some cases, however, like where there is no great demand for speed, you can have a relatively-low transmit rate for compromise of a long distance.
- Maximum Output power: Specify the signal transmission power. The higher the output power is, the wider the signal can cover, but the power consumption will be greater accordingly.
Wireless Profile
This section outlines available management options under the Profile Settings of the Wireless button. This access point supports multiple SSID, you can set an additional of 16 SSSID for your wireless network.

- Select Always Enabled option and click the Profile Name you would like to configure.

The following section outlines options to configure the basic settings of the multiple SSID.
- Profile Name: Enter the profile name of the network name you are configuring.
- Wireless Network Name (SSID): This acronym stands for Service Set Identifier and is the name of your wireless network. It differentiates your wireless network from others around you.
- Broadcast Network Name (SSID):
- Enabled allows wireless devices to search and discover your wireless network name (also called SSID) broadcasted by your router.
TRENDnet User's Guide
TEW-730APO
- Disabled turns off the ability for wireless devices to find your network. It is still possible for wireless devices to be configured to connect to your wireless network.
- Wireless Separation:
- Enabled separates all wireless clients connected to this SSID, clients cannot communicate with each other.
- Disabled allows all wireless clients connect to this SSID to communicate with each other
- WMM: Wi-Fi Multimedia is a Quality of Service (QoS) feature which prioritizes audio and video data packets. This feature requires the wireless device to also support WMM. Click Enabled (recommended) or Disabled to turn this feature on or off on your router.
- Max. Station Num.: Select this option to limit the amount of clients who can connect to this SSID.
- Enter the amount of clients you would like to limit.
Wireless Client Mode
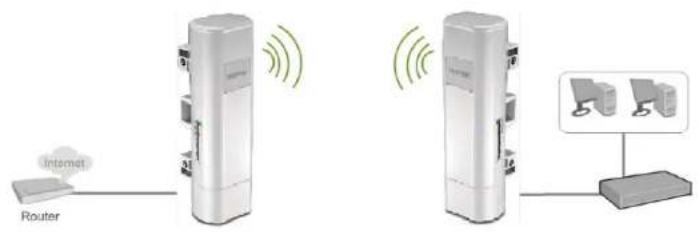
This section outlines available management options when the device System Setting is set to Bridge and the wireless Operation Mode is set to Wireless Client. Click Apply to save any changes.

- Disable Wireless LAN Interface:
- Check/Off: turns off wireless networking on your router.
- Unchecked/On: turns on the wireless networking on your router (by default it is enabled).
Note: It is recommended to leave the wireless setting to On unless you do not plan on connecting any wireless computers or devices to your network.
- Operation Mode: Select the mode you want the access point to operate in.
- AP: refer to page11 for additional information.
○ Wireless Client: refer to page13 for additional information
○ Bridge: refer to page 16 for additional information -
AP Repeater: refer to page18 for additional information to operate the device as an access point.
-
Site Survey: Click to scan and select available wireless networks.
- Wireless Network Name (SSID): This acronym stands for Service Set Identifier and is the name of your wireless network. You can manually enter the wireless network you want to connect to or click "Site Survey" option to scan for available wireless networks around you. Ple
- Lock AP MAC: Enter the MAC address of the access point you are connected.
- 802.11 Mode: If all of the wireless devices you want to connect with this Access Point can connect in the same transmission mode, you can improve performance slightly by choosing the appropriate mode. If you have some devices that use a different transmission mode, choose the appropriate mode.
TRENDnet User's Guide
TEW-730APO
☐ 802.11b/g mixed mode (2.4GHz) - This wireless mode works in the 2.4GHz frequency range and will allow both wireless b and wireless g client to connect and access point, at 54Mbps for wireless g and share access at the same time. Although the wireless b/g operates in the 2.4GHz frequency, it will allow the use of other 2.4GHz client devices (Wireless n/g @ 54Mbps) to connect and access at the same time.
802.11b/g/n mixed mode (2.4GHz) - This wireless mode works in the 2.4GHz frequency range and will only allow the use of wireless g client devices to connect and access point, 54Mbps for wireless g and up to 300Mbps* for wireless n and share access at the same time. Although the wireless b/g/n operates in the same 2.4GHz frequency, it will allow the use of other 2.4GHz client devices (Wireless b/g/n) to connect and access at the same time.
- 802.11 Mode: Four levels are available: 5MHz, 10MHz, 20MHz and 40MHz. The last one can enhance data throughput, but it takes more bandwidth, thus it might cause potential interference.
- Data Rate: Usually "Auto" is preferred. Under this rate, the IEEE 802.11b/g/n Wireless CPE will automatically select the highest available rate to transmit. In some cases, however, like where there is no great demand for speed, you can have a relatively-low transmit rate for compromise of a long distance.
- Output power: Specify the signal transmission power. The higher the output power is, the wider the signal can cover, but the power consumption will be greater accordingly.
- Enable MAC Clone: Available only under wireless client mode, it hides the MAC address of the AP while displays the one of associated wireless client or the MAC address designated manually.
Site Survey
The following section outlines how to utilize the site survey option in Wireless Client mode.
- Log into the management page (see "Access the management page" on page 27).
- Click on Wireless button and click on Basic Settings.
- Select Wireless Client in the Operation Mode pull down menu and click Apply.
- Click Site Survey button.

- The access point will automatically scan for available access points.
- Select the access point or wireless network you want to connect.

-
Click either Select AP, Select SSID or Scan option.
-
Select AP: Configures the access point based on the selected AP's SSID and MAC address
- Select SSID: Configures the access point based on the selected AP's SSID only
- Scan: Scans for available wireless networks.

- Click Apply when you have selected the wireless network you want to connect with.
- If your wireless network is configured with wireless security, click Profile Settings

- Security Settings: Select and configure the wireless security of your wireless network. Click Apply to save settings. Please refer to Wireless Encryption Type section on page30.
Bridge Mode
TRENDnet User's Guide
TEW-730APO
flowchart
graph TD
    A["Client Server"] --> B["Server"]
    B --> C["Central Server"]
    C --> D["Server"]
    D --> E["Server"]
    E --> F["Server"]
    style A fill:#f9f,stroke:#333
    style B fill:#ccf,stroke:#333
    style C fill:#cfc,stroke:#333
    style D fill:#fcc,stroke:#333
    style E fill:#cff,stroke:#333
    style F fill:#ffc,stroke:#333
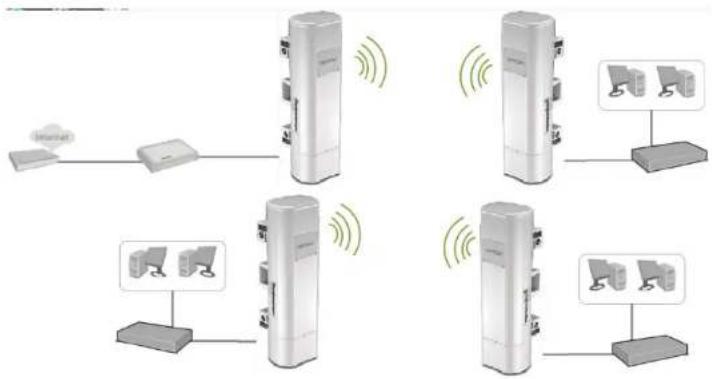
Bridge or Wireless Distribution System (WDS) or Bridge uses the WDS protocol that is not defined as the standard thus compatibility issues between equipment from different vendors may arise. Moreover, Tree or Star shape network topology should be used in all WDS use-cases (i.e. if AP2 and AP3 are specified as the WDS peers of AP1, AP2 should not be specified as the WDS peer of AP3 and AP3 should not be specified as the WDS peer of AP2 in any case). Mesh and Ring network topologies are not supported by WDS and should be avoided in all the use cases. This section outlines available management options when the device System Setting is set to Bridge and the wireless Operation Mode is set to Bridge. Click Apply to save any changes.

- Disable Wireless LAN Interface:
- Check/Off: turns off wireless networking on your router.
- Unchecked/On: turns on the wireless networking on your router (by default it is enabled).
Note: It is recommended to leave the wireless setting to On unless you do not plan on connecting any wireless computers or devices to your network.
- Operation Mode: Select the mode you want the access point to operate in.
- AP: refer to page11 for additional information.
○ Wireless Client: refer to page13 for additional information
○ Bridge: refer to page 16 for additional information
- AP Repeater: refer to page18 for additional information to operate the device as an access point.
- 802.11 Mode: If all of the wireless devices you want to connect with this Access Point can connect in the same transmission mode, you can improve performance slightly by choosing the appropriate mode. If you have some devices that use a different transmission mode, choose the appropriate mode.
802.11b/g mixed mode (2.4GHz) - This wireless mode works in the 2.4GHz frequency range and will allow both wireless b and wireless g client to connect and access point, at 54Mbps for wireless g and share access at the same time. Although the wireless b/g operates in the 2.4GHz frequency, it will allow the use of other 2.4GHz client devices (Wireless n/g @ 54Mbps) to connect and access at the same time.
- 802.11b/g/n mixed mode (2.4GHz) - This wireless mode works in the 2.4GHz frequency range and will only allow the use of wireless g client devices to connect and access point, 54Mbps for wireless g and up to 300Mbps* for
TRENDnet User's Guide
TEW-730APO
wireless n and share access at the same time. Although the wireless b/g/n operates in the same 2.4GHz frequency, it will allow the use of other 2.4GHz client devices (Wireless b/g/n) to connect and access at the same time.
- Frequency (Channel): To manually set the channel on which the router will broadcast, uncheck Auto Channel, then click the drop-down list and select the desired Channel for wireless communication. The goal is to select the Channel that is least used by neighboring wireless networks.
- Extension channel: When 20/40 channel bandwidth has been chosen, you should select extension channel to get higher throughput.
- Channel Mode: Four levels are available: 5MHz, 10MHz, 20MHz and 40MHz. The last one can enhance data throughput, but it takes more bandwidth, thus it might cause potential interference.
- Data Rate: Usually "Auto" is preferred. Under this rate, the IEEE 802.11b/g/n Wireless CPE will automatically select the highest available rate to transmit. In some cases, however, like where there is no great demand for speed, you can have a relatively-low transmit rate for compromise of a long distance.
- Maximum Output power: Specify the signal transmission power. The higher the output power is, the wider the signal can cover, but the power consumption will be greater accordingly.
Wireless >WDS Setting
This section outlines the available management options under the WDS Settings of the Wireless button. WDS Settings is available only under Bridge and AP Repeater Mode.
| Local MAC Address: | 00:19:70:94 fe a6 |
| WDS MAC Address 1: | |
| WDS MAC Address 2: | |
| WDS MAC Address 3: | |
| WDS MAC Address 4: |
- WDS Separation: Enable separates all configured WDS AP to communicate with each other.
- Remote AP: Enter the MAC address of the access point you want to WDS with.
Note: You must enter the MAC address of every access point in the WDS network. Each wireless setting (SSID, channel, wireless encryption) must match on each access point in the WDS network.
AP Repeater Mode
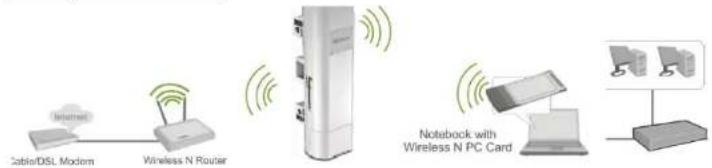
flowchart
graph LR
    A["Internet"] --> B["Wireless N Router"]
    B --> C["Router"]
    C --> D["Noteback with Wireless N PC Card"]
    D --> E["Computer"]
AP Repeater mode allows the access point to repeat a wireless signal of an existing wireless network. This section outlines available management options when the device System Setting is set to Bridge and the wireless Operation Mode is set to AP Repeater. Click Apply to save any changes.
Note: The access point's wireless settings must be configured with the exact wireless settings as the repeating signal (Network name, channel, wireless security, etc.)

- Disable Wireless LAN Interface:
TRENDnet User's Guide
TEW-730APO
- Check/Off: turns off wireless networking on your router.
○ Unchecked/On: turns on the wireless networking on your router (by default it is enabled).
Note: It is recommended to leave the wireless setting to On unless you do not plan on connecting any wireless computers or devices to your network.
- Operation Mode: Select the mode you want the access point to operate in.
- AP: refer to page11 for additional information.
○ Wireless Client: refer to page13 for additional information - Bridge: refer to page 16 for additional information
- AP Repeater: refer to page18 for additional information to operate the device as an access point.
- Wireless Network Name (SSID): This acronym stands for Service Set Identifier and is the name of your wireless network. You can manually enter the wireless network you want to repeat.
- Broadcast SSID:
○ Enable: Access point will broadcast the your wireless network name (SSID), making it easier for wireless clients to find the wireless network.
○ Disable: Access point will not broadcast the wireless network name (SSID) and wireless clients will have to manually enter the wireless network to connect.
- 802.11 Mode: If all of the wireless devices you want to connect with this Access Point can connect in the same transmission mode, you can improve performance slightly by choosing the appropriate mode. If you have some devices that use a different transmission mode, choose the appropriate mode.
☐ 802.11b/g mixed mode (2.4GHz) - This wireless mode works in the 2.4GHz frequency range and will allow both wireless b and wireless g client to connect and access point, at 54Mbps for wireless g and share access at the same time. Although the wireless b/g operates in the 2.4GHz frequency, it will allow the use of other 2.4GHz client devices (Wireless n/g @ 54Mbps) to connect and access at the same time.
802.11b/g/n mixed mode (2.4GHz) - This wireless mode works in the 2.4GHz frequency range and will only allow the use of wireless g client devices to connect and access point, 54Mbps for wireless g and up to 300Mbps* for wireless n and share access at the same time. Although the wireless b/g/n operates in the same 2.4GHz frequency, it will allow the use of other 2.4GHz client devices (Wireless b/g/n) to connect and access at the same time.
- Frequency (Channel): To manually set the channel on which the router will broadcast, uncheck Auto Channel, then click the drop-down list and select the
desired Channel for wireless communication. The goal is to select the Channel that is least used by neighboring wireless networks.
- Extension channel: When 20/40 channel bandwidth has been chosen, you should select extension channel to get higher throughput.
- Channel Mode: Four levels are available: 5MHz, 10MHz, 20MHz and 40MHz. The last one can enhance data throughput, but it takes more bandwidth, thus it might cause potential interference.
- Data Rate: Usually "Auto" is preferred. Under this rate, the IEEE 802.11b/g/n Wireless CPE will automatically select the highest available rate to transmit. In some cases, however, like where there is no great demand for speed, you can have a relatively-low transmit rate for compromise of a long distance.
- HT protect: Enable HT (High Throughput) protect to ensure HT transmission with MAC mechanism. Under 802.11n mode, wireless client can be divided into HT STA and Non-HT STA, among which the one with HT protect enabled gets higher throughput.
-
Maximum Output power: Specify the signal transmission power. The higher the output power is, the wider the signal can cover, but the power consumption will be greater accordingly.
-
Click Profile Settings and select the Profile Name you want to configure.
| # | Enabled | Profile Name | SSID | Security |
| 1 | Profile1 | 816_2.4GHz | Open System | |
| 2 | Profile2 | TR730_2.4 | Open System | |
| 3 | Profile3 | TRENDnet730_2.4GHz | Open System | |
| 4 | Profile4 | TRENDnet730_2.4GHz | Open System | |
| 5 | Profile5 | TRENDnet730_2.4GHz | Open System | |
| 6 | Profile6 | TRENDnet730_2.4GHz | Open System | |
| 7 | Profile7 | TRENDnet730_2.4GHz | Open System | |
| 8 | Profile8 | TRENDnet730_2.4GHz | Open System |
- Enter the configuration settings to match the access point to repeat and click Apply to save settings.
Router Mode
Below describes the configuration settings when the TEW-730APO System Mode is set to Router. In this configuration the Ethernet port of the TEW-730APO can serve as the
TRENDnet User's Guide
TEW-730APO
WAN (Wide Area Network) or Internet port. Please verify your network configuration when using this mode. Please refer to Internet Service Types section in the Appendix to help determine your Internet settings.
Configuration
- Log into the management page (see "Access the management page" on page 9).
- Click the System button on the left side and then System Settings.

- Select Router in the Network Mode drop down menu.

- Under WAN settings section, select your WAN type and configure settings.

- Select Enable DHCP Server under LAN Settings section.

Wireless Networking and Security
How to choose the type of security for your wireless network
Setting up wireless security is very important. Leaving your wireless network open and unsecure could expose your entire network and personal files to outsiders. TRENDnet recommends reading through this entire section and setting up wireless security on your new router.
TRENDnet User's Guide
TEW-730APO
There are a few different wireless security types supported in wireless networking each having its own characteristics which may be more suitable for your wireless network taking into consideration compatibility, performance, as well as the security strength along with using older wireless networking hardware (also called legacy hardware). It is strongly recommended to enable wireless security to prevent unwanted users from accessing your network and network resources (personal documents, media, etc.). In general, it is recommended that you choose the security type with the highest strength and performance supported by the wireless computers and devices in your network. Please review the security types to determine which one you should use for your network.
Wireless Encryption Types
- WEP: Legacy encryption method supported by older 802.11b/g hardware. This is the oldest and least secure type of wireless encryption. It is generally not recommended to use this encryption standard, however if you have old 802.11 b or 802.11g wireless adapters or computers with old embedded wireless cards(wireless clients), you may have to set your router to WEP to allow the old adapters to connect to the router. Note: This encryption standard will limit connection speeds to 54Mbps.
- WPA: This encryption is significantly more robust than the WEP technology. Much of the older 802.11g hardware was been upgraded (with firmware/driver upgrades) to support this encryption standard. Total wireless speeds under this encryption type however are limited to 54Mbps.
- WPA-Auto: This setting provides the router with the ability to detect wireless devices using either WPA or WPA2 encryption. Your wireless network will automatically change the encryption setting based on the first wireless device connected. For example, if the first wireless client that connects to your wireless network uses WPA encryption your wireless network will use WPA encryption. Only when all wireless clients disconnect to the network and a wireless client with WPA2 encryption connects your wireless network will then change to WPA2 encryption. NOTE: WPA2 encryption supports 802.11n speeds and WPA encryption will limit your connection speeds to 54Mbps
- WPA2: This is the most secure wireless encryption available today, similar to WPA encryption but more robust. This encryption standard also supports the highest connection speeds. TRENDnet recommends setting your router to this encryption standard. If you find that one of your wireless network devices does not support WPA2 encryption, then set your router to either WPA or WPA-Auto encryption.
Note: Check the specifications of your wireless network adapters and wireless appliances to verify the highest level of encryption supported.
Below is brief comparison chart of the wireless security types and the recommended configuration depending on which type you choose for your wireless network.
| Security Standard | WEP | WPA | WPA2 |
| Compatible Wireless Standards | IEEE 802.11a/b/g(802.11n devices will operate at 802.11g to connect using this standard) | IEEE 802.11a/b/g(802.11n devices will operate at 802.11g to connect using this standard) | IEEE 802.11a/b/g/n |
| Highest Performance Under This Setting | Up to 54Mbps | Up to 54Mbps | Up to 450Mbps* |
| Encryption Strength | Low | Medium | High |
| Additional Options | Open System or Shared Key, HEX or ASCII, Different key sizes | TKIP or AES, Preshared Key or RADIUS | TKIP or AES, Preshared Key or RADIUS |
| Recommended Configuration | Open System ASCII 13 characters | TKIP Preshared Key 8-63 characters | AES Preshared Key 8-63 characters |
*Dependent on the maximum 802.11n data rate supported by the device (150Mbps, 300Mbps, or 450Mbps)
Secure your wireless network
After you have determined which security type to use for your wireless network (see "How to choose the security type for your wireless network" on page 12), you can set up wireless security.
TRENDnet User's Guide
TEW-730APO
- Log into the management page (see "Access the management page" on page 9).
- Click on Wireless button and click on Profile Settings.
- Click on the Profile name you would like to apply wireless security.
| # | Enabled | Profile Name | SSID | Security | Vlan ID |
| 1 | Profile1 | 730APBO | Open System | 0 | |
| 2 | fz e2 | TEW-730APO | Open System | 0 | |
| 3 | Profile3 | TRENDnet730_2.4GHz | Open System | 0 |
- Select the wireless security on your wireless network from the Network Authentication pull down menu.
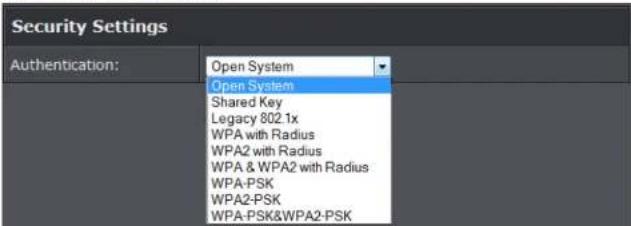
Selecting WEP (Open System or Shared Key):
If selecting WEP (Wired Equivalent Privacy), please review the WEP settings to configure and click Apply to save the changes.
Note: It is recommended to use Open System because it is known to be more secure than Shared Key.
| WEP Key Format | HEX | ASCII |
| Character set | 0-9 & A-F, a-f only | Alphanumeric (a,b,C,?,*,/,1,2, etc.) |
| 64-bit key length | 10 characters | 5 characters |
| 128-bit key length | 26 characters | 13 characters |

• Data Encryption: Choose the key length 64-bit or 128-bit.
Note: It is recommended to use 128-bit because it is more secure to use a key that consists of more characters.
• Key type: Choose HEX or ASCII.
Note: It is recommended to use ASCII because of the much larger character set that can be used to create the key.
• Key 1-4
- This is where you enter the password or key needed for a computer to connect to the router wirelessly
- You can define up to 4 passwords or 4 keys. Only one key can be active at a given time. Most users simply define one key.
○ Choose a key index 1, 2, 3, or 4 and enter the key.
When connecting to the router, the client must match both the password and the Key number. (e.g. if you have activated Key 2 with a password of 12345, then the client must select: Key 2 (entering Key 1, 3, or 4 will block the ability to connect) and enter password 12345)
- WEP Passphrase: Enter a passphrase and click Generate key to have the access point generate your encryption key.
Selecting WPA-PSK, WPA2-PSK, or WPA-PSK & WPA2-PSK (WPA2-PSK recommended):
TRENDnet User's Guide
TEW-730APO
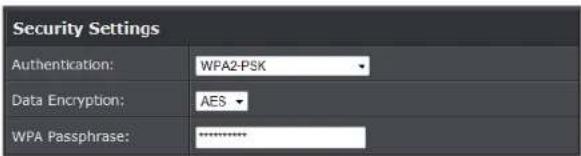
The following section outlines options when selecting PSK (Preshared Key Protocol).
• Data Encryption: Select the cipher type to use.
- TKIP: Recommended when using WPA-PSK security.
○ AES: Recommended when using WPA2-PSK or WPA-PSK & WPA2-PSK
- WPA Passphrase – Enter the passphrase.
- This is the password or key that is used to connect your computer to this router wirelessly
Selecting WPA, WPA2, or WPA & WPA2 with Radius:

The following section outlines options when selecting Radius.
Note: Radius requires an external RADIUS server, PSK only requires you to create a passphrase.
• Data Encryption: Select the cipher type to use.
- TKIP: Recommended when using WPA-PSK security.
○ AES: Recommended when using WPA2-PSK or WPA-PSK & WPA2-PSK
Once you have selected the data encryption type. Click Apply to save settings and go to the RADIUS Settings section under System button on the left side.
The following section outlines options to configure the access point's RADIUS settings.

- Radius Server: Configure the RADIUS server settings.
- IP: Enter the IP address of the RADIUS server. (e.g. 192.168.10.250)
- Port: Enter the port your RADIUS server is configured to use for RADIUS authentication.
Note: It is recommended to use port 1812. - Shared Secret: Enter the shared secret used to authorize your router

- Global-Key Update
- Enable this option to set the cache period based on seconds
Wireless access control
The MAC address filter section can be used to filter network access by machines based on the unique MAC addresses of their network adapter(s). It is most useful to prevent unauthorized wireless devices from connecting to your network. A MAC address is a unique ID assigned by the manufacturer of the network adapter.

- Access Control Mode:
- Profile Selection: Select the wireless profile you would like to apply the access control rule.
○ Disable: Access control is disabled
TRENDnet User's Guide
TEW-730APO
- Allow Listed: Enter MAC address allowed to connect to the access point
- Deny List: Enter MAC addresses to block connection to the access point.
Advance Settings
Change your IP address
In most cases, you do not need to change the access point's IP address settings. Typically, the access point IP address settings only needs to be changed, if you plan to use another access point in your network with the same IP address settings, if you are connecting the access point to an existing network that is already using the IP address settings your access point is using. In addition, the access point can be used as a DHCP (Dynamic Host Configuration Protocol) server to automatically assign an IP address to each computer or device on your network. If you already have a DHCP server on your network, or if you do not want to use the access point as a DHCP server, you can disable this setting. This setting would be used when the access point's System settings is set to Router mode.
Note: If you are not encountering any issues or are not faced with one of the cases described above or similar, it is recommended to keep your router IP address settings as default.
Note: For VPN (Virtual Private Network) configuration, it is required that each router should have a different router or LAN IP address/network on each end of the VPN tunnel.
Default Router or LAN IP Address: 192.168.10.1 00
Default Router or LAN IP Network: 192.168.10.0 / 255.255.255.0
- Log into the management page (see "Access the management page" on page 9).
- Click on System, and click on Network Settings.

- IP Address: Enter the new access point IP address. (e.g. 192.168.100.1)
- Subnet Mask: Enter the new access point subnet mask.(e.g. 255.255.255.0)
- DHCP Server: Enable or Disable the DHCP server on the access point.
- DHCP IP Address Range: Enter the IP address of the DHCP server to assign.
- Lease Time: Enter the lease time in seconds that DHCP client will hold their automatically assigned IP address before requesting a new IP address
- Enable DHCP Relay: Enable to forward DHCP requests and replies between clients and servers when they are not on the same physical subnet
- DHCP Server IP: Enter the DHCP IP address of the DHCP Relay
Note: The DHCP address range will change automatically to your new access point's IP address settings so you do not have to change the DHCP address range manually to match your new router IP address settings.
- To save changes, click Apply at the bottom of the page.
Note: If you changed the IP address of the access point you will need to access the management page using the new IP address (e.g. Instead of using the default http://192.168.10.100 using your new router IP address will use the following format using your new router IP address http://(new.router.ipaddress.here) to access the management page.
TRENDnet User's Guide
TEW-730APO
Configure your Internet connection
This section describes the features when setting the access points WAN settings. The access point supports DHCP, Static or PPPoE WAN types. Refer to Internet Service Type section in the Appendix for additional information on connection types. Before configuring this section, complete the settings in the Router Mode section to determine the type of networking you will be setting.
Note: This feature is only available when Router mode is applied in System Settings.
- Log into the management page (see "Access the management page" on page 9).
- Click on System, and click on Network Settings.
- In the WAN Access Type drop-down list, select the type of Internet connection provided by your ISP (Internet Service Provider).
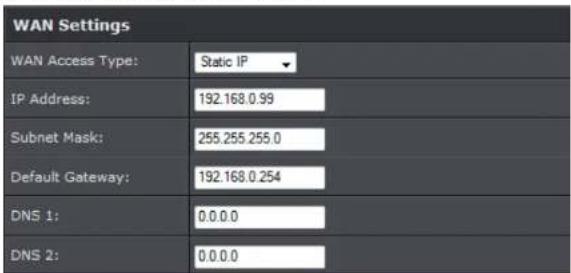
- Complete the fields required by your ISP.
- Complete the optional settings only if required by your ISP.
- To save changes, click Save.
Note: If you are unsure which Internet connection type you are using, please contact your ISP (Internet Service Provider).
Setting time
- Log into the management page (see "Access the management page" on page 9).
- Click on System, and click on Time Settings.
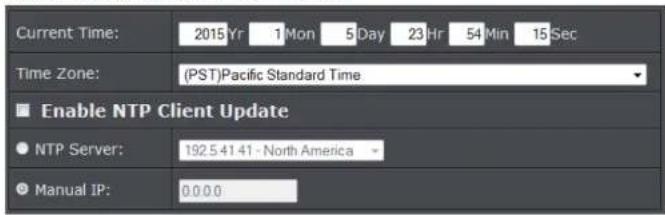
Manual configure time settings
- Manually enter the date and time settings.
- Next to Time Zone Select, select your time zone from the drop down menu. Click Apply to save settings.
Time setting using a NTP server
- Click Enable NTP client update option to obtain date and time settings from a NTP server.
- Select one of the below options. Click Apply to save settings.
• NTP Server: Select a NTP server to use.
- Manual IP: Manually enter your NTP server.
- You can also click Enable NTP client update option to obtain date and time settings from a NTP server.
Advance wireless settings
This section outlines available management options under the Advance Settings of the Wireless button.
TRENDnet User's Guide
TEW-730APO

- A-MPDU/A-MSDU aggregation: The data rate of your AP except wireless client mode could be enhanced greatly with this option enabled; however, if your wireless clients don't support A-MPDU/A-MSDU aggregation, it is not recommended to enable it.
- Short GI: Under 802.11n mode, enable it to obtain better data rate if there is no negative compatibility issue.
- RTS Threshold: The IEEE 802.11b/g/n Wireless CPE sends RTS (Request to Send) frames to certain receiving station and negotiates the sending of a data frame. After receiving an RTS, that STA responds with a CTS (Clear to Send) frame to acknowledge the right to start transmission. The setting range is 0 to 2346 in byte. Setting it too low may result in poor network performance. Leave it at its default of 2346 is recommended.
- Fragment Threshold: Specify the maximum size in byte for a packet before data is fragmented into multiple packets. Setting it too low may result in poor network performance. Leave it at its default of 2346 is recommended.
- Beacon Interval: Specify the frequency interval to broadcast packets. Enter a value between 20 and 1024.
- DTIM Interval: DTIM, which stands for Delivery Traffic Indication Message, is contained in the data packets. It is for enhancing the wireless transmission efficiency. The default is set to 1. Enter a value between 1 and 255.
Change your login password
- Log into the management page (see "Access the management page" on page 9).
- Click on Management, and click on Password Settings. Click Apply to save changes.
| Current Password: | |
| New Password: | |
| Confirm Password: |
- Current Password: Enter the current password of the access point.
- New Password: Enter the new password
- Confirm Password: Re-enter the new password to confirm.
Note: If you change the login password, you will need to access the management page using the new password instead of the default password "admin".
Access Control
IP Filtering
IP Filtering gives users the ability to restrict certain types of data packets from your local network to the access point based on assigned IP address. Use of such filters can be helpful in securing or restricting your local network. Please note that this feature is only available when access point System Mode is set to Router.
- Log into the management page (see "Access the management page" on page 9).
- Click on Firewall Filtering.
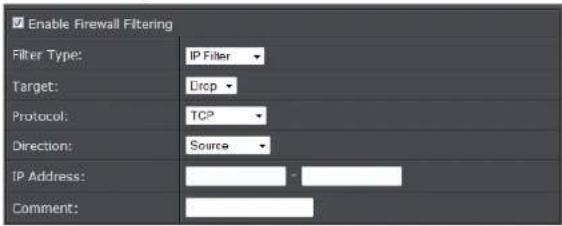
TRENDnet User's Guide
TEW-730APO
- Enable Source IP Filtering: Check this option to enable source IP filtering
- Filter Type: Select IP Filter in the pull down menu
- Protocol: Select the protocol you would like to filter.
- Direction: Select the direction of the packets to filter.
- IP Address: Enter the IP address or range of IP address to assign.
- Comment: Enter any notes you would like to add to distinguish the rule.
Port Filtering
The Port filtering gives you the ability to restrict the computers in LAN from accessing certain websites in WAN according to specified IP addresses. Please note that this feature is only available when access point System Mode is set to Router.
- Log into the management page (see "Access the management page" on page 9).
- Click on Firewall Settings.

- Enable Source IP Filtering: Check this option to enable source Port filtering
- Filter Type: Select Port Filter in the pull down menu
- Protocol: Select the protocol you would like to filter.
- Direction: Select the direction of the packets to filter.
- Port: Enter the IP address or range of IP address to assign.
- Comment: Enter any notes you would like to add to distinguish the rule.
MAC Filtering
The MAC filtering enables you to restrict certain MAC address to have access to your network. Please note that this feature is only available when access point System Mode is set to Router.
- Log into the management page (see "Access the management page" on page 9).
- Click on Firewall Settings.
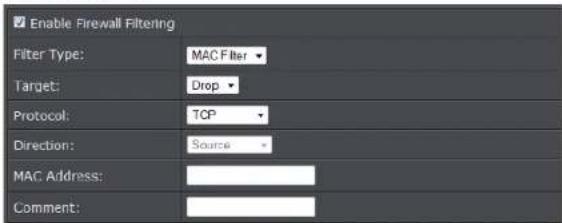
- Enable Source IP Filtering: Check this option to enable source IP filtering
- Filter Type: Select MAC Filter in the pull down menu
- Protocol: Select the protocol you would like to filter.
- Direction: Select the direction of the packets to filter.
- MAC Address: Enter the IP address or range of IP address to assign.
- Comment: Enter any notes you would like to add to distinguish the rule.
Port Forwarding
The destination port filtering enables you to restrict certain ports of data packets from your local network to Internet through the access point. Use of such filters can be helpful in securing or restricting your local network. Please note that this feature is only available when access point System Mode is set to Router.
- Log into the management page (see "Access the management page" on page 9).
- Click on Firewall Settings, and click on Port Forwarding. Click Apply to save settings.
TRENDnet User's Guide
TEW-730APO

- Enable Destination IP Filtering: Check this option to enable source IP filtering
- IP Address: Enter the IP address of the device to forward the port. (e.g. 192.168.10.101).
- Protocol: Select the protocol required for your device. TCP, UDP, or you can select Both to choose both TCP & UDP.
- Port Range: Enter the port number used to access the device from the Internet.
- Comment: Enter any notes you would like to add to distinguish the rule.
Example: To forward TCP port 80 to your network/IP camera
- Make sure to configure your network/IP camera to use a static IP address or you can use the DHCP reservation feature (see "Set up DHCP reservation" on page 55).
Note: You may need to reference your camera documentation on configuring a static IP address.
- Log into the management page (see "Access the management page" on page 9).
- Click on Firewall Settings on the side, click on Port Forwarding.
- Under IP Address, enter the IP address assigned to the camera. (e.g. 192.168.10.101)
- To save changes, click Save at the bottom of the page.
Open a device on your network to the Internet
DMZ
You may want to expose a specific computer or device on your network to the Internet to allow anyone to access it. Your router includes the DMZ (demilitarized zone) feature that makes all the ports and services available on the WAN/Internet side of the router and forwards them to a single IP address (computer or network device) on your
network. The DMZ feature is an easy way of allowing access from the Internet however, it is also very insecure method.
- Log into the management page (see "Access the management page" on page 9).
- Click on Firewall Settings, and click on DMZ Setting. Click Apply to save settings.

- Enable DMZ: Check this option to enable DMZ
- DMZ Host IP Address: Enter the IP address you would like to apply DMZ.
Configure your log
You may want send your router log to your e-mail address or to an external log server (also known as Syslog server) so you can check it periodically while away from home. You may also want to only see specific categories of logging.
- Log into the management page (see "Access the management page" on page 9).
- Click on Tools, and click on System Log. Click Apply to save settings.

- Enable Remote Syslog Server: Check this option to enable DMZ
- IP Address: enter the IP address (e.g. 192.168.10.250) of the external log server to send
- Port: Enter the port used on your log server.
TRENDnet User's Guide
TEW-730APO
View your log
You may want send your router log to your e-mail address or to an external log server (also known as Syslog server) so you can check it periodically while away from home. You may also want to only see specific categories of logging.
-
Log into the management page (see "Access the management page" on page 9).
-
Click on Tools, and click on System Log. Click Apply to save settings.
| # | Time | Priority | Source | Message |
| 2 | 2015-01-01 08:02:24 | notice | 192.168.10.126 | WEB: Authorized user "admin". |
| 3 | 2015-01-01 08:40:39 | notice | 192.168.10.126 | WEB: User "admin" logout. |
| 4 | 2015-01-01 08:40:43 | notice | 192.168.10.126 | WEB: Authorized user "admin". |
| 5 | 2015-01-01 09:44:28 | warn | 192.168.10.126 | WEB: Unauthorized user "admin". |
| 6 | 2015-01-01 09:45:13 | notice | 192.168.10.126 | WEB: Authorized user "admin". |
| 7 | 2015-01-01 09:55:11 | notice | 28:0D: FC: 3D:25:EA | Station authenticated. |
| 8 | 2015-01-01 09:55:30 | warn | 28:0D: FC: 3D:25:EA | Station deauthenticated. |
| 9 | 2015-01-01 09:55:43 | notice | 28:0D: FC: 3D:25:EA | Station authenticated. |
- Time: Displays the date and time of the log entry. If the time is inaccurate, make sure to set the router date and time correctly. (See "Setting time" on page 51)
• Source: Source of the log entry - Message: Displays the log message.
- Refresh: Click to refresh the displayed log entries
• Clear: Click to clear all current log entries
Ping Watchdog
You may want to expose a specific computer or device on your network to the Internet to allow anyone to access it. Your router includes the DMZ (demilitarized zone) feature that makes all the ports and services available on the WAN/Internet side of the router and forwards them to a single IP address (computer or network device) on your
network. The DMZ feature is an easy way of allowing access from the Internet however, it is also very insecure method.
- Log into the management page (see "Access the management page" on page 9).
- Click on Tools, and click on Ping Watchdog. Click Apply to save settings.
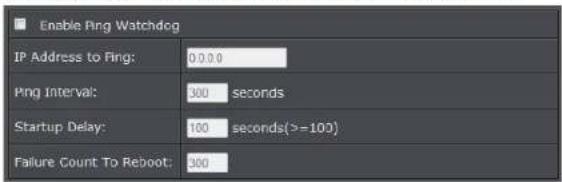
- Enable Ping Watchdog: Check this option to enable option
- IP Address to Ping: Enter the IP address of the remote unit to ping
- Ping Interval: Enter the time interval in seconds to ping the remote unit
- Startup Delay: Enter the startup delay time in seconds to prevent the reboot before the access point is initialized
- Failure Count To Reboot: Enter the count value of when the access point will reboot automatically
Remote Management
The access point provides a variety of remotes managements tools including Telnet, SNMP, FTP, SSH, HTTPS and exclusive WISE tool, making configuration more convenient and secure.
- Log into the management page (see "Access the management page" on page 9).
- Click on Management, and click on Remote Management.

- Select the management mode you would like to use. Click Apply to save settings.
• Normal: Select this mode to activate Telnet, SNMP and FTP
TRENDnet User's Guide
TEW-730APO
- Secure: Select this mode to activate SSH, HTTPS, and WISE
-
Customized: Select this mode to manually choose the management modes
-
If SNMP is one of the management tools you have selected. You will need to complete the below settings.

- Protocol Version: Select from the pull down menu the SNMP version to use.
• Server Port: Enter the your SNMP server port - Get Community: Enter the password for the incoming Get and GetNext requests from the management station
- Set Community: Specify the password for the incoming Set requests from the management station.
- Trap Destination: Specify the IP address of the station to send the SNMP traps to.
- Trap Community: Specify the password sent with each trap to the manager. To use SNMP V3, click the option "Configure SNMPv3 User Profile" to display the configuration settings.

- User Name: Specify a user name for the SNMPv3 administrator or user. Only the SNMP commands carrying this user name are allowed to access the access point
- Password: Specify a password for the SNMPv3 administrator or user. Only the SNMP commands carrying this password are allowed to access the access point
- Confirm Password: Input password again to confirm
- Access Type: Select "Read Only" or "Read and Write" accordingly.
- Authentication Protocol: Select an authentication algorithm. SHA authentication is stronger than MD5 but is slower.
- Privacy Protocol: Specify the encryption method for SNMP communication. None and DES are available.
○ None: No encryption is applied.
○ DES: Data Encryption Standard, it applies a 58-bit key to each 64-bit block of data.
Upgrade Firmware
You may have added many customized settings to your router and in the case that you need to reset your router to default, all your customized settings would be lost and would require you to manually reconfigure all of your router settings instead of simply restoring from a backed up router configuration file.
- Log into the management page (see "Access the management page" on page 9).
TRENDnet User's Guide
TEW-730APO
- Click on Management, and click on Firmware Upload.
- Click Browse and select the updated firmware file you want to load. Click Upload to load the firmware file.
Note: Any interruption during the firmware upgrade can damage your device.
Select File:
Browse
No file selected.
Backup and restore your router configuration settings
You may have added many customized settings to your router and in the case that you need to reset your router to default, all your customized settings would be lost and would require you to manually reconfigure all of your router settings instead of simply restoring from a backed up router configuration file.
To back up your configuration:
- Log into the management page (see "Access the management page" on page 9).
- Click on Management, and click on Configuration File.
Save Settings to File:
Save.
- Depending on your web browser settings, you may be prompted to save a file (specify the location) or the file may be downloaded automatically to the web browser settings default download folder. (Default Filename: config.bin)
- Save the configuration file to location on your computer.
To restore your router configuration and upgrade firmware
- Log into the management page (see "Access the management page" on page 9).
- Click on Management, and click on Configuration File.
- Under Load Settings from file, click on Browse select your saved configuration file and click Upload.
Load Settings from File:
Browse
No file selected.
Upload
Reboot your access point
You may want to restart your router if you are encountering difficulties with your router and have attempted all other troubleshooting.
There are two methods that can be used to restart your router.
- Disconnect the power adapter – Located on the rear panel of your router, see "Product Hardware Features" on page 4. Use this method if you are encountering difficulties with accessing your router management page. This is also known as a hard reboot or power cycle. Disconnect the power adapter from the power port of your router for 10 seconds, then, plug the power adapter back into the power of your router. Wait for your router Status light to begin flashing. OR
-
Router Management Page – This is also known as a soft reboot or restart. Toolbox > Reboot
-
Log into the management page (see "Access the management page" on page 9).
- Click on Management, and click on Configuration File.
Reboot The Device:
Reboot
- Click Yes or OK if prompted to your reboot your device.
Reset to factory defaults
You may want to reset your router to factory defaults if you are encountering difficulties with your router and have attempted all other troubleshooting. Before you reset your router to defaults, if possible, you should backup your router configuration first, see "Backup and restore your router configuration settings" on page 70.
There are two methods that can be used to reset your router to factory defaults.
TRENDnet User's Guide
TEW-730APO
- Reset Button – Located on the bottom panel of the access point, cap must be removed to access reset button. Use this method if you are encountering difficulties with accessing your router management page. Push and hold this button for 15 seconds and release to reset your router to its factory defaults.
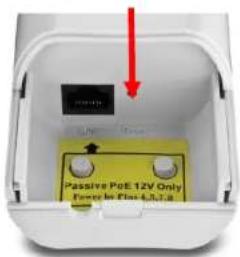
Bottom cap remove
OR
- Router Management Page
Management > Configuration Filet
- Log into the management page (see "Access the management page" on page 9).
- Click on Management, and click on Configuration File.

- You will be prompted to reset your router to factory defaults. Click Yes or OK.
Certificate configuration settings
Under Client mode, when EAP-TLS is used, the RADIUS server must know which user certificates to trust. The Server can trust all certificates issued by a given CA.
To import a user certificate, from Import User Certificates, click "Browse" and specify the location where the user certificate is placed. Click "Import".
-
Log into the management page (see "Access the management page" on page 9).
-
Click on Management, and click on Certificate Settings.

- Delete User Certificate: Select from the pull down menu the certificate would like to delete and deactivate. Press Delete to proceed.
- Import User Certificate: Click Browse and select the user certificate you want to load to the access point. Click Import to load the certificate.
Device Information
Under Client mode, when EAP-TLS is used, the RADIUS server must know which user certificates to trust. The Server can trust all certificates issued by a given CA.
To import a user certificate, from Import User Certificates, click "Browse" and specify the location where the user certificate is placed. Click "Import".
- Log into the management page (see "Access the management page" on page 9).
- Click on Status, and click on Information.
System Information
| System Information | |
| MAC Address: | 00:19:70:94:fc:e6 |
| Firmware Version: | 1.1.1(TN)4 |
| System Uptime: | 6m:52s |
| Device Name: | TEW-730APO |
| Country/Region: | Austria |
• Device Name: Name of device
• Country/Region: Applied country/region
- Firmware Version: Current firmware version of the access point.
WAN Settings
TRENDnet User's Guide
TEW-730APO
| WAN Settings | |
| MAC Address: | 00:19:70:94:fe:86 |
| Access Type: | Static IP |
| IP Address: | 192.168.0.99 |
| Subnet Mask: | 255.255.255.0 |
| Default Gateway: | 192.168.0.254 |
| DNS 1: | 0.0.0.0 |
| DNS 2: | 0.0.0.0 |
Information is based on the mode settings applied to the access point and when System mode is to Router.
- Connection Time: Display time duration of when the WAN has established connection
- Access Type: Display the WAN connection type
• IP Address: Current assigned WAN IP address - Subnet Mask: Assigned WAN Subnet Mask
- Default Gateway: Assigned WAN default gateway
• DNS1/2: Assigned WAN DNS IP address - MAC Address: Displays the MAC address of the access points WAN port
LAN Settings
| LAN Settings | |
| IP Address: | 192.168.10.100 |
| Subnet Mask: | 255.255.255.0 |
| Gateway IP Address: | 0.0.0.0 |
Information is based on the Wireless mode setting applied to the access pointr.
• IP Address: LAN IP address of your access point
- Subnet Mask: Subnet Mask of your Local Area Network (LAN)
- Gateway IP Address: Displays the gateway IP address assigned to the access point.
Wireless Settings
| Wireless Settings | |
| Operation Mode: | AP |
| 802.11 Mode: | 802.11B/G/N |
| SSID: | TRENDnet730_2.4GHz |
| Encryption: | Open System |
| ACK Timeout: | 35 μs |
- Operation Mode: Display the current wireless operation mode of the access point.
- 802.11 Mode: Displays the 802.11 mode applied on the access point
• SSID: Display the assigned SSID - Encryption: Displays the wireless security encryption type applied
- ACK: Displays the applied ACK timeout period.
Interface Status
| Interface Status | |||
| Interface | Status | Channel | Rate |
| Wireless | Up | 2437MHz (5) | Auto |
| Lifetime | up | A | B |
- Interface: Displays the interface of the access point
• Status: Displays the current status of the interface - Channel: Displays the operating channel of the wireless interface
- Rate: Displays the data rate of the interface.
Associated Information
Open "Connections" in "Status" to check the information of associated wireless devices such as MAC address, signal strength, connection time, IP address, etc. All is read only. Click "Refresh" at the bottom to update the current association list. By clicking on the MAC address of the selected device on the web you may see more details including device name, connection time, signal strength, noise floor, ACK timeout, link quality, IP information, current data rate, current TX/RX packets.
TRENDnet User's Guide
TEW-730APO
- Log into the management page (see "Access the management page" on page 27).
- Click on Status, and click on Connections.
| ◆# | ◆Interface | ◆MAC Address | ◆802.11 Mode | ◆Signal Strength | ◆Connected Time | ◆Action |
| 1 | VAP1 | 00:26:c6:2c:68:40 | 802.11B/G/N | -28 dBm | 25m:40s |
- Refresh: Click to refresh to view the current information
Statistics
You may want to check the statistical received and transmit packets of the wired and wireless connections of the access point.
- Log into the management page (see "Access the management page" on page 9).
- Click on Status, and click on Statistics.
| Received | Transmitted | |
| Wireless | ||
| Total Packets | 6424 | 7207 |
| Total Bytes | 947889 | 1952176 |
| Ethernet | ||
| Total Packets | 2105 | 2087 |
| Total Bytes | 254180 | 1325193 |
- Refresh: Click to refresh to view the current information
| Poll Interval: 5 (1-65534) Sec Set Interval Stop |
- Poll Interval: Specify the refresh time interval in the box beside "Poll Interval" and click "Set Interval" to save settings. "Stop" helps to stop the auto refresh of network flow statistics.
ARP Table
You may want to view the access point's current ARP table.
- Log into the management page (see "Access the management page" on page 9).
- Click on Status, and click on ARP Table.
| # | IP Address | MAC Address | Interface | Type |
| 1 | 192.168.10.161 | 00:26:c6:2c:68:40 | LAN | Dynamic |
- Refresh: Click to refresh to view the current information
Bridge Table
This page allows you to view any active bridge connections to the access point.
- Log into the management page (see "Access the management page" on page 9).
- Click on Status, and click on Bridge Table.
| ## | NAL Address | Interface | Ageing Time(s) |
| 1 | 00:26:c5:2c:68:40 | Wireless | 0.00 |
| 2 | 00:19:70:94:fe:bG | Bridge | ... |
- Refresh: Click to refresh to view the current information
DHCP Clients
This page displays the access point's current DHCP clients.
- Log into the management page (see "Access the management page" on page 9).
- Click on Status, and click on DHCP Clients.
| # | IP Address | MAC Address | Host Name | Time Expired(m) |
| --- | --- | --- | --- | --- |
- Refresh: Click to refresh to view the current information
TRENDnet User's Guide
TEW-730APO
Thin AP
Below describes the configuration settings when the TEW-730APO System Mode is set to Thin AP mode. In this mode the access point can only be configured with a device set on Virtual Access Control mode.
Configuration
- Log into the management page (see "Access the management page" on page 9).
- Your access point will prompt you for a user name and password.

- Enter the default user name and password and then click Login.
Default User Name: admin
Default Password: admin
- Click the System button on the left side and then System Settings.

- Select Thin AP in the Device Mode drop down menu.

Basic Setting
This page displays thin access points connected in the network.
- Log into the management page (see "Access the management page" on page 9).
- Click on Thin AP and Basic Settings.
General Settings

- Device Mode: Select the mode you would want the access point to operate on.
• Device Name: Enter a device name that can help distinguish each devices
IP Settings

- DHCP Client: Select this option to set the access point to obtain DHCP you're your DHCP server.
-
Static: Select this option to manually configure the access point's IP address.
-
IP Address: Enter the IP address to assign
○ Subnet Mask: Enter the subnet mask of the access point - Gateway IP Address: Enter the gateway IP address
- DNS1-2: Enter the DNS IP address to assign on the access point.
TRENDnet User's Guide
TEW-730APO
Access Control Mode

• LAN: Select when your access controller is connected on your LAN (Local Are Network).
- Internet: Select this option to have your access controller access the access point via Internet and enter the elect the mode you would want the access point to operate on.
○ Management Port: Enter the port to assign to access the access point via Internet
- FW Upgrade Port: Enter the port to use when performing upgrade through the Internet.
VLAN
√ Enable 802.1Q VLAN
Management VLAN ID :

(0 means disabled)
- Enable 802.1 Q VLAN: Select this option to enable VLAN
- Management VLAN ID: Enter the VLAN ID to assign the access point.
Information
This page displays thin access points configured information.
- Log into the management page (see "Access the management page" on page 9).
- Click on Thin AP and Basic Settings.
| Firmware Version: | 1.1.1(TN)4 |
| MAC Address: | 00:19:70:94:fe:a6 |
| System Uptime: | 1h:31m:35s |
| Register Status: | Unregistered |
| AC MAC Address: | N/A |
- Firmware version: Current firmware version of the access point
• MAC Address: Displays the MAC address of the access point - System Uptime: Displays the duration of the access point being active
- Registered Status: Displays the registration status of the access point with an access controller
- AC MAC Address: Displays the MAC address of the access controller assigned to the access point.
Virtual AC
In this mode the access point becomes the virtual access controller that can control thin access points on the network.
Configuration
- Log into the management page (see "Access the management page" on page 9).
- Your access point will prompt you for a user name and password.

-
Enter the default user name and password and then click Login.
Default User Name: admin Default Password: admin -
Click the System button on the left side and then System Settings.
TRENDnet User's Guide
TEW-730APO
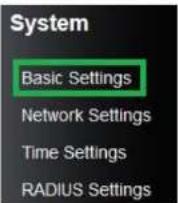
- Select Virtual AC in the Device Mode drop down menu and Select your Country/Region.
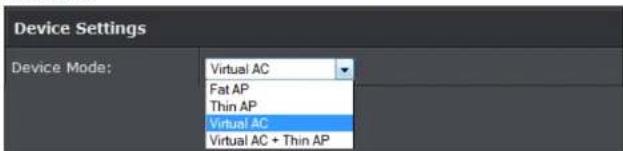
System Setting
This page displays thin access points connected in the network.
- Log into the management page (see "Access the management page" on page 9).
- Click on Management and System Settings.
Device Settings
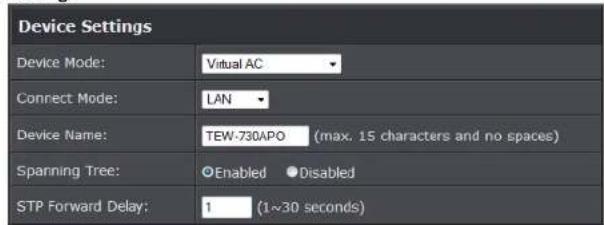
- Device Mode: Select the mode you would want the access point to operate on.
- Connect Mode: Select the mode the access controller will be connected
• Device Name: Enter the name of the device - Spanning Tree: Select to enable Spanning Tree feature
• STP Forward Delay: Enter the delay time duration
Enable VLAN

- Enable 802.1Q VLAN: Select to enable VLAN feature
• VLAN ID: Enter the assigned VLAN ID of the access controller
IP Address

- DHCP Client: Select to have access controller to receive IP address from your DHCP server
- Static: Select this option to manually configure the access point's IP address.
- IP Address: Enter the IP address to assign
- Subnet Mask: Enter the subnet mask of the access point
- Gateway IP Address: Enter the gateway IP address
- DNS1-2: Enter the DNS IP address to assign on the access point.
DHCP Server
TRENDnet User's Guide
TEW-730APO

• DHCP Client: Select to enable DHCP server
- DHCP IP Address Range: Enter the DHCP IP range to assign
○ Subnet Mask: Enter the Subnet mask to assign DHCP clients
○ Lease Time: Enter the lease time duration for DHCP clients.
ZNMP

• ZNMP Survey Interval: Enter the survey time interval
- P Address: Enter the IP address to assign
- Subnet Mask: Enter the subnet mask of the access point
- Gateway IP Address: Enter the gateway IP address
AP Management
This page displays thin access points connected in the network.
-
Log into the management page (see "Access the management page" on page 9).
-
Click on Status section and Managed APs.
-
Select the access point you would like to configure.
| # | Selected | Device Name | MAC | JP | FW | Status | Clients | TX | RX |
| 1 | TEW-730APO | 06:19, 70:54.5+40 (AC) | 192.168.10.100 | 1.L1(TN)4 | Registered | 0 | 106.8KB | 0.0B |
- Restart: Click this option to restart the selected device(s)
-
Rename: Click this option to rename the selected access point
-
Set IP: Click this option to change the IP address of the selected device
- Radio: Select this option to change the wireless radio settings of the selected device
- Upgrade Selected: Select this option to upgrade the selected devices
- Upgrade All: Select this option to upgrade all devices
- Refresh: Click to refresh the access point list
Advance Settings
Setting time
- Log into the management page (see "Access the management page" on page 9).
- Click on System, and click on Time Settings.
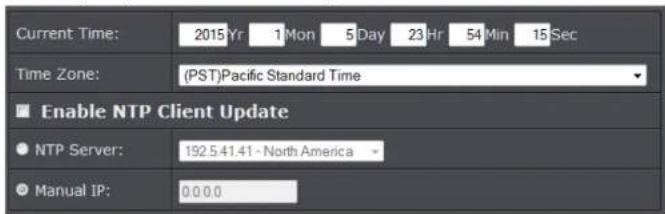
Manual configure time settings
- Manually enter the date and time settings.
- Next to Time Zone Select, select your time zone from the drop down menu. Click Apply to save settings.
Time setting using a NTP server
- Click Enable NTP client update option to obtain date and time settings from a NTP server.
- Select one of the below options. Click Apply to save settings.
• NTP Server: Select a NTP server to use.
- Manual IP: Manually enter your NTP server.
- You can also click Enable NTP client update option to obtain date and time settings from a NTP server.
TRENDnet User's Guide
TEW-730APO
Upgrade Firmware
You may have added many customized settings to your router and in the case that you need to reset your router to default, all your customized settings would be lost and would require you to manually reconfigure all of your router settings instead of simply restoring from a backed up router configuration file.
- Log into the management page (see "Access the management page" on page 9).
- Click on Management, and click on Firmware Upload.

- Click Browse and select the updated firmware file you want to load. Click Upload to load the firmware file.
Note: Any interruption during the firmware upgrade can damage your device.
Backup and restore your router configuration settings
You may have added many customized settings to your router and in the case that you need to reset your router to default, all your customized settings would be lost and would require you to manually reconfigure all of your router settings instead of simply restoring from a backed up router configuration file.
To back up your configuration:
- Log into the management page (see "Access the management page" on page 9).
- Click on Management, and click on Configuration File.

-
Depending on your web browser settings, you may be prompted to save a file (specify the location) or the file may be downloaded automatically to the web browser settings default download folder. (Default Filename: config.bin)
-
Save the configuration file to location on your computer.
To restore your router configuration and upgrade firmware
- Log into the management page (see "Access the management page" on page 9).
-
Click on Management, and click on Configuration File.
-
Under Load Settings from file, click on Browse select your saved configuration file and click Upload.

Reboot your access point
You may want to restart your router if you are encountering difficulties with your router and have attempted all other troubleshooting.
There are two methods that can be used to restart your router.
- Disconnect the power adapter – Located on the rear panel of your router, see "Product Hardware Features" on page 4.
Use this method if you are encountering difficulties with accessing your router management page. This is also known as a hard reboot or power cycle.
Disconnect the power adapter from the power port of your router for 10 seconds, then, plug the power adapter back into the power of your router. Wait for your router Status light to begin flashing.
OR -
Router Management Page – This is also known as a soft reboot or restart. Toolbox > Reboot
-
Log into the management page (see "Access the management page" on page 9).
- Click on Management, and click on Configuration File.

TRENDnet User's Guide
TEW-730APO
- Click Yes or OK if prompted to your reboot your device.
Reset to factory defaults
You may want to reset your router to factory defaults if you are encountering difficulties with your router and have attempted all other troubleshooting. Before you reset your router to defaults, if possible, you should backup your router configuration first, see "Backup and restore your router configuration settings" on page 70.
There are two methods that can be used to reset your router to factory defaults.
- Reset Button – Located on the bottom panel of the access point, cap must be removed to access reset button. Use this method if you are encountering difficulties with accessing your router management page. Push and hold this button for 15 seconds and release to reset your router to its factory defaults.
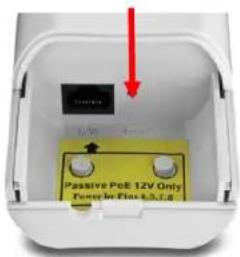
Bottom cap remove
OR
- Router Management Page
Management > Configuration Filet
- Log into the management page (see "Access the management page" on page 9).
- Click on Management, and click on Configuration File.

- You will be prompted to reset your router to factory defaults. Click Yes or OK.
Change your login password
- Log into the management page (see "Access the management page" on page 9).
- Click on Management, and click on Password Settings. Click Apply to save changes.
| Current Password: | |
| New Password: | |
| Confirm Password: |
- Current Password: Enter the current password of the access point.
- New Password: Enter the new password
- Confirm Password: Re-enter the new password to confirm.
Note: If you change the login password, you will need to access the management page using the new password instead of the default password "admin".
Configure your log
You may want send your router log to your e-mail address or to an external log server (also known as Syslog server) so you can check it periodically while away from home. You may also want to only see specific categories of logging.
- Log into the management page (see "Access the management page" on page 9).
- Click on Tools, and click on System Log. Click Apply to save settings.

- Enable Remote Syslog Server: Check this option to enable DMZ
- IP Address: enter the IP address (e.g. 192.168.10.250) of the external log server to send
TRENDnet User's Guide
TEW-730APO
- Port: Enter the port used on your log server.
Email Syslog

- Log Schedule: Select from the pull down menu the schedule to email logs
• Severity level: Select the log types to send - Send to: Enter the email address to send logs
• DHCP Client: Select to enable DHCP server
• Day for sending logs: Select when to email logs
• Time for sending logs: Enter the time when to email logs - Clear logs: Select to delete logs after emailing logs
Email Server

- Send log from: Enter the assigned email recipient
- Subject: Enter the subject of the log email
- SMTP server: Enter the SMTP server of IP address
- SMTP Authentication: Select to authenticate SMTP
- Username: Enter SMTP username
- Password: Enter the SMTP password
View your log
You may want send your router log to your e-mail address or to an external log server (also known as Syslog server) so you can check it periodically while away from home. You may also want to only see specific categories of logging.
- Log into the management page (see "Access the management page" on page 9).
- Click on Management, and click on System Log. Click Apply to save settings.
TRENDnet User's Guide
TEW-730APO
| # | Time | Priority | Source | Message |
| 2 | 2015-01-01 08:02:24 | notice | 192.158.10.126 | WEB: Authorized user "admin". |
| 3 | 2015-01-01 08:40:39 | notice | 192.158.10.126 | WEB: User "admin" logout. |
| 4 | 2015-01-01 08:40:43 | notice | 192.158.10.126 | WEB: Authorized user "admin". |
| 5 | 2015-01-01 09:44:28 | warn | 192.158.10.126 | WEB: Unauthorized user "admin". |
| 6 | 2015-01-01 09:45:13 | notice | 192.158.10.126 | WEB: Authorized user "admin". |
| 7 | 2015-01-01 09:55:11 | notice | 28:00:FC:3D:25:EA | Station authenticated. |
| 8 | 2015-01-01 09:55:38 | warn | 28:00:FC:3D:25:EA | Station deauthenticated. |
| 9 | 2015-01-01 09:55:43 | notice | 28:00:FC:3D:25:EA | Station authenticated. |
- Time: Displays the date and time of the log entry. If the time is inaccurate, make sure to set the router date and time correctly. (See "Setting time" on page 51)
• Source: Source of the log entry - Message: Displays the log message.
- Refresh: Click to refresh the displayed log entries
• Clear: Click to clear all current log entries
Ping Tool
You may want to expose a specific computer or device on your network to the Internet to allow anyone to access it. Your router includes the DMZ (demilitarized zone) feature that makes all the ports and services available on the WAN/Internet side of the router and forwards them to a single IP address (computer or network device) on your network. The DMZ feature is an easy way of allowing access from the Internet however, it is also very insecure method.
- Log into the management page (see "Access the management page" on page 9).
- Click on Tools, and click on Ping. Click Apply to save settings.

• Ping Address: Enter the IP address to ping
• Ping Count: Enter the ping count to conduct
• Data Size: Enter the data size to ping
Device Information
- Log into the management page (see "Access the management page" on page 9).
- Click on Status, and click on Information.
System Information
| System Information | |
| Firmware Version: | 1.1.1(TN)4 |
| MAC Address: | 00:19:70:94:fe:a6 |
| Device Name: | TEW-730APO |
- Firmware Version: Current firmware version of the access point.
• MAC Address: MAC address of the access controller
• Device Name: Assigned name of the device
IP Settings
| IP Settings | |
| IP Address: | 192.168.10.100 |
| Subnet Mask: | 255.255.255.0 |
| Gateway IP Address: | 0.0.0.0 |
• IP Address: Assigned IP address of the access controller
- Subnet Mask: Assigned subnet mask of the access controller
TRENDnet User's Guide
TEW-730APO
- Gateway IP Address: Assigned gateway IP of the access controller
Wireless Networks
| Wireless Networks | |||||
| # | SSID | Security | Clients | TX | RX |
| 1 | TRENDnet730_2.4GHz | Open System | 0 | 0.0B | 0.0B |
-
: Number of access points • SSID: Wireless SSID of the access point
• Security: Assigned wireless security of the access point - Clients: Number of connected clients on the access point
• TX: Date transmit rate of the access point - RX: Data receive rate of the access point
• N IP address of your access point - Subnet Mask: Subnet Mask of your Local Area Network (LAN)
Wireless Users
This page displays all connected wireless clients.
- Log into the management page (see "Access the management page" on page 9).
- Click on Status section and Wireless Users.
| # | MAC | SSID | AP Name | Signal | Uptime | TX | RX |
| --- | --- | --- | --- | --- | --- | --- | --- |
-
: The number of access point • MAC: Displays the MAC address of the access point
• SSID: Displays the SSID of the access point - AP Name: Displays the name assigned to the access point
• Signal: Displays the signal strength of the access point - Uptime: Displays the time duration of when the access point has been running
- Tx: Display the transmit data rate of the access point
- Rx: Displays the receive data rate of the access point
DHCP Client
This table shows the assigned IP address, MAC address and time expired for each DHCP leased client.
- Log into the management page (see "Access the management page" on page 9).
- Click on Status section and DHCP Client.
| # | IP Address | MAC Address | Host Name | Time Expired(m) |
| --- | --- | --- | --- | --- |
-
: The number of access point • IP Address: Displays the IP Address of the access point
• MAC Address: Displays the MAC address of the access point - Host Name: Host name of the access point
• Time Expiration: Displays the DHCP expiration time of the access point
• SSID: Displays the SSID of the access point
- AP Name: Displays the name assigned to the access point
• Signal: Displays the signal strength of the access point - Uptime: Displays the time duration of when the access point has been running
- Tx: Display the transmit data rate of the access point
- Rx: Displays the receive data rate of the access point
Configure Wireless Profile
This section outlines available management options under the Profile Settings of the Wireless button. This access point supports multiple SSID, you can set an additional of 16 SSSID for your wireless network.
TRENDnet User's Guide
TEW-730APO
| ◆# | Enabled | ◆Profile Name | ◆SSID | ◆Security | Vlan ID |
| 1 | Profile1 | 730_2.4GHz | WPA2-PSK | 0 | |
| 2 | Profile2 | TR730_2.4 | WPA2-PSK | 0 | |
| 3 | Profile3 | TRENDnet730_2.4GHz | Open System | 0 | |
| 4 | Profile1 | TRENDnet730_2.4GHz | Open System | 0 | |
| 5 | Profile5 | TRENDnet730_2.4GHz | Open System | 0 | |
| 6 | Profile6 | TRENDnet730_2.4GHz | Open System | 0 | |
| 7 | Profile7 | TRENDnet730_2.4GHz | Open System | 0 | |
| 8 | Profile8 | TRENDnet730_2.4GHz | Open System | 0 |
- Select Always Enabled option and click the Profile Name you would like to configure.

The following section outlines options to configure the basic settings of the multiple SSID.
- Profile Name: Enter the profile name of the network name you are configuring.
- Wireless Network Name (SSID): This acronym stands for Service Set Identifier and is the name of your wireless network. It differentiates your wireless network from others around you.
- Broadcast Network Name (SSID):
- Enabled allows wireless devices to search and discover your wireless network name (also called SSID) broadcasted by your router.
- Disabled turns off the ability for wireless devices to find your network. It is still possible for wireless devices to be configured to connect to your wireless network.
• Wireless Separation:
- Enabled separates all wireless clients connected to this SSID, clients cannot communicate with each other.
-
Disabled allows all wireless clients connect to this SSID to communicate with each other
-
WMM: Wi-Fi Multimedia is a Quality of Service (QoS) feature which prioritizes audio and video data packets. This feature requires the wireless device to also support WMM. Click Enabled (recommended) or Disabled to turn this feature on or off on your router.
- Max. Station Num.: Select this option to limit the amount of clients who can connect to this SSID.
- Enter the amount of clients you would like to limit.
Secure your wireless network
After you have determined which security type to use for your wireless network (see "How to choose the security type for your wireless network" on page 12), you can set up wireless security.
- Log into the management page (see "Access the management page" on page 9).
- Click on Wireless button and click on Profile Settings.
- Click on the Profile name you would like to apply wireless security.
| # | Enabled | Profile Name | SSID | Security | Vlan ID |
| 1 | Profile-1 | 730APBO | Open System | 0 | |
| 2 | In 2 | TEW-730APO | Open System | 0 | |
| 3 | Profile3 | TRENDnet730_2.4GHz | Open System | 0 |
- Select the wireless security on your wireless network from the Network Authentication pull down menu.
TRENDnet User's Guide
TEW-730APO

| WEP Key Format | HEX | ASCII |
| Character set | 0-9 & A-F, a-f only | Alphanumeric (a,b,C,?,*,/,1,2, etc.) |
| 64-bit key length | 10 characters | 5 characters |
| 128-bit key length | 26 characters | 13 characters |
Selecting WEP (Open System or Shared Key):
If selecting WEP (Wired Equivalent Privacy), please review the WEP settings to configure and click Apply to save the changes.
Note: It is recommended to use Open System because it is known to be more secure than Shared Key.

• Data Encryption: Choose the key length 64-bit or 128-bit.
Note: It is recommended to use 128-bit because it is more secure to use a key that consists of more characters.
• Key type: Choose HEX or ASCII.
Note: It is recommended to use ASCII because of the much larger character set that can be used to create the key.
• Key 1-4
- This is where you enter the password or key needed for a computer to connect to the router wirelessly
- You can define up to 4 passwords or 4 keys. Only one key can be active at a given time. Most users simply define one key.
○ Choose a key index 1, 2, 3, or 4 and enter the key.
When connecting to the router, the client must match both the password and the Key number. (e.g. if you have activated Key 2 with a password of 12345, then the client must select: Key 2 (entering Key 1, 3, or 4 will block the ability to connect) and enter password 12345)
- WEP Passphrase: Enter a passphrase and click Generate key to have the access point generate your encryption key.
Selecting WPA-PSK, WPA2-PSK, or WPA-PSK & WPA2-PSK (WPA2-PSK recommended):

The following section outlines options when selecting PSK (Preshared Key Protocol).
• Data Encryption: Select the cipher type to use.
- TKIP: Recommended when using WPA-PSK security.
○ AES: Recommended when using WPA2-PSK or WPA-PSK & WPA2-PSK
- WPA Passphrase – Enter the passphrase.
- This is the password or key that is used to connect your computer to this router wirelessly
acting WPA, WPA2, or WPA & WPA2 with Radius:
TRENDnet User's Guide
TEW-730APO
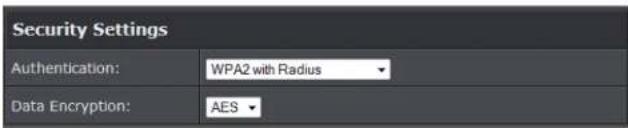
The following section outlines options when selecting Radius.
Note: Radius requires an external RADIUS server, PSK only requires you to create a passphrase.
• Data Encryption: Select the cipher type to use.
- TKIP: Recommended when using WPA-PSK security.
○ AES: Recommended when using WPA2-PSK or WPA-PSK & WPA2-PSK
Once you have selected the data encryption type. Click Apply to save settings and go to the RADIUS Settings section under System button on the left side.

The following section outlines options to configure the access point's RADIUS settings.

- Radius Server: Configure the RADIUS server settings.
- IP: Enter the IP address of the RADIUS server. (e.g. 192.168.10.250)
- Port: Enter the port your RADIUS server is configured to use for RADIUS authentication.
Note: It is recommended to use port 1812.
- Shared Secret: Enter the shared secret used to authorize your router

- Global-Key Update
○ Enable this option to set the cache period based on seconds
Wireless access control
The MAC address filter section can be used to filter network access by machines based on the unique MAC addresses of their network adapter(s). It is most useful to prevent unauthorized wireless devices from connecting to your network. A MAC address is a unique ID assigned by the manufacturer of the network adapter.
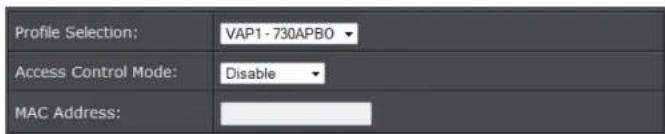
- Access Control Mode:
Profile Selection: Select the wireless profile you would like to apply the access control rule.
○ Disable: Access control is disabled
- Allow Listed: Enter MAC address allowed to connect to the access point
- Deny List: Enter MAC addresses to block connection to the access point.
TRENDnet User's Guide
TEW-730APO
Virtual AC + Thin AP
In this mode the access point becomes the virtual access controller and also a thin access point. Virtual access controller allows you to control all compatible thin access points connected in your network.
Configuration
- Log into the management page (see "Access the management page" on page 9).
- Your access point will prompt you for a user name and password.

- Enter the default user name and password and then click Login.
Default User Name: admin
Default Password: admin - Click the System button on the left side and then System Settings.

- Select Virtual AC + Thin AP in the Device Mode drop down menu and Select your Country/Region.

AP Management
This page displays thin access points connected in the network.
-
Log into the management page (see "Access the management page" on page 9).
-
Click on Management section and AP Management.
-
Select the access point you would like to configure.
| # | Selected | Device Name | MAC | IP | FW | Status | Clients | TX | RX |
| 1 | TEW-730APO | 61.15.75-94.86 (ADC) | 192.168.10.100 | 1.1.1(TN)A | Registered | 0 | 106.6KB | 0.0B |
- Restart: Click this option to restart the selected device(s)
- Rename: Click this option to rename the selected access point
- Set IP: Click this option to change the IP address of the selected device
- Radio: Select this option to change the wireless radio settings of the selected device
- Upgrade Selected: Select this option to upgrade the selected devices
- Upgrade All: Select this option to upgrade all devices
- Refresh: Click to refresh the access point list
System Setting
This page displays thin access points connected in the network.
-
Log into the management page (see "Access the management page" on page 9).
-
Click on Management and System Settings.
Device Settings

- Device Mode: Select the mode you would want the access point to operate on.
TRENDnet User's Guide
TEW-730APO
- Connect Mode: Select the mode the access controller will be connected
• Device Name: Enter the name of the device - Spanning Tree: Select to enable Spanning Tree feature
• STP Forward Delay: Enter the delay time duration
Enable VLAN

- Enable 802.1Q VLAN: Select to enable VLAN feature
- VLAN ID: Enter the assigned VLAN ID of the access controller
IP Address

- DHCP Client: Select to have access controller to receive IP address from your DHCP server
- Static: Select this option to manually configure the access point's IP address.
- IP Address: Enter the IP address to assign
- Subnet Mask: Enter the subnet mask of the access point
- Gateway IP Address: Enter the gateway IP address
- DNS1-2: Enter the DNS IP address to assign on the access point.
DHCP Server

• DHCP Client: Select to enable DHCP server
- DHCP IP Address Range: Enter the DHCP IP range to assign
- Subnet Mask: Enter the Subnet mask to assign DHCP clients
○ Lease Time: Enter the lease time duration for DHCP clients.
ZNMP

• ZNMP Survey Interval: Enter the survey time interval
- P Address: Enter the IP address to assign
○ Subnet Mask: Enter the subnet mask of the access point
- Gateway IP Address: Enter the gateway IP address
Advance Settings
Setting time
- Log into the management page (see "Access the management page" on page 9).
- Click on System, and click on Time Settings.
TRENDnet User's Guide
TEW-730APO

Manual configure time settings
- Manually enter the date and time settings.
- Next to Time Zone Select, select your time zone from the drop down menu. Click Apply to save settings.
Time setting using a NTP server
- Click Enable NTP client update option to obtain date and time settings from a NTP server.
- Select one of the below options. Click Apply to save settings.
• NTP Server: Select a NTP server to use.
- Manual IP: Manually enter your NTP server.
- You can also click Enable NTP client update option to obtain date and time settings from a NTP server.
Upgrade Firmware
You may have added many customized settings to your router and in the case that you need to reset your router to default, all your customized settings would be lost and would require you to manually reconfigure all of your router settings instead of simply restoring from a backed up router configuration file.
- Log into the management page (see "Access the management page" on page 9).
- Click on Management, and click on Firmware Upload.

- Click Browse and select the updated firmware file you want to load. Click Upload to load the firmware file.
Note: Any interruption during the firmware upgrade can damage your device.
Backup and restore your router configuration settings
You may have added many customized settings to your router and in the case that you need to reset your router to default, all your customized settings would be lost and would require you to manually reconfigure all of your router settings instead of simply restoring from a backed up router configuration file.
To back up your configuration:
- Log into the management page (see "Access the management page" on page 9).
- Click on Management, and click on Configuration File.

- Depending on your web browser settings, you may be prompted to save a file (specify the location) or the file may be downloaded automatically to the web browser settings default download folder. (Default Filename: config.bin)
- Save the configuration file to location on your computer.
To restore your router configuration and upgrade firmware
- Log into the management page (see "Access the management page" on page 9).
- Click on Management, and click on Configuration File.
- Under Load Settings from file, click on Browse select your saved configuration file and click Upload.
TRENDnet User's Guide
TEW-730APO
Load Settings from File:
Browse.
No file selected
Upload
Reboot your access point
You may want to restart your router if you are encountering difficulties with your router and have attempted all other troubleshooting.
There are two methods that can be used to restart your router.
- Disconnect the power adapter – Located on the rear panel of your router, see "Product Hardware Features" on page 4.
Use this method if you are encountering difficulties with accessing your router management page. This is also known as a hard reboot or power cycle.
Disconnect the power adapter from the power port of your router for 10 seconds, then, plug the power adapter back into the power of your router. Wait for your router Status light to begin flashing.
OR -
Router Management Page – This is also known as a soft reboot or restart.
Toolbox > Reboot -
Log into the management page (see "Access the management page" on page 9).
- Click on Management, and click on Configuration File.

- Click Yes or OK if prompted to your reboot your device.
Reset to factory defaults
You may want to reset your router to factory defaults if you are encountering difficulties with your router and have attempted all other troubleshooting. Before you reset your router to defaults, if possible, you should backup your router configuration first, see "Backup and restore your router configuration settings" on page 70.
There are two methods that can be used to reset your router to factory defaults.
- Reset Button – Located on the bottom panel of the access point, cap must be removed to access reset button. Use this method if you are encountering difficulties with accessing your router management page. Push and hold this button for 15 seconds and release to reset your router to its factory defaults.
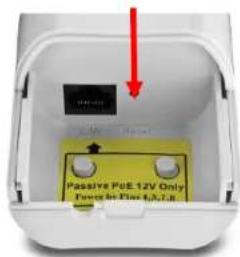
Bottom cap remove
OR
- Router Management Page
Management > Configuration Filet
- Log into the management page (see "Access the management page" on page 9).
- Click on Management, and click on Configuration File.

- You will be prompted to reset your router to factory defaults. Click Yes or OK.
Change your login password
- Log into the management page (see "Access the management page" on page 9).
- Click on Management, and click on Password Settings. Click Apply to save changes.
TRENDnet User's Guide
TEW-730APO

- Current Password: Enter the current password of the access point.
- New Password: Enter the new password
- Confirm Password: Re-enter the new password to confirm.
Note: If you change the login password, you will need to access the management page using the new password instead of the default password "admin".
Configure your log
You may want send your router log to your e-mail address or to an external log server (also known as Syslog server) so you can check it periodically while away from home. You may also want to only see specific categories of logging.
- Log into the management page (see "Access the management page" on page 9).
- Click on Tools, and click on System Log. Click Apply to save settings.

- Enable Remote Syslog Server: Check this option to enable DMZ
- IP Address: enter the IP address (e.g. 192.168.10.250) of the external log server to send
- Port: Enter the port used on your log server.
Email Syslog

- Log Schedule: Select from the pull down menu the schedule to email logs
• Severity level: Select the log types to send - Send to: Enter the email address to send logs
• DHCP Client: Select to enable DHCP server
• Day for sending logs: Select when to email logs
• Time for sending logs: Enter the time when to email logs - Clear logs: Select to delete logs after emailing logs
Email Syslog

- Send log from: Enter the assigned email recipient
- Subject: Enter the subject of the log email
- SMTP server: Enter the SMTP server of IP address
- SMTP Authentication: Select to authenticate SMTP
- Username: Enter SMTP username
- Password: Enter the SMTP password
TRENDnet User's Guide
TEW-730APO
View your log
You may want send your router log to your e-mail address or to an external log server (also known as Syslog server) so you can check it periodically while away from home. You may also want to only see specific categories of logging.
- Log into the management page (see "Access the management page" on page 9).
- Click on Management, and click on System Log. Click Apply to save settings.
| # | Time | Priority | Source | Message |
| 2 | 2015-01-01 08:02:24 | notice | 192.168.10.126 | WEB: Authorized user "admin". |
| 3 | 2015-01-01 08:40:39 | notice | 192.168.10.126 | WEB: User "admin" logout. |
| 4 | 2015-01-01 08:40:43 | notice | 192.168.10.126 | WEB: Authorized user "admin". |
| 5 | 2015-01-01 09:44:28 | warn | 192.168.10.126 | WEB: Unauthorized user "admin". |
| 6 | 2015-01-01 09:45:13 | notice | 192.168.10.126 | WEB: Authorized user "admin". |
| 7 | 2015-01-01 09:55:11 | notice | 28:00:FC:3D:25:EA | Station authenticated. |
| 8 | 2015-01-01 09:55:38 | warn | 28:00:FC:3D:25:EA | Station deauthenticated, |
| 9 | 2015-01-01 09:55:43 | notice | 28:00:FC:3D:25:EA | Station authenticated. |
- Time: Displays the date and time of the log entry. If the time is inaccurate, make sure to set the router date and time correctly. (See "Setting time" on page 51)
• Source: Source of the log entry - Message: Displays the log message.
- Refresh: Click to refresh the displayed log entries
- Clear: Click to clear all current log entries
Ping Tool
- Log into the management page (see "Access the management page" on page 9).
- Click on Tools, and click on Ping. Click Apply to save settings.
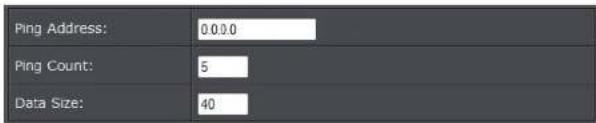
• Ping Address: Enter the IP address to ping
• Ping Count: Enter the ping count to conduct
• Data Size: Enter the data size to ping
Device Information
- Log into the management page (see "Access the management page" on page 9).
- Click on Status, and click on Information.
System Information
| System Information | |
| Firmware Version: | 1.1.1(TN)4 |
| MAC Address: | 00:19:70:94:fe:a6 |
| Device Name: | TEW-730APO |
- Firmware Version: Current firmware version of the access point.
• MAC Address: MAC address of the access controller
• Device Name: Assigned name of the device
IP Settings
| IP Settings | |
| IP Address: | 192.168.10.100 |
| Subnet Mask: | 255.255.255.0 |
| Gateway IP Address: | 0.0.0.0 |
• IP Address: Assigned IP address of the access controller
- Subnet Mask: Assigned subnet mask of the access controller
TRENDnet User's Guide
TEW-730APO
- Gateway IP Address: Assigned gateway IP of the access controller
Wireless Networks
| Wireless Networks | |||||
| # | SSID | Security | Clients | TX | RX |
| 1 | TRENDnet730_2.4GHz | Open System | 0 | 0.0B | 0.0B |
-
: Number of access points • SSID: Wireless SSID of the access point
• Security: Assigned wireless security of the access point - Clients: Number of connected clients on the access point
• TX: Date transmit rate of the access point - RX: Data receive rate of the access point
• N IP address of your access point - Subnet Mask: Subnet Mask of your Local Area Network (LAN)
Wireless Users
This page displays all connected wireless clients.
- Log into the management page (see "Access the management page" on page 9).
- Click on Status section and Wireless Users.
| # | MAC | SSID | AP Name | Signal | Uptime | TX | RX |
| --- | --- | --- | --- | --- | --- | --- | --- |
-
: The number of access point • MAC: Displays the MAC address of the access point
• SSID: Displays the SSID of the access point - AP Name: Displays the name assigned to the access point
• Signal: Displays the signal strength of the access point - Uptime: Displays the time duration of when the access point has been running
- Tx: Display the transmit data rate of the access point
- Rx: Displays the receive data rate of the access point
DHCP Client
This table shows the assigned IP address, MAC address and time expired for each DHCP leased client.
- Log into the management page (see "Access the management page" on page 9).
- Click on Status section and DHCP Client.
| # | IP Address | MAC Address | Host Name | Time Expired(m) |
| --- | --- | --- | --- | --- |
-
: The number of access point • IP Address: Displays the IP Address of the access point
• MAC Address: Displays the MAC address of the access point - Host Name: Host name of the access point
• Time Expiration: Displays the DHCP expiration time of the access point
• SSID: Displays the SSID of the access point
- AP Name: Displays the name assigned to the access point
• Signal: Displays the signal strength of the access point
- Uptime: Displays the time duration of when the access point has been running
- Tx: Display the transmit data rate of the access point
- Rx: Displays the receive data rate of the access point
TRENDnet User's Guide
TEW-730APO
Configure Wireless Profile
This section outlines available management options under the Profile Settings of the Wireless button. This access point supports multiple SSID, you can set an additional of 16 SSSID for your wireless network.
| ◆# | Enabled | ◆ Profile Name | ◆ SSID | ◆ Security | Vlan ID |
| 1 | Profile1 | 730_2.4GHz | WPA2-PSK | 0 | |
| 2 | Profile2 | TR730_2.4 | WPA2-PSK | 0 | |
| 3 | Profile3 | TRENDnet730_2.4GHz | Open System | 0 | |
| 4 | Profile4 | TRENDnet730_2.4GHz | Open System | 0 | |
| 5 | Profile5 | TRENDnet730_2.4GHz | Open System | 0 | |
| 6 | Profile6 | TRENDnet730_2.4GHz | Open System | 0 | |
| 7 | Profile7 | TRENDnet730_2.4GHz | Open System | 0 | |
| 8 | Profile8 | TRENDnet730_2.4GHz | Open System | 0 |
- Select Always Enabled option and click the Profile Name you would like to configure.
| Basic Settings | |
| Profile Name: | Profile1 |
| SSID: | 730_24GHz |
| Broadcast: SSID: | ○Enabled ●Disabled |
| Wireless Separation: | ●Enabled ○Disabled |
| WMM Support: | ●Enabled ●Disabled |
| IGMP Snooping: | ○Enabled ●Disabled |
| ■Max. Station Num: | 32 (1-32) |
The following section outlines options to configure the basic settings of the multiple SSID.
- Profile Name: Enter the profile name of the network name you are configuring.
- Wireless Network Name (SSID): This acronym stands for Service Set Identifier and is the name of your wireless network. It differentiates your wireless network from others around you.
- Broadcast Network Name (SSID):
- Enabled allows wireless devices to search and discover your wireless network name (also called SSID) broadcasted by your router.
○ Disabled turns off the ability for wireless devices to find your network. It is still possible for wireless devices to be configured to connect to your wireless network.
• Wireless Separation:
- Enabled separates all wireless clients connected to this SSID, clients cannot communicate with each other.
○ Disabled allows all wireless clients connect to this SSID to communicate with each other
- WMM: Wi-Fi Multimedia is a Quality of Service (QoS) feature which prioritizes audio and video data packets. This feature requires the wireless device to also support WMM. Click Enabled (recommended) or Disabled to turn this feature on or off on your router.
- Max. Station Num.: Select this option to limit the amount of clients who can connect to this SSID. - Enter the amount of clients you would like to limit.
Secure your wireless network
After you have determined which security type to use for your wireless network (see "How to choose the security type for your wireless network" on page 12), you can set up wireless security.
- Log into the management page (see "Access the management page" on page 9).
- Click on Wireless button and click on Profile Settings.
- Click on the Profile name you would like to apply wireless security.
| # | Enabled | Profile Name | SSID | Security | Vlan ID |
| 1 | Profile-1 | 730APBO | Open System | 0 | |
| 2 | fs ≥ 2 | TEW-730APO | Open System | 0 | |
| 3 | Profile-3 | TRENDnet730_2.4GHz | Open System | 0 |
- Select the wireless security on your wireless network from the Network Authentication pull down menu.
TRENDnet User's Guide
TEW-730APO

| WEP Key Format | HEX | ASCII |
| Character set | 0-9 & A-F, a-f only | Alphanumeric (a,b,C,?,*,/,1,2, etc.) |
| 64-bit key length | 10 characters | 5 characters |
| 128-bit key length | 26 characters | 13 characters |
Selecting WEP (Open System or Shared Key):
If selecting WEP (Wired Equivalent Privacy), please review the WEP settings to configure and click Apply to save the changes.
Note: It is recommended to use Open System because it is known to be more secure than Shared Key.

• Data Encryption: Choose the key length 64-bit or 128-bit.
Note: It is recommended to use 128-bit because it is more secure to use a key that consists of more characters.
• Key type: Choose HEX or ASCII.
Note: It is recommended to use ASCII because of the much larger character set that can be used to create the key.
• Key 1-4
- This is where you enter the password or key needed for a computer to connect to the router wirelessly
- You can define up to 4 passwords or 4 keys. Only one key can be active at a given time. Most users simply define one key.
○ Choose a key index 1, 2, 3, or 4 and enter the key.
When connecting to the router, the client must match both the password and the Key number. (e.g. if you have activated Key 2 with a password of 12345, then the client must select: Key 2 (entering Key 1, 3, or 4 will block the ability to connect) and enter password 12345)
- WEP Passphrase: Enter a passphrase and click Generate key to have the access point generate your encryption key.
Selecting WPA-PSK, WPA2-PSK, or WPA-PSK & WPA2-PSK (WPA2-PSK recommended):

The following section outlines options when selecting PSK (Preshared Key Protocol).
• Data Encryption: Select the cipher type to use.
- TKIP: Recommended when using WPA-PSK security.
○ AES: Recommended when using WPA2-PSK or WPA-PSK & WPA2-PSK
- WPA Passphrase – Enter the passphrase.
- This is the password or key that is used to connect your computer to this router wirelessly
acting WPA, WPA2, or WPA & WPA2 with Radius:
TRENDnet User's Guide
TEW-730APO

The following section outlines options when selecting Radius.
Note: Radius requires an external RADIUS server, PSK only requires you to create a passphrase.
• Data Encryption: Select the cipher type to use.
- TKIP: Recommended when using WPA-PSK security.
○ AES: Recommended when using WPA2-PSK or WPA-PSK & WPA2-PSK
Once you have selected the data encryption type. Click Apply to save settings and go to the RADIUS Settings section under System button on the left side.
The following section outlines options to configure the access point's RADIUS settings.
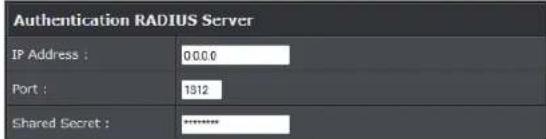
- Radius Server: Configure the RADIUS server settings.
- IP: Enter the IP address of the RADIUS server. (e.g. 192.168.10.250)
- Port: Enter the port your RADIUS server is configured to use for RADIUS
authentication.
Note: It is recommended to use port 1812.
- Shared Secret: Enter the shared secret used to authorize your router

- Global-Key Update
- Enable this option to set the cache period based on seconds
Wireless access control
The MAC address filter section can be used to filter network access by machines based on the unique MAC addresses of their network adapter(s). It is most useful to prevent unauthorized wireless devices from connecting to your network. A MAC address is a unique ID assigned by the manufacturer of the network adapter.

- Access Control Mode:
Profile Selection: Select the wireless profile you would like to apply the access control rule.
○ Disable: Access control is disabled
- Allow Listed: Enter MAC address allowed to connect to the access point
- Deny List: Enter MAC addresses to block connection to the access point.
Additional hardware installation
Ground wire
When placing your device out in an open area where lightning strikes can occur, it is advisable to ground it. This would protect your device from being damage and your network.
- Pinch the tab and slide the bottom cover down
- Remove the screw and insert the grounding wire on the screw.
- Tighten the screw firmly in place and router the wire alongside the Ethernet cable.
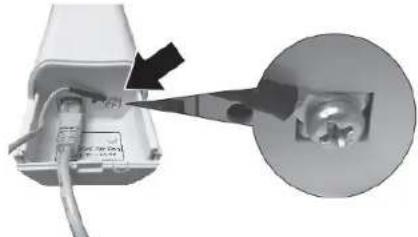
natural_image
Close-up of a small electronic device with cable and connector, showing a magnified view of a socket (no text or symbols visible)- Position both wires inside the access hole and the edge of the case, slide the cover back into place
Pole mounting
The access point comes with a pole mounting clamp that allows you to mount the device to a pole. The weather and outdoor rating of the device is based on upright position. It is important that the device is always mounted in an upright position.
Note: The mounting clamp supports up to 63mm diameter.
- Loosen the pole mounting clamp by turn the bolt in of the clamp counter clock wise

- Insert one end of the clamp through the back (center section) of the access point.

natural_image
Close-up of a white industrial air conditioner unit with red arrows indicating airflow or movement (no visible text or symbols)- Align the access point to the pole and tighten up the clamp till the access point is secured on the pole.
Troubleshooting
Q: I typed http://192.168.10.100 in my Internet Browser Address Bar, but an error message says "The page cannot be displayed." How can I access the access point management page?
Answer:
- Check your hardware settings again and that all cables are properly connected
- Make sure the LAN and WLAN lights are lit.
- Make sure your network adapter TCP/IP settings are set in the subnet class as the access point when accessing with a static IP address or Obtain an IP address automatically (see the steps below).
- Press on the factory reset button for 15 seconds, the release.
Windows 7
a. Go into the Control Panel, click Network and Sharing Center.
b. Click Change Adapter Settings, right-click the Local Area Connection icon.
c. Then click Properties and click Internet Protocol Version 4 (TCP/IPv4).
d. Then click Obtain an IP address automatically and click OK.
Windows Vista
a. Go into the Control Panel, click Network and Internet.
b. Click Manage Network Connections, right-click the Local Area Connection
icon and click Properties.
c. Click Internet Protocol Version (TCP/IPv4) and then click Properties.
d. Then click Obtain an IP address automatically and click OK.
Windows XP/2000
a. Go into the Control Panel, double-click the Network Connections icon
b. Right-click the Local Area Connection icon and the click Properties.
c. Click Internet Protocol (TCP/IP) and click Properties.
d. Then click Obtain an IP address automatically and click OK.
Note: If you are experiencing difficulties, please contact your computer or operating system manufacturer for assistance.
Q: I am connected to the access point and able to pull DHCP from my network, but I cannot get onto the Internet. What should I do?
Answer:
- Verify that you can get onto the Internet with a direct connection into your router (meaning plug your computer directly to the router and verify that your single computer can access the Internet).
- Power cycle your modem and router. Unplug the power to the modem and router. Wait 30 seconds, and then reconnect the power to the modem. Wait for the modem to fully boot up, and then reconnect the power to the router.
- Contact your ISP and verify all the information that you have in regards to your Internet connection settings is correct.
Q: I cannot connect wirelessly to the access point. What should I do?
Answer:
- Double check that the WLAN light on the router is lit.
- Power cycle the access point. Unplug the power to the router. Wait 15 seconds, then plug the power back in to the router.
- Contact the manufacturer of your wireless network adapter and make sure the wireless network adapter is configured with the proper SSID. The preset SSID is TRENDnet (model_number).
- Please see "Wireless Performance Consideration" if you continue to have wireless connectivity problems.
TRENDnet User's Guide
Appendix
Appendix
How to find your IP address?
Note: Please note that although the following procedures provided to follow for your operating system on configuring your network settings can be used as general guidelines, however, it is strongly recommended that you consult your computer or operating system manufacturer directly for assistance on the proper procedure for configuring network settings.
Command Prompt Method
Windows 2000/XP/Vista/7
- On your keyboard, press Windows Logo+R keys simultaneously to bring up the Run dialog box.
- In the dialog box, type cmd to bring up the command prompt.
- In the command prompt, type ipconfig /all to display your IP address settings.
MAC OS X
- Navigate to your Applications folder and open Utilities.
- Double-click on Terminal to launch the command prompt.
- In the command prompt, type ipconfig getifaddr
to display the wired or wireless IP address settings.
Note: en0 is typically the wired Ethernet and en1 is typically the wireless Airport interface.
Graphical Method
MAC OS 10.6/10.5
- From the Apple menu, select System Preferences.
- In System Preferences, from the View menu, select Network.
- In the Network preference window, click a network port (e.g., Ethernet, AirPort, and modem). If you are connected, you'll see your IP address settings under "Status:"
MAC OS 10.4
- From the Apple menu, select Location, and then Network Preferences.
- In the Network Preference window, next to "Show:" select Network Status. You'll see your network status and your IP address settings displayed.
Note: If you are experiencing difficulties, please contact your computer or operating system manufacturer for assistance.
How to configure your network settings to obtain an IP address automatically or use DHCP?
Note: Please note that although the following procedures provided to follow for your operating system on configuring your network settings can be used as general guidelines, however, it is strongly recommended that you consult your computer or operating system manufacturer directly for assistance on the proper procedure for configuring network settings.
Windows 7
a. Go into the Control Panel, click Network and Sharing Center.
b. Click Change Adapter Settings, right-click the Local Area Connection icon.
c. Then click Properties and click Internet Protocol Version 4 (TCP/IPv4).
d. Then click Obtain an IP address automatically and click OK.
Windows Vista
a. Go into the Control Panel, click Network and Internet.
b. Click Manage Network Connections, right-click the Local Area Connection icon and click Properties.
c. Click Internet Protocol Version (TCP/IPv4) and then click Properties.
d. Then click Obtain an IP address automatically and click OK.
Windows XP/2000
a. Go into the Control Panel, double-click the Network Connections icon
b. Right-click the Local Area Connection icon and the click Properties.
c. Click Internet Protocol (TCP/IP) and click Properties.
d. Then click Obtain an IP address automatically and click OK.
MAC OS 10.4/10.5/10.6
a. From the Apple, drop-down list, select System Preferences.
b. Click the Network icon.
c. From the Location drop-down list, select Automatic.
d. Select and view your Ethernet connection.
In MAC OS 10.4, from the Show drop-down list, select Built-in
Ethernet and select the TCP/IP tab.
In MAC OS 10.5/10.6, in the left column, select Ethernet.
e. Configure TCP/IP to use DHCP.
TRENDnet User's Guide
Appendix
In MAC 10.4, from the Configure IPv4, drop-down list, select Using DHCP and click the Apply Now button.
In MAC 10.5, from the Configure drop-down list, select Using DHCP and click the Apply button.
In MAC 10.6, from the Configure drop-down list, select Using DHCP and click the Apply button.
f. Restart your computer.
Note: If you are experiencing difficulties, please contact your computer or operating system manufacturer for assistance.
How to find your MAC address?
In Windows 2000/XP/Vista/7,
Your computer MAC addresses are also displayed in this window, however, you can type getmac -v to display the MAC addresses only.
In MAC OS 10.4,
- Apple Menu > System Preferences > Network
- From the Show menu, select Built-in Ethernet.
- On the Ethernet tab, the Ethernet ID is your MAC Address.
In MAC OS 10.5/10.6,
- Apple Menu > System Preferences > Network
- Select Ethernet from the list on the left.
- Click the Advanced button.
- On the Ethernet tab, the Ethernet ID is your MAC Address.
How to connect to a wireless network using the built-in Windows utility?
Note: Please note that although the following procedures provided to follow for your operating system on configuring your network settings can be used as general guidelines, however, it is strongly recommended that you consult your computer or operating system manufacturer directly for assistance on the proper procedure for connecting to a wireless network using the built-in utility.
Windows 7
- Open Connect to a Network by clicking the network icon (or) in the notification area.
- In the list of available wireless networks, click the wireless network you would like to connect to, then click Connect.
- You may be prompted to enter a security key in order to connect to the network.
- Enter in the security key corresponding to the wireless network, and click OK.
Windows Vista
- Open Connect to a Network by clicking the Start Button. and then click Connect To.
- In the Show list, click Wireless.
- In the list of available wireless networks, click the wireless network you would like to connect to, then click Connect.
- You may be prompted to enter a security key in order to connect to the network.
- Enter in the security key corresponding to the wireless network, and click OK.
Windows XP
- Right-click the network icon in the notification area, then click View Available Wireless Networks.
- In Connect to a Network, under Available Networks, click the wireless network you would like to connect to.
- You may be prompted to enter a security key in order to connect to the network.
- Enter in the security key corresponding to the wireless network, and click Connect.
TRENDnet User's Guide
Appendix
Federal Communication Commission Interference Statement
This equipment has been tested and found to comply with the limits for a Class B digital device, pursuant to Part 15 of the FCC Rules. These limits are designed to provide reasonable protection against harmful interference in a residential installation. This equipment generates uses and can radiate radio frequency energy and, if not installed and used in accordance with the instructions, may cause harmful interference to radio communications. However, there is no guarantee that interference will not occur in a particular installation. If this equipment does cause harmful interference to radio or television reception, which can be determined by turning the equipment off and on, the user is encouraged to try to correct the interference by one of the following measures:
Reorient or relocate the receiving antenna.
- Increase the separation between the equipment and receiver.
- Connect the equipment into an outlet on a circuit different from that to which the receiver is connected.
- Consult the dealer or an experienced radio/TV technician for help.
FCC Caution: Any changes or modifications not expressly approved by the party responsible for compliance could void the user's authority to operate this equipment.
This device complies with Part 15 of the FCC Rules. Operation is subject to the following two conditions: (1) This device may not cause harmful interference, and (2) this device must accept any interference received, including interference that may cause undesired operation.
IMPORTANT NOTE:
FCC Radiation Exposure Statement:
This equipment complies with FCC radiation exposure limits set forth for an uncontrolled environment. This equipment should be installed and operated with minimum distance 20cm between the radiator & your body.
This transmitter must not be co-located or operating in conjunction with any other antenna or transmitter.
The availability of some specific channels and/or operational frequency bands are country dependent and are firmware programmed at the factory to match the intended destination. The firmware setting is not accessible by the end user.
RoHS
This product is RoHS compliant.


Europe – EU Declaration of Conformity
TRENDnet hereby declare that the product is in compliance with the essential requirements and other relevant provisions under our sole responsibility.
Safety
EN 60950-1:2006+A11:2009+A1:2010+A12:2011
EN 60950-22: 2005
EMC
EN 55022: 2010 + AC: 2011 Class B
EN 55024: 2010
EN 301 489-1 V1.9.2: 09-2011
EN 301 489-17 V2.2.1:09-2012

Radio Spectrum & Health
EN 300 328 V1.8.1 : (2012-06)
EN 62311: 2008
Energy Efficiency
Regulation (EC) No. 1275/2008, Regulation, No. 278/2009, No. 801/2013
This product is herewith confirmed to comply with the Directives.
Directives
Low Voltage Directive 2006/95/EC
EMC Directive 2004/108/EC
EMF Directive 1999/519/EC
R&TTE Directive 1999/5/EC
Ecodesign Directive 2009/125/EC
RoHS Directive 2011/65/EU
REACH Regulation (EC) No. 1907/2006
TRENDnet User's Guide
Appendix
Industry Canada Statement
This device complies with Industry Canada license-exempt RSS standard(s). Operation is subject to the following two conditions: (1) this device may not cause interference, and (2) this device must accept any interference, including interference that may cause undesired operation of the device.
Radiation Exposure Statement:
This equipment complies with IC radiation exposure limits set forth for an uncontrolled environment. This equipment should be installed and operated with minimum distance 20cm between the radiator & your body.
TRENDnet User's Guide
Limited Warranty
Limited Warranty
TRENDnet warrants its products against defects in material and workmanship, under normal use and service, for the following lengths of time from the date of purchase.
TEW-730PO - 3 Years Warranty
AC/DC Power Adapter, Cooling Fan, and Power Supply carry 1 year warranty.
If a product does not operate as warranted during the applicable warranty period, TRENDnet shall reserve the right, at its expense, to repair or replace the defective product or part and deliver an equivalent product or part to the customer. The repair/replacement unit's warranty continues from the original date of purchase. All products that are replaced become the property of TRENDnet. Replacement products may be new or reconditioned. TRENDnet does not issue refunds or credit. Please contact the point-of-purchase for their return policies.
TRENDnet shall not be responsible for any software, firmware, information, or memory data of customer contained in, stored on, or integrated with any products returned to TRENDnet pursuant to any warranty.
There are no user serviceable parts inside the product. Do not remove or attempt to service the product by any unauthorized service center. This warranty is voided if (i) the product has been modified or repaired by any unauthorized service center, (ii) the product was subject to accident, abuse, or improper use (iii) the product was subject to conditions more severe than those specified in the manual.
Warranty service may be obtained by contacting TRENDnet within the applicable warranty period and providing a copy of the dated proof of the purchase. Upon proper submission of required documentation a Return Material Authorization (RMA) number will be issued. An RMA number is required in order to initiate warranty service support for all TRENDnet products. Products that are sent to TRENDnet for RMA service must have the RMA number marked on the outside of return packages and sent to TRENDnet prepaid, insured and packaged appropriately for safe shipment. Customers shipping from outside of the USA and Canada are responsible for return shipping fees. Customers shipping from outside of the USA are responsible for custom charges, including but not limited to, duty, tax, and other fees.
WARRANTIES EXCLUSIVE: IF THE TRENDNET PRODUCT DOES NOT OPERATE AS WARRANTED ABOVE, THE CUSTOMER'S SOLE REMEDY SHALL BE, AT TRENDNET'S OPTION, REPAIR OR REPLACE. THE FOREGOING WARRANTIES AND REMEDIES ARE EXCLUSIVE AND ARE IN LIEU OF ALL OTHER WARRANTIES, EXPRESSED OR IMPLIED, EITHER IN FACT OR BY OPERATION OF LAW, STATUTORY OR OTHERWISE, INCLUDING
WARRANTIES OF MERCHANTABILITY AND FITNESS FOR A PARTICULAR PURPOSE. TRENDNET NEITHER ASSUMES NOR AUTHORIZES ANY OTHER PERSON TO ASSUME FOR IT ANY OTHER LIABILITY IN CONNECTION WITH THE SALE, INSTALLATION MAINTENANCE OR USE OF TRENDNET'S PRODUCTS.
TRENDNET SHALL NOT BE LIABLE UNDER THIS WARRANTY IF ITS TESTING AND EXAMINATION DISCLOSE THAT THE ALLEGED DEFECT IN THE PRODUCT DOES NOT EXIST OR WAS CAUSED BY CUSTOMER'S OR ANY THIRD PERSON'S MISUSE, NEGLECT, IMPROPER INSTALLATION OR TESTING, UNAUTHORIZED ATTEMPTS TO REPAIR OR MODIFY, OR ANY OTHER CAUSE BEYOND THE RANGE OF THE INTENDED USE, OR BY ACCIDENT, FIRE, LIGHTNING, OR OTHER HAZARD.
LIMITATION OF LIABILITY: TO THE FULL EXTENT ALLOWED BY LAW TRENDNET ALSO EXCLUDES FOR ITSELF AND ITS SUPPLIERS ANY LIABILITY, WHETHER BASED IN CONTRACT OR TORT (INCLUDING NEGLIGENCE), FOR INCIDENTAL, CONSEQUENTIAL, INDIRECT, SPECIAL, OR PUNITIVE DAMAGES OF ANY KIND, OR FOR LOSS OF REVENUE OR PROFITS, LOSS OF BUSINESS, LOSS OF INFORMATION OR DATE, OR OTHER FINANCIAL LOSS ARISING OUT OF OR IN CONNECTION WITH THE SALE, INSTALLATION, MAINTENANCE, USE, PERFORMANCE, FAILURE, OR INTERRUPTION OF THE POSSIBILITY OF SUCH DAMAGES, AND LIMITS ITS LIABILITY TO REPAIR, REPLACEMENT, OR REFUND OF THE PURCHASE PRICE PAID, AT TRENDNET'S OPTION. THIS DISCLAIMER OF LIABILITY FOR DAMAGES WILL NOT BE AFFECTED IF ANY REMEDY PROVIDED HEREIN SHALL FAIL OF ITS ESSENTIAL PURPOSE.
Governing Law: This Limited Warranty shall be governed by the laws of the state of California.
Some TRENDnet products include software code written by third party developers. These codes are subject to the GNU General Public License ("GPL") or GNU Lesser General Public License ("LGPL").
Go to http://www.trendnet.com/gpl or http://www.trendnet.com Download section and look for the desired TRENDnet product to access to the GPL Code or LGPL Code. These codes are distributed WITHOUT WARRANTY and are subject to the copyrights of the developers. TRENDnet does not provide technical support for these codes. Please go to http://www.gnu.org/licenses/gpl.txt or http://www.gnu.org/licenses/lgpl.txt for specific terms of each license.
PWP05202009v2 2015/07/24
TRENDNET®
Product Warranty Registration
Please take a moment to register your product online. Go to TRENDnet's website at http://www.trendnet.com/register
TRENDnet
20675 Manhattan Place
Torrance, CA 90501. USA
Copyright ©2015. All Rights Reserved. TRENDnet.
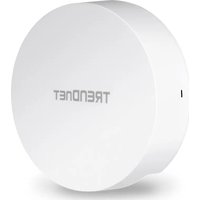
- dBi Outdoor PoE Access Point
- TRENDnet User's Guide
- Table of Contents
- Contents
- Product Overview ....3
- Product Hardware Features....4
- Getting Started ....7
- Configuration....10
- Device Modes ....10
- FAT AP 11
- Router Mode....18
- Wireless Networking and Security....19
- Advance Settings....23
- Access Control 25
- Thin AP 34
- Virtual AC 35
- Advance Settings....37
- Virtual AC + Thin AP 46
- Advance Settings......47
- Additional hardware installation....56
- Troubleshooting 57
- Appendix 58
- Product Overview
- Package Contents
- Features
- Multi-Mode Support
- Fat AP Mode
- Thin AP Mode
- Virtual Access Control (AC) Mode
- Wireless N300 (2.4 GHz)
- Directional Antenna
- Outdoor Rated
- Power over Ethernet (PoE)
- Logs
- TEW-730APO
- Encrypted Wireless
- Compatibility
- Mounting Hardware
- Application Diagram
- Creating a Network
- How to set up a home network
- Wireless Performance Considerations
- Getting Started
- Hardware Installation
- Connect wireless devices to your access point
- Steps to improve wireless connectivity
- Configuration
- Access the management page
- Device Modes
- FAT AP
- AP Mode
- Wireless Profile
- - Wireless Separation:
- - Disable Wireless LAN Interface:
- Site Survey
- Bridge Mode
- Router Mode
- Wireless Networking and Security
- How to choose the type of security for your wireless network
- Wireless Encryption Types
- Secure your wireless network
- Selecting WEP (Open System or Shared Key):
- Wireless access control
- Advance Settings
- Change your IP address
- Configure your Internet connection
- Setting time
- Manual configure time settings
- Time setting using a NTP server
- Advance wireless settings
- Change your login password
- Access Control
- IP Filtering
- Port Filtering
- MAC Filtering
- Port Forwarding
- Example: To forward TCP port 80 to your network/IP camera
- Open a device on your network to the Internet
- DMZ
- Configure your log
- View your log
- Ping Watchdog
- Remote Management
- Upgrade Firmware
- Backup and restore your router configuration settings
- To back up your configuration:
- To restore your router configuration and upgrade firmware
- Reboot your access point
- Reset to factory defaults
- OR
- - Router Management Page
- Certificate configuration settings
- Device Information
- WAN Settings
- Wireless Settings
- Associated Information
- Statistics
- ARP Table
- Bridge Table
- DHCP Clients
- Thin AP
- Basic Setting
- Access Control Mode
- VLAN
- √ Enable 802.1Q VLAN
- Information
- Virtual AC
- System Setting
- Device Settings
- Enable VLAN
- IP Address
- DHCP Server
- ZNMP
- AP Management
- Email Syslog
- Email Server
- Ping Tool
- : Number of access points
- Wireless Users
- : The number of access point
- DHCP Client
- Configure Wireless Profile
- • Key type: Choose HEX or ASCII.
- • Key 1-4
- The following section outlines options when selecting Radius.
- Virtual AC + Thin AP
- Additional hardware installation
- Ground wire
- Pole mounting
- Troubleshooting
- Answer:
- Windows 7
- Windows Vista
- Windows XP/2000
- Appendix
- MAC OS X
- Graphical Method
- MAC OS 10.6/10.5
- MAC OS 10.4
- MAC OS 10.4/10.5/10.6
- How to find your MAC address?
- How to connect to a wireless network using the built-in Windows utility?
- Windows XP
- Federal Communication Commission Interference Statement
- IMPORTANT NOTE:
- FCC Radiation Exposure Statement:
- RoHS
- Europe – EU Declaration of Conformity
- Safety
- EMC
- Radio Spectrum & Health
- Energy Efficiency
- Directives
- Industry Canada Statement
- Radiation Exposure Statement:
- Limited Warranty
- TRENDNET®
- Product Warranty Registration
Brand : TRENDNET
Model : TEW-730APO
Category : Access Point