
PKRK8 - Karaoke Pyle - Free user manual and instructions
Find the device manual for free PKRK8 Pyle in PDF.


| Product Type | Karaoke System |
| Brand | Pyle |
| Model | PKRK8 |
| Color | Black |
| Power Supply | AC 100-240V, 50/60Hz |
| Speaker Output | 5W RMS |
| Bluetooth Version | 5.0 |
| Microphone Inputs | 2 x 1/4" (6.35mm) |
| Connectivity | USB, SD Card, AUX, FM Radio |
| Display | LED with multi-color lights |
| Dimensions (W x H x D) | 12.2 x 8.1 x 5.9 inches |
| Weight | 4.6 lbs |
| Included Accessories | 2 wired microphones, remote control, audio cable, user manual |
| Audio Features | Echo control, volume/treble/bass adjustment |
| Frequency Range | FM: 87.5-108 MHz |
| Max Power Output | 5W |
| Playback Media | USB/SD up to 32GB, MP3/WMA |
| Battery | Not included (AC powered only) |
Frequently Asked Questions - PKRK8 Pyle
User questions about PKRK8 Pyle
0 question about this device. Answer the ones you know or ask your own.
Ask a new question about this device
Download the instructions for your Karaoke in PDF format for free! Find your manual PKRK8 - Pyle and take your electronic device back in hand. On this page are published all the documents necessary for the use of your device. PKRK8 by Pyle.
USER MANUAL PKRK8 Pyle
718.535.1800 718.236.2400(fax) 1600 63rd Street, Brooklyn NY 11204
PYLE®
PKRK8 OPPERATING INSTRUCTIONS
300 Watt Bluetooth Karaoke Vibe Portable PA Speaker w/8"Woofer, 7"TFT Screen, DVD Player and VHF Wireless Microphone

natural_image
Black PYLE portable electronic device with a microphone and external antenna (no visible text or symbols on the device body)Karaoke
User's manual
Panel design

-
Power ON/OFF switch
-
Guitar Volume controller
3.Mic volume
-
Echo for microphones
-
Bass controller for main channel
6.Treble controller for main channel
- Master volume controller
8.Mic Priority ON/OFF
9.DC 12V Input
-
Low battery indicator lights
-
Charging indicator lights1
-
Power ON/MP3 Working indicator lights
-
Guitar Input slot
14.MIC input slot
15.Input selectors
-
Next song selector
-
Previous song selector
-
Play for Mp3 or other audio sources
-
Repeat function for USB/SD
20.Mp3 player
21.Aux-In
22.Video output
23.Audio Input
- Audio Output
DVD Panel design
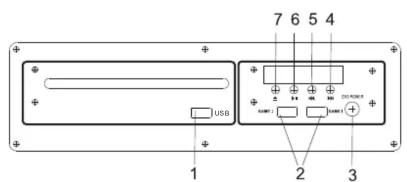
- USB slot
2.Game Slot
-
Power ON/OFF
-
Next
5.Previous
6.Play/Pause
7.Open/Close
DVD Remote contol
1.Open/Close for DVD
- PÁL/NTSC/AUTO switch
3.Mute for speakers
4.Radom play
-
Subtitle selector
-
Angle: choose different angles for visual
-
Vidoe Mode selector
8.A-B: Repeat from A to B
- Set up: set up for many functions
10.11.28.30. Four directions controllers
-
Menu for DVD player
-
Language: Choose to different operation language
14.STOP:stop the disc playing
- Volume +: increase the Volume
16.VOLUME-:decrease the volume level
17.1-10.10+: Numbers for choose discs or songs
18.Time: select the time you want to play
-
Next for song or other playing
-
Previous for song or other playing
21.Forward
- Backward for discs
23.DVD/USB switch
- Programme: make programmer for your
playing
25.Play/Pause controllers
-
Reset: reset for all playing back to Menu
-
Title: press this will playing from title
-
Confirm: confirm for your operation
31.PBC: open all menu for discs
32.View
3.3.Repeat: repeat for disc or songs
- Slow: will slow down your playing 35. For cheese different sound effect
33.Eq, choose different sound effect 26.ZOOM: enlarge what you playing
36.ZOOM: enlarge what you playing
- STEP: step playing the present videos or pictures
pictures
38.OSD:operation situation display
- Power: power in or standby your DVD player
7"display screen


User's manual
User's manual
Instructions
Turning ON/OFF
The PA speaker can be powered when connected to main power or using the internal 12V battery.
- Connect the power cable to the top of the unit.
- Connect the other end of power cable to main power.
- Turn on the switch for the main power.
- The unit will automatically power on when connected to main power.
Notes: If you wish to use the internal battery power of the unit, just simply turn on the Battery switch located on the top of unit to ON. Charging
Before using the PA speaker for the first time, charge the unit at least 8 hours.
- Connect the power cable to the top of the panel.
- Turn off the battery switch on the top of the panel.
- Recharge indicator light will be on when unit is charging. Notes: Notes: The internal battery will charge while the unit is being operated and the power switch is on. It is better to charge the unit while the power switch is off.
Instructions
Using the Wireless Microphone
The PA speaker comes with wireless microphones to get you started straight out of the box.
- Tune on the unit.
- Unscrew the bottom of the microphone to access the battery enclosure. Insert 2XAA batteries into the microphone. Take note the battery polarity when inserting the batteries.
- Replace the bottom microphone cover.
- The wireless microphone will flash once and automatically pair with the PA speaker, it is ready to use. If it does not flash, check that you have inserted the batteries correctly or replace old batteries.
- Adjust the volume of the microphone by turning the MIC VOL knob located on top control panel
Notes: Please do not operate the microphone directly in front of the PA speaker, please set the MIC VOL/ECHO at a lower level before turning on the wireless microphone. Operating the microphone incorrectly will cause a loud squealing noise. Please turn off the power switch when the wireless microphone is not in use. This will save the battery.
Instructions:
Using the Wired Microphone
You can connect the wired microphone to this unit using the MIC INPUT located on the top of control panel.
- Turn off the unit.
- Connect your wired microphone to the MIC INPUT located on top of the control panel.
- Adjust the microphone volume by tuning the MIC VOL/ECHO knobs located on top control panel.
NOTES: You can use the wired microphone and wireless microphone at the same time.
Connecting a Guitar
You can connect your Guitar to unit using the 1/4" GUITAR INPUT plug.
- Turn on the unit.
- Connect your guitar cable to GUITAR INPUT port on top control panel.
- Adjust the volume by turning the GUITAR VOL on top control panel.
Instructions
USB/SD Card Playback
You can play music from USB stick or SD Card using the USB/SD slot on the PA speaker.
- Turn on the unit.
User's manual
User's manual
- Insert your USB or SD card into the slot.
- Once inserted the USB or SD card unit will automatically play.
- You can use the PRE/NEXT/PLAY/PAUSE to control and play music. NOTES: The speaker system can play the following audio file formats: MP3, MP4, WMA. The USB/SD Card no more than 32GB. Operation may be slower when searching large memory files. It will need several seconds to respond when your USB/SD Card full of contents.
BLUETOOTH playback
You can connect your Bluetooth phone or other device to the PA speaker.
- Turn on the unit.
- Press the INPUT button which is located on top control panel, next to the USB/SD slot.
- The Bluetooth is on when you hear two "tone" indicator sound.
- Use your Bluetooth phone or other device to search for the PA speaker. It will displayed as PKRK8.
- Connect your device by selecting PKRK8, it will require you to enter a four digit code, the code is 0000.
- Enter the code and connect with unit.
- Play music on your phone or device, sound will come from the speaker through the BLUETOOTH wireless connection.
- You can use the VOLUME/BASS/TREBLE to adjust the sound level for BLUETOOTH, also you can adjust the Bluetooth music sound through your own phone or other device.
NOTES: If there is no sound through the PA speaker during Bluetooth, Check the volume controller both on the unit and on your phone or other device.
Using the Radio
- Turn on the unit.
-
Press INPUT once, to select FM Radio.
-
Press PRE/NEXT to select your desired radio station. Ensure that you have the extended the antenna located on the rear of the speaker. It will ensure the best possible radio quality and signal strength.
- When you first use the radio, press NEXT button twice, it will auto search and store the radio stations with the strongest signal.
Instructions
Use of the External Battery Option
To use the PA speaker longer than the internal battery life, you can connect the PA speaker to a external 12V Battery Source.
1. Find the INPUT DC 12V on the top control panel.
- Use the correct cable connect the INPUT DC 12V. NOTES: The PA speaker will consume the internal battery first, when it is low, the LOW BATTERY indicator light located on the control panel will turn on, you can use the external 12V battery to power on the unit. The external 12V battery will also charge the internal battery while in use.

PyleAudio 1600 63rd St Brooklyn, NY 11204 www.pyleaudio.com


Brand : Pyle
Model : PKRK8
Category : Karaoke