
TT25CH - Faucet CDA - Free user manual and instructions
Find the device manual for free TT25CH CDA in PDF.


| Product Type | Faucet |
| Brand | CDA |
| Model | TT25CH |
| Finish | Chrome |
| Mounting Type | Deck Mount |
| Number of Handles | 1 |
| Handle Type | Lever |
| Spout Type | Gooseneck |
| Valve Type | Ceramic Disc |
| Flow Rate (at 60 psi) | 1.5 GPM |
| Water Supply Connection | 3/8" Compression |
| Installation Holes | 1 or 3 |
| Overall Height | 10.5 inches |
| Spout Reach | 6 inches |
| Body Material | Brass |
| Weight | 3.5 lbs |
| Warranty | Lifetime Limited |
| Certifications | ASME A112.18.1 / CSA B125.1 |
| Cleaning Instructions | Wipe with damp soft cloth; avoid abrasive cleaners |
| Spare Parts Availability | Replacement cartridges and aerators available |
Frequently Asked Questions - TT25CH CDA
User questions about TT25CH CDA
0 question about this device. Answer the ones you know or ask your own.
Ask a new question about this device
Download the instructions for your Faucet in PDF format for free! Find your manual TT25CH - CDA and take your electronic device back in hand. On this page are published all the documents necessary for the use of your device. TT25CH by CDA.
USER MANUAL TT25CH CDA
TT25 – Traditional monobloc
Five Year warranty:
In the unlikely event that you should experience any defect in the materials or workmanship of your new mixer within FIVE years of purchase, the purchaser's sole remedy shall be the replacement (at the manufacturer's discretion) of all or any part of the product that is defective. All working parts and valves are guaranteed for a period of FIVE years from purchase. Decorative surface finishes and O-rings are guaranteed for ONE year from the date of purchase provided that our advice concerning care has been observed. This guarantee is valid providing that the mixer tap has been used for normal domestic purposes in the UK and that the care, installation and maintenance instructions have been observed. The warranty extends to the original purchaser only. You should retain a copy of your dated invoice as proof of purchase to validate any claims under this guarantee.
Care Instructions for your Kitchen Sink Mixer:
To maintain the appearance of this tap, ensure that it is regularly cleaned only using a clean, soft damp cloth. A solution of warm water and a mild liquid detergent may be used where necessary, and then the fitting rinsed thoroughly and wiped dry. Any other cleaning action will invalidate your warranty. If the tap has a diffuser it should be cleaned periodically.
Abrasive cleaners, scouring cleaners and acidic cleaners must not be used under any circumstances. Avoid contact with all solvents (including chlorinated solvents, ketones or acetones as these may result in surface deterioration or etching). Also avoid contact with any harsh household chemicals such as oven cleaners, drain cleaners, rust removers, paint strippers and toilet bowl cleaners, bar keepers friend or Brasso.
Important Technical Data:
Minimum operating pressure 0.3 bar Maximum hot water temperature 70^^* Maximum operating pressure 5.5 bar* Recommended hot water temperature 46^
*If these temperatures or pressures are exceeded, even for short periods, damage can result.
CDA taps are either WRAS approved or manufactured in accordance with recognised European standards. Please ensure that your Kitchen mixer is fitted in accordance with Local Water Byelaws.
These installation guidelines have been prepared for your direction and you must exercise due care at all times. We do not accept responsibility for problems that may occur through improper installation. Whilst assembling the tap take care not to accidentally loosen any screwed assemblies.
Installation Preparation:
Before installing the new mixer it is essential that you thoroughly flush through the supply pipes in order to remove any remaining solder, swarf or impurities from your system. Failure to carry out this simple procedure could cause problems or damage to the workings of the mixertap.
We strongly recommend installing particle filter strainers and isolation valves to both the hot and cold feed pipes in an accessible position. This will help to prevent premature failure of the valves and ease any future maintenance.
All parts should be removed from their packaging and inspected for any transport damage prior to installation.
Shut off your water heating system and ensure that your mains stopcock is closed. Open the lowest hot and cold taps in the house and allow the water to run until the cold-water storage tank and pipes are fully empty. Please note, the hot water storage cylinder (if applicable) will always remain full.
This mixertap requires a 35mm∅ tap hole, if replacing an existing tap, remove the tap & clean the end of the feed pipes using wire wool the tap hole area should be free from dirt and sealant.
Loosely position the tap and tail pipes to check if any alteration to the existing pipework is required, if this is the case do this now.
Installation:
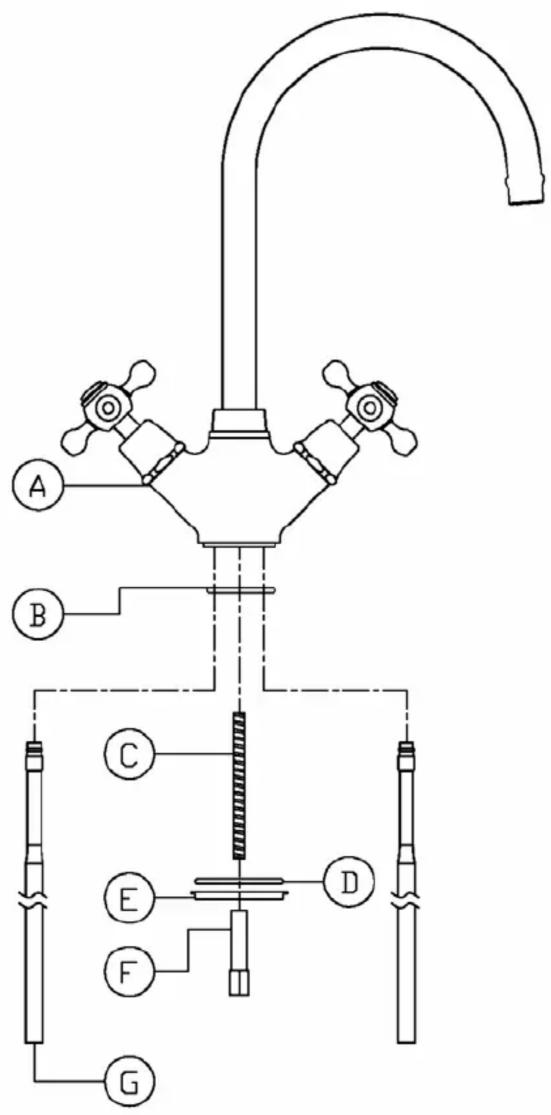
- Screw the studded rod (C) into the base of the tap (A).
- Screw the copper tail pipes (G) into the base of the tap, note the hot water should be connected to the left of the tap when viewed from the front.
- Pass the upper seal (B) over the studded rod (C) and tail pipes (G) and locate them centrally on the base of the mixertap (A).
- Place the mixertap (A) onto the sink or worktop and pass the tail pipes (G) and studded rod (C) through the taphole. With the tap in place check that the tail pipes (G) meet the hot and cold water feeds. If further adjustment to the plumbing is required do this now. Note: the tail pipes can be carefully bent apart to allow more space for fittings to be attached.
- Pass the rubber washer (D) and then metal horseshoe (E) over the studded rod (C) and around tail pipes (G).
- Fasten the fixing nut (F) securely onto the fixing stud (C) fixing the tap into its correct location.
- Connect the hot and cold water tail pipes (G) to the water supplies using 15mm compression fitting or similar.
| Key: | Description: Qty | |
| A | Mixertap body 1 | |
| B Upper sink/worktop seal 1 | ||
| C | Studded rod 1 | |
| D | Rubber washer 1 | |
| E | Metal horseshoe 1 | |
| F | Fixing nut 1 | |
| G Rigid 15mm tail pipes | 2 | |
After installation:
Once you have visually checked the new fittings and connections, ensure that all taps are closed except the new mixer tap, which should be left open. Turn on the water supply at the mains stop cock. As the system starts to refill, check carefully for leaks. Once you are fully satisfied that there are no leaks, turn on the water heating.
Clean the tap to remove any marks created during installation as instructed then replace the bag that has been provided to protect the tap until it is ready for use.


Brand : CDA
Model : TT25CH
Category : Faucet