PNDPP410GP - Tablet Cello - Free user manual and instructions
Find the device manual for free PNDPP410GP Cello in PDF.


| Product Type | Tablet |
| Brand | Cello |
| Model | PNDPP410GP |
| Display Size | 10.1 inches |
| Dimensions (W x H x D) | 240 x 160 x 8 mm |
| Weight | 520 g |
| Operating System | Android 10 |
| Processor | Quad-core 1.6 GHz |
| RAM | 2 GB |
| Storage | 32 GB (expandable via microSD) |
| Battery Capacity | 6000 mAh |
| Charging | Micro USB, 5V/2A |
| Camera (Rear) | 5 MP |
| Camera (Front) | 2 MP |
| Connectivity | Wi-Fi 802.11 b/g/n, Bluetooth 4.2 |
| Sensors | Accelerometer, G-sensor |
| Power Adapter | Input: AC 100-240V, Output: DC 5V/2A |
| Care & Cleaning | Wipe with dry soft cloth; avoid liquids and abrasives |
| Safety | Do not expose to water or extreme temperatures |
| Spare Parts Availability | Contact Cello support for replacement parts |
| Repairability | User-replaceable battery (with proper tools) |
| General Information | Designed for multimedia, browsing, and light productivity |
Frequently Asked Questions - PNDPP410GP Cello
User questions about PNDPP410GP Cello
0 question about this device. Answer the ones you know or ask your own.
Ask a new question about this device
Download the instructions for your Tablet in PDF format for free! Find your manual PNDPP410GP - Cello and take your electronic device back in hand. On this page are published all the documents necessary for the use of your device. PNDPP410GP by Cello.
USER MANUAL PNDPP410GP Cello
Internet Tablet With Touchscreen Quick Start Guide
Please read carefully before using.
Table of Contents
THANK YOU 3
Package Contents....3
Features......4
GETTING TO KNOW THE INTERNET
TABLET......5
About the Touchscreen 8
Protective Film 8
Touchscreen Actions......8
About the Orientation Sensor....9
Charging the Tablet 10
Inserting a Memory Card ....10
Resetting the Tablet....11
GETTING STARTED....12
Turning the Tablet On and Off 12
Turning the Screen On and Off (Standby) .....13
Unlocking the Screen 13
Home Screen at a Glance....14
About Applications ....15
Preinstalled Applications....15
Installing Applications ....16
About Widgets....17
About Notifications....18
CONNECTING TO THE INTERNET ...... 19
Requirements 19
Connect to a Wi-Fi Network.... 20
BROWSING THE WEB......22
OPTIONAL CONNECTIONS ...... 26
Connecting to a Computer 26
Connecting Headphones....27
Using the USB Full-Size Adapter....28
Connecting a Keyboard....28
Connecting a Storage Device....28
SETTING THE SYSTEM OPTIONS......29
SPECIFICATIONS....30
- Thank You
Congratulations on your purchase of this Internet Tablet. This guide is provided to help you get quickly started with your tablet; please read it carefully and save it for future reference.
Package Contents
Please make sure that the items shown below are included in the package. Should an item be missing, please contact the local retailer from whom purchased this product.
④ Internet Tablet
④ USB cable
④ USB host/keyboard adapter
④ Power adapter
Features
✦ Browse the Web.
Visit your favorite websites
✦ Check your e-mail
Keep in touch with friends and family
Watch YouTube™ videos
Browse the world's most popular video-sharing community
Read your favorite books
Download thousands of books with the included E-book reader *
Discover thousands of apps for Android™ Games, applications and more with the installed marketplace
Connect to the Internet wirelessly High-speed Wi-Fi 802.11 b/g/n networking
Enjoy your media library anywhere
Portable powerhouse plays popular music, video and photo formats
- microSD memory card reader
Increase your storage capacity (up to 32 GB supported)
Built-in camera Convenient front-facing camera
- Automatic orientation detection
Read any way you want; the display adjusts automatically!
* Reading books in the ePub format requires the included E-book reader application.
- Getting to Know the Internet Tablet
Unit at a Glance
| Name Description | |
| 1 | Camera Front-facing camera |

| Name Description | ||
| 2 Power key Press to turn the unit on, or to turn the screen on and off. Press and hold to access the Power Off menu. | ||
| 3 Headphone jack | Audio output connection for headphones. | |
| 4 MicroSD card slot | Load external microSD memory cards here. | |
| 5 Reset Key Press to reset the tablet if it freezes or otherwise behaves abnormally. (Use a paperclip or other small object to gently press this key.) | ||
| 6 USB Host Connect a storage device to the tablet. | ||
| 7 HDMI jack Connect to a TV or other display. | ||
| 8 Power jack Charge and power the tablet with the included power adapter. | ||
| 9 Volume + key | Press to increase the volume level. | |
| 10 Volume - key Press to decrease the volume level. | ||

| Name Description | ||
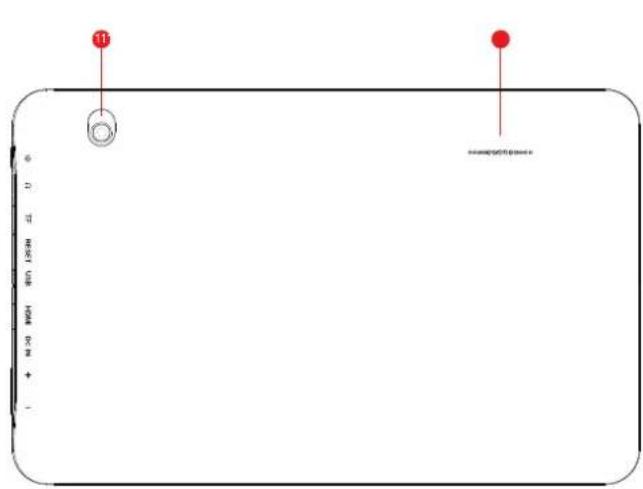
| 11 C | camera Back-facing camera | |
| 12 S | Speaker Speaker | output is automatically muted when using head-phone jack. |
About the Touchscreen
Your tablet comes equipped with an easy-to-use touch-screen which allows access to the tablet's functions. Use your fingertip to touch the area of the screen where a control icon is displayed. If you touch and hold the screen, it will register as a continuous button press.

To avoid damaging the screen, do not touch it with excessive force or with any object other than your finger. For best response, make sure your hands are clean before using the touchscreen controls.
Protective Film
A thin film has been applied to the touchscreen to protect it during shipping. The protective film should be removed before use. To remove it, simply take a corner of the film and peel it away from the screen.
Touchscreen Actions
You can control the functions of the tablet by using the touchscreen in combination with the three touch keys located on the bezel. To control the tablet with the touchscreen, use your fingertip to manipulate icons,
buttons, menu items, the on-screen keyboard and other items displayed on the screen.
You can perform the following actions on the touchscreen using your fingertip.
| Touch: To activate an on-screen item (e.g., application icons, buttons, menu items and the letter/symbols of the on-screen keyboard), simply touch it with your fingertip. | |
| Touch and Hold: | Some on-screen items have an alternate action if you touch and hold it (e.g., opening an alternate menu or to activate the drag function). To touch and hold an item, touch the item and do not lift your fingertip until the action occurs. |
| Drag: Drag an on-screen item to change its position (e.g., an application icon on the home screen).To drag an item, touch and hold it for a moment, then without lifting your fingertip, move your fingertip on the screen until the item reaches its target destination. | |
| Swipe: Swipe up | /down on the screen to scroll through a list. On some screens, you may be able to swipe left/right to change the view.To swipe, touch the screen and then quickly move your fingertip across the screen without lifting your fingertip.Do not pause on the screen with your fingertip at the initial point of contact or you may accidentally drag an item instead. |
| Double-tap: Quickly tap the screen twice on a webpage or other application screen to zoom (the application must support the double-tap/zoom function). Within the browser, double-tapping a webpage section will cause the browser to zoom and fit that section to the width of the screen. | |
About the Orientation Sensor
The tablet contains a sensor that will automatically change the orientation of most screens as you rotate the tablet. The sensor works best when the tablet is rotated perpendicular to the ground (i.e., when the tablet is held upright and not flat on its back).

The orientation sensor can be turned on and off in the Display settings menu.
Charging the Tablet
The current battery status will be always displayed in the lower right of the screen in the system information bar. The battery icon will change in accordance with the battery status.
When connected to the DC charger, the status area on the bottom bar will display the charging icon. Note the lightning symbol inside the battery icon.
To charge the battery:
- Plug one end of the included power adapter into an AC 100-240V outlet.
- Plug the other end of the included power adapter into the power jack on the tablet.
- Disconnect the power adapter when the tablet is fully charged.

The battery used in this device may cause a fire or chemical burn if mistreated. Do not disassemble, incinerate or heat the device. Do not leave the device in direct sunlight or in a car with its windows closed. Do not connect the device to a power source other than that which is indicated here or on the label, as this may result in a fire or electric shock.
Inserting a Memory Card
The tablet accepts microSD memory cards. Insert a memory card into the microSD card slot to:
- Increase the memory capacity of your tablet
Play media files stored on the memory card (e.g. music, video or photo files).
To insert a memory card:
- Align the memory card with the card slot. The metal contacts of the memory card should face down away from the LCD screen.
- Slide the card into the spring-loaded slot. Push the card in until it clicks into place.

Do not attempt to insert objects other than a microSD memory card into the card slot. A compatible memory card should fit easily into the card slot. If you encounter resistance, check the alignment of the card. Do not attempt to force the card in.
Avoid touching the gold contacts of the memory card.
To release and remove a memory card:
1. UNMOUNT the memory card.
a. In the home screen, tap the Launcher Tab and then touch Settings to show the settings menu.
b. Touch Storage to show the storage settings.
c. Touch Unmount SD card to prepare the memory card for safe removal.

3. Grasp the card by its edge to remove it.

To avoid damage and data corruption, do not remove a memory card while data is being written to or read from the card. For example, do not remove a card while playing a music file stored on the card.
Resetting the Tablet
Reset the tablet if it should freeze and not respond or otherwise malfunction.
- Disconnect your tablet if it is connected to a computer.
-
Use a paper clip to gently press the
button located on the right side of the tablet. -
Push the card further into the slot until you hear a click. The card will spring out of the slot.
- Getting Started
Turning the Tablet on and off
To turn the tablet on:
Press and hold the Power key until the LCD screen turns on. Wait until the Home screen appears; the tablet is now ready for use.
To turn the tablet off:
- Press and hold the Power key until the confirmation message appears.

- Touch OK to turn off the tablet.
Turning the Screen On and Off (Standby)
When the tablet is on, you can turn off the screen to conserve battery power. Simply press the Power key once to turn the screen off. Press the Power key again to turn the screen back on.

To conserve battery power, the screen can be set to turn off automatically when the tablet is not in use (between 15 seconds and 30 minutes). This Sleep option can be found in the Display menu.
Unlocking the Screen
When the screen turns off, you will have to unlock the screen when you turn it back on.
To unlock the screen, touch and drag the Lock icon to the edge of the circle that appears.

If a password has been set, enter the password to finish unlocking the screen. The Screen Unlock password can be set in the Security settings menu.


WARNING: Please write down your password/pin/lock pattern. Misplacing or forgetting this will lock the user out. Recovering the unit will reset the device back to factory defaults. ALL YOUR DATA & PROGRAMS WILL BE LOST.
Home Screen at a Glance
The Home Screen is the starting point for all of the features of your tablet.

| Name Description | ||
| 1 | Google Search | Touch to search with Google browser. |
| 2 | Home icon | Touch to go back to the central home screen. |
| 3 | Back icon | Touch to go back to the previous screen. |
| 4 | Recent Apps | Touch to display the list of thumbnail images of apps you have worked on recently. Touch an app to open it. |
| 5 | Widgets Widgets | are small applications that you can use directly from the home screen. For more information, refer to the “Widgets” section on page 17. |
| 6 | Launcher Tab | Open the Launcher to view the list of all Applications and Widgets installed on the tablet. Touch the Launcher tab to open the Launcher. |
| 7 | Icons Touch an icon to open an application or folder. | |
| 8 | Notification Bar | Shows notification icons such as time, battery level and the network signal strength; touch the bar to open the full Notifications panel. Touch a Notification icon to display more detail. |
About Applications
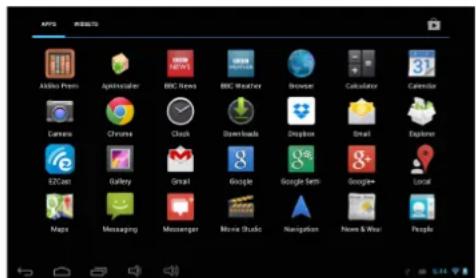
To open an application, touch the application icon on the home screen or in the Launcher.
Launcher screen:

Preinstalled Applications
Some applications have been installed on your tablet for your convenience. These applications include:
 | Browse the web. |
 | Display the calendar or record events and appointments to manage your schedule. |
 | Perform simple mathematical operations. |
 | Take pictures or videos with the front-facing camera. |
 | View the current time, or set an alarm. |
 | View and manage files stored on the tablet. |
 | Check your e-mail. |
 | Play music. |
 | Access the settings menu to adjust the tablet's options. |
 | View videos. |
 | View photos and videos, plus edit photos. |
 | Launch the mobile YouTubeTM browser page to watch internet videos. |
Installing Applications
You can also download and install additional applications from the play store, the web browser or other sources.
The tablet must be set to allow installation of applications from non-market sources. The unknown sources option can be set in the Application settings menu.
About Widgets
Widgets are self-contained applications that you can place on the Home screens to access your favorite features.
Adding Widgets to a Home Screen
- Navigate to the Home screen on which you want to place the Widget.
- Touch the Launcher Tab.
- Touch WIDGETS to show all widgets and then hold on a widget icon to add it to the Home screen.
Removing Widgets
Touch and hold the Widget until Remove icon appears at the top of the screen, then drag the Widget to the Remove icon to remove it.
About Notifications
The icons that appear in the Notification bar at the bottom right corner of the screen alert you when new messages arrive or alarms or other application events occur.
View and respond to the notifications by opening the full Notifications panel.
- Touch the Notification bar to open the Notifications panel.
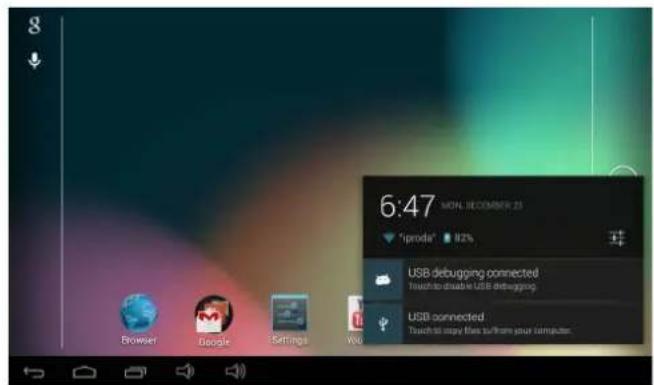
Touch a notification in the list; the Notifications panel will close and the application associated with the notification will launch.
To close the Notifications panel:
- Touch any other area of the screen except the Notifications panel or;
✦ Touch the Back icon.
To respond to a Notification:
- Connecting to the Internet
This tablet can utilize Wi-Fi data networks to connect to the Internet.
✿ Wireless Wi-Fi technology can provide Internet access at distances of over 300 feet; however, this distance can be affected by your surrounding environment and Wi-Fi router.
Requirements
In order to connect to the Internet, you will need either of the following:
A wireless router or access point with a broadband Internet connection
The wireless router must support Wi-Fi 802.11b/g/n connections. If the router supports 802.11n, make sure that it has been configured to accept 802.11b/g/n connections as well.
Please refer to your wireless router's documentation for help, or ask your network administrator for details.

You may encounter open Wi-Fi networks, or “hot spots.” These networks are usually configured so that you can simply connect to them without needing to know its settings; the tablet will obtain all the information it needs from the router automatically.

A minimum connection speed of 64 Kbps is recommended. Faster speeds will enable a better Internet experience.
You will need to know the name of your network (SSID), as well as the password or other credentials if your network is secured. These settings can usually be found on the administration webpage of your wireless router.
Connect to a Wi-Fi network
The Notification bar displays icons that indicate your tablet's Wi-Fi status.
| Connected to a Wi-Fi network (waves indicate connection strength). | |
| [no icon] | There are no Wi-Fi networks in range, or the Wi-Fi radio is off. |
- Turn on the Wi-Fi radio if it is not already on. To turn on Wi-Fi:
a. Go to the Home screen:
Touch the Home icon.
b. Open the Launcher screen:
Touch the Launcher Tab, then touch Settings.
c. Open the Wireless & Networks menu:
Touch WIRELESS & NETWORKS.
d. Open the Wi-Fi settings menu:
Touch WiFi.
e. Make sure that the Wi-Fi option box is set to ON: Touch and slide the block right to enable the Wi-Fi connection.
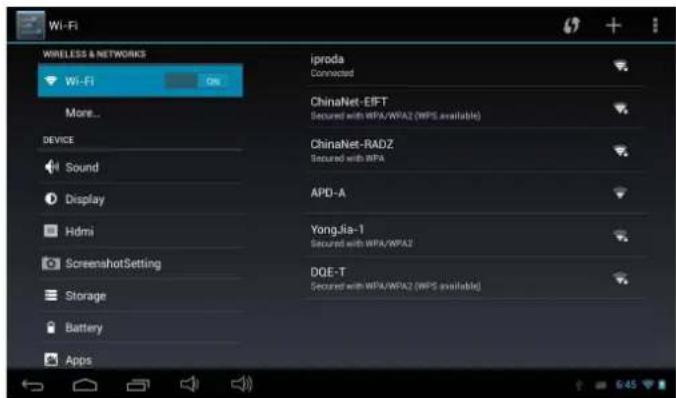
When Wi-Fi is on, the tablet will look for and display a list of available Wi-Fi networks.

If a network that you have connected to previously is found, the tablet will connect to it.
If you don't see your network in the list, you can force the tablet to re-scan. To scan for networks, tap the SCAN icon located on the top right corner of the screen.
2. Select an available Wi-Fi network to connect to:
In the same Wi-Fi settings menu above, touch a network in the list.
If the network is open, the tablet will prompt you to confirm connection to the network. Touch Connect to confirm.
If the network is secured (as indicated by a Lock icon), the tablet will prompt you to enter a password or other credentials. Touch the Wireless password box to show the on-screen keyboard and then use it to enter the password. Touch Connect to confirm.
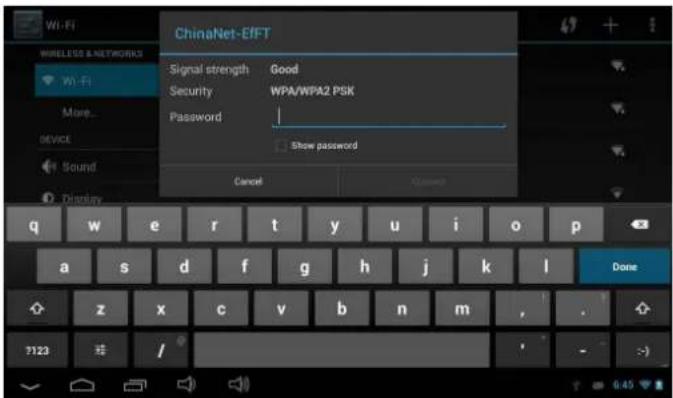
When you have successfully connected to a Wi-Fi network, the Notifications bar at the bottom of the screen will show a Wi-Fi signal indicator.

- Browsing the Web
The Browser application lets you visit webpages and find information on the web. Keep up with the news, your friends, or enjoy video from YouTube™, the world's most popular video-sharing community.
To use Browser, the tablet must be connected to the Internet. Read the section "Connecting to the Internet" to learn how to connect to the Internet.
To open Browser, touch the Browser icon on the Home screen or in the Launcher.

| Name Description | ||
| 1 | Address bar | Displays the address (URL) of the current page. Touch the bar to enter a new address or to search the web. |
| 2 | Goto Book-marks icon | Touch to view bookmarks, to view your most visited sites, or to view your browser history. |
| 3 | Search icon | Touch to search with Google browser. |
| 4 | Add Bookmark icon | Touch to add bookmarks. |
| 5 | New Window (+) | Creates new browser window. |
Some common Browser actions are described below.
+ To go to a webpage.
| 1. Touch theAddressbarat the top of the Browser screen. The keyboard will open automatically. (If the address bar is not visible, drag the page down to return to the top of the Browser screen.) |  |
| 2. Use the keyboard to enter the address (URL) of the webpage (e.g.,www.google.com). | 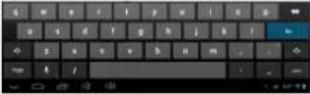 |
| 3. TouchEnterkey to open the webpage. |
To bookmark a webpage.
Bookmark your favorite webpages in order to visit them quickly without entering a URL.
| 1. Go to the web-page that you want to bookmark |  |
| 2. Touch the Add Bookmark icon. |  |
| 3. If desired, you can modify the name of the bookmark or its location (URL address). Otherwise, touch OK to finish adding the book-mark. |  |
To go to a bookmarked webpage.
| 1. Touch the Goto Bookmark icon. |  |
| 2. Touch a bookmark tile to open it. |  |
+ To delete a bookmarked webpage.
| 1. Touch the Goto Bookmark icon. |  |
| 2. Touch and hold a bookmark tile to open the option menu. |  |
| 3. Touch “Delete bookmark”. |  |
| 4. Touch “OK” to confirm. | |
Browser menu
While viewing a webpage, touch the icon shown on the right to open the Browser menu, the icon is located on the top right corner of the screen. The options are:
✦ Refresh: Refresh the current webpage.
Forward: Go to the next webpage.
New tab: Open the webpage in a new window, under a new tab.
New incognito tab: Open the webpage in a new window, under a new tab and the pages you view in the new window will not appear in your browser history or search history. See the on-screen explanation of going incognito.
Share page: Use Email to send the webpage URL.
Find on page: Search for content on the current page.
Request desktop site:
Save for offline reading: Save this page onto the internal memory, then you can read it when the internet connection is disabled.
Page info: View information about the current page, including the URL.
Settings: Customize the Browser.
- Optional Connections
Connecting to a Computer
Connect the tablet to a computer to transfer files.
- Connect your tablet to the computer.
With the included USB cable:
Plug the small end of the cable into the USB 2.0 Hispeed connector of the tablet.
Plug the large end of the cable into an available USB 2.0 Hi-speed port on the computer.
When your tablet is connected, a USB icon will appear in the Notification bar.

- Touch the Notification bar to open the notifications panel.


The Tablet's "mass storage mode" is compatible with many operating systems including: Microsoft® Windows® XP, Vista, 7 or higher and Mac OS or Linux.
2. Mount the storage drive.
Touch USB connected to mount the tablet's built-in storage, then touch "Turn on USB storage" and "OK" when prompted to confirm. When mounted, you can copy files to/from your computer.
Your tablet will be recognized by the computer as a Removable Storage drive. Drag and drop files between your tablet and the computer. To learn more about copying files, please refer to the documentation included with your computer or operating system.
Connecting Headphones
Connect a pair of headphones (or earphones) to the tablet to enjoy media in private.
Lower the volume level of the tablet before connecting headphones and then slowly raise the volume to a comfortable listening level.
The headphones must have a 3.5 mm (1/8 in) plug.
When headphones are connected, speaker output will be disabled automatically.

Hearing experts advise against the constant use of personal stereos played at high volume. Constant exposure to high volumes can lead to hearing loss. If you should experience ringing in the ears or hearing loss, discontinue use and seek medical advice.
Using the USB Full-Size Adapter
The USB full-size adapter can be used to connect and use USB devices with the tablet. The adapter converts the Micro USB port on the tablet into a USB On-the-Go (OTG) connector.

Connecting a Keyboard
For times when you want to type for an extended period of time, you may want to connect a full-size keyboard to the tablet.
Use the included USB full-size (Type A) adapter to connect a keyboard to the tablet.

You may also use this connection to add a mouse to the tablet.
The adapter supports one connection at a time. To use a keyboard and mouse simultaneously, you will need to add an external USB hub.
Connecting a Storage Device
Use the included USB full-size (Type A) adapter to connect a storage device to the tablet (e.g., a USB flash memory drive).

This connection supports a maximum storage size of 32 GB. For additional storage capacity, a microSD card can be added to the tablet.
- Setting the System Options
Open the system settings menu to adjust how the tablet looks and functions.

Many applications will have their own settings; refer to the documentation provided by the application developer to learn more.
To open the Settings menu:
- From the Home screen, touch the Launcher Tab.
- Touch Settings to open the Settings menu.
The settings are grouped by category. Touch a category to open and adjust its settings on the right.

Please refer to the manual for a description of the items in the Settings menu.

- Specifications
| Processor | RK3168 C ortex-A9 Dual Core |
| GPU | PowerVR SGX54X |
| RAM | 1GB |
| Storage | 8GB flash built-in microSD card slot (max. 32GB supported) |
| Display | 10.1" LCD (1024 x 600), capacitive touchscreen |
| Networking | Wi-Fi IEEE 802.11 b/g/n |
| Audio Output | 3.5 mm headphone |
| PC Interface | USB 2.0 hi-speed |
| Additional Features | Front/Back facing camera Built-in microphone Mono speaker |
| Operating System | AndroidTM 4.2 |
| Power | Rechargeable Li-poly battery power adapter (DC 5V) |
| Playback Time (hours) * | Up to 12 hours music, 3 hours video, 3 hours web browsing |
* Music was tested with a 128 kbps MP3 file; video was tested with a 1920 x 1080 MPEG-4/AVC file; browsing was tested with the screen brightness set to default. Actual playback results may vary.
- INTERNET TABLET WITH TOUCHSCREEN QUICK START GUIDE
- TABLE OF CONTENTS
- THANK YOU 3
- GETTING TO KNOW THE INTERNET
- TABLET......5
- GETTING STARTED....12
- CONNECTING TO THE INTERNET ...... 19
- BROWSING THE WEB......22
- OPTIONAL CONNECTIONS ...... 26
- SETTING THE SYSTEM OPTIONS......29
- SPECIFICATIONS....30
- THANK YOU
- PACKAGE CONTENTS
- FEATURES
- GETTING TO KNOW THE INTERNET TABLET
- ABOUT THE TOUCHSCREEN
- PROTECTIVE FILM
- TOUCHSCREEN ACTIONS
- ABOUT THE ORIENTATION SENSOR
- CHARGING THE TABLET
- TO CHARGE THE BATTERY
- INSERTING A MEMORY CARD
- TO INSERT A MEMORY CARD
- TO RELEASE AND REMOVE A MEMORY CARD
- UNMOUNT THE MEMORY CARD
- GRASP THE CARD BY ITS EDGE TO REMOVE IT
- RESETTING THE TABLET
- GETTING STARTED
- TURNING THE TABLET ON AND OFF
- TURNING THE SCREEN ON AND OFF (STANDBY)
- UNLOCKING THE SCREEN
- HOME SCREEN AT A GLANCE
- ABOUT APPLICATIONS
- PREINSTALLED APPLICATIONS
- INSTALLING APPLICATIONS
- ABOUT WIDGETS
- ADDING WIDGETS TO A HOME SCREEN
- REMOVING WIDGETS
- ABOUT NOTIFICATIONS
- TO CLOSE THE NOTIFICATIONS PANEL
- CONNECTING TO THE INTERNET
- REQUIREMENTS
- A WIRELESS ROUTER OR ACCESS POINT WITH A BROADBAND INTERNET CONNECTION
- CONNECT TO A WI-FI NETWORK
- SELECT AN AVAILABLE WI-FI NETWORK TO CONNECT TO
- BROWSING THE WEB
- TO GO TO A WEBPAGE
- TO BOOKMARK A WEBPAGE
- TO GO TO A BOOKMARKED WEBPAGE
- TO DELETE A BOOKMARKED WEBPAGE
- BROWSER MENU
- OPTIONAL CONNECTIONS
- CONNECTING TO A COMPUTER
- MOUNT THE STORAGE DRIVE
- CONNECTING HEADPHONES
- USING THE USB FULL-SIZE ADAPTER
- CONNECTING A KEYBOARD
- CONNECTING A STORAGE DEVICE
- SETTING THE SYSTEM OPTIONS
- SPECIFICATIONS
Brand : Cello
Model : PNDPP410GP
Category : Tablet