
KR.MP - Network card / adapter Kraun - Free user manual and instructions
Find the device manual for free KR.MP Kraun in PDF.


| Product Type | Network Card / Adapter |
| Brand | Kraun |
| Model | KR.MP |
| Interface | PCI Express x1 |
| Network Standard | IEEE 802.3, 802.3u, 802.3ab |
| Data Transfer Rate | 10/100/1000 Mbps |
| Connector Type | RJ-45 |
| Dimensions (Approx.) | 120 x 70 x 20 mm |
| Weight | 50 g |
| Power Supply | Via PCIe slot (3.3V / 12V) |
| Power Consumption | 2.5 W (typical) |
| Operating Temperature | 0°C to 55°C |
| Storage Temperature | -20°C to 70°C |
| Operating Humidity | 10% to 90% (non-condensing) |
| Supported Operating Systems | Windows, Linux, macOS |
| Main Functions | Gigabit Ethernet connectivity, Wake-on-LAN, Auto MDI/MDIX, VLAN tagging support, Jumbo frames support |
| Care and Cleaning | Disconnect from power before cleaning. Use a soft, dry cloth. Do not use liquids or solvents. |
| Safety | Follow ESD precautions when handling. Install in a well-ventilated slot. Keep away from moisture. |
| Spare Parts and Repairability | No user-serviceable parts. If defective, replace the unit. Refer to warranty. |
| General Information | Plug-and-play installation. Driver required for some OS. LED indicators for link and activity. |
Frequently Asked Questions - KR.MP Kraun
User questions about KR.MP Kraun
0 question about this device. Answer the ones you know or ask your own.
Ask a new question about this device
Download the instructions for your Network card / adapter in PDF format for free! Find your manual KR.MP - Kraun and take your electronic device back in hand. On this page are published all the documents necessary for the use of your device. KR.MP by Kraun.
USER MANUAL KR.MP Kraun
Wireless LAN USB Adapter
User Manual
Version: 1.3
(September, 2007)
COPYRIGHT
Copyright ©2005/2006 by this company. All rights reserved. No part of this publication may be reproduced, transmitted, transcribed, stored in a retrieval system, or translated into any language or computer language, in any form or by any means, electronic, mechanical, magnetic, optical, chemical, manual or otherwise, without the prior written permission of this company
This company makes no representations or warranties, either expressed or implied, with respect to the contents hereof and specifically disclaims any warranties, merchantability or fitness for any particular purpose. Any software described in this manual is sold or licensed "as is". Should the programs prove defective following their purchase, the buyer (and not this company, its distributor, or its dealer) assumes the entire cost of all necessary servicing, repair, and any incidental or consequential damages resulting from any defect in the software. Further, this company reserves the right to revise this publication and to make changes from time to time in the contents thereof without obligation to notify any person of such revision or changes.
CATALOG
Chapter I: Product Information .... 5
1-1 Introduction and safety information....5
1-2 Safety Information....6
1-3 System Requirements....7
1-4 Package Contents....8
1-5 Familiar with your new wireless network card 9
CHAPTER II: DRIVER INSTALLATION AND CONFIGURATION . 10
2-1 Network Card Installation ....10
2-2 Connect to Wireless Access Point ....16
2-2-1 Using Ralink Utility....16
2-2-2 Using Windows Zero Configuration....22
2-3 Connection Profile Management....26
2-3-1 Make a profile for an access point or wireless device....26
2-3-2 Using 802.1x - Certification....33
2-3-3 Using 802.1x - CA Server ....36
2-4 View Network Statistics and Link Status....37
2-4-1 Network Statistics ....37
2-4-2 Link Status....39
2-5 Advanced Settings 42
2-6 QoS Setting....46
2-7 WPS Configuration....49
2-7-1 WPS Setup - PBC (Push-Button Configuration)....50
2-7-2 WPS Setup - PIN....54
2-8 About ....56
CHAPTER III: Soft-AP Function 58
3-1 Switch to AP Mode and Basic Configuration....58
3-2 Security Settings....63
3-3 Access Control....65
3-3 Access Control....66
3-4 Connection table....69
3-5 Event Log ....71
3-6 Statistics....72
CHAPTER IV: APPENDIX....73
4-1 Hardware Specification ....73
4-2 Troubleshooting....74
4-3 Glossary....77
4-4 FCC and Other Compliance Statements....81
Chapter I: Product Information
1-1 Introduction and safety information
Thank you for purchasing this high-speed 802.11b/g/Draft-N wireless network card! Excepting common wireless standards 802.11b/g, this wireless network card is also 802.11 Draft-N compatible - data transfer rate is 300Mbps, and that's six times faster than 802.11g wireless network! 802.11 Draft-N also provides wider wireless coverage, so you don't have to worry if your computer is far from your wireless access point. This wireless network card also supports MIMO (Multi-In, Multi-Out) technology, which uses two different radio channels to enhance data transfer rate and wireless coverage.
With easy-to-install USB 2.0 interface - a very common expansion port of computers - plug this wireless network card into any empty USB port of your computer, just that simple!
Other features of this router including:
■ High-efficiency antenna, expands the scope of your wireless network.
■ QoS function: control the bandwidth required for different applications.
■ 802.11b/g/Draft-N compatible.
■ Supports major encryption methods like WEP, WPA, and WPA2 encryption.
■ USB 2.0 interface - you can get it installed on your computer in just few seconds!
■ Wireless access control - prevent unauthorized network access to your network and computer.
1-2 Safety Information
In order to keep the safety of users and your properties, please follow the following safety instructions:
- This USB wireless network card is designed for indoor use only. DO NOT expose this network card to direct sun light, rain, or snow.
- DO NOT put this network card at or near hot or humid places, like kitchen or bathroom. Also, do not left this wireless network card in the car in summer.
- This network card is small enough to put in a child's mouth, and it could cause serious injury or could be fatal. If they throw the network card, the card will be damaged. PLEASE KEEP THIS NETWORK CARD OUT THE REACH OF CHILDREN!
- This network card will become hot when being used for long time (This is normal and is not a malfunction). DO NOT put the network card on a paper, cloth, or other flammable objects after the network card has been used for a long time.
- There's no user-serviceable part inside the network card. If you found that the network card is not working properly, please contact your dealer of purchase and ask for help. DO NOT disassemble the network card by your self, warranty will be void.
- If the network card falls into water, DO NOT USE IT AGAIN BEFORE YOU SEND THE CARD TO THE DEALER OF PURCHASE FOR INSPECTION.
- If you smell something strange or even see some smoke coming out from the network card, switch the computer off immediately, and call dealer of purchase for help.
1-3 System Requirements
■ An empty USB 2.0 port (May not work on USB 1.1 port, and performance will be greatly reduced)
■ Windows 2000, 2003, XP, or Vista operating system
■ CD-ROM drive
■ At least 100MB of available disk space
1-4 Package Contents
Before you starting to use this wireless network card, please check if there's anything missing in the package, and contact your dealer of purchase to claim for missing items:
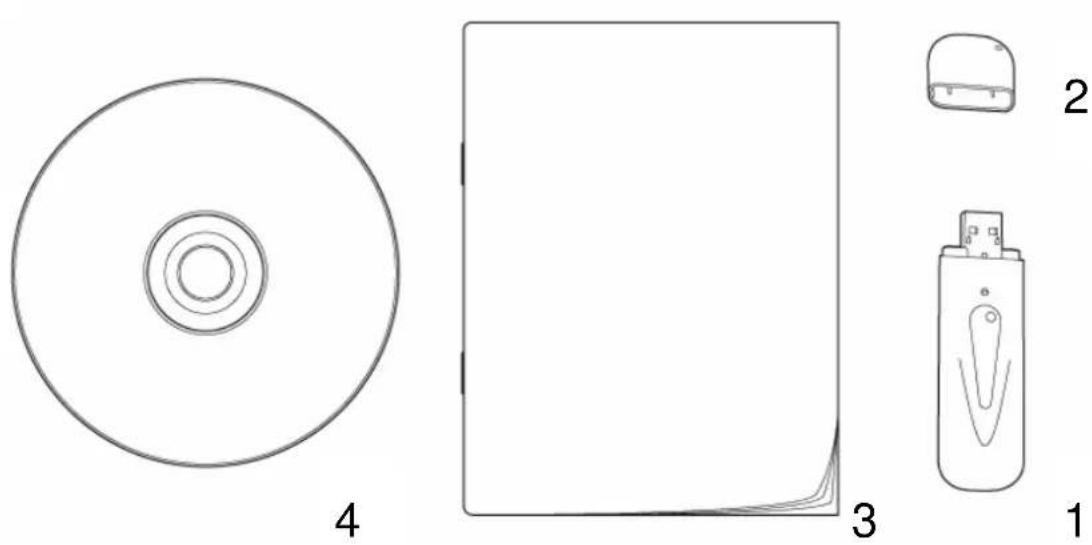
□USB wireless network card (1 pcs) 1
□ Protection Cap (1 pcs) 2
□ Quick installation guide (1 pcs) 3
□User manual CDROM (1 pcs) 4
1-5 Familiar with your new wireless network card
- USB Connector
- Connector Cap (To protect USB connector when not in use)
- Link/Activity LED
- WPS Button (Press to activate WPS pairing mode)
2


| LED Name | Light Status | Description |
| Link/Activity | On Linked to | a wireless access point /Transferring data |
| Off No wireless activity | ||
CHAPTER II: DRIVER INSTALLATION AND CONFIGURATION
2-1 Network Card Installation
Please follow the following instructions to install your new wireless network card:
- Insert the USB wireless network card into an empty USB 2.0 port of your computer when computer is switched on. Never use force to insert the card, if you feel it's stuck, flip the card over and try again.

- The following message will appear on your computer, click 'cancel'.

- Insert device driver CDROM into the CD/DVD ROM drive of your computer, and execute 'Setup.exe' program in 'Driver' folder. Please read the end user license agreement and click 'Yes' to accept license agreement.

- You can choose the configuration tool used to configure the wireless network card here. It's recommended to select 'Ralink Configuration Tool', which provides fully access to all function of this wireless network card. If you prefer to use the wireless configuration tool provided by Windows XP or Vista, please select 'Microsoft Zero Configuration Tool', then click 'Next'.

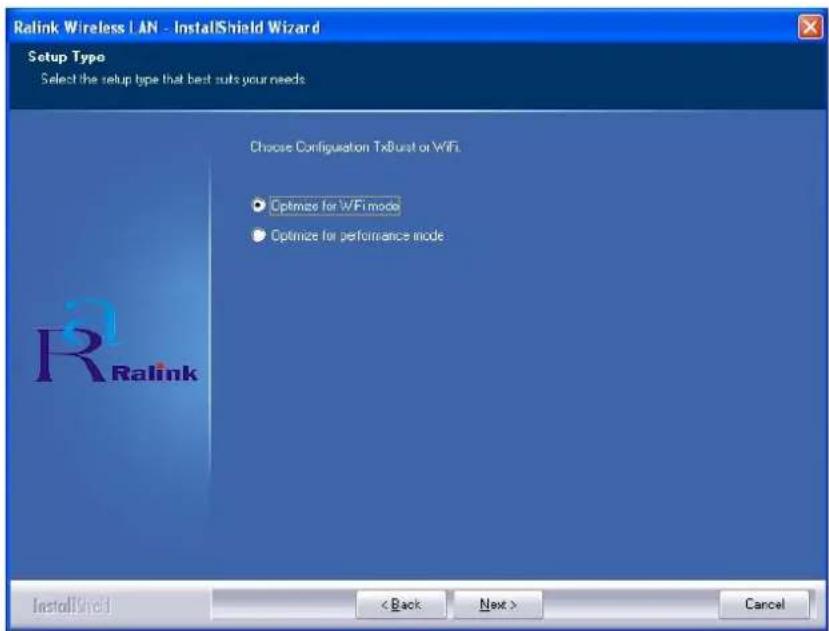
- There are two wireless performance mode you can select here:
Optimize for WiFi mode Optimize for performance mode
or
If you want to enhance wireless performance, please select ‘Optimize for performance mode’. However, wireless compatibility is not guaranteed in this mode. If you want to use this mode, you may not be able to communicate with older wireless devices and wireless access point, such as 802.11b devices, but the data transfer rate will be enhanced in this mode. You can select this mode when you only plan to communicate with 802.11 Draft-N devices.
If you want to keep compatibility and communicate with older wireless devices, please select 'Optimize for WiFi Mode'.
When you select one mode, please click 'Next' to continue. If you see 'Found New Hardware' message again, please ignore it and wait.
- Please wait while the install procedure is running. When you see this message, please click 'Finish' to complete the driver installation process.

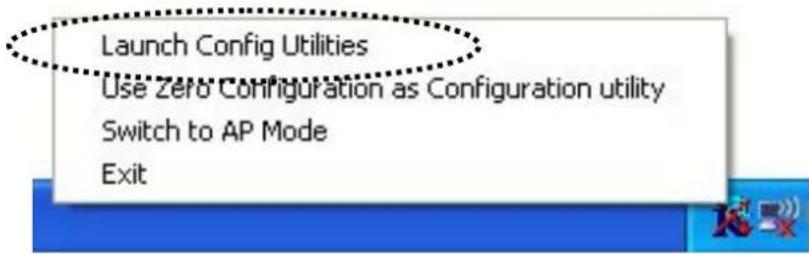
- A new icon will appear at lower-right corner of your computer desktop, you can put the mouse cursor on the icon, and the status of wireless card will be displayed as a popup balloon.

When you want to configure your wireless connection, please right click on this icon, and a popup menu will appear. You can click 'Launch Config Utilities' to start configuration program.
If you want to close configuration utility, please click 'Exit'.

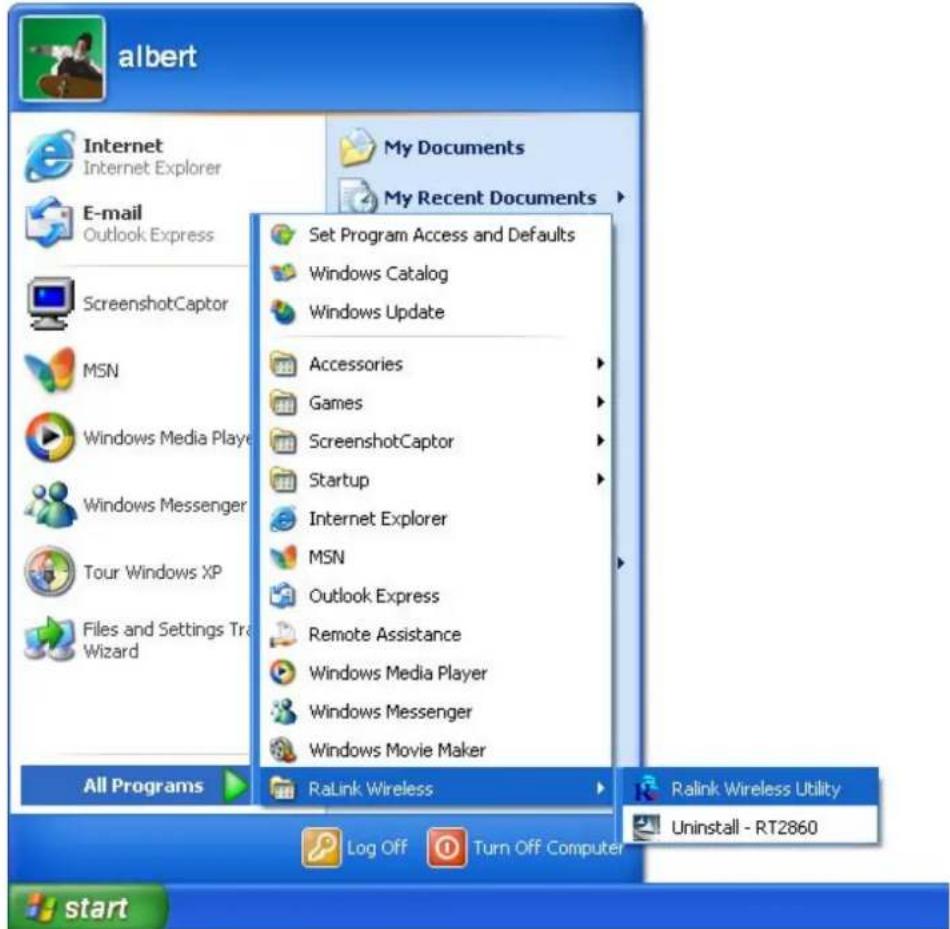
Please note that if you stopped config utility by ‘Exit’ function, you’ll not be able to maintain the wireless link to the access point you wish to use. In this case, you can start config utility again by clicking ‘Ralink Wireless Utility’ icon from ‘Start’ -> ‘All Programs’ -> ‘Ralink Wireless’, as shown below.
2-2 Connect to Wireless Access Point
After the driver is correctly installed, it will try to connect to any unencrypted wireless access point automatically. If you want to connect to a specific wireless access point, or the access point you wish to connect uses encryption, you have to configure the wireless network card and input required parameters, to get connected to the wireless access point you wish to connect.
There are two ways you can configure your wireless network card to connect to wireless access point: using the Ralink configuration utility which comes with wireless card driver, and using built-in windows zero configuration utility.
2-2-1 Using Ralink Utility
Please follow the following instructions to use Ralink configuration utility to connect to wireless access point.
- Right-click the Ralink configuration utility icon located at lower-right corner of computer desktop, then click 'Launch Config Utilities'.

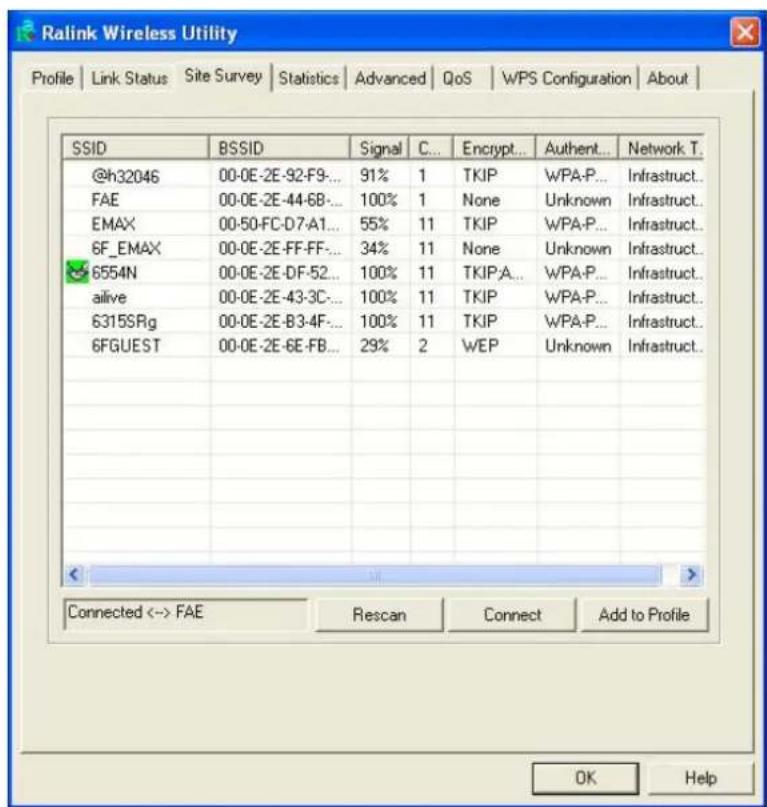
- Configuration utility will scan for all wireless access points automatically. Scan results will be displayed here, please check if the wireless access point with the SSID (the name of wireless access point) you preferred is shown here.
If the wireless access point you wish to connect does not show here, please click ‘Rescan’ to try again, until the one you preferred is displayed. You may have to click ‘Rescan’ for more than two times before you can see the access point you wish to use here sometimes.
If you still can not see the access point you wish to use after clicking ‘Rescan’ for more than five times, please move your computer closer to the location where the wireless access point is, or see instructions in chapter 4-2 ‘Troubleshooting’.

Here are descriptions of every setup item:
SSID: The Service Set IDentifier of wireless access point or other network device. You can think it as the name of access point of wireless device.
BSSID: The MAC address of wireless access point or other network device. Unlike SSID, BSSID of every access
point or network device is unique, and will not be the same with others. So you can identify a single access point or wireless device from others by BSSID, if they all have the same SSID.
Signal: Shows the signal strength of access point or wireless device. Larger number means better radio strength, which often means you're not too far from that access point or wireless device.
Channel: Shows the channel number that access point or wireless device uses.
Encryption: Shows the encryption method that access point or wireless device uses. If the wireless access point does not enable encryption, you'll see 'None' displayed here.
Authentication: Shows the authentication mode that access point or wireless device uses. If the wireless access point does not require authentication, you'll see 'Unknown' displayed here.
Network Type: Shows the type of wireless connection. If it's a wireless access point, 'Infrastructure' will be displayed here; if it's a computer or network device, 'AdHoc' will be displayed here.
Tips:
Wireless access point (Infrastructure) is a network device which acts as a bridge, to let wired and wireless network devices communicate with each other.
AdHoc is another connection type. A computer or network device can establish a direct wireless link with other computer or network device directly, without the help of wireless access point.
- Click the wireless access point or network device you wish to connect, it will be highlighted, then click 'Connect'.

If the access point you selected does not enable encryption (The content of ‘Encryption’ field of the access point you selected is ‘None’, you’ll be connected to this wireless access point within one minute. Please jump to step 6.
If the access point you selected enables encryption, please proceed to next step.
- If the wireless access point does not have SSID, you'll be prompted to input it here. Please ask the owner of wireless access point and input the exact SSID here, then click 'OK' when ready. If the SSID you provided here is wrong, you'll not be able to connect to this access point.
If the wireless access point you selected have SSID, please skip this step.

- If the wireless access point uses encryption, you have to input WEP passphrase or WPA preshared key. Please ask the owner of the wireless access point you want to connect, and input the correct passphrase / preshared key here, then click 'OK'. If the value you inputted here is wrong, you will not be able to connect to this wireless access point.
Authentication type is selected automatically, please don't change it.
If the access point you selected does not enable encryption and does not require authentication, please skip this step.

- You'll see 'Connected <-> SSID' ('SSID' is the SSID of the wireless access point or wireless device you connected to) message displayed at lower-left corner of configuration utility, congratulations, you're successfully connected to the access point or wireless device you selected!
2-2-2 Using Windows Zero Configuration
Windows XP and Vista has a built-in wireless network configuration utility, called as ‘Windows Zero Configuration’ (WZC). You can also use WZC to configure your wireless network parameter:
- Right-click Ralink configuration utility icon and select 'Use Zero Configuration as Configuration utility.

- Click ‘Start’ button (should be located at the bottom-left corner of windows desktop), click ‘Control Panel’, then click ‘Network and Internet Connections’ in Control Panel.
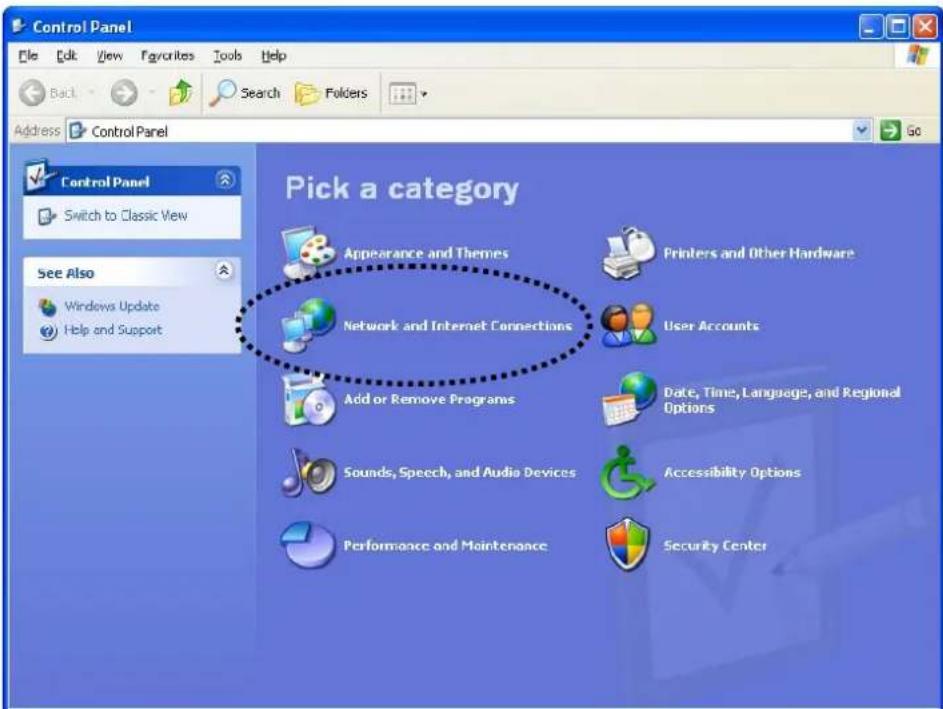
- Click 'Connect to a network' under 'Network Connections'

- Right-click ‘Wireless Network Connection’ (it may have a number as suffix if you have more than one wireless network card, please make sure you right-click the ‘Ralink 802.11n Wireless LAN Card), then select ‘View Available Wireless Networks’.

- All wireless access points in proximity will be displayed here. If the access point you want to use is not displayed here, please try to move your computer closer to the access point, or you can click 'Refresh
network list' to rescan access points. Click the access point you want to use if it's shown, then click 'Connect'.
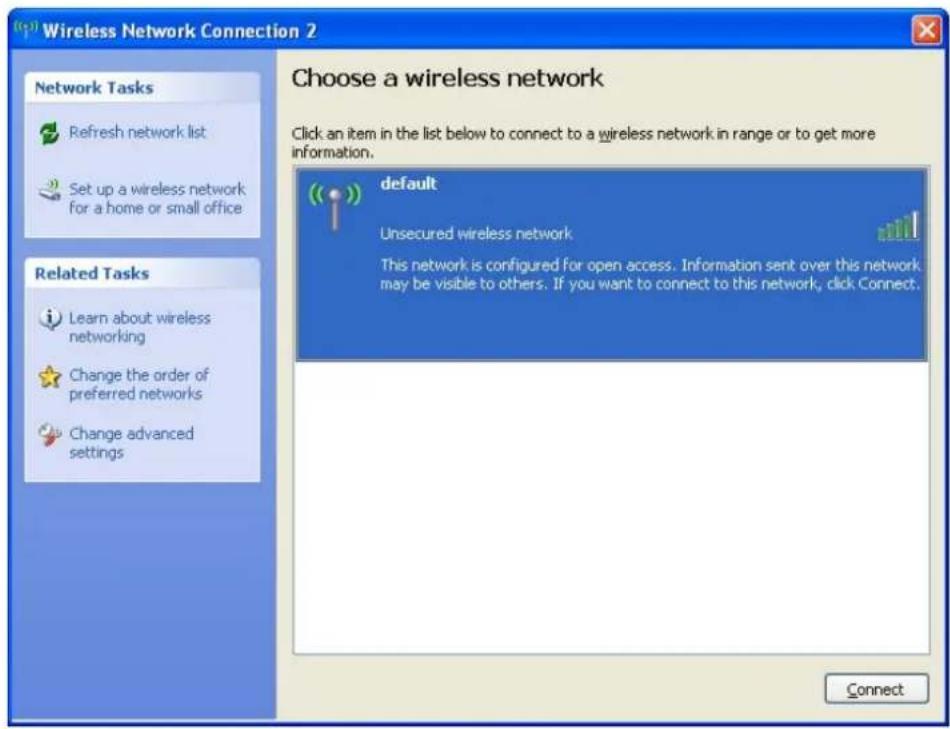
- If the access point is protected by encryption, you have to input its security key or passphrase here. It must match the encryption setting on the access point.
If the access point you selected does not use encryption, you'll not be prompted for security key or passphrase.

- If you can see 'Connected' message, the connection between your computer and wireless access point is successfully established.

2-3 Connection Profile Management
If you need to connect to different wireless access points at different time, like of access point of your home, office, cybercafe, or public wireless service, you can store the connection parameters (encryption, passphrase, security etc, etc.) as a profile for every access point, so you don't have in input these parameters every time you want to connect to a specific wireless access point.
2-3-1 Make a profile for an access point or wireless device
- Right-click the Ralink configuration utility icon located at lower-right corner of computer desktop, then click 'Launch Config Utilities'.

- There are two ways to add a new connection profile:
Create a new profile,
or
Add a profile from an existing wireless access point or wireless device
If you want to click new profile, click 'Profile' tab, then click 'Add' button:

Or, you can add a connected wireless access point or wireless device to a profile by clicking 'Site Survey' tab, then click 'Add to Profile' button:

And you can set the parameter for this connection here:
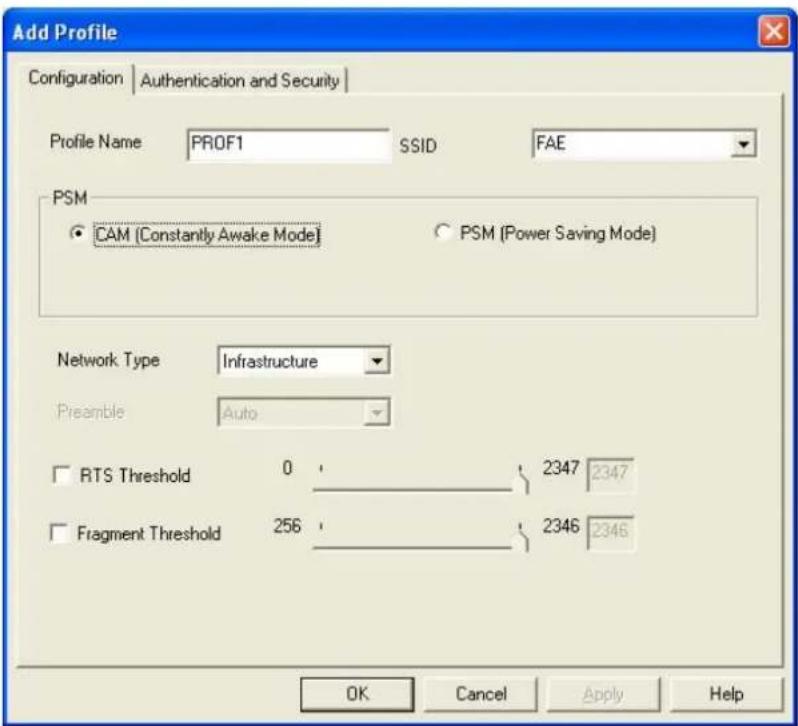
Here are descriptions of every setup items:
| Profile Name | Please give this profile a name, up to 32alphanumeric characters and symbols are allowed,but space is not allowed. |
| SSID The SSID of the wireless access point or wireless device you selected will be displayed here. But if the SSID of access point or wireless device is not available, you have to input it here manually. | |
| PSM:(Power Saving data), or PSM (Power saving mode, switches radio off when not transferring data). | Please select CAM (constantly awake mode, keep the wireless radio activity when not transferring |
| It's recommended to choose 'PSM' if you're using this network card with notebook computer to help the battery live longer. | |
| Network Type | Select network type ('Ad Hoc' or 'Infrastructure'). If you're adding a profile from an existing access point or wireless device, it's automatically selected and you don't have to change it. |
| Preamble This option is only available when the network type is 'Ad hoc'. You can select 'Auto' or 'Long Preamble'. Please select 'Auto' if you don't know what it is. | |
| RTS Threshold Check the box and you can set RTS threshold manually here. Do not modify default setting unless you know what it is. | |
| Fragment Check the box and you can set fragment threshold manually here. Do not modify default setting unless you know what it is. | |
Now click ‘Authentication and Security’ tab, and set the encryption and authentication settings.

Here are descriptions of every setup items:
Authentication Select the authentication type of the wireless access Type point or wireless device you wish to connect. If
you're adding a profile from an existing access point or wireless device, the value will be selected automatically, and please do not modify it.
If you select 'LEAP', the following message will be displayed. Please input LEAP identity, password, domain name, and select encryption type. You can check 'Show Password' box so the password you inputted will be displayed as you type, but not replace by asterisk.

Encryption:
Select the encryption type of the wireless access point or wireless device you wish to connect. If you're adding a profile from an existing access point or wireless device, the value will be selected automatically, and please do not modify it.
WPA Input WPA preshared key here. If encryption is not Preshared Key enabled, or you select 'WEP' as encryption type, this field will be disabled and grayed out.
WEP Key You can select key type (Hex or ASCII) and input WEP key here. If encryption is not enabled, or you select 'WPA' as encryption type, this field will be disabled and grayed out.
Show Password Check this box and all passphrases or security keys you inputted will be displayed as you type, but not replace your input with asterisk.
Use 802.1x Enable 802.1x wireless authentication. Please click '802.1x Setting' button to set 802.1x parameters. (See next section).
After you finish all settings, click 'OK' to save settings and exit. The profile you just created will be displayed:

Select the profile you wish to use, and click ‘Activate’ to use the profile you selected. You can only activate a profile a time, and the profile which is activated currently will have a green check (√) before its name. If the wireless access point is not reachable, a red check (√) will be displayed before its name.
If you want to change the connection parameters of a specific profile, just select it and click ‘Edit’ button, you’ll be prompted to input the connection parameters, just like you’re creating a new profile.
If you no longer need a profile, select the profile then click 'Delete'.
2-3-2 Using 802.1x - Certification
After you click '802.1x Setting', a new window will appear:

Here are descriptions of every setup items:
Authentication Please select an 802.1x authentication type here.
Type The type you select here must be identical to the type of the 802.1x authentication type you're using.
Session You can enable or disable session resumption here.
Resumption If you don't know if you should enable session resumption or not, please ask your 802.1x authentication administrator.
Identity Please input 802.1x identity here.
Password Please input the password of 802.1x identity here.
Domain Name Please input the domain name of 802.1x authentication here. This field will be grayed out when authentication type is not 'EAP-FAST'.
Use Client If the authentication type you use is 'PEAP' or
‘TTLS’, you can use the certificate stored on your computer. If the authentication type you use is ‘TLS/Smart Card’, this box is always checked.
More.. After you clicked this button, you'll be prompted to select a certificate on your computer.
Allow This box is always checked and can not be modified. unauthenticated provision mode
Use protected If the authentication type you use is 'EAP-FAST' authentication you can use protected authentication credential by check this box.
Remove Remove the credential you imported previously.
Import Import the authentication credential file (PAC or al file format), you'll be prompted to select a credential file from your computer.
Protocol You can select the protocol of tunneled authentication here. This pulldown menu is only available when authentication type you use is 'PEAP' or 'TTLS'. When you use 'EAP-FAST' as authentication type, the protocol setting is always 'Generic Token Card' and can not be changed.
Identity Please input the identity of tunneled authentication (of tunneled here. authentication)
Password Please input the password of tunneled authentication (of tunneled here.
authentication)
Password Mode Please select the password mode of 'EAP-FAST' authentication mode. This setting is hidden when the authentication type is not 'EAP-FAST'.
After you finish all settings, click 'OK' to save settings and exit.
2-3-3 Using 802.1x - CA Server
If you want to use CA server, please click 'CA Server' tab. And the following message will be displayed:
Here are descriptions of every setup items:
| Use certificate chain | Check this box to enable the use of certificate chain. | |
| Certificate Issuer | Please select the issuer of certificate from this dropdown menu. | |
| Allow intermediate certificates | Check this box if you wish to allow intermediate certificates. | |
| Server name | Input the server name of CA server here. | |
| Server name must match | Check this box and the wireless configuration utility will check if the server name of CA server | |
| exactly you set here is exactly matched with the CA server connected to. If they don’t match, connection will be dropped. | ||
| Domain name must end will check the end of domain name. If there’s in specified name anything wrong, connection will be dropped. | ||
After you finish all settings, click 'OK' to save settings and exit.
2-4 View Network Statistics and Link Status
The configuration utility provides information about network statistics and link status. If you want to know how your wireless network card works, you can use these functions to get detailed information about the wireless connection you're using.
2-4-1 Network Statistics
Please follow the following instructions to check network statistics:
- Right-click the Ralink configuration utility icon located at lower-right corner of computer desktop, then click 'Launch Config Utilities'.

- Click ‘Statistics’ tab, and the statistics of wireless connection will be displayed:

All connection-related statistics is displayed here. You can click 'Reset Counter' to reset the statistics of all items back to 0.
Click 'OK' to close the window.
2-4-2 Link Status
Please follow the following instructions to check network statistics:
- Right-click the Ralink configuration utility icon located at lower-right corner of computer desktop, then click 'Launch Config Utilities'.

- Click 'Link Status' tab, and information about current wireless connection will be displayed:
![Ralink Wireless Utility Profile Link Status Site Survey Statistics Advanced QoS WPS Configuration About Status: FAE <-> 00-0E-2E-44-6B-3E Extra Info: Link is Up [TxPower:100%] Channel: 1 <-> 2412 MHz; central channel : 3 Link Speed: Tx (Mbps) 243.0 Rx (Mbps) 28.9 Throughput: Tx (Kbps) 4.2 Rx (Kbps)…](/content/2026/05/959940/images/9725bfaef0da8e2b37cb9ca00094a29241ba3ab9e20db43cac85ce9fbd77b479.jpg)
Status Displays the SSID and BSSID of connected wireless access point or wireless device (displayed as SSID <-> BSSID as shown in above picture. If there's no active connection currently, 'Disconnected' will be displayed here.
Extra Info Displays the link status ('Link is up' or Link is down', and the radio transmitting power of your network card.
Channel Displays the radio channel being used now.
Link Speed Displays the link speed of data transmitting (Tx, in Mbps) and receiving (Rx, in Mbps). Link speed is the maximum available data transfer speed of the wireless connection, and depends on the radio signal quality of wireless connection.
Throughput Displays the rate of data transmitting (Tx, in Kbps) and receiving (Rx, in Kbps).
Link Quality Displays link quality (radio signal quality). When the link quality is better, the wireless link speed will be better, too. Link quality is displayed by percentage and a descriptive word (Good, normal, weak, and low).
Signal Strength 1 Displays the radio signal strength of built-in antenna 1.
Signal Strength 2 Displays the radio signal strength of built-in antenna 2.
Noise Level Displays the percentage or level of noise (unusable)
signal. If the value of this item is high, data transfer rate will drop.
dBm Check this box and the value of signal strength and noise level will be displayed in dBm level instead of percentage.
There are several wireless statuses available at the bottom of this window. For their explanations, please see chapter 4-3 ‘Glossary’.
2-5 Advanced Settings
This wireless network card provides several advanced settings for experienced wireless users. You can change these settings to increase data transfer performance, or change operation mode.
Please follow the following instructions to set advanced wireless settings:
- Right-click the Ralink configuration utility icon located at lower-right corner of computer desktop, then click 'Launch Config Utilities'.
- Click 'Advanced' tab, and the following settings will appear:
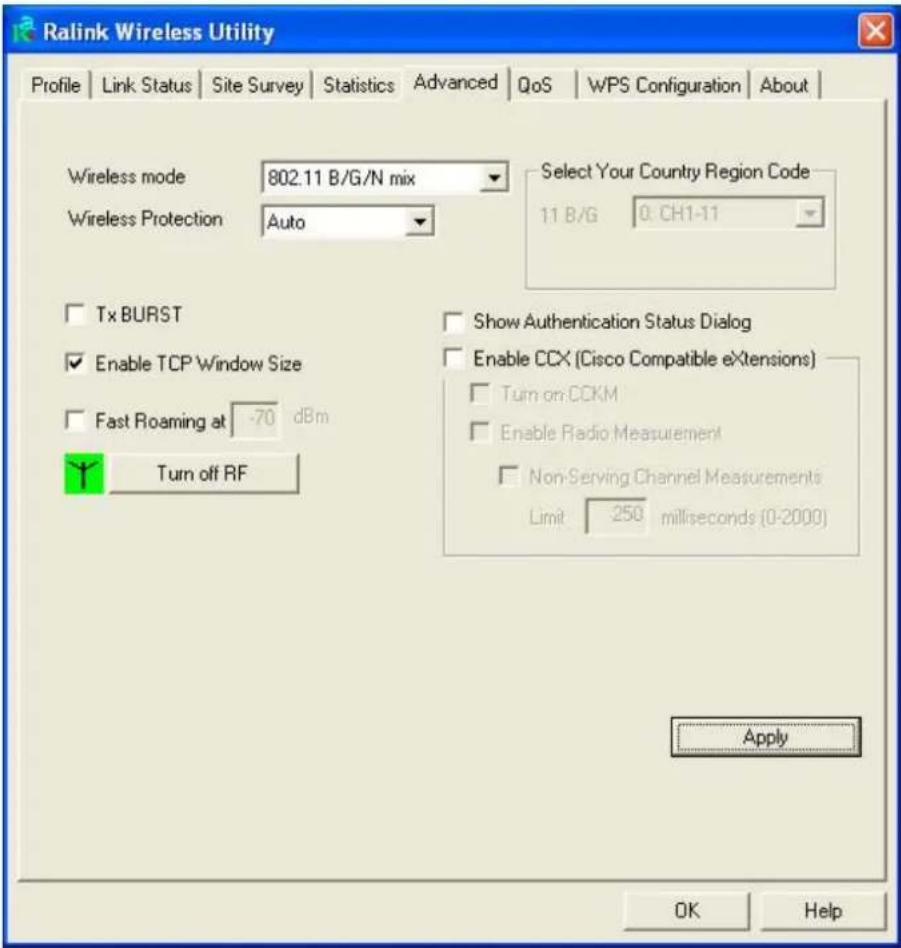
Here are descriptions of every setup items:
Wireless mode Select wireless operation mode, available options are 802.11 B/G mix, 802.11 B only, and 802.11 B/G/N mix. You can select 802.11 B/G/N mix to maximize wireless compatibility with wireless access points and other wireless devices. Anyway, you can set this setting to ‘802.11 B only’ when you’re going to communicate with old 802.11b wireless devices and you got problem using other two modes.
Wireless This setting helps your network card to avoid
Protection interference with other wireless devices when that are both 802.11b and 802.11g wireless devices in the same place. It's recommended to set this setting to 'Auto', since enabling this setting will slightly reduce the data transfer performance.
TX Rate Normally, the wireless network card will adjust transfer rate automatically according to wireless signal quality. However, you can fix the data transfer rate to a lower fixed rate if you think there's some problem about data transfer, or you're too far from wireless access point. It's recommended to set this setting to 'Auto', unless you really know the meaning of this setting.
Tx BURST Check this box to accelerate the data transmit rate. It may not work with all wireless access point and wireless devices.
Enable TCP Check this box and the configuration utility will Window Size adjust TCP window size automatically, to get better performance. It should be safe for most of wireless environments, but if you found some problem on data transfer, uncheck this box.
Fast Roaming at Check this box and you can adjust the threshold of
when this wireless network card should switch to another wireless access point with better signal quality. Only adjust value when you understand what it means.
Turn off RF Click this button to switch wireless radio off, click it again switch wireless radio on.
Select Your Select the country / region code of the place you're Country Region living. Different country / region has different Code regulations on wireless devices, and it's forbidden to use certain channel (radio frequency) in some countries or regions.
The operating frequency channel will be restricted to the country / region user located before importing.
Show When your computer is being authenticated by Authentication wireless authentication server, a dialog window Status Dialog with the process of authentication will appear. This function is helpful to find out the problem when you can not be authenticated, and you can provide this information to authentication server's administrator for debugging purpose.
Enable CCX Enable Cisco Compatible eXtensions. CCX is a wireless feature developed by Cisco used to improve the wireless performance with CCX compatible wireless devices. Check this box if you need to connect to CCX-compatible wireless devices.
Turn on CCKM Check this box to enable CCKM (Cisco Centralized Key Management), which enables wireless clients to roam between CCKM-enabled access points in very short time.
Enable Radio When you're connecting to CCX-compatible
Measurement access point, check this box to enable radio measurement function to improve wireless connectivity.
Non-Serving When you're connecting to CCX-compatible Channel access point, check this box to enable measurement Measurements on unused radio channels to improve wireless connectivity.
Limit --- Limit the time used for said measurement to a milliseconds certain time. Default value is 250.
After you finish the settings, click ‘Apply’ to apply new settings, and click ‘OK’ to close configuration utility.
2-6 QoS Setting
This wireless network card provides QoS (Quality of Service) function, which can improve the performance of certain network applications, like audio / video streaming, network telephony (VoIP), and others. When you enable WMM (Wi-Fi MultiMedia) function of this network card, you can define the priority of different kinds of data, to give higher priority to applications which require instant responding. Therefore you can improve the performance of such network applications.
Please follow the following instructions to set advanced wireless settings:
Right-click the Ralink configuration utility icon located at lower-right corner of computer desktop, then click 'Launch Config Utilities'.

Click 'QoS' tab, and the following settings will appear:

Here are descriptions of every setup items:
WMM Enable Check this box to enable WMM function. Please click 'Apply' button on the right of this check box after you check or uncheck this box, so corresponding settings in this window will be activated or deactivated respectively.
WMM - Power Enable WMM power saving mode to save energy Save Enable and lets your battery live longer.
Setting... Click this button to select the WMM data type which will suppress the function of power saving. When this kind of data is transferring, power saving function will be disabled. Available data types are AC_BK (Background / Low Priority), AC_BE (Best Effort), AC_VI (Video First), and AC_VO (Voice
First).
Direct Link Enable or disable direct link setup (DLS) function.
Setup Enable This function will greatly improve the data transfer rate between WMM-enabled wireless devices. Please click 'Apply' button on the right of this check box after you check or uncheck this box, so corresponding settings in this window will be activated or deactivated respectively.
MAC Address Input the MAC address of another WMM-enabled wireless device you wish to establish a direct link here, then click 'Apply' to add this MAC address to DLS address table.
Timeout Value Input the timeout value of this WMM-enabled direct link wireless device. If the wireless device is not responding after this time, it will be removed from DLS table.
Tear Down If you want to remove a specific wireless device from DLS table, select the device and click this button to remove it.
After you finish the settings, click 'OK' to close configuration utility.
2-7 WPS Configuration
Wi-Fi Protected Setup (WPS) is the latest wireless network technology which makes wireless network setup become very simple. If you have WPS-enabled wireless access point, and you want to establish a secure connection to it, you don't have to configure the wireless access point and setup data encryption. All you have to do is go to the WPS setup page of this wireless card, click a button, and then press a specific button on the wireless access point you wish to establish a secure connection - just three simple steps!
For older wireless access points, it's possible to perform a firmware upgrade to become a WPS-enabled access point. Since they may not have a hardware button to press for WPS setup, you can use an alternative WPS setup method – input the pin code. Every WPS-compatible wireless network card comes with a unique WPS pin code; you can just input the code to wireless access point, and the wireless access point and wireless network card will do the rest for you.
This wireless network card is compatible with WPS. To use this function, the wireless access point you wish to connect to must support WPS function too. Now, please follow the following instructions to establish secure connection between WPS-enabled wireless access point and your wireless network card:
2-7-1 WPS Setup - PBC (Push-Button Configuration)
- Right-click the Ralink configuration utility icon located at lower-right corner of computer desktop, then click 'Launch Config Utilities'.
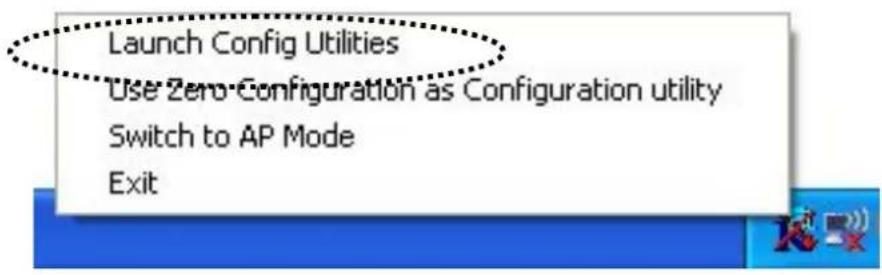
- Click 'WPS Configuration' tab, and the following settings will appear:

- Set ‘Config Mode’ to ‘Enrollee’, and then push the ‘WPS’ button on your wireless access point (the button used to activate WPS standby mode may have another name), or use other way to start WPS standby mode as the instruction given by your wireless access point’s user manual.
- Before you start to establish the wireless connection by using WPS, you can click 'Rescan' button to search for WPS-enabled access points near you, to make sure the WPS function of your access point is activated.

All access points with WPS function enabled will be displayed. Please make sure the access point you wish to connect is displayed. If not, please click 'Rescan' few more times. You can also click 'Information' button to see the detailed information about selected access point.
- Start PBC pairing procedure at access point side (please refer to the instruction given by your access point's manufacturer), then click 'PBC'
button in wireless configuration utility to start to establish wireless connection by WPS. Please be patient (This may require several seconds to one minute to complete). When you see ‘WPS status is connected successfully’ message, means the connection between your wireless network card and access point is successfully connected by WPS, and the information about access point you connected to will be displayed.
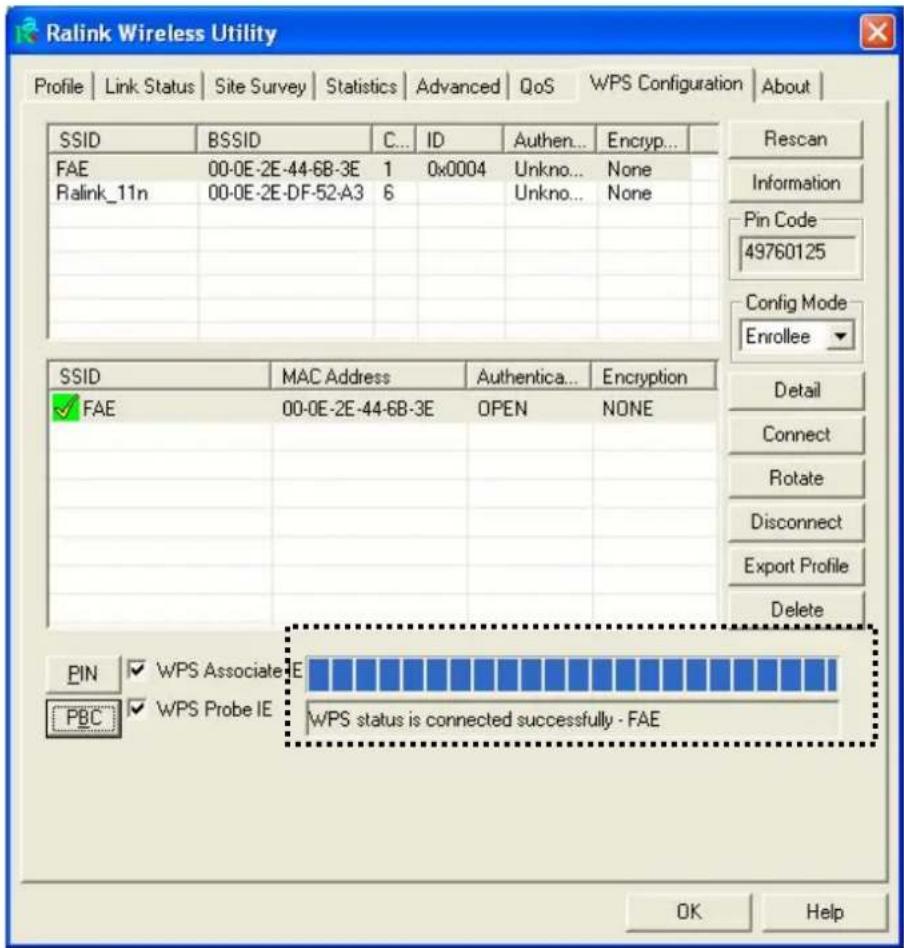
Sometime WPS may fail, and you can click ‘PBC’ button few more times to try again. When an access point is connected, you can click
'Disconnect' to disconnect your wireless network card from a connected access point, or select another WPS-enabled wireless access point, then click 'Connect' to establish connection to selected access point, if there are more than one WPS-enabled access point found. You can also click 'Rotate' button, and next access point on the list will be selected to establish connection.
If you want to delete a found access point from the list, select it and click 'Delete' button.
2-7-2 WPS Setup - PIN
If the wireless access point you wish to connect supports PIN, please follow the following instructions to establish connection to it:
- Right-click the Ralink configuration utility icon located at lower-right corner of computer desktop, then click 'Launch Config Utilities'.

- Click 'WPS Configuration' tab, and the following settings will appear:

The PIN number of your wireless network card is an eight-digit number
located at the upper-right position of configuration utility. Remember it, and input the number to your wireless access point as the WPS PIN code (Please refer to the user manual of your wireless access point for instructions about how to do this).
NOTE: The PIN code of every wireless network card is DIFFERENT. Please don't use the sample code shown here.
- Click 'PIN' button now, and wait for few seconds to one minute. If a wireless access point with correct PIN code is found, you'll be connected to that access point:

You may have to click 'PIN' for few more times to try again. If you still can not connect to access point by this way, please make sure the PIN code you provided to access point is correct.
2-8 About
The ‘About’ tab provides you the information about version numbers of configuration utility, firmware, and other important information about your wireless network card.
Please follow the following instructions to see these information:
- Right-click the Ralink configuration utility icon located at lower-right corner of computer desktop, then click 'Launch Config Utilities'.
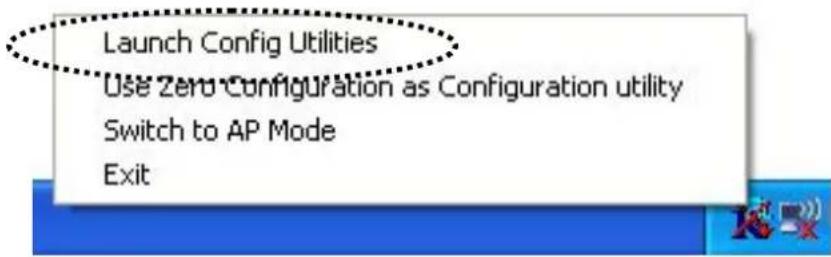
- Click 'About' tab, and the following settings will appear:

If you need assistance about network problem, you'll need these values. You can also click ‘WWW.RALINKTECH.COM’ button to go to the web site of network card driver manufacturer and get more information about your wireless network card.
Please click 'OK' to close configuration utility.
CHAPTER III: Soft-AP Function
Excepting become a wireless client of other wireless access points, this wireless card can act as a wireless service provider also! You can switch this wireless card's operating mode to ‘AP’ mode to simulate the function of a real wireless access point by software, and all other computers and wireless devices can connect to your computer wirelessly, even share the internet connection you have!
Please follow the instructions in following chapters to use the AP function of your wireless card.
3-1 Switch to AP Mode and Basic Configuration
The operating mode of the wireless card is ‘Station Mode’ (becoming a client of other wireless access points) by default. If you want to switch to AP mode, please right-click Ralink utility icon, and select ‘Switch to AP Mode’.

After you select 'Switch to AP Mode', the Ralink utility icon will change:

Which indicated the wireless card is operating in AP mode now. If you want to switch the wireless card back to station mode (become a client of other wireless access points), click ‘Switch to Station Mode’.

A configuration window will appear after you switch the operation mode to ‘AP’ or click ‘Launch Config Utilities’ after you right-click the Ralink configuration utility, which asks you to assign an existing network card with internet connection:

If your computer has another network card which is connected to Internet, please select it from ‘Name’ dropdown menu, and click ‘Enable ICS’; if your computer does not have another network card with Internet connection, please click ‘Not enable ICS’.
After you click ‘Enable ICS’ or ‘Not enable ICS’, you’ll see the basic configuration menu of the AP function:

Here are descriptions of every setup items:
SSID
Please input the SSID (the name used to identify this wireless access point) here. Up to 32 numerical characters can be accepted here, excepting space.
TX Rate Please select the data transfer rate here. The maximum TX rate you can select here depends on the wireless mode you're using. It's safe to select 'Auto' to let wireless card select a proper TX rate according to the strength and quality of radio signal. When the wireless mode is set to '802.11 B/G/N Mix', TX Rate will be set to 'Auto' and cannot be changed.
Channel Please select the wireless channel you wish to use. The number of channels available here will vary
depends on the setting of 'Country Region Code'.
Wireless Mode Please select the wireless operating mode. You can limit the type of wireless client to 802.11b or 802.11g only, or allow 802.11b/g, and 802.11b/g/n clients. It's safe to select '802.11 B/G/N mix' to allow all kinds of wireless client to connect to your computer, unless you want to limit the type of wireless client allowed to connect to your computer.
Use Mac Click this button to use the MAC address of the Address wireless card as SSID. A prefix of 'AP' will be added.
Security Set the security options (wireless data encryption) Setting Please refer to chapter 3-2 ‘Security Settings’ for details.
Country Available options are 0-7, which will affect the Region Code available wireless channels you can use:
0: FCC (US, Canada, and other countries uses FCC radio communication standards)
1: ETSI (Europe)
2: SPAIN
3: FRANCE
4: MKK
5: MKKI (TELEC)
6: ISERAL (Channel 3 to 9)
7: ISERAL (Channel 5 to 13)
The operating frequency channel will be restricted to the country / region user located before importing.
Wireless Wireless protection will prevent data collision when Protection there are both 802.11b and 802.11g clients. You can select 'Auto' to let configuration utility to decide to
use wireless protection or not. You can also select 'ON' or 'OFF' to force the use of wireless protection or not.
Beacon(ms) You can define the time interval that a beacon signal should be send. Default value is 100. Do not modify this value unless you know what will be affected.
Idle Time Select the idle time of your wireless network card. Default value is 300. Do not modify this value unless you know what will be affected.
No forwarding Check this box and wireless clients will not be able among wireless to share data with each other. clients
Hide SSID Check this box and the SSID will not be broadcasted to the public. Your wireless clients must know the exact SSID to be able to connect to your computer. This option is useful to enhance security level.
Allow BW Check this box to allow BW 40MHz capability. 40 MHz
Default Click this button to restore all settings in this page back to default value.
Apply Click this button to activate current settings.
To exit, click 'X' button at the upper-right corner of configuration window.
3-2 Security Settings
This wireless card supports wireless encryption in AP mode, which will encrypt the data being transferred over the air to enhance data security level. It’s recommended to enable data encryption unless you wish to open your computer (and its internet connection) to the public.
When you click ‘Security Setting’ in Ralink configuration utility, the following window will appear:
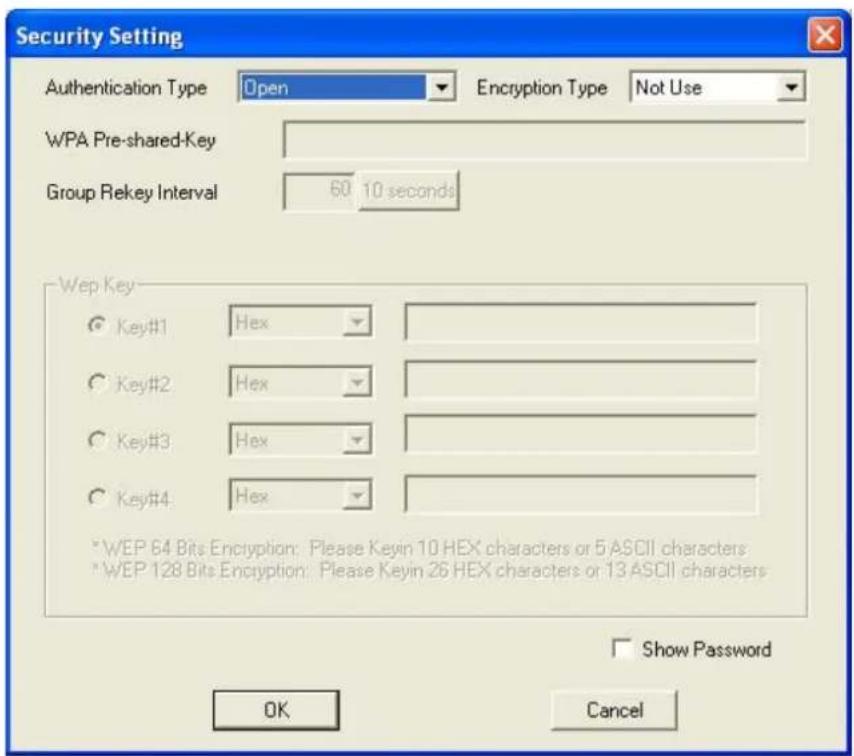
Here are descriptions of every setup items:
Authentication Please select a wireless authentication type you
Type wish to use. Available options are 'Open', 'Shared',
'WPA-PSK', 'WPA2-PSK', and 'WPA-PSK/
WPA2-PSK'. If you want to disable wireless data
encryption, you must select 'Open' or 'Shared'.
Encryption Please select an encryption mode. The available
Type options in this setting item will vary depending on
the authentication type you select. If you select 'Not
Use', data will not be encrypted and people with
some networking knowledge will be able to read the data you transfer with proper tool.
NOTE: WPA encryption is safer than WEP, however, some older wireless clients don't support WPA encryption.
WPA Pre-shared Please input the WPA pre-shared key here. Only Key clients with the same pre-shared key you inputted here will be able to connect to your computer. This
setting is only available when you select one of WPA encryptions.
Group Rekey You can specify the time interval to re-issue the key Interval to your wireless clients here. You can click the
button '10 seconds' or 'Kpackets' to change the unit of time interval. (every 10 seconds or a thousand data packets times the value you specified in 'Group Rekey Interval' field)
Wep Key Please input the WEP encryption key here when you #1 \~ #4 select 'WEP' as encryption type. There are 2 types
of WEP key: Hex (number 0 to 9, and ASCII characters A to F) and ASCII (all alphanumerical characters plus symbols). Please select the type of WEP key first, and then input the WEP key according to the type of WEP key you selected.
If you want to use WEP 64 bits encryption, please input 10 characters if you select HEX, or input 5 characters if you select ASCII; If you want to use WEP 128bits encryption, please input 26 characters if you select HEX, or input 13 characters if you select ASCII. 128 bits encryption is safer then 64 bits, but the data transfer speed will be slightly reduced.
Show Password Check this box and the WPA pre-shared key or WEP
key you inputted will be shown, but not replaced by asterisk (*).
OK Click this button to save changes you made in this page.
Cancel Click this button to discard all changes you made in this window.
3-3 Access Control
If you're not going to open your computer and wireless resources to the public, you can use MAC address filtering function to enforce your access control policy, so only wireless clients with MAC address you defined by this function can be connected to your software access point.
Please follow the following instructions to set access control based on MAC address:
- Right-Click Ralink configuration utility icon, and select 'Launch Config Utilities'

- Click 'Access Control' tab, and the following messages will appear:
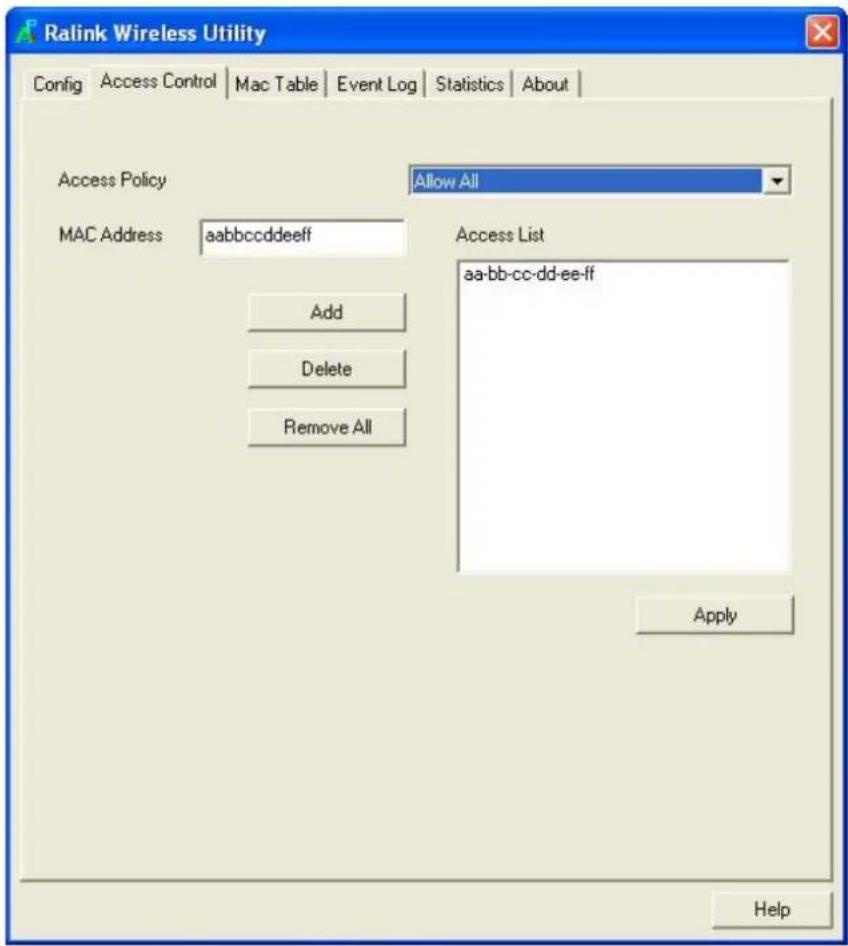
Here are descriptions of every setup items:
Access Policy Select the policy type of your access rule:
Disable: Allow any wireless client with proper authentication settings to connect to this access point.
Allow All: Only allow wireless clients with MAC address listed here to connect to this access point.
Reject All: Reject wireless clients with MAC address listed here to be connected to this access point.
MAC address Input the MAC address of the wireless client you you wish to allow or reject here. No colon (:) or hyphen (-) required.
Add Add the MAC address you inputted in 'MAC address' field to the list.
Delete Please select a MAC address from the list, then click 'Delete' button to remove it.
Remove All Delete all MAC addresses in the list.
Apply Save and apply changes you made.
3-4 Connection table
If you want to see the list of all wireless clients connected to this access point, please follow the following instructions:
- Right-Click Ralink configuration utility icon, and select 'Launch Config Utilities'

- Click ‘Mac Table’ tab, and a list containing all connected wireless clients will appear:

Here are descriptions of every fields:
MAC Address Displays the MAC address of this wireless client.
AID The serial number of this wireless connection.
Power Saving Displays the capability of power-saving function of
Mode this wireless client.
Status Displays additional information of this wireless
Connection, like current wireless operating mode and data transfer rate.
3-5 Event Log
This software access point will log all wireless-related activities as a log. You can follow the following instructions to view the content of the event log:
- Right-Click Ralink configuration utility icon, and select 'Launch Config Utilities'

- Click 'Event Log' tab, and the event log will be displayed:
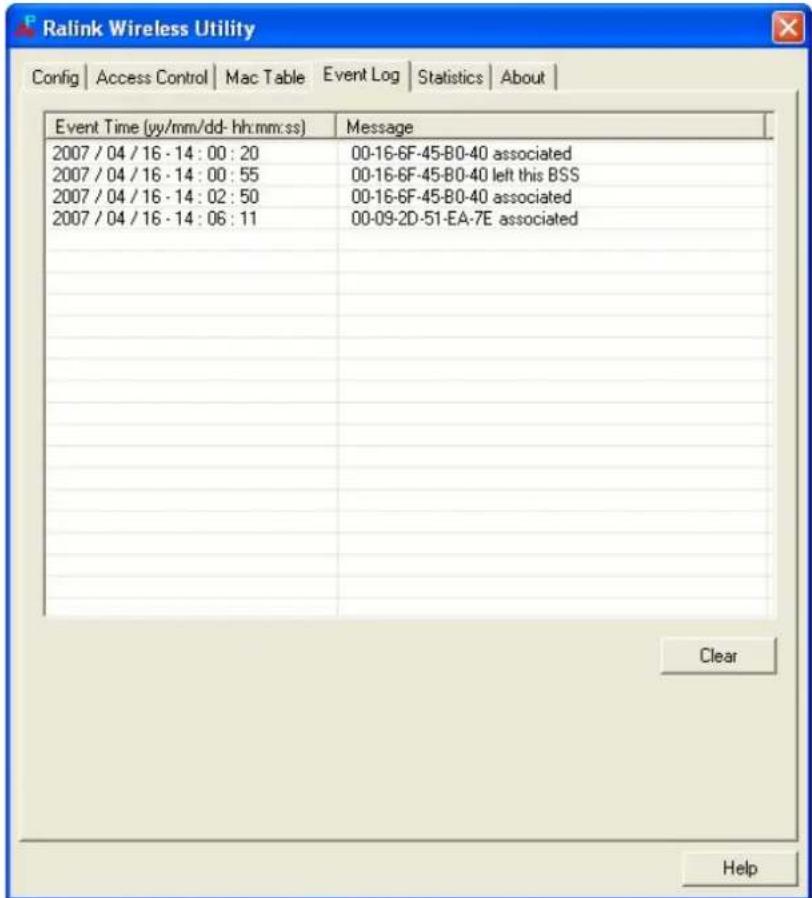
You can click 'Clear' to remove all entries in the log.
3-6 Statistics
If you want to know detailed information about how your software access point works, you can follow the following instructions to view the statistics of the access point:
- Right-Click Ralink configuration utility icon, and select 'Launch Config Utilities'

- Click 'Statistics' tab, and the event log will be displayed:

You can click 'RESET COUNTERS' button to reset all counters to zero.
CHAPTER IV: APPENDIX
4-1 Hardware Specification
Standards: IEEE 802.11b/g/Draft-N
Interface: USB 2.0 (USB 1.1 Compatible)
Frequency Band: 2.4000 \~ 2.4835GHz (Industrial Scientific Medical Band)
Data Rate: 11b: 1/2/5.5/11Mbps
11g: 6/9/12/24/36/48/54Mbps
11n (20MHz): MCS0-15, 32 with Half Guard Interval Support (up to 144Mbps)
11n (40MHz): MCS0-15, 32 with Half Guard Interval Support (up to 300Mbps)
Securities: WEP 64/128, WPA, WPA2
Cisco CCX Support
Antenna: Internal 2 Antennas with Two TX and Two RX
Drivers: Windows 2000/XP/2003/Vista Server
LEDs: Link/Activity
Temperature: 32\~131°F (0 \~ 55°C)
Humidity: 10-95% (NonCondensing)
Certification: FCC, CE
4-2 Troubleshooting
If you encounter any problem when you're using this wireless network card, don't panic! Before you call your dealer of purchase for help, please check this troubleshooting table, the solution of your problem could be very simple, and you can solve the problem by yourself!
| Scenario Solution | |
| I can’t find any wireless access point / wireless device in ‘Site Survey’ function. | 1. Click ‘Rescan’ for few more times and see if you can find any wireless access point or wireless device.2. Please move closer to any known wireless access point.3. ‘Ad hoc’ function must be enabled for the wireless device you wish to establish a direct wireless link.4. Please adjust the position of network card (you may have to move your computer if you’re using a notebook computer) and click ‘Rescan’ button for few more times. If you can find the wireless access point or wireless device you want to connect by doing this, try to move closer to the place where the wireless access point or wireless device is located. |
| Nothing happens when I click ‘Launch config utilities’ | 1. Please make sure the wireless network card is inserted into your computer’s USB port. If the Ralink configuration utility’s icon is black, the network card is not detected by your computer.2. Reboot the computer and try again.3. Remove the card and insert it into another USB port.4. Remove the driver and re-install.5. Contact the dealer of purchase for help. |
| I can not establish connection with a certain wireless access point | 1. Click ‘Connect’ for few more times.2. If the SSID of access point you wish to connect is hidden (nothing displayed in ‘SSID’ field in ‘Site Survey’ function), you have to input correct SSID of the access point you wish to connect. Please contact the owner of access point to ask for correct SSID.3. You have to input correct passphrase / security key to connect an access point with encryption. Please contact the owner of access point to ask for correct passphrase / security key.4. The access point you wish to connect only allows network cards with specific MAC address to establish connection. Please go to ‘About’ tab and write the value of ‘Phy_Addess’ down, then present this value to the owner of access point so he / she can add the MAC address of your network card to his / her access point’s list. |
| The network is slow / having problem when transferring large files | 1. Move closer to the place where access point is located.2. Enable ‘Wireless Protection’ in ‘Advanced’ tab.3. Try a lower TX Rate in ‘Advanced’ tab.4. Disable ‘Tx Burst’ in ‘Advanced’ tab.5. Enable ‘WMM’ in ‘QoS’ tab if you need to use multimedia / telephony related applications.6. Disable ‘WMM – Power Save Enable’ in ‘QoS’ tab.7. There could be too much people using the same radio channel. Ask the owner of the access point to change the channel number.Please try one or more solutions listed above. |
4-3 Glossary
1. What is the IEEE 802.11g standard?
802.11g is the new IEEE standard for high-speed wireless LAN communications that provides for up to 54 Mbps data rate in the 2.4 GHz band. 802.11g is quickly becoming the next mainstream wireless LAN technology for the home, office and public networks. 802.11g defines the use of the same OFDM modulation technique specified in IEEE 802.11a for the 5 GHz frequency band and applies it in the same 2.4 GHz frequency band as IEEE 802.11b. The 802.11g standard requires backward compatibility with 802.11b.
The standard specifically calls for:
A. A new physical layer for the 802.11 Medium Access Control (MAC) in the 2.4 GHz frequency band, known as the extended rate PHY (ERP). The ERP adds OFDM as a mandatory new coding scheme for 6, 12 and 24 Mbps (mandatory speeds), and 18, 36, 48 and 54 Mbps (optional speeds). The ERP includes the modulation schemes found in 802.11b including CCK for 11 and 5.5 Mbps and Barker code modulation for 2 and 1 Mbps.
B. A protection mechanism called RTS/CTS that governs how 802.11g devices and 802.11b devices interoperate.
2. What is the IEEE 802.11b standard?
The IEEE 802.11b Wireless LAN standard subcommittee, which formulates the standard for the industry. The objective is to enable wireless LAN hardware from different manufactures to communicate.
3. What does IEEE 802.11 feature support?
The product supports the following IEEE 802.11 functions:
• CSMA/CA plus Acknowledge Protocol
• Multi-Channel Roaming
• Automatic Rate Selection
• RTS/CTS Feature
- Fragmentation
• Power Management
4. What is Ad-hoc?
An Ad-hoc integrated wireless LAN is a group of computers, each has a Wireless LAN card, Connected as an independent wireless LAN. Ad hoc wireless LAN is applicable at a departmental scale for a branch or SOHO operation.
5. What is Infrastructure?
An integrated wireless and wireless and wired LAN is called an Infrastructure configuration. Infrastructure is applicable to enterprise scale for wireless access to central database, or wireless application for mobile workers.
6. What is BSS ID?
A specific Ad hoc LAN is called a Basic Service Set (BSS). Computers in a BSS must be configured with the same BSS ID.
7. What is WEP?
WEP is Wired Equivalent Privacy, a data privacy mechanism based on a 40 bit shared key algorithm, as described in the IEEE 802.11 standard.
8. What is TKIP?
TKIP is a quick-fix method to quickly overcome the inherent weaknesses in WEP security, especially the reuse of encryption keys. TKIP is involved in the IEEE 802.11i WLAN security standard, and the specification might be officially released by early 2003.
9. What is AES?
AES (Advanced Encryption Standard), a chip-based security, has been developed to ensure the highest degree of security and authenticity for digital information, wherever and however communicated or stored, while making more efficient use of hardware and/or software than previous encryption standards. It is also included in IEEE 802.11i standard. Compare with AES, TKIP is a temporary protocol for replacing WEP security until manufacturers implement AES at the hardware level.
10. Can Wireless products support printer sharing?
Wireless products perform the same function as LAN products. Therefore, Wireless products can work with Netware, Windows 2000, or other LAN operating systems to support printer or file sharing.
11. Would the information be intercepted while transmitting on air?
WLAN features two-fold protection in security. On the hardware side, as with Direct Sequence Spread Spectrum technology, it has the inherent security feature of scrambling. On the software side, WLAN series offer the encryption function (WEP) to enhance security and Access Control. Users can set it up depending upon their needs.
12. What is DSSS? What is FHSS? And what are their differences?
Frequency-hopping spread-spectrum (FHSS) uses a narrowband carrier that changes frequency in a pattern that is known to both transmitter and receiver. Properly synchronized, the net effect is to maintain a single logical channel. To an unintended receiver, FHSS appears to be short-duration impulse noise. Direct-sequence spread-spectrum (DSSS) generates a redundant bit pattern for each bit to be transmitted. This bit pattern is called a chip (or chipping code). The longer the chip is, the greater the probability that the original data can be recovered. Even if one or more bits in the chip are damaged during transmission, statistical techniques embedded in the radio can recover the original data without-the need for retransmission. To an unintended receiver, DSSS appears as low power wideband noise and is rejected (ignored) by most narrowband receivers.
13. What is Spread Spectrum?
Spread Spectrum technology is a wideband radio frequency technique developed by the military for use in reliable, secure, mission-critical communication systems. It is designed to trade off bandwidth efficiency for reliability, integrity, and security. In other words, more bandwidth is consumed than in the case of narrowband transmission, but the trade off produces a signal that is, in effect, louder and thus easier to detect, provided that the receiver knows the parameters of the spread-spectrum signal being broadcast. If a receiver is not tuned to the right frequency, a spread –spectrum signal looks like background noise. There are two main alternatives, Direct Sequence Spread Spectrum (DSSS) and Frequency Hopping Spread Spectrum (FHSS).
14. What is WMM?
Wi-Fi Multimedia (WMM), a group of features for wireless networks that improve the user experience for audio, video and voice applications. WMM is based on a subset of the IEEE 802.11e WLAN QoS draft standard. WMM adds prioritized capabilities to Wi-Fi networks and optimizes their performance when multiple concurring applications, each with different latency and throughput requirements, compete for network resources. By using WMM, end-user satisfaction is maintained in a wider variety of environments and traffic conditions. WMM makes it possible for home network users and enterprise network managers to decide which data streams are most important and assign them a higher traffic priority.
15. What is WMM Power Save?
WMM Power Save is a set of features for Wi-Fi networks that increase the efficiency and flexibility of data transmission in order to conserve power. WMM Power Save has been optimized for mobile devices running latency-sensitive applications such as voice, audio, or video, but can benefit any Wi-Fi device. WMM Power Save uses mechanisms included in the IEEE 802.11e standard and is an enhancement of IEEE 802.11 legacy power save. With WMM Power Save, the same amount of data can be transmitted in a shorter time while allowing the Wi-Fi device to remain longer in a low-power “dozing” state.
16. What is GI?
GI stands for Guard Interval. It's a measure to protect wireless devices from cross- interference. If there are two wireless devices using the same or near channel, and they are close enough, radio interference will occur and reduce the radio resource usability.
17. What is STBC?
STBC stands for Space-Time Block Coding, which is a technique used to transfer multiple copies of data by multiple antenna, to improve data transfer performance. By using multiple antennas, not only data transfer rate is improved, but also the wireless stability.
18. What is WPS?
WPS stands for Wi-Fi Protected Setup. It provides a simple way to establish unencrypted or encrypted connections between wireless clients and access point automatically. User can press a software or hardware button to activate WPS function, and WPS-compatible wireless clients and access point will establish connection by themselves. There are two types of WPS: PBC (Push-Button Configuration) and PIN code.
Federal Communication Commission Interference Statement
This equipment has been tested and found to comply with the limits for a Class B digital device, pursuant to Part 15 of FCC Rules. These limits are designed to provide reasonable protection against harmful interference in a residential installation. This equipment generates, uses, and can radiate radio frequency energy and, if not installed and used in accordance with the instructions, may cause harmful interference to radio communications. However, there is no guarantee that interference will not occur in a particular installation. If this equipment does cause harmful interference to radio or television reception, which can be determined by turning the equipment off and on, the user is encouraged to try to correct the interference by one or more of the following measures:
- Reorient or relocate the receiving antenna.
- Increase the separation between the equipment and receiver.
- Connect the equipment into an outlet on a circuit different from that to which the receiver is connected.
- Consult the dealer or an experienced radio technician for help.
FCC Caution
This device and its antenna must not be co-located or operating in conjunction with any other antenna or transmitter.
This device complies with Part 15 of the FCC Rules. Operation is subject to the following two conditions: (1) this device may not cause harmful interference, and (2) this device must accept any interference received, including interference that may cause undesired operation.
Any changes or modifications not expressly approved by the party responsible for compliance could void the authority to operate equipment.
Federal Communication Commission (FCC) Radiation Exposure Statement
This equipment complies with FCC radiation exposure set forth for an uncontrolled environment. In order to avoid the possibility of exceeding the FCC radio frequency exposure limits, human proximity to the antenna shall not be less than 20cm (8 inches) during normal operation.
The antenna(s) used for this transmitter must not be co-located or operating in conjunction with any other antenna or transmitter.
R&TTE Compliance Statement
This equipment complies with all the requirements of DIRECTIVE 1999/5/EC OF THE EUROPEAN PARLIAMENT AND THE COUNCIL of March 9, 1999 on radio equipment and telecommunication terminal Equipment and the mutual recognition of their conformity (R&TTE)
The R&TTE Directive repeals and replaces in the directive 98/13/EEC (Telecommunications Terminal Equipment and Satellite Earth Station Equipment) As of April 8, 2000.
Safety
This equipment is designed with the utmost care for the safety of those who install and use it. However, special attention must be paid to the dangers of electric shock and static electricity when working with electrical equipment. All guidelines of this and of the computer manufacture must therefore be allowed at all times to ensure the safe use of the equipment.
EU Countries Intended for Use
The ETSI version of this device is intended for home and office use in Austria, Belgium, Denmark, Finland, France, Germany, Greece, Ireland, Italy, Luxembourg, the Netherlands, Portugal, Spain, Sweden, and the United Kingdom.
The ETSI version of this device is also authorized for use in EFTA member states: Iceland, Liechtenstein, Norway, and Switzerland.
EU Countries Not intended for use
None.


- WIRELESS LAN USB ADAPTER
- USER MANUAL
- COPYRIGHT
- CATALOG
- CHAPTER I: PRODUCT INFORMATION .... 5
- CHAPTER II: DRIVER INSTALLATION AND CONFIGURATION . 10
- CHAPTER III: SOFT-AP FUNCTION 58
- CHAPTER IV: APPENDIX....73
- CHAPTER I: PRODUCT INFORMATION
- INTRODUCTION AND SAFETY INFORMATION
- OTHER FEATURES OF THIS ROUTER INCLUDING
- SAFETY INFORMATION
- SYSTEM REQUIREMENTS
- PACKAGE CONTENTS
- CHAPTER II: DRIVER INSTALLATION AND CONFIGURATION
- OPTIMIZE FOR WIFI MODE OPTIMIZE FOR PERFORMANCE MODE
- CONNECT TO WIRELESS ACCESS POINT
- 2-2-1 USING RALINK UTILITY
- TIPS
- 2-2-2 USING WINDOWS ZERO CONFIGURATION
- CONNECTION PROFILE MANAGEMENT
- 2-3-1 MAKE A PROFILE FOR AN ACCESS POINT OR WIRELESS DEVICE
- 2-3-2 USING 802.1X - CERTIFICATION
- HERE ARE DESCRIPTIONS OF EVERY SETUP ITEMS
- 2-3-3 USING 802.1X - CA SERVER
- VIEW NETWORK STATISTICS AND LINK STATUS
- 2-4-1 NETWORK STATISTICS
- 2-4-2 LINK STATUS
- ADVANCED SETTINGS
- WIRELESS THIS SETTING HELPS YOUR NETWORK CARD TO AVOID
- QOS SETTING
- FIRST)
- WPS CONFIGURATION
- 2-7-1 WPS SETUP - PBC (PUSH-BUTTON CONFIGURATION)
- 2-7-2 WPS SETUP - PIN
- ABOUT
- CHAPTER III: SOFT-AP FUNCTION
- SWITCH TO AP MODE AND BASIC CONFIGURATION
- SECURITY SETTINGS
- ACCESS CONTROL
- CONNECTION TABLE
- EVENT LOG
- STATISTICS
- CHAPTER IV: APPENDIX
- HARDWARE SPECIFICATION
- TROUBLESHOOTING
- GLOSSARY
- WHAT IS THE IEEE 802.11G STANDARD
- WHAT IS THE IEEE 802.11B STANDARD
- WHAT DOES IEEE 802.11 FEATURE SUPPORT
- WHAT IS AD-HOC
- WHAT IS INFRASTRUCTURE
- WHAT IS BSS ID
- WHAT IS WEP
- WHAT IS TKIP
- WHAT IS AES
- CAN WIRELESS PRODUCTS SUPPORT PRINTER SHARING
- WOULD THE INFORMATION BE INTERCEPTED WHILE TRANSMITTING ON AIR
- WHAT IS DSSS? WHAT IS FHSS? AND WHAT ARE THEIR DIFFERENCES
- WHAT IS SPREAD SPECTRUM
- WHAT IS WMM
- WHAT IS WMM POWER SAVE
- WHAT IS GI
- WHAT IS STBC
- WHAT IS WPS
- FEDERAL COMMUNICATION COMMISSION INTERFERENCE STATEMENT
- FCC CAUTION
- FEDERAL COMMUNICATION COMMISSION (FCC) RADIATION EXPOSURE STATEMENT
- R&TTE COMPLIANCE STATEMENT
- SAFETY
- EU COUNTRIES INTENDED FOR USE
- EU COUNTRIES NOT INTENDED FOR USE
Brand : Kraun
Model : KR.MP
Category : Network card / adapter