
SGM-4000-KLLN1-GP - Mouse COOLER MASTER - Free user manual and instructions
Find the device manual for free SGM-4000-KLLN1-GP COOLER MASTER in PDF.


| Product Type | Wired Gaming Mouse |
| Model | SGM-4000-KLLN1-GP |
| Brand | Cooler Master |
| Dimensions (L x W x H) | 125 x 67 x 38 mm |
| Weight | 98 g (without cable) |
| Cable Length | 1.8 m braided cable |
| Sensor Type | Optical (PMW3325 or similar) |
| DPI Range | 200 – 10000 DPI (adjustable in steps) |
| Number of Buttons | 7 programmable buttons |
| Switch Type | Omron switches (20 million clicks) or equivalent |
| Polling Rate | 1000 Hz (1 ms response) |
| Lighting | RGB LED (customizable zones) |
| Onboard Memory | Yes, for profile storage |
| Connection Interface | USB-A |
| Power Source | USB bus powered (5V DC) |
| Compatibility | Windows, macOS, Linux (limited) |
| Software | Cooler Master MasterPlus+ (optional) |
| Cleaning | Wipe with dry cloth; do not use liquids |
| Safety Warnings | Avoid exposure to moisture; keep away from magnets |
| Spare Parts | Mouse feet, cable, grips available via Cooler Master support |
| Repairability | Limited user-serviceable parts; contact support for issues |
Frequently Asked Questions - SGM-4000-KLLN1-GP COOLER MASTER
User questions about SGM-4000-KLLN1-GP COOLER MASTER
0 question about this device. Answer the ones you know or ask your own.
Ask a new question about this device
Download the instructions for your Mouse in PDF format for free! Find your manual SGM-4000-KLLN1-GP - COOLER MASTER and take your electronic device back in hand. On this page are published all the documents necessary for the use of your device. SGM-4000-KLLN1-GP by COOLER MASTER.
USER MANUAL SGM-4000-KLLN1-GP COOLER MASTER
Complies with 21 CFR 1040.10 and 104.11 except for deviations pursuant to Laser Notice No. 50, dated June 24, 2007
INVISIBLE LASER RADIATION
DO NOT VIEW DIRECTLY WITH
OPTICAL INSTRUMENTS
CLASS 1M LASER PRODUCT
CMSTORM INFERNO
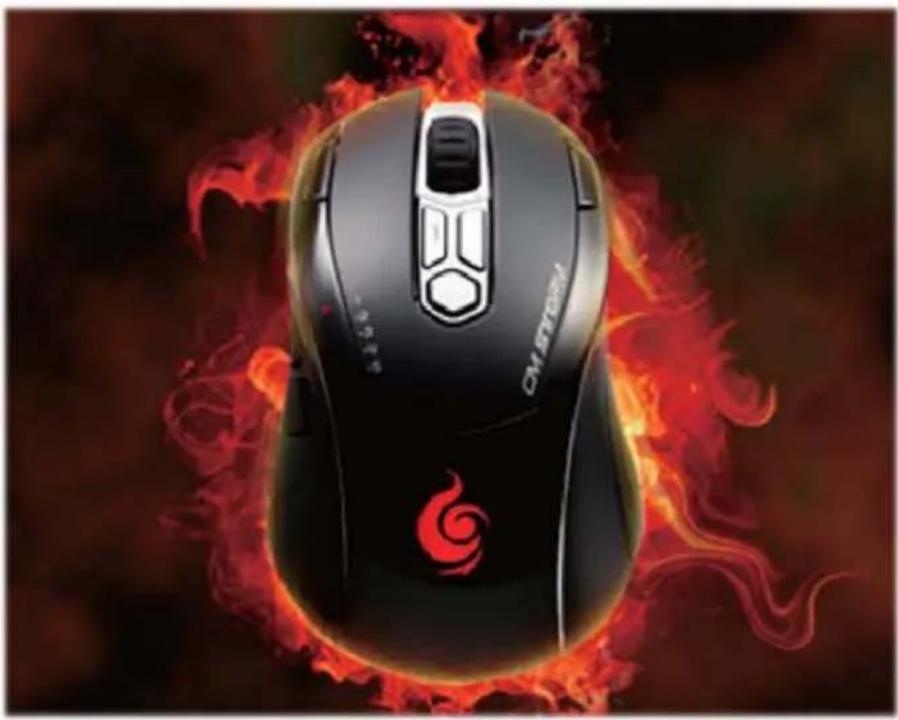
INFERNO
GAMING MOUSE
4000 DPI Precision Laser Sensor Advanced Storm MacroPro™ Key Storm Tactics™ Multiplier key Onboard Sentinel-X™ 128Kb
Package Contents
1
Inferno
Gaming Mouse

2
Storm Tactic AP Software
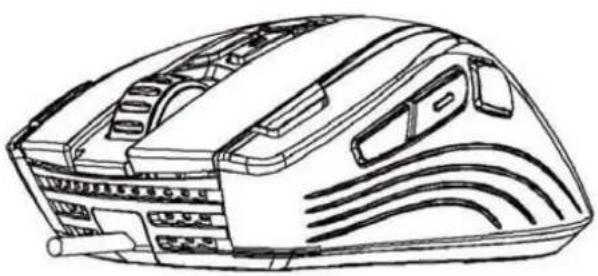
CMSTORM INFERNO OUTLOOK

Mechanical Buttons

ShadeMorphert™ LED Tech

DPI Display System

Storm Tactical™ Sensor
| A | Button 1 | Left Click |
| B | Button 2 | Right Click |
| C | Button 3 | Middle Button/ Scroll Wheel |
| D | Button 4 | Side Button (IE, Forward) |
| E | Button 5 | Side Button (IE, Backward) |
| F | Button 6 | DPI + |
| G | Button 7 | DPI - |
| H | Button 8 | Rapid Fire TacticalTM Key |
| I | Button 9 | Storm MacroProTM Key |
| J | Button 10 | Storm Profile Button |
| K | Button 11 | Storm TacticsTM Multiplier key |
| L | LED | ShadeMorphertM Front LED |
| M | LED | ShadeMorphertM Scroll LED |
| N | LED | ShadeMorphertM Top LED |
| O | LED | DPI Management System |
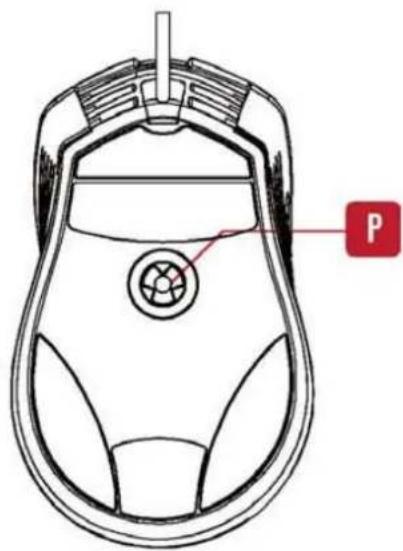
| P | Laser | Storm TacticalTM Laser Sensor |

Hardware Setup and Software Installation
The Inferno is a full-speed, plug and play USB gaming mouse. If your computer system supports plug and play, drivers will be optional for installation. Although most USB ports today are hot-swappable, we do recommend shutting down your system before plugging in or removing the USB device.
System Requirements:
Windows® 2000/XP/Vista/7
Free USB Port
CD-ROM Drive
![graph TD A["Desktop"] -->|USB| B["Switch"] B --> C["Laptop"] C --> D["CD"] D --> E["Computer"]](/content/2026/05/959770/images/4b460a704ab6bb677c47257d446dcc7164425d7e509e38672420bb3ccccd6797.jpg)
Step 1: Plug Inferno into any free USB port on your computer system.
Step 2: Turn on the computer system; Windows® will automatically install the necessary programs.
Step 3: Open->Control Panel->System->Hardware->Device Manager and confirm that your mouse is working properly.
Step 4: Insert your Storm Tactic AP Software CD into the CD-ROM drive.
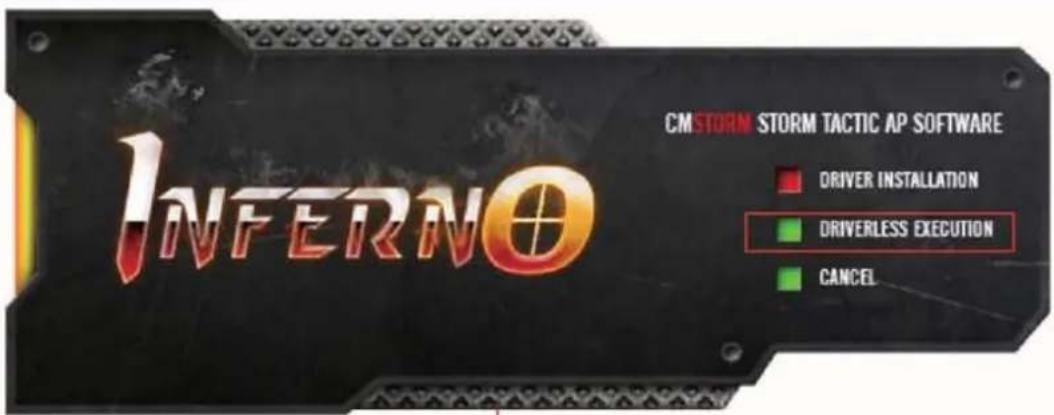
Step 5: When the Storm Tactic AP Software setup screen appears, select Driver Installation (optional) or Driverless Execution.
Step 6: Customize your Inferno through the Storm Tactic AP Software
NOTE:
1 Regular updates will be available for the Inferno. For the latest firmware please visit the CM Storm home page: http://www.cmstorm.com.
2 The Inferno is a high performance gaming mouse with mass data transfer rates. To ensure optimal performance we do recommend plugging the mouse directly to system USB port and not a USB HUB.
3 During customization, the inferno must be connected to the computer system. Do not remove the mouse during customization.
LAN-friendly Driverless Setup

LAN-friendly and Driver-free
As a LAN-friendly gaming mouse, the Inferno is driver-free; enabling you to bring your mouse to LAN-parties, internet cafes, and other out-of-home locations without extra system installation.

Setup: Copying Source Files
For driverless freedom, simply copy the files from the Storm Tactic AP Software CD, and paste the application files in to a removable drive of your choice. Please make sure that the files are copied on to the local hard disk at the new destination before launching the software. The application will automatically create three folders in the local drive – “Firmware”, “Images” and “Library” to store your tactical settings.

Launching the Application
To launch application, double click on CMSTORM.EXE, and Storm Tactic setup page will appear, choose Driverless Execution and the application will search and load initial mouse settings into the Inferno.

Optimize Sensor
Set your sensor to perform under office/casual gaming or pro gaming mode, please wait few seconds for the application to load.
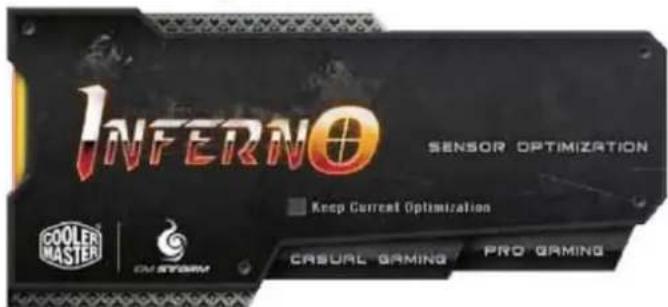
For office use please choose casual gaming option.

The Inferno is not connected to system
Hardware Control
Switch your DPI mechanically with the Sentinel Advance
Step 1:
Press DPI [-] switch down for 3 seconds to activate mechanical DPI switch mode.
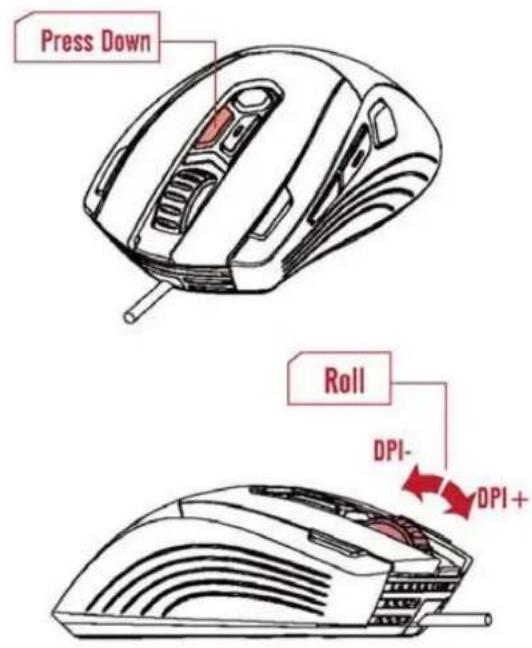
Step 2:
Roll the mouse roller forward to increase DPI.
Roll the mouse roller backward to decrease DPI.
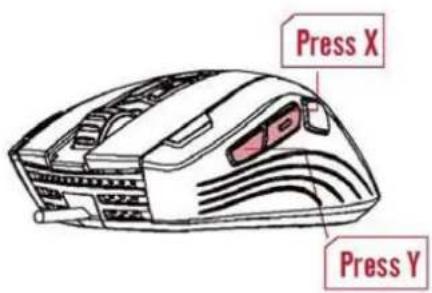
Step 3:
Press IE Back button to configure X indepedantly.
Press IE Forward button to configure Y indepedantly.
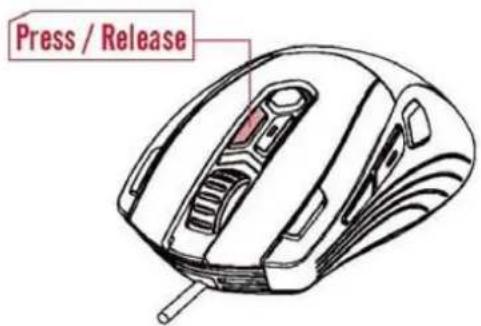
Step 4:
Press DPI [-] switch and release to exit mechanical DPI switch mode.
Main Control
Configuring your Storm Tactic AP Software
![INFERNO MAIN CONTROL STORM TACTICS MACRO SCRIPT LIBRARY SUPPORT /UPDATE BUTTONS ASSIGNMENT 1 L-BUTTON 2 R-BUTTON 3 M-BUTTON 1 IE BACK 5 IE FORWARD 6 DPI (+) 7 DPI (-) 8 MACRO 9 RAPID FIRE [MOUSE] 10 PROFILE SWITCH 11 STORM TACTICS CANALY COOLER MASTER CM BYDYM OK R APPLY CANCEL STANDARD PROFILE Leth…](/content/2026/05/959770/images/f9642d141adb169b7dea301b31053d9c6501a9429a3a2e21f97d178096d2edd6.jpg)
Main Control
The main control allows users to have full control over DPI levels, intrinsic mouse settings, and programmable button assignments. After configuration is complete, you can safeguard all your settings inside the 128 KB Sentinel-X™ Onboard Memory; all settings are manageable within the gaming profile system.
Note: All settings can be stored internally, allowing applied settings to be utilized on another computer without the Storm Tactic AP Software installed.
Main Control Modules:
Button Assignment
DPI Level Control
Motion Sensitivity
USB Report Rate
Game Profiles
Main Control
Button Assignments
![BUTTONS ASSIGNMENT L-BUTTON DISABLED L-BUTTON R-BUTTON M-BUTTON IE FORWARD IE BACK DPI [+]](/content/2026/05/959770/images/52c157dd221bd4f154011e46a5d8e8a9814b031e0832f1ea1e8c1ea2987687b1.jpg)
From the drop down menu, you can re-define each button based on your own preference.
In addition to buttons re-assignment, there are also various functions to utilize such as scripts, macros, rapid fire mode, multimedia and internet functions.
Note: To assign scripts and macros to a specific button, you must first record macro or script in the corresponding menu of your selection.
General Button Assignments
| Disable: | Switches the mouse button off |
| L-Button | Left Click |
| R-Button | Right Click |
| M-Button | Scroll Wheel Click |
| IE Forward | Select the next previously selected program or website |
| IE Back | Select the previous program or website |
| DPI [+] | Increases DPI resolution |
| DPI [-] | Decrease DPI resolution |
| Cyclic DPI [+] | DPI resolution loop increase |
| Cyclic DPI [[-] | DPI resolution loop decrease |
| Macro | Assigns preset macro to button |
| Script 1 - 6 | Assigns preset script to button |
| Profile Switch | Profile Switch: Switch to next profile |
| Standard Profile | Jump to standard profile |
| User Profile 1-4 | Jump to selected user profile |
| Profile [+] | Jump to next profile |
| Profile [-] | Jump to previous profile |
| Motion On/Off | Turns mouse motion on and off |
| DPI Level 1-4 | Jumps to the DPI Level of choice |
Main Control
Advanced Button Assignments

Keyboard
This option is made to emulate keyboard commands; single or compound short-cuts can be inserted and assigned to memory. The process is as follows.
Step 1 Image:
![2 KEYBOARD CYCLIC DPI [-] KEYBOARD MULTIMEDIA RAPID FIRE [MOUSE] RAPID FIRE [KBD] SCRIPT #1 5 DPI [-]](/content/2026/05/959770/images/4e92a8cc2a9f19cc67ece794c08883e0ec8ec509d79d22c841bf5bd3ee4ebbdb.jpg)
Step 2 Image:
![2 KEYBOARD [LCtrl]+[LAlt]+[Del] C](/content/2026/05/959770/images/e1d334917585213037852e1fbe3c28754830b0cc676a085ea5706b37bf0c9c4b.jpg)
Step 1: Choose a button and select "Keyboard" from the drop down menu.
Step 2: Input the command by keyboard. (Clear input by clicking icon C)
Step 3: Press Apply to activate new setting.

Multimedia
Inferno can also emulate Multimedia (Human Interface Device HID) by , specific code. The process is as follows.
Step 1 Image:
![2 MULTIMEDIA CYCLIC DPI [-] KEYBOARD MULTIMEDIA RAPID FIRE [MOUSE] RAPID FIRE [KBD] SCRIPT #1 5 DPI [-]](/content/2026/05/959770/images/6c9595073dcf710c893ab10ffc9c0edfbf98356c4b2fea7302ad154de32f3234.jpg)
Step 1: Choose a button and select "Multimedia"
Step 2: Select a Multimedia function, or enter a HID code.
Step 2 Image:
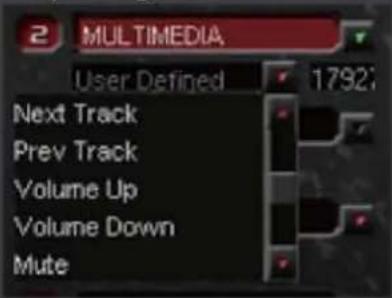
Step 3: Press Apply to activate new setting.
Main Control
Advanced Button Assignments

Rapid Fire Tactical™ Key
The Rapid Fire Key allows gamers to assign automatic firing power to dedicated left side key or other buttons on the Inferno. The rapid shots can be looped continuously or repeated from ranges of 1 shot to 254 shots; user can also define the time duration with each shot and also the time interval between each shot.
Step 1 Image:
![BUTTONS ASSIGNMENT 1 L-BUTTON 2 RAPID FIRE [MOUSE] MULTIMEDIA RAPID FIRE [MOUSE] RAPID FIRE [KBD] SCRIPT #1 SCRIPT #2 SCRIPT #3 5 DPI [-]](/content/2026/05/959770/images/8ab162ea342e176875513b8eb027bc8c9dbf33ae5875c13df09a348e5edadc6f.jpg)
Step 2 Image:
![2 RAPID FIRE [MOUSE] R-BUTTON 4 6 6 3 M-BUTTON ABC](/content/2026/05/959770/images/ae2ed0cb9520f79f0ac52e49a2cdcb9aa23734ad2fb64b54c8a8926dc83eb486.jpg)
Step 1: Choose a button and select "Rapid Fire(Mouse)" or "Rapid Fire (Keyboard)".
Step 2: Define the button to emulate.
Set the shooting times and speed.
Column A: Rapid fire counts: Place a number from 1 to 254. 255 for continuous loop shots while held.
Column B: Time duration of each shot while button is pressed: Place a number from 1\~255.
Column C: Interval between two shots : Place a number from 1\~255.
Step 3: Press Apply to activate new setting.

Storm Tactics™ Multiplier Key
The Storm Tactic Key is a mouse button dedicated to act as a function key, built to multiply your instructions with easy to remember combination output. An additional of 36 extra programmable output is available including scripts macros and multimedia commands.
(More information on Storm Tactics page)

Storm MacroPro™ Key
The Pro Macro key allows users to unleash pre-programmed macros, and scripts with ease. Located in the right side key area, users can simply shift over and activate vital commands under intensive game play.
(More information on Macro, Script page)
Main Control:
DPI Level Control
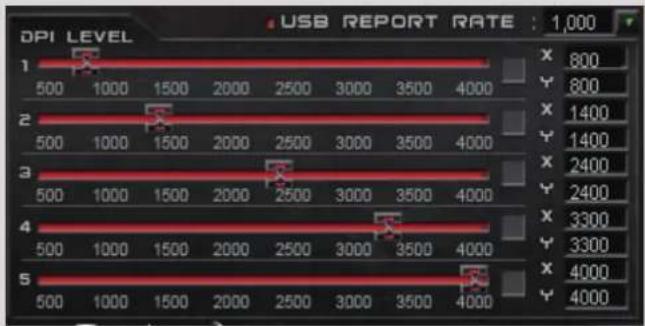

With default DPI levels set at 800, 1400, 2400, 3300, and 4000 you can fine tune each DPI by either adjusting the DPI slider or through text definition in the X and Y DPI input box. To suit your gaming environment X & Y can be adjusted independently by unchecking the check box.
USB Report Rate


The USB report rate can be set to 100Hz, 111Hz, 125Hz, 142Hz, 166Hz, 200Hz, 250Hz, 333Hz, 500Hz, and or 1000Hz. The higher the USB report rate the more times the computer communicates with the mouse with information, at a high DPI resolution we suggest setting the report rate above 500Hz.
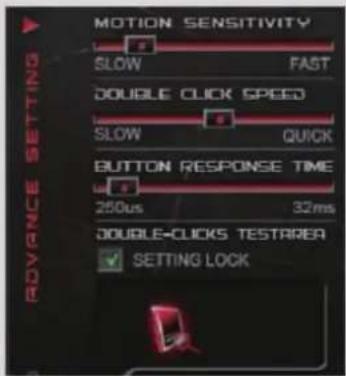
Windows Sensitivity Control
Motion Sensitivity

Adjust windows pointer sensitivity here from slow to fast. We recommend keeping the sensitivity level in the middle under regular usage, and tuning the sensitivity slower while operating under a high DPI setting such as 4000 DPI.
Double Click Speed

The double-click response slider area allows you to adjust your double-click speed from slow to fast. Essentially slow means a longer interval between each click, and fast as a shorter interval between each clicks.
Button Response Time

Here users are allowed to adjust button response time from 250 microseconds to 32 milliseconds.
Game Profiles
Game Profiles
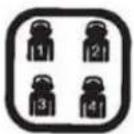
The Game Profiles area holds 4 sets of profiles – 1 standard and 3 customizable profiles are available for settings creation and data storage management. All setting changes are registered into the internal Sentinel-X™ Memory, allowing users to load presets from memory and perform without reconfiguration.
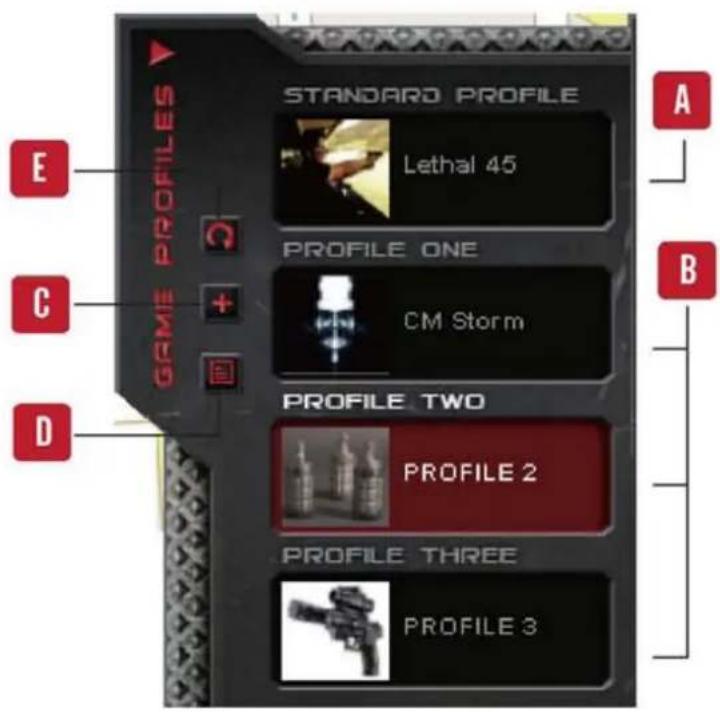
C Create/ Edit Profile
To organize your gaming profile, simply select the profile of choice, click Create/ Edit Profile under Game Profiles and enter an avatar name in English with a maximum of 10 characters, after you are done press OK and store name to the internal Sentinel-X™ Memory. You may also upload a profile image in the same menu, and create a cool profile avatar for neat organization.
A Standard Profile
The standard profile acts as a factory default and limits users to general behavior settings such as "DPI level", "Motion Sensitivity", "Double Click Speed", "Button Response Time", "USB Report Rate" and "Effect Control". Users may conveniently switch back to standard mode to troubleshoot setting errors made in other profiles.
B Customizable Profile
In addition to the functions available in the standard profile, customizable profiles allows users to alter button assignments, assign dedicated gaming buttons and activate functions such as macro, scripts and Rapid Fire Tactical™ mode.
D Profile Management
Here the profile management system allows users to import and export profile through mouse and local hard disk.
E Revert to default
To save you from figuring out where you have gone wrong during customization, you can always have the function to revert to default.
Storm Tactics™
Configuring Storm Tactics Functions
![INFERNO MAIN CONTROL STORM TACTICS MACRO SCRIPT LIBRARY SUPPORT /UPDATE STORM TACTICS Button 1 Button 2 Execution ✓ Storm Tactic Key+ BUTTON [1] + NO BUTTON : MULTIMEDIA ✓ Storm Tactic Key+ BUTTON [2] + BUTTON [8] : SCRIPT #1 ✓ Storm Tactic Key+ BUTTON [3] + BUTTON [2] : TACTICS#2 MACRO ✓ Storm Tact…](/content/2026/05/959770/images/984f558210ee2d89eaf31ed0eee6647f0638cd399df5e675826ef6238c90d61e.jpg)
Storm Tactics menu provides an easy to configure functionality panel to set vital combo key commands built for quick in-game execution with utmost flexibility. Along with the extra 32 on-the-fly button execution, each profile has ability to individualize scroll wheel speeds, whether it is scroll up or scroll down.
Note: To distinguish each unique profile, each profile can also be manageable by its own set of effect style, whether it is Full Color, Breathing, Disable, or Rapid fire mode, the user can quickly recognize and stay on top of game play.
Storm Tactics™
Configuring Storm Tactics Functions
![STORM TACTICS Button 1 Button 2 Execution ✓ 1 Storm Tactic Key+ BUTTON [2] + BUTTON [2] : DISABLED ✓ 2 Storm Tactic Key+ BUTTON [2] + NO BUTTON : TACTICS#1 MACRO ✓ 3 Storm Tactic Key+ BUTTON [3] + BUTTON [2] : PF#1 BTN-1 MACRO ✓ 4 Storm Tactic Key+ BUTTON [8] + BUTTON [2] : RAPID FIRE [KBD] A 3 2 1…](/content/2026/05/959770/images/23f2dbb49c271683611b902c4feaa43717738c12bb7e1a8dff2ee445a9178263.jpg)
Simply choose key combos to apply preset commands
Storm Tactics comes equipped with 32 additional combo executions (8 per profile); each can be defined base on user defined intuitiveness and personalized in configuration. Simply select one or two button assignment(s) on the menu and define the execution method. The Execution method includes 36 Macros, 6 Scripts, Rapid Fire, Multimedia and all other regular button assignments. When using the mouse simply press the Storm Tactics™ multiplier key with the buttons assigned to activate the command.

Scroll Wheel and Style Configuration
Scroll Wheel - Check scroll up or scroll down to adjust the wheel speed Choose Style - Change the current profile effect to personalize each profile setting
Macro
Configuring your Storm Tactics™ Macro Support
Macro Function
Vital to in-game situations and to further fortify input performance, the Storm Tactics™ Macro Support system allows gamers to record all keyboard and mouse inputs into a sequential format.
Storm Tactics™ Macro Support system allows 256 byte length of string storage, which allows users to input single or compound commands executable to variable methods of choice. With ability to have manageable time delays between each command users can have full control and conveniently assign macros to buttons 3-9 on each profile of the Inferno. [MacroPro™ Key is set as the dedicate default]
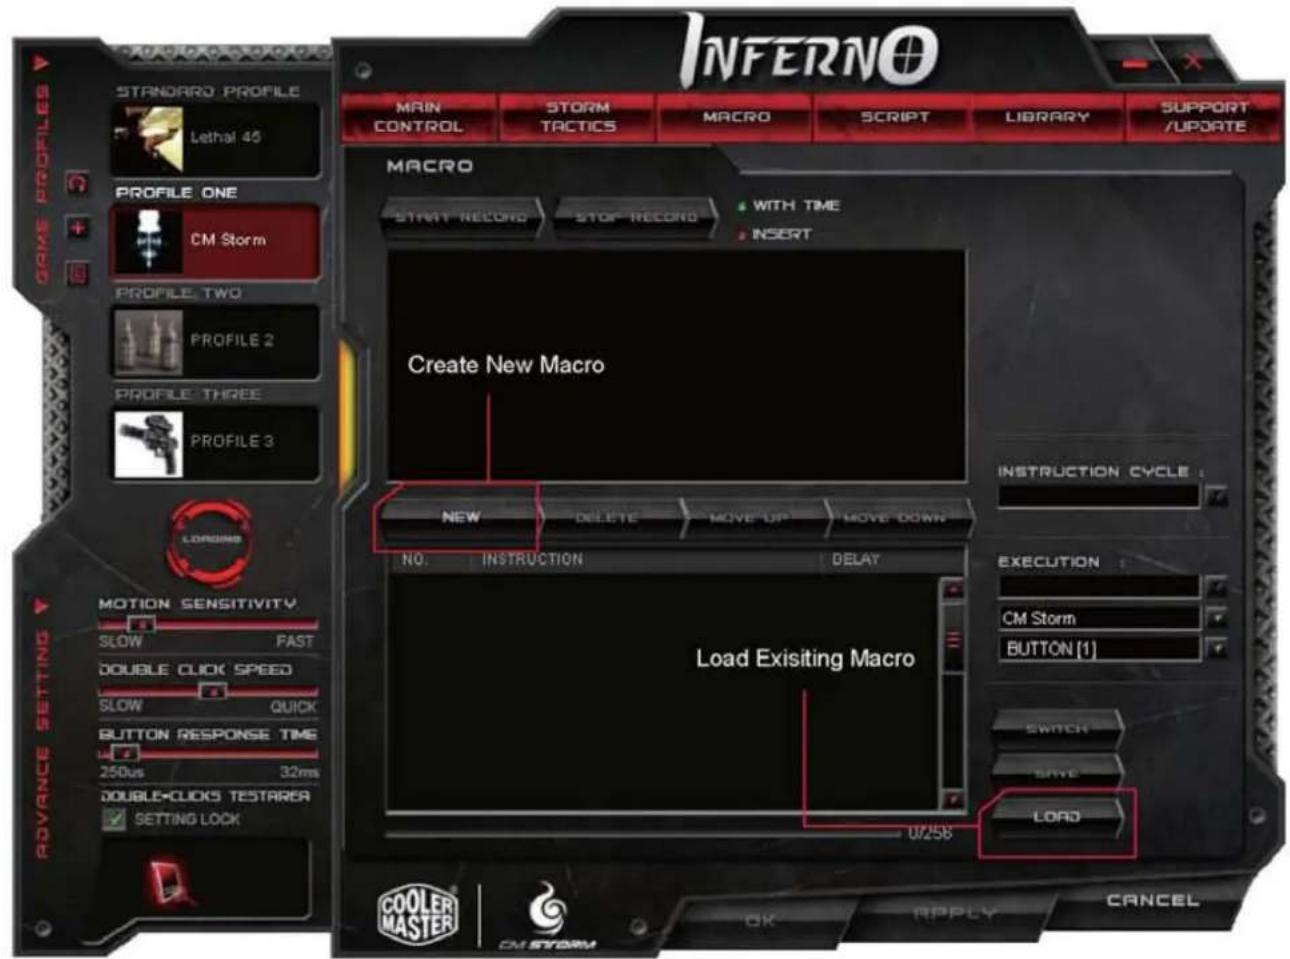
Creating a Macro
Under the "Macro" menu click NEW to create a brand new macro, or LOAD to edit a preset macro previously assigned to a button.
Macro Recording and Editing
A Macro Recording
Move the cursor to the "record area", click on Start Record to record keyboard and mouse instructions. After you've finished recording, click Stop Record to enable macro editing mode.
Note: After recording, users can edit each "Macro Line" by selecting the recorded data in the left column.
B "With time"
By activating this function, the time duration of each button press, button release and time intervals between each command will be automatically registered and recorded.
C "Insert"
By activating this function, keyboard and mouse input recordings will be inserted after the selected "Macro Line" of your choice.
D Navigating Macro Data Priorities:
Click Move Up & Move Down to alter "Macro Line" position
Macro Data Removal:
Click DELETE, to remove the selected "Macro Line".
F Edit Macro Data and Time Delay:
Double click on the "Macro Line" and edit data assignments and time delays.
![MACRO A START RECORD STOP RECORD WITH TIME - B INSERT - C Record Area E D NEW DELETE MOVE UP MOVE DOWN NO. INSTRUCTION DELAY 1 'Left-Ctrl' F 24ms 2 'Left-Alt' 12ms 4/256 INSTRUCTION CYCLE : 12ms EXECUTION : G Loop (Released) CM Storm BUTTON [1] SWITCH SAVE LONG](/content/2026/05/959770/images/05eaed5d6db99bd73d961eddcf61a22da7f46fc87abb68782a8602b083b2eab3.jpg)
G There are 5 execution methods:
Loop (released): The recorded macro will be executed repeatedly when the assigned button is released. To stop execution, simply perform the same button release.
One shot (released): The recorded macro will be executed once when the assigned button is released.
One shot (press): The recorded macro will be executed once when the assigned button is pressed.
Loop (hold): The recorded macro will be executed when the assigned button is pressed. Release to stop the execution.
Loop (press): The recorded macro will be executed repeatedly when the assigned button is pressed. To stop execution, simply perform same button release.
Script
Configuring your Storm Tactics™ Script Support
Script Function
The Storm Tactics™ Script Support system is an advanced macro editor coupled with a robust scripting engine. A total of 6 script assignments are available, with each holding 256 byte length of string storage. For users with basic programming knowledge, the script command line allows users to add extra commands such as "GOTO", "IF", "IF (Variable)", "CALL", "Repeat", "Pause", "Stop", "Left and right button down/ up", record "Mouse Motion" and assign "Variable". Along with scripting abilities virtually all Multimedia (HID) commands can be embedded as well.

Creating a Script
Under the "Script" menu click NEW to create a brand new script, or LOAD to edit a preset script previously assigned to a button.
Script Recording and Editing
A Script Recording
Move the cursor to the "record area", click on Start Record to record keyboard and mouse instructions. After you've finished recording, click Stop Record to enable script editing mode.
Note: After recording, users can edit each "Script Line" by selecting the recorded data in the left column.
B "With time"
By activating this function, the time duration of each button press, button release and time intervals between each command will be automatically registered and recorded.
© Edit Script Data and Time Delay:
Double click on the "Script Line" and edit data assignments and time delays.
D "Insert"
By activating this function, keyboard and mouse input recordings will be inserted after the selected "Script Line" of your choice.
E Navigating Script Data Priorities:
Click Move Up & Move Down to alter "Script Line" position
F Script Data Removal:
Click DELETE, to remove the selected "Script Line".
G Command Script Insert
Script command line allows users to add programming commands with the activation of multimedia (HID) functions. Press ADD to add to the last line of "Script Line" or INSERT to insert it under the selected "Script Line" of choice.
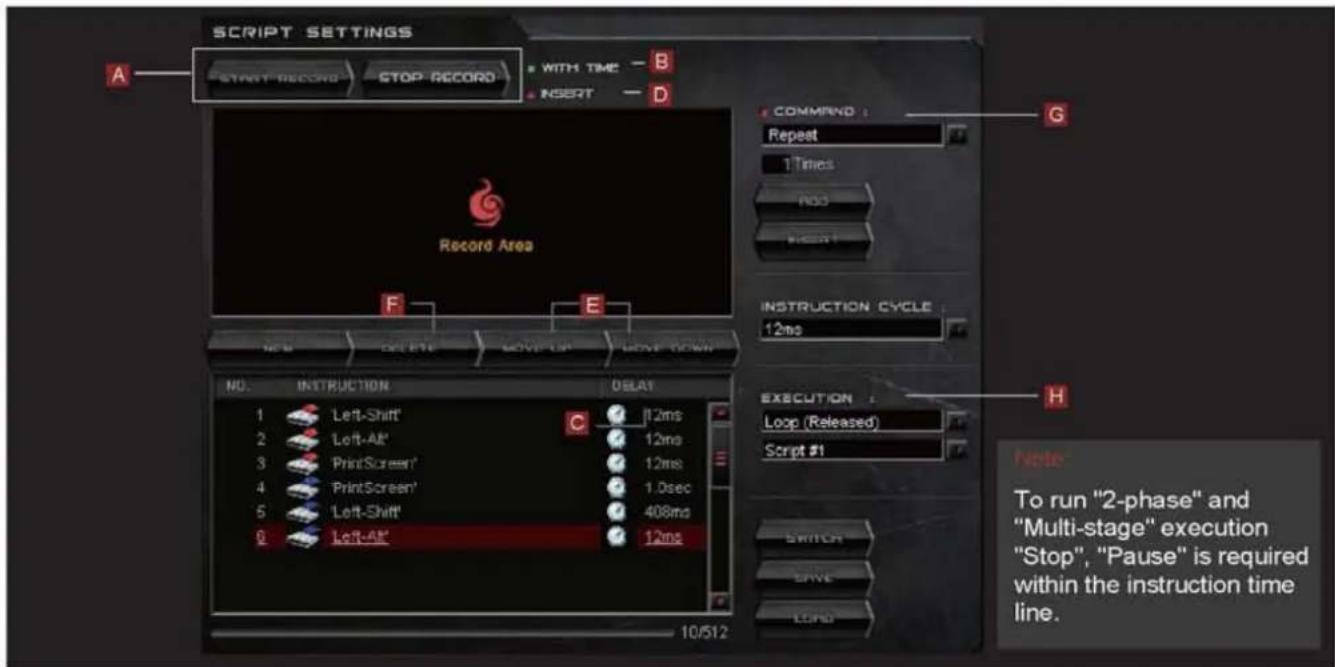
H There are 8 execution methods:
Loop (released): The recorded script will be executed repeatedly when the assigned button is released. To stop execution, simply perform the same button release.
One shot (released): The recorded script will be executed once when the assigned button is released.
One shot (press): The recorded script will be executed once when the assigned button is pressed.
Loop (hold): The recorded script will be executed when the assigned button is pressed, release to stop the execution.
Loop (press): The recorded script will be executed repeatedly when the assigned button is pressed. To stop execution, simply perform same button release.
2-phase: If there is a "pause" command in the recorded script, when the assigned gaming button is pressed, the script will be executed and stop on the "pause" command, release for the button the execution continue.
Multi-stage (press): If there are several "pause" commands in the recorded script, when the assigned gaming button is pressed, the script will be executed and stop on the "pause" command, press the button again for the execution to continue, it will stop on the command before the next "pause".
Multi-Stage (released): If there are several "pause" commands in the recorded script, when the assigned gaming button is released, the script will be executed and stop on the "pause" command, release the button again for the execution continue, it will stop on the command before the next "pause".
The Library:
This library function allows you to save macro & script to your local hard disk.

The Step as following:
A. Upload Macro file
- Select "SELECT MACRO"
- Select the profile and macro button you want to upload
to library - Select←Upload to Library
-
Input the file name (*.mac, macro file), then save it.
B. Download Macro file: -
Select "SELECT MACRO"
- Select the file in the "MACRO LIBRARY" that you want
to download to mouse - Select the profile and macro button you want to
download - Select→Download to Mouse
C. Upload the Script file
- Select "SELECT SCRIPT"
- Select the Script you want to upload to library
- Select←Upload to Library
-
Input the file name (*.sh, script file), then save it.
D. Download Script file -
Select "SELECT SCRIPT"
- Select the file in SCRIPT LIBRARY
- Select the Script #1, 2, 3 you want
- Select→Download to Mouse
Support and Update
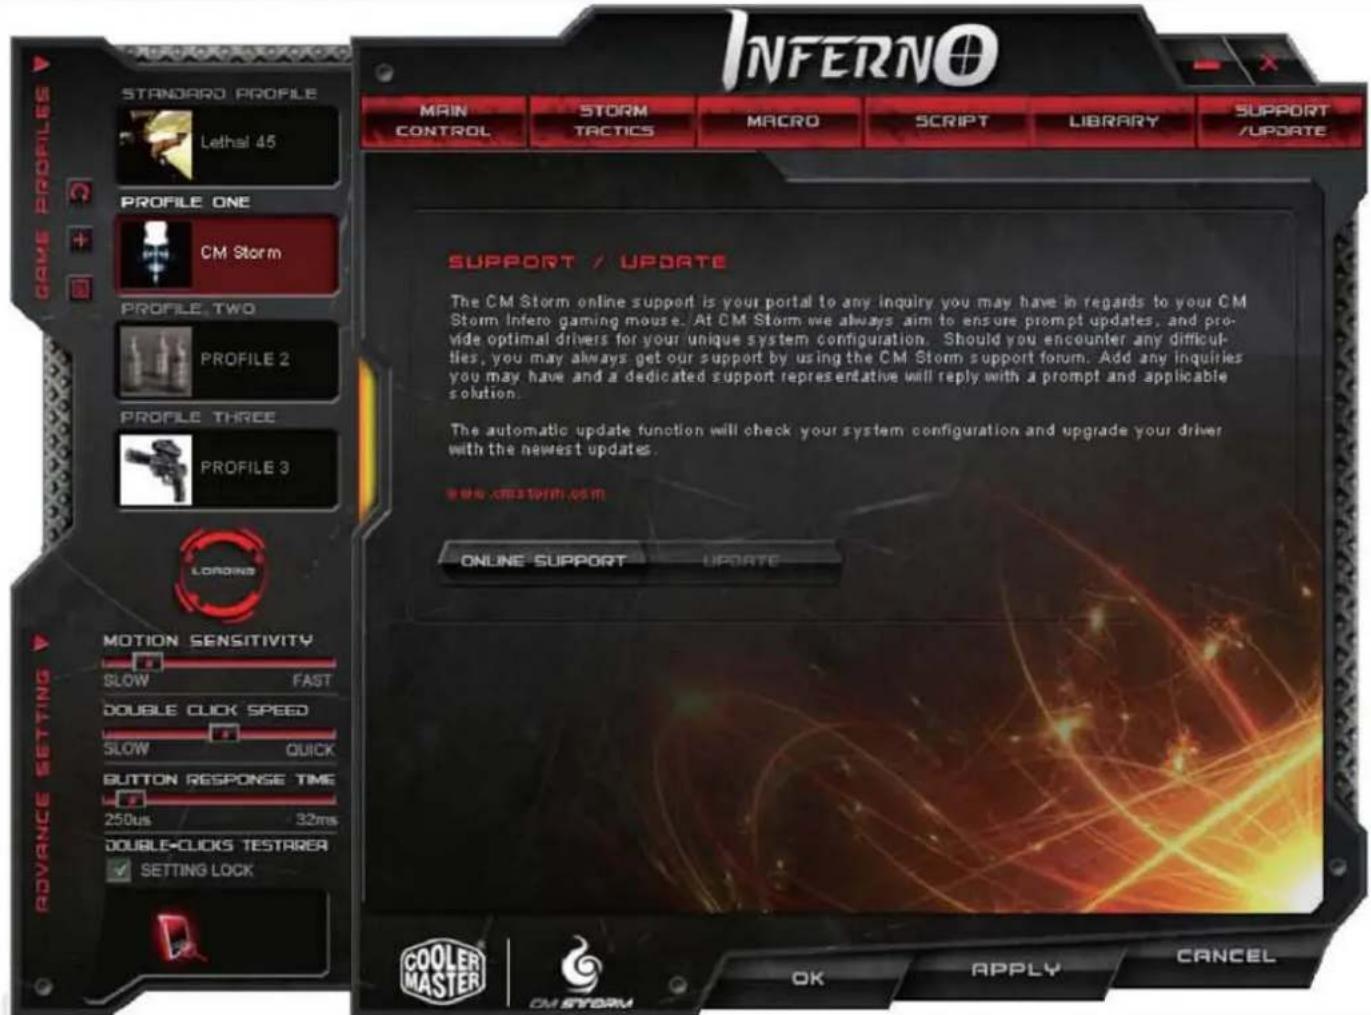
Technical Support
For technical support and the latest drivers and firmware, please visit
www.cmstorm.com
Email: eservice.tw@cmstorm.com
Update Firmware
Download the latest firmware from CM Storm website and click UPDATE to load the latest firmware.
Warranty
Two years' limited manufacturer's warranty
Q&A
Q1. Hi, I just plugged in the mouse and the cursor doesn't work so well? What can I do?
A: By default the Sentinel Advance should work virtually on any gaming mouse pad or surface.
If this happens, please try to reduce the USB report rate on the Storm Tactics AP Software. Your system may not support the current USB report rate.
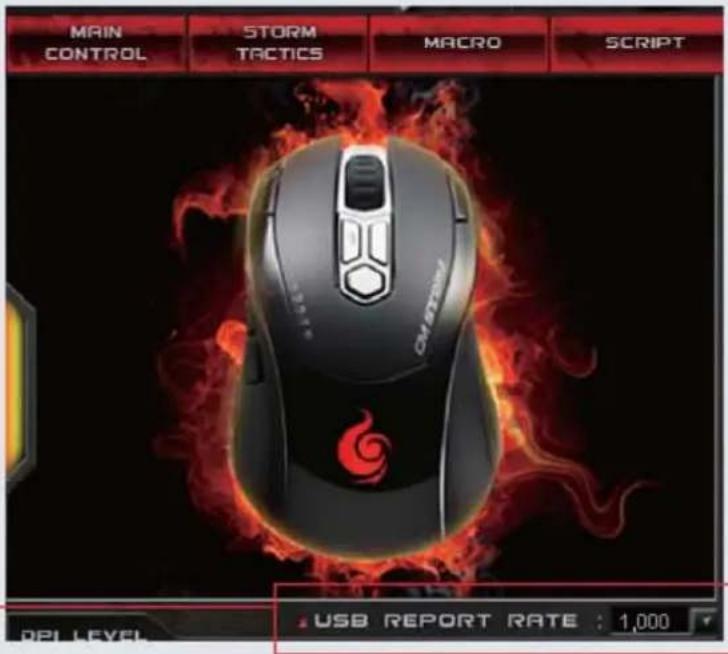
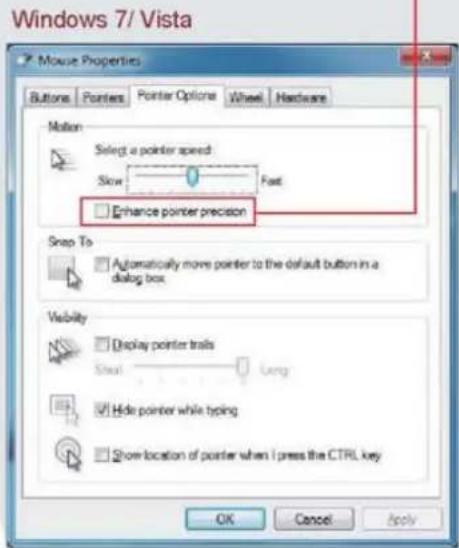
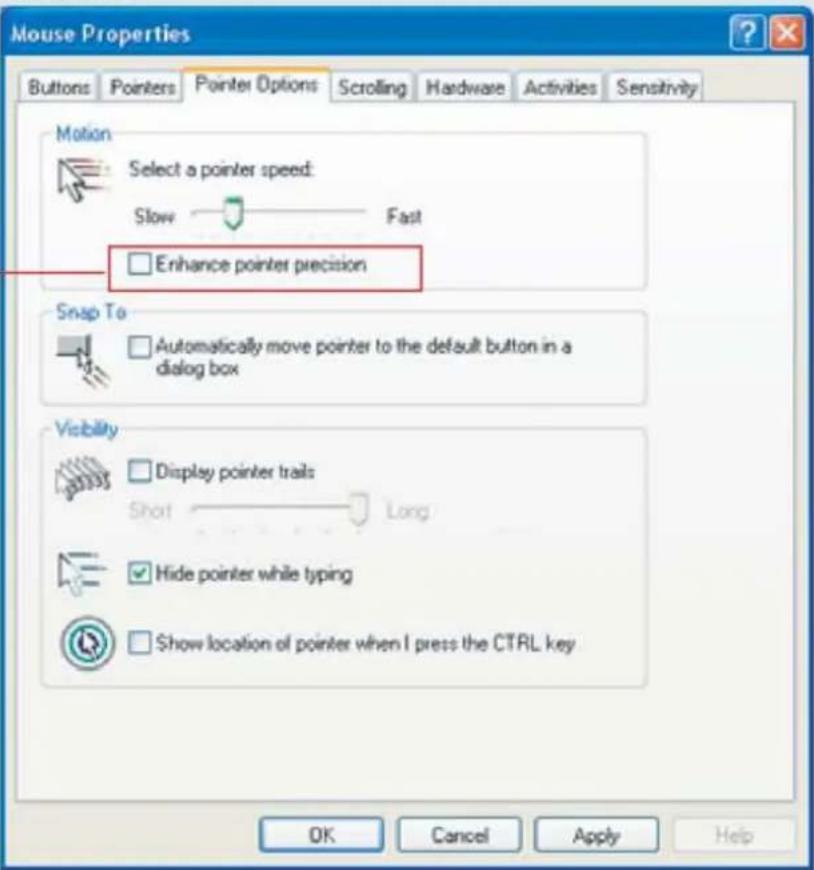
B: Uncheck the "Enhance pointer precision" in Mouse Pointer Option, for better performance.
Windows XP
C: Clean around your mouse sensor on the bottom with a cue tip.
Q&A
Q2. The Sentinel Advance is connected to the PC, but not enabled. What can I do?
A: Here are possible solutions:
- First try to change to another USB port.
2.
(Windows XP)
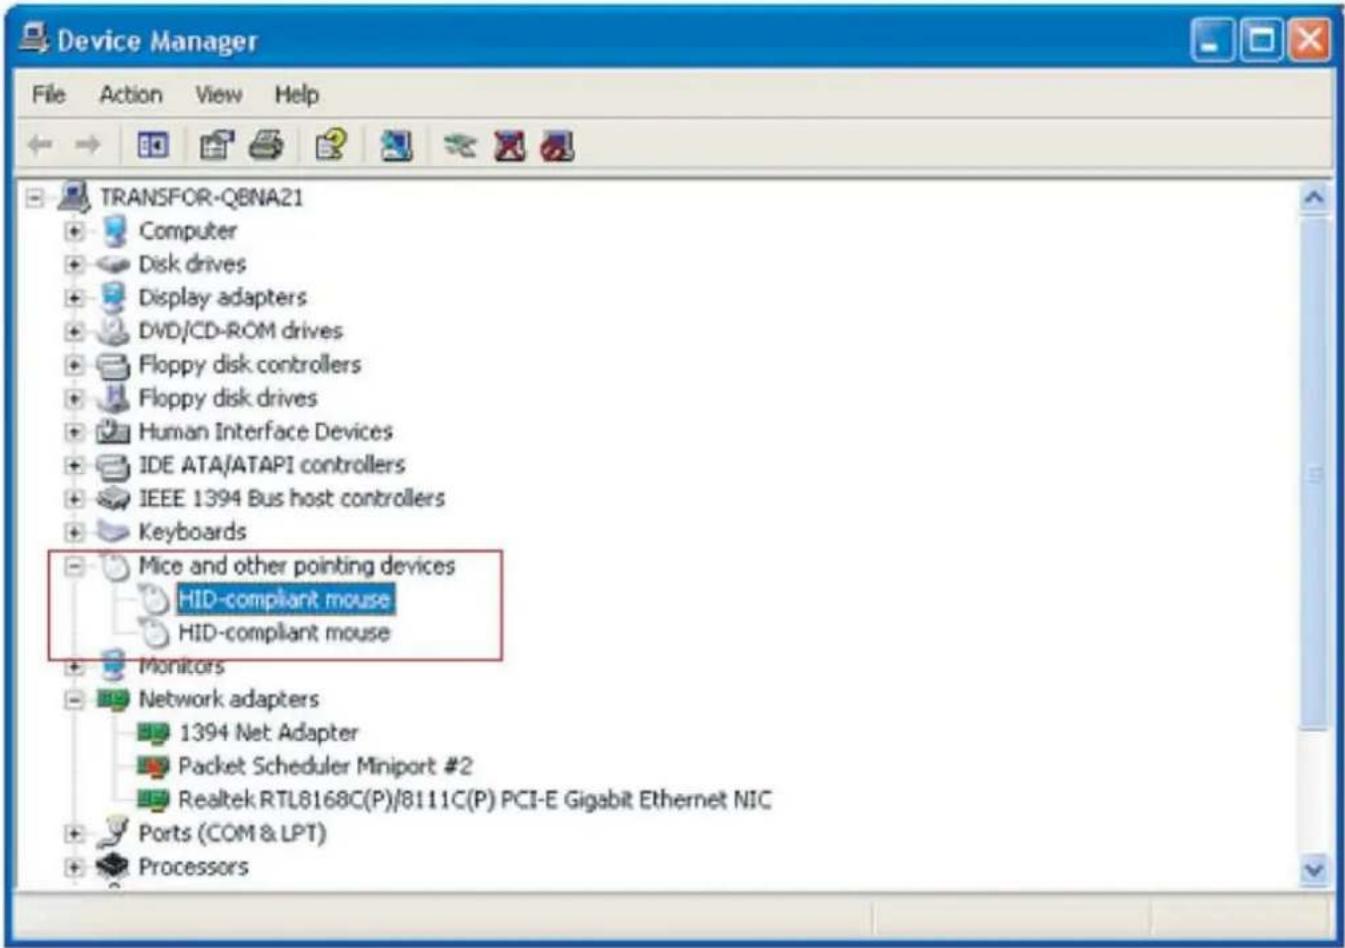
USB registry error process: Start>Control Panel>View By Large icons or small icons>Mouse or DeviceManager> delete the hid compliant mouse (Sentinel Advance)>unplug Sentinel Advance mouse> re-plug Sentinel Advance.
(Windows Vista)
USB registry error process: Start>Control Panel>Hardware and Sound>Mouse or DeviceManager> delete the hid compliant mouse (Sentinel Advance)>unplug Sentinel Advance mouse> re-plug Sentinel Advance.
(Windows 7)
USB registry error process: Start>Control Panel>View By Large icons or small icons>Mouse or DeviceManager> delete the hid compliant mouse (Sentinel Advance)>unplug Sentinel Advance mouse>re-plug Sentinel Advance.
INFERNO

OM STORM
Cooler Master Co., Ltd.
9F, No. 786, Chung Cheng Road, Chung Ho city, Taipei, Taiwan, R.O.C.
Tel: +886-(0)2-32340050
Email: eservice.tw@cmstorm.com
For the most updated information, please visit our official website: http://www.cmstorm.com
Ver 10:200507


- CMSTORM INFERNO
- INFERNO
- PACKAGE CONTENTS
- CMSTORM INFERNO OUTLOOK
- HARDWARE SETUP AND SOFTWARE INSTALLATION
- SYSTEM REQUIREMENTS
- NOTE
- LAN-FRIENDLY DRIVERLESS SETUP
- LAN-FRIENDLY AND DRIVER-FREE
- SETUP: COPYING SOURCE FILES
- LAUNCHING THE APPLICATION
- OPTIMIZE SENSOR
- HARDWARE CONTROL
- SWITCH YOUR DPI MECHANICALLY WITH THE SENTINEL ADVANCE
- STEP 1
- STEP 2
- STEP 3
- STEP 4
- MAIN CONTROL
- CONFIGURING YOUR STORM TACTIC AP SOFTWARE
- MAIN CONTROL MODULES
- BUTTON ASSIGNMENTS
- ADVANCED BUTTON ASSIGNMENTS
- KEYBOARD
- MULTIMEDIA
- RAPID FIRE TACTICAL™ KEY
- STORM TACTICS™ MULTIPLIER KEY
- STORM MACROPRO™ KEY
- GAME PROFILES
- C CREATE/ EDIT PROFILE
- A STANDARD PROFILE
- B CUSTOMIZABLE PROFILE
- D PROFILE MANAGEMENT
- E REVERT TO DEFAULT
- STORM TACTICS™
- CONFIGURING STORM TACTICS FUNCTIONS
- SIMPLY CHOOSE KEY COMBOS TO APPLY PRESET COMMANDS
- SCROLL WHEEL AND STYLE CONFIGURATION
- MACRO
- CONFIGURING YOUR STORM TACTICS™ MACRO SUPPORT
- MACRO FUNCTION
- CREATING A MACRO
- MACRO RECORDING AND EDITING
- A MACRO RECORDING
- B "WITH TIME
- C "INSERT
- D NAVIGATING MACRO DATA PRIORITIES
- MACRO DATA REMOVAL
- F EDIT MACRO DATA AND TIME DELAY
- G THERE ARE 5 EXECUTION METHODS
- SCRIPT
- CONFIGURING YOUR STORM TACTICS™ SCRIPT SUPPORT
- SCRIPT FUNCTION
- CREATING A SCRIPT
- SCRIPT RECORDING AND EDITING
- A SCRIPT RECORDING
- © EDIT SCRIPT DATA AND TIME DELAY
- D "INSERT
- E NAVIGATING SCRIPT DATA PRIORITIES
- F SCRIPT DATA REMOVAL
- G COMMAND SCRIPT INSERT
- H THERE ARE 8 EXECUTION METHODS
- THE LIBRARY
- THE STEP AS FOLLOWING
- SUPPORT AND UPDATE
- TECHNICAL SUPPORT
- UPDATE FIRMWARE
- WARRANTY
- Q&A
- OM STORM
Brand : COOLER MASTER
Model : SGM-4000-KLLN1-GP
Category : Mouse