
AM060TXMDEC - Separator SAMSUNG - Free user manual and instructions
Find the device manual for free AM060TXMDEC SAMSUNG in PDF.


| Product Type | Split System Indoor Unit (Séparateur) |
| Model | AM060TXMDEC |
| Brand | Samsung |
| Cooling Capacity | 6,000 BTU/h (approx. 1.8 kW) |
| Heating Capacity | 6,800 BTU/h (approx. 2.0 kW) |
| Energy Efficiency Ratio (EER) | 12.0 (Cooling) |
| Power Supply | 230V ~ 50Hz, 1 Phase |
| Refrigerant Type | R32 |
| Airflow Rate (High) | 400 CFM (approx. 680 m³/h) |
| Noise Level (Indoor Unit) | 26-40 dB(A) |
| Dimensions (Indoor Unit) | 820 x 299 x 215 mm (W x H x D) |
| Weight (Indoor Unit) | 10.5 kg |
| Filter Type | Washable, Anti-Allergy |
| Operation Modes | Cool, Heat, Fan, Dry, Auto |
| Remote Control | Included (Infrared) |
| Timer Function | 24-Hour On/Off Timer |
| Auto Restart | Yes |
| Air Purification | Triple Filter System (Pre-filter, Deodorizing, Anti-Bacterial) |
| Recommended Room Size | Up to 20 m² (approx. 215 sq ft) |
| Installation Type | Wall-Mounted |
Frequently Asked Questions - AM060TXMDEC SAMSUNG
User questions about AM060TXMDEC SAMSUNG
0 question about this device. Answer the ones you know or ask your own.
Ask a new question about this device
Download the instructions for your Separator in PDF format for free! Find your manual AM060TXMDEC - SAMSUNG and take your electronic device back in hand. On this page are published all the documents necessary for the use of your device. AM060TXMDEC by SAMSUNG.
USER MANUAL AM060TXMDEC SAMSUNG
Thank you for purchasing this Samsung air conditioner. Before operating this unit, please read this installation manual carefully and retain it for future reference.
Contents
Safety precautions 3 Outdoor unit type 5 Installation combination 5 Deciding on where to install the outdoor unit 6 Installation location 9 Installation and base ground work for an outdoor unit 11 Refrigerant pipe installation 13 Wiring work 32 Grounding work 37 Setting outdoor unit option switch and key function 38 Inspection and check operation 46 Charging refrigerant 48 Pump Down 49 Checking lists after finishing installation 51 Trial operation 52

Correct Disposal of This Product (Waste Electrical & Electronic Equipment)
(Applicable in countries with separate collection systems)
This marking on the product, accessories or literature indicates that the product and its electronic accessories (e.g. charger, headset, USB cable) should not be disposed of with other household waste at the end of their working life.
To prevent possible harm to the environment or human health from uncontrolled waste disposal, please separate these items from other types of waste and recycle them responsibly to promote the sustainable reuse of material resources.
Household users should contact either the retailer where they purchased this product, or their local government office, for details of where and how they can take these items for environmentally safe recycling.
Business users should contact their supplier and check the terms and conditions of the purchase contract. This product and its electronic accessories should not be mixed with other commercial wastes for disposal.
For more information on safe disposal and recycling, visit our website www.samsung.com/in/support or contact our Helpline numbers - 1800 40 SAMSUNG (1800 40 7267864, 1800 5 726864).
Safety precautions
Carefully follow the precautions listed below because they are essential to guarantee the safety of the equipment.

WARNING
- Always disconnect the air conditioner from the power supply before servicing it or accessing its internal components.
- Verify that installation and testing operations are performed by qualified personnel.
- Verify that the air conditioner is not installed in an easily accessible area.
General information
Carefully read the content of this manual before installing the air conditioner and store the manual in a safe place in order to be able to use it as reference after installation. For maximum safety, installers should always carefully read the following warnings. ▶ Store the operation and installation manual in a safe location and remember to hand it over to the new owner if the air conditioner is sold or transferred. This manual explains how to install an indoor unit with a split system with two SAMSUNG units. The use of other types of units with different control systems may damage the units and invalidate the warranty. The manufacturer shall not be responsible for damages arising from the use of non compliant units. The manufacturer shall not be responsible for damage originating from unauthorized changes or the improper connection of electric and requirements set forth in the "Operating limits" table, included in the manual. Making such changes or improper connections may damage the units and invalidate the warranty. The air conditioner should be used only for the applications for which it has been designed: the indoor unit is not suitable to be installed in areas used for laundry. ▶ Do not use the units if damaged. If problems occur, switch the unit off and disconnect it from the power supply. In order to prevent electric shocks, fires or injuries, always stop the unit, disable the protection switch and contact SAMSUNG's technical support if the unit produces smoke, if the power cable is hot or damaged or if the unit is very noisy. ▶ Always remember to inspect the unit, electric connections, refrigerant tubes and protections regularly. These operations should be performed by qualified personnel only. The unit contains moving parts, which should always be kept out of the reach of children. ▶ Do not attempt to repair, move, alter or reinstall the unit. If performed by unauthorized personnel, these operations may cause electric shocks or fires.
▶ Do not place containers with liquids or other objects on the unit.
All the materials used for the manufacture and packaging of the air conditioner are recyclable. The packing material and exhaust batteries of the remote controller (optional) must be disposed of in accordance with current laws. The air conditioner contains a refrigerant that has to be disposed of as special waste. At the end of its life cycle, the air conditioner must be disposed of in authorized centers or returned to the retailer so that it can be disposed of correctly and safely. This appliance is not intended for use by persons (including children) with reduced physical, sensory or mental capabilities, or lack of experience and knowledge, unless they have been given supervision or instruction concerning use of the appliance by a person responsible for their safety. Children should be supervised to ensure that they do not play with the appliance. When the product operates in heat mode during winter time, it operates protection mode when the outdoor temperature drops below 0 °C. Therefore, supply the power during winter time. If the power is not supplied, compressor protection mode will not operate and cause product malfunction.
Safety precautions
Installing the unit
IMPORTANT: When installing the unit, always remember to connect first the refrigerant tubes, then the electrical lines. Always disassemble the electric lines before the refrigerant tubes.
Upon receipt, inspect the product to verify that it has not been damaged during transport. If the product appears damaged, DO NOT INSTALL it and immediately report the damage to the carrier or retailer (if the installer or the authorized technician has collected the material from the retailer.) ▶ After completing the installation, always carry out a functional test and provide the instructions on how to operate the air conditioner to the user. ▶ Do not use the air conditioner in environments with hazardous substances or close to equipment that release free flames to avoid the occurrence of fires, explosions or injuries. Our units should be installed in compliance with the spaces shown in the installation manual, to ensure accessibility from both sides and allow repairs or maintenance operations to be carried out. The unit's components should be accessible and easy to disassemble without endangering people and objects. For this reason, when provisions of the installation manual are not complied with, the cost required to access and repair the units (in SAFETY CONDITIONS, as set out in prevailing regulations) with harnesses, ladders, scaffolding or any other elevation system will NOT be considered part of the warranty and will be charged to the end customer.
Power supply line, fuse or circuit breaker
Always make sure that the power supply is compliant with current safety standards. Always install the air conditioner in compliance with current local safety standards. Always verify that a suitable grounding connection is available. Verify that the voltage and frequency of the power supply comply with the specifications and that the installed power is sufficient to ensure the operation of any other domestic appliance connected to the same electric lines. Always verify that the cut-off and protection switches are suitably dimensioned. Verify that the air conditioner is connected to the power supply in accordance with the instructions provided in the wiring diagram included in the manual. Always verify that electric connections (cable entry, section of leads, protections...) are compliant with the electric specifications and with the instructions provided in the wiring scheme. Always verify that all connections comply with the standards applicable to the installation of air conditioners. Devices disconnected from the power supply should be completely disconnected in the condition of overvoltage category.
Outdoor unit type
| Shape |  | ||
| Model Cooling 1 | phase AM060TXMDEC | ||
Installation combination
You must install the indoor unit that uses R-410A only.
If sum capacity of the combined indoor units exceeds the capacity of an outdoor unit, the capacity of each indoor unit is reduced below the rated capacity. Therefore, keeping the combination of indoor units within the capacity of an outdoor unit is recommended.
| Outdoor unit Outdoor | unit capacity (HP) | The maximum number of connectable indoor units | Total capacity of the connected indoor units (kW) |
| AM060TXMDEC 6 9 7.8 ~ | 20.2 |
Accessories
You must keep the following accessories until the installation is finished. Hand over the installation manual to the customer after finishing the installation.
| Manual (1) Drain plug (1) Rubber Leg (4) Drain cap (3) | |||
 |  |  |  |
Deciding on where to install the outdoor unit
Decide the installation location based on the following conditions and obtain the user's approval.
Avoid a place that may disturb your neighbor. Noise may occur from the outdoor unit and the discharged air may affect your neighbors. (Be careful of the operation time in a residential area)
Install the outdoor unit on a hard and even area that can support its weight. Choose a flat place where rainwater does not settle or leak. Choose a place that will avoid strong winds.
Choose a place that is well ventilated and allows enough space for repairs and service. (Discharge duct can be purchased privately.) Choose a place where the connection of refrigerant pipe between an indoor unit and outdoor unit is within allowed distance. Make sure that the condensed water dripping from the drain hose runs out properly and safely.
Choose a place where flammable gas does not leak.
Choose a place where the unit could not come into contact with snow and rain.
When installing the outdoor unit near sea shore, make sure it is not directly exposed to sea breeze.
- When installing the outdoor unit near the seashore, consult a qualified installer, as these locations require additional measures for corrosion resistance. (You should remove salt and dust from the heat exchanger at least once a year.)
Make sure to follow the guidelines below when installing at the seashore.
- Do not install the product in a place where it is directly exposed to seawater and sea breeze.
- Make sure to install the product behind a structure (such as a building) that can block the sea breeze.
- Even when it is inevitable to install the product at the seashore, make sure that the product is not directly exposed to the sea breeze by installing a protection wall.
- Thoroughly wash external panels to ensure saline particles are removed.
- Because residual water at the bottom of the outdoor unit significantly promotes corrosion, make sure that the slope does not disturb drainage.
- Keep the floor level so that rain does not accumulate.
- Be careful not to block the drain hole due to foreign substances.
- When the product is installed at the seashore, periodically clean it with water to remove attached salinity.
- Make sure to install the product in a place that provides smooth water drainage. Especially, ensure that the base part has good drainage.
- If the product is damaged during installation or maintenance, make sure to repair it.
- Check the condition of the product periodically.
- Check the installation site every 3 months and perform anti-corrosion treatment such as R-Pro supplied by SAMSUNG (Code: MOK-220SA) or commercial water repellent grease and wax, etc., based on the product condition.
- When the product is to be shut down for a long period of time, such as off-peak hours, take appropriate measures like covering the product.
- If the product is installed within 500m of the seashore, special anti-corrosion treatment is required.
* Please contact your local SAMSUNG representative for further details.
![graph TD A["Sea"] --> B["Sea breeze"] B --> C["Outdoor unit"] C --> D["Outdoor unit"] E["Sea Sea"] --> F["Sea breeze"] F --> G["Outdoor unit"] G --> H["Protection wall"] H --> I["Outdoor unit"] style A fill:#f9f,stroke:#333 style E fill:#f9f,stroke:#333 style H fill:#ccf,stroke:#333](/content/2026/05/959218/images/ee2de3dca82a89cb34e6810714fbcf4b003f9e2a6166ab3a14ef85d07d17aafe.jpg)
Protection wall should be constructed with a solid material that can block the sea breeze, and the height and width of the wall should be 1.5 times larger than the size of the outdoor unit. (You must secure more than 700mm of space between the protection wall and the outdoor unit for air circulation.)
Deciding where to install the outdoor unit

- Install the indoor unit away from any interfering sources such as radio, computer, stereo equipment, and also select a place where electrical wiring work and indoor unit installation are possible.
- Especially keep the unit at least 3 m away from electrical equipment in an area where weak electromagnetic waves are generated, and install the protection tube to protect the main power cable and communication cable.
- Make sure that there is no equipment that generates electromagnetic waves. If so, malfunction of the control system may occur due to the effect of the electromagnetic wave. (For example: The remote control sensor of the indoor unit may not have good reception in an area with fluorescent lamp style lighting.)
- Make sure the outdoor unit is installed in a safe place where it will not be obstructed by snowfall. The frame should be installed in a place where the air inlet and heat exchanger of the unit are not buried in the snow.
- A ventilation system may be required when the outdoor unit is installed in a closed space or room, even though R-410A is not poisonous or flammable. • Install railing around the outdoor unit to prevent it falling when the unit is installed on a high place such as the roof of the building.
- Avoid installing the units in places near an exhaust pipe and ventilating opening exposed to corrosive gas, oxides of sulfur, ammonia gas, or sulfur gas herbicides. (These places need additional anticorrosive treatments. Please contact the manufacturer to avoid corroding copper pipes or soldered parts.)
- There shouldn't be any inflammable material such as wood and oil around the indoor unit. Otherwise, external fire may spread to the product.
- According to the condition of the power supply, electric noise or unstable voltage can cause malfunction of electric parts or the control system. (On ships or in places using power from an electric generator, etc.)

▶ Make sure that the water dripping from the drain hose runs away correctly and safely. ▶ You should repaint or protect the damaged part so that the paint of the cabinet does not peel off and become rusty during installation. When the cabinet becomes rusty, the life of an outdoor unit will be reduced.
Installation location
▶ Make a space for ventilation and service as seen in the picture.
▶ When multiple outdoor units are combined for installation, allow enough space for ventilation against a wall. If the ventilation space is not allowed, product malfunction may occur.
The side with the logo is the front side of the outdoor unit.
* Figure Description
| Top view Side view | ||
le: Air intake de: Air outlet de: Air outlet |  | Back side: Air intake |

Air flow direction.
When installing 1 outdoor unit
* When the air outlet is opposite the wall

* When the air outlet is toward the wall (Unit: mm)

* When 3 sides of the outdoor unit are blocked by the wall

* The upper part of the outdoor unit is blocked and the air outlet is toward the wall

* The upper part of the outdoor unit is blocked and the air outlet is opposite the wall

* When the walls are blocking the front and the rear of the outdoor unit

Installation location
When installing more than 1 outdoor unit
* When 3 sides of the outdoor unit are blocked by the wall (Unit: mm)

300 or more 600 or more 600 or more 600 or more
* When the walls are blocking front and the rear of the outdoor units

* When front and rear side of the outdoor unit is toward the wall

1500 or more 600 or more 3000 or more 300 or more 3000 or more

- Should adopt bar type louver. Don't use a type of rain resistance louver.
![[Bar type louver]](/content/2026/05/959218/images/72ddc891a43ff0902eec22b4b0ae4ad4dfed023c6ec71c1477bf830563a89095.jpg)
![[Rain resistance louver]](/content/2026/05/959218/images/ad3a10d63d66e9ef724d5097e4901c03b16726664777f54fa8a3888cbc219b04.jpg)
- Louver specifications.
- Angle criteria: less than 20°
- Opening ratio criteria: greater than 80%
Moving the Outdoor Unit
▶ Select the moving route in advance. ▶ Be sure that moving route is safe from the weight of the outdoor unit.
▶ Do not slant the product more than 30° when carrying it. (Do not lay the product down sideways.)
The surface of the heat exchanger is sharp. Be careful not to get injured while moving and installing.
When moving with a crane or wire rope
When moving an outdoor unit to a higher place such as the rooftop. - Fasten the wire rope as seen in the picture. - Move the outdoor unit with the product packed to prevent possible product damage during transportation.

When moving an outdoor unit with hands
Moving the outdoor unit by lifting up and carrying for short travel distance. - Two people should carry the outdoor unit by holding the transportation handle. - Be careful not to damage the heat exchanger on the rear side of the outdoor unit during transportation. - Be careful not to get hurt by the sharp surface of the heat exchanger.

Installation and base ground work for an outdoor unit
Install the outdoor unit 150 mm higher than the base ground and install the drain hole to connect the pipe to the drainage.
When the front fan of an outdoor unit is installed in a place where the average snowfall is more than 150 mm, the discharge duct should be attached to the outdoor unit.
The concrete foundation should be 1.5 times larger than the bottom of the outdoor unit.
It is necessary to install wire mesh or steel bar when outdoor units are installed on a soft foundation.
When installing multiple outdoor units at the same place, install the H beam on the base ground. (When installing a number of outdoor units, you can install it on the base ground.)
Install the H beam (150 mm x 150 mm x t10: basic specification) or vibration absorption frame to jut out from the base ground.
After installing the H beam, apply corrosion protection.
Install a square pad (t=20 mm or more) to prevent vibration from the outdoor unit onto the base ground. Place the outdoor unit on the H beam and fix it with the bolt, nut, and washer. (Fix with M10 basic anchor bolt, nut, and washer.)

Installation and base ground work for an outdoor unit
Base ground work


The outdoor unit should be supported within the measurement range below for base ground work.
(Unit: mm)

▶ When the outdoor unit needs to be supported, fix it with wire as shown in the picture.
- Slightly loosen the four screws on the top cover of the outdoor unit.
- Wind wires around the four screws and tighten the screws again.
- Fix the wires to the ground.

CAUTION
- If the outdoor unit is not fixed securely, it may fall and cause injury or property damage.
• Do not install the outdoor unit on a wooden pallet.
• Secure the outdoor unit to the base ground with anchor bolts.
- The manufacturer is not responsible for damage caused by not adhering to the installation standards.
- To protect the outdoor unit from external conditions such as rain, install it on the base ground and connect the drain pipe to the drainage.
Refrigerant pipe installation
Refrigerant pipe work
The length of the refrigerant pipe should be as short as possible, and the height difference between the indoor and outdoor units should be minimized. The piping length between the outdoor unit and the indoor unit must not exceed the allowable piping length, height difference, and the allowable length after branching. The pressure of R-410A is high. Use only certified refrigerant pipe and follow the installation method. ▶ After pipe installation, charge the refrigerant according to the pipe length, and use R-410A refrigerant. ▶ Use clean refrigerant pipe, and ensure there are no harmful ions, oxides, dust, iron content, or moisture inside the pipe. ▶ Use tools and accessories that are compatible with R-410A only.

- When installing, make sure there is no leakage. When collecting the refrigerant, stop the compressor first before removing the connection pipe. If the refrigerant pipe is not properly connected and the compressor works with the service valve open, the pipe inhales the air and it makes the pressure inside of the refrigerant cycle abnormally high. It may cause explosion and injury.
| Tool Work If compatible with conventional tool | |||
| Pipe cutter | Refrigerant pipe work | Pipe cutting | Compatible |
| Flaring tool Pipe flaring | |||
| Refrigerant oil | Apply refrigerant oil on flared part | Exclusive ether oil, ester oil, alkali benzene oil or synthetic oil | |
| Torque wrench | Connect flare nut with pipe | Compatible | |
| Pipe bender Pipe bending | |||
| Nitrogen gas | Air tightening test | Inhibition of oxidization | |
| Brazing tool Pipe brazing | |||
| Manifold gauge | Air tightening test ~ additional refrigerant charging | Vacuuming, charging and checking operation | Need exclusive one to prevent mixture of R-22 refrigerant oil use and also the measurement is not available due to the high pressure. |
| Refrigerant charging hose | Need exclusive one due to the refrigerant leakage or inflow of impurities. | ||
| Vacuum pump Vacuum drying | Compatible (Use products which contain the check valve to prevent the oil from flowing backward into the outdoor unit.) Use the one that can be vacuumed up to 100.7 kpa(5Torr.-755 mmHg). | ||
| Scale for refrigerant charging | leak test | Compatible | |
| Gas leak detector Gas leak test | Need exclusive one (The one for R-134a can be used) | ||
| Flare nut | You must use the flare nut equipped with product. Refrigerant leakage may occur when the conventional flare nut for R-22 is used. | ||
Refrigerant pipe installation
Selecting refrigerant pipe
Temper grade and minimum thickness of the refrigerant pipe
| Outer diameter [mm] Minimum thickness [mm] Temper grade | |
| φ 6.35\ 0.7 | |
| φ 9.52\ 0.7 | |
| φ 12.70\ 0.8 | |
| φ 15.88\ 1.0 | |
| φ 19.05\ 0.9 | |
| φ 22.23\ 0.9 |

CAUTION
- For pipes larger than ∅ 19.05, drawn type (C1220T-1/2H or C1220T-H) type copper pipe must be used. If an annealed type (C1220T-O) copper pipe is used, pipe may break due to its low pressure resistance and cause personal injury.
Pipe installation between an outdoor unit and the first Y-joint
| Outdoor unit capacity [HP] Liquid pipe [mm] Gas pipe [mm] | One step upgraded pipe [mm] | |
| 4 ø9.52 ø15.88 ø19.05 | ||
| 5 ø9.52 ø15.88 ø19.05 | ||
| 6 ø9.52 ø19.05 ø22.23 |
▶ Install the refrigerant pipe according to main pipe size of each outdoor unit capacity. When the pipe length between an outdoor unit and the farthest indoor unit including elbow exceeds 90 m, the gas pipe size should be upgraded one step among the main pipes from the outdoor unit to the first Y-joint. (The liquid pipe size will be maintained.) ▶ If the capacity of the outdoor unit can decline due to the pipe length, upgrade the pipe size one step (gas pipe).
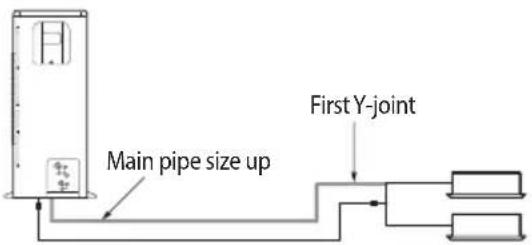
Pipe installation between Y-joints
| Indoor unit total capacity(kW) | Pipe diameter (O·D·mm) | |
| Liquid pipe (mm) Gas pipe (mm) | ||
| X ≤ 15.0 | ∅9.52 | ∅15.88 |
| 15.0 < X ≤ 23.2 | ∅19.05 | |
Selecting Y-joint
▶ Select the first Y-joint according to main pipe size of each outdoor unit capacity.
▶ Select the other Y-joints according to the total indoor unit capacity under the selected Y-joint.
| Selecting the first Y-joint Other Y-joints | |
| Outdoor unit capacity (HP) Y-joint model | |
| 4 | MXJ-YA1509* |
| 5 | MXJ-YA1509* |
| 6 MXJ-YA2512* | |
| Total indoor unit capacity under the selected Y-joint (kW) | Y-joint model |
| X ≤ 15.0 | MXJ-YA1509* |
| 15.0 < X ≤ 40.6 | MXJ-YA2512* |
Keeping refrigerant pipe
To prevent foreign materials or water from entering the pipe, it is important to keep the refrigerant pipe clean and dry and to seal it during installation.
Apply correct sealing method depending on the environment.
| Exposure place Exposure time Sealing type | ||
| Outside exposure | Longer than one month Pipe pinch | |
| Shorter than one month Taping | ||
| Inside exposure | - | Taping |
Refrigerant pipe brazing and safety information
Important information for refrigerant pipe work
▶ Make sure that there is no moisture inside the pipe. ▶ Make sure that there are no foreign materials and impurities in the pipe. ▶ Make sure that there is no leak. ▶ Make sure to follow the instructions when brazing and keeping the pipe.
Nitrogen flushing brazing
▶ Use Nitrogen gas when brazing the pipes as shown in the picture.
If you do not perform nitrogen flushing when brazing the pipes, oxide may form inside the pipe. It can cause damage to important parts such as the compressor and valves. ▶ Adjust the flow rate of the Nitrogen flushing with a pressure regulator to maintain 0.05 m3/h or less.

Refrigerant pipe installation
Direction of the pipe when brazing
▶ Brazing the pipe should be done with the pipe headed downward or horizontally. ▶ Avoid brazing with the pipe headed upward.
CAUTION
- The test liquid used to detect leakage after pipe brazing should be the designated one. The use of test liquid containing sulfur element may cause pipe corrosion.
Cutting or Flaring the pipes
▶ Make sure that you prepared the required tools.
- Pipe cutter, reamer, flaring tool and pipe holder, etc.
▶ If you want to shorten the pipe, cut it using a pipe cutter ensuring that the cut edge remains at 90° with the side of the pipe.
- There are some examples of correctly and incorrectly cut edges below.


▶ To prevent a gas leak, remove all burrs at the cut edge of the pipe using a reamer. Carry out flaring work using a flaring tool as shown below.
[Flaring tool]


| Pipe diameter (mm) | A(mm) | ||
| Flare tool for R-410A clutch type | Conventional flare tool | ||
| Clutch type Wing nut type | |||
| ø6.35 0~0.5 1.0~1.5 1.5~2.0 | |||
| ø9.52 0~0.5 1.0~1.5 1.5~2.0 | |||
| ø12.70 0~0.5 1.0~1.5 1.5~2.0 | |||
| ø15.88 0~0.5 1.0~1.5 1.5~2.0 | |||
▶ Check that you flared the pipe correctly.
- There are some examples of incorrectly flared pipes below.
Correct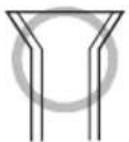
Inclined
Damaged Surface
Cracked
Uneven Thickness
CAUTION
- If foreign matters or burrs are not removed after cutting the pipe, refrigerant gas may leak.
- If foreign matters enter inside the pipe, the important interior parts of the unit may get damaged or product efficiency will be reduced. So, the direction of the pipe should be downward during pipe cutting or flaring.
Tightening flare connection area
▶ Check that the flaring is properly made.
Align the center of the piping and sufficiently tighten the flare nut with fingers. Finally, tighten the flare nut with a torque wrench until the wrench clicks. When tightening the flare nut with a torque wrench, ensure the direction for tightening follows the arrow on the wrench.
Make sure to use ester oil to coat the flare connection section.

| Outer diameter (D, mm) Connection torque (kgf·cm) Flare dimension (A, mm) Flare shape (mm) | |||
| ø6.35 145~175 8.70~9.10 |  | ||
| ø9.52 333~407 12.80~13.20 | |||
| ø12.70 505~615 16.20~16.60 | |||
| ø15.88 630~769 19.30~19.70 | |||

CAUTION
- Blowing nitrogen gas should be done when brazing the pipe. Make sure to use the provided flare nut. Make sure that there are no cracks on the bent pipe. Do not fasten the flare nut with excessive strength.
- Use ester oil to coat the flare connection area to prevent refrigerant leak. R-410A is a high pressure refrigerant. Therefore, there is a risk of refrigerant leakage if the flare connection is not coated with ester oil.
Refrigerant pipe installation
Pipe installation for an outdoor unit
Pipe direction
The refrigerant pipe can be pulled out from the front, flank, rear, and bottom side, so install it depending on the installation site conditions.

CAUTION
Caution for using knock-out hole
Make sure not to damage the exterior of the outdoor unit. Remove all burrs at the edge of the knock-out hole and apply paint to prevent rust. Use a cable tube and bushing to prevent a cable from being damaged when passing through a knock-out hole. After installing pipes, block the unused knock-out hole to prevent small animals from entering. However, the radiant heat hole (A) should be able to intake air.


CAUTION
Caution for connecting the pipe
- When brazing the pipe, the unit may get damaged by a brazing fire and a flame. Use a flame proofing cloth to protect the unit from a brazing fire or flame.
- The O-ring and Teflon packing inside the service valve may get damaged by a brazing fire. Wrap the bottom side of the service valve with a wet cloth and braze it as shown above. Make sure not to interrupt the brazing with the drips from the wet cloth.
- The connecting pipes of the liquid side and gas side should not contact each other nor should they contact the product. Vibration may cause damage to the pipes.

High pressure (Liquid side)
Low pressure (Gas side)
Outdoor unit refrigerant pipe connection
| Classification Front, flank, rear side of pipe connection Bottom side of pipe connection | ||
| Working process | First, remove the pipe cover from unit.Separate the knock-out hole to use. If the hole is open, small animals such as squirrels and rats may get into the unit through the hole and the unit may be damaged. | Separate the knock-out hole at the bottom side of the unit and install the pipe.After installing and insulating the pipe, close up the remaining gap. If the gap remains open, small animals such as rats and squirrels may get inside the unit and cause damage to the unit. |
Refrigerant pipe installation examples
Using a Y-joint Using a Y-joint/EEV kit![graph TD A["Server Rack"] --> B["Client Server"] A --> C["Client Server"] A --> D["Client Server"] A --> E["Client Server"] A --> F["Client Server"] B --> G["Central Hub"] C --> G D --> G E --> G F --> G G --> H["Client Server"] G --> I["Client Server"] G --> J["Client Server"]](/content/2026/05/959218/images/388e14b6980f85be7b809b08ccf786fc3f7f6754367270d3edfa29efe28c7c4b.jpg)
![graph TD A["Server"] --> B["Client 1"] A --> C["Client 2"] A --> D["Client 3"] A --> E["Client 4"] B --> F["Computer 1"] C --> G["Computer 2"] D --> H["Computer 3"] E --> I["Computer 4"] F --> J["Computer 5"] G --> K["Computer 6"] H --> L["Computer 7"] I --> M["Computer 8"]](/content/2026/05/959218/images/3a3c40cb6ae44d3c78e9b6f2c9afea5746699c05f9feab84fc5b52ee266c45e9.jpg)
Using a header joint Using a header joint/ Y-joint![graph TD A["Server"] --> B["Client 1"] A --> C["Client 2"] A --> D["Client 3"] A --> E["Client 4"] A --> F["Client 5"] A --> G["Client 6"] A --> H["Client 7"] A --> I["Client 8"]](/content/2026/05/959218/images/bba31be4e354745abad2db0680e0906d8a61b4dd1e79a4a93603fa488feaa222.jpg)
![graph TD A["Client 1"] --> B["Central Server"] C["Client 2"] --> B D["Client 3"] --> B E["Client 4"] --> B F["Client 5"] --> B B --> G["Server"] style A fill:#f9f,stroke:#333 style C fill:#f9f,stroke:#333 style D fill:#f9f,stroke:#333 style E fill:#f9f,stroke:#333 style F fill:#f9f,stroke:#333](/content/2026/05/959218/images/6524ab79e778900cfca5cf7b4dba1987fdb72c4b58d69a2efbb267fe1ab8c23b.jpg)
Allowable length of the refrigerant pipe and the installation examples
Connection by Y-joint![graph TD A["Outdoor unit"] --> B["a"] B --> C["b"] C --> D["c"] D --> E["d"] E --> F["e"] F --> G["f"] G --> H["g"] H --> I["g"] I --> J["p"] J --> K["H1"] K --> L["H2'"] L --> M["n"] M --> N["m"] N --> O["k"] O --> P["d"] P --> Q["i"] Q --> R["h"] R --> S["1"] S --> T["2"] T --> U["3"] U --> V["4"]…](/content/2026/05/959218/images/1c9e457c3e878ddb709cdd5374de4687ef5f2781074f9b5a366371e9b0ef9d22.jpg)
Connection by Y-joint/EEV kit![graph TD A["Outdoor unit"] -->|a| B["A"] B -->|b| C["B"] C -->|c| D["C"] D -->|d| E["d"] E --> F["h"] F --> G["4"] G --> H["i"] H --> I["H2"] I --> J["j"] J --> K["H1"] B -->|e| L["1"] C -->|f| M["2"] D -->|g| N["3"] E --> O["6"]](/content/2026/05/959218/images/5b9f3de124b299d383cb04d4f5f1a85feeacb94566030d4c94482949215499a9.jpg)
Refrigerant pipe installation
| Classification Y-joint connection | Y-joint / EEV kit connection | |||
| Maximum allowable length of pipe | Outdoor unit ~ Indoor units | Actual Length | The distance between the outdoor unit and the farthest indoor unit ≤ 150 m | |
| Ex) 8 indoor unitsa+b+c+d+e+f+g+p≤ 150 m | Ex) 6 indoor unitsa+b+c+d+j≤ 150 m | |||
| Equivalent length | The distance between an outdoor unit and the farthest indoor unit ≤ 175 m | |||
| Main pipe length | The main pipe(a) from the outdoor unit to the first Y-joint should be less than 110 m. | |||
| Total length The sum of the total length of pipes should be less then 300 m. | ||||
| Maximum allowable height | Outdoor unit ~ Indoor units | Height H1: The difference of height between an outdoor unit and indoor unit < 50 m | ||
| Height | H2: The difference of height between indoor units ≤ 15 m | |||
| Maximum allowable length after Y-joint | Actual Length | The distance between the first Y-joint and the farthest indoor unit ≤ 40 mEx) 8 indoor unitsb+c+d+e+f+g+p≤ 40 m | Allowable length between EEV kit and an indoor unit ≤ 20 mEx) h, l, j ≤ 20 m | |
| EEV Kit Model name Remarks | |||||
| EEV Kit ~ Indoor units | Actual pipe length | 2 m or less | MEV-E24SA | 1 indoor | E24K200AApply to products without EEV (Wall mounted & ceiling) |
| MEV-E32SA | |||||
| 20 m or less | MXD-E24K132A | 2 indoorMXD | |||
| MXD-E32K200A | |||||
| MXD-E24K232A | 3 indoor | ||||
| MXD-E24K300A | |||||
| MXD-E32K224A | |||||
| MXD-E32K300A | |||||
* When the equivalent length between an outdoor unit and the farthest indoor unit exceeds 90 m, upgrade the low pressure pipe of the main pipe one step.
![graph TD A["Outdoor unit"] -->|a| B["Header joint"] B --> C["A"] C --> D["X"] D --> E["Indoor unit"] E --> F["g"] F --> G["Indoor unit"] style A fill:#f9f,stroke:#333 style B fill:#ccf,stroke:#333 style C fill:#cfc,stroke:#333 style D fill:#fcc,stroke:#333 style E fill:#cff,stroke:#333 style F fill:…](/content/2026/05/959218/images/8f465c30cedbda6de24665da51c5b727d7356865a2a1e24c8c092982791b2fb4.jpg)
Connection by Y-joint/header joint![graph TD A["Outdoor unit"] -->|a| B["A"] B -->|b| C["B"] C -->|c| D["Header joint"] D -->|d| E["X"] E --> F["f"] F --> G["3"] F --> H["4"] F --> I["5"] E --> J["g"] J --> K["2"] L["Indoor unit"] --> M["1"] N["H1"] --> B O["H2"] --> P["2"]](/content/2026/05/959218/images/7a07f3dcb1e71decc84d28bcf4cadc246989b70d8fce2d86d6444d44bd34c92f.jpg)
| Classification | Header joint connection | Y-joint / header joint connection | ||
| Maximum allowable length of pipe | Outdoor unit ~ Indoor units | Actual Length | The distance between an outdoor unit and the farthest indoor unit ≤ 150 m | |
| Ex) 8 indoor unitsa+g≤ 150 m | Ex) 8 indoor unitsa+b+c ≤ 150 m | |||
| Equivalent length | The distance between an outdoor unit and the farthest indoor unit ≤ 175 m | |||
| Main pipe length | The main pipe(a) from the outdoor unit to the first Y-joint should be less than 110 m. | |||
| Total length | The sum of total length of pipes should be less then 300 m. | |||
| Maximum allowable height | Outdoor unit ~ Indoor units | Height | H1: The difference in height between an outdoor unit and indoor unit < 50 m | |
| Height | H2: The difference in height between indoor units ≤ 15 m | |||
| Maximum allowable length after Y-joint | Actual Length | The distance between the header joint and the indoor unit ≤ 40 mEx) b, c ~ f, g ≤ 40 m | The distance between the first Y-joint and the farthest indoor unit ≤ 40 mEx) 8 indoor unitsb+c, d+g ≤ 40 m | |
* When the equivalent length between an outdoor unit and the farthest indoor unit exceeds 90 m, upgrade the low pressure pipe of the main pipe one step.
Refrigerant pipe installation
Refrigerant pipe work
Refrigerant Y-joint installation
Install the Y-joint horizontally or vertically.
Install horizontally

Install vertically
NOTE
- When using A~J type of Y-joint, connect the Y-joint to the pipe with the provided reducer.
- When using K~Z type of Y-joint, connect the Y-joint to the pipe by cutting the inlet of the Y-joint or provided reducer properly.

10~15 mm or more
CAUTION
• Install the Y-joint within ±15° on the horizontal or on the vertical. • Make sure that the pipe does not break at Y-joint and pipe connection. • Keep a minimum straight line distance of 500 mm or more before connecting Y-joint.

| Correct use(The insertion depth of connecting pipe) | Incorrect use(The insertion depth of connecting pipe) | |
| Basic specification |  Connecting pipe Connecting pipe Connecting pipe Connecting pipe |  |
| When cutting connection part |  Connecting pipe Connecting pipe Connecting pipe Connecting pipe |  |

• When inserting connecting pipe into the Y-joint, please comply with the installation regulation.
Refrigerant header joint installation
Select the reducer fitted on the diameter of the pipe.
| Liquid side Gas side | |
 |  |
▶ Block the unused pipe ends with caps if the number of connected indoor units is fewer than the header joint ports.
| Liquid side Gas side | |
Brazing part Block the port of header joint Block the port of header joint | C |
Refrigerant pipe installation

CAUTION
- When using A~J type of header joint, connect the header joint to the pipe with the provided reducer.
- When using K~Z type of header joint, connect the header joint to the pipe by cutting the provided reducer properly.
- Connect the header joint in order, respecting the number of the indoor unit.
- Connect the indoor unit with the highest capacity first.


▶ Install the header joint horizontally. - Install the header joint horizontally so that it is not facing down.
| Liquid side |  |
| Gas side |  |
Performing air tightening test
▶ Use tools for R-410A only to prevent the inflow of foreign substances and to resist the internal pressure.
▶ Use dry nitrogen gas to do an airtight test as below.
![graph TD A["Apply pressure to the liquid side pipe, gas side pipe with Nitrogen gas of 4.1 MPa (gauge pressure)."] --> B["Continue to apply pressure for minimum 24 hours to check if the pressure drops."] B --> C["If the pressure drops, check if there is a gas leak."] C --> D["Maintain 1.0 MPa (gauge…](/content/2026/05/959218/images/16bc885ab20d02828809d0de7aec204a7268aa31b86d881cd3ffc4b6fd6215be.jpg)


- If the joint of the high pressure side is disconnected and the nitrogen gas comes into contact with the human body, injury may occur. Tighten the joint connection firmly to prevent dangerous situations.
Refrigerant pipe installation
Vacuuming a pipe and an indoor unit
▶ Use the tools for R-410A only to prevent the inflow of foreign substances and resist against the internal pressure. ▶ Use the vacuum pump with the check valve to prevent pump oil from flowing backward while the vacuum pump is stopped suddenly. ▶ Use the vacuum pump that can be vacuumed up to 666.6 Pa (5 mmHg). ▶ Close the service valve of the liquid side pipe and gas side pipe completely when performing air tightening test or vacuum drying.

![graph TD A["Connect the manifold gauge to the liquid pipe and gas pipe."] --> B["Vacuum the liquid pipe and gas pipe using the vacuum pump."] B --> C["Vacuum those pipes for more than 2 hours and 30 minutes."] C --> D["Close the valve after checking the vacuum gauge pressure has reached at -100.7 kP…](/content/2026/05/959218/images/5bc9ec00b08f23cd78b6106710cb2424a402f95808a452ff17248de93aff510b.jpg)
Make sure to install check valve to prevent pump oil from flowing into the pipe.
The time of vacuum drying may differ depending on the length of the pipe or outdoor temperature. Perform vacuum drying for at least 2 hours and 30 minutes.
Check the vacuum pressure using the vacuum gauge.
![graph TD A["an hour."] --> B{Pressure Increase} B -->|Yes| C["Check the gas leak."] B -->|No| D["Charging additional refrigerant according to piping length"] C --> E["Vacuum destruction due to the moisture inside the pipe<br>• Apply pressure with Nitrogen gas of 0.05 MPa (gauge pressure)."] E --> F[…](/content/2026/05/959218/images/8e23e169f35372aa02d954a45a8746480a691be15ccb19c1b6d860395b6e7114.jpg)
Selecting additional refrigerant charging
▶ Basic refrigerant
The basic amount of additional refrigerant charged at a factory
| Model Refrigerant Factory charge(kg) | |
| AM060TXMDEC R-410A 2.8 |
▶ Charging additional refrigerant
| The amount of additional refrigerant charging = | The amount of refrigerant charging for pipe + the amount of refrigerant correction charging for an indoor unit. |
1. The amount of additional refrigerant depending on the pipe size.
- Amount of additional refrigerant has to be calculated based on the sum of all liquid pipe length.
| Size of liquid pipe (mm) 6,35 9,52 | 12,7 | 15,88 | ||
| Additional amount (kg/m) | 0,02 | 0,06 | 0,125 | 0,18 |
Additional refrigerant charging calculation = The sum of total length of ∅ 9.52 liquid pipe(m) x 60 g + the sum of total length of ∅ 6.35 liquid pipe(m) x 20 g
Ex) a(∅ 9.52)=40 m, b+c+d(∅ 9.52)=15 m, e+f+g(∅ 6.35)=15 m
The amount of additional refrigerant = 55 m x 60g + 15 m x 20 g = 3600 g
2. The amount of additional refrigerant for each indoor unit.
(Unit : kg)
| Product | Capacity (kW) | |||||||||||||||||
| 1.5 | 1.7 | 2.2 | 2.8 | 3.2 | 3.6 | 4.5 | 5.6 | 6 | 7.1 | 8.2 | 9 | 9.3 | 11.2 | 12.8 | 14 | 16 | ||
| 1Way CST(Fluid/Wind-Free) | (AM***FN1DE**) | 0.25 | 0.25 | 0.25 | 0.32 | 0.32 | ||||||||||||
| (AM***NN1DE**) | ||||||||||||||||||
| (AM***JN1DE**) | ||||||||||||||||||
| 1Way CST(Fluid/Wind-Free) | (AM***NN1PE**) | 0.15 | 0.15 | |||||||||||||||
| 2Way CST | (AM***FN2DE**) | 0.31 | 0.47 | |||||||||||||||
| 4Way CST(AM***NN4DE**) | (AM***FN4DE**) | 0.45 | 0.45 | 0.45 | 0.45 | 0.57 | 0.69 | 0.69 | ||||||||||
| (AM***NN4DEH**) | 0.45 | 0.45 | 0.45 | 0.45 | 0.69 | 0.69 | 0.69 | |||||||||||
| 360 CST | (AM***KN4DE**) | 0.45 | 0.45 | 0.45 | 0.45 | 0.69 | 0.69 | 0.69 | ||||||||||
| 4Way CST(600X600) | (AM***FNNDE**) | 0.29 | 0.29 | 0.29 | 0.37 | 0.37 | 0.37 | |||||||||||
| (AM***NNNDE**) | 0.22 | 0.31 | 0.38 | 0.38 | 0.38 | |||||||||||||
| Duct S | (AM***HNMPK**) | 0.22 | 0.31 | 0.38 | 0.38 | 0.38 | ||||||||||||
| Slim Duct | (AM***FNLDE**) | 0.17 | 0.17 | 0.17 | 0.26 | 0.35 | 0.35 | 0.45 | 0.42 | 0.42 | 0.62 | 0.62 | ||||||
| (AM***KNLDEH**) | ||||||||||||||||||
| MSP Duct | (AM****NMDE**) | 0.24 | 0.24 | 0.24 | 0.28 | 0.28 | 0.28 | 0.32 | 0.54 | 0.68 | 0.68 | 0.91 | ||||||
| HSP Duct | (AM***FNHDE**) | 0.68 | 0.68 | 0.68 | ||||||||||||||
| Home Duct | (AM***KNLDE**) | 0.13 | 0.13 | 0.13 | 0.17 | |||||||||||||
| (AM***MNLDE**) | 0.26 | 0.26 | 0.33 | |||||||||||||||
| Ceiling(AM***JNCDK**) | (AM***FNCDE**) | 0.39 | 0.39 | 0.56 | 0.56 | |||||||||||||
| Console | (AM****NUDE**) | 0.16 | 0.27 | 0.27 | 0.27 | 0.27 | ||||||||||||
Refrigerant pipe installation
| Product | Capacity (kW) | |||||||||||||||||
| 1.5 | 1.7 | 2.2 | 2.8 | 3.2 | 3.6 | 4.5 | 5.6 | 6 | 7.1 | 8.2 | 9 | 9.3 | 1 | 1.2 | 12.8 | 14 | ||
| Concealed Floor Standing | (AM***FNFDE**) | 0.22 | 0.32 | 0.32 | ||||||||||||||
| Neo Forte (AM | ***FNTDE** | 0.24 | 0.24 | 0.36 | 0.36 | |||||||||||||
| Neo Forte (with EEV) | (AM***FNQDE**) | 0.34 | 0.34 | 0.34 | 0.51 | 0.51 | 0.51 | |||||||||||
| Boracay (AM | ***KNTDE** | 0.24 | 0.24 | 0.32 | 0.49 | 0.49 | 0.49 | |||||||||||
| Boracay (with EEV) | (AM***KNQDE**) | 0.24 | 0.24 | 0.32 | 0.32 | 0.49 | 0.49 | 0.49 | ||||||||||
| Max (with EEV) | (AM***MNQDE**) | 0.49 | ||||||||||||||||
| AR5000 (AM | ***JNADK** | 0.16 | 0.16 | 0.19 | 0.25 | 0.25 | 0.52 | 0.52 | 0.52 | |||||||||
| AR5000 (with EEV) | (AM***JNVDK**) | 0.22 | 0.22 | 0.25 | 0.34 | 0.34 | 0.71 | 0.71 | 0.71 | |||||||||
| Wind-Free RAC | (AM***TN*D*H**) | 0.23 | 0.23 | 0.32 | 0.32 | 0.48 | 0.48 | 0.48 | 0.64 | |||||||||
Example: When the indoor units AM022FN1DEH and AM056FN4DEH are combined, additional refrigerant charging = 250 g + 450 g = 700 g.
- The total amount of additional refrigerant charging = the amount of refrigerant charging for the pipe + the amount of refrigerant for each indoor unit.
Example: The amount of additional refrigerant charging = 3600 g + 700 g = 4300 g.
Connecting the drain hose to the outdoor unit
When using the air conditioner in heating mode, ice may accumulate. During defrosting (defrost operation), the condensed water must be drained off safely. Consequently, you must install a drain hose on the outdoor unit, following the instructions below.
Leave a space of more than 50 mm between the bottom of the outdoor unit and the ground for installation of the drain hose, as shown in the figure. ▶ Insert the drain plug into the hole on the underside of the outdoor unit. ▶ Connect the drain hose to the drain plug. ▶ Ensure that the drained water runs off correctly and safely.


▶ Be sure to plug the rest of the drain holes not connected with drain plugs using drain caps.

Insulating refrigerant pipe or Y-joint
▶ You must check for gas leaks before completing the entire installation process. After you check that the gas does not leak, you must insulate the pipe and hose.
▶ Use EPDM insulation that meets the following condition.
| Item Unit Standard | ||
| Density g/cm | 3 | 0.048~0.096 |
| Dimension change route by heat % -5 or less | ||
| Water absorption rate g/cm | 3 | 0.005 or less |
| Thermal conductivity kcal/m·h·°C 0.032 or less | ||
| Moisture transpiration factor ng/(m) | 2·s·Pa) 15 or less | |
| Moisture transpiration grade g/(m) | 324h) 15 or less | |
| Formaldehyde dispersion | mg/L | - |
| Oxygen rate | % | 25 or more |
Selecting the insulation of refrigerant pipe
▶ Insulate the gas pipe and liquid pipe by referring to the thickness of insulation for each pipe size. The standard condition is 30 °C with humidity less than 85%. In conditions of high humidity, use one grade thicker.
| Pipe | Pipe size (mm) | Insulation(Cooling, Heating) | Remarks | |
| Standard[30°C, 85%] | High humidity[30°C, 85% or more] | |||
| EPDM, NBR | ||||
| Liquid pipe | ∅6.35~∅9.52 | 9t | ← | Heat resisting temperature is more than 120 °C |
| ∅12.70~∅50.80 | 13t | ← | ||
| Gas pipe | ∅6.35 | 13t | 19t | |
| ∅9.52 | 19t | 25t | ||
| ∅12.70 | ||||
| ∅15.88 | ||||
| ∅19.05 | ||||
| ∅22.23 | ||||
Refrigerant pipe installation
Insulating refrigerant pipe
▶ You must insulate the refrigerant pipe, Y-joint, header joint, and pipe connection area. ▶ If you insulate the pipes, condensed water will not drip from the pipes. ▶ Check for any insulation cracks on the bent pipe.


| Pipe insulation Pipe insulation after insulating EEV kit | |
| The insulation of the gas and liquid pipes can be in contact with each other but they should not press excessively against each other.When contacting the gas side and liquid side pipe, use thicker insulation. | When installing the gas side and liquid side pipes, leave 10 mm of space.When contacting the gas side and liquid side pipe, use thicker insulation. |
 |  |

• Install the insulation so that it does not become wider, and use adhesive on the connection part to prevent moisture from entering. - Bind the refrigerant pipe with insulation tape if it is exposed to outside sunlight. (When binding the pipe with finishing tape, be careful not to reduce the thickness of the insulation.) • Install the refrigerant pipe, ensuring that the insulation does not get thinner on the bent part or hanger of the pipe. - When the thickness of the insulation is reduced, supplement the reduced thickness with additional insulation.

Insulating the header joint
▶ Fasten the header joint using a cable tie and cover the connected part. ▶ Insulate the header joint and the brazing part, and wrap the connected part with an adhesive insulation tape to prevent dew formation.
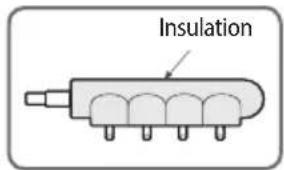
![graph LR A["Adhesive insulation tape"] --> B["Insulation for the header joint"] B --> C["Insulation for the refrigerant pipe"] C --> D["Insulation after brazing a stopper"] D --> E["Adhesive insulation tape"]](/content/2026/05/959218/images/0df845a2cec4394ae2bde29377e3106079576636fe3bddd1a342de2f8ab76066.jpg)
▶ Fix the header joint with a hanger after insulating it.


Insulating the Y-joint, liquid & gas side connecting pipe
▶ Attach the insulation provided with the Y-joint to the insulation purchased privately without a gap. Wrap the connected part with insulation (purchased privately) of a thickness of at least 10 mm. ▶ Use insulation that should be able to handle an interior temperature of over 120 °C. Wrap the Y-joint with insulation of a thickness of at least 10 mm.

Insulation tape (purchased privately)
* Attach the adhesive insulation tape to the pipe as shown in the picture after insulating the pipe.
Wiring work
Wiring work should be performed in accordance with related laws such as 'Technical specification on electric installation', 'Wiring regulations' or 'Installation manual'. ▶ Copper cable should be used for wiring work, and all wires or parts should be rated products.
▶ Wiring work should be performed by a company certified by an electric power company. ▶ Refer to the circuit diagram attached to the outdoor unit for detailed wiring work.
▶ Wiring work should be performed after disconnecting the main circuit breaker and Y-joint switch.
▶ You must perform grounding work.
(Grounding resistance value should be less than 100 Ω.)
When ELCB is installed, protective grounding resistance value can be applied.
(When the ELCB is 100 mA, 0.1 sec, protective grounding resistance value should be less than 250 Ω at a place where electric danger is high and should be less than 500 Ω at other places.)
▶ Electric wiring circuit diagram displays outline only.
▶ Do not connect a heater to an outdoor unit and do not install a duct which you arbitrarily remodeled.
- Failure to do so may result in reduced capacity of an air conditioner, electric shock, and fire.
▶ Do not connect the grounding wire to that of gas pipe, water pipe, lightning rod, or telephone.
- Gas pipe: If the gas leaks, explosion or ignition may occur.
- Water pipe: If rigid vinyl pipe is used, grounding effect will not work.
- Grounding wire and lightning rod of telephone: The electric potential of grounding wire may rise abnormally in the falling of a thunderbolt.
The ELB for ground-fault protection only should be combined with MCCB or fuse equipped load breaker switch. In this case, you should use the one that has at least the same or more capacity as fuse capacity or the rated current of MCCB. ▶ Use the wires that comply with regulated specification and firmly connect to the terminal board. Then tighten it with the screws provided so that the terminal board cannot be moved by external force. (The connecting cable and the grounding terminal should be locally procured). When wiring, the connection cable shouldn't be too tight.
▶ Apply silicon at the end of CD pipe so that rainwater does not enter.
Conduit leading into an outdoor unit

Overall System Configuration
Connection of the power cable (1 phase 2 wires)
Distribution board Outdoor unit Indoor unit![graph TD A["Earth"] --> B["1 phase"] B --> C["2 wires"] C --> D["220-240V~"] D --> E["ELCB"] E --> F["MCCB + ELB"] F --> G["Communication cable"] G --> H["220V"] H --> I["Wired remote controller"] I --> J["Earth"] G --> K["1 phase"] K --> L["MCCB + ELB"] L --> M["ELCB"] M --> N["220-240V~"] N --> O[…](/content/2026/05/959218/images/4c27504a8aebc4678ec24a041342fb3540846fb765aa6ddd8dd67bc6a2e8878f.jpg)
Connection of the power cable (1 phase 2 wires using EEV kit)
Distribution board, Outdoor unit, Indoor unit![graph TD A["Earth"] --> B["1 phase 2 wires 220-240V~ Or ELCB"] B --> C["MCCB + ELB"] C --> D["EEV kit"] D --> E["Communication cable"] E --> F["1 phase 2 wires 220-240V~ Or MCCB + ELB"] F --> G["ELCB"] G --> H["Wired remote controller"] H --> I["Power Supply"] D --> J["Power Supply"] style A fill:#f…](/content/2026/05/959218/images/79b9bcc32987f9dd5c3ad55cec039818718e86435019c0c8d0c3686b6b989daa.jpg)
CAUTION
• You must install an earth leakage breaker.
- ELCB (Earth Leakage Circuit Breaker)
- MCCB (Molded Case Circuit Breaker)
- ELB (Earth Leakage fuse breaker)
• Manufacturers are not responsible for fire caused by not installing ELCB or MCCB. • Install the cabinet panel near the outdoor unit for service convenience and emergency operation switch off. - You must install a circuit breaker that can prevent excess current and shut off the electric leakage on the outdoor unit.
Wiring work
Specification for circuit breaker and power supply cord
▶ Power supply cord is not supplied with air conditioner.
▶ Select the power supply cord in accordance with relevant local and national regulations. ▶ Wire size must comply with the applicable local and national code. The appliance shall be provided with a certified power supply cord and interconnection cord complying with the national regulations of the countries in which the appliance is to be sold. ▶ Power supply cords of parts of appliances for outdoor use shall not be lighter than polychloroprene sheathed flexible cord. (Code designation IEC : 60245 IEC 57 / CENELEC : H05RN-F)
| Model Voltage MCA | MFA Ssc value (MVA) | |||
| AM060TXMDEC 1phase, | 220~240 V, 50/60 Hz 32 A 40 A | (Note1) |
(Note1) Equipment complying with IEC 61000-3-12.
Tightening power terminal
▶ Connect the cables to the terminal board using the compressed ring terminal. ▶ Use rated cables only.
▶ Connect the cables with driver and wrench that can apply the rated torque to the screws. ▶ Make sure that appropriate tightening torque is applied for cable connection. If the terminal is loose, arc heat may occur and cause fire and if the terminal is connected too firmly, terminal may get damaged.
| Tightening torque (kgf·cm) | ||
| M4 12.0~ | 18.0 | Communication : F1, F23 phase AC power: 1(L), 2(N), L, N, L1(R), L2(S), L3(T), N |
| M5 20.0~ | 30.0 1 phase AC power : 1(L), 2(N), L, N | |
Selecting compressed ring terminal
▶ Select a compressed ring terminal of a connecting power cable based on nominal dimensions for cable. ▶ Cover a compressed ring terminal and a connector part of the power cable and then connect it.


| Nominal dimensions for cable (mm2) 4/6 10 16 25 35 50 70 | ||||||||||||
| Nominal dimensions for screw (mm) 4 | 8 | 8 | 8 | 8 | 8 | 8 | 8 | 8 | 8 | |||
| B | Standard dimension (mm) 9 | . 5 | 1 | 5 | 1 | 5 | 1 | 6 | 1 | 2 | 1 | 6 |
| Allowance (mm) ±0.2 ±0.2 ±0.2 ±0.3 ±0.3 ±0.4 | ||||||||||||
| D | Standard dimension (mm) | 5.6 | 7.1 | 9 | 11.5 | 13.3 | 13.5 | 17.5 | ||||
| Allowance (mm) | +0.3-0.2 | +0.3-0.2 | +0.3-0.2 | +0.5-0.2 | +0.5-0.2 | +0.5-0.2 | +0.5-0.4 | |||||
| d1 | Standard dimension (mm) | 3.4 | 4.5 | 5.8 | 7.7 | 9.4 | 11.4 | 13.3 | ||||
| Allowance (mm) ±0.2 ±0.2 ±0.2 ±0.2 ±0.2 ±0.3 ±0.4 | ||||||||||||
| E | Min. | 6 | 7.9 | 9.5 | 11 | 12.5 | 17.5 | 18.5 | ||||
| F | Min. | 5 | 9 | 9 | 13 | 15 | 13 | 13 | 14 | 20 | ||
| L | Max. | 20 | 28.5 | 30 | 33 | 34 | 38 | 43 | 50 | 51 | ||
| d2 | Standard dimension (mm) | 4.3 | 8.4 | 8.4 | 8.4 | 8.4 | 8.4 | 8.4 | 8.4 | |||
| Allowance (mm) | +0.20 | +0.40 | +0.40 | +0.40 | +0.40 | +0.40 | +0.40 | +0.40 | ||||
| t | Min. | 0.9 | 1.15 | 1.45 | 1.7 | 1.8 | 1.8 | 2.0 | ||||
Wiring work
Installing grounding wire
▶ Grounding must be done by a qualified installer for your safety.
▶ Use the grounding wire by referring to the specification of the electric cable of the outdoor unit.
Grounding the power cable
The standard of grounding may vary according to the rated voltage and installation place of the air conditioner.
▶ Ground the power cable according to the following.
| Installation placePower condition | High humidity Average humidity Low humidity | |
| Voltage of lower than 150V | Perform the grounding work3. Note 1) Perform the grounding work 3 if possible for your safety. Note 2) | |
| Voltage of higher than 150V | Must perform the grounding work 3. Note 1)(In case of installing circuit breaker as well) |
NOTE
1. Grounding work 3
- Grounding must be done by your installation specialist. - Check if the grounding resistance is lower than 100Ω. When installing a circuit breaker that can cut the electric circuit within 0.5 second in case of a short circuit, the allowable grounding resistance should be 30 500Ω.
2. Grounding at dry place
- The grounding resistance should be lower than 100Ω. (It should not be higher than 250Ω) - Use the rated grounding wire by referring to the specification of the electric cable of the outdoor unit.
Performing the grounding work
Use the grounding wire by referring to the specification of the electric cable for the outdoor unit.
| When using the terminal for grounding only When using grounding of the switch board | |
 |  |
Grounding work
If the power distribution circuit does not have a grounding or the grounding does not comply with specifications, a ground rod must be installed.
The corresponding accessories are not supplied with the air conditioner.
- Select a grounding rod that complies with the specifications given in the illustration.

- Select a proper place for the grounding rod installation.
- In damp hard soil rather than loose sandy or gravel soil that has a higher grounding resistance.
- Away from underground structures or facilities, such as gas pipes, water pipes, telephone lines and underground cables.
- At least two meters away from lightning (as in a storm) conductor.


- The grounding wire for the telephone line cannot be used to ground the air conditioner.
- Install a green/yellow coloured grounding wire:
- Refer to the 'Wiring work' for the specification of grounding wire.
- When the grounding wire is too short, extend the grounding wire but bind the connection part with insulation tape. (Do not bury the connection).
- Secure the grounding wire in position with staples.

- When the grounding rod is installed in a place where many people pass by, you must fix it firmly.
- Carefully check the installation, by measuring the grounding resistance with a ground resistance tester.
- If the resistance is above required level, drive the grounding rod deeper into the ground or increase the number of grounding rods.
- Connect the grounding wire to the electrical component box inside of the outdoor unit.
Setting outdoor unit option switch and key function
Setting outdoor unit option switches : A TYPE
▶ Setting outdoor install option
| Step Button Display Description Note | ||||
| Quantity of indoor units | ||||
| nd | Setting required | |||
| Step1 | Press (K1+K2) for 2 seconds | 00 | Ready to set - | |
| Step2 | K2 x n times | X0 | Tens digit (0 ~ 6) | Ex) 03 : 3 units10 : 10 units |
| K4 x n times | 0X | Ones digit (0 ~ 9) | ||
| *K4:Press for 2 seconds - automatic detection of indoor units' quantity | ||||
| Step3 | If it is heat recovery model, go to step 4.Otherwise, press K2 button for 2 seconds to save & exit.(system will be reset) | |||
![graph TD A["Start (Step 1)"] --> B["Quantity of indoor units (Step 2 ~ 3)"] B --> C{Heat Recovery?} C -->|No| D["Save (Step 8)"] C -->|Yes| E["Quantity of HR Changer/ MCUs (Step 4 ~ 5)"] E --> F["The setting of heat recovery system (Step 6 ~7)"] F --> D](/content/2026/05/959218/images/19a76de7d4b2f6c69e472bb53b50787839886943f934399dee443c9e953ad7c0.jpg)
Setting outdoor unit option switch and key function
Installing and setting the option with tact switch and explanation of the functions
Setting the option
- Press and hold K2 to enter the option setting. (Only available when the operation is stopped)
- If you enter the option setting, display will show the following. (If you have set the 'Emergency operation for compressor malfunction', 1 or 2 will be displayed on Seg 4.)

- Seg 1 and Seg 2 will display the number for the selected option. - Seg 3 and Seg 4 will display the number for the set value of the selected option.
- If you have entered option setting, you can briefly press the K1 switch to adjust the value of Seg 1 and Seg 2 and select the desired option.
Example)

- If you have selected the desired option, you can briefly press the K2 switch to adjust the value of Seg 3 and Seg 4 and change the function for the selected option.

- After selecting the function for options, press and hold the K2 switch for 2 seconds. The edited value of the option will be saved when the entire segments blink and tracking mode begins.

- The edited option will not be saved if you do not end the option setting as explained in the above instruction.
* While you are setting the option, you may press and hold the K1 button to reset the value to the previous setting. * If you want to restore the setting to factory default, press and hold the K4 button while you are in the option setting mode. - If you press and hold the K4 button, the setting will be restored to factory default, but it doesn't mean that the restored setting is saved. Press and hold the K2 button. When the segments show that tracking mode is in progress, the setting will be saved.
| Optional item | Input unit SEG1 | SEG2 | SEG3 SEG4 | Function of the option Remarks | ||||
| Unused option | M | a | i | n | 0 | 0 | 0 | Unused option Unused optic |
| Cooling capacity correction | Main 0 1 | 0 0 7-9 | Targeted evaporation temperature [°C].(When low temperature value is set, discharged air temperature of the indoor unit will decrease) | |||||
| 0 1 5-7 (Factory default) | ||||||||
| 0 2 9-11 | ||||||||
| 0 3 10-12 | ||||||||
| 0 4 11-13 | ||||||||
| 0 5 12-14 | ||||||||
| 0 6 13-15 | ||||||||
| Capacity correction for heating | Main 0 2 | 0 0 | 3.0 (Factory default) | 5 Targeted high pressure [MPa].6 (When low pressure7 value is set, discharged air8 temperature of the indoor gunit will decrease)1※ Unused by the cooling only models2 3 | ||||
| 0 | 1 | 2 | . | |||||
| 0 | 2 | 2 | . | |||||
| 0 | 3 | 2 | . | |||||
| 0 | 4 | 2 | . | |||||
| 0 | 5 | 2 | . | |||||
| 0 | 6 | 3 | . | |||||
| 0 | 7 | 3 | . | |||||
| 0 | 8 | 3 | . | |||||
| Current restriction rate | Main 0 3 | 0 0 100% (Factory default) | When restriction option is set, cooling and heating performance may decrease. | |||||
| 0 1 | 95 % | |||||||
| 0 2 | 90 % | |||||||
| 0 3 | 85 % | |||||||
| 0 4 | 80 % | |||||||
| 0 5 | 75 % | |||||||
| 0 6 | 70 % | |||||||
| 0 7 | 65 % | |||||||
| 0 8 | 60 % | |||||||
| 0 9 | 55 % | |||||||
| 1 0 | 50 % | |||||||
| 1 1 | No restriction | |||||||
| Oil collection interval | Main 0 4 | 0 0 | Factory default | |||||
| 0 1 | Shorten the interval by 1/2 | |||||||
| Temperature to trigger defrost operation | Main 0 5 | 0 0 | Factory default | |||||
| 0 | 1 | Apply setting when the product is being installed in humid area such as near river or lake | The defrost option shortens the starting time of the defrost operation※ Unused by the cooling only models | |||||
Setting outdoor unit option switch and key function
| Optional item | Input unit SEG1 | SEG2 | SEG3 | SEG4 | Function of the option Remarks | |||
| Fan speed correction for outdoor unit | Main 06 | 00 Factory default | ||||||
| 01 Increase fan speed | Increase the outdoor unit's fan speed to maximum value | |||||||
| Silent mode for night-time | Main 07 | 00 Disabled (Factory default) | ||||||
| 01 LEVEL 1 / Auto | Enables the silent mode for night-time in cooling mode. (It operates automatically depending on the temperature.) However, if the external contact interface module (MIM-B14) is used, entering the silent mode is available with contact signal in cooling and heating mode. | |||||||
| 02 LEVEL 2 / Auto | ||||||||
| 03 LEVEL 3 / Auto | ||||||||
| 04 LEVEL 1/ External contact | ||||||||
| 05 LEVEL 2/ External contact | ||||||||
| 06 LEVEL 3/ External contact | ||||||||
| High-head condition setting | Main 08 | 00 Disabled (Factory default) | ||||||
| 0 | 1 | Level 1 of height difference type 1 (indoor unit is lower than outdoor unit) | When outdoor unit is located 40~80m above the indoor unit | |||||
| 02 Not applicable | ||||||||
| 0 | 3 | Height difference type 2 (outdoor unit is lower than indoor unit) | When indoor unit is over 30m above the outdoor unit | |||||
| Long-pipng condition setting (Setting is unnecessary if high-head condition is set) | Main 09 | 00 Disabled (Factory Default) | ||||||
| 01 | LEVEL 1 | When equivalent length of farthest indoor unit from the outdoor unit is over 100m | ||||||
| 02 Not applicable | ||||||||
| Energy saving setting | Main 10 | 00 Disabled (Factory default) | ||||||
| 01 | Energy saving mode | Energy saving mode triggers when the room temperature reaches desired temperature while operating in heating mode. | ||||||
| 02 | Rapid cooling | This function increases cooling speed. | ||||||
| Unused option | Main | 1 | 1 | 0 | 0 | Unused option | Unused option by this model | |
| Unused option | Main | 1 | 2 | 0 | 0 | Unused option | Unused option by this model | |
| Optional item | Input unit SEG1 | SEG2 | SEG3 | SEG4 | Function of the | option Remarks | ||
| Channel address | Main 1 3 | A | U | Automatic setting (factory default) | Address for classifying the product from upper level controller(DMS,S-NET 3,etc.) | |||
| 0 - 15 | Manual setting for channel 0 - 15 | |||||||
| Snow accumulation prevention control | Main 1 4 | 0 0 Enabled | During snow accumulation , the fan may spin even when the unit is not in operation | |||||
| 0 | 1 | Disabled (Factory default) | ||||||
| Unused option | M | a | i | n | 1 | 5 0 0 | Unused option Unused opti | |
| Unused option | M | a | i | n | 1 | 6 0 0 | Unused option Unused opti | |
| Unused option | M | a | i | n | 1 | 7 0 0 | Unused option Unused opti | |
| Max. capacity restriction | Main 1 8 | 0 0 Enabled (Factory default) | Restrict excessive capacity increase when operating indoor units with small capacity | |||||
| 0 1 Disabled | ||||||||
| Gas leak pump down | Main 1 9 | 0 0 Disabled (Factory default) | If the gas leak occurred it should be entered in the pump down operation. | |||||
| 0 1 Enabled | ||||||||
| Unused option | M | a | i | n | 2 | 0 0 0 | Unused option Unused opti | |
| Unused option | M | a | i | n | 2 | 1 0 0 | Unused option Unused opti | |
| Emergency operation for indoor unit communication error | Main 2 2 | 0 0 Disabled (Factory default) | When set, emergency operation is possible even if an indoor communication error occurs. | |||||
| 0 | 1 | Indoor high humidity condition (operating for up to 12hours) | ||||||
| 0 | 2 | Indoor low humidity condition (operating for up to 24hours) | ||||||
| Base Heater | Main 2 3 | 0 0 Disabled | Set when Base Heater is installed. | |||||
| 0 1 Enabled | ||||||||
| Unused option | M | a | i | n | 2 | 4 0 0 | Unused option Unused opti | |
| Aux Heater's interworking control for cycle heating (cooling priority control) | Main 2 5 | 0 0 | Not applied | When using the Aux Heater, set the delay time for switching from cooling to heating.※ Unused by the cooling only models | ||||
| 0 | 1 | Switching delay to heating (30 mins.) | ||||||
| 0 | 2 | Switching delay to heating (15 mins.) | ||||||
| 0 | 3 | Switching delay to heating (10 mins.) | ||||||
| 0 | 4 | Switching delay to heating (5 mins.) | ||||||
| 0 5 | No switching delay | |||||||
| Auto Change Over | Main 2 6 | 0 0 | Not applied With | Thermo off for all running indoor units, change the operation mode.※ Unused by the cooling only models | ||||
| 0 1 | Applied | |||||||
* There is a risk of water leakage during emergency operation for indoor unit communication error. Please be careful when using it.
Setting outdoor unit option switch and key function
Setting key operation and checking the view mode with tact switch
| K1 Control KEY operation Display on segment | |
| Press and hold 1 time Auto trial operation “K” “K” “BLANK” “BLANK” |
| K1(Number of press) KEY operation Display on segment | |
| 1 time Unused option — | |
| 2 times Unused option — | |
| 3 times Unused option — | |
| 4 times Vacuuming “K” “4” “BLANK” “1” | |
| 5 times End Key operation — |
| K2(Number of press) KEY operation Display on segment | ||
| 1 time | Refrigerant charging in Cooling mode | “K”“5”“BLANK”“BLANK” |
| 2 times | Trial operation in Cooling mode | “K”“6”“BLANK”“BLANK” |
| 3 times Pump down in Cooling mode | “K”“7”“BLANK”“BLANK” | |
| 4 times | Automatic setting of operation mode (Cooling/Heating) for trial operation | “K”“8”“BLANK”“BLANK” |
| 5 times | Checking the amount of refrigerant | “K”“9”“X”“X” (Display of last two digits may differ depending on the progress) |
| 6 times | Discharge mode of DC link voltage | “K”“A”“BLANK”“BLANK” |
| 7 times Unused option | — | |
| 8 times | Forced oil collection “K” “C” “BLANK” “BLANK” | |
| 9 times | Inverter compressor check | “K”“D”“BLANK”“BLANK” |
| 10 times | End Key operation | — |
* Even when the outdoor unit power is off, it is dangerous to come in contact with the inverter PCB since it is charged with high DC voltage. * When replacing/repairing the PCB, cut off the power and wait until the DC voltage is discharged before replacing/repairing it. (Wait for more than 15 minutes to allow it to discharge naturally.) * When there was an error, the 'Discharge mode of DC link voltage' may not have been effective. Especially if error E464 has occurred, the power element might be damaged by fire and therefore, do not use the 'Discharge mode of DC link voltage'. * During "Discharge mode of DC link voltage", the voltage of INV will be displayed.
| K3(Number of press) KEY operation Display on segment | |
| 1 time Initialize (Reset) setting Same as initial state |
| K4(Number of press) | KEY operation | Display on segment | |
| SEG 1 SEG2, 3, 4 | |||
| 1 time Outdoor unit model 1 | 6HP (AM060*XM*) → 0, 0, 6 | ||
| 2 times Order frequency of compressor 2 | 120 Hz → 1,2,0 | ||
| 3 times High pressure 3 | 1.52 MPa → 1, 5, 2 | ||
| 4 times Low pressure 4 | 0.43 MPa → 0, 4, 3 | ||
| 5 times Discharge temperature of compressor 5 | 188.6 °F(87 °C) → 0, 8, 7 | ||
| 6 times | IPM temperature of compressor | 6 | 188.6 °F(87 °C) → 0, 8, 7 |
| 7 times | CT sensor value of compressor | 7 | 2 A → 0, 2, 0 |
| 8 times | Suction temperature | 8 | -43.6 °F(-42 °C) → -, 4, 2 |
| 9 times | COND OUT temperature | 9 | -43.6 °F(-42 °C) → -, 4, 2 |
| 10 times | Liquid pipe temperature | A | -43.6 °F(-42 °C) → -, 4, 2 |
| 11 times | TOP temperature of compressor | B | 188.6 °F(87 °C) → 0, 8, 7 |
| 12 times | Outdoor temperature C | -43.6 °F(-42 °C) → -, 4, 2 | |
| 13 times | EVI inlet temperature | D | -43.6 °F(-42 °C) → -, 4, 2 |
| 14 times | EVI outlet temperature | E | -43.6 °F(-42 °C) → -, 4, 2 |
| 15 times | Main EEV step F | 2000 steps → 2, 0, 0 | |
| 16 times | EVI EEV step | G | 300 steps → 3, 0, 0 |
| 17 times | Fan step | H | 13 steps → 0, 1, 3 |
| 18 times | Current frequency of compressor | I | 120 Hz → 1,2,0 |
| 19 times | Master indoor unit address (Master indoor unit can be selected by wired remote-controller) | J | Master indoor unit not selected → BLANK, N, DIf indoor unit No.1 is selected as the master unit → 0, 0, 1 |
| 20 times | MCU Bypass EEV Step | K | 300 steps → 3, 0, 0 |
| K4 (Press and hold for 2 seconds to enter the setting) → K4 press (Number of press) | Displayed content | Display on segment | ||
| Page 1 | Page 2 | |||
| 1 time | Main version | MAIN | Ver. (ex) 1412) | |
| 2 times | Inverter version | INV1 | Ver. (ex) 1412) | |
| 3 times | EEP version | EEP | Ver. (ex) 1412) | |
| 4 times | Assigned address of the units | AUTO | SEG 1,2 | SEG 3,4 |
| Indoor unit: "A", "0" HR Changer/MCU Unit : "C", "1" | Address (ex) 07) | |||
| 5 times | Manually assigned address of the units | MANU | SEG 1,2 | SEG 3,4 |
| Indoor unit: "A", "0" | Address (ex) 15) | |||
Inspection and check operation

CAUTION
Precautions before check operation
- When the outdoor temperature is low, turn on the main power 3 hours before beginning the operation.
- If you start the operation immediately after turning on the main power, it may cause serious damage to the parts within the product.
- Do not touch the refrigerant pipe during or right after the operation.
- The refrigerant pipe may be hot or cold during or right after the operation depending on the status of the refrigerant flowing through the refrigerant pipe, compressor, and other parts of the refrigerant cycle. If you touch the refrigerant pipe during or right after the operation, you may get burns or frostbite.
- Do not operate the product with its panel or protection nets off.
- There is a risk of personal injury from rotating parts, heated parts, or high voltage.
- Do not turn off the main power immediately after stopping the operation.
- Wait for at least 5 minutes before turning off the main power. If not, water leakage or other problems may occur.
- Connect all the indoor units and the power supply for the outdoor unit and run auto or manual address setting. Run auto or manual address setting after changing the indoor unit PCB.
Inspection before check operation
- Check the power cable and communication cable of the indoor and outdoor units.
- Supply power to the outdoor unit 3 hours before check operation to pre-heat the crank case heater.
- Before supplying the power, use a voltmeter and phase tester to check the voltage and the phase.
- R, S, T terminals: check the 380 V ~ 415 V between wires (R-S, S-T, T-R) / 220 V ~ 240 V between wires (L-N).
- When the power is supplied, the outdoor unit will execute tracking to check the indoor unit connection and other options.
- Write down the installation report on the service history report paper attached on the front part of the control box.

CAUTION
• Supply power to the outdoor unit 3 hours before check operation to pre-heat the crank case heater.
6. Guaranteed range of check operation
For correct judgment, you must perform check operation in below indoor/outdoor temperature condition.

- Check operation selects and operates cooling/heating mode automatically.
- In the temperature range marked with slashed pattern, system protection control may trigger during operation. (It may be hard to judge the check operation correctly due to protection control operation.)
- When the temperature is outside of guaranteed range, accuracy of judgment on check operation may decrease near border line area.
Check operation
- Use KEY MODE to run check operation.
- When the check operation is not completed, UP (unprepared) will appear on the LED after the communication check and restrict compressor from operating. (UP Mode will be cleared automatically when check operation is completed.)
- Check operation may proceed from 30 minutes maximum 50 minutes depending on the operation status.
- During check operation, noise can be generated due to valve inspection. (Check the product if abnormal noise occurs continuously)
- When error occurs during check operation, check the error code and take appropriate measures.
- Refer to service manual if you need inspection or when other errors occur.
- When check operation ends, use S-NET pro or S-CHECKER to issue a result report.
- Refer to service manual for further actions if you have any items with "inspection required" sign on the result report.
- After taking appropriate measure for the items with "inspection needed" sign, run the check operation again.
- Check the following items by running (cooling/heating) trial operation.
- Check if cooling/heating operation performs normally.
- Individual indoor unit control: Check for air flow direction and fan speed.
- Check for abnormal operation noise from the indoor and outdoor unit.
- Check for proper draining from the indoor unit during cooling operation.
- Use S-NET pro to check the detail operation status.
- Explain to the user how to use the air conditioner according to the user's manual.
- Hand over the installation manual to the customer so they can keep it with them.
Charging refrigerant
The R-410A refrigerant is a blended refrigerant. Add only liquid refrigerant.
▶ Measure the quantity of the refrigerant according to the length of the liquid side pipe. Add the quantity of the refrigerant using a scale.
Charging refrigerant
▶ Open the manifold gauge valve connected to the liquid side service valve and add the liquid refrigerant. ▶ If you cannot add the whole quantity of the refrigerant while the outdoor unit is stopped, open the gas side and liquid side service valve. Then, add the remaining refrigerant by pressing the refrigerant adding button on the outdoor PCB.
![graph TD A["R-410A (Inject liquid refrigerant)"] --> B["Scale"] B --> C["Vacuum port"] C --> D["Manifold gage"] D --> E["Service valve"] E --> F["Liquid side"] F --> G["Outdoor unit"] G --> H["Gas side"] H --> I["Valve"] style A fill:#f9f,stroke:#333 style B fill:#ccf,stroke:#333 style C fill:#cfc,s…](/content/2026/05/959218/images/7d56a080495d202a25b07a782274c833f17c8a98dc2752339b2244dd30f4b7af.jpg)

Open the gas side and liquid side service valve completely after charging the refrigerant. (If you operate the air conditioner with the service valve closed, the important parts may be damaged.) • Put on safety equipment when charging refrigerant. - Do not charge the refrigerant when you adjust or control other products such as indoor units or EEV kits. - When the ambient temperature is low in winter, do not heat the refrigerant container to speed up the charging process. There is a risk of explosion. - Beware of the possibility of refrigerant leakage when you connect the manifold gauge to the charging port for heating. - Close the valve of the refrigerant container immediately after charging the refrigerant. If not, there might be a change in the entire amount of refrigerant.
Pump Down

- After installing the product, be sure to perform leak tests on the piping connections. After pumping down refrigerant to inspect or relocate the outdoor unit, be sure to stop the compressor and then remove the connected pipes. - Do not operate the compressor while a valve is open due to refrigerant leakage from a pipe or an unconnected or incorrectly connected pipe. Failure to do so may cause air to flow into the compressor and too high a pressure to develop inside the refrigerant circuit, leading to an explosion or product malfunction.
The object of pump down
You can reduce as much refrigerant leakage as possible during product movement or repair by collecting the refrigerant to the outdoor unit.
Caution for pump down procedure
The amount of refrigerant that can be put into an outdoor unit is limited due to the slim shape of the outdoor unit. Before performing pump down, most of the refrigerant should be put into an empty container at first. The maximum amount of refrigerant that can be put into the outdoor unit is 5kg. When the amount of system refrigerant exceeds the amount of maximum receptive capacity, compressor trip or damage by fire might be caused.
Pump down procedure
Before performing pump down, collect the refrigerant into the empty container. Turn off the manifold gage. Turn off the service valve of liquid pipe side. Press K2 button on the outdoor unit PCB three times is displayed on outdoor PCB LED. When the compressor starts operating, observe low pressure using manifold gage.
When the low pressure goes below 0kg/cm2 , g, turn off the service valve at gas side and finish the pump down operation. (To finish pump down operation, press K2 button one more time or press K3 button one time to be initiated.)

- When putting refrigerant into the refrigerant container, you must use the exclusive container that can be recharged. When remodeling normal refrigerant container illegally, explosion might occur.
Pump Down
How to put the refrigerant into the refrigerant container before pump down operation
* When the amount of refrigerant charged in the system exceeds maximum receptive capacity, collect the refrigerant into the refrigerant container at first and then perform the pump down.
Prepare the exclusive refrigerant container that can be recharged, scale, and manifold gage that can be recharged. Check the current amount of refrigerant within the system. After connecting the refrigerant container to an outdoor unit, operate 50 % of all indoor units as cooling mode. Check the pressure of high pressure side for manifold gage after 10 minutes from cooling operation. When the pressure of high pressure side is above 30 kg/cm2 , g decrease the number of operating indoor unit and make the pressure below 30 kg/cm2 , g. After checking that the pressure of high pressure side went below 30 kg/cm2 , g, open the manifold gage side valve(2) that is connected to the liquid pipe and refrigerant container valve. Then run the refrigerant from liquid pipe to refrigerant container. Check whether the proper amount of refrigerant are put into the container using a scale, turn off the valve and remove the manifold gage. The amount of refrigerant that can be put into the refrigerant container should be about 50% of all refrigerant of the whole system. Do not collect too much refrigerant in one refrigerant container.
![graph TD A["Refrigerant container valve"] --> B["R-410A"] B --> C["Scale"] C --> D["Valve(1)"] C --> E["Valve(2)"] D --> F["Manifold gage"] E --> F F --> G["Outdoor unit"] G --> H["Liquid side"] H --> I["Service valve"] I --> J["Ground"] style A fill:#f9f,stroke:#333 style B fill:#ccf,stroke:#333 st…](/content/2026/05/959218/images/e620d5643cc159ab5172492bc86a03ebdf74d9dc2134a3cb439e0b205de54f56.jpg)
Checking lists after finishing installation
Before supplying power, measure the power terminal (L, N) and outdoor unit grounding using an insulation-resistance tester.
- The measured value should be above 30 MΩ.

CAUTION
- You must not measure the communication terminal since the communication circuit may get damaged.
- Check the short circuit using a circuit tester.
| Installation | Outdoor unit | Have you secured air discharge profile at the bottom of service cover?Have you checked the external surface and the inside of the outdoor unit?Is there any possibility of short circuit due to the heat of an outdoor unit?Is the place well-ventilated and ensures space for service?Is the outdoor unit fixed securely? |
| Indoor unit | Have you checked the external surface and the inside of the indoor unit?Is the place well-ventilated and has enough space been allowed for service?Have you checked if the center of the indoor unit is ensured and it is installed horizontally? | |
| Refrigerant pipe work | Have you selected correct pipes?Are the liquid and gas valve open?Is the total number of connecting indoor units within the allowable range?Are the length and the height difference between the refrigerant pipes within the allowable range?Is the refrigerant Y-joint properly installed?Has the connection of liquid and gas pipes been correctly performed?Have you chosen correct insulation for pipes and have you insulated them correctly?Is the pipe or connection part properly insulated?Is the quantity of the additional refrigerant correctly weighed in? (You must record the amount of additional refrigerant charging on the service record paper placed outside the outdoor unit.) | |
| Installing the drain pipe | Have you checked whether the drain pipes of the indoor unit and outdoor unit are connected together?Have you completed the drain test?Is the drain pipe properly insulated? | |
| Wiring work | Are the power cable and communication cable tightened firmly on the terminal board within the range of rated tightening torque?Have you performed the earthing work 3 to the outdoor unit?Is 2-core cable used for the communication cable?Is the length of the wire is in the limited range?Is the wiring route correct? | |
| Setting ADDRESS | Are the ADDRESSES of the indoor and outdoor units properly set?Are the ADDRESSES of the remote controller properly set?(When using multiple remote controllers) | |
| Option | Have you checked whether the vibration-resistance frame is correctly installed if there is a possible vibration of the outdoor unit. | |
Trial operation
▶ Check the power supply between the outdoor unit and the cabinet panel.
- 1 phase power supply : L, N
- 3 phase power supply : R,S,T,N
▶ Check the indoor unit.
- Check whether you have connected the power and communication cables correctly. (The communication cables between an indoor unit and outdoor unit are F1, F2.)
- Check the thermistor sensor, drain pump/hose, and display are connected correctly.
▶ Check with Key mode or S-Net Pro.
- At first, operate all the indoor units with Key mode and operate the indoor units individually with S-Net Pro.
- In the beginning of operation, check the compressor operation sound. If there is a boom sound, stop the trial operation.
▶ Check the operation status of indoor and outdoor unit.
- Check whether the cooling operation is done correctly.
- Check the individual indoor unit control, wind velocity, and wind flow direction.
- Check whether you can hear abnormal sound from indoor unit and outdoor unit.
- Check whether the drainage is done correctly in cooling.
- Check S-net Pro for detailed operation.
Explain to the user the usage of the air conditioner by referring to the users manual.

CAUTION
• Turn on the outdoor unit 3 hours before the test operation to preheat the compressor.
- If the compressor is not preheated, 'CH' may appear on the outdoor unit PCB depending on the outdoor temperature.
Writing and keeping installation checking card
▶ Installation checking card is enclosed with the installation manual.
- Installer should fill out the front side of the card meticulously.
- Write basic information such as date of installation, name of an installer, contact information, supervision company etc.
- Write additional information such as the name of outdoor unit models, unusual, calculation of the additional amount of refrigerant etc.
- Write indoor unit related information such as indoor unit installation location, indoor unit model name etc.
▶ Keep the installation checking card in a designated place and do not lose it.

Installation checking card
Memo
ENGLISH
SAMSUNG
This product is RoHS compliant.



- CONTENTS
- (APPLICABLE IN COUNTRIES WITH SEPARATE COLLECTION SYSTEMS)
- SAFETY PRECAUTIONS
- WARNING
- GENERAL INFORMATION
- INSTALLING THE UNIT
- POWER SUPPLY LINE, FUSE OR CIRCUIT BREAKER
- OUTDOOR UNIT TYPE
- INSTALLATION COMBINATION
- ACCESSORIES
- DECIDING ON WHERE TO INSTALL THE OUTDOOR UNIT
- DECIDING WHERE TO INSTALL THE OUTDOOR UNIT
- INSTALLATION LOCATION
- WHEN INSTALLING 1 OUTDOOR UNIT
- WHEN INSTALLING MORE THAN 1 OUTDOOR UNIT
- MOVING THE OUTDOOR UNIT
- WHEN MOVING WITH A CRANE OR WIRE ROPE
- WHEN MOVING AN OUTDOOR UNIT WITH HANDS
- INSTALLATION AND BASE GROUND WORK FOR AN OUTDOOR UNIT
- BASE GROUND WORK
- REFRIGERANT PIPE INSTALLATION
- REFRIGERANT PIPE WORK
- SELECTING REFRIGERANT PIPE
- SELECTING Y-JOINT
- KEEPING REFRIGERANT PIPE
- REFRIGERANT PIPE BRAZING AND SAFETY INFORMATION
- IMPORTANT INFORMATION FOR REFRIGERANT PIPE WORK
- NITROGEN FLUSHING BRAZING
- DIRECTION OF THE PIPE WHEN BRAZING
- CUTTING OR FLARING THE PIPES
- TIGHTENING FLARE CONNECTION AREA
- CAUTION
- PIPE INSTALLATION FOR AN OUTDOOR UNIT
- PIPE DIRECTION
- CAUTION FOR USING KNOCK-OUT HOLE
- CAUTION FOR CONNECTING THE PIPE
- OUTDOOR UNIT REFRIGERANT PIPE CONNECTION
- REFRIGERANT PIPE INSTALLATION EXAMPLES
- ALLOWABLE LENGTH OF THE REFRIGERANT PIPE AND THE INSTALLATION EXAMPLES
- REFRIGERANT Y-JOINT INSTALLATION
- REFRIGERANT HEADER JOINT INSTALLATION
- PERFORMING AIR TIGHTENING TEST
- VACUUMING A PIPE AND AN INDOOR UNIT
- SELECTING ADDITIONAL REFRIGERANT CHARGING
- BASIC REFRIGERANT
- CHARGING ADDITIONAL REFRIGERANT
- THE AMOUNT OF ADDITIONAL REFRIGERANT DEPENDING ON THE PIPE SIZE
- THE AMOUNT OF ADDITIONAL REFRIGERANT FOR EACH INDOOR UNIT
- CONNECTING THE DRAIN HOSE TO THE OUTDOOR UNIT
- INSULATING REFRIGERANT PIPE OR Y-JOINT
- SELECTING THE INSULATION OF REFRIGERANT PIPE
- INSULATING REFRIGERANT PIPE
- INSULATING THE HEADER JOINT
- INSULATING THE Y-JOINT, LIQUID & GAS SIDE CONNECTING PIPE
- WIRING WORK
- OVERALL SYSTEM CONFIGURATION
- CONNECTION OF THE POWER CABLE (1 PHASE 2 WIRES)
- CONNECTION OF THE POWER CABLE (1 PHASE 2 WIRES USING EEV KIT)
- SPECIFICATION FOR CIRCUIT BREAKER AND POWER SUPPLY CORD
- TIGHTENING POWER TERMINAL
- SELECTING COMPRESSED RING TERMINAL
- INSTALLING GROUNDING WIRE
- GROUNDING THE POWER CABLE
- GROUNDING WORK
- GROUNDING AT DRY PLACE
- PERFORMING THE GROUNDING WORK
- SETTING OUTDOOR UNIT OPTION SWITCH AND KEY FUNCTION
- SETTING THE OPTION
- INSPECTION AND CHECK OPERATION
- PRECAUTIONS BEFORE CHECK OPERATION
- INSPECTION BEFORE CHECK OPERATION
- GUARANTEED RANGE OF CHECK OPERATION
- CHECK OPERATION
- CHARGING REFRIGERANT
- PUMP DOWN
- THE OBJECT OF PUMP DOWN
- CAUTION FOR PUMP DOWN PROCEDURE
- PUMP DOWN PROCEDURE
- HOW TO PUT THE REFRIGERANT INTO THE REFRIGERANT CONTAINER BEFORE PUMP DOWN OPERATION
- CHECKING LISTS AFTER FINISHING INSTALLATION
- TRIAL OPERATION
- WRITING AND KEEPING INSTALLATION CHECKING CARD
- MEMO
- SAMSUNG
Brand : SAMSUNG
Model : AM060TXMDEC
Category : Separator