
Bryant IOL598BK - Lighting Canarm - Free user manual and instructions
Find the device manual for free Bryant IOL598BK Canarm in PDF.


| Brand | Canarm |
| Model | Bryant IOL598BK |
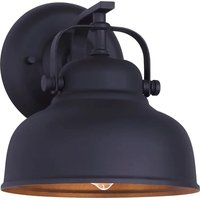
| Product Type | Outdoor Wall Light |
| Color | Black |
| Material | Die-cast aluminum, tempered glass |
| Dimensions (W x H x D) | 7.1 x 14.2 x 8.3 inches (180 x 360 x 210 mm) |
| Weight | 4.2 lbs (1.9 kg) |
| Light Source | Incandescent or LED (not included) |
| Socket Type | Medium base (E26) |
| Wattage | Max 60W per bulb |
| Voltage | 120V AC, 60Hz |
| Wet Location Listed | Yes, suitable for outdoor use |
| Installation Type | Wall mount, hardwired |
| Mounting Hardware Included | Yes |
| Weather Resistance | Rust-proof, UV-resistant finish |
| Safety Rating | ETL Listed |
| Warranty | 1 year limited |
| Cleaning Instructions | Wipe with damp cloth; do not use harsh chemicals |
| Bulb Compatibility | Dimmable with compatible bulbs and dimmer switch |
| Energy Efficient | Accepts LED bulbs for reduced energy consumption |
Frequently Asked Questions - Bryant IOL598BK Canarm
User questions about Bryant IOL598BK Canarm
0 question about this device. Answer the ones you know or ask your own.
Ask a new question about this device
Download the instructions for your Lighting in PDF format for free! Find your manual Bryant IOL598BK - Canarm and take your electronic device back in hand. On this page are published all the documents necessary for the use of your device. Bryant IOL598BK by Canarm.
USER MANUAL Bryant IOL598BK Canarm
Call or Email us first
Our service team is ready to answer your questions...
1-800-265-1833 (English) / 1-800-567-2513 (French)
IN CANADA - ressalescanada@canarmna.ca - IN USA - ressalesusa@canarmna.ca
Monday – Friday
8 AM - 5 PM E.S.T.

INSTRUCTIONS PERTAINING TO RISK OF FIRE OR INJURY TO PERSONS READ ALL INSTRUCTIONS
IMPORTANT SAFETY
INSTRUCTIONS
SAVE THESE INSTRUCTIONS
TOOLS AND MATERIALS REQUIRED:
Phillips
Screwdriver
Wire Cutters
SAFETY PRECAUTIONS:
- TURN OFF ELECTRICAL POWER BEFORE STARTING INSTALLATION OF LIGHT FIXTURE.
- WIRING SUPPLIES AS REQUIRED BY LOCAL ELECTRICAL CODE.
- THIS PRODUCT MUST BE INSTALLED IN ACCORDANCE WITH THE APPLICABLE INSTALLATION CODE BY A PERSON FAMILIAR WITH THE CONSTRUCTION AND OPERATION OF THE PRODUCT AND THE HAZARDS INVOLVED.
- TO CLEAN THE FIXTURE, TURN OFF THE POWER, WAIT FOR IT TO COOL, AND WIPE THE FIXTURE WITH A CLEAN, SOFT CLOTH.
NOTE: Product may not look exactly as shown in figures.
INSTALLATION:

Option 1
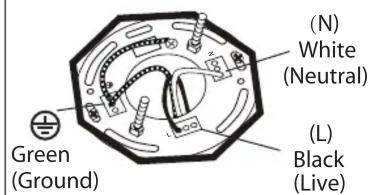
Option 2


-
Attach Easy Connect™ mounting bracket to electrical box with electrical box screws (not included).
-
Option 1: Connect (push) electrical wires from electric box (house wiring) into correct inserts.
Option 2: For multiple green (ground), black (live) and white (neutral) wires joined in the electrical box (house wiring), attach a single "green", "black" and "white" jumper wire before connecting. Strip 7mm from the 6" jumper wires supplied. Then connect (push) wires into the correct inserts.
- Connect (push) electrical wires from fixture into correct inserts.
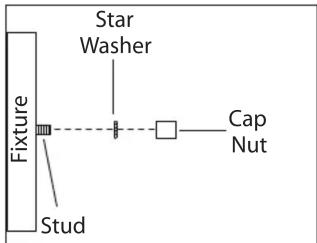

- Tuck electrical wires into electrical box and position fixture over studs on mounting bracket assembly. Secure fixture in place with star washers and cap nuts.
- Install specified bulb type and wattage (not included).
- Screw the glass shade on to the fixture. Ensure the glass is securely attached to the fixture.
- After installation, seal around the top and side perimeter between the fixture and the wall surface with weather resistant caulk. The bottom should be left un-caulked to prevent moisture build-up. Apply a small amount of weather resistant caulkaround the side perimeter between the cap nuts and mounting plate.
Brand : Canarm
Model : Bryant IOL598BK
Category : Lighting