
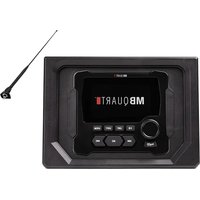
GMR7V1.2 - Radio MB QUART - Free user manual and instructions
Find the device manual for free GMR7V1.2 MB QUART in PDF.


| Product Type | 7-inch Waterproof Touchscreen Source Unit (Marine Radio) |
| Waterproof Rating | IPX67 (Dust and water resistant) |
| Display Size | 7 inches |
| Preamp Output Voltage | 4 volts |
| Built-in Amplifier Power | Not specified (assumed standard 4x50W RMS) |
| Frequency Range (FM) | 87.5 – 107.9 MHz |
| Frequency Range (AM) | 530 – 1710 kHz |
| Weather Band | NOAA NWR (7 preset frequencies) |
| Bluetooth | Yes (A2DP, AVRCP, Hands-free calling) |
| USB Ports | 2 USB inputs (1 for music, 1 for iPhone) |
| AUX Input | RCA stereo input (3.5mm adapter required) |
| Apple CarPlay | Wired and wireless |
| Android Auto | Wired and wireless |
| Zone Control | Dual zone with independent volume and EQ |
| Equalizer | 10-band graphic EQ (64, 150, 250, 500, 1K, 2K, 4K, 6K, 10K, 16K Hz) |
| Subwoofer Control | Independent level and low-pass filter (80/120/160 Hz/All Pass) |
| Camera Inputs | 2 camera inputs (trigger wires for reverse) |
| Video Output | RCA composite video output for external monitor |
| Power Supply | 12V DC (negative ground), 5A fuse |
| Mounting Dimensions | Approx. 6.50 x 8.25 inches (cutout template) |
| Supported Audio Formats | MP3, WMA, WAV, OGG, FLAC, APE, AAC, AC3, ATRA, DTS |
| Supported Video Formats | MKV, AVI, MOV, MP4, TS, ASF, FLV, PMP, RMVB, MPG, WMV (up to 1280x720) |
| Maintenance | Clean with soft dry cloth; avoid solvents |
| Safety | Disconnect battery before installation; use proper wiring; keep away from moisture |
| Spare Parts / Repairability | Contact authorized retailer or MB Quart; fuse replaceable (5A ATO) |
Frequently Asked Questions - GMR7V1.2 MB QUART
User questions about GMR7V1.2 MB QUART
0 question about this device. Answer the ones you know or ask your own.
Ask a new question about this device
Download the instructions for your Radio in PDF format for free! Find your manual GMR7V1.2 - MB QUART and take your electronic device back in hand. On this page are published all the documents necessary for the use of your device. GMR7V1.2 by MB QUART.
USER MANUAL GMR7V1.2 MB QUART
7" Waterproof Touchscreen Source Unit

Operator's Guide and Installation Instructions
Congratulations on choosing the GMR7V1 7" Waterproof Touchscreen Source Unit by MB Quart. For more detailed information about the product, please visit MBQuart.com.

CAUTION

Always consider consulting a professional audio installation technician before installing any mobile audio components. Be careful and take your time. Disconnect the power source (battery) before installing. Do not let wires make contact with metal edges, sources of moisture, or hot engine components.
Table of Contents
Specifications ....3
Installation....4
Wiring and Connections....5
Mounting Radio....7
Controls....8
Button Selectors and Volume Knob 8
HOME Touch Screen 9
Common Top Bar for Touch Screen Displays 10
Radio Touch Screen Display....10
USB1 / USB2 13
Aux In....16
Bluetooth® (BT) Mode 16
Carplay/Android Auto.... 20
Camera1 / Camera2....22
Settings 23
Language Options: 23
Audio Menu 23
Radio Area: 25
Display: 25
Wallpaper: 26
Time: 26
Camera: 27
Other: 27
LED Color: 28
Information: 28
Day/Night: 29
Reset: 30
Diagnostics & Troubleshooting....31
Supported Audio & Video Formats....32
©2024 Maxxsonics, LLC
MB Quart products are designed and engineered in the USA by
MAXXSONICS®
www.maxxsonics.com
7" Waterproof Touchscreen Source Unit
CarPlay/Android Auto, AM/FM, Weather Band Radio, USB, Bluetooth®, and AUX sources. Marine Certified to IPX67 for water and dust intrusion.
Auxiliary A/V Sources
Quick Connect Bluetooth Audio USB Audio Input w/Charging Auxiliary RCA Stereo Preamp Input Weather Band Radio Composite Video Camera Input Composite Video Output
AM / FM / Weather Band Section
USA Frequency: FM87.5 – 107.9MHz / AM530 – 1710kHz NOAA NWR Weather Band Frequency: Preset (162.400MHz, 162.425MHz, 162.450MHz, 162.475MHz, 162.500MHz, 162.525MHz, 162.550MHz)
USB / AUX / Bluetooth Audio Section
RCA S/N: >81.8dB BT S/N: >88.1dB
USB S/N: >84.6dB Frequency Response: 20Hz – 20KHz
Audio Section & Other Features
Preamp Output Voltage: 4 volts
Dual Zone Capability between Preamp Outputs and Built-in Power Independent Subwoofer Level Control with Selectable Low Pass Filter 10-Band Graphic EQ (64, 150, 250, 500, 1K, 2K, 4K, 6K, 10K, and 16K)
Installation
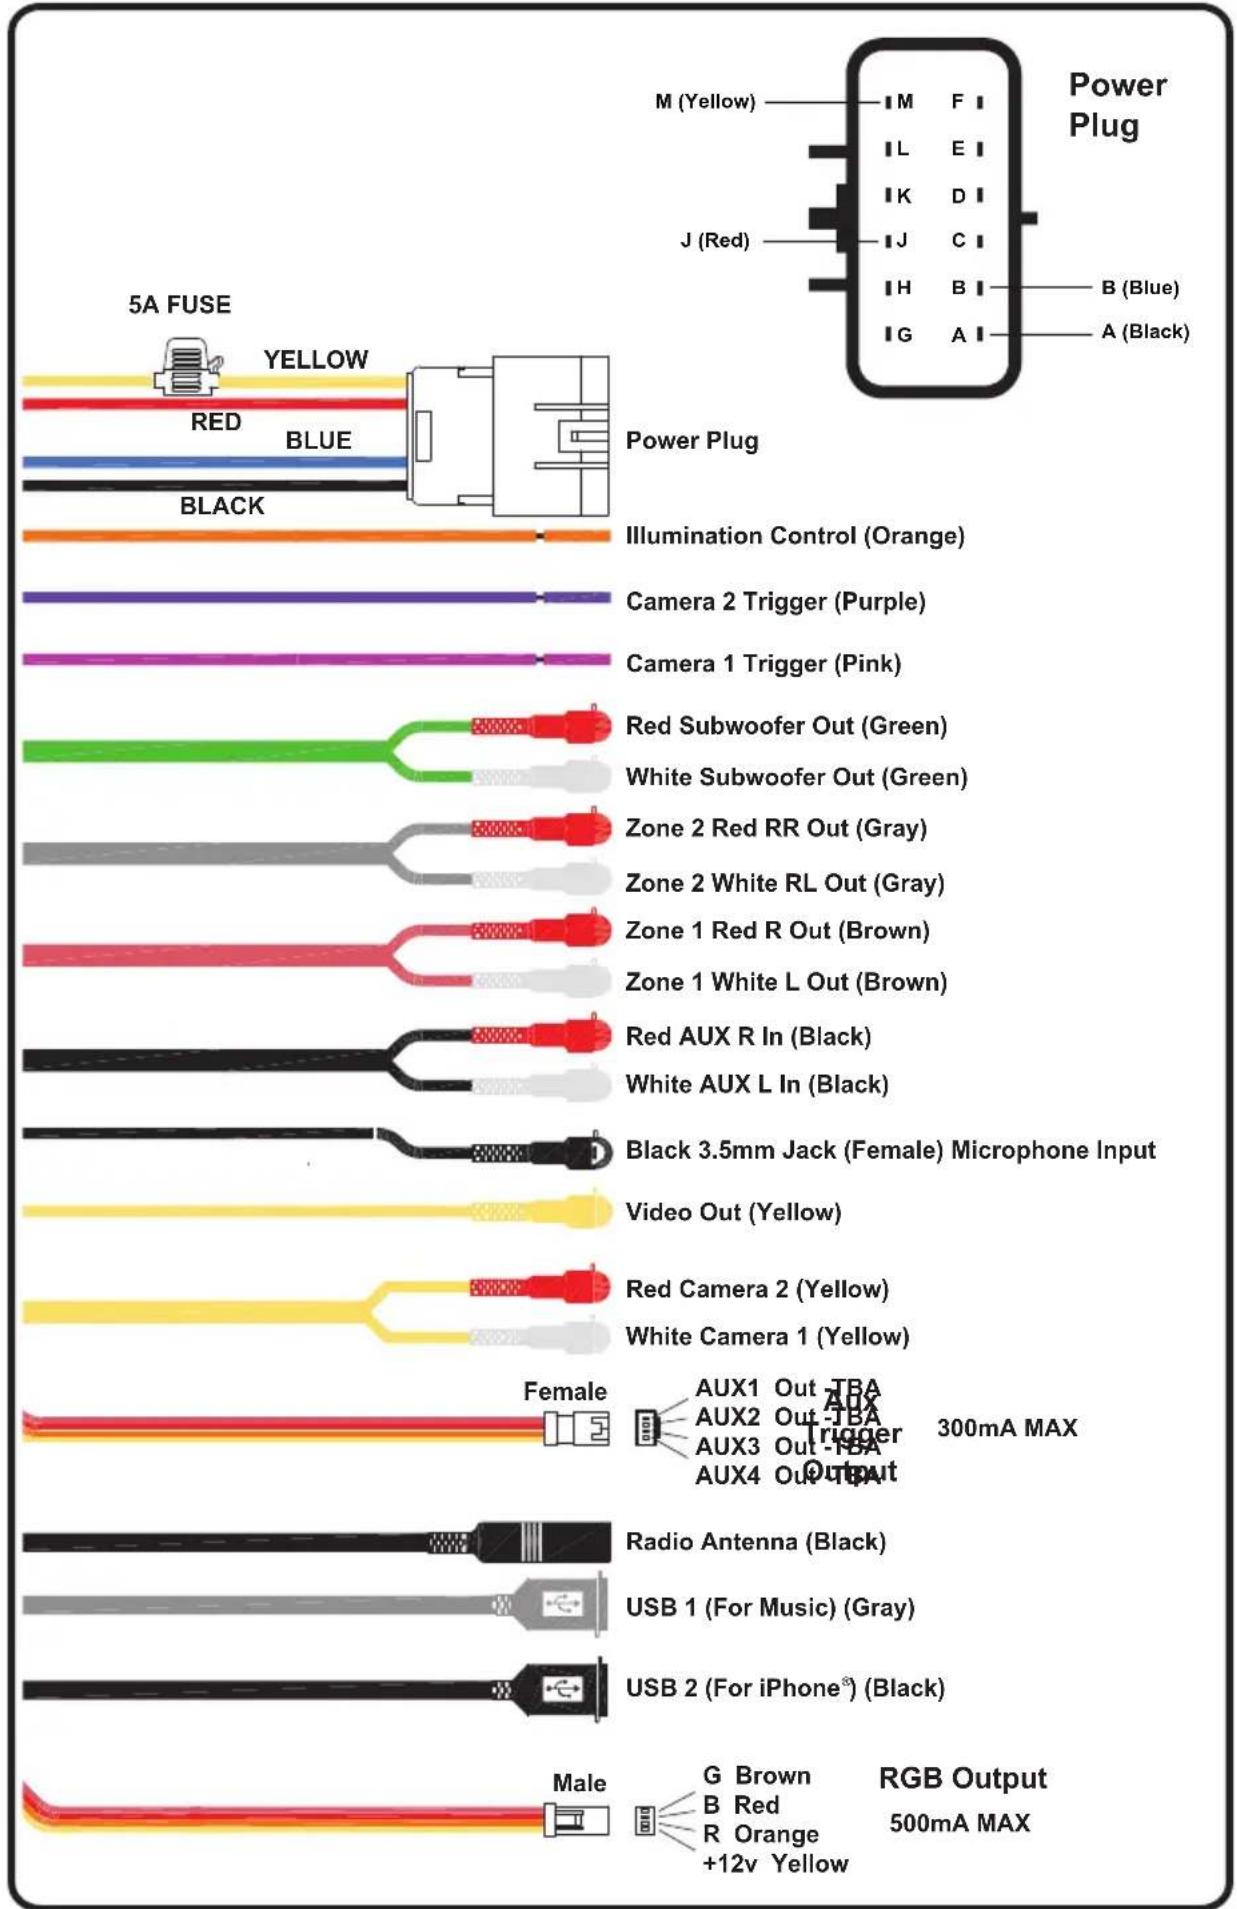
Wiring and Connections
- We recommend wire-to-wire connections such as power, ground, and speaker wiring are soldered and protected with either heat shrink tubing or high quality electrical tape.
- The main (yellow) power wire should be connected to a source with at least 10 amps of additional current capability to support the unit. This has an in-line 5 amp fuse for protection.
Wire Color/Tag Location Function
| Black Power Plug Pin | A Negative Chassis | Ground (-) |
| Blue Power Plug Pin B | Amp Turn-On (+12v Output) | |
| Red Power Plug Pin J | +12 volt Accessory | |
| Yellow Power Plug Pin | M +12 volt Constant | |
| Orange / ILL Harness | Illumination Control | |
| Purple / Cam 2 | Harness Camera 2 | Trigger |
| Pink / Cam 1 | Harness Camera 1 | Trigger |
| Green / Subwoofer | Harness Subwoofer | Output Female-RCA |
| Gray / Zone 2 | Harness Zone 2 Lineout | Female-RCA |
| Brown / Zone 1 | Harness Zone 1 Lineout | Female-RCA |
| Black / Aux | Harness Auxiliary Input | Female-RCA |
| Black / Mic | Harness 3.5mm Phone | Female Jack |
| Yellow / Video Out | Harness Video Output | |
| Yellow / Cam 2 / Red | Harness Camera 2 | Input Female-RCA |
| Yellow / Cam 1 / Wht | Harness Camera 1 | Input Female-RCA |
| * White/OrangeAux Trigger | Harness Aux 1 – Aux 4 | Trigger Output |
| Black / Antenna | Harness Radio Antenna Input | |
| Black / USB 1 | Harness USB Input for Music | |
| Black / USB 2 | Harness USB Input for iPhone | |
| ** White/Orange RGB | Harness RGB Output | |
* Refer to Page 25 for aux trigger functionality.
** Refer to Page 26 for RGB output functionality.
Preamp Level Audio Connections
- Zone 1, Zone 2, and Subwoofer RCA preamp outputs are labeled as such. These are intended to be connected to external amplifiers (not included).
- Subwoofer RCA outputs (green RCAs) are mono and paralleled. They are identical subwoofer audio signals. Their frequency range is controlled by the low pass crossover and the subwoofer level control. Both are found in SETTINGS (refer to Page 21). We recommend starting with 100Hz for the low pass crossover point.
- This unit offers zone control to balance the sound level between different zones. The zones are designated by the zone 1 & zone 2 RCA outputs (using external amplifiers). For example, if using in a boat, a passenger area can be designated as zone 1 and a wakeboard tower speaker could be designated as zone 2, allowing lower or muted volume in the passenger area zone 1 and more volume at the wakeboard speakers zone 2. Each zone can also be independently tuned to achieve the best sound output for different size or style speakers. Example, if the boat has 6.5in speakers connected to zone 1, the HPF may be set to 120Hz high pass to reduce distortion from low frequency reproduction and if zone 2 has 8in wakeboard tower speakers it can be adjusted to play a full range audio signal. (See page 21 for more information.) The volume knob will control both zones and the individual zone 1 & zone 2 buttons allow adjustment of each zone independently.(see page 8)
A full scale cutout template can be found at mbquart.com/product-manuals/
Please print the template out or use the provided dimensions shown below for easy installation.

radar
| Direction | Value (Inches) | | --------- | -------------- | | Top Left | 6.50 | | Bottom Right | 8.25 | | Middle Right | - | | Bottom Left | - | | Top Right | - | | Bottom Right | - |
Mounting Radio
-
Disconnect the Negative Battery terminal.
-
Cut mounting surface using the template.
-
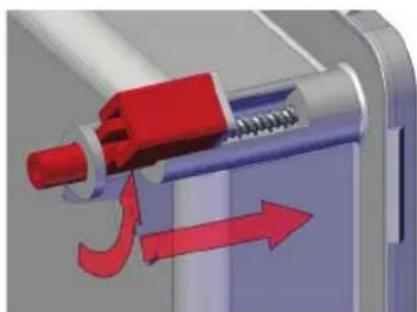
Test fit housing (E) into the cut out. Make sure mounting feet are turned into the notches.
-
If it fits good, assemble the radio (A) into housing (E) using the washers (F) and screws (G).
-
Insert assembled radio and housing into cut out.
-
Tighten the adjustable mounting feet screws until housing is secured in cut out. The mounting feet will turn into position as the screws are tightened.
-
Install housing trim (D), rubber seal (B), then outer trim (C) over the radio (A).

natural_image
3D illustration of a mechanical assembly with red directional arrows indicating motion (no text or symbols)Controls

Button Selectors and Volume Knob
1. SUB-:

Subwoofer volume decrease.
Quick press to adjust.
2. Zone 1 Mute and Volume Adjust:

Press, then use master volume knob (3) to independently adjust this zones volume.
3. Volume Knob:
Rotate to adjust volume.
Press and hold to turn unit On/Off.
4. Zone 2 Mute and Volume Adjust:

Press, then use master volume knob (3) to independently adjust this zones volume.
5. SUB + :

Subwoofer volume increase.
Quick press to adjust.

HOME Touch Screen
Pressing the Home Icon 📋 on any screen will return here.
- Radio:
Touch to listen to the AM/FM/WB. (Refer to page 11.)
- USB1/USB2
Touch to access your chosen USB music. (Refer to page 13.)
- Aux In:
Touch to gain access to the AUX input. (Refer to page 14.)
- Music / Phone Bluetooth:
Touch to gain access to your BT Audio or Phone. (Refer to page 19.)
- Settings:
Touch to gain access to your settings menu. (Refer to page 21.)
- Dimmer:
Touch to quickly dim or brighten the display.
- Carplay/Android Auto:
(Refer to page 20.)
- Camera1 / Camera2:
(Refer to page 22.)
- Unavailable:
If an item on the screen is not connected the Unavailable icon will appear briefly.

Common Top Bar for Touch Screen Displays
1. Home:
Pressing will take you back to home screen shown on page 9.
2. Clock:
Displays your current time. Can be set for 12 hr (AM/PM) or 24 hr. (Refer to settings page 24 for adjustment.)
3. EQ Shortcut:
Press to shortcut to your EQ adjustments. (Refer to settings page 22 for adjustment.)
4. Day/Night Mode:
Displays your current background mode and if pressed allows a quick change if Day/Night mode is disabled.
5. Battery Voltage (V):
Displays current battery voltage. (A warning will be displayed if the voltage gets too low.)

Radio Touch Screen Display
Here we cover the basic functions of your touch screen radio.
1. Seek Tuner Up:
Quick touch to increase radio frequency. Long touch to seek.
2. Tuner Search:
Touch to enable auto seek, the tuner will search for a frequency with good signal strength. When done, station will play and frequency will be stored in Preset 1.
3. Seek Tuner Down:
Quick touch to decrease radio frequency. Long touch to seek.
4. Radio Frequency Display:
This displays your current radio frequency.
5. Radio Presets:
Quickly touch to change the current frequency to your selected preset.
To save or overwrite a preset, adjust the frequency via the seek tuner up/down indicator until your desired station is achieved, then press and hold the desired preset location on one of the six available preset boxes.


Radio Touch Screen Display
Here we cover the more advanced functions of the AM/FM tuner.
1. Band:
Touch the band indicator and a selection box will display.
Touch the desired band to change between FM1-3, AM1-2, and WB (Weather Band - see below for preset selection).


other
| Category | Value | |---|---| | WB | 162.400 | | WB | 162.400 | | WB | 162.400 | | WB | 162.450 | | WB | 162.450 | | WB | 162.500 | | WB | 162.425 | | WB | 162.475 | | WB | 162.525 |2. PS (Program Scan):
Touch PS to listen the preset stations [1] to [6] FM1\~FM3 (or AM1/AM2) for few seconds. PS will be displayed in the station area during the scan.
3. Manual:
Touch to choose a manual frequency entry (use the key input to enter the station frequency).
4. ST/MO (Stereo/Mono):
Touch to choose STEREO or MONO output. Recommended to set to MONO for AM as AM radio signal is broadcast in mono. Recommended to set to STEREO for FM as FM radio signal is broadcast in stereo.
ST will be displayed only if in Stereo mode.

5. DX/LOC (Distant/Local):
DX (distant) or LOC (local) frequency handling. This function filters out weaker signals when ON to limit only strong stations in seek feature.
6. RDS (Radio Data System):
This enables FM radio stations to send additional information along with the regular program signal (touch to open selection pad).

AF (Alternative Frequencies list):
This provides the receiver with a list of frequencies that allows a receiver to
re-tune to a different frequency providing the same station when the first signal becomes too weak (e.g., when moving out of range).
TA (Traffic Announcement):
Refers to the broadcasting of a specific type of traffic report on the Radio Data System. It is generally used by motorists, to assist with route planning, and for the avoidance of traffic congestion.
PTY (Program Type):
Some stations put a digital encoding on the program type and you can scan for pre-defined program types like rock, news, jazz, etc. (When > is selected, you can scroll through a list of variety options.)
USB1 / USB2
Touch to access your chosen USB music.
The multimedia controller supports MP3, WMA, and WAV audio files with a USB thumb drive connected. Additionally, M4A or Apple Lossless file types are supported if the user connects an iPhone® using iTunes as the music player.

Most smartphones with a USB-based charging connector and USB thumb drives easily connect to the multimedia controller.
Many smartphones include album art through the phone's music player. Some USB thumb drive files may not include album art, only song information.
Music Files:
1. Folder Selector:
Touch to enter your USBs folder and search for a specific track (See 7 on following page).
2. Play/Pause:
Touch this to pause your music and touch again to resume play.
3. Play Mode Selector
Touch to change play mode from normal, to track repeat, album repeat or randomized.

A - Normal
B - Track repeat
C - Album/Folder repeat
D - Random


A
B C D


Controls


4. Track Back:
Quick touch to return to previous track.
5. Audio Progression Indicator:
Allows you to fast forward or rewind by sliding the progression dot.
6. Track Forward:
Quick touch to change to next track.
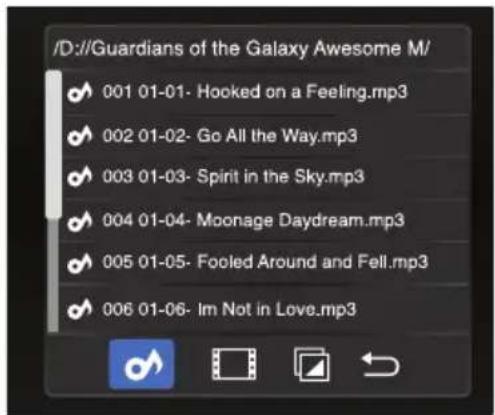
7. Folder Selector Screen:
A - Touch to show audio tracks list.
B - Touch to show the video list.
C - Touch to show the picture list.
D - Touch to return to playback page.
Video Files:
1. Previous Track:
Touch to play the previous track.
2. Play/Pause:
Touch this to pause and to resume play.
3. Next Track:
Touch to play the next track.
4. Multi-Field Selector:
Touch to show the multi-field information for
videos with multi-field information.
A B C D


Touch to show the video list. Then select the video track to play.
7. Next Screen
Touch to show the next selection screen area.

8. Repeat Selector:
Touch to change repeat mode: Repeat One/Repeat Directory/Repeat All.
9. Repeat A-B Selector:
Touch to select which tracks to repeat.
10.Brightness Selector:
Touch to adjust the brightness.
11. Previous Screen:
Touch to show the previous selection screen.
Image Files:
1. Previous Image:
Touch to show the previous image.
2. Play/Pause:
Touch this to pause and to resume play.
3. Next Image:
Touch to show the next image.

natural_image
Game interface with blue starry background and playback controls (no readable text or symbols)
4. Rotate Image:
Touch to rotate the current image.
5. Phantom Play:
6. Zoom In/Zoom Out:
Touch to zoom in on current image. Next screen allows movement selection of image area.
7. File List:
Touch to display the file list.
Aux In
The multimedia controller has right and left preamp level RCA connections for the Auxiliary Input. If a portable device with a headphone jack is used, a 3.5mm (male) to RCA (male) adapter cable is required and not included.
(For connector location refer to page 4.)
Bluetooth® (BT) Mode
The Bluetooth ^® connection is not available when Apple CarPlay or Android Auto is on.
The Bluetooth® function allows pairing cell phones & BT equipped media playback devices with the car audio system. Once
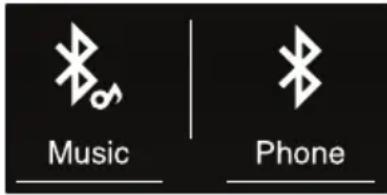
you pair a cell phone with the car audio system, you can make phone calls with the built-in hands-free function. You can access the list of dialed numbers and the phone book of the registered cell phone after selecting "Sync" option.
If the connected Bluetooth® device supports the functions like A2DP and AVRCP, you can play music via the car audio system and control playback. During a call, music playback is interrupted and resumes again after the call.
If a cell phone is paired via Bluetooth® and a call is received during playback, the source playback is interrupted and the call menu is displayed.
- Scan for "GMR7V1" in the Bluetooth list on the mobile device.
- Select "GMR7V1" and confirm that this code is shown on "GMR7V1". Do not enter this code on any accessory.
A "BLUETOOTH Loading" screen will appear briefly as the mobile device's song info and album art are transferred to the multimedia source unit.
The BT icon will be displayed when successful paired.
- If a PIN Code is Required:
Some Bluetooth devices require inputting a pass code for connection. Please input code "0000" and the connection will be made automatically.
• Automatically Connecting:
Once the multimedia controller has made a connection with the Bluetooth mobile device for the first time, the unit can then connect to the Bluetooth mobile device automatically within a valid range.
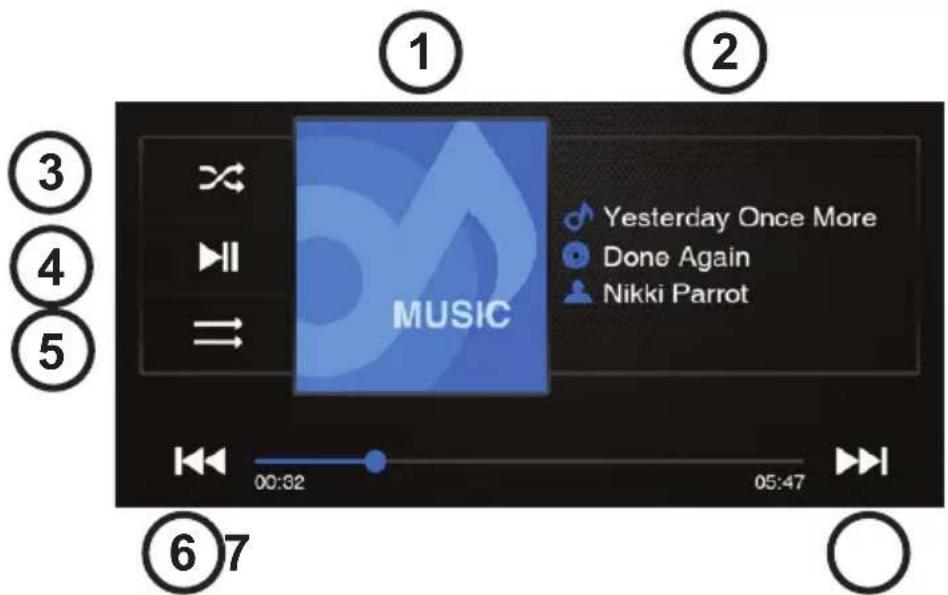
- Bluetooth Music:
- Album Art:
Shows album art or music note Icon.
- Info Screen:
Shows song title and artist information.
- Random Selector:
Touch to randomize playlist.
- Play/Pause:
Touch this to pause and again to resume play.
- Repeat Selector:
Touch to change repeat mode: Repeat One/Repeat All/Repeat Off.
- Previous Track:
Touch to play the previous track.
- Next Track:
Touch to play the next track.
- Manually Disconnecting:
To disconnect and allow another user to connect, use the mobile device to forget the "GMR7V1" connection entirely or turn off device bluetooth.

Controls

- Bluetooth Phone:
When the device is in range, the connection is established and the menu for the device is displayed.

1. Info Screen:
Shows name (if available) number and time on call.
2. Keypad Screen:
Use to enter phone number.
3. Call Selector:
Touch to dial entered phone number or number from contact list.
4. Phone Talk:
Touch for talking back to the phone.
5. End Call:
Touch to end or reject incoming call.
6. Keypad Selector:
Touch to enter phone number on keypad.
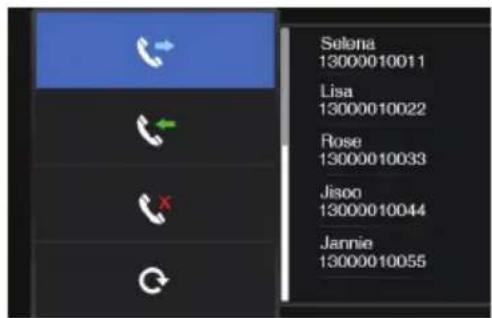
7. Phone Log Selector:
Touch to enter dialing log page for phone number.
A - Dialed out number list.
B - Incoming call list.
C - Missed call list.
D - Sync call records.
A
B
C
D
Continued on following page
Continued from previous page

8. Phone Book:
Touch to enter contact list for phone numbers.
Phone Book Sync: To be able to access the Phone Log/Phone Book of a connected mobile phone / device, you must allow sync phone book on your mobile phone. Car audio system support up to 1024 numbers.
Phone Log/Phone Book Download: Once device is paired with the car radio & sync option is selected the car radio begins downloading the phone log and phone book.
Apple CarPlay (Wired and Wireless)
Connection
- Connect iPhone to product USB1 port via lightning cable, the product screen will automatically show the CarPlay interface. User can operate the common functions of iPhone on the product. iPhone support: minimum iPhone5; Required iOS: minimum iOS 7.1.
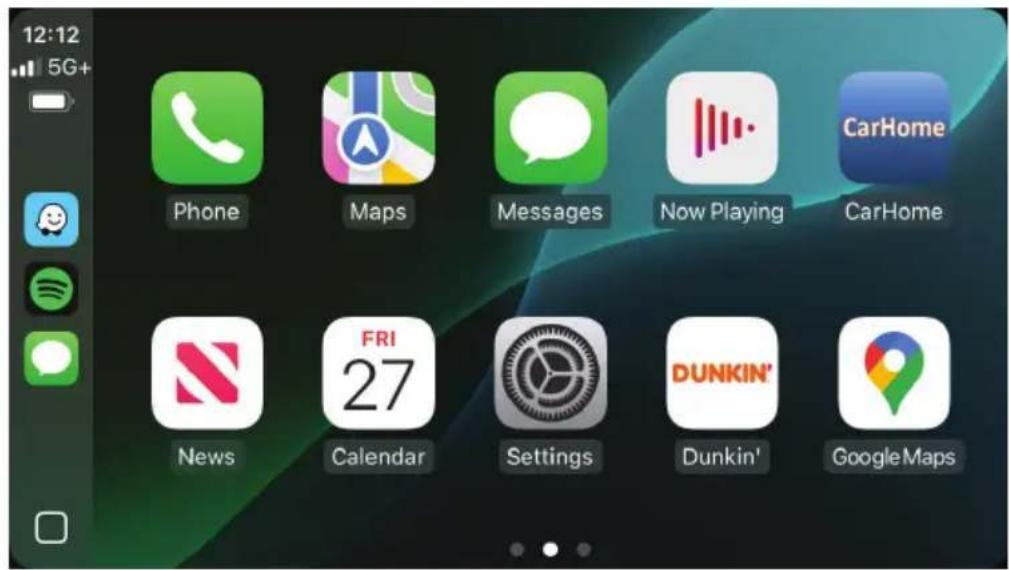
- Users can initiate a wireless CarPlay connection via Bluetooth pairing. Note that the CP Wifi in the other settings is set to on
Call Out / Receive Call
Touch the phone button on the main interface of CarPlay for Calling.
Play Music
Touch the music button on the main interface of CarPlay to play all of contents from iTunes.
Use Map
Touch the navigation button on the main interface of CarPlay to show the maps.
Siri
-
Touch and hold Apple Home key on the iPhone device for using Siri voice assistant, such as making a call, playing music, opening the map and other voice commands;
-
Control with "Hey, Siri".
Android Auto (Wired and Wireless)
Connection
- Connect Android Auto compatible phone to product USB1 port via standard USB cable. Drivers can enjoy music from their phone, show the way with Google map or other map App and make or receive a call. User need to enable Bluetooth on both phones and the product at the same time. Required Android OS:6.0.
(Android Auto App must be installed on the phone before connecting)
- Users can initiate a wireless Android Auto connection via Bluetooth pairing. Note that the AA Wifi in the other settings is set to on.

Controls
- Camera 1 Input
This device features a video input at the rear of the device for connecting a view camera that is available as an option (sold separately). If a view camera is connected, the image is displayed on the screen, when select camera 1 as the source.
When connect CAM 1 trigger wire to 12V power supply can to view camera 1
- Camera 2 Input
This device features a video input at the rear of the device for connecting a view camera that is available as an option (sold separately). If a view camera is connected, the image is displayed on the screen, when select camera 2 as the source.
When connect CAM 2 trigger wire to 12V power supply can to view camera 2


natural_image
Red off-road vehicle driving on a dirt road surrounded by dense green trees under a blue sky (no text or symbols visible)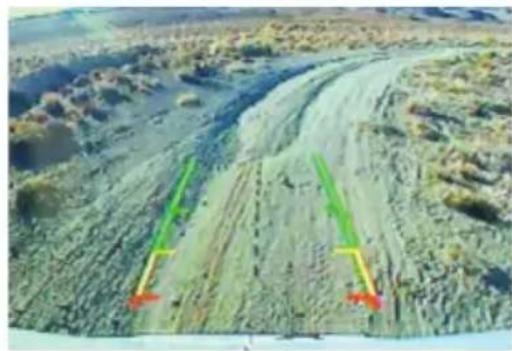
natural_image
Aerial view of a rugged, arid landscape with visible tire tracks and two colored measurement overlays (green and yellow) pointing to specific terrain features.Examples
- External Monitor
This device features a video out for connecting an external monitor for passengers in the rear seat (see Connection diagram at the end of these instructions).
Select the desired source via the main menu and start movie playback, e.g. from a USB.
The image is displayed on the rear monitor.
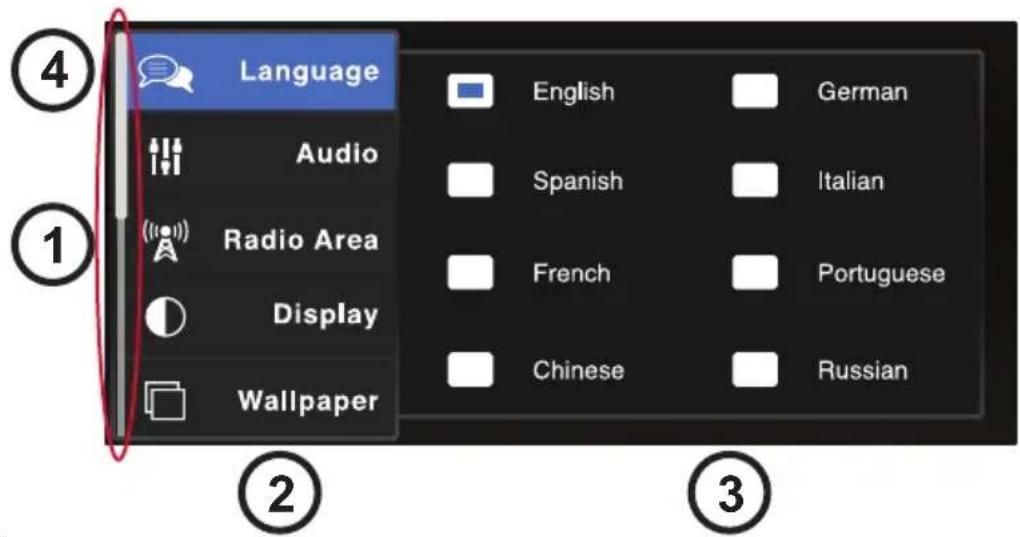
Settings
- Sliding Menu Indicator:
Indicates the position of the settings menu.
- Settings Menu:
Touch and hold from bottom to top to scroll the menu.
-
Setting Options Display Area.
-
Language Options:
Touch to select language shown in the settings options display area.
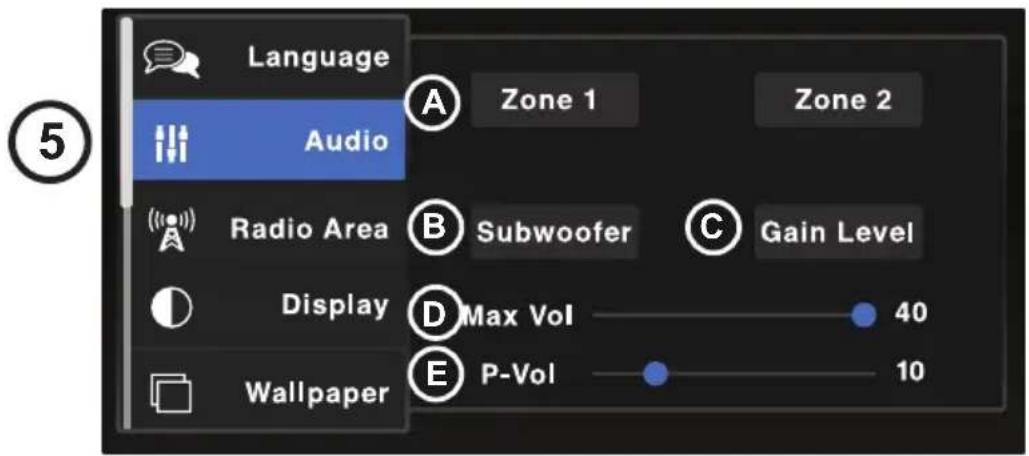
5. Audio Menu
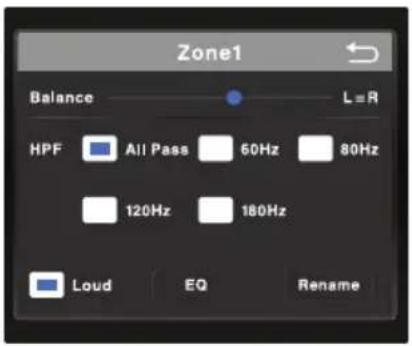
A - Zone 1 or Zone 2:
Touch to enter Zone adjustment menu.
Balance: Use slider to adjust Left and Right speaker sound.
HPF: Select the High Pass Filter (HPF) that you want to use to block out unwanted frequencies to the speakers.

* Zone 2 has same exact adjustments.
Continued on following page
Controls
Continued from previous page
Loud: Select to boost sound.
EQ (Graphic Equalizer):
Touch to take you directly to the EQ.
a - Preset Equalizer Options:
Touch to select (Flat / Pop / Classic / Rock / Jazz / User).

b - 10-Band Graphic Equalizer:
Use sliders to adjust the audio to personal preference.

bar
| Genre | Value | |---------|-------| | Flat | 6 | | Pop | 4 | | Classic | 3 | | Rock | 3 | | Jazz | 2 | | User | 2 | | 64 | 3 | | 150 | 3 | | 250 | 3 | | 500 | 2 | | 1K | 2 | | 2K | 2 | | 4K | 3 | | 8K | 3 | | 10K | 4 | | 16K | 6 |Rename:
Touch to open the rename screen. You can select between the Zone #, Front, Rear, Panel, Dash, or Custom.
Selecting Custom will bring up the keypad screen where you can enter a custom name up to 10 characters.
Select OK to set custom name.

B - Subwoofer:
Touch for subwoofer menu. Use slider to adjust Sub. Level volume.
Select the Low Pass Filter (LPF) that you want to use. (Refer to subwoofers manufacturers specification on proper settings.)


C - Gain Level:
Touch for gain level menu.
Use slider to adjust the gain for different inputs (USB / Radio / Bluetooth / Aux).

D - Max Vol: (refer to image on page 21)
Slide to adjust the maximum volume for the unit.

E - P-Vol: (refer to image on page 21)
Slide to adjust start up volume for the unit.


6. Radio Area:
Selectable radio region control, touch to select your local region.


7. Display:
Adjust brightness, contrast, saturation, and hue. Touch and slide to make personal adjustment. Touch Reset to revert to default settings.


8. Wallpaper:
Touch to make a background selection.
The background will be shown when the Day/Night Mode is turned off or when the radio is in Night Mode.


9. Time:
A - Adjust Clock:
Touch up/down arrows to adjust Year / Month / Day / Hour / Minute.
B - 12hr or 24hr Selection Format:
Select your preference.
C - CT Sync:
If the Clock Time or CT setting on your car stereo is set to ON, your device automatically displays the current time using Radio Data System (RDS) information.


10. Camera:
Select to adjust Camera 1 and Camera 2, to reverse image.


11. Other:
A - Beep:
Select to turn on/off audible button press sound.
B - Carplay:
Select to turn on/off Carplay.
C - Android Auto:
Select to turn on/off Android Auto.
D - Aux Out:
Touch to turn on and off aux outputs (Aux 1 – Aux 4).
Aux outputs are a negative output designed to trigger a standard automotive relay to power accessories such as light bars, dome lights, boat anchor lights, rock lights, or anything that can use a 12-volt switch to function (300mA Max).
Controls

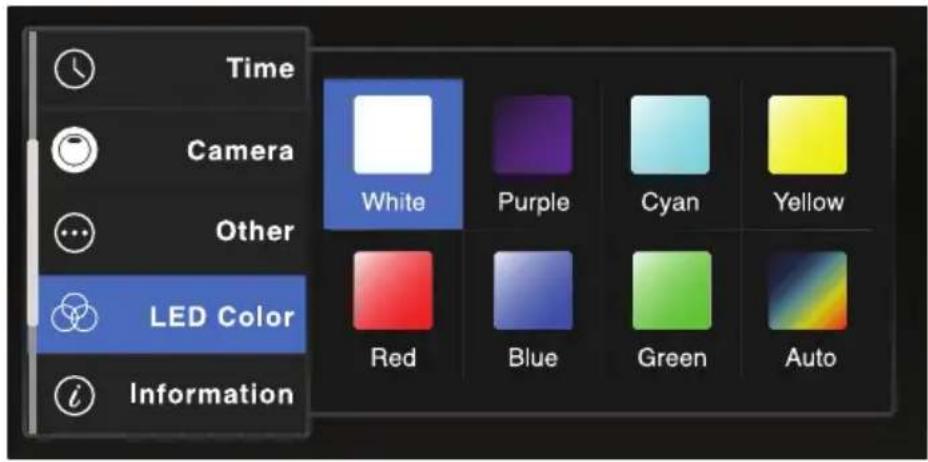
12. LED Color:
Built in RGB Controller for backlighting unit buttons and external RBG output. Touch to select color or to cycle color effect (Auto).

13. Information:
Shows the current firmware installed in the unit.


©
14. Day/Night:
This feature, when set, automatically changes the screen for dark background or chosen background, Night ZMode to white Day Mode screen background (see below for example).
A - Night Mode Start Time:
Touch up down arrows to adjust.
B - Night Mode End Time:
Touch up down arrows to adjust.
C - Day/Night On/Off Toggle:
Touch to turn Day/Night Mode On/Off.
If the selection shows as Off, the screen will stay in Night Mode with the dark background or optional background image.
If the selection shows as ON, use the selectors to adjust the Start Time and End Time for mode.

Example of Day Mode
Controls


15. Reset:
Touch to perform a factory reset.
Problem Cause Solution
| No power(Unit does not turn on) | Incorrect wiringFuse is blownWiring harness is not connected | Re-check wiringReplace fuseRe-check wiring harness connection |
| No sound(External amplifiers) | Amplifiers not connected to powerAmplifiers not turning on | Check amplifier power/ ground connectionsConnect blue remote turn on wire |
| No AM/FM reception | Antenna cable is not connectedThe signals are too weak | Insert the antenna cable securelySelect a station manually |
| AUX Input or RCA output distortion | Volume may be up too much on external device | Lower volume on external device until distortion goes away |
| External amplifiers have low signal input.Gain too high (hiss) | Zone control is turned down too far | Increase zone control level to provide more signal level to amplifiers |
| Bluetooth can't/won't connect | Mobile device has BT switched offMobile device is not discoverable | Enable the Bluetooth functionMake the device discoverable |
| USB thumb drive not reading | Music file is not MP3, WAV or WMA format | Convert music file format into MP3, WAV or WMA format |
| Camera does not display in reverse, only in camera source menu | Purple/white reverse trigger wire not powered | Power the purple/white wire on the back of the unit with +12v trigger |
Supported Audio & Video Formats
| Audio | ||||
| Audio format | Profile Max Bitrate Max Sample Rate | |||
| MP3 All 320kbps | 48000 | |||
| WMA Standard/Pro | 384kbps 48000 | |||
| OGG QI / QIO 500kbps | 48000 | |||
| FLAC Level 0 - Level 10 1.60Mbps | 48000 | |||
| APE 950kbps | 48000 | |||
| AAC | 448kbps | 48000 | ||
| AC3 | Ar3only | 132kbps | 48000 | |
| ATRA | 132kbps | 44100 | ||
| DTS | Dts only | 3.84Mbps | 48000 | |
| Video | ||||
| Video Format | Resolution | Video Decode | ||
| MKV | 1280x720 | M PEG4/XVID, DIVX4/DIVXS/M SMP EG4V3,M PEG2, RV1.0/RV2.Q/RVG2, RV 3.Q/RV 4.0/R | ||
| 720x480 | H 264/AVC | |||
| 640x480 | DIVX3 | |||
| AVI | 1280x720 | M PEG4/XVID, DIVX4/DIVXS/M SMP EG4V3,H 263, M JPEG | ||
| 720x480 | H264/AVC | |||
| 640x480 | DIVX3, | |||
| MOV/MP4 | 1280x720 | M PEG4/XVID, DIVX4/DIVXS/M SMP EG4V3,M PEG2, M PEG1, H 263, M JPEG | ||
| 720x480 | H 264/AVC | |||
| 640x480 | DIVX3 | |||
| TS 1280x720 | M PEG2 | |||
| 720x480 | H 264/AVC | |||
| AS F 1280x720 | M PEG4/XVID, DIVX4/DIVXS/M SMP EG4V3,MPEG2, MPEG 1, H263, MJPEG | |||
| 720x480 | H 264/AVC | |||
| 640x480 | DIVX3 | |||
| FLV | 1280x720 | H 263 | ||
| 720x480 | H 264/AVC | |||
| PMP | 1280x720 | M PEG4/XVID | ||
| 720x480 | H 264/AVC | |||
Supported Audio and Video Formats
| Video Format | Resolution | Video | Decode |
| RMVB 1280x720 | RV1.0/RV 2.0/RV G2, RV 3.0/RV4.0/RV8/RV 9 | ||
| MPGNOB 1280x720 | M PEG2, M | PEG1 | |
| WMV 1280x720 | M PEG4/XVID, | ||
| 720x480 DIV | VX4/DIVXS/M SMPEG4V3, MPE G2 | ||
NOTE: Video decoder does not support WMV1, WMV2, WMV3, VC1, VP6, M SMPEG-41 /2
| Photo | ||
| Photo format Max resolution Profile | ||
| JPEG Unlimited Baseline | ||
| BMP /PNG 2.SM pixels ALL | ||
| GIF 2.SM pixels 89a/87A | ||
FCC Notice
This equipment has been tested and found to comply with the limits for a Class B digital device, pursuant to Part 15 of the FCC Rules. These limits are designed to provide reasonable protection against harmful interference in a mobile installation. This equipment generates, uses, and can radiate radio frequency energy and if not installed and used in accordance with the instructions may cause harmful interference to radio communications. However, there is no guarantee that interference will not occur in a particular installation.
WARNING: Changes or modifications not expressly approved by the party responsible for compliance could void the user's authority to operate the equipment.
This equipment complied with FCC radiation exposure limits set forth for an uncontrolled environment. This equipment should be installed and operated with minimum distance 7.9 inches (20 cm) between the radiator and your body.



MBQuart.com
MUSIC DEFINED
WARRANTY
Maxxsonics, LLC. warrants this product, to the original consumer purchaser, to be free from defects in material and workmanship for a period of one (1) year from the date of purchase.
Maxxsonics, LLC. will, at its discretion, repair or replace defective products during the warranty period. Components that prove to be defective in materials and workmanship under proper installation and use must be returned to the original authorized Maxxsonics, LLC. retailer from where it was purchased. A photocopy of the original receipt must accompany the product being returned. The costs associated with removal, re-installation, and freight are not the responsibility of Maxxsonics, LLC. This warranty is limited to defective parts and specifically excludes any incidental or consequential damages connected therewith. Please visit the website to view the full warranty.
The Bluetooth® word mark and logos are registered trademarks owned by the Bluetooth SIG, Inc. and any use such marks by MB Quart is under license.
All product names, logos, and brands are property of their respective owners. All company, product, and service names used in this literature are for identification purposes only. Use of these names, logos, and brands does not imply endorsement.
©2024 Maxxsonics, LLC
MB Quart products are designed and engineered in the USA by:
MAXXSONICS®
www.maxxsonics.com
DIMENSIONS / TEMPLATE SHOWN BELOW FOR EASY INSTALLATION.

radar
| Dimension | Value | | ----------------- | --------- | | Height (6.50 inches) | 165 mm | | Height (8.25 inches) | 210 mm |
- CAUTION
- Table of Contents
- Specifications ....3
- Installation....4
- Controls....8
- Diagnostics & Troubleshooting....31
- Supported Audio & Video Formats....32
- 7" Waterproof Touchscreen Source Unit
- Auxiliary A/V Sources
- Wiring and Connections
- Preamp Level Audio Connections
- Mounting Radio
- Controls
- Button Selectors and Volume Knob
- SUB-:
- Zone 1 Mute and Volume Adjust:
- Volume Knob:
- Zone 2 Mute and Volume Adjust:
- SUB + :
- Common Top Bar for Touch Screen Displays
- Home:
- Clock:
- EQ Shortcut:
- Day/Night Mode:
- Battery Voltage (V):
- Radio Touch Screen Display
- Seek Tuner Up:
- Tuner Search:
- Seek Tuner Down:
- Radio Frequency Display:
- Radio Presets:
- Band:
- PS (Program Scan):
- Manual:
- ST/MO (Stereo/Mono):
- DX/LOC (Distant/Local):
- RDS (Radio Data System):
- USB1 / USB2
- Music Files:
- Folder Selector:
- Play/Pause:
- Play Mode Selector
- Track Back:
- Audio Progression Indicator:
- Track Forward:
- Folder Selector Screen:
- Video Files:
- Previous Track:
- Next Track:
- Multi-Field Selector:
- Next Screen
- Repeat Selector:
- Repeat A-B Selector:
- 10.Brightness Selector:
- Previous Screen:
- Image Files:
- Previous Image:
- Next Image:
- Rotate Image:
- Phantom Play:
- Zoom In/Zoom Out:
- File List:
- Aux In
- Bluetooth® (BT) Mode
- - If a PIN Code is Required:
- • Automatically Connecting:
- - Bluetooth Phone:
- Info Screen:
- Keypad Screen:
- Call Selector:
- Phone Talk:
- End Call:
- Keypad Selector:
- Phone Log Selector:
- Phone Book:
- Apple CarPlay (Wired and Wireless)
- Connection
- Call Out / Receive Call
- Play Music
- Use Map
- Siri
- Android Auto (Wired and Wireless)
- - Camera 1 Input
- - Camera 2 Input
- - External Monitor
- Settings
- Audio Menu
- EQ (Graphic Equalizer):
- a - Preset Equalizer Options:
- b - 10-Band Graphic Equalizer:
- Rename:
- B - Subwoofer:
- C - Gain Level:
- D - Max Vol: (refer to image on page 21)
- E - P-Vol: (refer to image on page 21)
- Radio Area:
- Display:
- Wallpaper:
- Time:
- Camera:
- Other:
- LED Color:
- Information:
- Day/Night:
- A - Night Mode Start Time:
- B - Night Mode End Time:
- C - Day/Night On/Off Toggle:
- Reset:
- Supported Audio & Video Formats
- Supported Audio and Video Formats
- FCC Notice
- MUSIC DEFINED
- WARRANTY
Brand : MB QUART
Model : GMR7V1.2
Category : Radio