
Adapt SpaceSaving - Chair Baby Trend - Free user manual and instructions
Find the device manual for free Adapt SpaceSaving Baby Trend in PDF.


| Brand | Baby Trend |
| Model | Adapt SpaceSaving |
| Product Type | Booster Chair |
| Modes of Use | Infant booster (with tray), toddler booster (without tray) |
| Maximum Child Weight | 45 lb (20.41 kg) |
| Minimum Age | 6 months (child must sit upright unassisted) |
| Recommended Use Until | Child can get in and out without help (approx. 2.5 years) |
| Harness Type | 5-point harness with adjustable shoulder straps |
| Tray Features | Removable, 4-position adjustment, dishwasher-safe insert |
| Tray Insert Care | Dishwasher safe up to 160°F (71°C) |
| Seat Pad Care | Surface clean only; refer to care label; not machine washable |
| Harness Care | Not washable; spot clean only |
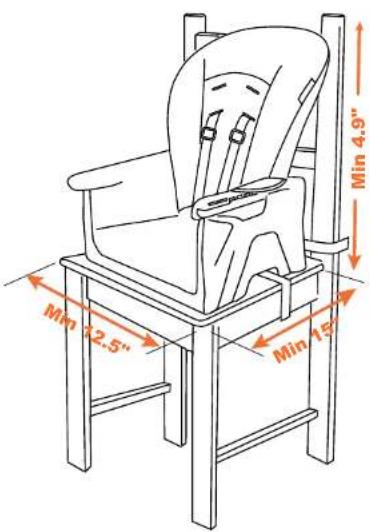
| Adult Chair Requirements | Minimum width 12.5 in, depth 15 in, backrest height 4.9 in; must have backrest, no armrests |
| Attachment System | Bottom and back straps that buckle around adult chair |
| Warranty | 1 year limited warranty against workmanship defects |
| Assembly Required | Yes (adult assembly) |
| Country of Origin | Designed in USA, manufactured in China |
Frequently Asked Questions - Adapt SpaceSaving Baby Trend
User questions about Adapt SpaceSaving Baby Trend
0 question about this device. Answer the ones you know or ask your own.
Ask a new question about this device
Download the instructions for your Chair in PDF format for free! Find your manual Adapt SpaceSaving - Baby Trend and take your electronic device back in hand. On this page are published all the documents necessary for the use of your device. Adapt SpaceSaving by Baby Trend.
USER MANUAL Adapt SpaceSaving Baby Trend
Adapt SpaceSaving Booster Chair

babytrend®
Quality • Comfort • Style
natural_image
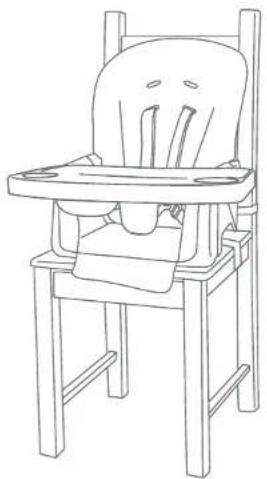
Line drawing of a baby's high chair with seat, tray, and armrest (no text or symbols)*Chair not included *Silla no incluida
Instruction Manual Manual de Instrucciones
HC12XXXXC
Baby Trend, Inc. 13048 Valley Blvd.
Fontana CA 92335
1-800-328-7363
(8:00 a.m. \~ 4:30 p.m. PST)
www.babytrend.com

babytrend®
Quality·Comfort·Style
babytrend
WARRANTY
DO NOT RETURN YOUR PRODUCT TO THE STORE. PLEASE CONTACT BABY TREND® FOR REPLACEMENT PARTS, SERVICE AND REPAIR.
The Baby Trend® warranty covers workmanship defects within 1 year of purchase. Any product which has been subjected to misuse, abuse, abnormal use, excessive wear and tear, improper assembly, negligence, environmental exposure, alteration or accident, or has had its serial number altered or removed invalidates all claims against the manufacturer. Any damage to property during installation is the sole responsibility of the end user.
Customer Service Department can be contacted at 1 (800) 328-7363 Monday through Friday between 8:00 a.m. and 4:30 p.m. (PST). Return Authorizations are required prior to returning product(s) to Baby Trend®. Please visit http://babytrend.com/pages/limited-warranty for complete warranty details.
GARANTIA
NO DEVUELVA SU PRODUCTO A LA TIENDA. POR FAVOR CONTACTE A BABY TREND® PARA PIEZAS DE REPUESTO, SERVICIO Y REPARACION.
Baby Trend, Inc. 13048 Valley Blvd. Fontana CA 92335
1-800-328-7363 • (8:00am \~ 4:30pm PST)
www.babytrend.com
MODES
PARTS
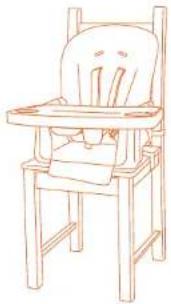
MODES OF USE
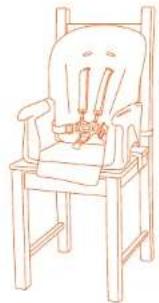
Infant Booster Seat Toddler Booster
On dining chair, with tray installed *only use with most upright position*
natural_image
Line drawing of a baby boom chair with seat and backrest (no text or symbols)On dining chair, without tray installed *only use with most upright position*
natural_image
Line drawing of a high chair with seatbelt and seatbelt (no text or symbols)Check that you have all the parts for this model before assembly.
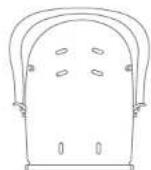
Seat Back Seat Pad
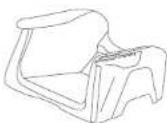
[Non-Text]
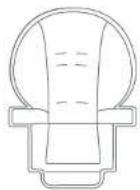
Seat Base Pins (2)
(in manual PE bag)
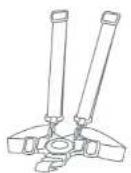
Harness Tray
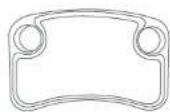
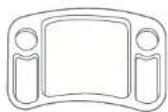
Tray Insert

WARNING

WARNING
WARNING: Failure to follow these warnings and the instructions could result in serious injury or death.
⚠ WARNING: Chicken have suffered head injuries, including skull fractures, after falling with or from booster seats, seats.
Check that booster seat is securely attached to adult chair before each use. chair before each use.
ALWAYS use restraints until child is able to get in and out of booster seat without help (about 2 1/2 years old). The child should be secured in the booster seat at all times by
the restraint system. Adjust to lift snugly the restraint system. Adjust to lift, not replace booster seat in any location in where there NEVER allow child to push away from table. NEVER allow child to push away from table. Never allow child to push away from table. NEVER allow child to push away from table. NEVER allow child to push away from table. NEVER allow child to push away from table. NEVER allow child to push away from table. NEVER allow child to push away from table. NEVER allow child to push away from table. NEVER allow child to push away from table. NEVER allow child to push away from table. NEVER allow child to push away from table. NEVER allow child to push away from table. NEVER allow child to push away from table. NEVER allows the seat.
STAY NEAR and watch your child during use.
ALWAYS check security of fit to adult chair before each use and limitation of the booster seat.
NEVER use this booster seat on a stool or bench that does not have a seat back.
Never use this booster seat on the floor. This booster seat can only be used on the adult chair.
Maximum child weight for the toddler booster is 45 lb, (20.41 kg).
WARNING: Prevent serious injury or death. Do not use in motor vehicles.
WARNING: The tray is not designed to hold the child in the chair.
A WARNING: It is recommended that the booster follow these warnings and seat be used in the upright position only by children capable, of sitting upright, unassisted.
Children have suffered head injuries. The booster seat should be used only by children at least 6 months of age.
WARNING: Always secure the booster on a chair using the bottom and back attachment straps. Never use this booster seat on a stool or bench that does not have a seat back.
⚠ STRANGULATION HAZARD:
Do not place booster seat in any location in where there are cords, such as a window blind cords, drapes, phone is cords the seat.
Other accessory items may change the balance of the booster seat and cause hazardous unstable conditions. NEVER allow your booster seat to be used as a toy. NEVER use this booster seat if there are any loose or missing fasteners, loose joints, broken parts, or torn mesh/fabric. Check before assembly and periodically during use. Contact Baby Trend Customer Service at 1-800-328-7363 for replacement parts, repair or instructions.
NEVER substitute parts.

WARNING

WARNING
ADULT CHAIR SIZE DIAGRAM:
Always follow the safe measurements below when using the booster seat on a chair, the booster seat on a chair.
Minimum adult chair size for Booster Seat : width: 12.5 inch, inch,
depth: 15 inch, backrest height: 4.9 inch depth: 15 inch, backrest height: 4.8 inch broken.
NEVER lift this booster seat with your child in it.
IMPORTANT! To ensure safe operation of your. To ensure booster seat, please follow these instructions carefully. Please keep these instructions for future reference.
IMPORTANT! Before assembly and each use, inspect this booster seat for damaged hardware, loose joints, missing parts or sharp edges. NEVER use if any parts are missing or broken.
IMPORTANT! Adult assembly is required.
ASSEMBLYASSEMBLY
TO ASSEMBLE SEAT
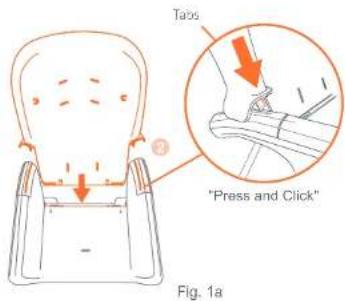
1) • Insert metal tabs (1) and (2) directly into the seat base slot until it secures into place. Ensure the backrest sits in the base correctly (Fig. 1a).
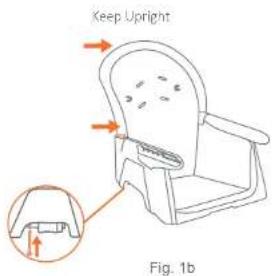
- Important Pin Set Up: The backrest must be in the most upright position before inserting the pins (Fig. 1b).
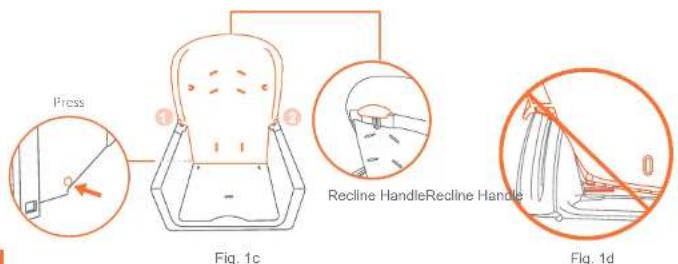
- Press Pins In: Ensure the seat parts latched together in the upright position. Insert the pin all the way into each side of the seat base and test the recline feature (Fig. 1c). CAUTION: DO NOT push pin into the base only. Must catch base and backrest (Fig. 1d).
Copyright © 2024. Baby Trend Inc., All Rights Reserved. Todos los derechos reservados.
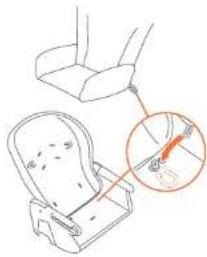
2) Loop the flap on the back of the pad over the top of the Seat Back. Connect the Seat Pad to the Seat Back with the two Elastic Loops. These fit over the Attachment Tabs located near the top harness slots (Fig. 2a).
- Attach the bottom of Seat Pad to the Seat Base with the two Elastic loops located at the rear of the bottom of the Seat Pad. These fit over the Attachment Tabs located on the underside of the Seat Base (Fig. 2b).
- Attach each anchor hook of the Seat Pad to the side of the seat armrest. Ensure that the slot of the anchor hook slides through the under side division (Fig. 2c).
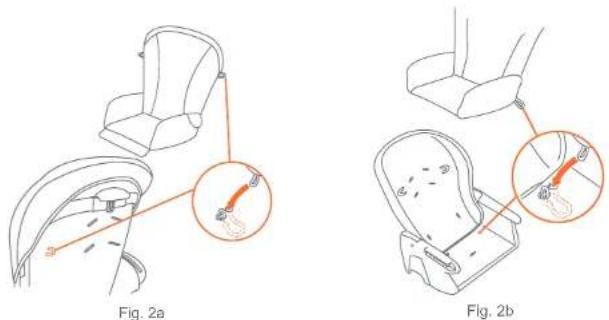
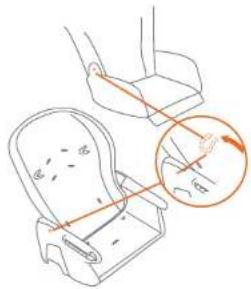
Fig. 2c
Copyright © 2024, Baby Trend Inc.. All Rights Reserved. Todos los derechos reservados.
ASSEMBLYASSEMBLY
BOOSTER SEAT ATTACHMENT
Always adjust the seat back to the most upright position before attaching.
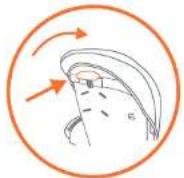
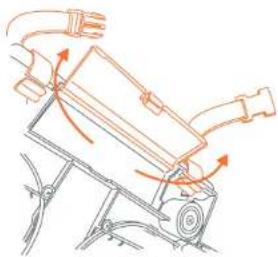
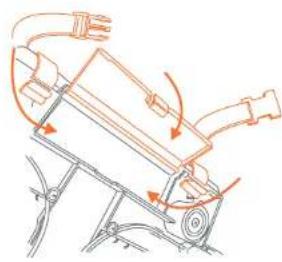
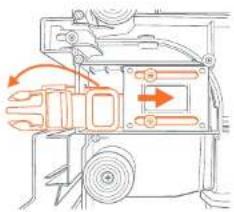
3) • To attach to the chair use the seat back straps located underneath the seat compartment (Fig. 3a).
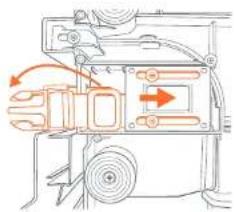
- Use the seat bottom straps located underneath the seat slot compartments (Fig. 3b).
- Set on chair with seat back and no armrests. Make sure there are not extra padding or cushions on the chair.
• (1) Wrap the back straps around the back of the chair. Buckle the straps making sure you hear the buckle "click" closed. (Fig. 3c).
• (2) Wrap bottom straps around the bottom of the chair. Buckle the straps making sure you hear buckle "click" closed (Fig. 3c).
natural_image
Diagram of a mechanical device with directional arrows indicating motion or force (no text or symbols)Fig. 3a
natural_image
Technical diagram of a mechanical device with directional arrows indicating motion or flow (no text or symbols)Fig. 3b
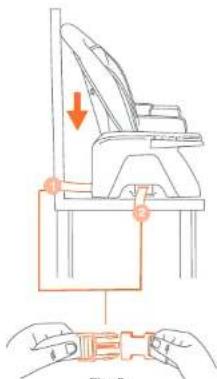
Fig. 3c
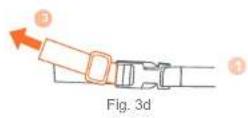
• (3) Tighten the Booster Seat onto the chair (Fig. 3d). • Check that the Booster is tightly installed by attempting to move the Booster Seat from side-to-side and up. The Booster Seat should not move more than 1 inch.
TO REMOVE BOOSTER SEAT FROM CHAIR
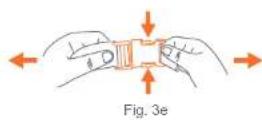
- Unbuckle all straps (Fig. 3e). Turn Booster Seat over and store straps away in each compartment (Fig. 3f). NOTE: Close each compartment.
natural_image
Diagram of a mechanical device with arrows indicating motion or force direction (no text or symbols)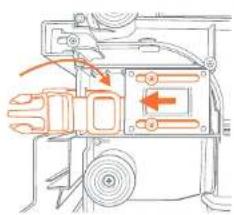
Fig. 3f
ASSEMBLYASSEMBLY
TO ATTACH TRAY
WARNING: The tray is not designed to hold the child in the chair. The child should be secured in the booster seat at all times by the 5-point restraining system. Stay near and watch child during use. Never leave child unattended, leave child unattended.
4) To attach the Tray, squeeze the release handle located underneath the tray, line up the grooves on the bottom of the tray parallel with the armrests of the booster chair, slide the tray onto the armrests and release the release handle. Check that the Tray is securely locked on the armrest (Fig. 4a).
- The Tray has a 4-position adjustment. To adjust the position, squeeze the Tray's release handle and reposition the tray to the desired position (Fig. 4b). Release the Tray's handle. Check that the Tray is securely locked in its new position.
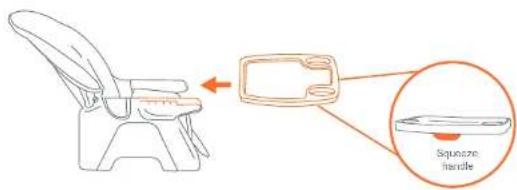
Fig. 4a
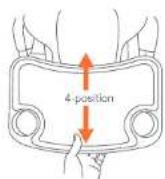
Tray Release located underneath tray
Fig. 4b
TO ATTACH TRAY INSERT
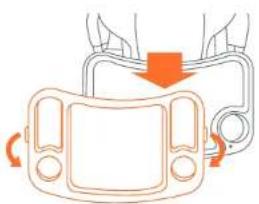
5) • The dishwasher safe food Tray Insert snaps onto the Booster seat Tray and is held in place by tabs on the sides of the Tray. When installing the Tray Insert make sure that it snaps into place to prevent the child from removing the Tray Insert. To remove Insert, unsnap the tabs from the Tray (Fig. 5).
natural_image
Diagram of a car interior with hands and a belt, showing motion arrows (no text or symbols)Fig. 5
SAFETYSAFETY
TO USE SAFETY BELT
WARNING: The booster seat should be used. The boost only by children capable of sitting upright unassisted one at least 6 months of age and at least 6 months of age.
WARNING: Prevent serious injury or death from falls or sliding out. Always use the restraint system. The child should be secured in the booster seat at all times by the 5-point restraining system. Times by the 5-point restraining system. TO REATTACH SEAT PAD NOTE: Certain Booster seat n
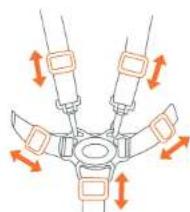
6) • 5-point harness: The shoulder straps of the 5-point harness have 2 attachment positions. Select the position that places the shoulder strap level with, or below, the top of the child's shoulders (Fig. 6a).
- Carefully place the child in the seat and position the safety harness around the child's waist and over the shoulders. Place the crotch strap between the child's legs. Insert the male end of each shoulder/waist belt into the buckle on the crotch strap. Tighten the harness to be snug around the child's waist and over the child's shoulders (Fig. 6b).
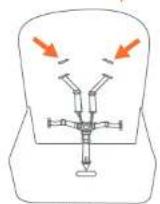
Fig. 6a
natural_image
Diagram of a mechanical assembly with four arms and directional arrows indicating motion (no text or symbols)Adjust for a snug fit
Fig. 6b
TO RELEASE SAFETY BELT
7) Push Button on Center Clasp, the two Harness Buckles will pop free (Fig. 7).
NOTE: Certain Booster seat models are packaged with the Booster seat Seat Pad and Seat Insert already attached to the Seat Back.
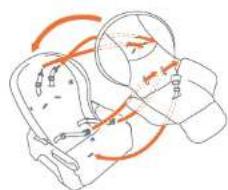
(8) • Thread non-buckle end of Harness Straps called Harness Attachment Tabs through the provided slots in the Seat Fabric, Seat Insert, Seat Back, and Seat Base (Fig. 8). When Harness Attachment Tabs are through the provided slots, rotate the Harness Attachment Tabs 90 degrees. Make sure that the straps are firmly in place.
9) • Revert to step 2 and follow steps (Fig. 2a to Fig. 2b).
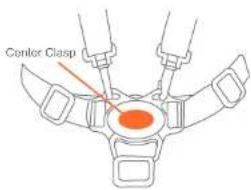
Fig. 7
natural_image
Diagram of two mechanical components with orange arrows indicating motion or force direction (no text or symbols)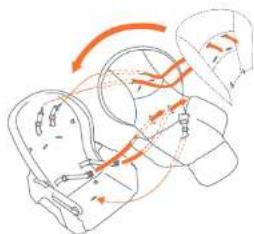
natural_image
Diagram of a mechanical assembly with arrows indicating motion or force direction (no text or symbols)With Insert
Fig. 8
PRODUCT CARE
MODOS
CARE AND MAINTENANCE
MODOS DE USO
⚠ WARNING: Harness Straps are NOT washable. Harness Straps are NOT washable.
Booster Chair/Tray: Use mild soap and wash with damp cloth. Please use only a soft bristle brush, sponge or cloth to clean the surface or remove particles of food. DO NOT submerge Booster seat and Tray in water. Surface clean only.
Dishwasher Safe Tray Insert:
The Tray Insert is dishwasher safe to 160° F (71° C). Do not use scouring pads on the Tray Insert as they will damage the surface and the Tray Insert will become more difficult to clean.
Seat Pad:
Please refer to the care label on individual soft good pieces for cleaning instructions.
To remove the seat pad:
Remove Harness Straps by pushing Harness Attachment Tabs through the Harness slots on the Seat Back, Seat Base and Seat Pad. Remove Elastic Loops from Attachment Tabs on Seat Base and Seat Back.
To attach the seat pad:
Carefully follow the instructions outlined in Step 6 on how to correctly re-thread the safety harness.
natural_image
Line drawing of a baby's high chair with seat and backrest (no text or symbols)natural_image
Line drawing of a wooden chair with a seat and armrest (no text or symbols)ADVERTENCIAPI
natural_image
Line drawing of a car seat assembly with a magnified inset showing the internal components (no text or symbols)Fig. 2a
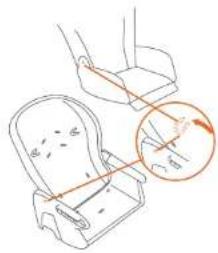
Fig. 2b
natural_image
Line drawing of a baby seat with an inset showing the angle of measurement (no text or symbols)Fig. 2c
Copyright © 2024. Baby Trend Inc., All Rights Reserved. Todos los derechos reservados.
natural_image
Diagram of a mechanical device with directional arrows indicating motion or force (no text or symbols)Fig. 3a
natural_image
Technical diagram of a mechanical device with internal components and directional arrows (no text or labels)Fig. 3b
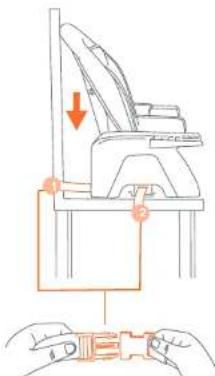
Fig. 3c
Copyright © 2024, Baby Trend Inc.. All Rights Reserved. Todos los derechos reservados.
MONTAJEMONTAJE
natural_image
Diagram of a mechanical device with arrows indicating motion or force direction (no text or symbols)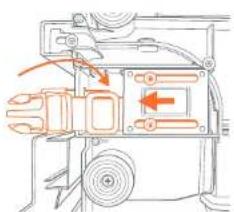
natural_image
Mechanical assembly diagram showing internal components with directional arrows (no text or labels)Fig. 3f
PARA SUJETAR LA BANDEJA
natural_image
Illustration of a car dashboard with hands and a belt, showing motion arrows (no text or symbols)Fig. 5
natural_image
Diagram of a vehicle seatbelt with directional arrows indicating movement (no text or symbols)natural_image
Diagram showing two figures in a gear-like environment with motion arrows indicating rotation (no text or symbols)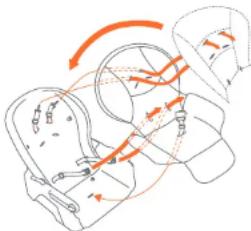
natural_image
Diagram of mechanical components with directional arrows indicating motion (no text or symbols)- babytrend
- WARRANTY
- GARANTIA
- MODES
- PARTS
- MODES OF USE
- Infant Booster Seat Toddler Booster
- WARNING
- ADULT CHAIR SIZE DIAGRAM:
- ASSEMBLYASSEMBLY
- TO ASSEMBLE SEAT
- BOOSTER SEAT ATTACHMENT
- TO REMOVE BOOSTER SEAT FROM CHAIR
- TO ATTACH TRAY
- TO ATTACH TRAY INSERT
- SAFETYSAFETY
- TO USE SAFETY BELT
- TO RELEASE SAFETY BELT
- PRODUCT CARE
- MODOS
- CARE AND MAINTENANCE
- MODOS DE USO
- ⚠ WARNING: Harness Straps are NOT washable. Harness Straps are NOT washable.
- Dishwasher Safe Tray Insert:
- Seat Pad:
- To remove the seat pad:
- To attach the seat pad:
- ADVERTENCIAPI
- MONTAJEMONTAJE
- PARA SUJETAR LA BANDEJA
Brand : Baby Trend
Model : Adapt SpaceSaving
Category : Chair