
Floodlight Wired - Lighting RING - Free user manual and instructions
Find the device manual for free Floodlight Wired RING in PDF.


| Product Type | Wired Floodlight Security Camera |
| Brand | Ring |
| Model | Floodlight Wired |
| Dimensions | 10.2 x 6.3 x 3.1 inches |
| Weight | 1.5 lbs |
| Power Source | Hardwired (120V AC) |
| Video Resolution | 1080p HD |
| Field of View | 240° horizontal, 140° vertical |
| Night Vision | Color night vision with LED floodlights |
| Motion Detection | Adjustable motion zones with customizable sensitivity |
| Two-Way Talk | Built-in microphone and speaker |
| Light Output | Up to 2000 lumens, adjustable brightness |
| Siren | Built-in 110 dB alarm |
| Connectivity | 2.4 GHz Wi-Fi (802.11 b/g/n) |
| Weather Resistance | IP65 rated, durable for outdoor use |
| Compatibility | Ring app (iOS/Android), Alexa, Works with Ring |
| Maintenance | Clean lens with soft dry cloth; check for debris |
| Security | End-to-end encryption, privacy zones |
| Spare Parts | Mounting bracket, screws, wire connectors (included) |
| Repairability | User-replaceable faceplate; professional installation recommended |
| General Info | Requires existing junction box; wired to house power |
Frequently Asked Questions - Floodlight Wired RING
User questions about Floodlight Wired RING
0 question about this device. Answer the ones you know or ask your own.
Ask a new question about this device
Download the instructions for your Lighting in PDF format for free! Find your manual Floodlight Wired - RING and take your electronic device back in hand. On this page are published all the documents necessary for the use of your device. Floodlight Wired by RING.
USER MANUAL Floodlight Wired RING
natural_image
Black and white photo of a ring-mounted smart device with two lenses (no text or symbols visible)Floodlight Wired
Smart Lighting
For your safety...

WARNING: Risk of electrical shock.
Disconnect power at the fuse or circuit breaker before installing.
Verify that the supply voltage is correct. Connect fixture to a 100 VAC\~240 VAC 50/60 Hz power source.
Properly ground fixture.
Always follow code standards when installing wired connections.
CAUTION: Risk of fire. Do not install near combustible or flammable surfaces.
NOTICE: Do not connect this light fixture to a dimmer switch or timer.
Floodlight Wired must be installed on a 4" round UL listed weatherproof electrical box.
This manual is for informational purposes only. Working with electricity can be dangerous unless proper safety precautions are taken. If you are not comfortable or are inexperienced with the processes and tools described in this manual, we recommend that you hire a licensed electrician.
1. Set up your Floodight.
Download the Ring app.
The app walks you through setting up and managing your Floodlight Wired.
Download it on your iOS or Android device.
ring
Set up your Ring Bridge.
The Bridge connects your Ring Smart Lights to the Ring app and other compatible Ring devices.
To set up your Bridge, follow the instructions in the Ring app or Bridge user manual.

natural_image
White electronic device with a small port and logo (no visible text or symbols)Before you begin.
Check out all the stuff in the box.
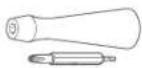
Screwdriver & Reversible Bit
Use to install the mounting hardware.

Foam Gasket
Attach this to the back of the Plastic Mounting Plate to keep water and debris out of your junction box.

Plastic Mounting Plate
Use this to attach to your junction box and secure your Floodlight Wired.
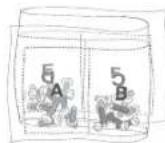
Bag o' Screws
Find the right ones to attach the mounting hardware to your junction box without running to the hardware store.

Metal Mounting Bracket
Screw this into your junction box to secure the Plastic Mounting Plate.

Wire Nuts (3)
Use these to connect your new Floodlight's wires to your existing wires.

Hook
Hang your Floodlight Wired to help make connecting the wires easier.

These instructions assume you're replacing an existing floodlight and/or have a junction box where Floodlight Wired can be mounted. If you don't have a junction box, then you'll need to hire an electrician to install one.
Shut power off at the breaker!
You'll be working with electrical wires during the install process. For safety's sake, shut off power to your floodlight at the circuit breaker.
If you don't know where your breaker is or how to turn off power to your floodlight circuit, consult with a licensed electrician.

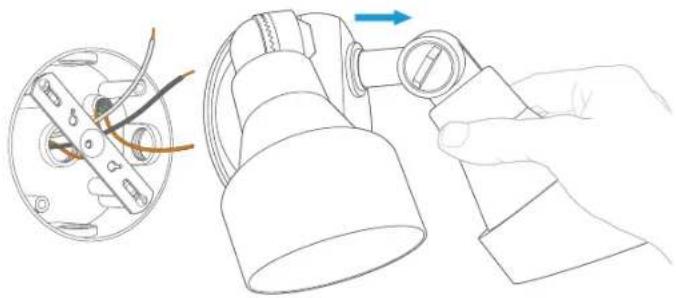
Remove your existing floodlight.
With power off at the breaker, remove your existing floodlight from the junction box it's attached to and disconnect the wires.
natural_image
Diagram showing a hand holding a flashlight next to a close-up of a mechanical component (no text or symbols present)
Floodlight Wired must be installed on a 4" round UL listed junction box. If you don't have an existing junction box, you'll need to hire a licensed electrician to install one. Be sure to comply with your local building codes.
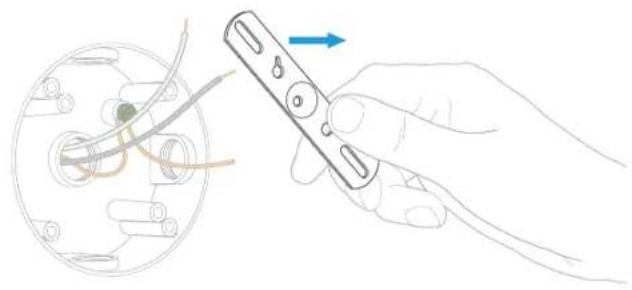
Remove the bracket.
If there is a metal bracket attached to your junction box, remove that as well.
Inspect your junction box to make sure water cannot get into it.
natural_image
Illustration of a hand holding a remote control device with cable and wiring, showing a close-up of internal components (no text or symbols)2. Install your Floodlight.
Secure the ground wire.
With power turned off at the breaker, attach the ground wire from your home to the ground screw inside the junction box.
The included metal mounting bracket has a hole marked "GND".
DO NOT attach the ground wire to the metal mounting bracket. Attach it to your junction box as shown here.

natural_image
Diagram of a mechanical or electrical component with wires and a central green component, no visible text or symbolsChoose your screws.
Select a set of screws from the bags marked "A" through "E" that fit your junction box to secure the metal mounting bracket. One size does not fit all here, so we sent several.
| Bag A Standard screws. These should fit most junction boxes. |
| Bags B & C Longer screws to reach the screw holes in recessed junction boxes. |
| Bags D & E Best for older boxes with smaller screw holes. |

We included a spare of all the screws and wire nuts just in case you drop one in the bushes (we did).
Attach the metal mounting bracket.
With the screws you selected in the previous step, secure the mounting bracket to your junction box using either pair of screw holes.
Be sure to align the bracket so that the "FRONT" text faces outwards.

natural_image
Hand holding a screwdriver inserted into a circular device with wires and connectors (no text or symbols visible)Attach the foam gasket.
Remove the tape from the foam gasket. Press the adhesive side firmly against the rear of the plastic mounting plate, making sure to align the center screw hole and wire slot on the foam gasket with the screw hole and wire slot on the plastic mounting plate.
Expose the wires.
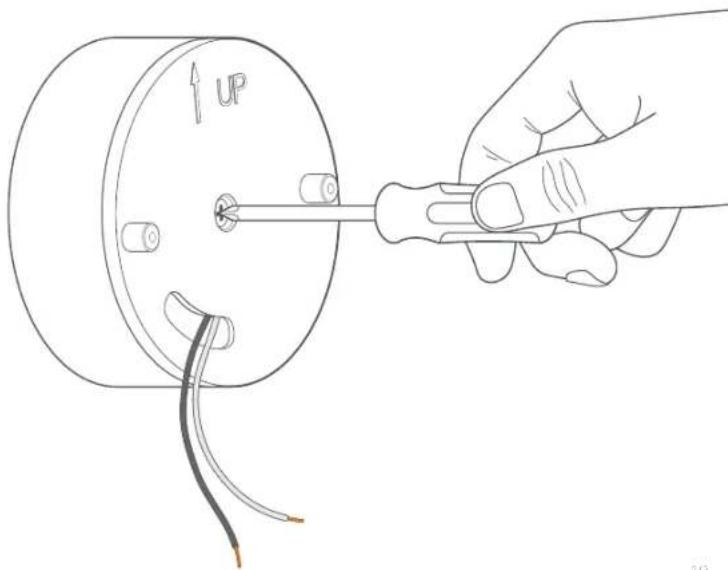
Before securing the plastic mounting plate to your junction box, guide the wires coming from your home through the slot in the bottom of the plate to access them during installation.

Secure the plastic mounting plate.
Center the plastic mounting plate over the metal mounting bracket and secure it through the center screw hole with one of the screws from the bag marked "F."
Ensure the "UP" arrow on the plastic mounting plate points upwards for wall mounting, and away from the direction you want your motion sensor and lights to point for eave and overhang mounting.
natural_image
Hand holding a screwdriver inserted into a cylindrical component with a curved wire, no text or symbols presentTo mount on an eave or overhang...
You'll have to rotate the motion sensor in order to optimize it for horizontal motion detection.
If you're mounting vertically on a wall, skip ahead to page 24.
Rotate the Motion Sensor.

Push the motion sensor to the right, then rotate it counter-clockwise 180^ .

The motion sensor will now be facing the light heads, and "ring" will be upside down.

You may need to hold the motion sensor's locking collar in place while rotating to keep it from unlocking.

natural_image
Diagram of a mechanical device with two circular components and a 180° rotation indicator (no text or symbols)A

natural_image
Line drawing of a mechanical device with three circular components and a central ring (no text or symbols)B
Complete installation.
Follow the rest of the instructions in this manual or the Ring app.
Once you've installed your Floodlight Wired should look like the image on the next page.
If you need a little extra help with eave or overhang mounting, visit: ring.com/help

natural_image
Technical line drawing of a mechanical assembly with three components (no text or symbols)Hang it up.
Use the provided hook to hang your Floodlight from the installed plastic mounting plate to make wiring easier.
Put one end of the hook into one of the mounting holes on your Floodlight, and the other into the slot on the plastic mounting plate.

Connect the power wires.
The white wire on your Floodlight is a neutral wire. Use a wire nut from the bag marked "G" to connect the white wire from your Floodlight to the white (or neutral) wire coming from your junction box.
The black wire on your Floodlight is a hot wire. Use another wire nut from the bag marked "G" to connect the black wire from your Floodlight to the black (or hot) wire from your junction box.

If you don't have clearly marked black and white wires coming out of your junction box, consult with a licensed electrician.

natural_image
Technical line drawing of a mechanical assembly with cylindrical components and connecting wires (no text or symbols)Mount your Floodlight.
Lift the Floodlight off of the hook, and remove the hook from the mounting plate. Push the wires through the slot in the plastic mounting plate and back into the junction box.
Slide your Floodlight over the posts on the mounting plate. Grab a couple of screws from the bag marked "H" and use them to mount your Floodlight.
Once your Floodlight is mounted, apply a weatherproof silicone caulk or sealant (not included) around the outside where the Floodlight housing and junction box meet to prevent water from collecting inside the junction box.

Switch power back on.
You're all set! Feel free to turn the power back on at the breaker.
Your Floodlight will flash twice (and you may hear a "click") to let you know it's in Setup Mode.
Set up your Floodlight Wired in the Ring app.
In the app, tap Set Up a Device.
When prompted, select Smart Lighting and follow the in-app instructions.
For additional help, visit: ring.com/help Or give us a call...
US 1 800 656 1918
Canada 1 855 300 7289
Worldwide +1 310 929 7085
For a list of all our customer support numbers, visit: ring.com/callus
To review your warranty coverage, please visit www.ring.com/warranty.
Patents: www.ring.com/patents
© 2019 Ring LLC or its affiliates.
Ring, Alexa, Always Home, and all related logos are trademarks of Amazon.com, Inc. or its affiliates.
Last updated: 03/13/19


- Floodlight Wired
- Smart Lighting
- For your safety...
- Set up your Floodight.
- Download the Ring app.
- Set up your Ring Bridge.
- Before you begin.
- Shut power off at the breaker!
- Remove your existing floodlight.
- Remove the bracket.
- Install your Floodlight.
- Secure the ground wire.
- Choose your screws.
- Attach the metal mounting bracket.
- Attach the foam gasket.
- Expose the wires.
- Secure the plastic mounting plate.
- To mount on an eave or overhang...
- Rotate the Motion Sensor.
- Complete installation.
- Hang it up.
- Connect the power wires.
- Mount your Floodlight.
- Switch power back on.
- Set up your Floodlight Wired in the Ring app.
Brand : RING
Model : Floodlight Wired
Category : Lighting